GDI+知识讲解
GDI+英文全称:Graphics Device Interface Plus, GDI+是对GDI的扩展。
一. GDI概述
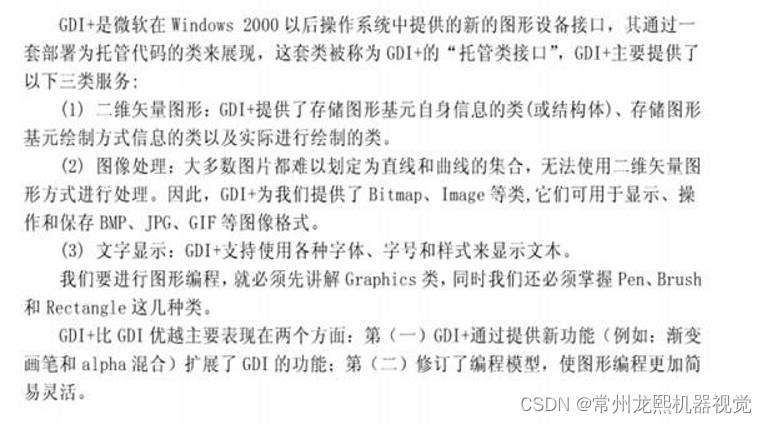
二.Graphics类介绍
Graphics 类封装了很多GDI+绘图对象,并将这些对象显示到设备上。创建Graphics对象也被称为创建一个画板,创建画板一共有3种方式:
1. 利用控件或窗体的Paint事件中参数PaintEventArgs来创建画板
private void Form1_Paint(object sender, System.Windows.Forms.PaintEventArgs e)
{
}
2. 利用控件和窗体的CreateGraphics方法创建画板
This. CreateGraphics或者 控件名. CreateGraphics()
3. 调用Graphics的FromImage函数创建画板。
Image im= Image. FromImage(“1.jpg”);
Graphics g=Graphics. FromImage(im);
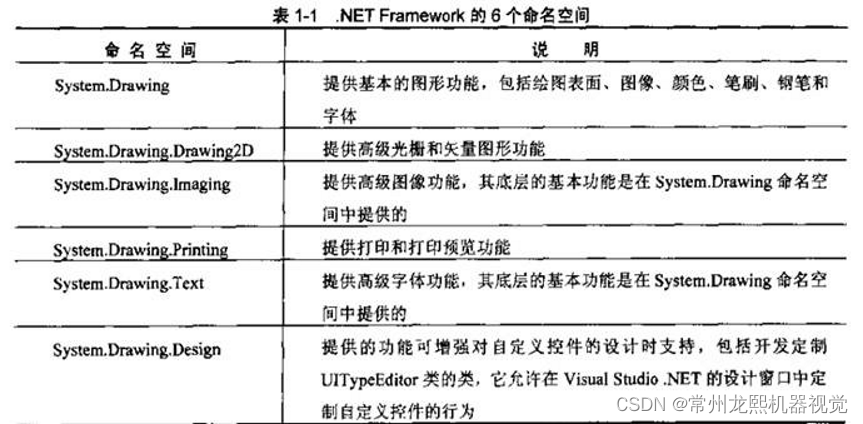
三.GDI+相关命名空间
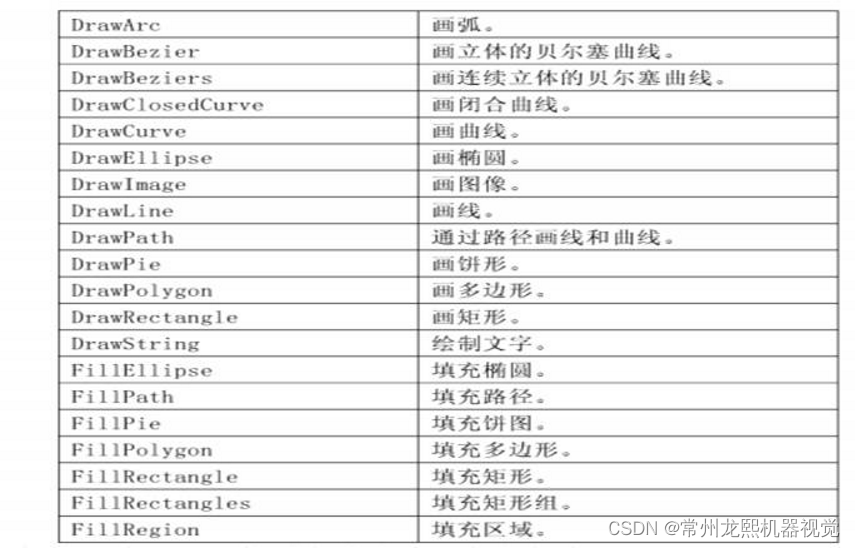
四. Graphics支持的画图方法
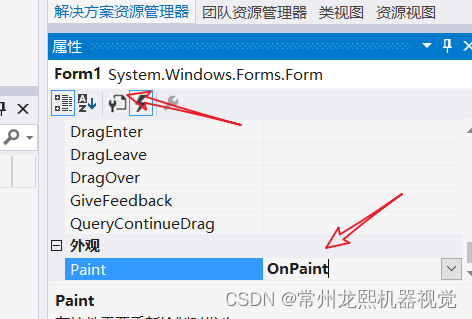
创建 C# 的 winform程序
这个 form窗口的属性 事件 Paint 添加事件
这个 paint 事件
private void OnPaint(object sender, PaintEventArgs e){// Create pens & points// 创建一个画笔工具,红色,画笔的粗细是1Pen redPen = new Pen(Color.Red, 1);// Draw rectangles to screen.// 画笔工具的构造函数// 矩形 ,矩形左上角坐标 XY 矩形的宽高Rectangle rect = new Rectangle(20, 20, 80, 40);// 创建画板e.Graphics.DrawRectangle(redPen, rect);// DisposeredPen.Dispose();}
注意
当我们 使用鼠标移动事件,绘画图形。 其实这个只是设置ROI图形的 参数,要调用第80行指向的这个函数,通知picturebox控件绘图。
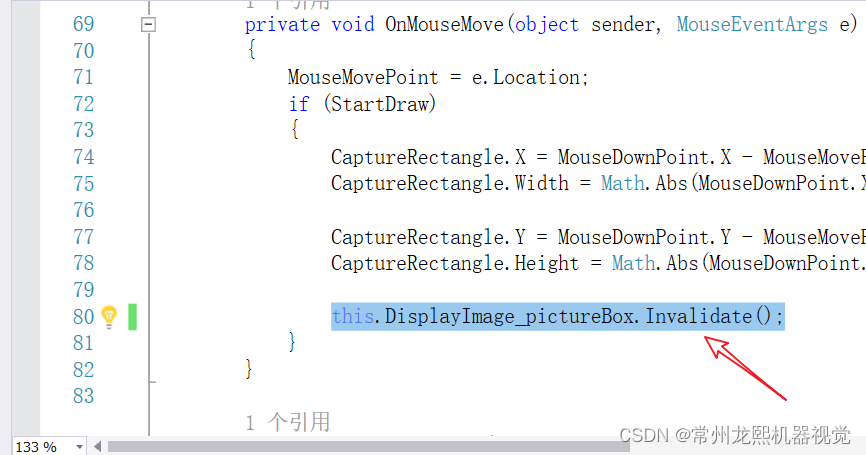
这个才是真正的绘图
第3
用鼠标在界面画一个矩形
添加一个 picture box 控件
改名DisplayImage_pictureBox
不是改控件的 text
再绑定这几个事件 form_load OnMouseDown OnMouseMove OnMouseUp OnPaint
只能画一个 ROI区域,当画完一个,再画另外一个时,前一个RO区域将消失
using System;
using System.Collections.Generic;
using System.ComponentModel;
using System.Data;
using System.Drawing;
using System.Linq;
using System.Text;
using System.Threading.Tasks;
using System.Windows.Forms;namespace GDI_Text
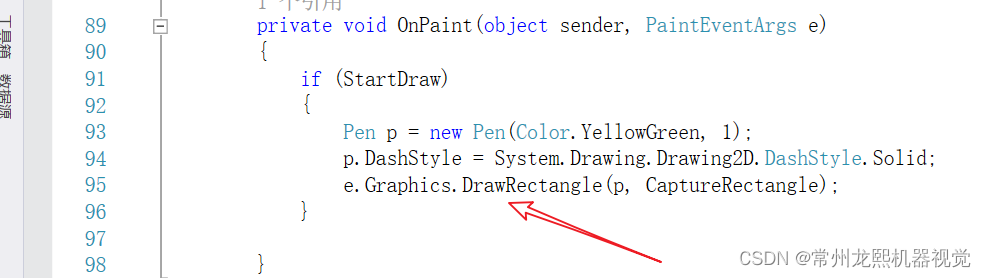
{public partial class Form1 : Form{// 位图对象private Bitmap OriginImage;// 定义鼠标按下的点private Point MouseDownPoint;// 定义 鼠标移动的点private Point MouseMovePoint;// 鼠标弹起的点private Point MouseUpPoint;// 为true表示在画的状态private bool StartDraw;// 矩形private Rectangle CaptureRectangle;public Form1(){InitializeComponent();MouseDownPoint = new Point(0, 0);MouseMovePoint = new Point(0, 0);MouseUpPoint = new Point(0, 0);StartDraw = false;}private void Form1_Load(object sender, EventArgs e){// 位图对象实例化LoadImage("demo.png");SetDoubleBuffering();}/// <summary>/// 设置双缓存,防止图片闪烁/// </summary>private void SetDoubleBuffering(){this.SetStyle(ControlStyles.ResizeRedraw, true);this.SetStyle(ControlStyles.OptimizedDoubleBuffer, true);this.SetStyle(ControlStyles.AllPaintingInWmPaint, true);this.SetStyle(ControlStyles.UserPaint, true);this.SetStyle(ControlStyles.SupportsTransparentBackColor, true);this.UpdateStyles();}/// <summary>/// 加载图像/// </summary>/// <param name="ImagePath"></param>private void LoadImage(string ImagePath){OriginImage = new Bitmap(ImagePath);this.DisplayImage_pictureBox.Image = OriginImage;}/// <summary>/// 鼠标左键按下 触发/// </summary>/// <param name="sender"></param>/// <param name="e"></param>private void OnMouseDown(object sender, MouseEventArgs e){// 如果是鼠标左键 按下if (e.Button == MouseButtons.Left){// 设置为true 表示开始要画矩形了StartDraw = true;// 记录 鼠标左键按下的坐标MouseDownPoint = new Point(e.X, e.Y);}}/// <summary>/// 鼠标移动/// 实时记录移动的坐标/// </summary>/// <param name="sender"></param>/// <param name="e"></param>private void OnMouseMove(object sender, MouseEventArgs e){// 实时记录移动的坐标MouseMovePoint = e.Location;// 判断是否开始画矩形if (StartDraw){// 设置 矩形的左上角 XY坐标,和 长宽CaptureRectangle.X = MouseDownPoint.X - MouseMovePoint.X < 0 ? MouseDownPoint.X : MouseMovePoint.X;CaptureRectangle.Width = Math.Abs(MouseDownPoint.X - MouseMovePoint.X);CaptureRectangle.Y = MouseDownPoint.Y - MouseMovePoint.Y < 0 ? MouseDownPoint.Y : MouseMovePoint.Y;CaptureRectangle.Height = Math.Abs(MouseDownPoint.Y - MouseMovePoint.Y);// 促使图像失效,重新绘制图像this.DisplayImage_pictureBox.Invalidate();}}private void OnMouseUp(object sender, MouseEventArgs e){StartDraw = false;}/// <summary>/// 重新绘制/// 可以防止 在快速拖动 FORM窗口时 绘画的图像抖动/// </summary>/// <param name="sender"></param>/// <param name="e"></param>private void OnPaint(object sender, PaintEventArgs e){if (StartDraw){Pen p = new Pen(Color.YellowGreen, 1);p.DashStyle = System.Drawing.Drawing2D.DashStyle.Solid;e.Graphics.DrawRectangle(p, CaptureRectangle);}//Create pens &points// 创建一个画笔工具,红色,画笔的粗细是1//Pen redPen = new Pen(Color.Red, 1);//Draw rectangles to screen.// 画笔工具的构造函数// 矩形 ,矩形左上角坐标 XY 矩形的宽高//Rectangle rect = new Rectangle(20, 20, 80, 40);//创建画板//e.Graphics.DrawRectangle(redPen, rect);//Dispose//redPen.Dispose();}}
}
移动 ROI 区域
第4
要增加一个 按钮
using System;
using System.Collections.Generic;
using System.ComponentModel;
using System.Data;
using System.Drawing;
using System.Linq;
using System.Text;
using System.Threading.Tasks;
using System.Windows.Forms;namespace GDI_Text
{public partial class Form1 : Form{private Bitmap OriginImage;            //原始位图private Point MouseDownPoint;         //鼠标按下坐标private Point MouseMovePoint;         //鼠标移动坐标private Point MouseUpPoint;           //鼠标弹起坐标private Point TempStart_Point;        //记录下矩形当前位置private bool IsMoving;               //移动状态private bool StartDraw;              //开始画ROI对象private bool FinishedDraw;           //完成画ROI对象private bool BlockWidth;             //锁定ROI宽度private bool BlockHeight;            //锁定ROI高度private Rectangle CaptureRectangle;       //当前ROI对象    // 为了改变矩形大小的时候用得到private Rectangle[] m_OperateRectangle;     //ROI周边8个小矩形框private SolidBrush SolidBrushObject;       //画刷对象public Form1(){InitializeComponent();// 类的成员初始化MouseDownPoint = new Point(0, 0);MouseMovePoint = new Point(0, 0);MouseUpPoint = new Point(0, 0);TempStart_Point = new Point(0, 0);StartDraw = false;IsMoving = false;BlockWidth = false;BlockHeight = false;FinishedDraw = false;SolidBrushObject = new SolidBrush(Color.YellowGreen);// 对数组的初始化赋值,这是8个小矩形的m_OperateRectangle = new Rectangle[8];for (int i = 0; i < 8; i++){// 矩形的 X Y 坐标是 0  0 ,矩形的宽高是 10  10m_OperateRectangle[i] = new Rectangle(0, 0, 10, 10);}}private void Form1_Load(object sender, EventArgs e){// 位图对象实例化LoadImage("demo.png");// 设置双缓冲SetDoubleBuffering();}/// <summary>/// 设置双缓存,防止图片闪烁/// </summary>private void SetDoubleBuffering(){this.SetStyle(ControlStyles.ResizeRedraw, true);this.SetStyle(ControlStyles.OptimizedDoubleBuffer, true);this.SetStyle(ControlStyles.AllPaintingInWmPaint, true);this.SetStyle(ControlStyles.UserPaint, true);this.SetStyle(ControlStyles.SupportsTransparentBackColor, true);this.UpdateStyles();}/// <summary>/// 改变鼠标样式/// </summary>private void ChangeCursor(Point loc, bool DrawOrMove){if (DrawOrMove){if (m_OperateRectangle[0].Contains(loc) || m_OperateRectangle[7].Contains(loc))this.Cursor = Cursors.SizeNWSE;else if (m_OperateRectangle[1].Contains(loc) || m_OperateRectangle[6].Contains(loc))this.Cursor = Cursors.SizeNS;else if (m_OperateRectangle[2].Contains(loc) || m_OperateRectangle[5].Contains(loc))this.Cursor = Cursors.SizeNESW;else if (m_OperateRectangle[3].Contains(loc) || m_OperateRectangle[4].Contains(loc))this.Cursor = Cursors.SizeWE;else if (CaptureRectangle.Contains(loc))this.Cursor = Cursors.SizeAll;elsethis.Cursor = Cursors.Default;}}/// <summary>/// 加载图像/// </summary>/// <param name="ImagePath"></param>private void LoadImage(string ImagePath){OriginImage = new Bitmap(ImagePath);this.DisplayImage_pictureBox.Image = OriginImage;}/// <summary>/// MouseEventArgs e 当前鼠标/// MouseState=1:当鼠标双击ROI之外的图像区域时候,保留已存在ROI区域;/// MouseState=2:根据鼠标在8个矩形框位置来确定是改变宽度还是高度;/// /// 这个 8个小矩形的布局,从上到下,从左到右,每一层一层的数/// 0  1  2/// 3     4/// 5  6  7/// /// 鼠标在 这个 3  和4  是锁定了 高度/// 鼠标在 这个 1 和 6 是锁定宽度/// /// /// </summary>private void KeepMouseState(int MouseState, MouseEventArgs e){// 这个m_OperateRectangle 表示那8个小矩形// 鼠标左键按下的时候位置在不在这8个小矩形的哪个的框里if (m_OperateRectangle[0].Contains(e.Location)){//这个 CaptureRectangle 是当前ROI对象,把X Y 坐标 给别人// 这个 MouseMovePoint 是鼠标移动坐标MouseMovePoint.X = this.CaptureRectangle.Right;MouseMovePoint.Y = this.CaptureRectangle.Bottom;}else if (m_OperateRectangle[1].Contains(e.Location)){MouseMovePoint.Y = this.CaptureRectangle.Bottom;BlockWidth = true;}else if (m_OperateRectangle[2].Contains(e.Location)){MouseMovePoint.X = this.CaptureRectangle.X;MouseMovePoint.Y = this.CaptureRectangle.Bottom;}else if (m_OperateRectangle[3].Contains(e.Location)){MouseMovePoint.X = this.CaptureRectangle.Right;BlockHeight = true;}else if (m_OperateRectangle[4].Contains(e.Location)){MouseMovePoint.X = this.CaptureRectangle.X;BlockHeight = true;}else if (m_OperateRectangle[5].Contains(e.Location)){MouseMovePoint.X = this.CaptureRectangle.Right;MouseMovePoint.Y = this.CaptureRectangle.Y;}else if (m_OperateRectangle[6].Contains(e.Location)){MouseMovePoint.Y = this.CaptureRectangle.Y;BlockWidth = true;}else if (m_OperateRectangle[7].Contains(e.Location)){MouseMovePoint = this.CaptureRectangle.Location;}else if (this.CaptureRectangle.Contains(e.Location)){// 这里啥也不干,才能表示要移动ROI的位置}else{//当在ROI矩形外按下鼠标,保留现有的ROI,防止ROI被刷掉if (MouseState == 1){StartDraw = false;}}}/// <summary>///  鼠标左键按下 触发/// </summary>/// <param name="sender"></param>/// <param name="e"></param>private void OnMouseDown(object sender, MouseEventArgs e){if (e.Button == MouseButtons.Left){StartDraw = true;// 不锁定 宽高,矩形在调整大小的时候BlockWidth = false;BlockHeight = false;KeepMouseState(1, e);MouseDownPoint = new Point(e.X, e.Y);//通过鼠标移动坐标位置来判断是改变ROI大小还是移动ROI操作// 这个 FinishedDraw 为true 表示矩形已经画了,if (FinishedDraw){// 判断鼠标的位置是否在矩形里面,是的话表示要移动if (this.CaptureRectangle.Contains(e.Location)){IsMoving = true;}else{IsMoving = false;}}}}/// <summary>/// 鼠标移动/// 实时记录移动的坐标/// </summary>/// <param name="sender"></param>/// <param name="e"></param>private void OnMouseMove(object sender, MouseEventArgs e){// 改变鼠标的样式,分鼠标在ROI的范围内还是外ChangeCursor(e.Location, true);// 表示鼠标正在画if (StartDraw){// 判断鼠标移动的位置是否在8个矩形框里,还是在大ROI里KeepMouseState(2, e);}// 得出矩形的实时的大小if (StartDraw){// 移动状态的矩形的 位置if(IsMoving){this.CaptureRectangle.X = TempStart_Point.X + e.X - MouseDownPoint.X;this.CaptureRectangle.Y = TempStart_Point.Y + e.Y - MouseDownPoint.Y;if (this.CaptureRectangle.X < 0) this.CaptureRectangle.X = 0;if (this.CaptureRectangle.Y < 0) this.CaptureRectangle.Y = 0;if (this.CaptureRectangle.Right > OriginImage.Width) this.CaptureRectangle.X = OriginImage.Width - this.CaptureRectangle.Width - 1;if (this.CaptureRectangle.Bottom > OriginImage.Height) this.CaptureRectangle.Y = OriginImage.Height - this.CaptureRectangle.Height - 1;}else { // 鼠标不是在移动中,就要改变矩形的大小if (Math.Abs(e.X - MouseMovePoint.X) > 1 || Math.Abs(e.Y - MouseMovePoint.Y) > 1){if ((e.X >= 0 && e.X <= this.OriginImage.Width) && (e.Y >= 0 && e.Y <= this.OriginImage.Height)){//当前坐标在图像区域}else{//当前坐标不在图像区域return;}// 锁定宽if (!BlockWidth){CaptureRectangle.X = MouseMovePoint.X - e.X < 0 ? MouseMovePoint.X : e.X;//以CaptureRectangle的Left或Right为正负分界线,//MouseMovePoint.X - e.X < 0:正向方向改变大小,MouseMovePoint.X - e.X > 0:负向方向改变大小CaptureRectangle.Width = Math.Abs(MouseMovePoint.X - e.X);}// 锁定高if (!BlockHeight){CaptureRectangle.Y = MouseMovePoint.Y - e.Y < 0 ? MouseMovePoint.Y : e.Y;//以CaptureRectangle的Top或Bttom为正负分界线,//MouseMovePoint.Y - e.Y < 0:正向方向改变大小,MouseMovePoint.Y - e.Y > 0:负向方向改变大小CaptureRectangle.Height = Math.Abs(MouseMovePoint.Y - e.Y);}}}this.DisplayImage_pictureBox.Invalidate();}}/// <summary>///  鼠标左键弹起,表示ROI画好了,置为 false/// </summary>/// <param name="sender"></param>/// <param name="e"></param>private void OnMouseUp(object sender, MouseEventArgs e){if (e.Button == MouseButtons.Left){StartDraw = false;//记录下鼠标弹起时,ROI当前位置TempStart_Point = CaptureRectangle.Location;}}/// <summary>/// 重新绘制/// </summary>/// <param name="sender"></param>/// <param name="e"></param>private void OnPaint(object sender, PaintEventArgs e){if (FinishedDraw){Pen p = new Pen(Color.YellowGreen, 1);p.DashStyle = System.Drawing.Drawing2D.DashStyle.Solid;e.Graphics.DrawRectangle(p, CaptureRectangle);DrawOperationBox(e.Graphics);}}/// <summary>/// 绘制8个小矩形框/// </summary>/// <param name="g"></param>protected virtual void DrawOperationBox(Graphics g){m_OperateRectangle[0].X = this.CaptureRectangle.X - 5;m_OperateRectangle[0].Y = this.CaptureRectangle.Y - 5;m_OperateRectangle[1].X = this.CaptureRectangle.X + this.CaptureRectangle.Width / 2 - 5;m_OperateRectangle[1].Y = m_OperateRectangle[2].Y = this.CaptureRectangle.Y - 7;m_OperateRectangle[2].X = this.CaptureRectangle.Right - 5;m_OperateRectangle[2].Y = this.CaptureRectangle.Y - 5;m_OperateRectangle[3].X = this.CaptureRectangle.X - 7;m_OperateRectangle[3].Y = this.CaptureRectangle.Y + this.CaptureRectangle.Height / 2 - 5;m_OperateRectangle[4].X = this.CaptureRectangle.Right - 2;m_OperateRectangle[4].Y = this.CaptureRectangle.Y + this.CaptureRectangle.Height / 2 - 5;m_OperateRectangle[5].X = this.CaptureRectangle.X - 5;m_OperateRectangle[5].Y = this.CaptureRectangle.Bottom - 5;m_OperateRectangle[6].X = this.CaptureRectangle.X + this.CaptureRectangle.Width / 2 - 5;m_OperateRectangle[6].Y = this.CaptureRectangle.Bottom - 2;m_OperateRectangle[7].X = this.CaptureRectangle.Right - 5;m_OperateRectangle[7].Y = this.CaptureRectangle.Bottom - 5;if (this.CaptureRectangle.Width > 10 && this.CaptureRectangle.Height > 10){SolidBrushObject.Color = Color.YellowGreen;foreach (Rectangle rect in m_OperateRectangle){g.FillRectangle(SolidBrushObject, rect);}}}/// <summary>/// 用鼠标在图像上一点,画一个默认的矩形
这个是一个 按钮的点击事件/// </summary>/// <param name="sender"></param>/// <param name="e"></param>private void OnDrawRectangle(object sender, EventArgs e){// 设定矩形的参数CaptureRectangle.X = OriginImage.Width / 2;CaptureRectangle.Width = OriginImage.Width / 4;CaptureRectangle.Y = OriginImage.Height / 2;CaptureRectangle.Height = OriginImage.Height / 4;TempStart_Point = CaptureRectangle.Location;FinishedDraw = true;  // 表示 开始画8个小矩形IsMoving = false;  // 画矩形的时候,不是移动状态this.DisplayImage_pictureBox.Invalidate();}}
}
剪切 画好的ROI
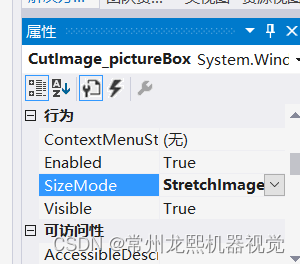
增加一个 picture box
小窗口的属性设置为这个
增加了一个函数
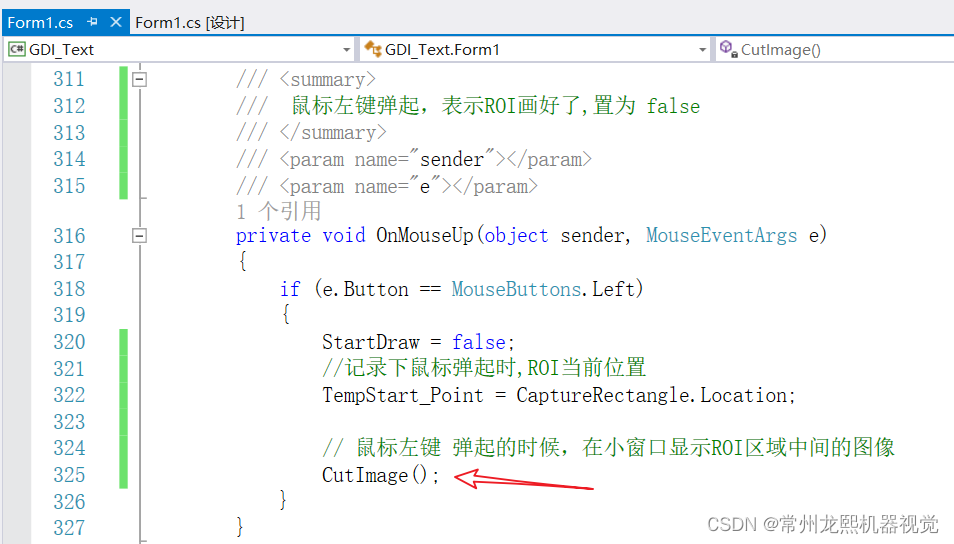
/// <summary>/// 剪切图像/// </summary>private void CutImage(){// 创建位图Bitmap CutBitmap = new Bitmap(CaptureRectangle.Width, CaptureRectangle.Height);// 创建画板 ,空的位图Graphics GraphicsObject = Graphics.FromImage(CutBitmap);// 向画板 画一张图像,原始图是OriginImage,把原始图像中的ROI区域,画进去GraphicsObject.DrawImage(OriginImage, new Rectangle(0, 0, CaptureRectangle.Width, CaptureRectangle.Height), CaptureRectangle, GraphicsUnit.Pixel);// 小的 picture 控件this.CutImage_pictureBox.Image = CutBitmap;this.CutImage_pictureBox.Width = CutBitmap.Width;this.CutImage_pictureBox.Height = CutBitmap.Height;GraphicsObject.Dispose();}
在鼠标弹起的时候调用
把 ROI 剪切的图像,转为 HALCON 变量
增加一个 按钮, 转halcon 变量
在 项目 的引用里 添加 halcon的dll文件
这个 项目属性 生成 要配置成 X64 才行
using System;
using System.IO;
using System.Collections.Generic;
using System.ComponentModel;
using System.Data;
using System.Drawing;
using System.Linq;
using System.Text;
using System.Windows.Forms;
using System.Runtime.InteropServices;
using HalconDotNet;namespace GDI_Text
{public partial class Form1 : Form{private Bitmap OriginImage;            //原始位图private Point MouseDownPoint;         //鼠标按下坐标private Point MouseMovePoint;         //鼠标移动坐标private Point MouseUpPoint;           //鼠标弹起坐标private Point TempStart_Point;        //记录下矩形当前位置private bool IsMoving;               //移动状态private bool StartDraw;              //开始画ROI对象private bool FinishedDraw;           //完成画ROI对象private bool BlockWidth;             //锁定ROI宽度private bool BlockHeight;            //锁定ROI高度private Rectangle CaptureRectangle;       //当前ROI对象    // 为了改变矩形大小的时候用得到private Rectangle[] m_OperateRectangle;     //ROI周边8个小矩形框private SolidBrush SolidBrushObject;       //画刷对象public Form1(){InitializeComponent();// 类的成员初始化MouseDownPoint = new Point(0, 0);MouseMovePoint = new Point(0, 0);MouseUpPoint = new Point(0, 0);TempStart_Point = new Point(0, 0);StartDraw = false;IsMoving = false;BlockWidth = false;BlockHeight = false;FinishedDraw = false;SolidBrushObject = new SolidBrush(Color.YellowGreen);// 对数组的初始化赋值,这是8个小矩形的m_OperateRectangle = new Rectangle[8];for (int i = 0; i < 8; i++){// 矩形的 X Y 坐标是 0  0 ,矩形的宽高是 10  10m_OperateRectangle[i] = new Rectangle(0, 0, 10, 10);}}private void Form1_Load(object sender, EventArgs e){// 位图对象实例化LoadImage("demo.png");// 设置双缓冲SetDoubleBuffering();}/// <summary>/// 设置双缓存,防止图片闪烁/// </summary>private void SetDoubleBuffering(){this.SetStyle(ControlStyles.ResizeRedraw, true);this.SetStyle(ControlStyles.OptimizedDoubleBuffer, true);this.SetStyle(ControlStyles.AllPaintingInWmPaint, true);this.SetStyle(ControlStyles.UserPaint, true);this.SetStyle(ControlStyles.SupportsTransparentBackColor, true);this.UpdateStyles();}/// <summary>/// 改变鼠标样式/// </summary>private void ChangeCursor(Point loc, bool DrawOrMove){if (DrawOrMove){if (m_OperateRectangle[0].Contains(loc) || m_OperateRectangle[7].Contains(loc))this.Cursor = Cursors.SizeNWSE;else if (m_OperateRectangle[1].Contains(loc) || m_OperateRectangle[6].Contains(loc))this.Cursor = Cursors.SizeNS;else if (m_OperateRectangle[2].Contains(loc) || m_OperateRectangle[5].Contains(loc))this.Cursor = Cursors.SizeNESW;else if (m_OperateRectangle[3].Contains(loc) || m_OperateRectangle[4].Contains(loc))this.Cursor = Cursors.SizeWE;else if (CaptureRectangle.Contains(loc))this.Cursor = Cursors.SizeAll;elsethis.Cursor = Cursors.Default;}}/// <summary>/// 加载图像/// </summary>/// <param name="ImagePath"></param>private void LoadImage(string ImagePath){OriginImage = new Bitmap(ImagePath);this.DisplayImage_pictureBox.Image = OriginImage;}/// <summary>/// MouseEventArgs e 当前鼠标/// MouseState=1:当鼠标双击ROI之外的图像区域时候,保留已存在ROI区域;/// MouseState=2:根据鼠标在8个矩形框位置来确定是改变宽度还是高度;/// /// 这个 8个小矩形的布局,从上到下,从左到右,每一层一层的数/// 0  1  2/// 3     4/// 5  6  7/// /// 鼠标在 这个 3  和4  是锁定了 高度/// 鼠标在 这个 1 和 6 是锁定宽度/// /// /// </summary>private void KeepMouseState(int MouseState, MouseEventArgs e){// 这个m_OperateRectangle 表示那8个小矩形// 鼠标左键按下的时候位置在不在这8个小矩形的哪个的框里if (m_OperateRectangle[0].Contains(e.Location)){//这个 CaptureRectangle 是当前ROI对象,把X Y 坐标 给别人// 这个 MouseMovePoint 是鼠标移动坐标MouseMovePoint.X = this.CaptureRectangle.Right;MouseMovePoint.Y = this.CaptureRectangle.Bottom;}else if (m_OperateRectangle[1].Contains(e.Location)){MouseMovePoint.Y = this.CaptureRectangle.Bottom;BlockWidth = true;}else if (m_OperateRectangle[2].Contains(e.Location)){MouseMovePoint.X = this.CaptureRectangle.X;MouseMovePoint.Y = this.CaptureRectangle.Bottom;}else if (m_OperateRectangle[3].Contains(e.Location)){MouseMovePoint.X = this.CaptureRectangle.Right;BlockHeight = true;}else if (m_OperateRectangle[4].Contains(e.Location)){MouseMovePoint.X = this.CaptureRectangle.X;BlockHeight = true;}else if (m_OperateRectangle[5].Contains(e.Location)){MouseMovePoint.X = this.CaptureRectangle.Right;MouseMovePoint.Y = this.CaptureRectangle.Y;}else if (m_OperateRectangle[6].Contains(e.Location)){MouseMovePoint.Y = this.CaptureRectangle.Y;BlockWidth = true;}else if (m_OperateRectangle[7].Contains(e.Location)){MouseMovePoint = this.CaptureRectangle.Location;}else if (this.CaptureRectangle.Contains(e.Location)){// 这里啥也不干,才能表示要移动ROI的位置}else{//当在ROI矩形外按下鼠标,保留现有的ROI,防止ROI被刷掉if (MouseState == 1){StartDraw = false;}}}/// <summary>///  鼠标左键按下 触发/// </summary>/// <param name="sender"></param>/// <param name="e"></param>private void OnMouseDown(object sender, MouseEventArgs e){if (e.Button == MouseButtons.Left){StartDraw = true;// 不锁定 宽高,矩形在调整大小的时候BlockWidth = false;BlockHeight = false;KeepMouseState(1, e);MouseDownPoint = new Point(e.X, e.Y);//通过鼠标移动坐标位置来判断是改变ROI大小还是移动ROI操作// 这个 FinishedDraw 为true 表示矩形已经画了,if (FinishedDraw){// 判断鼠标的位置是否在矩形里面,是的话表示要移动if (this.CaptureRectangle.Contains(e.Location)){IsMoving = true;}else{IsMoving = false;}}}}/// <summary>/// 鼠标移动/// 实时记录移动的坐标/// </summary>/// <param name="sender"></param>/// <param name="e"></param>private void OnMouseMove(object sender, MouseEventArgs e){// 改变鼠标的样式,分鼠标在ROI的范围内还是外ChangeCursor(e.Location, true);// 表示鼠标正在画if (StartDraw){// 判断鼠标移动的位置是否在8个矩形框里,还是在大ROI里KeepMouseState(2, e);}// 得出矩形的实时的大小if (StartDraw){// 移动状态的矩形的 位置if (IsMoving){this.CaptureRectangle.X = TempStart_Point.X + e.X - MouseDownPoint.X;this.CaptureRectangle.Y = TempStart_Point.Y + e.Y - MouseDownPoint.Y;if (this.CaptureRectangle.X < 0) this.CaptureRectangle.X = 0;if (this.CaptureRectangle.Y < 0) this.CaptureRectangle.Y = 0;if (this.CaptureRectangle.Right > OriginImage.Width) this.CaptureRectangle.X = OriginImage.Width - this.CaptureRectangle.Width - 1;if (this.CaptureRectangle.Bottom > OriginImage.Height) this.CaptureRectangle.Y = OriginImage.Height - this.CaptureRectangle.Height - 1;}else{// 鼠标不是在移动中,就要改变矩形的大小if (Math.Abs(e.X - MouseMovePoint.X) > 1 || Math.Abs(e.Y - MouseMovePoint.Y) > 1){if ((e.X >= 0 && e.X <= this.OriginImage.Width) && (e.Y >= 0 && e.Y <= this.OriginImage.Height)){//当前坐标在图像区域}else{//当前坐标不在图像区域return;}// 锁定宽if (!BlockWidth){CaptureRectangle.X = MouseMovePoint.X - e.X < 0 ? MouseMovePoint.X : e.X;//以CaptureRectangle的Left或Right为正负分界线,//MouseMovePoint.X - e.X < 0:正向方向改变大小,MouseMovePoint.X - e.X > 0:负向方向改变大小CaptureRectangle.Width = Math.Abs(MouseMovePoint.X - e.X);}// 锁定高if (!BlockHeight){CaptureRectangle.Y = MouseMovePoint.Y - e.Y < 0 ? MouseMovePoint.Y : e.Y;//以CaptureRectangle的Top或Bttom为正负分界线,//MouseMovePoint.Y - e.Y < 0:正向方向改变大小,MouseMovePoint.Y - e.Y > 0:负向方向改变大小CaptureRectangle.Height = Math.Abs(MouseMovePoint.Y - e.Y);}}}//使画布无效,从而执行OnPaint()this.DisplayImage_pictureBox.Invalidate();}}/// <summary>///  鼠标左键弹起,表示ROI画好了,置为 false/// </summary>/// <param name="sender"></param>/// <param name="e"></param>private void OnMouseUp(object sender, MouseEventArgs e){if (e.Button == MouseButtons.Left){StartDraw = false;//记录下鼠标弹起时,ROI当前位置TempStart_Point = CaptureRectangle.Location;// 鼠标左键 弹起的时候,在小窗口显示ROI区域中间的图像CutImage();}}/// <summary>/// 剪切图像/// </summary>private Bitmap CutImage(){// 创建位图Bitmap CutBitmap = new Bitmap(CaptureRectangle.Width, CaptureRectangle.Height);// 创建画板 ,空的位图Graphics GraphicsObject = Graphics.FromImage(CutBitmap);// 向画板 画一张图像,原始图是OriginImage,把原始图像中的ROI区域,画进去GraphicsObject.DrawImage(OriginImage, new Rectangle(0, 0, CaptureRectangle.Width, CaptureRectangle.Height), CaptureRectangle, GraphicsUnit.Pixel);// 小的 picture 控件this.CutImage_pictureBox.Image = CutBitmap;this.CutImage_pictureBox.Width = CutBitmap.Width;this.CutImage_pictureBox.Height = CutBitmap.Height;GraphicsObject.Dispose();return CutBitmap;}/// <summary>/// 重新绘制/// </summary>/// <param name="sender"></param>/// <param name="e"></param>private void OnPaint(object sender, PaintEventArgs e){if (FinishedDraw){Pen p = new Pen(Color.YellowGreen, 1);p.DashStyle = System.Drawing.Drawing2D.DashStyle.Solid;e.Graphics.DrawRectangle(p, CaptureRectangle);//绘制8个小矩形框DrawOperationBox(e.Graphics);}}/// <summary>/// 绘制8个小矩形框/// </summary>/// <param name="g"></param>protected virtual void DrawOperationBox(Graphics g){m_OperateRectangle[0].X = this.CaptureRectangle.X - 5;m_OperateRectangle[0].Y = this.CaptureRectangle.Y - 5;m_OperateRectangle[1].X = this.CaptureRectangle.X + this.CaptureRectangle.Width / 2 - 5;m_OperateRectangle[1].Y = m_OperateRectangle[2].Y = this.CaptureRectangle.Y - 7;m_OperateRectangle[2].X = this.CaptureRectangle.Right - 5;m_OperateRectangle[2].Y = this.CaptureRectangle.Y - 5;m_OperateRectangle[3].X = this.CaptureRectangle.X - 7;m_OperateRectangle[3].Y = this.CaptureRectangle.Y + this.CaptureRectangle.Height / 2 - 5;m_OperateRectangle[4].X = this.CaptureRectangle.Right - 2;m_OperateRectangle[4].Y = this.CaptureRectangle.Y + this.CaptureRectangle.Height / 2 - 5;m_OperateRectangle[5].X = this.CaptureRectangle.X - 5;m_OperateRectangle[5].Y = this.CaptureRectangle.Bottom - 5;m_OperateRectangle[6].X = this.CaptureRectangle.X + this.CaptureRectangle.Width / 2 - 5;m_OperateRectangle[6].Y = this.CaptureRectangle.Bottom - 2;m_OperateRectangle[7].X = this.CaptureRectangle.Right - 5;m_OperateRectangle[7].Y = this.CaptureRectangle.Bottom - 5;if (this.CaptureRectangle.Width > 10 && this.CaptureRectangle.Height > 10){SolidBrushObject.Color = Color.YellowGreen;foreach (Rectangle rect in m_OperateRectangle){g.FillRectangle(SolidBrushObject, rect);}}}/// <summary>/// 用鼠标在图像上一点,画一个默认的矩形/// </summary>/// <param name="sender"></param>/// <param name="e"></param>private void OnDrawRectangle(object sender, EventArgs e){// 设定矩形的参数CaptureRectangle.X = OriginImage.Width / 2;CaptureRectangle.Width = OriginImage.Width / 4;CaptureRectangle.Y = OriginImage.Height / 2;CaptureRectangle.Height = OriginImage.Height / 4;TempStart_Point = CaptureRectangle.Location;FinishedDraw = true;  // 表示 开始画8个小矩形IsMoving = false;  // 画矩形的时候,不是移动状态this.DisplayImage_pictureBox.Invalidate();}private void pictureBox1_Click(object sender, EventArgs e){}/// <summary>/// 转换 按钮事件/// 这个 ROI 剪切的图像 转HALCON 变量/// </summary>/// <param name="sender"></param>/// <param name="e"></param>private void ConvertHalcon(object sender, EventArgs e){Bitmap CutBitmap = CutImage();HObject Image = BitmapToHobject(CutBitmap.Width, CutBitmap.Height, CutBitmap);string FileName = DateTime.Now.ToString("yyyy年MM月dd日HH时mm分ss秒fff毫秒");HOperatorSet.WriteImage(Image, "bmp", 0, Directory.GetCurrentDirectory() + "/" + FileName + ".bmp");}/// <summary>/// Bitmap位图转halcon Hobject图像类型///  4通道/// </summary>/// <param name="Width"></param>/// <param name="Height"></param>/// <param name="MyBitmap"></param>/// <returns></returns>public HObject BitmapToHobject(int Width, int Height, System.Drawing.Bitmap MyBitmap){HObject Image;// 锁住内存 ,Format32bppRgb 是32为的RGBSystem.Drawing.Imaging.BitmapData BitmapData = MyBitmap.LockBits(new Rectangle(0, 0, Width, Height), System.Drawing.Imaging.ImageLockMode.ReadWrite, System.Drawing.Imaging.PixelFormat.Format32bppRgb);// 在C#里使用 C++的代码// 在属性里设置,生成 ,允许不安全代码unsafe{//图像数据排列BGR// 这个 Scan0 表示位图的第一个像素的地址byte* Inptr = (byte*)(BitmapData.Scan0.ToPointer());// 三个数组表示 RGB 三个通道,还有一个通道不用管byte[] R_OutBuffer = new byte[Width * Height];byte[] G_OutBuffer = new byte[Width * Height];byte[] B_OutBuffer = new byte[Width * Height];// 三个通道 指针 初始化fixed (byte* R_Outptr = R_OutBuffer, G_Outptr = G_OutBuffer, B_Outptr = B_OutBuffer){// 将图像数据里的像素,依次放到 RGB 三个数组for (int i = 0; i < Height; i++){for (int j = 0; j < Width; j++){// 这个 乘4 ,是表示4个通道int Index = (i * Width + j) * 4;B_OutBuffer[Index / 4] = (byte)Inptr[Index + 0];G_OutBuffer[Index / 4] = (byte)Inptr[Index + 1];R_OutBuffer[Index / 4] = (byte)Inptr[Index + 2];}}// 解除锁定MyBitmap.UnlockBits(BitmapData);//将 RGB 三通道转为 HALCON 的图像HOperatorSet.GenImage3(out Image, "byte", Width, Height, new IntPtr(R_Outptr), new IntPtr(G_Outptr), new IntPtr(B_Outptr));return Image;}}}}
}