文章目录
- 概述
- 结构
- Model --- 消息模型
- Header --- 消息头
- Router --- 消息路由
- 资源操作
- 资源类型
- Context --- 上下文
- ModuleContext --- 模块上下文
- MessageContext --- 消息上下文
- GlobalContext --- 全局上下文
- 方法
- Channel Context
- 数据结构
- 方法
- ModuleContext 接口实现
- AddModule
- AddModuleGroup
- Cleanup
- MessageContext 接口实现
- Send
- Receive
- SendSync
- SendResp
- SendToGroup
- SendToGroupSync
- Socket Context
- 主体
- 数据结构
- broker
- 数据结构
- 方法
- Connect
- Send
- Receive
- SendSyncInternal
- Store
- 数据结构
- Wapper
- Packer
- Read
- Write
- Module
- StartModules
- GracefulShutdown
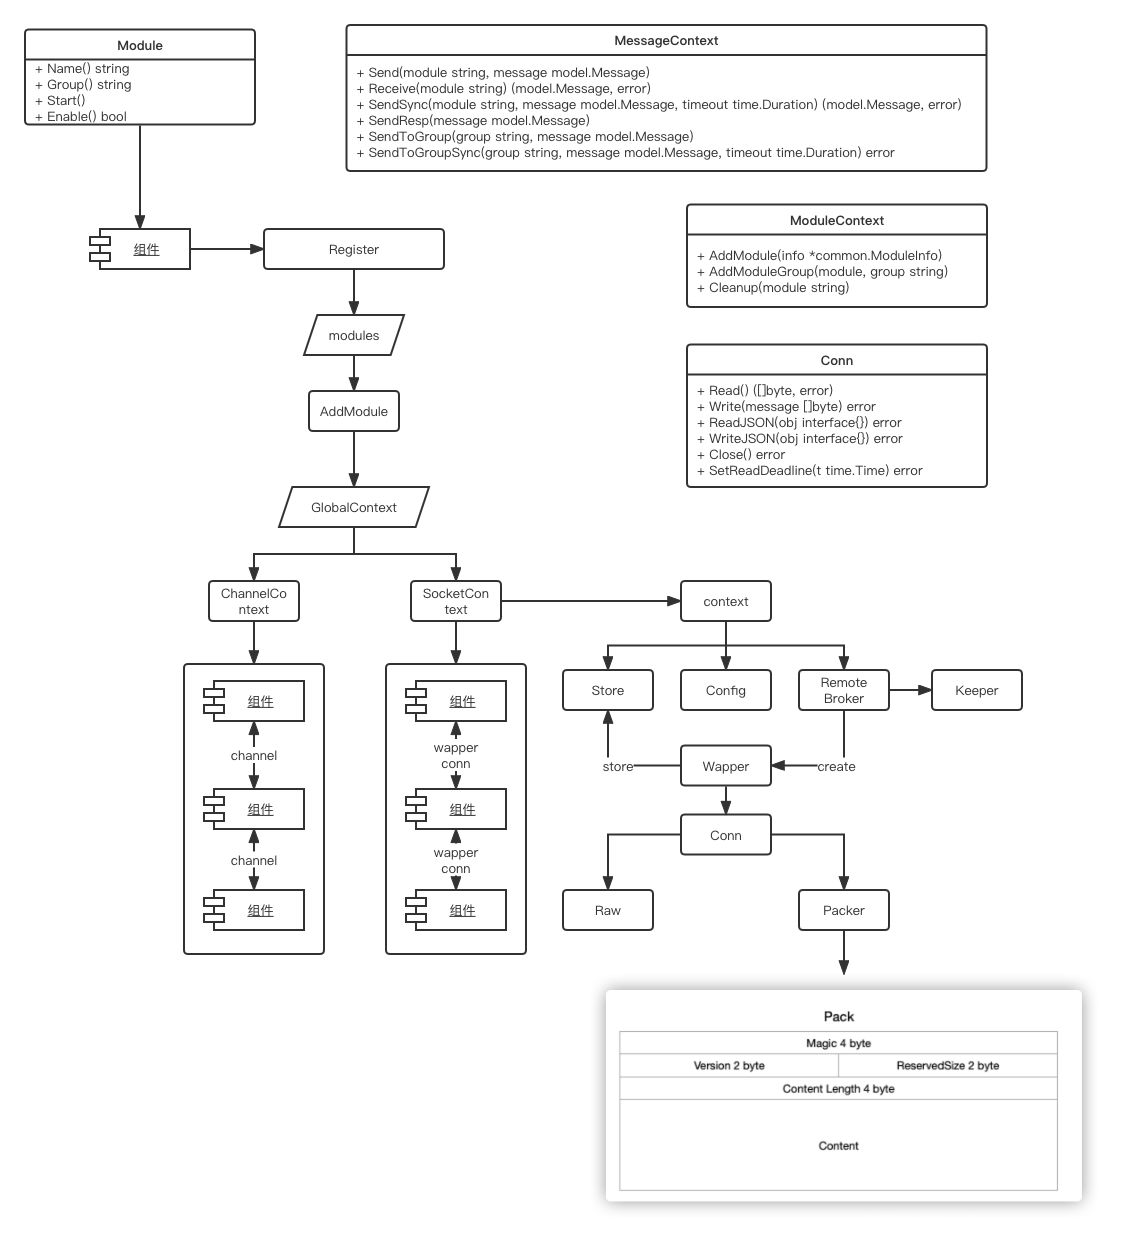
概述
Beehive 模块是 kubeedge 的核心模块,它负责管理所有模块的启动与停止,同时也负责多模块间的通信,它当前主要由: model, context, socket, channel 四个部分组成,其中:
- model 部分定义了消息的模型,这个消息模型是各个组件间通信所必须符合的规范。
- context 部分定义了消息的上下文以及模块上下文两个接口,同时使用了一个全局上下文来管理各个类型的上下文。
- socket 部分则实现了socket 类型的上下文通信,主要用于非本地通信。
- channel 部分则实现了channel 类型的上下文通信,主要用于本地通信。
结构
Model — 消息模型
在 model 中定义了消息的模型, 其主要结构如下:
type Message struct {  Header  MessageHeader `json:"header"`  Router  MessageRoute  `json:"route,omitempty"`  Content interface{}   `json:"content"`
}
Header 为消息头,Router 为消息路由,Content 为消息本体。
Header — 消息头
消息头中主要定义了一些消息头部的详细信息,其结构如下:
type MessageHeader struct {  //消息的ID,使用UUID生成。 ID string `json:"msg_id"`  //消息的父ID,一般在响应消息时候填充,其一般要与请求消息的ID相同ParentID string `json:"parent_msg_id,omitempty"`  //消息的创建时间Timestamp int64 `json:"timestamp"`  //消息的特定资源版本,目前保存的是 k8s 资源的版本。//kubeedge利用消息资源版本的概念来实现可靠传输。ResourceVersion string `json:"resourceversion,omitempty"`  //发送同步的标志位,该标志将在 sendsync 中设置。Sync bool `json:"sync,omitempty"`  //船渡消息的类型,一般为 channel,unixsocket 等类型,如果为空,则默认是 channel 类型MessageType string `json:"type,omitempty"`
}
Router — 消息路由
消息路由中定义了消息的一些操作和目的地等信息,其结构如下:
type MessageRoute struct {  //消息的来源Source string `json:"source,omitempty"`  //消息的目的地Destination string `json:"destination,omitempty"`  //消息广播的时候需要广播到哪个组Group string `json:"group,omitempty"`  //如何去操作资源Operation string `json:"operation,omitempty"`  //想要操作的资源类型是什么Resource string `json:"resource,omitempty"`
}
资源操作
描述了可以对资源进行哪些操作:
const (InsertOperation        = "insert"  DeleteOperation        = "delete"  QueryOperation         = "query"  UpdateOperation        = "update"  PatchOperation         = "patch"  UploadOperation        = "upload"  ResponseOperation      = "response"  ResponseErrorOperation = "error"
)
资源类型
描述了由哪些资源类型:
const (ResourceTypePod                 = "pod"  ResourceTypeConfigmap           = "configmap"  ResourceTypeServiceAccountToken = "serviceaccounttoken"  ResourceTypeSecret              = "secret"  ResourceTypeNode                = "node"  ResourceTypePodlist             = "podlist"  ResourceTypePodStatus           = "podstatus"  ResourceTypePodPatch            = "podpatch"  ResourceTypeNodeStatus          = "nodestatus"  ResourceTypeNodePatch           = "nodepatch"  ResourceTypeRule                = "rule"  ResourceTypeRuleEndpoint        = "ruleendpoint"  ResourceTypeRuleStatus          = "rulestatus"  ResourceTypeLease               = "lease"
)
Context — 上下文
ModuleContext — 模块上下文
ModuleContext 接口定义了如何将 module 加入到当前 context, 并将其分组,以及,结束时如何清理模块的接口:
type ModuleContext interface {  AddModule(info *common.ModuleInfo)  AddModuleGroup(module, group string)  Cleanup(module string)
}
MessageContext — 消息上下文
MessageContext 接口定义了上下文如何为各个模块发送,接收,同步以及广播消息:
type MessageContext interface {  // async mode  Send(module string, message model.Message)  Receive(module string) (model.Message, error)  // sync mode  SendSync(module string, message model.Message, timeout time.Duration) (model.Message, error)  SendResp(message model.Message)  // group broadcast  SendToGroup(group string, message model.Message)  SendToGroupSync(group string, message model.Message, timeout time.Duration) error
}
当前这个两个接口的实现,在 kubeedge 中,主要是由 socket 部分和 channel 部分对其进行了实现,分别用于远程模块通信与本地模块通信。
GlobalContext — 全局上下文
GlobalContext 主要用来管理 module , message 与 Context 间的关系,以及提供一些方法,来便捷的操作 context, 其主要结构如下:
type GlobalContext struct {// 存储 context 类型与 ModuleContext 接口间关系// key 为 context 类型,value 为对应的 ModuleContext 接口moduleContext  map[string]ModuleContext// 存储 context 类型与 MessageContext 接口间关系  // key 为 context 类型,value 为对应的 MessageContext 接口messageContext map[string]MessageContext  // 存储 module 与 context 类型间的关系// key 为 module 名称,value 为对应的 context 类型moduleContextType map[string]string  // 存储 group 与 context 类型间的关系// key 为 group 名称,value 为对应的 context 类型 groupContextType map[string]string  ctx     gocontext.Context  cancel  gocontext.CancelFunc  ctxLock sync.RWMutex
}
方法
// 根据传入的 contextTypes 初始化 context
InitContext(contextTypes []string)
// 获取 context
GetContext() gocontext.Context
// 结束
Done() <-chan struct{}
// 取消
Cancel()
// 添加 module
AddModule(module *common.ModuleInfo)
// 添加 module group
AddModuleGroup(module, group string)
// 清理 module
Cleanup(module string)
// 发送消息到模块
Send(module string, message model.Message)
// 接收模块的消息
Receive(module string) (model.Message, error)
// 发送同步消息
SendSync(module string,message model.Message, timeout time.Duration)(model.Message, error)
// 发送响应消息
SendResp(resp model.Message)
// 发送广播消息
SendToGroup(group string, message model.Message)
// 发送同步广播消息
SendToGroupSync(group string, message model.Message, timeout time.Duration) error
Channel Context
数据结构
通信类型的 Context 主要用于本地通信,即程序内部不同模块间的交互。其结构如下:
type Context struct {// 存储 module 与 channel 的关系// key 为模块名称, value 为 对应的 channel// 默认channel 缓冲区大小为1024channels     map[string]chan model.Message  chsLock      sync.RWMutex// 存储 group , module 与 channel 的关系// 第一层 key 为 group// 第二层 key 为 module ,vaule 为 channeltypeChannels map[string]map[string]chan model.Message  typeChsLock  sync.RWMutex // 匿名通道map// 存储 message 与 channel 的关系// key 为 messageID ,value 为 channelanonChannels map[string]chan model.Message  anonChsLock  sync.RWMutex
}
方法
ModuleContext 接口实现
AddModule
- 创建一个类型为 model.Message 类型的,带缓冲区的 channel ,通道大小默认为1024。
- 将数据存入 channels map,key 为模块名称, value 为 对应的 channel
代码不是源码,为了方便展示整合过
func (ctx *Context) AddModule(info *common.ModuleInfo) {  channel := make(chan model.Message, ChannelSizeDefault) ctx.channels[module] = moduleCh
}
AddModuleGroup
- 根据 module 名称从 channels map 中获取 channel
- 获取成功:
- 判断 typeChannels map 中是否存在对应的group, 不存在就初始化一个。
- 存在就将对应 module ,group,channel 存储起来
- 获取失败就输出警告
代码不是源码,为了方便展示整合过
func (ctx *Context) AddModuleGroup(module, group string) {if _,ok := ctx.channels[module]; ok {  if _, exist := ctx.typeChannels[group]; !exist {  ctx.typeChannels[group] = make(map[string]chan model.Message)  }  ctx.typeChannels[group][module] = ctx.typeChannels[group] return  }  klog.Warningf("Get bad module name %s when addmodulegroup", module)
}
Cleanup
- 根据 module 从 channels map 获取 channel
- 获取成功:
- 从 channels map 删除数据
- 从 typeChannels map 删除数据
- sleep 20 Millisecond 以减少通道关闭的可能异常
- 关闭 channel
代码不是源码,为了方便展示整合过
func (ctx *Context) Cleanup(module string) {  if _,ok := ctx.channels[module]; ok {  delete(ctx.channels, module) for _, moduleMap := range ctx.typeChannels {  if _, exist := moduleMap[module]; exist {  delete(moduleMap, module)  break  }  } // decrease probable exception of channel closing  time.Sleep(20 * time.Millisecond)  close(channel)  }
}
MessageContext 接口实现
Send
- 根据 module 获取 channel
- 往 channel 写 message
代码不是源码,为了方便展示整合过
func (ctx *Context) Send(module string, message model.Message) {  if channel := ctx.getChannel(module); channel != nil {  channel <- message  return  }
}
Receive
- 根据 module 获取 channel
- 从 channel 读 message
代码不是源码,为了方便展示整合过
func (ctx *Context) Receive(module string) (model.Message, error) {  if channel := ctx.getChannel(module); channel != nil {  content := <-channel  return content, nil  }  return model.Message{}, fmt.Errorf("failed to get channel for module(%s)", module)
}
SendSync
- 设置 deadline 即超时时间, 传入 timeout <= 0 时,默认为30s
- 将消息头 Sync 标志为设置为 true
- 根据 module 获取 channel : reqChannel
- 创建一个匿名 channel 存入 anonChannels map, key 为 messageID
- 创建一个defer 用来删除刚刚创建的匿名 channel
- 往 reqChannel 写 message
- 写超时就返回发送消息超时错误
- 未超时就等待匿名通道返回响应消息
- 响应超时就返回接收响应消息超时错误
代码不是源码,为了方便展示整合过
func (ctx *Context) SendSync(module string, message model.Message, timeout time.Duration) (model.Message, error) {  if timeout <= 0 {  timeout = MessageTimeoutDefault  }  deadline := time.Now().Add(timeout)  // make sure to set sync flag  message.Header.Sync = true  // check req/resp channel  reqChannel := ctx.getChannel(module)  if reqChannel == nil {  return model.Message{}, fmt.Errorf("bad request module name(%s)", module)  }  // new anonymous channel for response  anonChan := make(chan model.Message)  anonName := getAnonChannelName(message.GetID())  ctx.anonChsLock.Lock()  ctx.anonChannels[anonName] = anonChan  ctx.anonChsLock.Unlock()  defer func() {  ctx.anonChsLock.Lock()  delete(ctx.anonChannels, anonName)  close(anonChan)  ctx.anonChsLock.Unlock()  }()  select {  case reqChannel <- message:  case <-time.After(timeout):  return model.Message{}, fmt.Errorf("timeout to send message %s", message.GetID())  }  var resp model.Message  select {  case resp = <-anonChan:  case <-time.After(time.Until(deadline)):  return model.Message{}, fmt.Errorf("timeout to get response for message %s", message.GetID())  }  return resp, nil
}
SendResp
- 根据 messageID 从 anonChannels map 获取 channel
- 往匿名 channel 写 message
代码不是源码,为了方便展示整合过
func (ctx *Context) SendResp(message model.Message) {  anonName := getAnonChannelName(message.GetParentID())  if channel, exist := ctx.anonChannels[anonName]; exist {  select {  case channel <- message:  default:}  return  }
}
SendToGroup
- 根据 group 从 typeChannels map 获取当前 group 下的 channel map
- 遍历 channel map
- 往 channel 写 message
代码不是源码,为了方便展示整合过
func (ctx *Context) SendToGroup(moduleType string, message model.Message) {  send := func(module string, ch chan model.Message) {  select {  case ch <- message:  default:  ch <- message  }  }  if channelList := ctx.getTypeChannel(moduleType); channelList != nil {  for module, channel := range channelList {  go send(module, channel)  }  return  }
}
SendToGroupSync
- 设置 deadline 即超时时间, 传入 timeout <= 0 时,默认为30s
- 根据 group 从 typeChannels map 获取当前 group 下的 channel map
- 创建一个匿名 channel 存入 anonChannels map, key 为 messageID, 缓冲区大小为 channel map 的大小
- 创建一个defer 用来删除刚刚创建的匿名 channel,
- 将消息头 Sync 标志为设置为 true
- 遍历 channel map ,开启多协程往 channel 写 message
- 写超时就将 timeoutCounter ++
- 等待匿名通道返回响应消息
- 响应超时就返回接收响应消息超时错误
- 清理刚刚创建匿名 channel
代码不是源码,为了方便展示整合过
func (ctx *Context) SendToGroupSync(moduleType string, message model.Message, timeout time.Duration) error {  if timeout <= 0 {  timeout = MessageTimeoutDefault  }  deadline := time.Now().Add(timeout)  channelList := ctx.getTypeChannel(moduleType)  if channelList == nil {  return fmt.Errorf("failed to get module type(%s) channel list", moduleType)  }  // each module must sync a response,  // let anonchan size be module number   channelNumber := len(channelList)  anonChan := make(chan model.Message, channelNumber)  anonName := getAnonChannelName(message.GetID())  ctx.anonChsLock.Lock()  ctx.anonChannels[anonName] = anonChan  ctx.anonChsLock.Unlock()  cleanup := func() error {  ctx.anonChsLock.Lock()  delete(ctx.anonChannels, anonName)  close(anonChan)  ctx.anonChsLock.Unlock()  var uninvitedGuests int  // cleanup anonchan and check parentid for resp  for resp := range anonChan {  if resp.GetParentID() != message.GetID() {  uninvitedGuests++  }  }  if uninvitedGuests != 0 {return fmt.Errorf("got some unexpected(%d) resp", uninvitedGuests)  }  return nil  }  // make sure to set sync flag before sending  message.Header.Sync = true  var timeoutCounter int32  send := func(ch chan model.Message) {  // avoid exception because of channel closing  // TODO: need reconstruction  defer func() {  if exception := recover(); exception != nil {  klog.Warningf("xxx")  }  }()  sendTimer := time.NewTimer(time.Until(deadline))  select {  case ch <- message:  sendTimer.Stop()  case <-sendTimer.C:  atomic.AddInt32(&timeoutCounter, 1)  }  }  for _, channel := range channelList {  go send(channel)  }  sendTimer := time.NewTimer(time.Until(deadline))  ticker := time.NewTicker(TickerTimeoutDefault)  for {  if len(anonChan) == channelNumber {  break  }  select {  case <-ticker.C:  case <-sendTimer.C:  err := cleanup()  if err != nil {  klog.Errorf("Failed to cleanup, error: %v", err)  }  if timeoutCounter != 0 {  return fmt.Errorf("xxx")  }  return fmt.Errorf("timeout to send message")  }  }  return cleanup()
}
Socket Context
socket 部分主要用于远程信息交换,底层通过 net.conn 获取连接。它主要有以下几个部分组成:
- broker: 网络代理
- config: 配置
- socket: socket module
- stroe: 通信存储
- keeper: 心跳保持
- wapper: 消息打包
主体
数据结构
外层的Context 只负责实现 MessageContext 与 ModuleContext 接口和存储实际用于通信的 context。对应 MessageContext 接口实现也是调用 通信context 的方法来实现。
type Context struct {  // 存储 module 与 context 的关系// key 为 module,value 为 contextcontexts map[string]*context  // 存储 group 与 context 的关系// key 为 module,value 为 contextgroups map[string]*context  sync.RWMutex
}type context struct {  name       string  address    string  moduleType string  bufferSize int  certificate tls.Certificate  store       *store.PipeStore  broker      *broker.RemoteBroker
}
而在 context 中:
- 消息通讯主要使用 broker 进行
- module 存储 则主要使用 store 进行
所以,接下来,我们主要看一下 broker 与 store 的实现。
broker
数据结构
broker 是一个消息代理,它的内部,持有一个心跳保持对象:
type RemoteBroker struct {  keeper *synckeeper.Keeper
}
同时还有一个用于建联的配置选项数据结构:
type ConnectOptions struct {  Address     string  MessageType string  BufferSize  int  Cert        tls.Certificate  // for websocket/http  RequestHeader http.Header
}
方法
Connect
- 调用 ConnectFunc 获取 net.Conn
- 新建一个消息包装对象
func (broker *RemoteBroker) Connect(opts ConnectOptions, connect ConnectFunc) wrapper.Conn {  conn, err := connect(opts)  ...return wrapper.NewWrapper(opts.MessageType, conn, opts.BufferSize)
}func Connect(opts broker.ConnectOptions) (interface{}, error) {  conn, err := net.Dial(opts.MessageType, opts.Address)  ... return conn, nil
}func NewWrapper(connType string, conn interface{}, buffSize int) Conn {  readerType := reader.ReaderTypeRaw  writerType := writer.WriterTypeRaw  return &ConnWrapper{  conn:   conn,  reader: reader.NewReader(readerType, conn, buffSize),  writer: writer.NewWriter(writerType, conn),  }
}
Send
- 调用 conn 的 WriteJSON 发送消息
func (broker *RemoteBroker) Send(conn wrapper.Conn, message model.Message) error {  err := conn.WriteJSON(&message)  ...  return nil
}
Receive
- 设置超时时间—无
- 调用 conn 的 ReadJSON 读取消息
- 判断消息是否是同步响应消息
- 不是就返回消息
- 是就发送心跳保持消息
func (broker *RemoteBroker) Receive(conn wrapper.Conn) (model.Message, error) {  var message model.Message  for {  err := conn.SetReadDeadline(time.Time{})  err = conn.ReadJSON(&message)  ...isResponse := broker.keeper.IsSyncResponse(message.GetParentID())  if !isResponse {  return message, nil  }  err = broker.keeper.SendToKeepChannel(message)  }
}
SendSyncInternal
- 设置超时时间,默认10s
- 设置同步标志位
- 调用 conn 的 WriteJSON 发送消息
- 发送失败就返回错误
- 成功就调用 conn 的 ReadJSON 等待响应消息
- 响应超时返回错误
- 响应成功就返回响应消息
func (broker *RemoteBroker) SendSyncInternal(conn wrapper.Conn, message model.Message, timeout time.Duration) (model.Message, error) {  if timeout <= 0 {  timeout = syncMessageTimeoutDefault  }  // make sure to set sync flag  message.Header.Sync = true  err := conn.WriteJSON(&message)  ...deadline := time.Now().Add(timeout)  err = conn.SetReadDeadline(deadline)  var response model.Message  err = conn.ReadJSON(&response)  ...return response, nil
}
Store
数据结构
type PipeStore struct {// key modulepipeMap          map[string]PipeInfo  pipeMapLock      sync.RWMutex  // key group modulegroupPipeMap     map[string]map[string]PipeInfo  groupPipeMapLock sync.RWMutex
}type PipeInfo struct {  pipe interface{}
}
PipeInfo 存储的是一个通信对象,主要有以下几种:
- chan model.Message
- net.Conn
- wrapper.Conn
方法就不过多介绍,与其他模块差异不大,因为它主要的功能就是存储。所以都是CRUD。
Wapper
wapper 包装了一个自定义的网络连接,定一个了Conn接口。其数据结构如下:
type Conn interface {  Read() ([]byte, error)  Write(message []byte) error  ReadJSON(obj interface{}) error  WriteJSON(obj interface{}) error  Close() error  SetReadDeadline(t time.Time) error
}  // ConnWrapper conn wrapper
type ConnWrapper struct {  conn   interface{}  reader reader.Reader  writer writer.Writer
}
对与 Conn 接口,她的实际实现主要有两种(纯粹实现就只有 ConnWrapper,但是实际上 ConnWrapper 也是调用的底层实现),Raw 和 Package 两种,其中:
- Raw: 就是常规的buffer 实现,直接通过 net.Conn 进行操作
- Package:则是自定义的一个消息协议,将消息封装后在通过 net.Conn 通信。
Packer
当前未使用
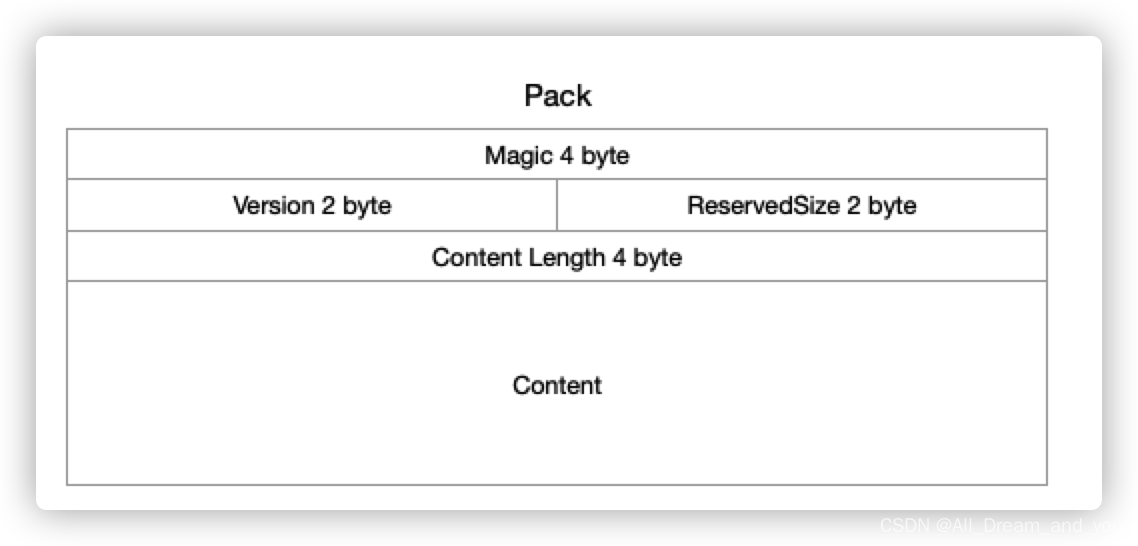
Packer 自定义了通信协议,它将每条消息的前12个字节作为消息头。
- [:4] 魔术位–无实义 4 字节
- (4:6] 版本位–存储版本号 2字节
- (6:8] 保留位 2字节
- (8:12] 长度位 – 存储消息长度 4字节
const (  magicSize    = 4  versionSize  = 2  reservedSize = 2  // MessageLenOffest message len offest   MessageLenOffest = magicSize + versionSize + reservedSize  // MessageOffset message offset   MessageOffset = MessageLenOffest + 4  // HeaderLen header len   HeaderLen = MessageOffset
)
type Packer struct {  Magic    [magicSize]byte  Version  [versionSize]byte  Reserved [reservedSize]byte  Length   int32  Message  []byte
}
Read
func (p *Packer) Read(reader io.Reader) error {// 读取魔术位err := binary.Read(reader, binary.BigEndian, &p.Magic)  ... // 读取版本位err = binary.Read(reader, binary.BigEndian, &p.Version)  ... // 读取保留位 err = binary.Read(reader, binary.BigEndian, &p.Reserved)  ...// 读取长度位err = binary.Read(reader, binary.BigEndian, &p.Length)  ... // 读取消息实体err = binary.Read(reader, binary.BigEndian, &p.Message)  ...return err
}
Write
var (  headerTags = [HeaderLen]byte{'b', 'e', 'e', 'h', 'v', '1', 'r', 'v', 0, 0, 0, 0}
)func (p *Packer) Write(writer io.Writer) error {  // 通过位运算写入数据长度headerTags[MessageLenOffest] = byte(uint32(p.Length) >> 24)  headerTags[MessageLenOffest+1] = byte(uint32(p.Length) >> 16)  headerTags[MessageLenOffest+2] = byte(uint32(p.Length) >> 8)  headerTags[MessageLenOffest+3] = byte(uint32(p.Length)) // 写入消息头 err := binary.Write(writer, binary.BigEndian, &headerTags)  ... // 写入消息实体err = binary.Write(writer, binary.BigEndian, &p.Message)  ... return nil
}
到此,我们基本上介绍完了它的内部核心实现,接下来,我们来看看的外层包装
Module
我们在上述的章节中一直提到了 modlue 这样一个概念,在 kubeedge 中,它通过 Module 这样一个接口来约定,只要实现了这个接口,kubeedge 就认为你是一个 modlue。
type Module interface {  Name() string  Group() string  Start()  Enable() bool
}
core 模块通过 ModuleInfo 存储单个 modlue 的信息,各个模块则使用 Register() 方法将自己注册进来,然后所有的 ModuleInfo 会存储到 modules map 和 disabledModules map 中,并通过 GetModules() 方法将 module 暴露出去。
var (  // Modules map  modules         map[string]*ModuleInfo  disabledModules map[string]*ModuleInfo
)
type ModuleInfo struct {  contextType string  remote      bool  module      Module
}func Register(m Module, opts ...string) {  info := &ModuleInfo{  module:      m,  contextType: common.MsgCtxTypeChannel,  remote:      false,  }  if len(opts) > 0 {  info.contextType = opts[0]  info.remote = true  }  if m.Enable() {  modules[m.Name()] = info  } else {  disabledModules[m.Name()] = info  }
}
func GetModules() map[string]*ModuleInfo {  return modules
}
StartModules
- 默认初始化 Context 为 channel 类型
- 获取所有已注册的 modules
- 遍历 modules 将各个 module 加入到Context
- 启动 module
func StartModules() {  // only register channel mode, if want to use socket mode, we should also pass in common.MsgCtxTypeUS parameter  beehiveContext.InitContext([]string{common.MsgCtxTypeChannel})  modules := GetModules()  for name, module := range modules {  var m common.ModuleInfo  switch module.contextType {  case common.MsgCtxTypeChannel:  m = common.ModuleInfo{  ModuleName: name,  ModuleType: module.contextType,  }  case common.MsgCtxTypeUS:  m = common.ModuleInfo{  ModuleName: name,  ModuleType: module.contextType,  // the below field ModuleSocket is only required for using socket.  ModuleSocket: common.ModuleSocket{  IsRemote: module.remote,  },  }  default:  klog.Exitf("unsupported context type: %s", module.contextType)  }  beehiveContext.AddModule(&m)  beehiveContext.AddModuleGroup(name, module.module.Group())  go moduleKeeper(name, module, m)  klog.Infof("starting module %s", name)  }
}func moduleKeeper(name string, moduleInfo *ModuleInfo, m common.ModuleInfo) {  for {  moduleInfo.module.Start()  // local modules are always online  if !moduleInfo.remote {  return  }  // try to add module for remote modules  beehiveContext.AddModule(&m)  beehiveContext.AddModuleGroup(name, moduleInfo.module.Group())  }
}
GracefulShutdown
- 开启一个通道接收系统信号
- 接收到信号就执行 Context.Cancel() 方法
- 获取所有已注册的 modules
- 调用 Context.Cleanup() 方法 清理module.
func GracefulShutdown() {  c := make(chan os.Signal, 1)  signal.Notify(c, syscall.SIGINT, syscall.SIGHUP, syscall.SIGTERM,  syscall.SIGQUIT, syscall.SIGILL, syscall.SIGTRAP, syscall.SIGABRT)  s := <-c  klog.Infof("Get os signal %v", s.String())  // Cleanup each modules  beehiveContext.Cancel()  modules := GetModules()  for name := range modules {  klog.Infof("Cleanup module %v", name)  beehiveContext.Cleanup(name)  }
}