本文代码来自于https://github.com/bubbliiiing/faster-rcnn-pytorch,b站视频https://www.bilibili.com/video/BV1BK41157Vs?p=1,本文仅作学习使用
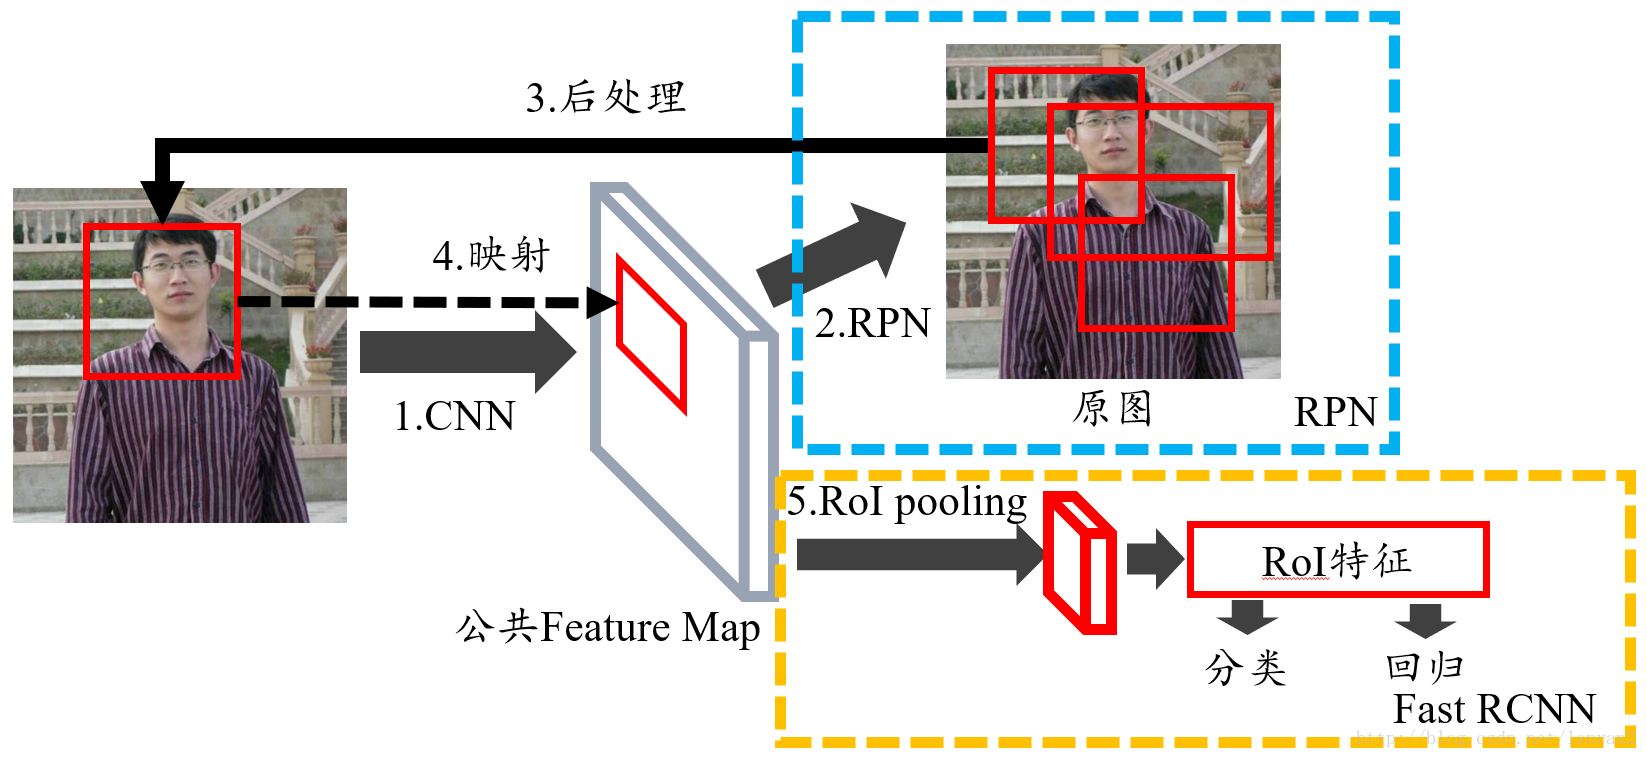
FasterRCNN整体的网络构造
class FasterRCNN(nn.Module):def __init__(self, num_classes, mode = "training",feat_stride = 16,anchor_scales = [8, 16, 32],ratios = [0.5, 1, 2],backbone = 'vgg',pretrained = False):super(FasterRCNN, self).__init__()self.feat_stride = feat_stride#---------------------------------## 一共存在两个主干# vgg和resnet50#---------------------------------#if backbone == 'vgg':self.extractor, classifier = decom_vgg16(pretrained)#---------------------------------## 构建建议框网络#---------------------------------##RPN网络self.rpn = RegionProposalNetwork(512, 512,ratios = ratios,anchor_scales = anchor_scales,feat_stride = self.feat_stride,mode = mode)#---------------------------------## 构建分类器网络#---------------------------------#self.head = VGG16RoIHead(n_class = num_classes + 1,roi_size = 7,spatial_scale = 1,classifier = classifier)elif backbone == 'resnet50':self.extractor, classifier = resnet50(pretrained)#---------------------------------## 构建classifier网络#---------------------------------#self.rpn = RegionProposalNetwork(1024, 512,ratios = ratios,anchor_scales = anchor_scales,feat_stride = self.feat_stride,mode = mode)#---------------------------------## 构建classifier网络#---------------------------------#self.head = Resnet50RoIHead(n_class = num_classes + 1,roi_size = 14,spatial_scale = 1,classifier = classifier)def forward(self, x, scale=1.):#---------------------------------## 计算输入图片的大小#---------------------------------#img_size = x.shape[2:]#---------------------------------## 利用主干网络提取特征#---------------------------------#base_feature = self.extractor.forward(x)#---------------------------------## 获得建议框#---------------------------------#_, _, rois, roi_indices, _ = self.rpn.forward(base_feature, img_size, scale)#---------------------------------------## 获得classifier的分类结果和回归结果#---------------------------------------#roi_cls_locs, roi_scores = self.head.forward(base_feature, rois, roi_indices, img_size)return roi_cls_locs, roi_scores, rois, roi_indicesdef freeze_bn(self):for m in self.modules():if isinstance(m, nn.BatchNorm2d):m.eval()先看RegionProposalNetwork这个网络结构
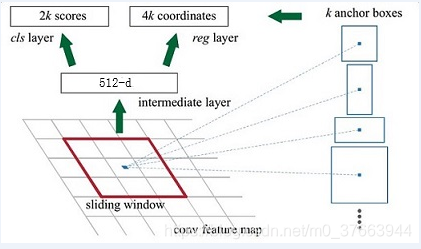
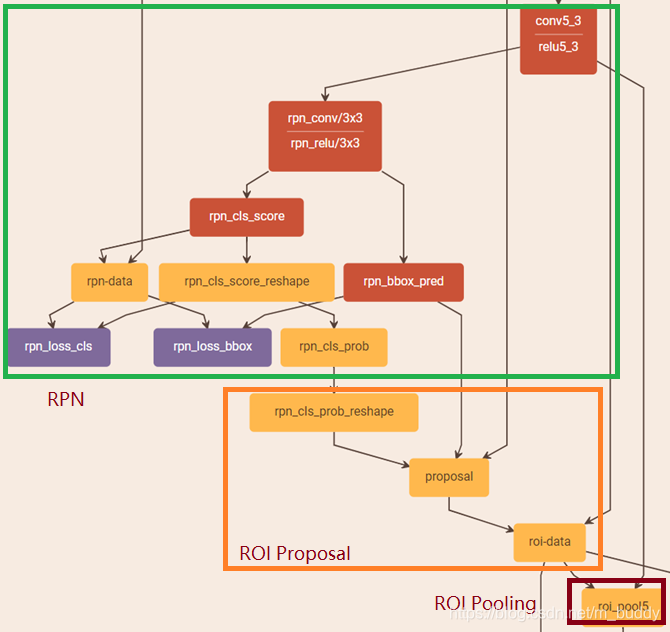
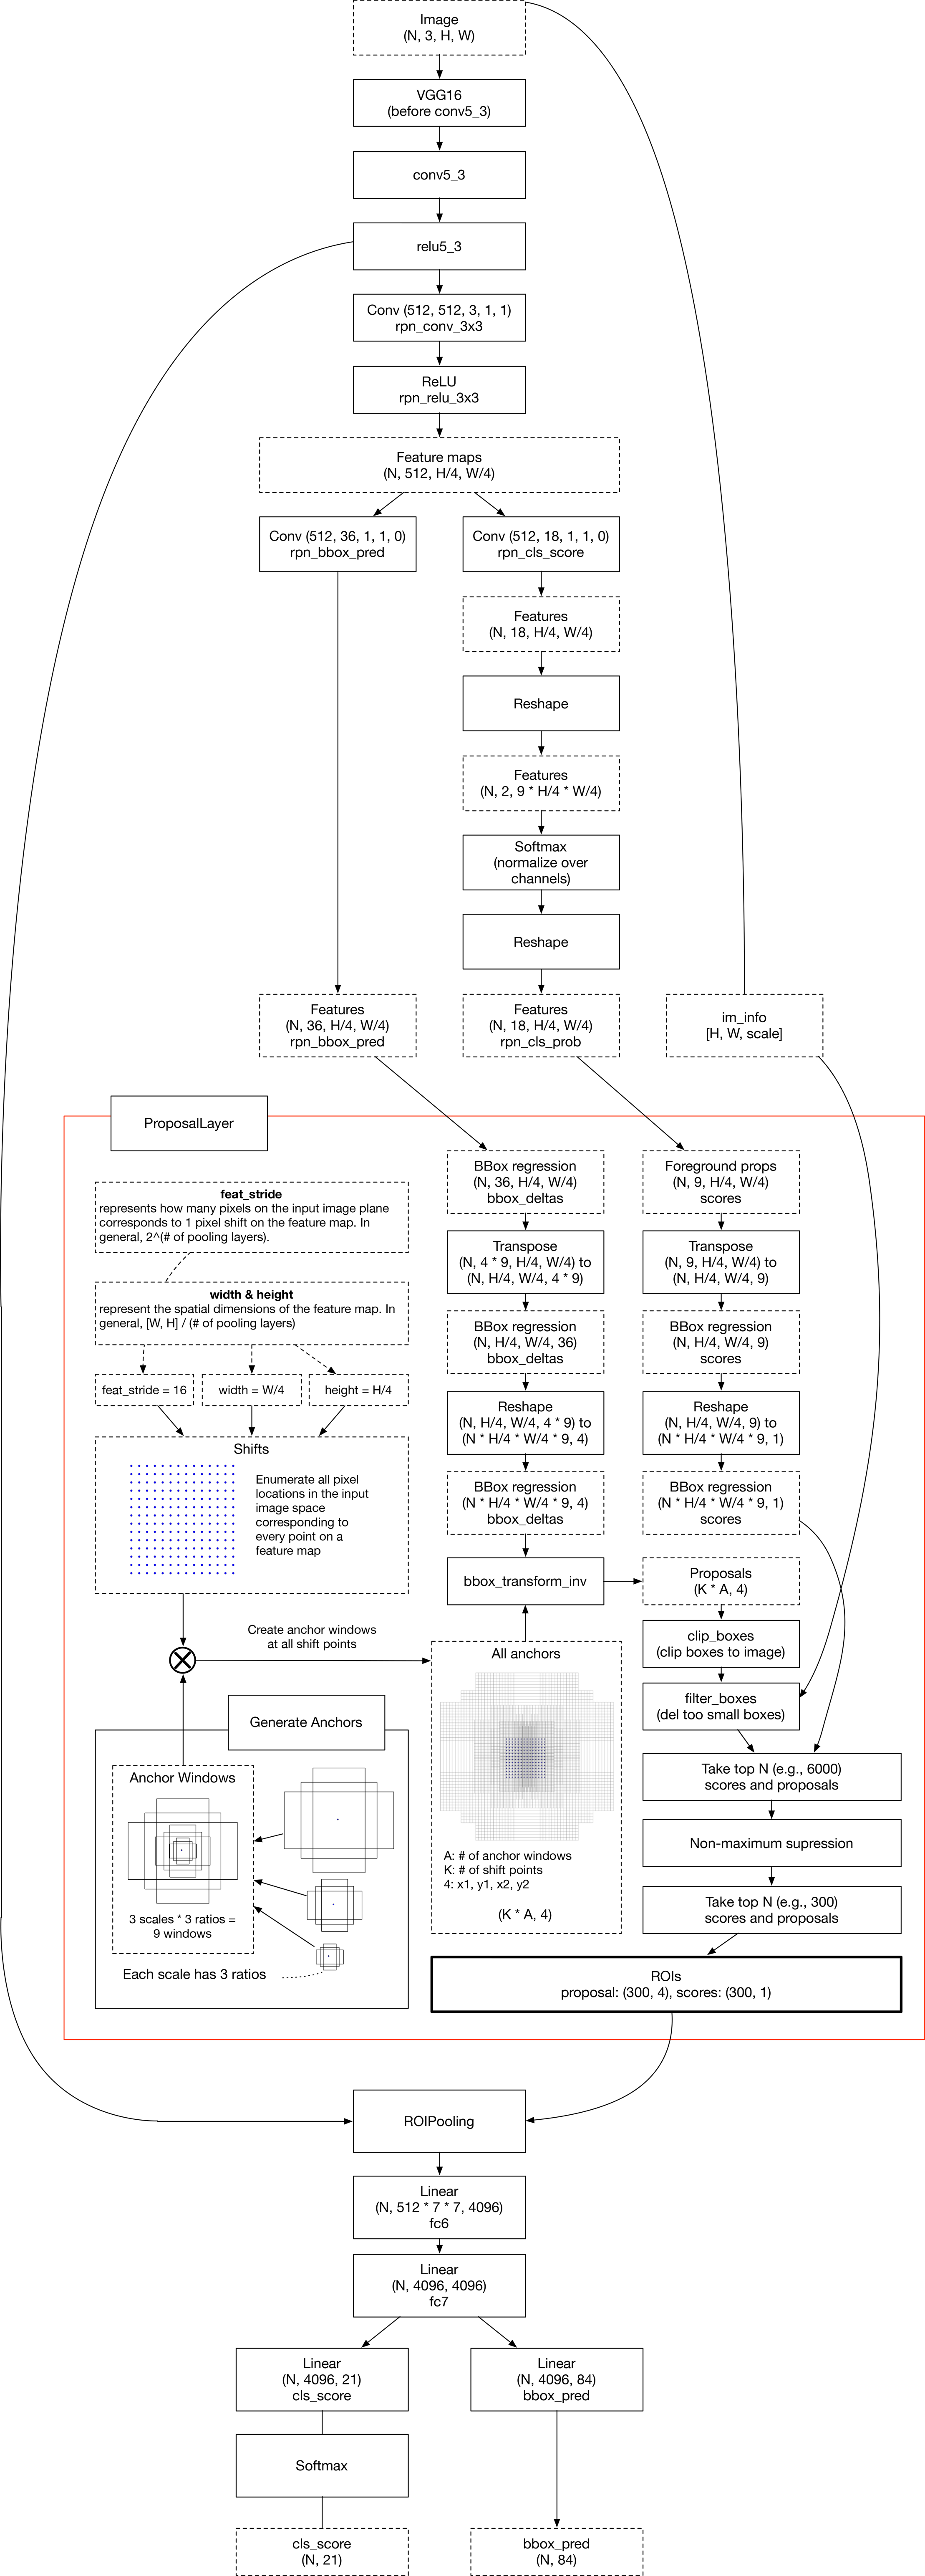
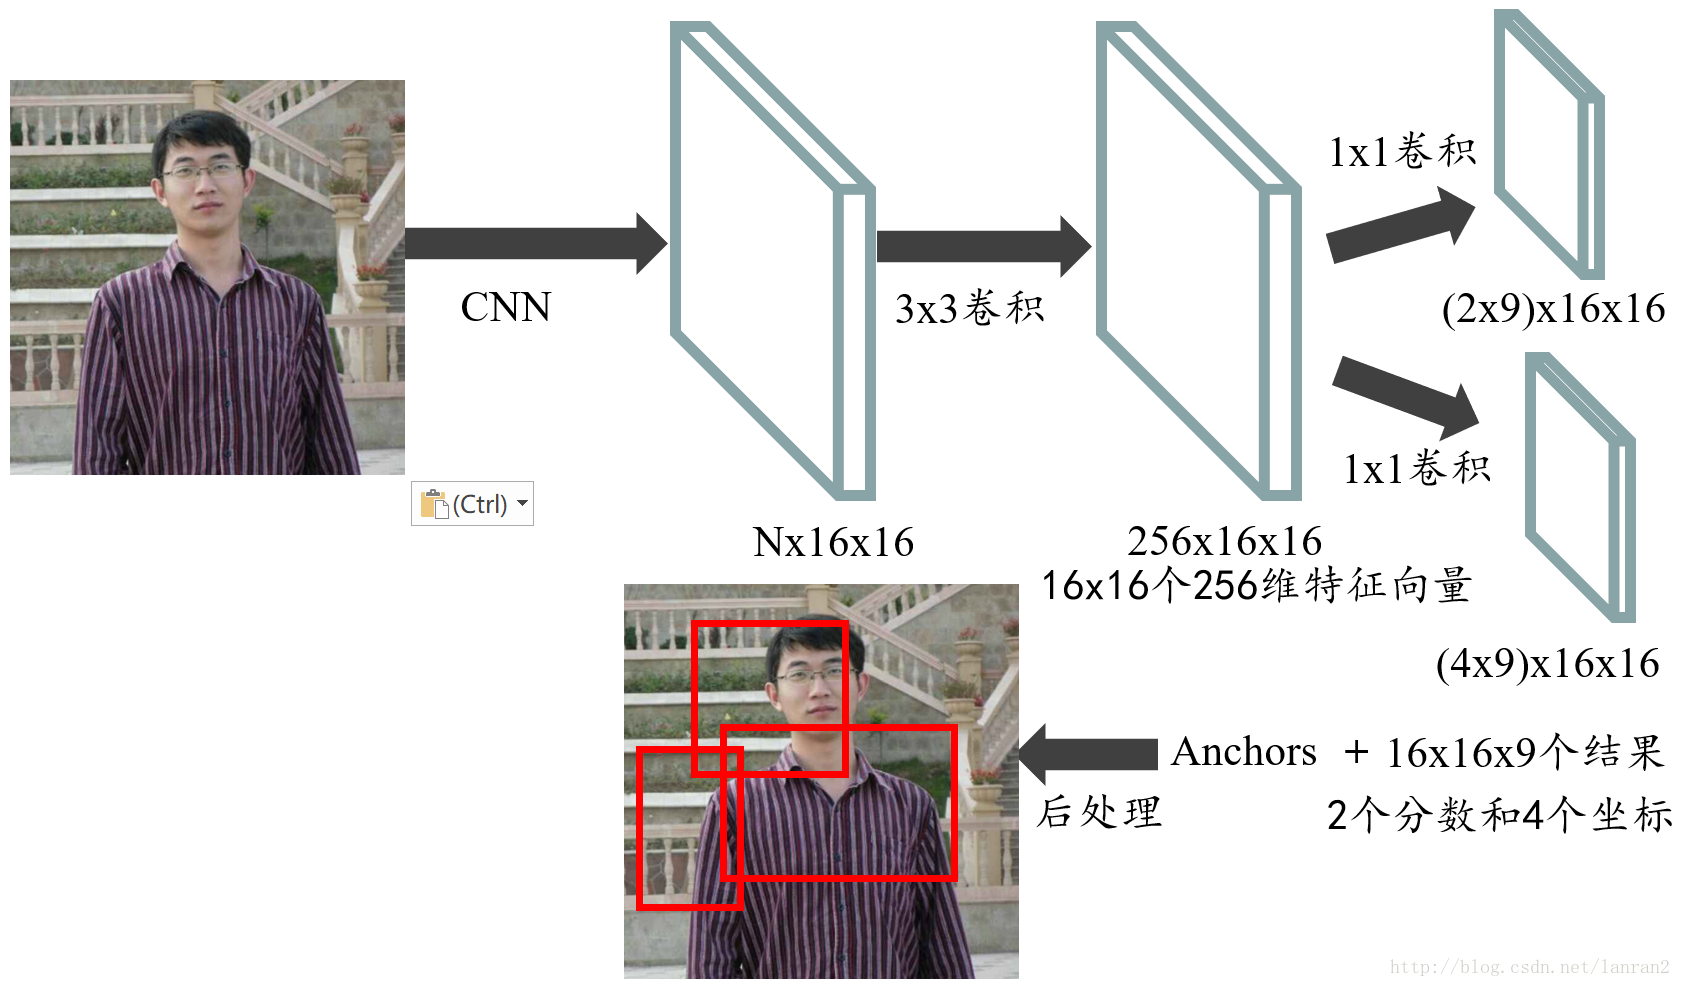
class RegionProposalNetwork(nn.Module):def __init__(self, in_channels = 512, mid_channels = 512, #确定anchor是长,正方形,宽ratios = [0.5, 1, 2],#anchor的大小anchor_scales = [8, 16, 32], feat_stride = 16,mode = "training",):super(RegionProposalNetwork, self).__init__()#-----------------------------------------## 生成基础先验框,shape为[9, 4]# 为每个像素点生成9个先验框#-----------------------------------------##. generate_anchor_base见标题1self.anchor_base = generate_anchor_base(anchor_scales = anchor_scales, ratios = ratios)#anchor的个数n_anchor = self.anchor_base.shape[0]#-----------------------------------------## 先进行一个3x3的卷积,可理解为特征整合#-----------------------------------------#self.conv1 = nn.Conv2d(in_channels, mid_channels, 3, 1, 1)#-----------------------------------------## 分类预测先验框内部是否包含物体#. 有n个anchor,score有2n个值,每个anchor都有2个值为,包含物体和不包含物体的概率#-----------------------------------------#self.score = nn.Conv2d(mid_channels, n_anchor * 2, 1, 1, 0)#-----------------------------------------## 回归预测对先验框进行调整#. loc得到n*4,得到的不是先验框的具体坐标,而是先验框的偏移值,即对先验框的修正值#-----------------------------------------#self.loc = nn.Conv2d(mid_channels, n_anchor * 4, 1, 1, 0)#-----------------------------------------## 特征点间距步长#-----------------------------------------#self.feat_stride = feat_stride#-----------------------------------------## 用于对建议框解码并进行非极大抑制#-----------------------------------------##。 ProposalCreator见标题3self.proposal_layer = ProposalCreator(mode)#--------------------------------------## 对FPN的网络部分进行权值初始化#--------------------------------------#normal_init(self.conv1, 0, 0.01)normal_init(self.score, 0, 0.01)normal_init(self.loc, 0, 0.01)def forward(self, x, img_size, scale=1.):#n:batch_size,_:channeln, _, h, w = x.shape#-----------------------------------------## 先进行一个3x3的卷积,可理解为特征整合#-----------------------------------------#x = F.relu(self.conv1(x))#-----------------------------------------## 回归预测对先验框进行调整#-----------------------------------------#rpn_locs = self.loc(x)rpn_locs = rpn_locs.permute(0, 2, 3, 1).contiguous().view(n, -1, 4)#-----------------------------------------## 分类预测先验框内部是否包含物体#-----------------------------------------#rpn_scores = self.score(x)rpn_scores = rpn_scores.permute(0, 2, 3, 1).contiguous().view(n, -1, 2)#--------------------------------------------------------------------------------------## 进行softmax概率计算,每个先验框只有两个判别结果# 内部包含物体或者内部不包含物体,rpn_softmax_scores[:, :, 1]的内容为包含物体的概率#--------------------------------------------------------------------------------------#rpn_softmax_scores = F.softmax(rpn_scores, dim=-1)rpn_fg_scores = rpn_softmax_scores[:, :, 1].contiguous()rpn_fg_scores = rpn_fg_scores.view(n, -1)#------------------------------------------------------------------------------------------------## 生成先验框,此时获得的anchor是布满网格点的,当输入图片为600,600,3的时候,shape为(12996, 4)'''#-------------frcnn--------------------## 利用主干网络提取特征#---------------------------------#base_feature = self.extractor.forward(x)得到38x38的特征层,输入到rpn#---------------------------------## 获得建议框#---------------------------------#_, _, rois, roi_indices, _ = self.rpn.forward(base_feature, img_size, scale)'''#. 此时数据为38*38时,得到的应该为(38*38*9,4)#. 此时图片的每个像素点都有9个先验框#------------------------------------------------------------------------------------------------##. _enumerate_shifted_anchor见标题二anchor = _enumerate_shifted_anchor(np.array(self.anchor_base), self.feat_stride, h, w)rois = list()roi_indices = list()#对于batch_size里的每一张图,ifor i in range(n):#proposal_layer见标题三#roi得到最终的先验框roi = self.proposal_layer(rpn_locs[i], rpn_fg_scores[i], anchor, img_size, scale = scale)#indexbatch_index = i * torch.ones((len(roi),))rois.append(roi)roi_indices.append(batch_index)rois = torch.cat(rois, dim=0)roi_indices = torch.cat(roi_indices, dim=0)return rpn_locs, rpn_scores, rois, roi_indices, anchor
下面详解上面的RPN网络
1.generate_anchor_base函数
#--------------------------------------------#
#   生成基础的先验框
#.  返回的是先验框的4个值(-w/2,-h/2,w/2,h/2)
#--------------------------------------------#
def generate_anchor_base(base_size=16, ratios=[0.5, 1, 2], anchor_scales=[8, 16, 32]):anchor_base = np.zeros((len(ratios) * len(anchor_scales), 4), dtype=np.float32)#9个先验框,每个框需要4个坐标确定print(anchor_base.shape)#(9, 4)for i in range(len(ratios)):# 循环产生不同大小,符合比列的框# 使用srqt可以使得框更平均#i j h.                w                  h1.  w1#0 0 90.50966799187809 181.01933598375618 64.0 128.0#0 1 181.01933598375618 362.03867196751236 128.0 256.0#0 2 362.03867196751236 724.0773439350247 256.0 512.0#1 0 128.0 128.0 128 256#1 1 256.0 256.0 256 512#1 2 512.0 512.0 512 1024#2 0 181.01933598375618 90.50966799187809 256 512#2 1 362.03867196751236 181.01933598375618 512 1024#2 2 724.0773439350247 362.03867196751236 1024 2048#可以看到使用srqt之后的框更平均,不至于太大太小,但是宽高比还是一样for j in range(len(anchor_scales)):# h=16*8*sqrt(0.5)h = base_size * anchor_scales[j] * np.sqrt(ratios[i])w = base_size * anchor_scales[j] * np.sqrt(1. / ratios[i])h1 = base_size * anchor_scales[j] * (ratios[i])w1 = base_size * anchor_scales[j] * (2*ratios[i])print(i,j,h,w,h1,w1)index = i * len(anchor_scales) + j#index记录的是序号print('index',index)#???记录下面4个点有什么用,不应该记录x1,y1,x2,y2吗# 解答:后面得到每个像素的中心点,xcenter-(w/2)就是xmin,其他同理#需要看到后面3.1才能解释anchor_base[index, 0] = - h / 2.anchor_base[index, 1] = - w / 2.anchor_base[index, 2] = h / 2.anchor_base[index, 3] = w / 2.print(anchor_base[index,0],anchor_base[index,1],anchor_base[index,2],anchor_base[index,3])return anchor_base
2._enumerate_shifted_anchor函数
#-----------_enumerate_shifted_anchor测试代码,测试数据为图片大小为38*38---------------#
#假设有一个(h,w)为(38,38)的图片,步长间距为16
height, width, feat_stride  = 38,38,16
# 得到w*h大小的图上每个像素点都有9个先验框
anchors_all = _enumerate_shifted_anchor(nine_anchors, feat_stride, height, width)
print(np.shape(anchors_all))
#-----------_enumerate_shifted_anchor测试代码--------------------------------------##--------------------------------------------#
#   对基础先验框进行拓展对应到所有特征点上
#--------------------------------------------#
def _enumerate_shifted_anchor(anchor_base, feat_stride, height, width):#---------------------------------##   计算网格中心点#.  解读:得到一个网格shift,每个点代表了图标的位置,每个点和图片的一个像素点对应#.  每个点有4个坐标,对应了先验框的位置(x1,y1,x2,y2),所以最后的shift的shape为(38*38*9,4)#---------------------------------# 0-38*16,16,,产生38个# np.arange第一个参数为起点,第二个参数为终点,第三个参数为步长shift_x             = np.arange(0, width * feat_stride, feat_stride)shift_y             = np.arange(0, height * feat_stride, feat_stride)# 根据输入的坐标向量生成对应的坐标矩阵#shape (38,38),(38,38)shift_x, shift_y    = np.meshgrid(shift_x, shift_y)# 沿着列进行拼接,总共最后4列#shape (38*38,4)shift               = np.stack((shift_x.ravel(), shift_y.ravel(), shift_x.ravel(), shift_y.ravel(),), axis=1)#---------------------------------##   每个网格点上的9个先验框#---------------------------------#A       = anchor_base.shape[0]#9K       = shift.shape[0]#38*38#A=9,K=1444# anchor:[1444,9,4]#为每个点都分配9个先验框,共1444个点,每个点9个先验框,每个框4个坐标anchor  = anchor_base.reshape((1, A, 4)) + shift.reshape((K, 1, 4))#---------------------------------##   所有的先验框#---------------------------------#anchor  = anchor.reshape((K * A, 4)).astype(np.float32)# 保证图片上的每个像素点都有9个先验框return anchor
# #fig = plt.figure()ax = fig.add_subplot(111)plt.ylim(-300,900)plt.xlim(-300,900)shift_x = np.arange(0, width * feat_stride, feat_stride)shift_y = np.arange(0, height * feat_stride, feat_stride)shift_x, shift_y = np.meshgrid(shift_x, shift_y)# 蓝色为图片大小,框不在蓝色中说明框不符合要求plt.scatter(shift_x,shift_y)box_widths = anchors_all[:,2]-anchors_all[:,0]box_heights = anchors_all[:,3]-anchors_all[:,1]# for i in [108, 109, 110, 111, 112, 113, 114, 115, 116]:for i in [200,300,400,500,600]:rect = plt.Rectangle([anchors_all[i, 0],anchors_all[i, 1]],box_widths[i],box_heights[i],color="r",fill=False)ax.add_patch(rect)print(i,anchors_all[i, 0],anchors_all[i, 1],anchors_all[i, 1],anchors_all[i, 1])plt.show()输出
200 170.98067 -362.03867 -362.03867 -362.03867
300 464.0 -64.0 -64.0 -64.0
400 -32.0 -112.0 -112.0 -112.0
500 16.0 -240.0 -240.0 -240.0
600 357.49033 -29.254833 -29.254833 -29.254833

3.proposal_layer函数
#直接看ProposalCreator函数#-----------------------------------------## 用于对建议框解码并进行非极大抑制#-----------------------------------------#self.proposal_layer = ProposalCreator(mode)class ProposalCreator():def __init__(self, mode, nms_iou = 0.7,n_train_pre_nms = 12000,n_train_post_nms = 600,n_test_pre_nms = 3000,n_test_post_nms = 300,min_size = 16):#-----------------------------------## 设置预测还是训练#-----------------------------------#self.mode = mode#-----------------------------------## 建议框非极大抑制的iou大小#-----------------------------------#self.nms_iou = nms_iou#-----------------------------------## 训练用到的建议框数量#-----------------------------------#self.n_train_pre_nms = n_train_pre_nmsself.n_train_post_nms = n_train_post_nms#-----------------------------------## 预测用到的建议框数量#-----------------------------------#self.n_test_pre_nms = n_test_pre_nmsself.n_test_post_nms = n_test_post_nmsself.min_size = min_size# __call__()。该方法的功能类似于在类中重载 () 运算符,使得类实例对象可以像调用普通函数那样,以“对象名()”的形式使用。def __call__(self, loc, score, anchor, img_size, scale=1.):if self.mode == "training":n_pre_nms = self.n_train_pre_nmsn_post_nms = self.n_train_post_nmselse:n_pre_nms = self.n_test_pre_nmsn_post_nms = self.n_test_post_nms#-----------------------------------## 将先验框转换成tensor#-----------------------------------#anchor = torch.from_numpy(anchor)if loc.is_cuda:anchor = anchor.cuda()#-----------------------------------## 将RPN网络预测结果转化成建议框#-----------------------------------## 将建议框加上回归出来的数据得到最后预测的框(x1,y1,x2,y2)#. loc为每个框的偏移值# loc2bbox见3.1roi = loc2bbox(anchor, loc)#-----------------------------------## 防止建议框超出图像边缘#-----------------------------------## torch.clamp(input, min, max, out=None) → Tensor# 将input 的值控制在min 和 max 之间,# https://blog.csdn.net/u013230189/article/details/82627375roi[:, [0, 2]] = torch.clamp(roi[:, [0, 2]], min = 0, max = img_size[1])roi[:, [1, 3]] = torch.clamp(roi[:, [1, 3]], min = 0, max = img_size[0])#-----------------------------------## 建议框的宽高的最小值不可以小于16#-----------------------------------#min_size = self.min_size * scale# torch.where()函数的作用是按照一定的规则合并两个tensor类型。#https://blog.csdn.net/sinat_28729797/article/details/122193256?utm_medium=distribute.pc_relevant.none-task-blog-2~default~baidujs_baidulandingword~default-0.queryctrv2&spm=1001.2101.3001.4242.1&utm_relevant_index=3# keep = torch.where(# ((roi[:, 2] - roi[:, 0]) >= min_size) & ((roi[:, 3] - roi[:, 1]) >= min_size)# )[0]# torch.where[0]返回第一维度的坐标,即返回的是符合条件(宽高大于最小值)的框keep = torch.where(((roi[:, 2] - roi[:, 0]) >= min_size) & ((roi[:, 3] - roi[:, 1]) >= min_size))[0]#-----------------------------------## 将对应的建议框保留下来#-----------------------------------#roi = roi[keep, :]#. 对应框的分数score = score[keep]#-----------------------------------## 根据得分进行排序,取出建议框#-----------------------------------#order = torch.argsort(score, descending=True)#. 取出前n_pre_nms个框if n_pre_nms > 0:order = order[:n_pre_nms]roi = roi[order, :]score = score[order]#-----------------------------------## 对建议框进行非极大抑制# 使用官方的非极大抑制会快非常多#-----------------------------------## score 包含物体的概率#from torchvision.ops import nms'''nms测试'''keep = nms(roi, score, self.nms_iou)keep = keep[:n_post_nms]roi = roi[keep]return roi3.1 loc2bbox
def loc2bbox(src_bbox, loc):if src_bbox.size()[0] == 0:return torch.zeros((0, 4), dtype=loc.dtype)# w=x2-x1# h=y2-y1# ctr_x=x1+0.5*w# ctr_y=y1+0.5*hsrc_width = torch.unsqueeze(src_bbox[:, 2] - src_bbox[:, 0], -1)src_height = torch.unsqueeze(src_bbox[:, 3] - src_bbox[:, 1], -1)src_ctr_x = torch.unsqueeze(src_bbox[:, 0], -1) + 0.5 * src_widthsrc_ctr_y = torch.unsqueeze(src_bbox[:, 1], -1) + 0.5 * src_height# a:b:c表示从a到b,步长为c# 将b取消就是a::c,就是从a到最后,步长为c# loc对应的数据是回归数据,(调整数据,或者说偏移量)#例如 loc[:,0::4]就是从0列到最后一列,以步长4走,因为总共就4列,所以就去取第0列,下面同理dx = loc[:, 0::4]#取出0列,dxdy = loc[:, 1::4]# dydw = loc[:, 2::4]# dwdh = loc[:, 3::4]# dh#偏移调整#ctr_x,ctr_y中心点坐标ctr_x = dx * src_width + src_ctr_xctr_y = dy * src_height + src_ctr_yw = torch.exp(dw) * src_widthh = torch.exp(dh) * src_heightdst_bbox = torch.zeros_like(loc)dst_bbox[:, 0::4] = ctr_x - 0.5 * w#x1dst_bbox[:, 1::4] = ctr_y - 0.5 * h#y1dst_bbox[:, 2::4] = ctr_x + 0.5 * w#x2dst_bbox[:, 3::4] = ctr_y + 0.5 * h#y2return dst_bbox