ALSA 声卡与设备
- 一、ALSA Sound 初始化
- 1、alsa_sound_init() 入口函数
- 2、init_soundcore() 入口函数
- 二、声卡结构体与创建、注册
- 1、struct snd_card
- 2、声卡创建流程
- 3、声卡创建过程使用举例
- 三、声卡之 Pcm 设备
- 1、Pcm 设备简介
- 2、ALSA Driver 的 Pcm 中间层
- 3、Pcm 设备创建
- 四、声卡之 Control 设备
- 1、Control 设备简介
- 2、Control 设备的建立
- 3、Controls 的创建
一、ALSA Sound 初始化
1、alsa_sound_init() 入口函数
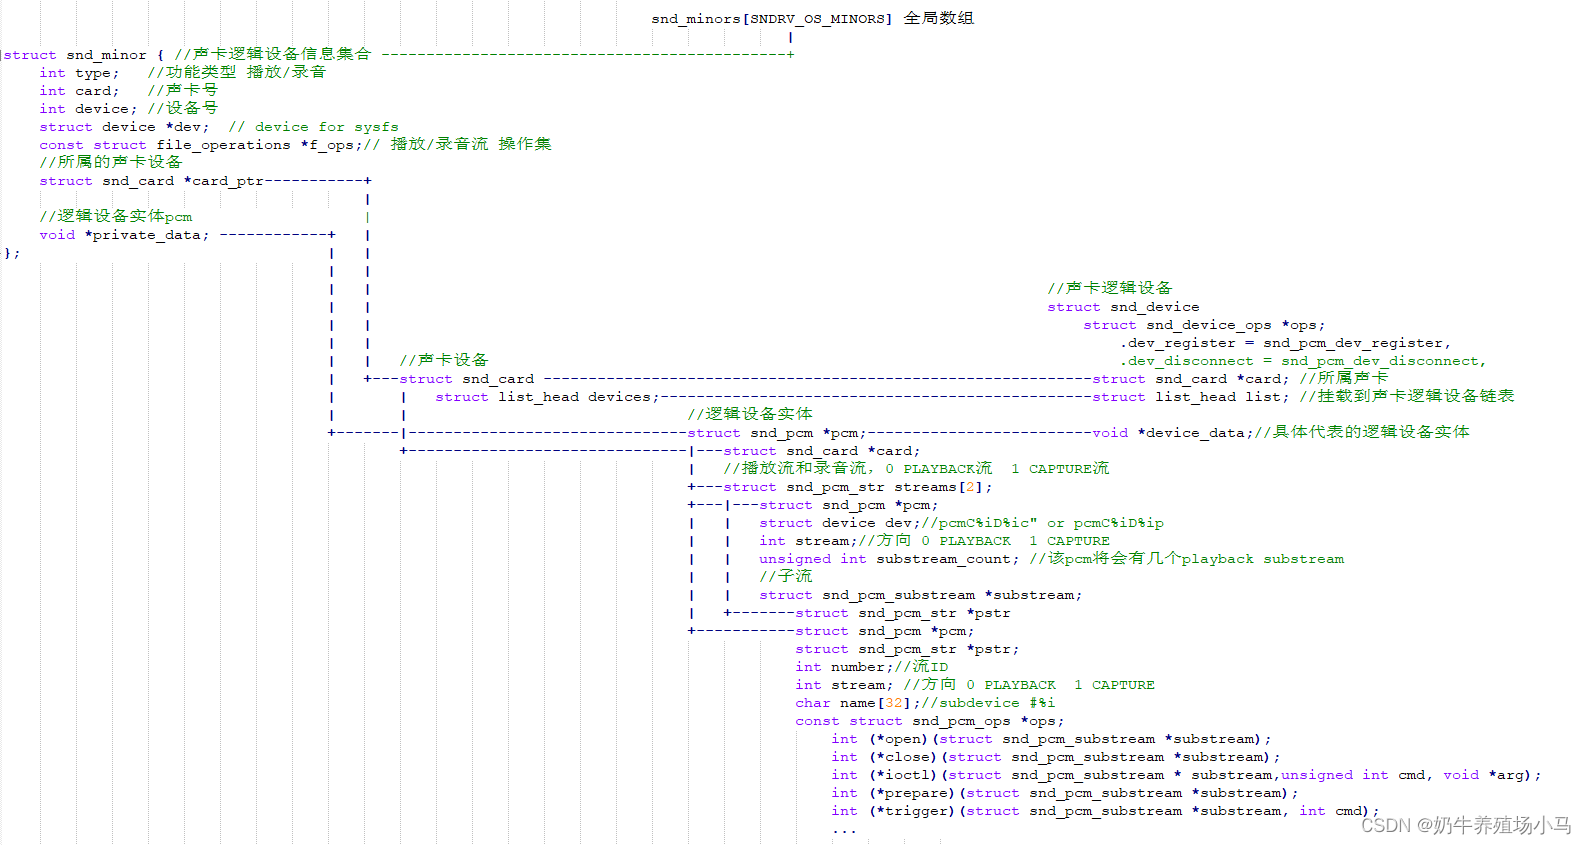
在我们创建声卡前,ALSA Sound 会先有相应的初始化,即 sound.c 的入口函数,位于 sound/core/sound.c,主要是用于申请一个字符设备的主设备号(116),后面的 pcm、control 等逻辑设备都是这个主设备号下的次设备。
/**  INIT PART*/static int __init alsa_sound_init(void)
{snd_major = major;snd_ecards_limit = cards_limit;//获取字符设备主设备号,即声卡的主设备号,其他声卡设备都是其下的次设备号if (register_chrdev(major, "alsa", &snd_fops)) {pr_err("ALSA core: unable to register native major device number %d\n", major);return -EIO;}//创建 snd_proc_root 目录为 /proc/soundif (snd_info_init() < 0) {unregister_chrdev(major, "alsa");return -ENOMEM;}
#ifndef MODULEpr_info("Advanced Linux Sound Architecture Driver Initialized.\n");
#endifreturn 0;
}
其中 struct snd_fops 定义如下,所有次设备共用一个 open 接口,
static const struct file_operations snd_fops =
{.owner =	THIS_MODULE,.open =		snd_open,.llseek =	noop_llseek,
};
snd_open 函数定义如下:
static int snd_open(struct inode *inode, struct file *file)
{//获取声卡下对应的次设备unsigned int minor = iminor(inode);struct snd_minor *mptr = NULL;const struct file_operations *new_fops;int err = 0;if (minor >= ARRAY_SIZE(snd_minors))return -ENODEV;mutex_lock(&sound_mutex);//获取到具体的声卡设备,即次设备比如 control、pcm 设备等mptr = snd_minors[minor];if (mptr == NULL) {mptr = autoload_device(minor);if (!mptr) {mutex_unlock(&sound_mutex);return -ENODEV;}}//获取次设备的 f_ops 文件结构体new_fops = fops_get(mptr->f_ops);mutex_unlock(&sound_mutex);if (!new_fops)return -ENODEV;//用次设备的 file_operations 替换replace_fops(file, new_fops);//执行该次设备的文件 open 函数if (file->f_op->open)err = file->f_op->open(inode, file);return err;
}
如上述注释所述,在 snd_open 函数中利用次设备号根据全局数组 snd_minors 找到相应的次设备 file_operations 并替换,最后调用相应次设备的 open 函数。(备注:很多设备框架都是使用这种做法)
snd_minors 是定义在 sound.c 中的全局变量,表示主设备号下的次设备比如 control、pcm 设备等,定义如下:
struct snd_minor {int type;			/* SNDRV_DEVICE_TYPE_XXX */int card;			/* card number */int device;			/* device number */const struct file_operations *f_ops;	/* file operations */void *private_data;		/* private data for f_ops->open */struct device *dev;		/* device for sysfs */struct snd_card *card_ptr;	/* assigned card instance */
};static struct snd_minor *snd_minors[SNDRV_OS_MINORS];
其中包含的设备类型如下,位于 include/sound/minors.h
enum {SNDRV_DEVICE_TYPE_CONTROL,SNDRV_DEVICE_TYPE_SEQUENCER,SNDRV_DEVICE_TYPE_TIMER,SNDRV_DEVICE_TYPE_HWDEP,SNDRV_DEVICE_TYPE_RAWMIDI,SNDRV_DEVICE_TYPE_PCM_PLAYBACK,SNDRV_DEVICE_TYPE_PCM_CAPTURE,SNDRV_DEVICE_TYPE_COMPRESS,
};
2、init_soundcore() 入口函数
该入口函数是 sound_core.c 的入口函数,主要用于创建 sound_class,如下
static char *sound_devnode(struct device *dev, umode_t *mode)
{if (MAJOR(dev->devt) == SOUND_MAJOR)return NULL;return kasprintf(GFP_KERNEL, "snd/%s", dev_name(dev));
}static int __init init_soundcore(void)
{int rc;rc = init_oss_soundcore();if (rc)return rc;//创建全局 sound_classsound_class = class_create(THIS_MODULE, "sound");if (IS_ERR(sound_class)) {cleanup_oss_soundcore();return PTR_ERR(sound_class);}sound_class->devnode = sound_devnode;return 0;
}
subsys_initcall(init_soundcore);
二、声卡结构体与创建、注册
1、struct snd_card
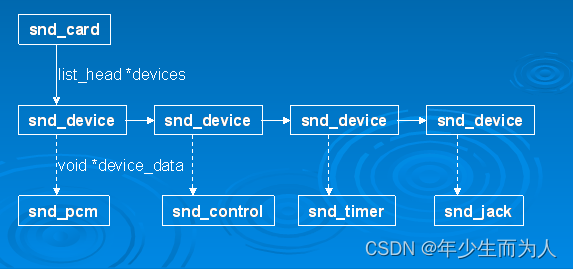
结构体 snd_card 是整个 ALSA 音频驱动最顶层的一个结构体,整个声卡的软件逻辑结构开始于该结构,几乎所有与声音相关的逻辑设备都是在 snd_card 的管理之下,声卡驱动的第一个动作就是创建一个 snd_card 结构体,其定位于 include/sound/core.h,如下:
/* main structure for soundcard */struct snd_card {int number;			/* number of soundcard (index tosnd_cards) */char id[16];			/* id string of this card */char driver[16];		/* driver name */char shortname[32];		/* short name of this soundcard */char longname[80];		/* name of this soundcard */ //会在具体驱动中设置,主要反映在/proc/asound/cards中char irq_descr[32];		/* Interrupt description */char mixername[80];		/* mixer name */char components[128];		/* card components delimited withspace */struct module *module;		/* top-level module */void *private_data;		/* private data for soundcard */ //声卡的私有数据,可以在创建声卡时通过参数指定数据的大小void (*private_free) (struct snd_card *card); /* callback for freeing ofprivate data */struct list_head devices;	/* devices */ //记录该声卡下所有逻辑设备的链表struct device ctl_dev;		/* control device */unsigned int last_numid;	/* last used numeric ID */struct rw_semaphore controls_rwsem;	/* controls list lock */rwlock_t ctl_files_rwlock;	/* ctl_files list lock */int controls_count;		/* count of all controls */int user_ctl_count;		/* count of all user controls */struct list_head controls;	/* all controls for this card */ //记录该声卡下所有控制单元的链表struct list_head ctl_files;	/* active control files */ //用于管理该card下的active的control设备struct snd_info_entry *proc_root;	/* root for soundcard specific files */struct snd_info_entry *proc_id;	/* the card id */struct proc_dir_entry *proc_root_link;	/* number link to real id */struct list_head files_list;	/* all files associated to this card */struct snd_shutdown_f_ops *s_f_ops; /* file operations in the shutdownstate */spinlock_t files_lock;		/* lock the files for this card */int shutdown;			/* this card is going down */struct completion *release_completion;struct device *dev;		/* device assigned to this card */ //和card相关的设备struct device card_dev;		/* cardX object for sysfs */ //card用于在sys中显示,用于代表该cardconst struct attribute_group *dev_groups[4]; /* assigned sysfs attr */bool registered;		/* card_dev is registered? */wait_queue_head_t remove_sleep;#ifdef CONFIG_PMunsigned int power_state;	/* power state */wait_queue_head_t power_sleep;
#endif#if IS_ENABLED(CONFIG_SND_MIXER_OSS)struct snd_mixer_oss *mixer_oss;int mixer_oss_change_count;
#endif
};
其中 snd_card 的 driver 字段保存着芯片的 ID 字符串,用户空间的 alsa-lib 会使用到该字符串,所以必须保证该 ID 的唯一性,shortname 字段更多地用于打印信息,longname 字段则会出现在 /proc/asound/cards 中。
2、声卡创建流程
1、创建 snd_card 实例
/***  snd_card_new - create and initialize a soundcard structure*  @parent: the parent device object*  @idx: card index (address) [0 ... (SNDRV_CARDS-1)]*  @xid: card identification (ASCII string)*  @module: top level module for locking*  @extra_size: allocate this extra size after the main soundcard structure*  @card_ret: the pointer to store the created card instance*  *  Creates and initializes a soundcard structure.*  *  The function allocates snd_card instance via kzalloc with the given*  space for the driver to use freely.  The allocated struct is stored*  in the given card_ret pointer.*  *  Return: Zero if successful or a negative error code.*/
int snd_card_new(struct device *parent, int idx, const char *xid,struct module *module, int extra_size,struct snd_card **card_ret);
通过如上描述的 snd_card_new() 函数可以创建一个声卡实例,参数 & 功能描述如上,api 主要 flow 如下,
snd_card_new--> 根据 extra_size 参数大小用 kzalloc 分配一个 snd_card,如果 extra_size > 0 则将 snd_card->private_data 指向 extra_size addr;--> 初始化 snd_card 结构体的必要字段,id、idx 及 card->card_dev;--> snd_ctl_create() # 建立逻辑设备:Control=> snd_device_new(SNDRV_DEV_CONTROL) # 填充 dev 字段,如 type,state,ops,dev_data=card,并将该 device insert 到 card->devices list 中。--> snd_info_card_create(card) # 建立 proc 文件中的 info 节点:通常就是 /proc/asound/card0
声卡的专用数据主要用于存放一些资源信息,例如中断资源、io资源、dma资源等,根据 extra_size 参数分有两种方式创建 snd_card,
- 1)内部分配,通过 snd_card_create 函数创建 private_data
// 创建 struct my_chip_priv 结构体
struct my_chip_priv {...
};// 创建 snd_card
snd_card_new(dev, idx, xid, THIS_MODULE, sizeof(my_chip_priv), &card);//从 snd_card->private_data 取数据
struct my_chip_priv *my_chip = card->private_data;
- 2)外部分配,自己创建 priv_buf,并将 snd_card->private_data 指向它
// 创建 struct my_chip_priv 结构体(内部成员包含 snd_card)
struct my_chip_priv {struct snd_card *card;...
};
struct snd_card *card;
struct my_chip_priv *my_chip;
// 手动创建
my_chip = kzalloc(sizeof(*chip), GFP_KERNEL);
// 创建 snd_card
snd_card_new(dev, idx, xid, THIS_MODULE, 0, &card);// 专用数据记录snd_card实例
my_chip->card = card;
2、设置 snd_card 的 Driver ID 和 Name
strcpy(card->driver, "My Chip");
strcpy(card->shortname, "My Own Chip 123");
sprintf(card->longname, "%s at 0x%lx irq %i", card->shortname, chip->ioport, chip->irq);
snd_card 的 driver 字段保存着芯片的 ID 字符串,user空间的 alsa-lib 会使用到该字符串,所以必须要保证该 ID 的唯一性。shortname 字段更多地用于打印信息,longname 字段则会出现在 /proc/asound/cards 中。
3、创建声卡的功能部件(逻辑设备)
还记得 snd_card 结构体中的 devices 字段吗?在注册声卡的时候会对该 devices 链表中的所有逻辑设备都进行注册,故在注册声卡前需要调用 snd_device_new() 来生成一个 snd_device 实例,并将该实例链接到 snd_card 的 devices 链表中。
通常,alsa-driver的已经提供了一些常用的部件的创建函数,而不必直接调用snd_device_new(),常见的如下:
PCM ---- snd_pcm_new()RAWMIDI -- snd_rawmidi_new()CONTROL -- snd_ctl_create()TIMER -- snd_timer_new()INFO -- snd_card_proc_new()JACK -- snd_jack_new()
API 详细见下方逻辑设备描述~
4、注册声卡
/***  snd_card_register - register the soundcard*  @card: soundcard structure**  This function registers all the devices assigned to the soundcard.*  Until calling this, the ALSA control interface is blocked from the*  external accesses.  Thus, you should call this function at the end*  of the initialization of the card.**  Return: Zero otherwise a negative error code if the registration failed.*/
int snd_card_register(struct snd_card *card);
注册声卡时需要 Call snd_card_register() 函数,如注释所述,该 api 内部会 register 所有 devices,关于该 API 的主要 Flow 如下:
snd_card_register--> device_add(&card->card_dev) 创建 /sys/devices 下的设备;--> snd_device_register_all(card) 通过 snd_card 的 devices 链表,遍历所有的 snd_device,并且调用 snd_device 的 ops->dev_register() 来实现格子设备的注册;
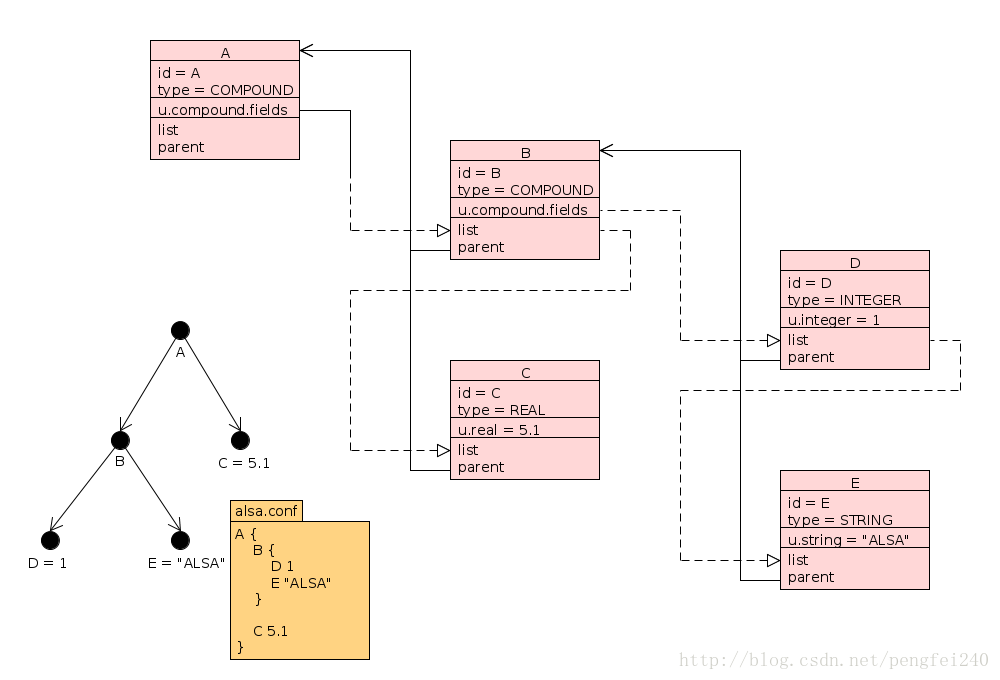
经过上述的创建声卡步骤后,声卡的逻辑结构则如下图所示:
3、声卡创建过程使用举例
/sound/arm/pxa2xx-ac97.c
三、声卡之 Pcm 设备
1、Pcm 设备简介
PCM 是英文 Pulse-code modulation 的缩写,中文译名是脉冲编码调制。PCM就是要把声音从模拟转换成数字信号的一种技术,简单的来说就是利用一个固定的频率对模拟信号进行采样,采样后的信号的幅值按一定的采样精度进行量化,量化后的数值被连续地输出、传输、处理或记录到存储介质中。

PCM 信号的两个重要指标是采样频率和量化精度,目前,CD音频的采样频率通常为 44100 Hz,量化精度是 16bit。通常,播放音乐时,用程序从存储介质中读取音频数据(MP3、WMA、AAC…),经过解码后,最终送到音频驱动程序中的就是PCM数据,反过来,在录音时,音频驱动不停地把采样所得的PCM数据送回给应用程序,由应用程序完成压缩、存储等任务。所以,音频驱动的两大核心任务就是:
playback如何把用户空间的应用程序发过来的PCM数据,转化为人耳可以辨别的模拟音频;capture把mic拾取到得模拟信号,经过采样、量化,转换为PCM信号送回给用户空间的应用程序。
2、ALSA Driver 的 Pcm 中间层
ALSA 已经实现了 Pcm 中间层,我们的驱动都是调用 pcm 相关 api,基本上只需要实现底层的需要访问硬件的函数即可。
<sound/pcm.h>提供访问 PCM 中间层代码的 API<sound/pcm_params.h>提供访问一些与 hw_param 相关的函数
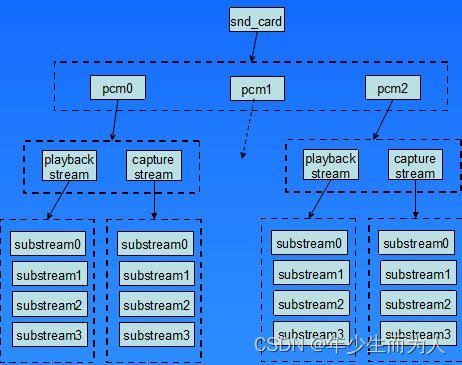
前面提到过声卡中挂载着 Pcm Device,Pcm 设备用 snd_pcm 结构体描述,一个 Pcm 实例下面有一个 playback & capture stream,针对 alsa asoc 都是 playback & capture 下各自只有一个 substream.
3、Pcm 设备创建
/*** snd_pcm_new - create a new PCM instance* @card: the card instance* @id: the id string* @device: the device index (zero based)* @playback_count: the number of substreams for playback* @capture_count: the number of substreams for capture* @rpcm: the pointer to store the new pcm instance** Creates a new PCM instance.** The pcm operators have to be set afterwards to the new instance* via snd_pcm_set_ops().** Return: Zero if successful, or a negative error code on failure.*/
int snd_pcm_new(struct snd_card *card, const char *id, int device,int playback_count, int capture_count, struct snd_pcm **rpcm);
/*** snd_pcm_new_internal - create a new internal PCM instance* @card: the card instance* @id: the id string* @device: the device index (zero based - shared with normal PCMs)* @playback_count: the number of substreams for playback* @capture_count: the number of substreams for capture* @rpcm: the pointer to store the new pcm instance** Creates a new internal PCM instance with no userspace device or procfs* entries. This is used by ASoC Back End PCMs in order to create a PCM that* will only be used internally by kernel drivers. i.e. it cannot be opened* by userspace. It provides existing ASoC components drivers with a substream* and access to any private data.** The pcm operators have to be set afterwards to the new instance* via snd_pcm_set_ops().** Return: Zero if successful, or a negative error code on failure.*/
int snd_pcm_new_internal(struct snd_card *card, const char *id, int device,int playback_count, int capture_count,struct snd_pcm **rpcm)
通过 snd_pcm_new() / snd_pcm_new_internal() 创建 Pcm 设备,如注释所述,internal api 则不会创建 dev 供外部访问,其主要 Flow 如下:
snd_pcm_new() / snd_pcm_new_internal() # 创建 Pcm 设备(是否可供外部访问)--> call _snd_pcm_new(internal = false/true)=> 分配 snd_pcm,填充 snd_pcm 字段,如 card,device,internal=> call snd_pcm_new_stream(SNDRV_PCM_STREAM_PLAYBACK, playback_count)==> 填充 pcm_streams[PLAYBACK]字段,如stream,substream_count==> dev_set_name( pcmC0Dxp )==>d for(substream_count) 分配 substream,填充 substream 字段,如 streams,number,stream等,并将所有的 substream 填充到 snd_pcm->snd_pcm_substream->substream 中。=> snd_pcm_new_stream(SNDRV_PCM_STREAM_CAPTURE) # 同 playback,略=> snd_device_new(SNDRV_DEV_PCM)==> 填充 dev 字段,如type,state,ops,dev_data=snd_pcm,并将该 device insert 到 card->device list 中。【其中根据 internal 差异会选择不同的 snd_dev_ops/internal_ops】
在注册声卡的时候会注册挂在该声卡下所有的 Device,对于 Pcm Device 则会 call 如下函数:
snd_pcm_dev_register()--> call snd_pcm_add(pcm) # 将 pcm 插入到全局链表 snd_pcm_devices--> call snd_register_device(SNDRV_DEVICE_TYPE_PCM_PLAYBACK/CAPTURE)=> 定义 & 分配 snd_minor 并填充字段,如 type,dev,f_ops = snd_pcm_f_ops[0:playback, 1:capture],private_data=snd_pcm(在 open 时会取 private_data)=> 创建 /dev/snd/pcmC0Dxp & pcmC0Dxc 字符设备,并根据 minor 次设备号保存在 snd_minor[minor] 中(如前面所述,在 snd_open 时会根据 minor 拿到这里保存的 snd_minor[minor],并替换 f_ops=snd_pcm_f_ops)至此,Pcm Device 则已经创建。
四、声卡之 Control 设备
1、Control 设备简介
Control 接口主要让用户空间的应用程序(alsa-lib/tinyalsa)可以访问和控制音频 codec 芯片中的多路开关,滑动控件等。常见的 control 控件有 Mixer,Mux,Demux 等。
<sound/control.h> 定义了所有的 Control API. 如果你要为你的codec实现自己的controls,请在代码中包含该头文件。
2、Control 设备的建立
Control设备和PCM设备一样,都属于声卡下的逻辑设备。用户空间的应用程序通过alsa-lib访问该Control设备,读取或控制control的控制状态,从而达到控制音频Codec进行各种Mixer等控制操作。
Control设备的创建过程大体上和PCM设备的创建过程相同。对于创建 Pcm 设备只需要在驱动初始化时主动调用 snd_pcm_new() 函数创建,而 control 设备则用 snd_ctl_create() 创建。不过由于 snd_card_create() 函数中已经会调用 snd_ctl_create() 函数创建 control 设备节点,故我们无需显示地创建 control 设备,只要建立声卡,control 设备则被自动地创建。
和 Pcm Device 一样,在注册声卡的时候会注册挂在该声卡下所有的 Device,对于 Control Device 则会 call 如下函数:
snd_ctl_dev_register()
--> call snd_register_devices(SNDRV_DEVICE_TYPE_CONTROL)=> 定义 & 分配 snd_minor 并填充字段,如 type,device,f_ops=snd_ctl_f_ops,private_data=card(在 open 时会取 private_data)=> 创建 /dev/snd/ControlCx 字符设备,并根据 minor 次设备号保存在 snd_minor[minor] 中(如前面所述,在 snd_open 时会根据 minor 拿到这里保存的 snd_minor[minor],并替换 f_ops=snd_ctl_f_ops)
3、Controls 的创建
当用户空间需要控制某个控件,如 mixer 等,我们必须要将该控件定位为 control,使得用户空间可以访问控制,Controls 的创建步骤如下:
(1)定义一个 snd_kcontrol_new 实例;
(2)通过 snd_ctl_new1() 分配 snd_kcontrol 对象,并将 snd_kcontrol_new 对象相应的值复制到该实例中;
(3)通过 snd_ctl_add(card, kcontrol) 将 snd_kcontrol 添加到 card->controls list 中。
(1)snd_kcontrol_new 的定义
要自定义一个Control,我们首先要定义3各回调函数:info,get 和 put。然后,定义一个 snd_kcontrol_new 结构:
static struct snd_kcontrol_new my_control __devinitdata = {.iface = SNDRV_CTL_ELEM_IFACE_MIXER,.name = "PCM Playback Switch",.index = 0,.access = SNDRV_CTL_ELEM_ACCESS_READWRITE,.private_value = 0xffff,.info = my_control_info,.get = my_control_get,.put = my_control_put
};
iface 字段指出了 control 的类型,alsa定义了几种类型(SNDDRV_CTL_ELEM_IFACE_XXX),常用的类型是 MIXER,当然也可以定义属于全局的 CARD 类型,也可以定义属于某类设备的类型,例如 HWDEP,PCMRAWMIDI,TIMER 等,这时需要在 device 和 subdevice 字段中指出卡的设备逻辑编号。
name 字段是该 control 的名字,从ALSA 0.9.x开始,control 的名字是变得比较重要,因为 control 的作用是按名字来归类的。ALSA 已经预定义了一些 control 的名字,我们在后面的章节中会详细讨论。
index 字段用于保存该 control 的在该卡中的编号。如果声卡中有不止一个 codec,每个 codec 中有相同名字的 control,这时我们可以通过index 来区分这些 controls。当 index 为 0 时,则可以忽略这种区分策略。
access 字段包含了该control的访问类型。每一个 bit 代表一种访问类型,这些访问类型可以多个“或”运算组合在一起。
private_value 字段包含了一个任意的长整数类型值。该值可以通过info,get,put 这几个回调函数访问。你可以自己决定如何使用该字段。例如可以把它拆分成多个位域,又或者是一个指针,指向某一个数据结构。
tlv字段为该control提供元数据。
Control的名字
control 的名字需要遵循一些标准,通常可以分成 3 部分来定义 control 的名字:源–方向–功能。
- 源:可以理解为该control的输入端,alsa 已经预定义了一些常用的源,例如:Master,PCM,CD,Line等等.。
- 方向:代表该control的数据流向,例如:Playback,Capture,Bypass,Bypass Capture 等等,也可以不定义方向,这时表示该Control 是双向的( playback 和 capture )。
- 功能:根据 control 的功能,可以是以下字符串:Switch,Volume,Route 等等。
也有一些命名上的特例:
-
全局的 capture 和 playback“Capture Source”,“Capture Volume”,“Capture Switch”,它们用于全局的 capture source,switch 和 volume。同理,“Playback Volume”,“Playback Switch”,它们用于全局的输出 switch 和 volume。 -
Tone-controles音调控制的开关和音量命名为:Tone Control - XXX,例如。“Tone Control - Switch”,“Tone Control - Bass”,“Tone Control - Center”. -
3D controls3D控件的命名规则:“3D Control - Switch”,“3D Control - Center”,“3D Control - Space”. -
Mic boost麦克风音量加强控件命名为:“Mic Boost” 或 “Mic Boost(6dB)”.
访问标志(ACCESS Flags)
Access字段是一个 bitmask,它保存了该 control 的访问类型。默认的访问类型是:SNDDRV_CTL_ELEM_ACCESS_READWRITE,表明该 control 支持读和写操作。如果 access 字段没有定义(.access==0),此时也认为是 READWRITE 类型。
如果是一个只读 control,access 应该设置为:SNDDRV_CTL_ELEM_ACCESS_READ,这时,我们不必定义 put 回调函数。类似地,如果是只写 control,access 应该设置为:SNDDRV_CTL_ELEM_ACCESS_WRITE,这时,我们不必定义 get 回调函数。
如果control的值会频繁地改变(例如:电平表),我们可以使用VOLATILE 类型,这意味着该 control 会在没有通知的情况下改变,应用程序应该定时地查询该control的值。
回调函数
info 回调函数用于获取control的详细信息。它的主要工作就是填充通过参数传入的 snd_ctl_elem_info 对象,以下例子是一个具有单个元素的 boolean 型 control 的 info 回调:
static int snd_myctl_mono_info(struct snd_kcontrol *kcontrol,struct snd_ctl_elem_info *uinfo)
{uinfo->type = SNDRV_CTL_ELEM_TYPE_BOOLEAN;uinfo->count = 1;uinfo->value.integer.min = 0;uinfo->value.integer.max = 1;return 0;
}
type 字段指出该 control 的值类型,值类型可以是 BOOLEAN,INTEGER,ENUMERATED,BYTES,IEC958 和 INTEGER64 之一。
count 字段指出了该 control 中包含有多少个元素单元,比如,立体声的音量 control 左右两个声道的音量值,它的 count 字段等于2。
value 字段是一个联合体(union),value 的内容和 control 的类型有关。其中,boolean 和 integer 类型是相同的。
ENUMERATED 类型有些特殊。它的 value 需要设定一个字符串和字符串的索引,请看以下例子:
static int snd_myctl_enum_info(struct snd_kcontrol *kcontrol,
struct snd_ctl_elem_info *uinfo)
{static char *texts[4] = {"First", "Second", "Third", "Fourth"};uinfo->type = SNDRV_CTL_ELEM_TYPE_ENUMERATED;uinfo->count = 1;uinfo->value.enumerated.items = 4;if (uinfo->value.enumerated.item > 3)uinfo->value.enumerated.item = 3;strcpy(uinfo->value.enumerated.name,texts[uinfo->value.enumerated.item]);return 0;
}
alsa 已经为我们实现了一些通用的 info 回调函数,例如:snd_ctl_boolean_mono_info(),snd_ctl_boolean_stereo_info() 等等。
get 回调函数用于读取 control 的当前值,并返回给用户空间的应用程序。
static int snd_myctl_get(struct snd_kcontrol *kcontrol,struct snd_ctl_elem_value *ucontrol)
{struct mychip *chip = snd_kcontrol_chip(kcontrol);ucontrol->value.integer.value[0] = get_some_value(chip);return 0;
}
value 字段的赋值依赖于 control 的类型(如同 info 回调)。很多声卡的驱动利用它存储硬件寄存器的地址、bit-shift 和 bit-mask,这时,private_value 字段可以按以下例子进行设置:
private_value = reg | (shift << 16) | (mask << 24);
然后,get 回调函数可以这样实现:
static int snd_sbmixer_get_single(struct snd_kcontrol *kcontrol,struct snd_ctl_elem_value *ucontrol){int reg = kcontrol->private_value & 0xff;int shift = (kcontrol->private_value >> 16) & 0xff;int mask = (kcontrol->private_value >> 24) & 0xff;....//根据以上的值读取相应寄存器的值并填入value中
}
如果 control 的 count 字段大于1,表示 control 有多个元素单元,get回调函数也应该为 value 填充多个数值。
put 回调函数用于把应用程序的控制值设置到 control 中。
static int snd_myctl_put(struct snd_kcontrol *kcontrol,struct snd_ctl_elem_value *ucontrol)
{struct mychip *chip = snd_kcontrol_chip(kcontrol);int changed = 0;if (chip->current_value !=ucontrol->value.integer.value[0]) {change_current_value(chip,ucontrol->value.integer.value[0]);changed = 1;}return changed;
}
如上述例子所示,当 control 的值被改变时,put 回调必须要返回1,如果值没有被改变,则返回0。如果发生了错误,则返回一个负数的错误号。
和 get 回调一样,当 control 的 count 大于1时,put 回调也要处理多个 control 中的元素值。
(2)创建 Controls
当把以上讨论的内容都准备好了以后,我们就可以创建我们自己的control 了。alsa-driver 为我们提供了两个用于创建 control 的API:
snd_ctl_new1()
snd_ctl_add()
我们可以用以下最简单的方式创建 control:
err = snd_ctl_add(card, snd_ctl_new1(&my_control, chip));
if (err < 0)return err;
在这里,my_control 是一个之前定义好的 snd_kcontrol_new 对象,chip 对象将会被赋值在 kcontrol->private_data 字段,该字段可以在回调函数中访问。
snd_ctl_new1() 会分配一个新的 snd_kcontrol 实例,并把 my_control中相应的值复制到该实例中,所以,在定义 my_control 时,通常我们可以加上 __devinitdata 前缀。snd_ctl_add 则把该 control 绑定到声卡对象 card 当中。
snd_ctl_new1(snd_kcontrol_new)
--> 定义 snd_kcontrol,call snd_ctl_new(&snd_control)=> 根据 count 给 snd_kcontrol 分配空间,并填充 kcontrol 参数,如 vd[idx],access,count 等--> 将 snd_kcontrol_new 中相应的值复制到 snd_control.
snd_ctl_add(card, snd_kcontrol)
--> call __snd_ctl_add(card, snd_kcontrol)=> 根据 kcontrol->id find card->controls 是否已经有添加,对于新的 snd_kcontrol 则添加到 card->controls list 中,更新 card->controls_count 等参数.
参考链接:
https://www.cnblogs.com/xinghuo123/category/1786302.html?page=2