目录
- 概述
- graph cut
- Alpha Matting
概述
对于抠图,比较简单的方法是图像分割,这是很老的方法,但这其实算不上真正意义的抠图,因为他的主要目的是用于图像之间块与块的分割。典型的就是grabcut算法,opencv上面有相应的优化好的算法。还有一种就是对于前后景的分割,叫做Alpha Matting,这是抠图的主要实现方法,好的算法对头发丝也能处理得很好,最近主要实现了2010年的一篇论文《Shared Sampling for Real-Time Alpha Matting》,这是比较出名的效果比较好的经典前后景分割算法。
graph cut
这部分原理不是很麻烦,网上随便一搜就能搜到。这里主要借助opencv的接口函数grabcut去实现。grabcut是在graph cut基础上改进的一种图像分割算法,网上有很多grabcut方面的论文,opencv的grabcut算法也是在此基础上优化封装的。这种方法的实现,需要人工交互框出一个矩形表示待处理的区域,矩形外都被视为背景,还可以在人工交互上用画笔绘画,绘画区域表示前景或者后景。
代码如下:
#include <iostream>
#include <opencv2\opencv.hpp>
#include <opencv2/core/core.hpp>
#include<opencv2/highgui/highgui.hpp>
#include "opencv2/imgproc/imgproc.hpp"using namespace std;
using namespace cv;static void help()
{cout << "\nThis program demonstrates GrabCut segmentation -- select an object in a region\n""and then grabcut will attempt to segment it out.\n""Call:\n""./grabcut <image_name>\n""\nSelect a rectangular area around the object you want to segment\n" <<"\nHot keys: \n""\tESC - quit the program\n""\tr - restore the original image\n""\tn - next iteration\n""\n""\tleft mouse button - set rectangle\n""\n""\tCTRL+left mouse button - set GC_BGD pixels\n""\tSHIFT+left mouse button - set CG_FGD pixels\n""\n""\tCTRL+right mouse button - set GC_PR_BGD pixels\n""\tSHIFT+right mouse button - set CG_PR_FGD pixels\n" << endl;
}const Scalar RED = Scalar(0, 0, 255);
const Scalar PINK = Scalar(230, 130, 255);
const Scalar BLUE = Scalar(255, 0, 0);
const Scalar LIGHTBLUE = Scalar(255, 255, 160);
const Scalar GREEN = Scalar(0, 255, 0);const int BGD_KEY = CV_EVENT_FLAG_CTRLKEY;  //Ctrl键
const int FGD_KEY = CV_EVENT_FLAG_SHIFTKEY; //Shift键static void getBinMask(const Mat& comMask, Mat& binMask)
{if (comMask.empty() || comMask.type() != CV_8UC1)CV_Error(CV_StsBadArg, "comMask is empty or has incorrect type (not CV_8UC1)");if (binMask.empty() || binMask.rows != comMask.rows || binMask.cols != comMask.cols)binMask.create(comMask.size(), CV_8UC1);binMask = comMask & 1;  //得到mask的最低位,实际上是只保留确定的或者有可能的前景点当做mask
}class GCApplication
{
public:enum{ NOT_SET = 0, IN_PROCESS = 1, SET = 2 };static const int radius = 2;static const int thickness = -1;void reset();void setImageAndWinName(const Mat& _image, const string& _winName);void showImage() const;void mouseClick(int event, int x, int y, int flags, void* param);int nextIter();int getIterCount() const { return iterCount; }
private:void setRectInMask();void setLblsInMask(int flags, Point p, bool isPr);const string* winName;const Mat* image;Mat mask;Mat bgdModel, fgdModel;uchar rectState, lblsState, prLblsState;bool isInitialized;Rect rect;vector<Point> fgdPxls, bgdPxls, prFgdPxls, prBgdPxls;int iterCount;
};/*给类的变量赋值*/
void GCApplication::reset()
{if (!mask.empty())mask.setTo(Scalar::all(GC_BGD));bgdPxls.clear(); fgdPxls.clear();prBgdPxls.clear();  prFgdPxls.clear();isInitialized = false;rectState = NOT_SET;    //NOT_SET == 0lblsState = NOT_SET;prLblsState = NOT_SET;iterCount = 0;
}/*给类的成员变量赋值而已*/
void GCApplication::setImageAndWinName(const Mat& _image, const string& _winName)
{if (_image.empty() || _winName.empty())return;image = &_image;winName = &_winName;mask.create(image->size(), CV_8UC1);reset();
}/*显示4个点,一个矩形和图像内容,因为后面的步骤很多地方都要用到这个函数,所以单独拿出来*/
void GCApplication::showImage() const
{if (image->empty() || winName->empty())return;Mat res;Mat binMask;if (!isInitialized)image->copyTo(res);else{getBinMask(mask, binMask);image->copyTo(res, binMask);  //按照最低位是0还是1来复制,只保留跟前景有关的图像,比如说可能的前景,可能的背景}vector<Point>::const_iterator it;/*下面4句代码是将选中的4个点用不同的颜色显示出来*/for (it = bgdPxls.begin(); it != bgdPxls.end(); ++it)  //迭代器可以看成是一个指针circle(res, *it, radius, BLUE, thickness);for (it = fgdPxls.begin(); it != fgdPxls.end(); ++it)  //确定的前景用红色表示circle(res, *it, radius, RED, thickness);for (it = prBgdPxls.begin(); it != prBgdPxls.end(); ++it)circle(res, *it, radius, LIGHTBLUE, thickness);for (it = prFgdPxls.begin(); it != prFgdPxls.end(); ++it)circle(res, *it, radius, PINK, thickness);/*画矩形*/if (rectState == IN_PROCESS || rectState == SET)rectangle(res, Point(rect.x, rect.y), Point(rect.x + rect.width, rect.y + rect.height), GREEN, 2);imshow(*winName, res);
}/*该步骤完成后,mask图像中rect内部是3,外面全是0*/
void GCApplication::setRectInMask()
{assert(!mask.empty());mask.setTo(GC_BGD);   //GC_BGD == 0rect.x = max(0, rect.x);rect.y = max(0, rect.y);rect.width = min(rect.width, image->cols - rect.x);rect.height = min(rect.height, image->rows - rect.y);(mask(rect)).setTo(Scalar(GC_PR_FGD));    //GC_PR_FGD == 3,矩形内部,为可能的前景点
}void GCApplication::setLblsInMask(int flags, Point p, bool isPr)
{vector<Point> *bpxls, *fpxls;uchar bvalue, fvalue;if (!isPr) //确定的点{bpxls = &bgdPxls;fpxls = &fgdPxls;bvalue = GC_BGD;    //0fvalue = GC_FGD;    //1}else    //概率点{bpxls = &prBgdPxls;fpxls = &prFgdPxls;bvalue = GC_PR_BGD; //2fvalue = GC_PR_FGD; //3}if (flags & BGD_KEY){bpxls->push_back(p);circle(mask, p, radius, bvalue, thickness);   //该点处为2}if (flags & FGD_KEY){fpxls->push_back(p);circle(mask, p, radius, fvalue, thickness);   //该点处为3}
}/*鼠标响应函数,参数flags为CV_EVENT_FLAG的组合*/
void GCApplication::mouseClick(int event, int x, int y, int flags, void*)
{// TODO add bad args checkswitch (event){case CV_EVENT_LBUTTONDOWN: // set rect or GC_BGD(GC_FGD) labels{bool isb = (flags & BGD_KEY) != 0,isf = (flags & FGD_KEY) != 0;if (rectState == NOT_SET && !isb && !isf)//只有左键按下时{rectState = IN_PROCESS; //表示正在画矩形rect = Rect(x, y, 1, 1);}if ((isb || isf) && rectState == SET) //按下了alt键或者shift键,且画好了矩形,表示正在画前景背景点lblsState = IN_PROCESS;}break;case CV_EVENT_RBUTTONDOWN: // set GC_PR_BGD(GC_PR_FGD) labels{bool isb = (flags & BGD_KEY) != 0,isf = (flags & FGD_KEY) != 0;if ((isb || isf) && rectState == SET) //正在画可能的前景背景点prLblsState = IN_PROCESS;}break;case CV_EVENT_LBUTTONUP:if (rectState == IN_PROCESS){rect = Rect(Point(rect.x, rect.y), Point(x, y));   //矩形结束rectState = SET;setRectInMask();assert(bgdPxls.empty() && fgdPxls.empty() && prBgdPxls.empty() && prFgdPxls.empty());showImage();}if (lblsState == IN_PROCESS)   //已画了前后景点{setLblsInMask(flags, Point(x, y), false);    //画出前景点lblsState = SET;showImage();}break;case CV_EVENT_RBUTTONUP:if (prLblsState == IN_PROCESS){setLblsInMask(flags, Point(x, y), true); //画出背景点prLblsState = SET;showImage();}break;case CV_EVENT_MOUSEMOVE:if (rectState == IN_PROCESS){rect = Rect(Point(rect.x, rect.y), Point(x, y));assert(bgdPxls.empty() && fgdPxls.empty() && prBgdPxls.empty() && prFgdPxls.empty());showImage();    //不断的显示图片}else if (lblsState == IN_PROCESS){setLblsInMask(flags, Point(x, y), false);showImage();}else if (prLblsState == IN_PROCESS){setLblsInMask(flags, Point(x, y), true);showImage();}break;}
}/*该函数进行grabcut算法,并且返回算法运行迭代的次数*/
int GCApplication::nextIter()
{if (isInitialized)//使用grab算法进行一次迭代,参数2为mask,里面存的mask位是:矩形内部除掉那些可能是背景或者已经确定是背景后的所有的点,且mask同时也为输出//保存的是分割后的前景图像grabCut(*image, mask, rect, bgdModel, fgdModel, 1);else{if (rectState != SET)return iterCount;if (lblsState == SET || prLblsState == SET)grabCut(*image, mask, rect, bgdModel, fgdModel, 1, GC_INIT_WITH_MASK);elsegrabCut(*image, mask, rect, bgdModel, fgdModel, 1, GC_INIT_WITH_RECT);isInitialized = true;}iterCount++;bgdPxls.clear(); fgdPxls.clear();prBgdPxls.clear(); prFgdPxls.clear();return iterCount;
}GCApplication gcapp;static void on_mouse(int event, int x, int y, int flags, void* param)
{gcapp.mouseClick(event, x, y, flags, param);
}int main(int argc, char** argv)
{string filename = "input.png";Mat image = imread(filename, 1);if (image.empty()){cout << "\n Durn, couldn't read image filename " << filename << endl;return 1;}help();const string winName = "image";cvNamedWindow(winName.c_str(), CV_WINDOW_AUTOSIZE);cvSetMouseCallback(winName.c_str(), on_mouse, 0);gcapp.setImageAndWinName(image, winName);gcapp.showImage();clock_t start, end;for (;;){char c = cvWaitKey(0);switch ((char)c){case '\x1b':cout << "Exiting ..." << endl;goto exit_main;case 'r':cout << endl;gcapp.reset();gcapp.showImage();break;case 'n':int iterCount = gcapp.getIterCount();//cout << "<" << iterCount << "... ";start = clock();int newIterCount = gcapp.nextIter();end = clock();double endtime = (double)(end - start) / CLOCKS_PER_SEC;cout << "NO." << newIterCount << ": " << endtime * 1000  << "ms" << endl;if (newIterCount > iterCount){gcapp.showImage();//cout << newIterCount << ">" << endl;}elsecout << "rect must be determined>" << endl;break;}}exit_main:cvDestroyWindow(winName.c_str());return 0;
}
代码很简单,使用方法都有注释。核心就是grabcut函数。
下面是运行结果:
输入:

输出:

耗时:

No.1-No.7分别表示算法多次迭代,每次迭代的耗时,迭代次数越多,每次添加新的前后景标志的话,抠图效果会更好。可以看出这种算法的时间效果不太好。
Alpha Matting
这个算法是重点想介绍和实现的。主要实现了2010年的一篇论文《Shared Sampling for Real-Time Alpha Matting》,这是比较出名的效果比较好的经典前后景分割算法。
总结的手稿贴出一下:

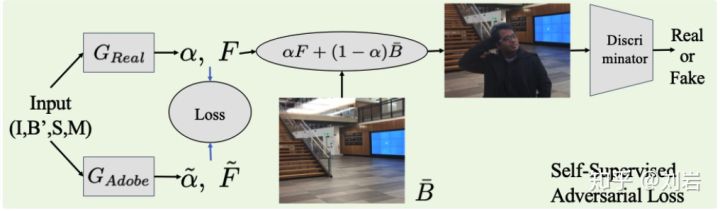
Alpha matting算法研究的是如何将一幅图像中的前景信息和背景信息分离的问题,即抠图。我们把图像I分割成一个前景对象图像F,一个背景图像B和一个alpha matte α,于是就有了digital matting的数学定义: I=α×F+(1-α)×B。
算法的输入:原始图片,三分图(trimap)或“乱画图”(scribble)。
《Shared Sampling for Real-Time Alpha Matting》这篇论文中算法大致步骤如下:
(1)Expansion,针对用户的输入,对已知区域(前景或背景)进行小规模的扩展;
(2)Sample and Gather,对剩余的未知区域内的每个点按一定的规则取样,并选择出最佳的一对前景和背景取样点;
(3)Refinement,在一定的领域范围内,对未知区域内的每个点的最佳配对重新进行组合。
(4)Local Smoothing,对得到的前景和背景对以及透明度值进行局部平滑,以减少噪音。
关于这篇论文的源码给出下载地址:code
关于这篇论文的数据下载及论文原文地址:Shared Sampling for Real-Time Alpha Matting
不过下载下来后运行的时候出了一点小问题,主要就是mat、cvmat、IplImage之间数据传递的问题,把他们统一改成mat类型就没问题了。
下面是运行结果:
输入:


输出:

耗时:

可以看到使用它的数据效果还是很好,不过他也有缺点,就是应用的抠图场合的背景应该比较简单。


![[Matting]论文阅读:Deep Image Matting 详细解读](https://img-blog.csdnimg.cn/20210428154141153.png?x-oss-process=image/watermark,type_ZmFuZ3poZW5naGVpdGk,shadow_10,text_aHR0cHM6Ly9ibG9nLmNzZG4ubmV0L1h4eExpdHRsZU9uZQ==,size_16,color_FFFFFF,t_70)