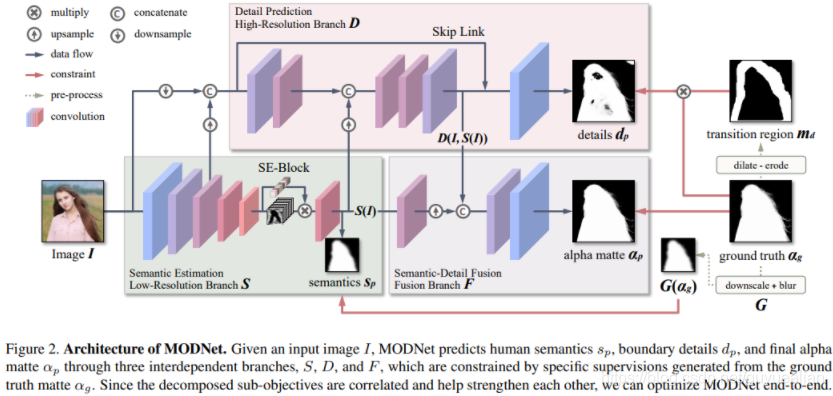
上一篇博客【Matting】MODNet:实时人像抠图模型-笔记分析了MODNet的原理,本篇博客将使用python部署MODNet官方提供的onnx模型,其效果如下:
在线人像抠图体验:CV案例
相关部署链接:
【Matting】MODNet:实时人像抠图模型-onnx C++部署
NCNN量化部署链接(模型大小仅为1/4):
【Matting】MODNet:实时人像抠图模型-NCNN C++量化部署
本文完整的代码:modnet onnx python部署


好了,废话不多说,正式开始。
一、下载onnx模型
首先,下载官方提供的onnx模型,官方的repo地址:https://github.com/ZHKKKe/MODNet.git,在onnx文件夹下有下载链接,这里就不给出来了。
二、部署
主要实现了图片抠图、摄像头抠图、视频抠图3个功能,代码如下(文章开头给出了可直接运行的带权重的压缩包):
PS:运行速度和电脑性能有关,可以修改代码使用GPU加速
import cv2
import time
from tqdm import tqdm
import numpy as np
import onnxruntime as rtclass Matting:def __init__(self, model_path='onnx_model\modnet.onnx', input_size=(512, 512)):self.model_path = model_pathself.sess = rt.InferenceSession(self.model_path)self.input_name = self.sess.get_inputs()[0].nameself.label_name = self.sess.get_outputs()[0].nameself.input_size = input_sizeself.txt_font = cv2.FONT_HERSHEY_PLAINdef normalize(self, im, mean=[0.5, 0.5, 0.5], std=[0.5, 0.5, 0.5]):im = im.astype(np.float32, copy=False) / 255.0im -= meanim /= stdreturn imdef resize(self, im, target_size=608, interp=cv2.INTER_LINEAR):if isinstance(target_size, list) or isinstance(target_size, tuple):w = target_size[0]h = target_size[1]else:w = target_sizeh = target_sizeim = cv2.resize(im, (w, h), interpolation=interp)return imdef preprocess(self, image, target_size=(512, 512), interp=cv2.INTER_LINEAR):image = self.normalize(image)image = self.resize(image, target_size=target_size, interp=interp)image = np.transpose(image, [2, 0, 1])image = image[None, :, :, :]return imagedef predict_frame(self, bgr_image):assert len(bgr_image.shape) == 3, "Please input RGB image."raw_image = cv2.cvtColor(bgr_image, cv2.COLOR_BGR2RGB)h, w, c = raw_image.shapeimage = self.preprocess(raw_image, target_size=self.input_size)pred = self.sess.run([self.label_name],{self.input_name: image.astype(np.float32)})[0]pred = pred[0, 0]matte_np = self.resize(pred, target_size=(w, h), interp=cv2.INTER_NEAREST)matte_np = np.expand_dims(matte_np, axis=-1)return matte_npdef predict_image(self, source_image_path, save_image_path):bgr_image = cv2.imread(source_image_path)assert len(bgr_image.shape) == 3, "Please input RGB image."matte_np = self.predict_frame(bgr_image)matting_frame = matte_np * bgr_image + (1 - matte_np) * np.full(bgr_image.shape, 255.0)matting_frame = matting_frame.astype('uint8')cv2.imwrite(save_image_path, matting_frame)def predict_camera(self):cap_video = cv2.VideoCapture(0)if not cap_video.isOpened():raise IOError("Error opening video stream or file.")beg = time.time()count = 0while cap_video.isOpened():ret, raw_frame = cap_video.read()if ret:count += 1matte_np = self.predict_frame(raw_frame)matting_frame = matte_np * raw_frame + (1 - matte_np) * np.full(raw_frame.shape, 255.0)matting_frame = matting_frame.astype('uint8')end = time.time()fps = round(count / (end - beg), 2)if count >= 50:count = 0beg = endcv2.putText(matting_frame, "fps: " + str(fps), (20, 20), self.txt_font, 2, (0, 0, 255), 1)cv2.imshow('Matting', matting_frame)if cv2.waitKey(1) & 0xFF == ord('q'):breakelse:breakcap_video.release()cv2.destroyWindow()def check_video(self, src_path, dst_path):cap1 = cv2.VideoCapture(src_path)fps1 = int(cap1.get(cv2.CAP_PROP_FPS))number_frames1 = cap1.get(cv2.CAP_PROP_FRAME_COUNT)cap2 = cv2.VideoCapture(dst_path)fps2 = int(cap2.get(cv2.CAP_PROP_FPS))number_frames2 = cap2.get(cv2.CAP_PROP_FRAME_COUNT)assert fps1 == fps2 and number_frames1 == number_frames2, "fps or number of frames not equal."def predict_video(self, video_path, save_path, threshold=2e-7):# 使用odf策略time_beg = time.time()pre_t2 = None  # 前2步mattepre_t1 = None  # 前1步mattecap = cv2.VideoCapture(video_path)fps = int(cap.get(cv2.CAP_PROP_FPS))size = (int(cap.get(cv2.CAP_PROP_FRAME_WIDTH)),int(cap.get(cv2.CAP_PROP_FRAME_HEIGHT)))number_frames = cap.get(cv2.CAP_PROP_FRAME_COUNT)print("source video fps: {}, video resolution: {}, video frames: {}".format(fps, size, number_frames))videoWriter = cv2.VideoWriter(save_path, cv2.VideoWriter_fourcc('I', '4', '2', '0'), fps, size)ret, frame = cap.read()with tqdm(range(int(number_frames))) as t:for c in t:matte_np = self.predict_frame(frame)if pre_t2 is None:pre_t2 = matte_npelif pre_t1 is None:pre_t1 = matte_np# 第一帧写入matting_frame = pre_t2 * frame + (1 - pre_t2) * np.full(frame.shape, 255.0)videoWriter.write(matting_frame.astype('uint8'))else:# odferror_interval = np.mean(np.abs(pre_t2 - matte_np))error_neigh = np.mean(np.abs(pre_t1 - pre_t2))if error_interval < threshold < error_neigh:pre_t1 = pre_t2matting_frame = pre_t1 * frame + (1 - pre_t1) * np.full(frame.shape, 255.0)videoWriter.write(matting_frame.astype('uint8'))pre_t2 = pre_t1pre_t1 = matte_npret, frame = cap.read()# 最后一帧写入matting_frame = pre_t1 * frame + (1 - pre_t1) * np.full(frame.shape, 255.0)videoWriter.write(matting_frame.astype('uint8'))cap.release()print("video matting over, time consume: {}, fps: {}".format(time.time() - time_beg, number_frames / (time.time() - time_beg)))if __name__ == '__main__':model = Matting(model_path='onnx_model\modnet.onnx', input_size=(512, 512))# model.predict_camera()model.predict_image('images\\1.jpeg', 'output\\1.png')model.predict_image('images\\2.jpeg', 'output\\2.png')model.predict_image('images\\3.jpeg', 'output\\3.png')model.predict_image('images\\4.jpeg', 'output\\4.png')# model.predict_video("video\dance.avi", "output\dance_matting.avi")
三、效果


![[Matting]论文阅读:Deep Image Matting 详细解读](https://img-blog.csdnimg.cn/20210428154141153.png?x-oss-process=image/watermark,type_ZmFuZ3poZW5naGVpdGk,shadow_10,text_aHR0cHM6Ly9ibG9nLmNzZG4ubmV0L1h4eExpdHRsZU9uZQ==,size_16,color_FFFFFF,t_70)


