Image Matting: 图像抠图技术是指从静态图像或者视频序列中抽取感兴趣目标的过程,在ps和视频编辑中有重要的应用。
1.Image Matting
Matting 技术可以表示为下面的图,与语义分割不同,它可以针对感兴趣前景物体进行细节处理、包括细微的毛发和透明的物体等。
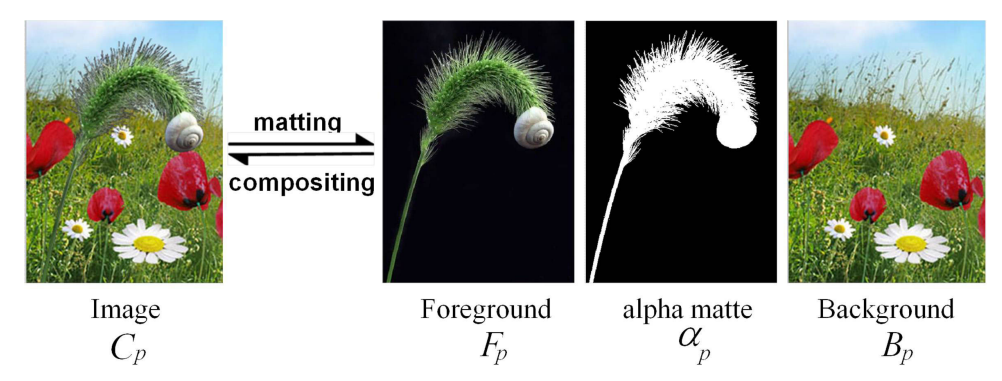
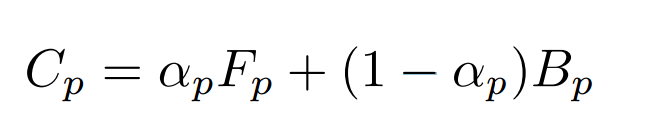
其公式可以表示为前景、掩膜与背景三者间的关系(如果 α p \alpha_p αp在0~1范围内,公式表示matting/composition问题,需要考虑透明度;如果 α p \alpha_p αp为二值化的0/1,则称为了分割问题。):
matting技术主要包括了交互式抠图、幕布抠图和基于学习的抠图(参考:What’s the Role of Image Matting in Image Segmentation?):

2.Deep Image Matting
而随着深度学习技术的发展研究人员也提出了基于深度学习方法解决图像抠图问题的方案,英伟达的Deep Image Matting就是其中的代表(下图中skip层没有画出来*):
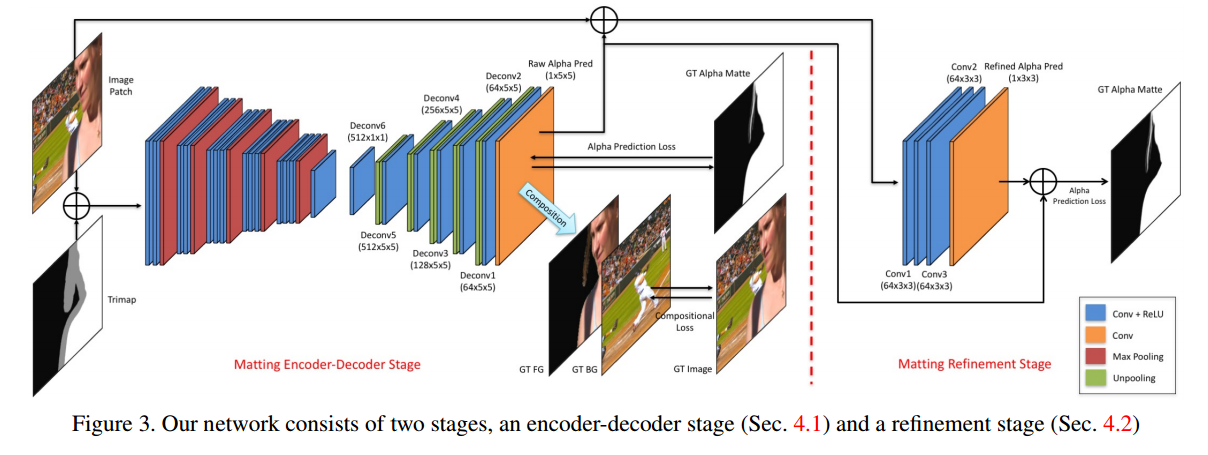
研究人员利用低层级和高层级的信息,利用原图和trimap作为输入得到粗糙的alpha通道map,随后利用一个小的卷积来优化得到更精细的matting结果,同时得到mask的alpha损失。其中还用前景瑜背景进行合成与原图进行比较得到图像组合损失。损失函数的定义如下:
一个是预测蒙版alpha与基准的损失:
L α i = ( a p i − a g i ) + ϵ 2 L_\alpha^i = \sqrt{(a_p^i-a_g^i)+\epsilon^2} Lαi=(api−agi)+ϵ2
另一个是预测出matting 与基准前景、基准背景合成的图像与输入之间的损失:
L α i = ( c p i − c g i ) + ϵ 2 L_\alpha^i = \sqrt{(c_p^i-c_g^i)+\epsilon^2} Lαi=(cpi−cgi)+ϵ2
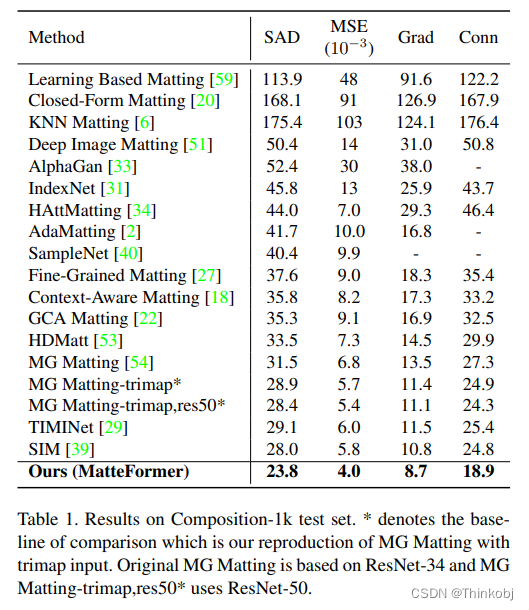
训练中的数据集来自于http://alphamatting.com/和研究人员自己提出的Composition-1k数据集。
这种方法的结果与其他相比如下:
2.2 代码实现
对于DeepImageMatting中,这里有一份基于Keras的实现:
首先构建了编码器和解码器架构,以及对应的优化模块。可以参照前文的图像理解,编解码部分各包含了五组操作模块。。
# copy from:https://github.com/foamliu/Deep-Image-Matting/blob/master/model.py
def build_encoder_decoder():# Encoder#--------------------编码器部分----------------------------### 根据架构图,编码与解码器各有五个操作组,编码器包括卷积和最大池化,解码器包括卷积和解卷积上采样input_tensor = Input(shape=(320, 320, 4))x = ZeroPadding2D((1, 1))(input_tensor)x = Conv2D(64, (3, 3), activation='relu', name='conv1_1')(x)x = ZeroPadding2D((1, 1))(x)x = Conv2D(64, (3, 3), activation='relu', name='conv1_2')(x)orig_1 = x       # 用于做skip-layerx = MaxPooling2D((2, 2), strides=(2, 2))(x)# >>首先两层卷积加一个池化层x = ZeroPadding2D((1, 1))(x)x = Conv2D(128, (3, 3), activation='relu', name='conv2_1')(x)x = ZeroPadding2D((1, 1))(x)x = Conv2D(128, (3, 3), activation='relu', name='conv2_2')(x)orig_2 = x      # 用于做skip-layerx = MaxPooling2D((2, 2), strides=(2, 2))(x)# >>第二次两层卷积加一个池化层x = ZeroPadding2D((1, 1))(x)x = Conv2D(256, (3, 3), activation='relu', name='conv3_1')(x)x = ZeroPadding2D((1, 1))(x)x = Conv2D(256, (3, 3), activation='relu', name='conv3_2')(x)x = ZeroPadding2D((1, 1))(x)x = Conv2D(256, (3, 3), activation='relu', name='conv3_3')(x)orig_3 = x      # 用于做skip-layerx = MaxPooling2D((2, 2), strides=(2, 2))(x)# >>第一个三层卷积加一个池化层x = ZeroPadding2D((1, 1))(x)x = Conv2D(512, (3, 3), activation='relu', name='conv4_1')(x)x = ZeroPadding2D((1, 1))(x)x = Conv2D(512, (3, 3), activation='relu', name='conv4_2')(x)x = ZeroPadding2D((1, 1))(x)x = Conv2D(512, (3, 3), activation='relu', name='conv4_3')(x)orig_4 = x     # 用于做skip-layerx = MaxPooling2D((2, 2), strides=(2, 2))(x)# >>第二个三层卷积加一个池化层x = ZeroPadding2D((1, 1))(x)x = Conv2D(512, (3, 3), activation='relu', name='conv5_1')(x)x = ZeroPadding2D((1, 1))(x)x = Conv2D(512, (3, 3), activation='relu', name='conv5_2')(x)x = ZeroPadding2D((1, 1))(x)x = Conv2D(512, (3, 3), activation='relu', name='conv5_3')(x)orig_5 = x   # 用于做skip-layerx = MaxPooling2D((2, 2), strides=(2, 2))(x)# >>第三个三层卷积加一个池化层# 解码器输出编码后的特征图#--------------------解码器部分----------------------------### Decoder# x = Conv2D(4096, (7, 7), activation='relu', padding='valid', name='conv6')(x)# x = BatchNormalization()(x)   #细化编码部分,一维编码,没有使用# x = UpSampling2D(size=(7, 7))(x)x = Conv2D(512, (1, 1), activation='relu', padding='same', name='deconv6', kernel_initializer='he_normal',bias_initializer='zeros')(x)x = BatchNormalization()(x)x = UpSampling2D(size=(2, 2))(x)the_shape = K.int_shape(orig_5)shape = (1, the_shape[1], the_shape[2], the_shape[3])origReshaped = Reshape(shape)(orig_5)     # 跳接层# print('origReshaped.shape: ' + str(K.int_shape(origReshaped)))xReshaped = Reshape(shape)(x)# print('xReshaped.shape: ' + str(K.int_shape(xReshaped)))together = Concatenate(axis=1)([origReshaped, xReshaped])# print('together.shape: ' + str(K.int_shape(together)))x = Unpooling()(together)# >>卷积上采样,512个核 Deconv6x = Conv2D(512, (5, 5), activation='relu', padding='same', name='deconv5', kernel_initializer='he_normal',bias_initializer='zeros')(x)x = BatchNormalization()(x)x = UpSampling2D(size=(2, 2))(x)the_shape = K.int_shape(orig_4)shape = (1, the_shape[1], the_shape[2], the_shape[3])origReshaped = Reshape(shape)(orig_4)     # 跳接层xReshaped = Reshape(shape)(x)together = Concatenate(axis=1)([origReshaped, xReshaped])x = Unpooling()(together)# >>卷积上采样,512个5*5核 Deconv5x = Conv2D(256, (5, 5), activation='relu', padding='same', name='deconv4', kernel_initializer='he_normal',bias_initializer='zeros')(x)x = BatchNormalization()(x)x = UpSampling2D(size=(2, 2))(x)the_shape = K.int_shape(orig_3)shape = (1, the_shape[1], the_shape[2], the_shape[3])origReshaped = Reshape(shape)(orig_3)     # 跳接层xReshaped = Reshape(shape)(x)together = Concatenate(axis=1)([origReshaped, xReshaped])x = Unpooling()(together)# >>卷积上采样,256个5*5核 Deconv4x = Conv2D(128, (5, 5), activation='relu', padding='same', name='deconv3', kernel_initializer='he_normal',bias_initializer='zeros')(x)x = BatchNormalization()(x)x = UpSampling2D(size=(2, 2))(x)the_shape = K.int_shape(orig_2)shape = (1, the_shape[1], the_shape[2], the_shape[3])origReshaped = Reshape(shape)(orig_2)     # 跳接层xReshaped = Reshape(shape)(x)together = Concatenate(axis=1)([origReshaped, xReshaped])x = Unpooling()(together)# >>卷积上采样,128个5*5核 Deconv3x = Conv2D(64, (5, 5), activation='relu', padding='same', name='deconv2', kernel_initializer='he_normal',bias_initializer='zeros')(x)x = BatchNormalization()(x)x = UpSampling2D(size=(2, 2))(x)the_shape = K.int_shape(orig_1)shape = (1, the_shape[1], the_shape[2], the_shape[3])origReshaped = Reshape(shape)(orig_1)   # 跳接层xReshaped = Reshape(shape)(x)together = Concatenate(axis=1)([origReshaped, xReshaped])x = Unpooling()(together)# >>卷积上采样,64个5*5核 Deconv2x = Conv2D(64, (5, 5), activation='relu', padding='same', name='deconv1', kernel_initializer='he_normal',bias_initializer='zeros')(x)x = BatchNormalization()(x)# >>卷积上采样,64个5*5核 Deconv1x = Conv2D(1, (5, 5), activation='sigmoid', padding='same', name='pred', kernel_initializer='he_normal',bias_initializer='zeros')(x)# >>得到最终的输出Raw Alpha Pred 输出model = Model(inputs=input_tensor, outputs=x)return model
随后利用小模型来优化alpha图:
def build_refinement(encoder_decoder):input_tensor = encoder_decoder.inputinput = Lambda(lambda i: i[:, :, :, 0:3])(input_tensor)# 包含了输入的RGB图和编码器输入的粗糙mattex = Concatenate(axis=3)([input, encoder_decoder.output]) x = Conv2D(64, (3, 3), activation='relu', padding='same', kernel_initializer='he_normal',bias_initializer='zeros')(x)x = BatchNormalization()(x)x = Conv2D(64, (3, 3), activation='relu', padding='same', kernel_initializer='he_normal',bias_initializer='zeros')(x)x = BatchNormalization()(x)x = Conv2D(64, (3, 3), activation='relu', padding='same', kernel_initializer='he_normal',bias_initializer='zeros')(x)x = BatchNormalization()(x)# (Covn+Relu)*三次重复x = Conv2D(1, (3, 3), activation='sigmoid', padding='same', name='refinement_pred', kernel_initializer='he_normal',bias_initializer='zeros')(x)# Covn输入精炼的refine aplha的残差model = Model(inputs=input_tensor, outputs=x)return model构建损失函数,包含预测出的matte掩膜和合成的图像损失:
# from:https://github.com/foamliu/Deep-Image-Matting/blob/master/utils.py
# 蒙版预测损失
def alpha_prediction_loss(y_true, y_pred):mask = y_true[:, :, :, 1]diff = y_pred[:, :, :, 0] - y_true[:, :, :, 0]diff = diff * masknum_pixels = K.sum(mask)return K.sum(K.sqrt(K.square(diff) + epsilon_sqr)) / (num_pixels + epsilon)
# 图像重建损失
def compositional_loss(y_true, y_pred):mask = y_true[:, :, :, 1]mask = K.reshape(mask, (-1, img_rows, img_cols, 1))image = y_true[:, :, :, 2:5]fg = y_true[:, :, :, 5:8]bg = y_true[:, :, :, 8:11]c_g = imagec_p = y_pred * fg + (1.0 - y_pred) * bgdiff = c_p - c_gdiff = diff * masknum_pixels = K.sum(mask)return K.sum(K.sqrt(K.square(diff) + epsilon_sqr)) / (num_pixels + epsilon)
#总损失
def overall_loss(y_true, y_pred):w_l = 0.5return w_l * alpha_prediction_loss(y_true, y_pred) + (1 - w_l) * compositional_loss(y_true, y_pred)
随后再构建完整的模型:
# copy from https://github.com/foamliu/Deep-Image-Matting/blob/master/train.py
#----- 省略各种初始化内容 ------## Load our model, added support for Multi-GPUsnum_gpu = len(get_available_gpus())if num_gpu >= 2:with tf.device("/cpu:0"):model = build_encoder_decoder()  #构建编码器model = build_refinement(model)  #构建精炼模块if pretrained_path is not None:model.load_weights(pretrained_path)else:migrate_model(model)final = multi_gpu_model(model, gpus=num_gpu)decoder_target = tf.placeholder(dtype='float32', shape=(None, None, None, None))final.compile(optimizer='nadam', loss=overall_loss, target_tensors=[decoder_target])  #编译,加入模型、损失等等参数# Final callbackscallbacks = [tensor_board, model_checkpoint, early_stop, reduce_lr]    # 优化模型,训练过程final.fit_generator(train_gen(),steps_per_epoch=num_train_samples // batch_size,validation_data=valid_gen(),validation_steps=num_valid_samples // batch_size,epochs=epochs,verbose=1,callbacks=callbacks,use_multiprocessing=True,workers=2)
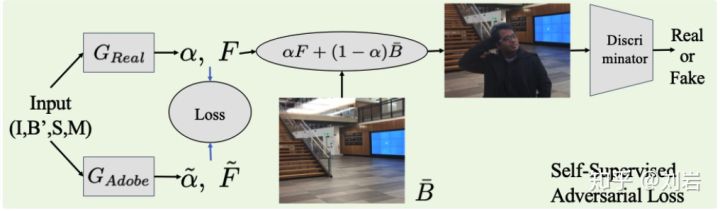
3.AlphaGAN 自然图像抠图
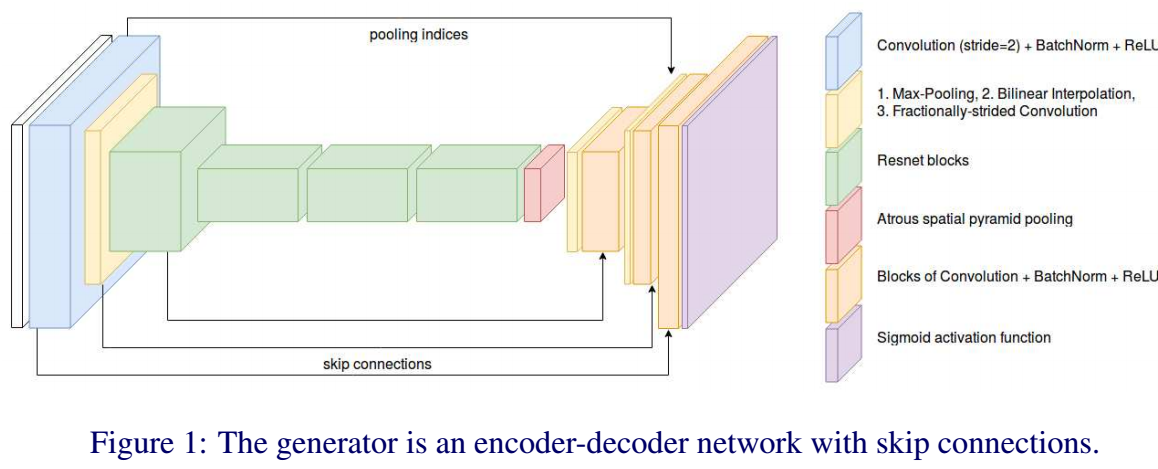
在deep image matting后又出现了一篇基于生成对抗网络来实现的抠图工作。生成器用于生成alpha通道,而判别器则用于判定基于生成matting结果的合成图是否为真。为了更好的解决CNN的空间定位问题,在编码器中通过膨胀卷积的方法捕捉全局特征信息来避免对特征图下采样,克服了deepmatting中空间信息损失的问题。
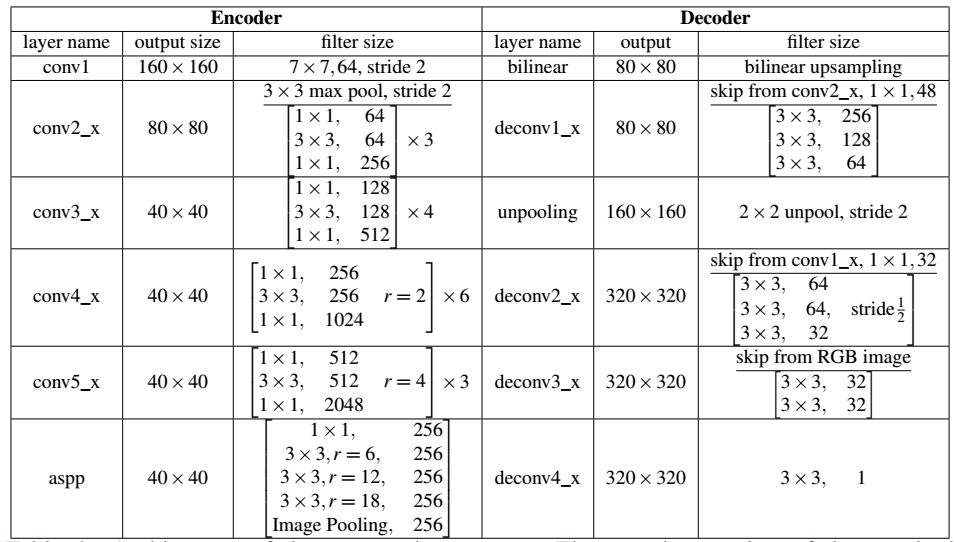
其编码器如下图所示,特别的其中包含了一系列残差块,在第三和第四个残差块中还是用了膨胀卷积;随后紧跟着使用了ASPP(Atrous Spatial Pyramid Pooling)模块对特征进行重采样,随后将输入的特征解码双线性插值与残差块相连,最后利用sigmoid函数输出。:
判别器则使用了PatchGAN[18],用于对每一个NxN的图像片进行真伪判断,主要抓取高频特征、并且假设像素间的独立。由于生成器生成的蒙版比较平滑,判别器可以迫使生成器训练出更为锐利的结果。同时Trimap的输入,也引导了判别器专注于需要引导生成器生成更好的蒙版以便合成更好的结果。
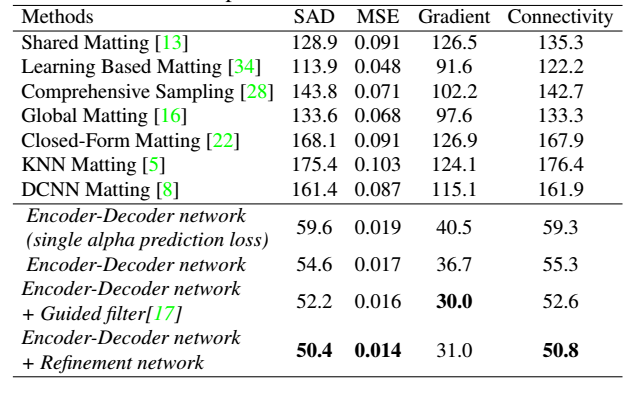
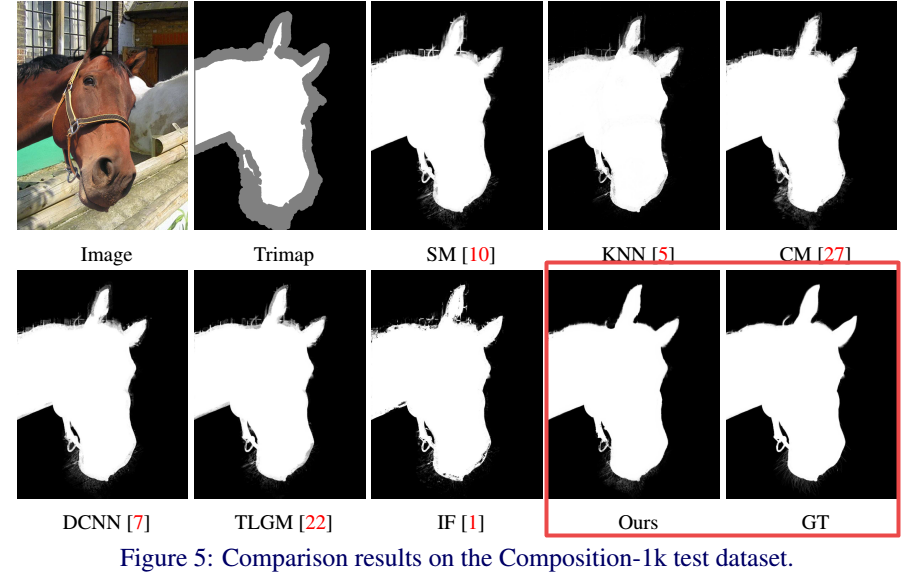
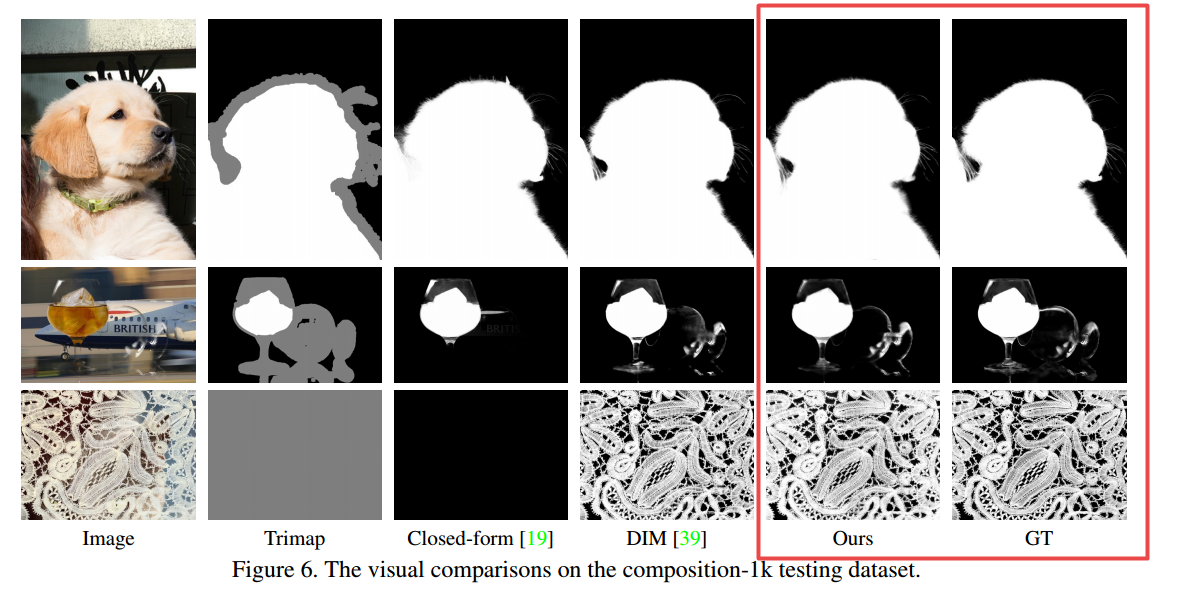
下图是最后得到的结果dataset:Composition-1k:
4.基于深度学习的其他抠图方法
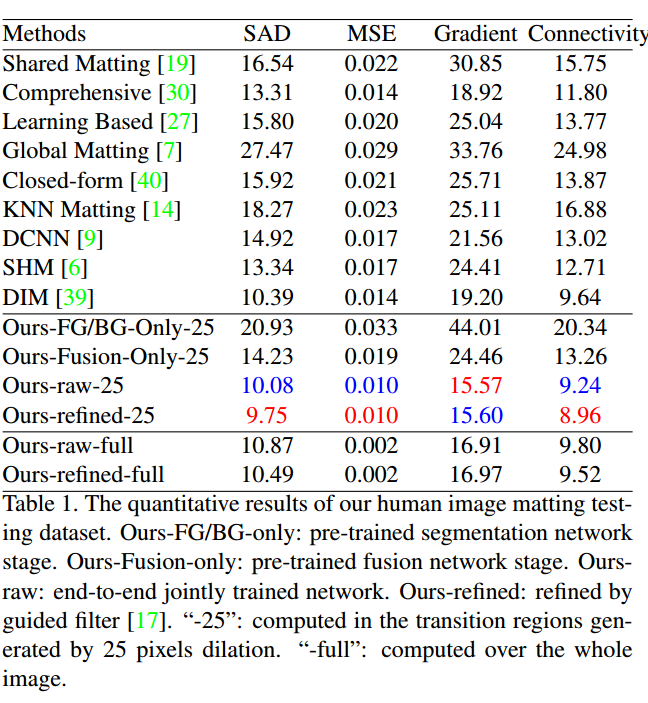
A Late Fusion CNN for Digital Matting,基于融合的Matting方法_CVPR2019,这一方法中使用了两个解码器分支分别预测前景和背景,而后在经过融合得到了更为细腻的alpha通道结果。两个解码器使得模型的容量更大,更容易训练出好结果。同时由于分类器得到了前景背景的中间结果,这种方法还可以提供Trimap。
模型中包含了一个编码器和两个解码器(分割部分),以及一个用于融合的全卷积网络(融合部分)。最后输出的matting是预测出前景和背景的概率图和融合权重map的线性融合结果。

对于任何一张图像来说,可以认为是前景图F、背景图B和对应的蒙版α三者通过下面的公式合成的:
I p = α p F p + ( 1 − α p ) B p I_p = \alpha_pF_p+(1-\alpha_p)B_p Ip=αpFp+(1−αp)Bp
一般方法首先学习前景、背景;而后计算每个像素属于前背景的概率;最后得到alpha通道。在本文的方法中,研究人员通过融合输出的前景背景来得到最终的蒙版通道,则 a l p h a alpha alpha的计算公式(也就是融合网络部分)可以被写为:
α p = β p F p ˉ + ( 1 − β p ) ( 1 − B p ˉ ) \alpha_p = \beta_p\bar{F_p}+(1-\beta_p)(1-\bar{B_p}) αp=βpFpˉ+(1−βp)(1−Bpˉ)
如果从优化的视角来看,对上述的方程右边对β进行差分,则可以得到下面的式子:
B p ˉ + F p ˉ = 1 \bar{B_p}+\bar{F_p}=1 Bpˉ+Fpˉ=1
融合网络在前景背景预测精确的时候可以聚焦于学习前景和背景间的转变区域的学习、另一方面可以在F+B≠1的渐变区域通过精心设计的损失函数来提供更有效的梯度训练融合网络。
整个网络的数据集主要分为三个部分:基于VOC的25张背景图像和成测试集;基于228 human images with high-quality alpha mattes combined with another 211 human foreground objects from the DIM dataset [39];利用COCO作为背景与人物前景构建合成图像作为训练集;Composition-1k testing dataset in [39]。(from:part4)
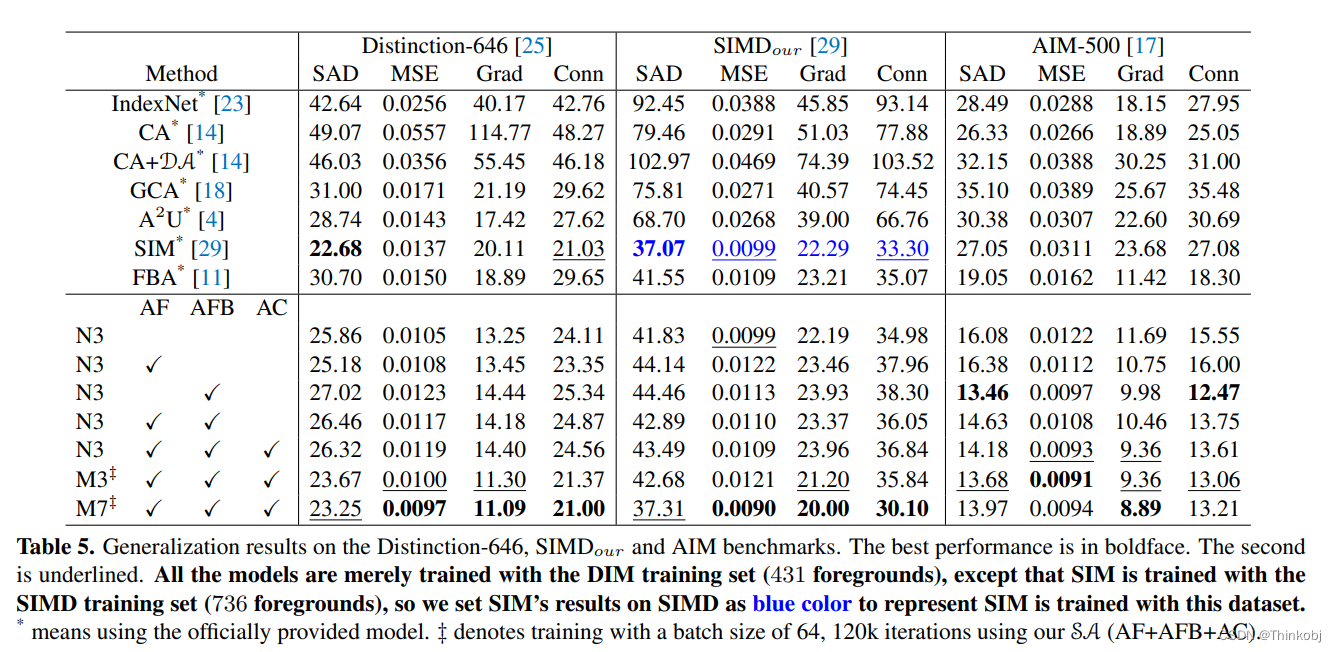
下表显示了与其他方法结果的比较:
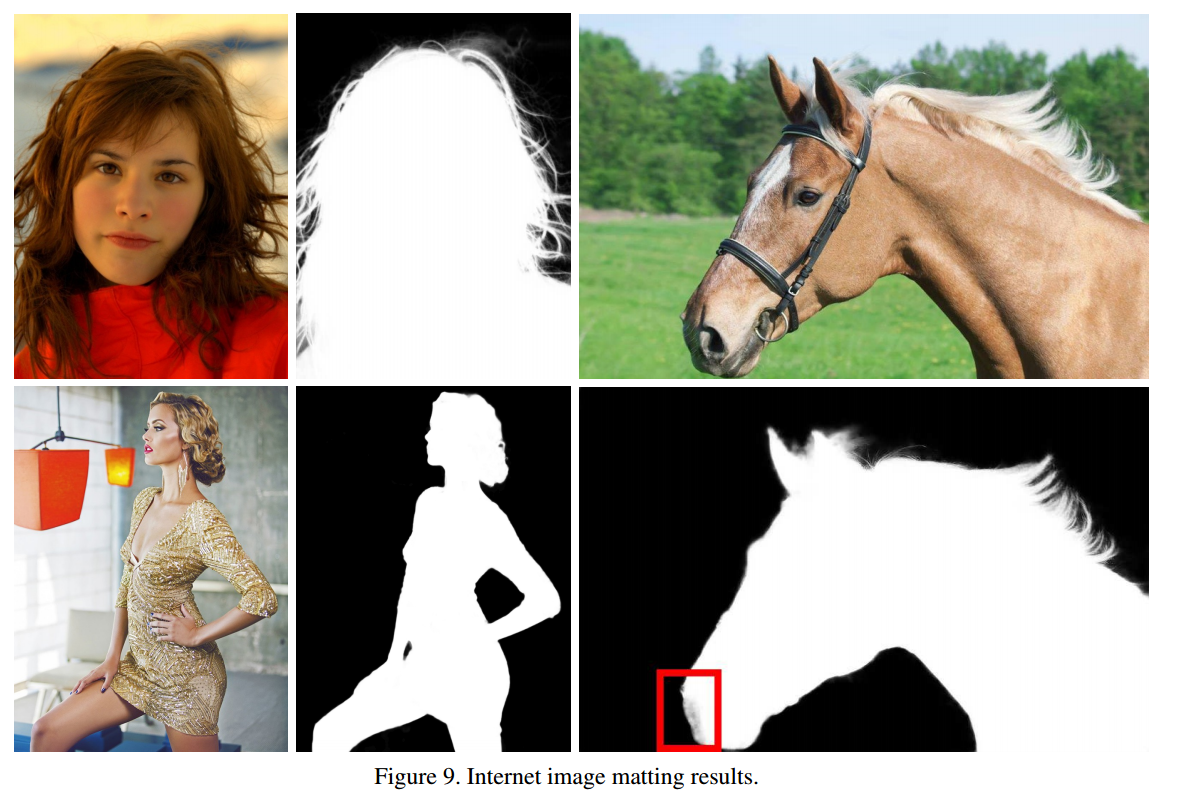
一些得到的结果:

github:https://github.com/yunkezhang/FusionMatting
Learning-based Sampling for Natural Image Matting,基于前背景颜色层估计的matting方法_cvpr2019,这篇文章通过估计前景和背景颜色层来作为网络先验,最后实现透明度估计。颜色层估计更适合于神经网络,同时颜色的有效性减少了合成公式中的未知量,提高透明度预测的有效性。
模型主要的流程如下图所示,背景可以视为被前景遮挡住的不透明材质,具有连续的纹理和结构;首先基于连续结构估计出背景图像,随后利用背景估计得到前景图像,最后利用前景和背景作为输入来估计最终的matting。

web:http://people.inf.ethz.ch/aksoyy/samplenet/
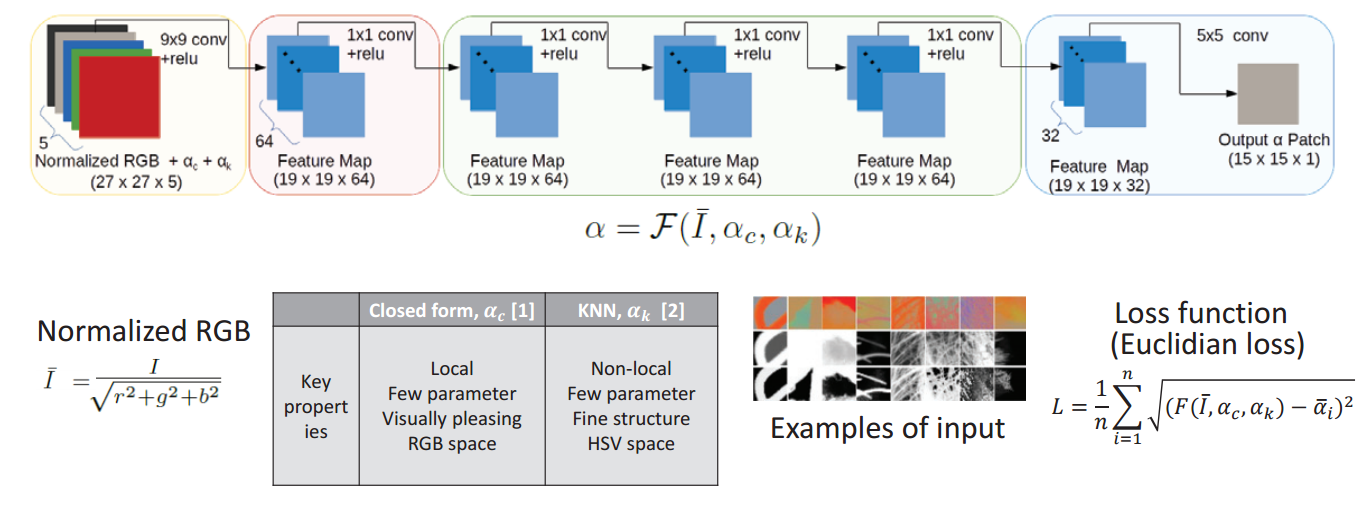
Natural Image Matting using Deep Convolutional Neural Networks结合局域和非局域的方法来重建高质量的alpha通道_ECCV2016,结合局域和非局域的matting方法来得到全局和局部的高质量alpha。需要融合的两种方法优劣如下:
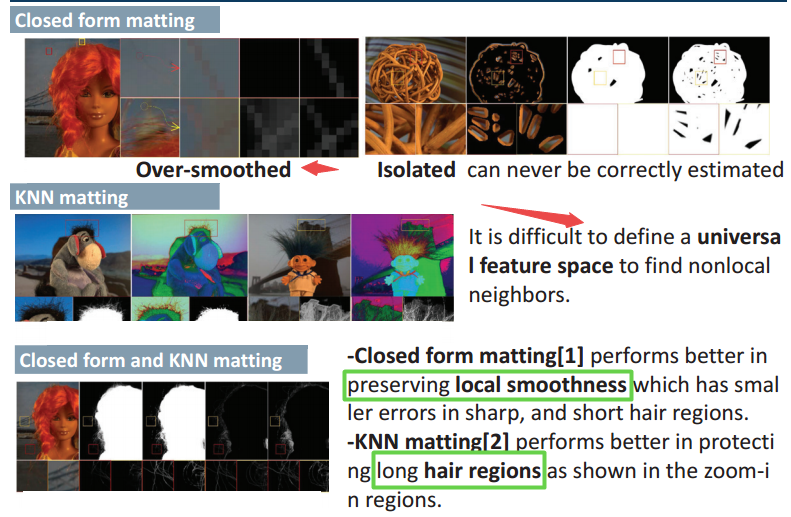
得到的CNN 如下图所示,输入包含了RGB,和两种形式的alphamap,输出为得到优化后的蒙版:
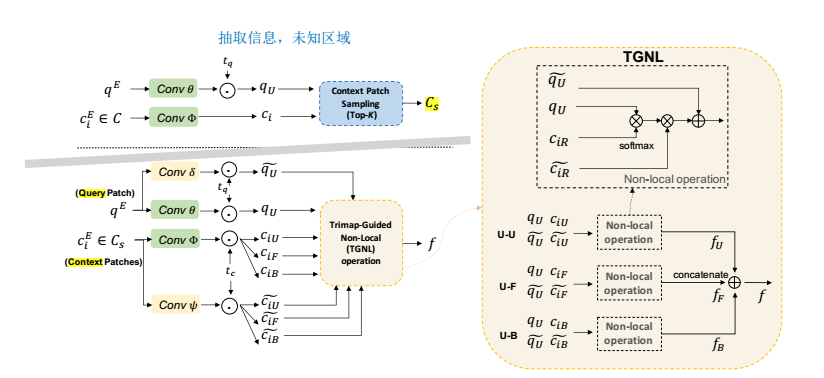
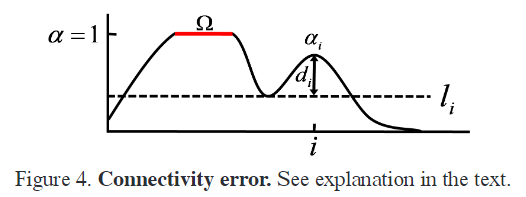
高分辨率抠图 HDMatt: High-Resolution Deep Image Matting,利用Trimap引导的方法实现长程依赖的获取,提升了基于片元抠图方法的连续性和信息依赖性。

ICCV2019, TPAMI, IndexNet ,在特征图条件下动态预测每个局域区域的索引值,预测出的index引导编码过程中的下采样和解码过程中的上采样。
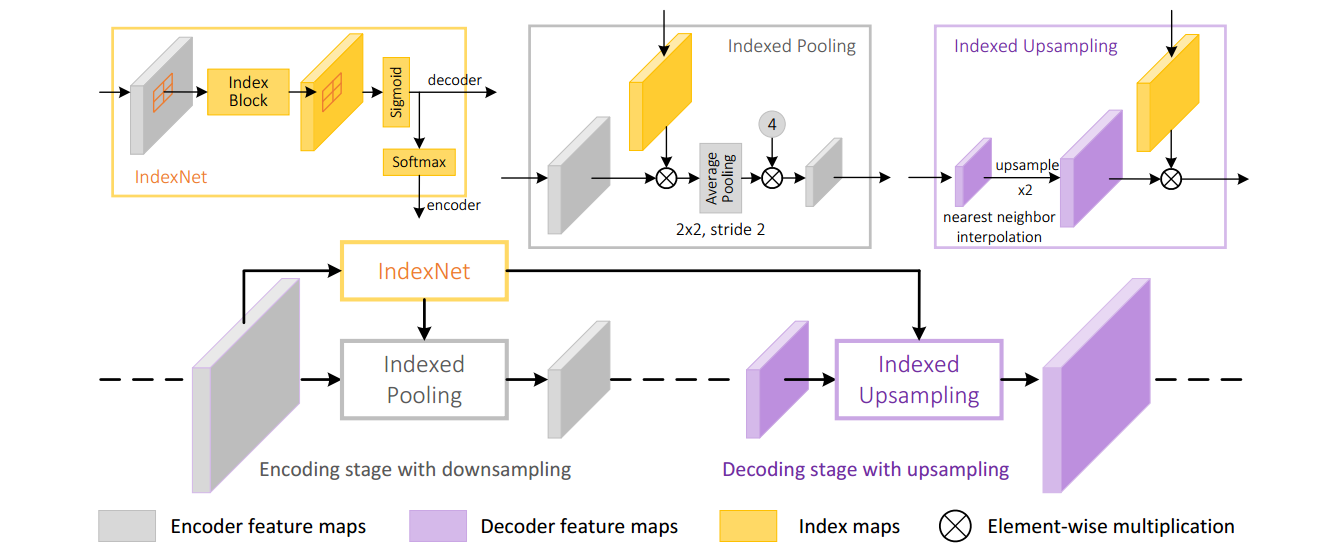
code
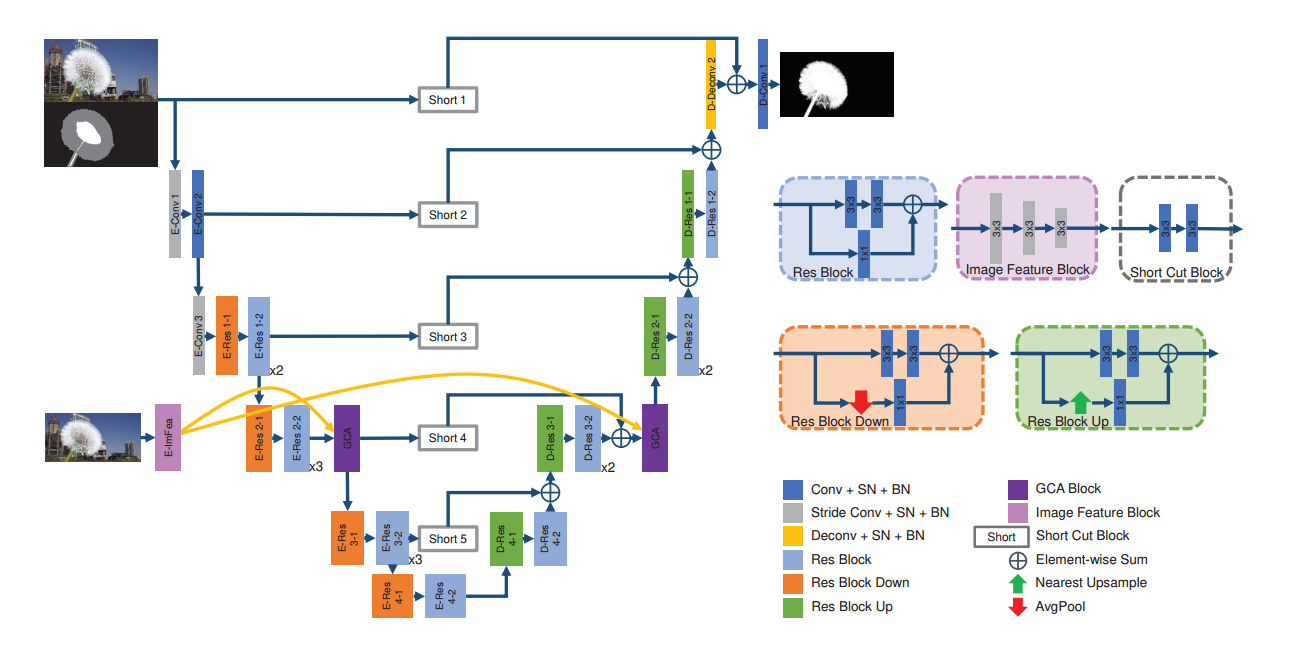
AAAI20 提出的GCAMatting,基于引导上下文注意力的抠图方法。(From SJTU,Yaoyi Li, Hongtao Lu∗)
5.抠图的相关知识教程
5.1 布朗大学的计算摄影和图像操作

Matting的课件在这里
5.2 CMU的计算机摄影学
Gradient-domain image processing:matting在这里
ref:
Deep image matting paper:https://arxiv.org/pdf/1703.03872.pdf
code:https://github.com/foamliu/Deep-Image-Matting
web:https://sites.google.com/view/deepimagematting
https://blog.csdn.net/u012905422/article/details/62226403
Author:https://sites.google.com/view/ningxu/homepage
AlphaGanMatting:https://neurohive.io/en/state-of-the-art/alphagan-natural-image-matting/
Role of Image Matting in Image Segmentation:https://ieeexplore.ieee.org/stamp/stamp.jsp?arnumber=6739711
Image Matting and Applications:https://sites.math.washington.edu/~morrow/336_14/papers/dylan.pdf
Knn base matting: https://github.com/dingzeyuli/knn-matting
A Closed Form Solution to Natural Image Matting:http://cs.brown.edu/courses/cs129/results/final/valayshah/Matting-Levin-Lischinski-Weiss-CVPR06.pdf
#--------------------Deeplearning Approach--------------------------##
Learning-based Sampling for Natural Image Matting
A Late Fusion CNN for Digital Matting
Deep Automatic Portrait Matting
Image matting in the perception granular deep learning
Natural Image Matting using Deep Convolutional Neural Networks
各种抠图算法
达摩院透明物体抠图
#-----------------------------------#
https://scholar.google.com/scholar?q=Image+Matting+scholar&hl=zh-CN&as_sdt=0&as_vis=1&oi=scholart
http://people.inf.ethz.ch/aksoyy/samplenet/
https://www.ijcai.org/proceedings/2018/0139.pdf
https://github.com/foamliu/Deep-Image-Matting
https://sites.google.com/view/deepimagematting
http://cs.brown.edu/courses/cs129/results/final/valayshah/
http://numahub.com/articles/image-matting-using-machine-learning
Image and Video Matting A Suvery: http://citeseerx.ist.psu.edu/viewdoc/download?doi=10.1.1.190.1825&rep=rep1&type=pdf
Stanford Graphic Marc Levoy: https://sites.google.com/site/marclevoylectures/
Brown Computer Graphic: http://cs.brown.edu/courses/csci1230/lectures.shtml
Stanford Graphic Course: http://graphics.stanford.edu/courses/
Evaluation: http://www.alphamatting.com/
#--------image from-----------#
http://cs.brown.edu/courses/cs129/2011/results/final/aabouche/
http://www.lensmen.ie/portfolio-item/green-screen-photography/


![[Matting]论文阅读:Deep Image Matting 详细解读](https://img-blog.csdnimg.cn/20210428154141153.png?x-oss-process=image/watermark,type_ZmFuZ3poZW5naGVpdGk,shadow_10,text_aHR0cHM6Ly9ibG9nLmNzZG4ubmV0L1h4eExpdHRsZU9uZQ==,size_16,color_FFFFFF,t_70)