论文:
[2012.07810] Real-Time High-Resolution Background Matting (arxiv.org)
GitHub项目源码:GitHub - PeterL1n/BackgroundMattingV2: Real-Time High-Resolution Background Matting
目录
论文学习
方法设计:
网络模型:
训练方法:
项目上手
测试数据下载:
测试图片的抠图效果:
训练自己权重文件 :
简单实现背景替换
论文学习
方法设计:
给定图像 ,背景图
,alpha遮罩图
,前景图
则可以在新的背景图B' 合成新的图像I' ,描述为:
并且通过求解前景残差:
最后的前景图可以通过:
网络模型:

网络模型分成两部分:基础网络和优化网络
:包括三个模块Backbone、ASPP和Decoder。Backbone提供ResNet-50、ResNet-101、MobileNetV2使用。ASPP由3、6和9尺寸的卷积滤波器组成,采用DeepLab-V3构成的编解码网络结构。Decoder则是进行每一步应用双线性上采样构成的解码器网络。输入下采样的图像及相应背景图
和
,得到粗糙的alpha通道图
、前景残差图
、误差预测图
和网络隐藏特征
。
:对
中值较大的区域使用
,
,
,
和
进行优化,生成与原图像相同分辨率的alpha遮罩图
和前景残差图
。
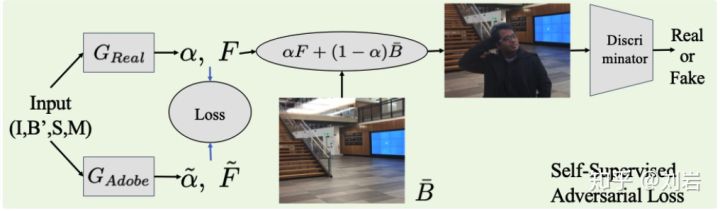
训练方法:
数据集包括alpha遮罩图和前景图,以及多种背景图。通过多种数据增强技术(仿射变换、水平翻转、亮度、色调和饱和度调整、模糊、锐化和随机噪声等)避免过拟合。
损失:alpha图:![]()
前景残差():
![]()
预测误差:
![]()
则的损失:
![]()
的损失:
![]()
项目上手
环境配置:pip install -r requirements.txt
这里我使用的CPU,源码是以GPU版编写的,所以要使用CPU版,需要适当修改部分参数和源码(修改比较简单,百度即可),文章主要讲GPU版直接上手。
train_xxx.py:训练模型文件
inference_xxx.py:推理文件,
export_xxx.py:转换框架文件
requirements.txt:相关依赖描述
README.md:说明文件
LICENSE:许可文件
data_path.py:数据集配置路径文件
model:存放网络模型构建文件
images:存放样本预测结果
doc:里面的model_usage.md说明如何调用模型
dataset:存放对数据集的加载和预处理文件
eval:存放MATLAB评估调用文件
测试数据下载:
在README.md里可以看到,已经有现成的数据集,训练好的权重文件,这里只要我们去下载即可。

这里以下载好的Download/Model / Weights/
- Download model / weights
pytorch/pytorch_resnet50.pth权重文件
和Download/Video / Image/Examples
- 4K videos and images
Images测试集文件为例。
测试图片的抠图效果:
预测提供了inference_images.py,inference_video.py,inference_webcam.py,inference_speed_test.py。这里调用inference_images.py
# --------------- Arguments ---------------parser = argparse.ArgumentParser(description='Inference images')parser.add_argument('--model-type', type=str, required=True, choices=['mattingbase', 'mattingrefine'])
parser.add_argument('--model-backbone', type=str, required=True, choices=['resnet101', 'resnet50', 'mobilenetv2'])
parser.add_argument('--model-backbone-scale', type=float, default=0.25)
parser.add_argument('--model-checkpoint', type=str, required=True)
parser.add_argument('--model-refine-mode', type=str, default='sampling', choices=['full', 'sampling', 'thresholding'])
parser.add_argument('--model-refine-sample-pixels', type=int, default=80_000)
parser.add_argument('--model-refine-threshold', type=float, default=0.7)
parser.add_argument('--model-refine-kernel-size', type=int, default=3)parser.add_argument('--images-src', type=str, required=True)
parser.add_argument('--images-bgr', type=str, required=True)parser.add_argument('--device', type=str, choices=['cpu', 'cuda'], default='cuda')
parser.add_argument('--num-workers', type=int, default=0, help='number of worker threads used in DataLoader. Note that Windows need to use single thread (0).')
parser.add_argument('--preprocess-alignment', action='store_true')parser.add_argument('--output-dir', type=str, required=True)
parser.add_argument('--output-types', type=str, required=True, nargs='+', choices=['com', 'pha', 'fgr', 'err', 'ref'])
parser.add_argument('-y', action='store_true')
主要修改带required=True的参数:
--model-type:有基础网络模型mattingbase,优化网络模型mattingrefine可选。
--model-backbone:因为我下载的是pytorch_resnet50.pth,所以骨干网络这里选择resnet50。
--model-checkpoint:权重文件路径,这里是pytorch_resnet50.pth的路径。
--images-src:需要预测的图片的原图,这里是下载好Images下的img路径。
--images-bgr:需要预测的图片的对应背景图,这里是下载好Images下的bgr路径。
--output-dir:预测结果输出路径。
--output-types:预测结果的样式选择:'com', 'pha', 'fgr', 'err', 'ref',这里选择com。
其他参数根据自己需求修改即可。
运行结束后会在输出路径下生成com文件,里面便是预测结果。


训练自己权重文件 :
训练文件提供了train_base.py和train_refine.py,这里以train_base.py展示。
训练数据集可以自己准备也可以下载提供的训练数据集Download/Datasets/
- Download datasets
数据集包括:前景图、alpha遮罩图、各种背景图。这里以下载好的VideoMatte240K_JPEG_SD为例。然后配置data_path.py里面相应路径
'backgrounds': {'train': 'PATH_TO_IMAGES_DIR','valid': 'PATH_TO_IMAGES_DIR'},'Mydataset': {'train': {'fgr': 'PATH_TO_IMAGES_DIR','pha': 'PATH_TO_IMAGES_DIR',},'valid': {'fgr': 'PATH_TO_IMAGES_DIR','pha': 'PATH_TO_IMAGES_DIR'},},然后调用train_base.py进行训练
# --------------- Arguments ---------------parser = argparse.ArgumentParser()parser.add_argument('--dataset-name', type=str, required=True, choices=DATA_PATH.keys())parser.add_argument('--model-backbone', type=str, required=True, choices=['resnet101', 'resnet50', 'mobilenetv2'])
parser.add_argument('--model-name', type=str, required=True)
parser.add_argument('--model-pretrain-initialization', type=str, default=None)
parser.add_argument('--model-last-checkpoint', type=str, default=None)parser.add_argument('--batch-size', type=int, default=8)
parser.add_argument('--num-workers', type=int, default=16)
parser.add_argument('--epoch-start', type=int, default=0)
parser.add_argument('--epoch-end', type=int, required=True)parser.add_argument('--log-train-loss-interval', type=int, default=10)
parser.add_argument('--log-train-images-interval', type=int, default=2000)
parser.add_argument('--log-valid-interval', type=int, default=5000)parser.add_argument('--checkpoint-interval', type=int, default=5000)args = parser.parse_args()
主要修改带required=True的参数,其他参数根据自己需求修改即可。
--dataset-name:数据集名字,前面在修改data_path.py时加入Mydataset,所以这里是Mydataset。
--model-backbone:骨干网络选择。
--model-name:模型名字。
--epoch-end:训练的最大步数。
另外--model-pretrain-initialization这个参数是预训练模型路径,可在以下路径下载GitHub - VainF/DeepLabV3Plus-Pytorch: DeepLabv3, DeepLabv3+ and pretrained weights on VOC & Cityscapes
正常训练便是:

训练结束会生成log文件夹存放训练日志和checkpoint文件夹存放每一步的权重文件,最大一步的权重文件就是最终训练得到的权重文件。
简单实现背景替换
为了简单方便加载模型,实现单张图片的替换即可,这里就不使用到inference_xxx.py文件,这份代码是基于CPU版实现。
加载要使用到的模块
import torch
from model import MattingRefine
from torchvision.transforms.functional import to_tensor
from PIL import Image
from torchvision.transforms.functional import to_pil_image
加载模型
device = torch.device('cpu')
precision = torch.float32model = MattingRefine(backbone='resnet50',backbone_scale=0.25,refine_mode='sampling',refine_sample_pixels=80_000)model.load_state_dict(torch.load('pytorch_resnet50.pth',map_location='cpu'))
model = model.eval().to(precision).to(device)
载入图片
image_src_path=r'IMG_PATH'
image_bgr_path=r'BGR_PATH'
image_new_bgr_path=r'NEW_BGR_PATH'batch_size=1src = to_tensor(Image.open(image_src_path)).unsqueeze(0).repeat(batch_size, 1, 1, 1).to(device=device, dtype=precision)
bgr = to_tensor(Image.open(image_bgr_path)).unsqueeze(0).repeat(batch_size, 1, 1, 1).to(device=device, dtype=precision)
背景替换方法
def bg_replace(img, new_bg,path):img = to_pil_image(img[0].cpu())img_size = img.sizenew_bg_img = Image.open(new_bg).convert('RGBA')bg=new_bg_img.resize(img_size, Image.ANTIALIAS)out = Image.alpha_composite(bg, img)out.show()out.save(path)主函数
if __name__ == '__main__':with torch.no_grad():pha, fgr = model(src, bgr)[:2]com = torch.cat([fgr * pha.ne(0), pha], dim=1)bg_replace(com,image_new_bgr_path,'output.png')完整代码
import torch
from model import MattingRefine
from torchvision.transforms.functional import to_tensor
from PIL import Image
from torchvision.transforms.functional import to_pil_imageimage_src_path=r'IMG_PATH'
image_bgr_path=r'BGR_PATH'
image_new_bgr_path=r'NEW_BGR_PATH'batch_size=1
device = torch.device('cpu')
precision = torch.float32model = MattingRefine(backbone='resnet50',backbone_scale=0.25,refine_mode='sampling',refine_sample_pixels=80_000)model.load_state_dict(torch.load('pytorch_resnet50.pth',map_location='cpu'))
model = model.eval().to(precision).to(device)src = to_tensor(Image.open(image_src_path)).unsqueeze(0).repeat(batch_size, 1, 1, 1).to(device=device, dtype=precision)
bgr = to_tensor(Image.open(image_bgr_path)).unsqueeze(0).repeat(batch_size, 1, 1, 1).to(device=device, dtype=precision)def bg_replace(img, new_bg,path):img = to_pil_image(img[0].cpu())img_size = img.sizenew_bg_img = Image.open(new_bg).convert('RGBA')bg=new_bg_img.resize(img_size, Image.ANTIALIAS)out = Image.alpha_composite(bg, img)out.show()out.save(path)if __name__ == '__main__':with torch.no_grad():pha, fgr = model(src, bgr)[:2]com = torch.cat([fgr * pha.ne(0), pha], dim=1)bg_replace(com,image_new_bgr_path,'output.png')
加入单张原图、原背景图和新背景图运行即可,结果如下:


![[Matting]论文阅读:Deep Image Matting 详细解读](https://img-blog.csdnimg.cn/20210428154141153.png?x-oss-process=image/watermark,type_ZmFuZ3poZW5naGVpdGk,shadow_10,text_aHR0cHM6Ly9ibG9nLmNzZG4ubmV0L1h4eExpdHRsZU9uZQ==,size_16,color_FFFFFF,t_70)