实战二:手把手教你图像风格迁移
一、简介
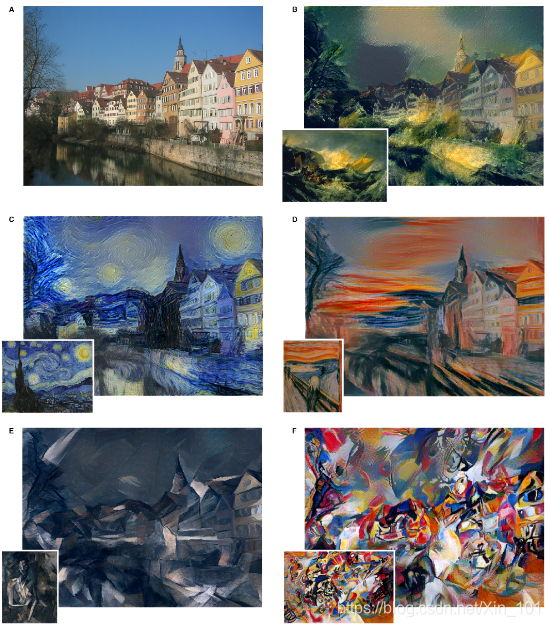
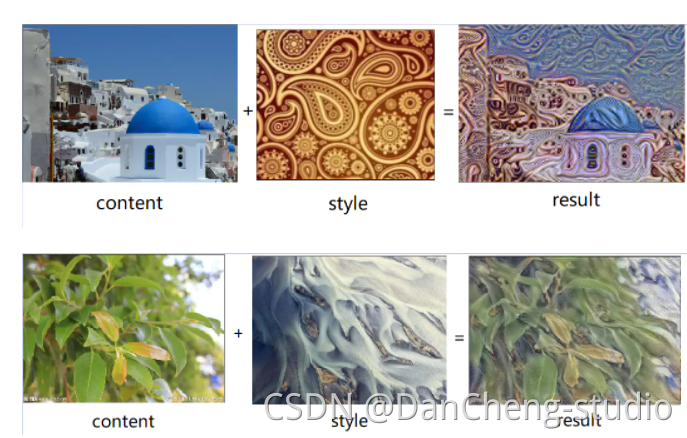
图像风格迁移是指,将一幅内容图的内容,和一幅或多幅风格图融合在一起,从而生成一些有意思的图片。
有兴趣的可以看一下外文文献 Leon A. Gatys' paper, A Neural Algorithm of Artistic Style
https://arxiv.org/abs/1508.06576(ps访问需外网,可参考后面的操作)
例子:

二、方法一TensorFlow实现图像风格迁移
1. 准备
安装包:
pip install numpy scipy tensorflow keras图片准备:
准备好内容图片以及风格图片

2. 原理
为了将风格图的风格和内容图的内容进行融合,所生成的图片,在内容应当尽可能接近内容图,在风格中应当尽可能接近风格图。
因此需要定义内容损失函数和风格损失函数,经过加权后作为总的损失函数。
实现步骤如下:
a.随机产生一张图片
b.在每轮迭代中,根据总的损失函数,调整图片的像素值
c.经过多轮迭代,得到优化后的图片
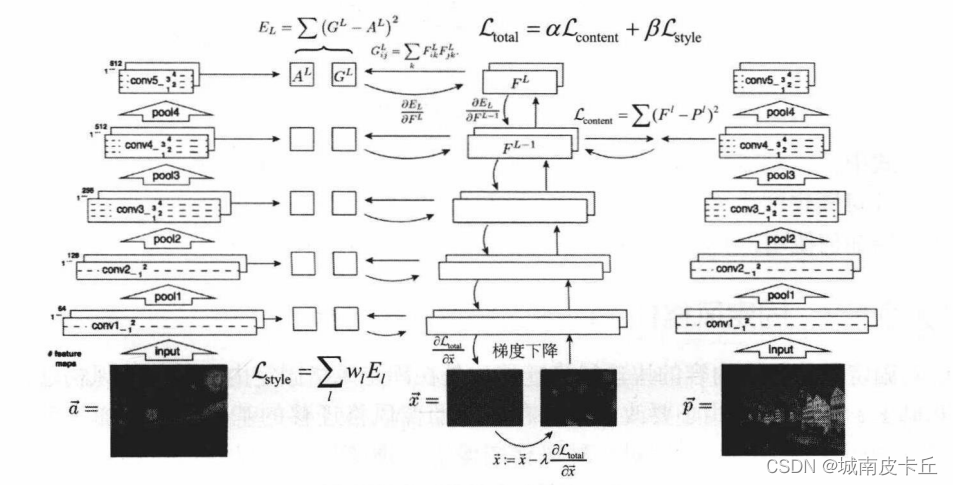
3.内容损失函数
两张图片在内容中相似,不能仅仅靠简单的纯像素比较
CNN具有抽象和理解图像的能力,因此可以考虑将各个卷积层的输出作为图像的内容。
以VGG19为例,其中包括了多个卷积层、池化层,以及最后的全连接层。

这里使用conv4_2的输出作为图像的内容表示,定义内容损失函数如下

4.风格损失函数
风格是一个很难说清楚的概念,可能是笔触、纹理、结构、布局、用色等等。
这里使用卷积层各个特征图之间的互相关作为图像的风格,以conv1_1为例
- 共包含64个特征图即feature map,或者说图像的深度、通道的个数
- 每个特征图都是对上一层输出的一种理解,可以类比成64个人对同一幅画的不同理解
- 这些人可能分别偏好印象派、现代主义、超现实主义、表现主义等不同风格
- 当图像是某一种风格时,可能这一部分人很欣赏,但那一部分人不喜欢
- 当图像是另一种风格时,可能这一部分人不喜欢,但那一部分人很欣赏
- 64个人之间理解的差异,可以用特征图的互相关表示,这里使用Gram矩阵计算互相关
- 不同的风格会导致差异化的互相关结果
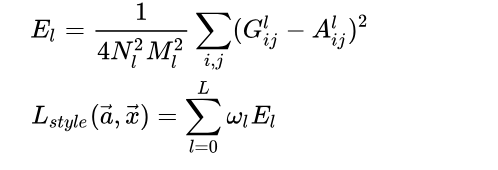
Gram矩阵的计算如下,如果有64个特征图,那么Gram矩阵的大小便是64 × 64,第i行第j列的值表示第i个特征图和第j个特征图之间的互相关,用内积计算

风格损失函数定义如下,对多个卷积层的风格表示差异进行加权
5.损失函数
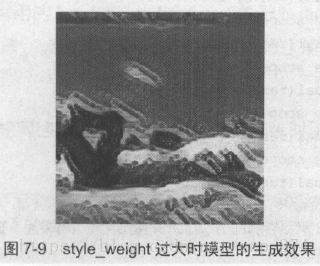
总的损失函数即内容损失函数和风格损失函数的加权,不同的权重会导致不同的迁移效果。

6.TensorFlow代码实现
# -*- coding: utf-8 -*-
# 加载库
import tensorflow as tf
import numpy as np
import scipy.io
import scipy.misc
import os
import timedef the_current_time():print(time.strftime("%Y-%m-%d %H:%M:%S", time.localtime(int(time.time()))))# 定义一些变量
CONTENT_IMG = 'content.jpg'
STYLE_IMG = 'style5.jpg'
OUTPUT_DIR = 'neural_style_transfer_tensorflow/'if not os.path.exists(OUTPUT_DIR):os.mkdir(OUTPUT_DIR)IMAGE_W = 800
IMAGE_H = 600
COLOR_C = 3NOISE_RATIO = 0.7
BETA = 5
ALPHA = 100
VGG_MODEL = 'imagenet-vgg-verydeep-19.mat'
MEAN_VALUES = np.array([123.68, 116.779, 103.939]).reshape((1, 1, 1, 3))# 加载VGG19模型
def load_vgg_model(path):'''Details of the VGG19 model:- 0 is conv1_1 (3, 3, 3, 64)- 1 is relu- 2 is conv1_2 (3, 3, 64, 64)- 3 is relu    - 4 is maxpool- 5 is conv2_1 (3, 3, 64, 128)- 6 is relu- 7 is conv2_2 (3, 3, 128, 128)- 8 is relu- 9 is maxpool- 10 is conv3_1 (3, 3, 128, 256)- 11 is relu- 12 is conv3_2 (3, 3, 256, 256)- 13 is relu- 14 is conv3_3 (3, 3, 256, 256)- 15 is relu- 16 is conv3_4 (3, 3, 256, 256)- 17 is relu- 18 is maxpool- 19 is conv4_1 (3, 3, 256, 512)- 20 is relu- 21 is conv4_2 (3, 3, 512, 512)- 22 is relu- 23 is conv4_3 (3, 3, 512, 512)- 24 is relu- 25 is conv4_4 (3, 3, 512, 512)- 26 is relu- 27 is maxpool- 28 is conv5_1 (3, 3, 512, 512)- 29 is relu- 30 is conv5_2 (3, 3, 512, 512)- 31 is relu- 32 is conv5_3 (3, 3, 512, 512)- 33 is relu- 34 is conv5_4 (3, 3, 512, 512)- 35 is relu- 36 is maxpool- 37 is fullyconnected (7, 7, 512, 4096)- 38 is relu- 39 is fullyconnected (1, 1, 4096, 4096)- 40 is relu- 41 is fullyconnected (1, 1, 4096, 1000)- 42 is softmax'''vgg = scipy.io.loadmat(path)vgg_layers = vgg['layers']def _weights(layer, expected_layer_name):W = vgg_layers[0][layer][0][0][2][0][0]b = vgg_layers[0][layer][0][0][2][0][1]layer_name = vgg_layers[0][layer][0][0][0][0]assert layer_name == expected_layer_namereturn W, bdef _conv2d_relu(prev_layer, layer, layer_name):W, b = _weights(layer, layer_name)W = tf.constant(W)b = tf.constant(np.reshape(b, (b.size)))return tf.nn.relu(tf.nn.conv2d(prev_layer, filter=W, strides=[1, 1, 1, 1], padding='SAME') + b)def _avgpool(prev_layer):return tf.nn.avg_pool(prev_layer, ksize=[1, 2, 2, 1], strides=[1, 2, 2, 1], padding='SAME')graph = {}graph['input']    = tf.Variable(np.zeros((1, IMAGE_H, IMAGE_W, COLOR_C)), dtype='float32')graph['conv1_1']  = _conv2d_relu(graph['input'], 0, 'conv1_1')graph['conv1_2']  = _conv2d_relu(graph['conv1_1'], 2, 'conv1_2')graph['avgpool1'] = _avgpool(graph['conv1_2'])graph['conv2_1']  = _conv2d_relu(graph['avgpool1'], 5, 'conv2_1')graph['conv2_2']  = _conv2d_relu(graph['conv2_1'], 7, 'conv2_2')graph['avgpool2'] = _avgpool(graph['conv2_2'])graph['conv3_1']  = _conv2d_relu(graph['avgpool2'], 10, 'conv3_1')graph['conv3_2']  = _conv2d_relu(graph['conv3_1'], 12, 'conv3_2')graph['conv3_3']  = _conv2d_relu(graph['conv3_2'], 14, 'conv3_3')graph['conv3_4']  = _conv2d_relu(graph['conv3_3'], 16, 'conv3_4')graph['avgpool3'] = _avgpool(graph['conv3_4'])graph['conv4_1']  = _conv2d_relu(graph['avgpool3'], 19, 'conv4_1')graph['conv4_2']  = _conv2d_relu(graph['conv4_1'], 21, 'conv4_2')graph['conv4_3']  = _conv2d_relu(graph['conv4_2'], 23, 'conv4_3')graph['conv4_4']  = _conv2d_relu(graph['conv4_3'], 25, 'conv4_4')graph['avgpool4'] = _avgpool(graph['conv4_4'])graph['conv5_1']  = _conv2d_relu(graph['avgpool4'], 28, 'conv5_1')graph['conv5_2']  = _conv2d_relu(graph['conv5_1'], 30, 'conv5_2')graph['conv5_3']  = _conv2d_relu(graph['conv5_2'], 32, 'conv5_3')graph['conv5_4']  = _conv2d_relu(graph['conv5_3'], 34, 'conv5_4')graph['avgpool5'] = _avgpool(graph['conv5_4'])return graph# 定义内容损失函数
def content_loss_func(sess, model):def _content_loss(p, x):N = p.shape[3]M = p.shape[1] * p.shape[2]return (1 / (4 * N * M)) * tf.reduce_sum(tf.pow(x - p, 2))return _content_loss(sess.run(model['conv4_2']), model['conv4_2'])# 定义风格损失函数
STYLE_LAYERS = [('conv1_1', 0.5), ('conv2_1', 1.0), ('conv3_1', 1.5), ('conv4_1', 3.0), ('conv5_1', 4.0)]def style_loss_func(sess, model):def _gram_matrix(F, N, M):Ft = tf.reshape(F, (M, N))return tf.matmul(tf.transpose(Ft), Ft)def _style_loss(a, x):N = a.shape[3]M = a.shape[1] * a.shape[2]A = _gram_matrix(a, N, M)G = _gram_matrix(x, N, M)return (1 / (4 * N ** 2 * M ** 2)) * tf.reduce_sum(tf.pow(G - A, 2))return sum([_style_loss(sess.run(model[layer_name]), model[layer_name]) * w for layer_name, w in STYLE_LAYERS])# 随机产生一张初始照片
def generate_noise_image(content_image, noise_ratio=NOISE_RATIO):noise_image = np.random.uniform(-20, 20, (1, IMAGE_H, IMAGE_W, COLOR_C)).astype('float32')input_image = noise_image * noise_ratio + content_image * (1 - noise_ratio)return input_image# 加载图片
def load_image(path):image = scipy.misc.imread(path)image = scipy.misc.imresize(image, (IMAGE_H, IMAGE_W))image = np.reshape(image, ((1, ) + image.shape))image = image - MEAN_VALUESreturn image# 保存图片
def save_image(path, image):image = image + MEAN_VALUESimage = image[0]image = np.clip(image, 0, 255).astype('uint8')scipy.misc.imsave(path, image)# 调用以上函数并训练模型
the_current_time()with tf.Session() as sess:content_image = load_image(CONTENT_IMG)style_image = load_image(STYLE_IMG)model = load_vgg_model(VGG_MODEL)input_image = generate_noise_image(content_image)sess.run(tf.global_variables_initializer())sess.run(model['input'].assign(content_image))content_loss = content_loss_func(sess, model)sess.run(model['input'].assign(style_image))style_loss = style_loss_func(sess, model)total_loss = BETA * content_loss + ALPHA * style_lossoptimizer = tf.train.AdamOptimizer(2.0)train = optimizer.minimize(total_loss)sess.run(tf.global_variables_initializer())sess.run(model['input'].assign(input_image))ITERATIONS = 2000for i in range(ITERATIONS):sess.run(train)if i % 100 == 0:output_image = sess.run(model['input'])the_current_time()print('Iteration %d' % i)print('Cost: ', sess.run(total_loss))save_image(os.path.join(OUTPUT_DIR, 'output_%d.jpg' % i), output_image)
7.结果展示
(1)运行
python main_tf(2)运行过程

可以看出在本机的cpu上跑非常慢,很慢,,,,,
(3)结果展示

三、方法二TensorFlow实现快速图像风格迁移(Fast Neural Style Transfer)
1.简介
使用TensorFlow实现快速图像风格迁移(Fast Neural Style Transfer)
2.准备
风格图及原图

3.原理
在之前介绍的图像风格迁移中,可以根据内容图片和风格图片优化输入图片,使内容损失函数和风格损失函数尽可能小。
使用快速图像风格迁移可大大缩短生成一张迁移图片所需的时间,其模型结构如下,包括转换网络和损失网络。

- 风格图片是固定的,而内容图片是可变的输入,因此以上模型用于将任意图片快速转换为指定风格的图片
- 转换网络:参数需要训练,将内容图片转换成迁移图片
- 损失网络:计算迁移图片和风格图片之间的风格损失,以及迁移图片和原始内容图片之间的内容损失。
- 经过训练后,转换网络所生成的迁移图片,在内容和输入的内容图片相似,在风格上和指定的风格图片相似
- 进行推断时,仅使用转换网络,输入内容图片,即可得到对应的迁移图片
- 如果有多个风格图片,对每个风格分别训练一个模型即可。
4.实现代码
# -*- coding: utf-8 -*-import tensorflow as tf
import numpy as np
from imageio import imread, imsave
import os
import timedef the_current_time():print(time.strftime("%Y-%m-%d %H:%M:%S", time.localtime(int(time.time()))))style = 'udnie'
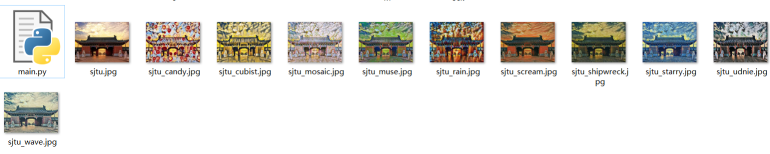
model = 'samples_%s' % style
content_image = 'sjtu.jpg'
result_image = 'sjtu_%s.jpg' % style
X_image = imread(content_image)sess = tf.Session()
sess.run(tf.global_variables_initializer())saver = tf.train.import_meta_graph(os.path.join(model, 'fast_style_transfer.meta'))
saver.restore(sess, tf.train.latest_checkpoint(model))graph = tf.get_default_graph()
X = graph.get_tensor_by_name('X:0')
g = graph.get_tensor_by_name('transformer/g:0')the_current_time()gen_img = sess.run(g, feed_dict={X: [X_image]})[0]
gen_img = np.clip(gen_img, 0, 255) / 255.
imsave(result_image, gen_img)the_current_time()
5.运行结果展示
(1)过程展示

速度很快,在本机CPU中5s左右就完成了
(2)结果展示
四、方法三TensorFlow实现图像风格迁移
前面都是在CPU上跑的程序,可我就想试试在GPU上跑,怎么办?怎么办?
那么方法来了,谷歌提供了Google Colob可以免费试用GPU来跑代码,那么赶快来试试吧!!!
1.外网访问
谷歌访问助手破解版,无需设置推广网站的地址
https://github.com/haotian-wang/google-access-helper
2.Google Colab免费GPU服务器使用教程
参考一个博主提供的文章
https://blog.csdn.net/cocoaqin/article/details/79184540
3.例子


在此过程中,我们按照下列步骤中进行
a.可视化数据
b.基本预处理/准备数据
c.设置损失功能
d.创建模型
e.优化损失功能
4.代码展示
(1)下载图片到文件中
#下载图片到文件中
import os
img_dir = '/tmp/nst'
if not os.path.exists(img_dir):os.makedirs(img_dir)
!wget --quiet -P /tmp/nst/ https://upload.wikimedia.org/wikipedia/commons/d/d7/Green_Sea_Turtle_grazing_seagrass.jpg
!wget --quiet -P /tmp/nst/ https://upload.wikimedia.org/wikipedia/commons/0/0a/The_Great_Wave_off_Kanagawa.jpg
!wget --quiet -P /tmp/nst/ https://upload.wikimedia.org/wikipedia/commons/b/b4/Vassily_Kandinsky%2C_1913_-_Composition_7.jpg
!wget --quiet -P /tmp/nst/ https://upload.wikimedia.org/wikipedia/commons/0/00/Tuebingen_Neckarfront.jpg
!wget --quiet -P /tmp/nst/ https://upload.wikimedia.org/wikipedia/commons/6/68/Pillars_of_creation_2014_HST_WFC3-UVIS_full-res_denoised.jpg
!wget --quiet -P /tmp/nst/ https://upload.wikimedia.org/wikipedia/commons/thumb/e/ea/Van_Gogh_-_Starry_Night_-_Google_Art_Project.jpg/1024px-Van_Gogh_-_Starry_Night_-_Google_Art_Project.jpg
(2)运行代码
# 导入和配置模块
import matplotlib.pyplot as plt
import matplotlib as mpl
mpl.rcParams['figure.figsize'] = (10,10)
mpl.rcParams['axes.grid'] = Falseimport numpy as np
from PIL import Image
import time
import functoolsimport IPython.displayimport tensorflow as tf
import tensorflow.contrib.eager as tfefrom tensorflow.python.keras.preprocessing import image as kp_image
from tensorflow.python.keras import models
from tensorflow.python.keras import losses
from tensorflow.python.keras import layers
from tensorflow.python.keras import backend as Ktf.enable_eager_execution()
print("Eager execution: {}".format(tf.executing_eagerly()))# 定义全局变量
content_path = '/tmp/nst/Green_Sea_Turtle_grazing_seagrass.jpg'
style_path = '/tmp/nst/The_Great_Wave_off_Kanagawa.jpg'# 定义加载图片函数
def load_img(path_to_img):max_dim = 512img = Image.open(path_to_img)long = max(img.size)scale = max_dim/longimg = img.resize((round(img.size[0]*scale), round(img.size[1]*scale)), Image.ANTIALIAS)img = kp_image.img_to_array(img)# We need to broadcast the image array such that it has a batch dimension img = np.expand_dims(img, axis=0)return img# 定义显示图片的函数
def imshow(img, title=None):# Remove the batch dimensionout = np.squeeze(img, axis=0)# Normalize for display out = out.astype('uint8')plt.imshow(out)if title is not None:plt.title(title)plt.imshow(out)# 定义显示原内容图像和风格图像的函数
def display():plt.figure(figsize=(10,10))content = load_img(content_path).astype('uint8')style = load_img(style_path).astype('uint8')plt.subplot(1, 2, 1)imshow(content, 'Content Image')plt.subplot(1, 2, 2)imshow(style, 'Style Image')plt.show()# 定义加载和处理图像函数
def load_and_process_img(path_to_img):img = load_img(path_to_img)img = tf.keras.applications.vgg19.preprocess_input(img)return img# 定义优化输出的函数
def deprocess_img(processed_img):x = processed_img.copy()if len(x.shape) == 4:x = np.squeeze(x, 0)assert len(x.shape) == 3, ("Input to deprocess image must be an image of ""dimension [1, height, width, channel] or [height, width, channel]")if len(x.shape) != 3:raise ValueError("Invalid input to deprocessing image")# perform the inverse of the preprocessiing stepx[:, :, 0] += 103.939x[:, :, 1] += 116.779x[:, :, 2] += 123.68x = x[:, :, ::-1]x = np.clip(x, 0, 255).astype('uint8')return x# 内容层
# Content layer where will pull our feature maps
content_layers = ['block5_conv2']
# 风格层
# Style layer we are interested in
style_layers = ['block1_conv1','block2_conv1','block3_conv1', 'block4_conv1', 'block5_conv1']num_content_layers = len(content_layers)
num_style_layers = len(style_layers)# 构建模型
def get_model():""" Creates our model with access to intermediate layers. This function will load the VGG19 model and access the intermediate layers. These layers will then be used to create a new model that will take input imageand return the outputs from these intermediate layers from the VGG model. Returns:returns a keras model that takes image inputs and outputs the style and content intermediate layers. """# Load our model. We load pretrained VGG, trained on imagenet datavgg = tf.keras.applications.vgg19.VGG19(include_top=False, weights='imagenet')vgg.trainable = False# Get output layers corresponding to style and content layers style_outputs = [vgg.get_layer(name).output for name in style_layers]content_outputs = [vgg.get_layer(name).output for name in content_layers]model_outputs = style_outputs + content_outputs# Build model return models.Model(vgg.input, model_outputs)# 定义内容损失函数
def get_content_loss(base_content, target):return tf.reduce_mean(tf.square(base_content - target))# 定义函数
def gram_matrix(input_tensor):# We make the image channels first channels = int(input_tensor.shape[-1])a = tf.reshape(input_tensor, [-1, channels])n = tf.shape(a)[0]gram = tf.matmul(a, a, transpose_a=True)return gram / tf.cast(n, tf.float32)# 定义风格损失函数
def get_style_loss(base_style, gram_target):"""Expects two images of dimension h, w, c"""# height, width, num filters of each layer# We scale the loss at a given layer by the size of the feature map and the number of filtersheight, width, channels = base_style.get_shape().as_list()gram_style = gram_matrix(base_style)return tf.reduce_mean(tf.square(gram_style - gram_target))# / (4. * (channels ** 2) * (width * height) ** 2)# 定义一个反馈函数
def get_feature_representations(model, content_path, style_path):"""Helper function to compute our content and style feature representations.This function will simply load and preprocess both the content and style images from their path. Then it will feed them through the network to obtainthe outputs of the intermediate layers. Arguments:model: The model that we are using.content_path: The path to the content image.style_path: The path to the style imageReturns:returns the style features and the content features. """# Load our images in content_image = load_and_process_img(content_path)style_image = load_and_process_img(style_path)# batch compute content and style featuresstyle_outputs = model(style_image)content_outputs = model(content_image)# Get the style and content feature representations from our model style_features = [style_layer[0] for style_layer in style_outputs[:num_style_layers]]content_features = [content_layer[0] for content_layer in content_outputs[num_style_layers:]]return style_features, content_features# 定义计算损失函数
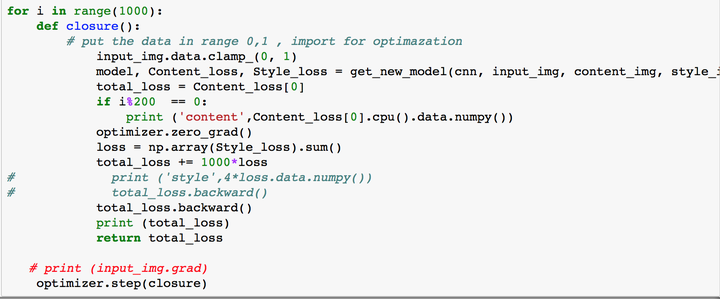
def compute_loss(model, loss_weights, init_image, gram_style_features, content_features):"""This function will compute the loss total loss.Arguments:model: The model that will give us access to the intermediate layersloss_weights: The weights of each contribution of each loss function. (style weight, content weight, and total variation weight)init_image: Our initial base image. This image is what we are updating with our optimization process. We apply the gradients wrt the loss we are calculating to this image.gram_style_features: Precomputed gram matrices corresponding to the defined style layers of interest.content_features: Precomputed outputs from defined content layers of interest.Returns:returns the total loss, style loss, content loss, and total variational loss"""style_weight, content_weight = loss_weights# Feed our init image through our model. This will give us the content and # style representations at our desired layers. Since we're using eager# our model is callable just like any other function!model_outputs = model(init_image)style_output_features = model_outputs[:num_style_layers]content_output_features = model_outputs[num_style_layers:]style_score = 0content_score = 0# Accumulate style losses from all layers# Here, we equally weight each contribution of each loss layerweight_per_style_layer = 1.0 / float(num_style_layers)for target_style, comb_style in zip(gram_style_features, style_output_features):style_score += weight_per_style_layer * get_style_loss(comb_style[0], target_style)# Accumulate content losses from all layers weight_per_content_layer = 1.0 / float(num_content_layers)for target_content, comb_content in zip(content_features, content_output_features):content_score += weight_per_content_layer* get_content_loss(comb_content[0], target_content)style_score *= style_weightcontent_score *= content_weight# Get total lossloss = style_score + content_score return loss, style_score, content_score# 定义计算渐变函数
def compute_grads(cfg):with tf.GradientTape() as tape: all_loss = compute_loss(**cfg)# Compute gradients wrt input imagetotal_loss = all_loss[0]return tape.gradient(total_loss, cfg['init_image']), all_loss# 定义优化循环函数
def run_style_transfer(content_path, style_path,num_iterations=1000,content_weight=1e3, style_weight=1e-2): # We don't need to (or want to) train any layers of our model, so we set their# trainable to false. model = get_model() for layer in model.layers:layer.trainable = False# Get the style and content feature representations (from our specified intermediate layers) style_features, content_features = get_feature_representations(model, content_path, style_path)gram_style_features = [gram_matrix(style_feature) for style_feature in style_features]# Set initial imageinit_image = load_and_process_img(content_path)init_image = tfe.Variable(init_image, dtype=tf.float32)# Create our optimizeropt = tf.train.AdamOptimizer(learning_rate=5, beta1=0.99, epsilon=1e-1)# For displaying intermediate images iter_count = 1# Store our best resultbest_loss, best_img = float('inf'), None# Create a nice config loss_weights = (style_weight, content_weight)cfg = {'model': model,'loss_weights': loss_weights,'init_image': init_image,'gram_style_features': gram_style_features,'content_features': content_features}# For displayingnum_rows = 2num_cols = 5display_interval = num_iterations/(num_rows*num_cols)start_time = time.time()global_start = time.time()norm_means = np.array([103.939, 116.779, 123.68])min_vals = -norm_meansmax_vals = 255 - norm_means imgs = []for i in range(num_iterations):grads, all_loss = compute_grads(cfg)loss, style_score, content_score = all_lossopt.apply_gradients([(grads, init_image)])clipped = tf.clip_by_value(init_image, min_vals, max_vals)init_image.assign(clipped)end_time = time.time() if loss < best_loss:# Update best loss and best image from total loss. best_loss = lossbest_img = deprocess_img(init_image.numpy())if i % display_interval== 0:start_time = time.time()# Use the .numpy() method to get the concrete numpy arrayplot_img = init_image.numpy()plot_img = deprocess_img(plot_img)imgs.append(plot_img)IPython.display.clear_output(wait=True)IPython.display.display_png(Image.fromarray(plot_img))print('Iteration: {}'.format(i)) print('Total loss: {:.4e}, ' 'style loss: {:.4e}, ''content loss: {:.4e}, ''time: {:.4f}s'.format(loss, style_score, content_score, time.time() - start_time))print('Total time: {:.4f}s'.format(time.time() - global_start))IPython.display.clear_output(wait=True)plt.figure(figsize=(14,4))for i,img in enumerate(imgs):plt.subplot(num_rows,num_cols,i+1)plt.imshow(img)plt.xticks([])plt.yticks([])return best_img, best_loss# 定义结果展示函数
def show_results(best_img, content_path, style_path, show_large_final=True):plt.figure(figsize=(10, 5))content = load_img(content_path) style = load_img(style_path)plt.subplot(1, 2, 1)imshow(content, 'Content Image')plt.subplot(1, 2, 2)imshow(style, 'Style Image')if show_large_final: plt.figure(figsize=(10, 10))plt.imshow(best_img)plt.title('Output Image')plt.show()# 显示结果
best, best_loss = run_style_transfer(content_path, style_path, num_iterations=1000)Image.fromarray(best)
show_results(best, content_path, style_path)5.结果展示
(1)过程展示


(2)最终结果

五、项目地址
链接:https://pan.baidu.com/s/1MydlfdfLRYUigZVhKwj7kw
提取码:utmt
github链接