Buildroot编译hisi平台根文件系统
文章目录
- 1. 下载Buildroot源码
- 2. Menuconfig配置
- 3. 编译Buildroot
- 3.1 手动下载软件包
- 3.2 kernel header 报错
- 3.3 `arm-hisiv300-linux-gcc-ar:cannot find plugin liblto_plugin.so`
- 3.4 `/media/data/hisi/buildroot-2022.02.8/output/host/arm-buildroot-linux-uclibcgnueabi/sysroot/usr/lib/armv5te_arm9_soft/libm.so: file not recognized: Is a directory`
- 3.5 `/opt/hisi-linux/x86-arm/arm-hisiv300-linux/bin/../lib/gcc/arm-hisiv300-linux-uclibcgnueabi/4.8.3/../../../../arm-hisiv300-linux-uclibcgnueabi/bin/ld: cannot find libc.so.0`
- 3.6 `fallocate.c:(.text.fallocate_main+0xa0): undefined reference to 'posix_fallocate'`
- 3.7 其它错误
- 4. 烧录测试
记录一次Buildroot构建根文件系统的经历。使用buildroot构建imx6ull平台的根文件系统,参考整点原子的教程,过程十分顺利,换成hisi倒是遇到很多问题,这里做个记录。
1. 下载Buildroot源码
进入Buildroot官网下载。这里直接下载最新版本的长期支持的release源码,版本是2022.02.8。
复制到docker编译环境的共享文件夹中,然后解压。docker环境中已经安装了arm-hisiv300-linux 编译工具链。由于我使用的docker容器是ubuntu18,因此建议直接下载最新的Buildroot,因为使用老版本,可能会遇到更多的编译问题,最好是换个老点的系统。为了不更换系统,这里直接使用最新版本的Buildroot。
$ docker start hisi
$ docker exec -it -u duapple hisi /bin/bash
duapple@92fa1c7e1a00:/media/data/hisi/buildroot-2022.02.8$ ls
CHANGES  Config.in         DEVELOPERS  Makefile.legacy  arch   boot     docs  linux    support  toolchain
COPYING  Config.in.legacy  Makefile    README           board  configs  fs    package  system   utils
2. Menuconfig配置
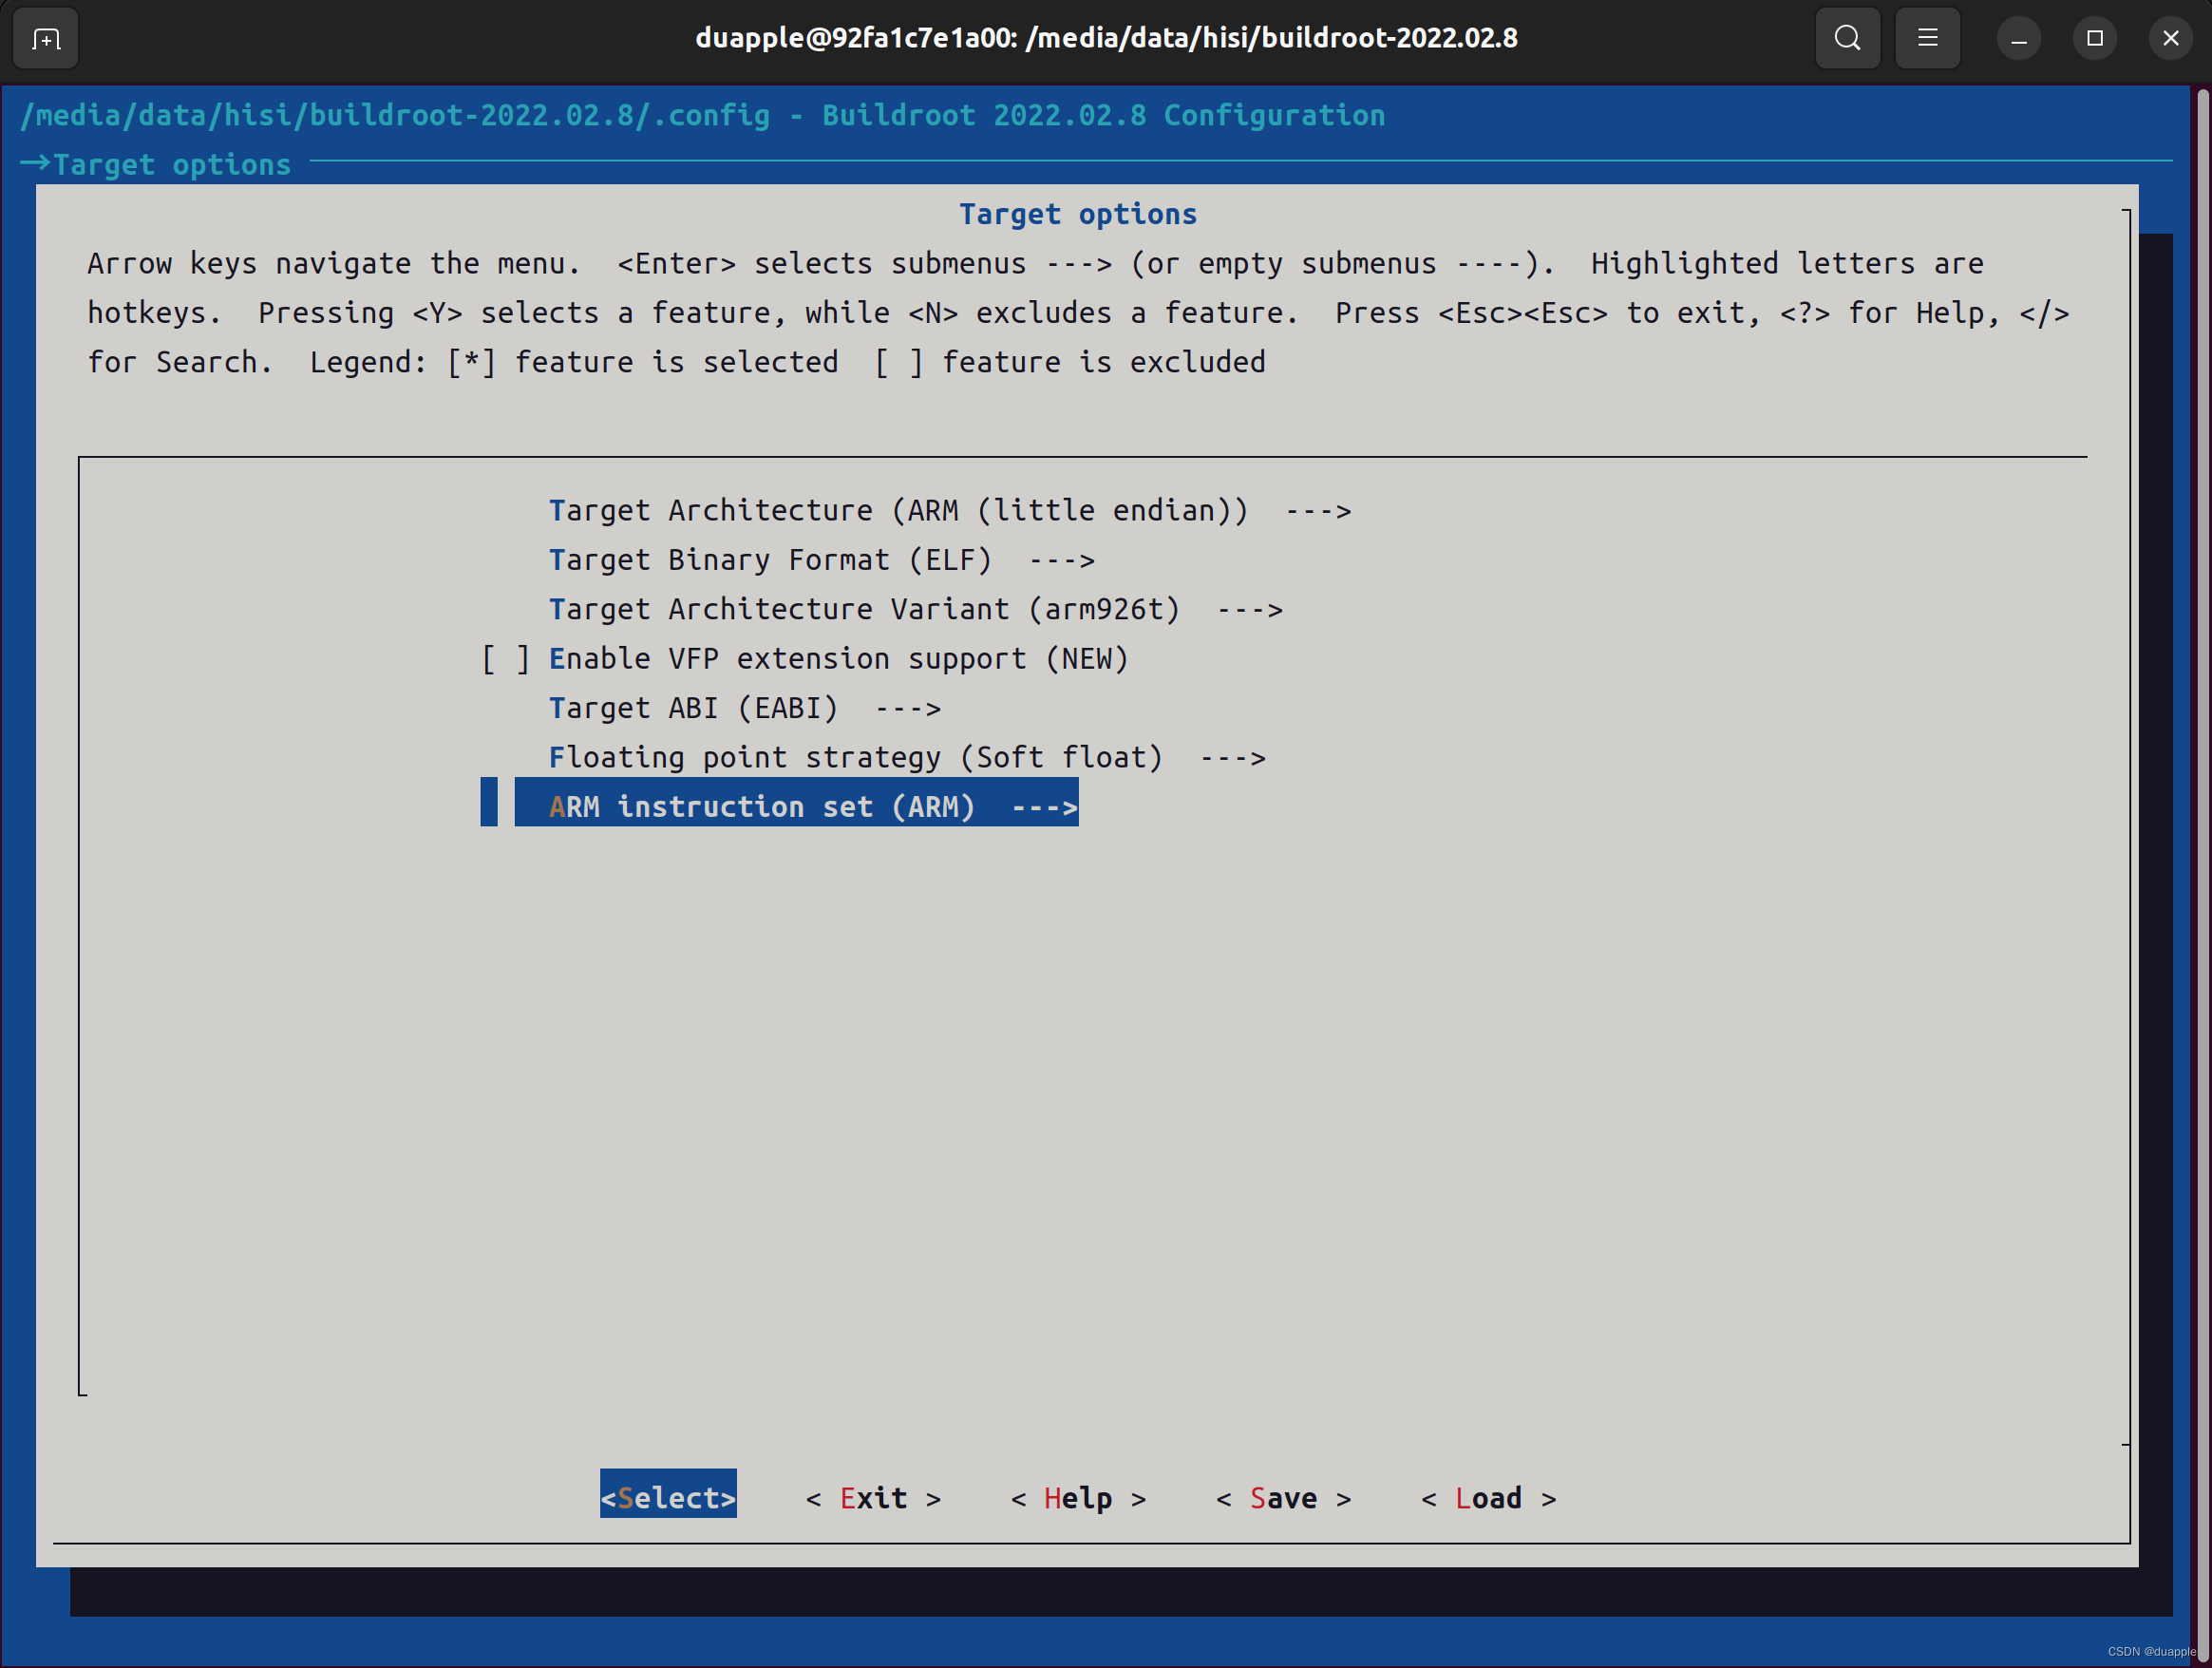
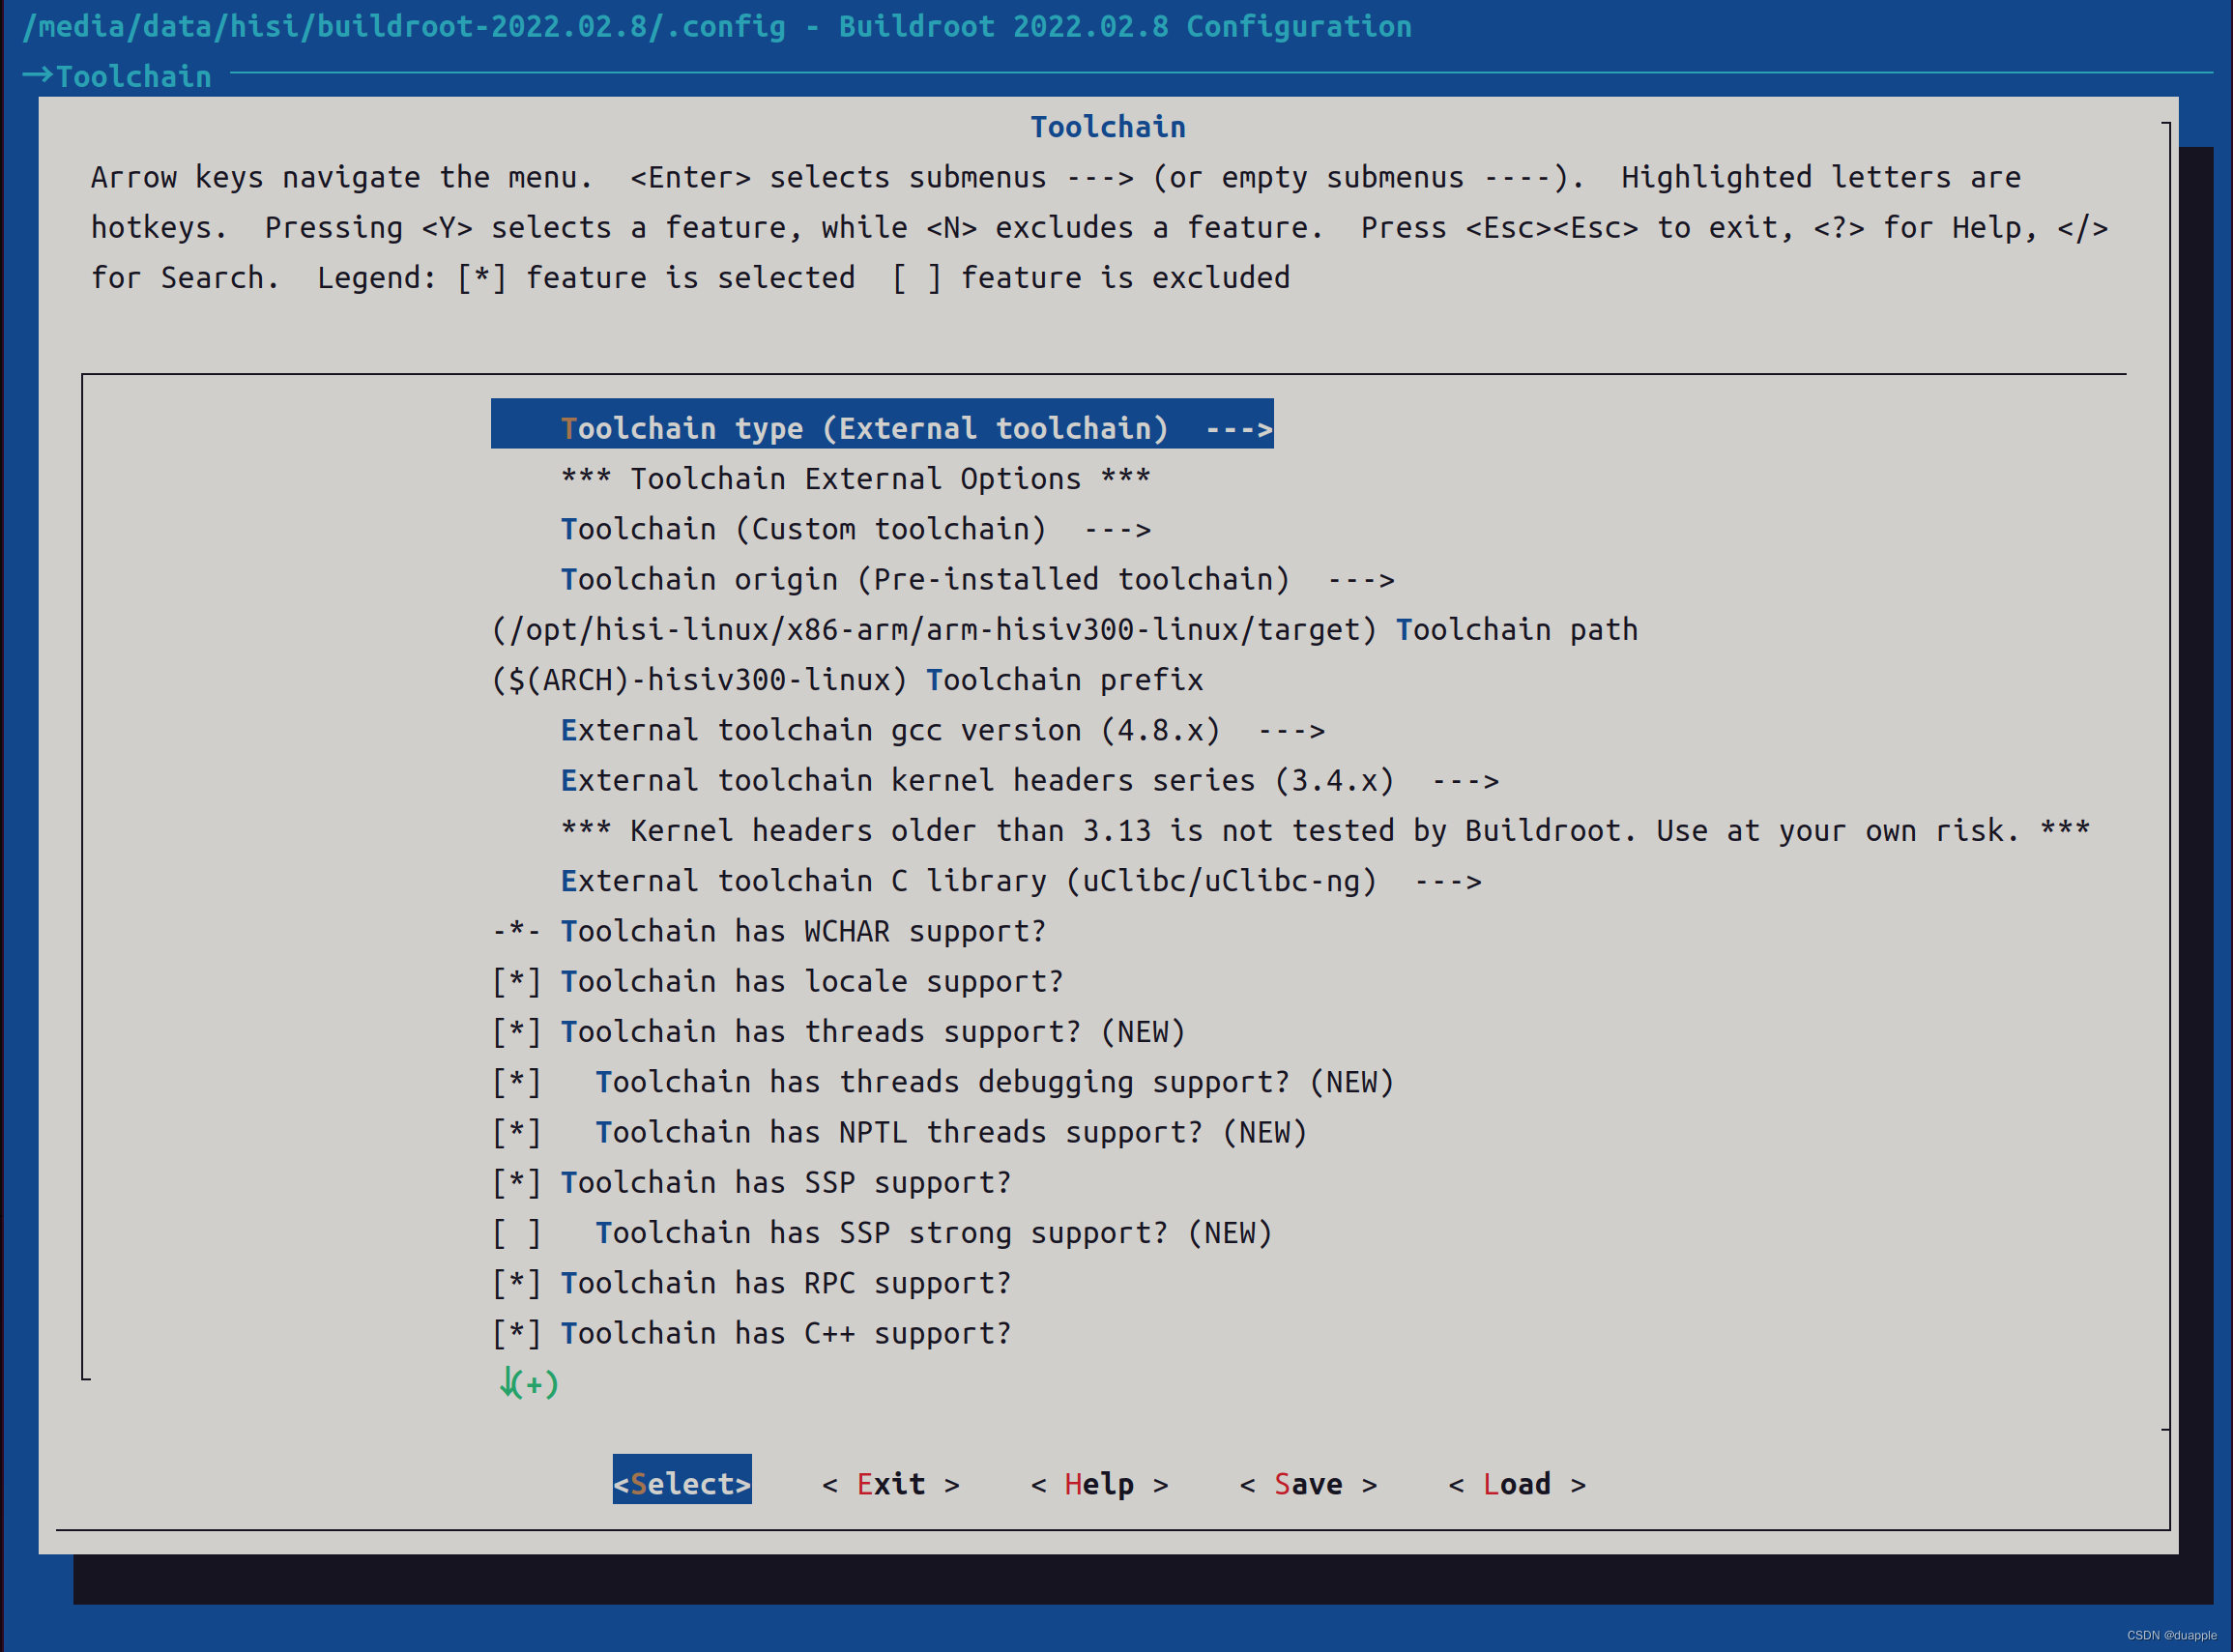
一般来说,会先从config 中寻找支持的芯片板卡默认配置文件。将其辅助到buildroot根目录,并命名为.config,这样就能使用某个芯片的默认配置了。但是新版的Buildroot源码中已经没有hisi的默认配置了。为了知道怎么配置架构,在网上找到了曾经适配好hisi平台的Buildroot源码,使用sudo make menuconfig 查看了它的默认配置,主要配置Target options、Toolchain 、System configuration 、Filesystem images 。
由于不是Buildroot构建Kernel和 Uboot ,所以不需要配置Kernel和Bootloaders。这里也不构建交叉编译工具链,直接使用外部工具链即hisi的交叉编译工具链。
注意,不要使用该源码的.config,不能通过复制该.config 到我们下载的Buildroot源码目录。由于该源码是15年的,比较久远了,配置文件可能存在一些兼容性问题,会导致配置无法保存生效。因此打开该源码的menuconfig,在新源码中进行相应的配置即可。如果是版本较劲的Buildroot源码,可以直接使用。该源码的config 目录下有hi3518e_defconfig 文件,可以作为我们的参考配置。
配置Target options
配置Toolchain
这里使用外部工具链。工具链gcc版本可以通过arm-hisiv300-linux-gcc -v进行查看。与参考的Buildroot里面并不一致。
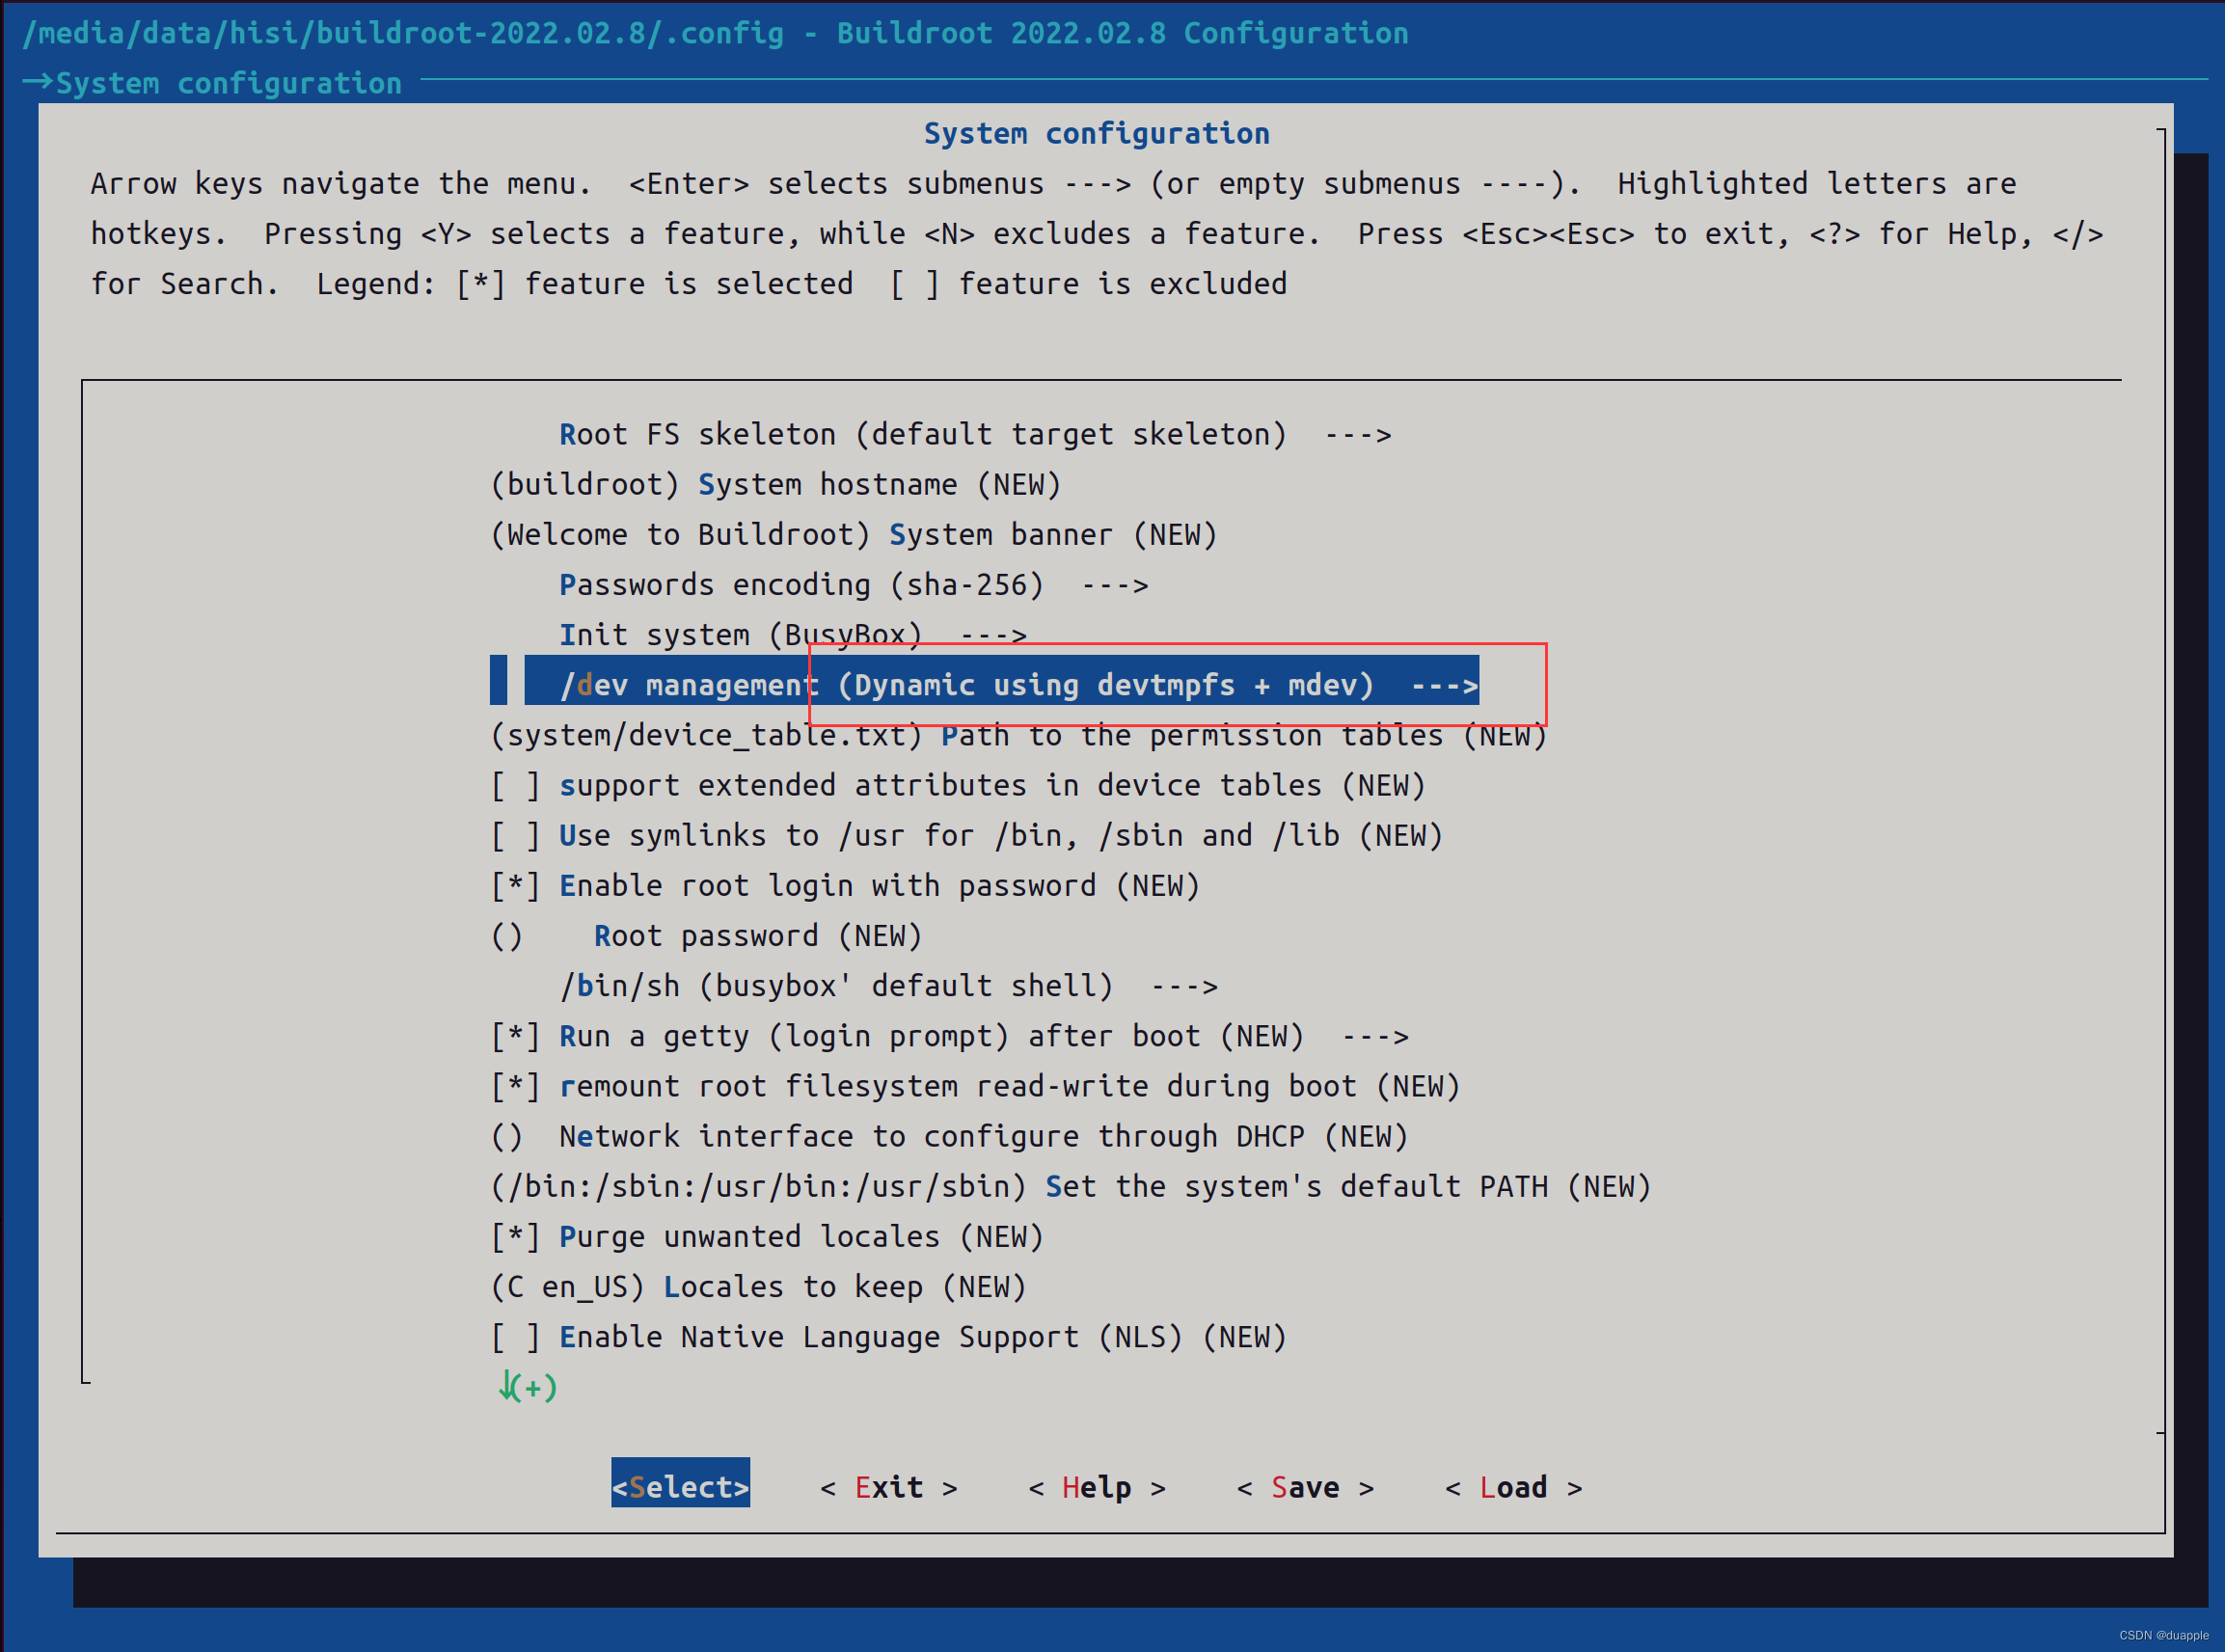
配置System configuration
这里需要配置mdev,否则/dev下不会自动生成设备,无法进入console。另外还可以配置欢迎语与登陆密码。
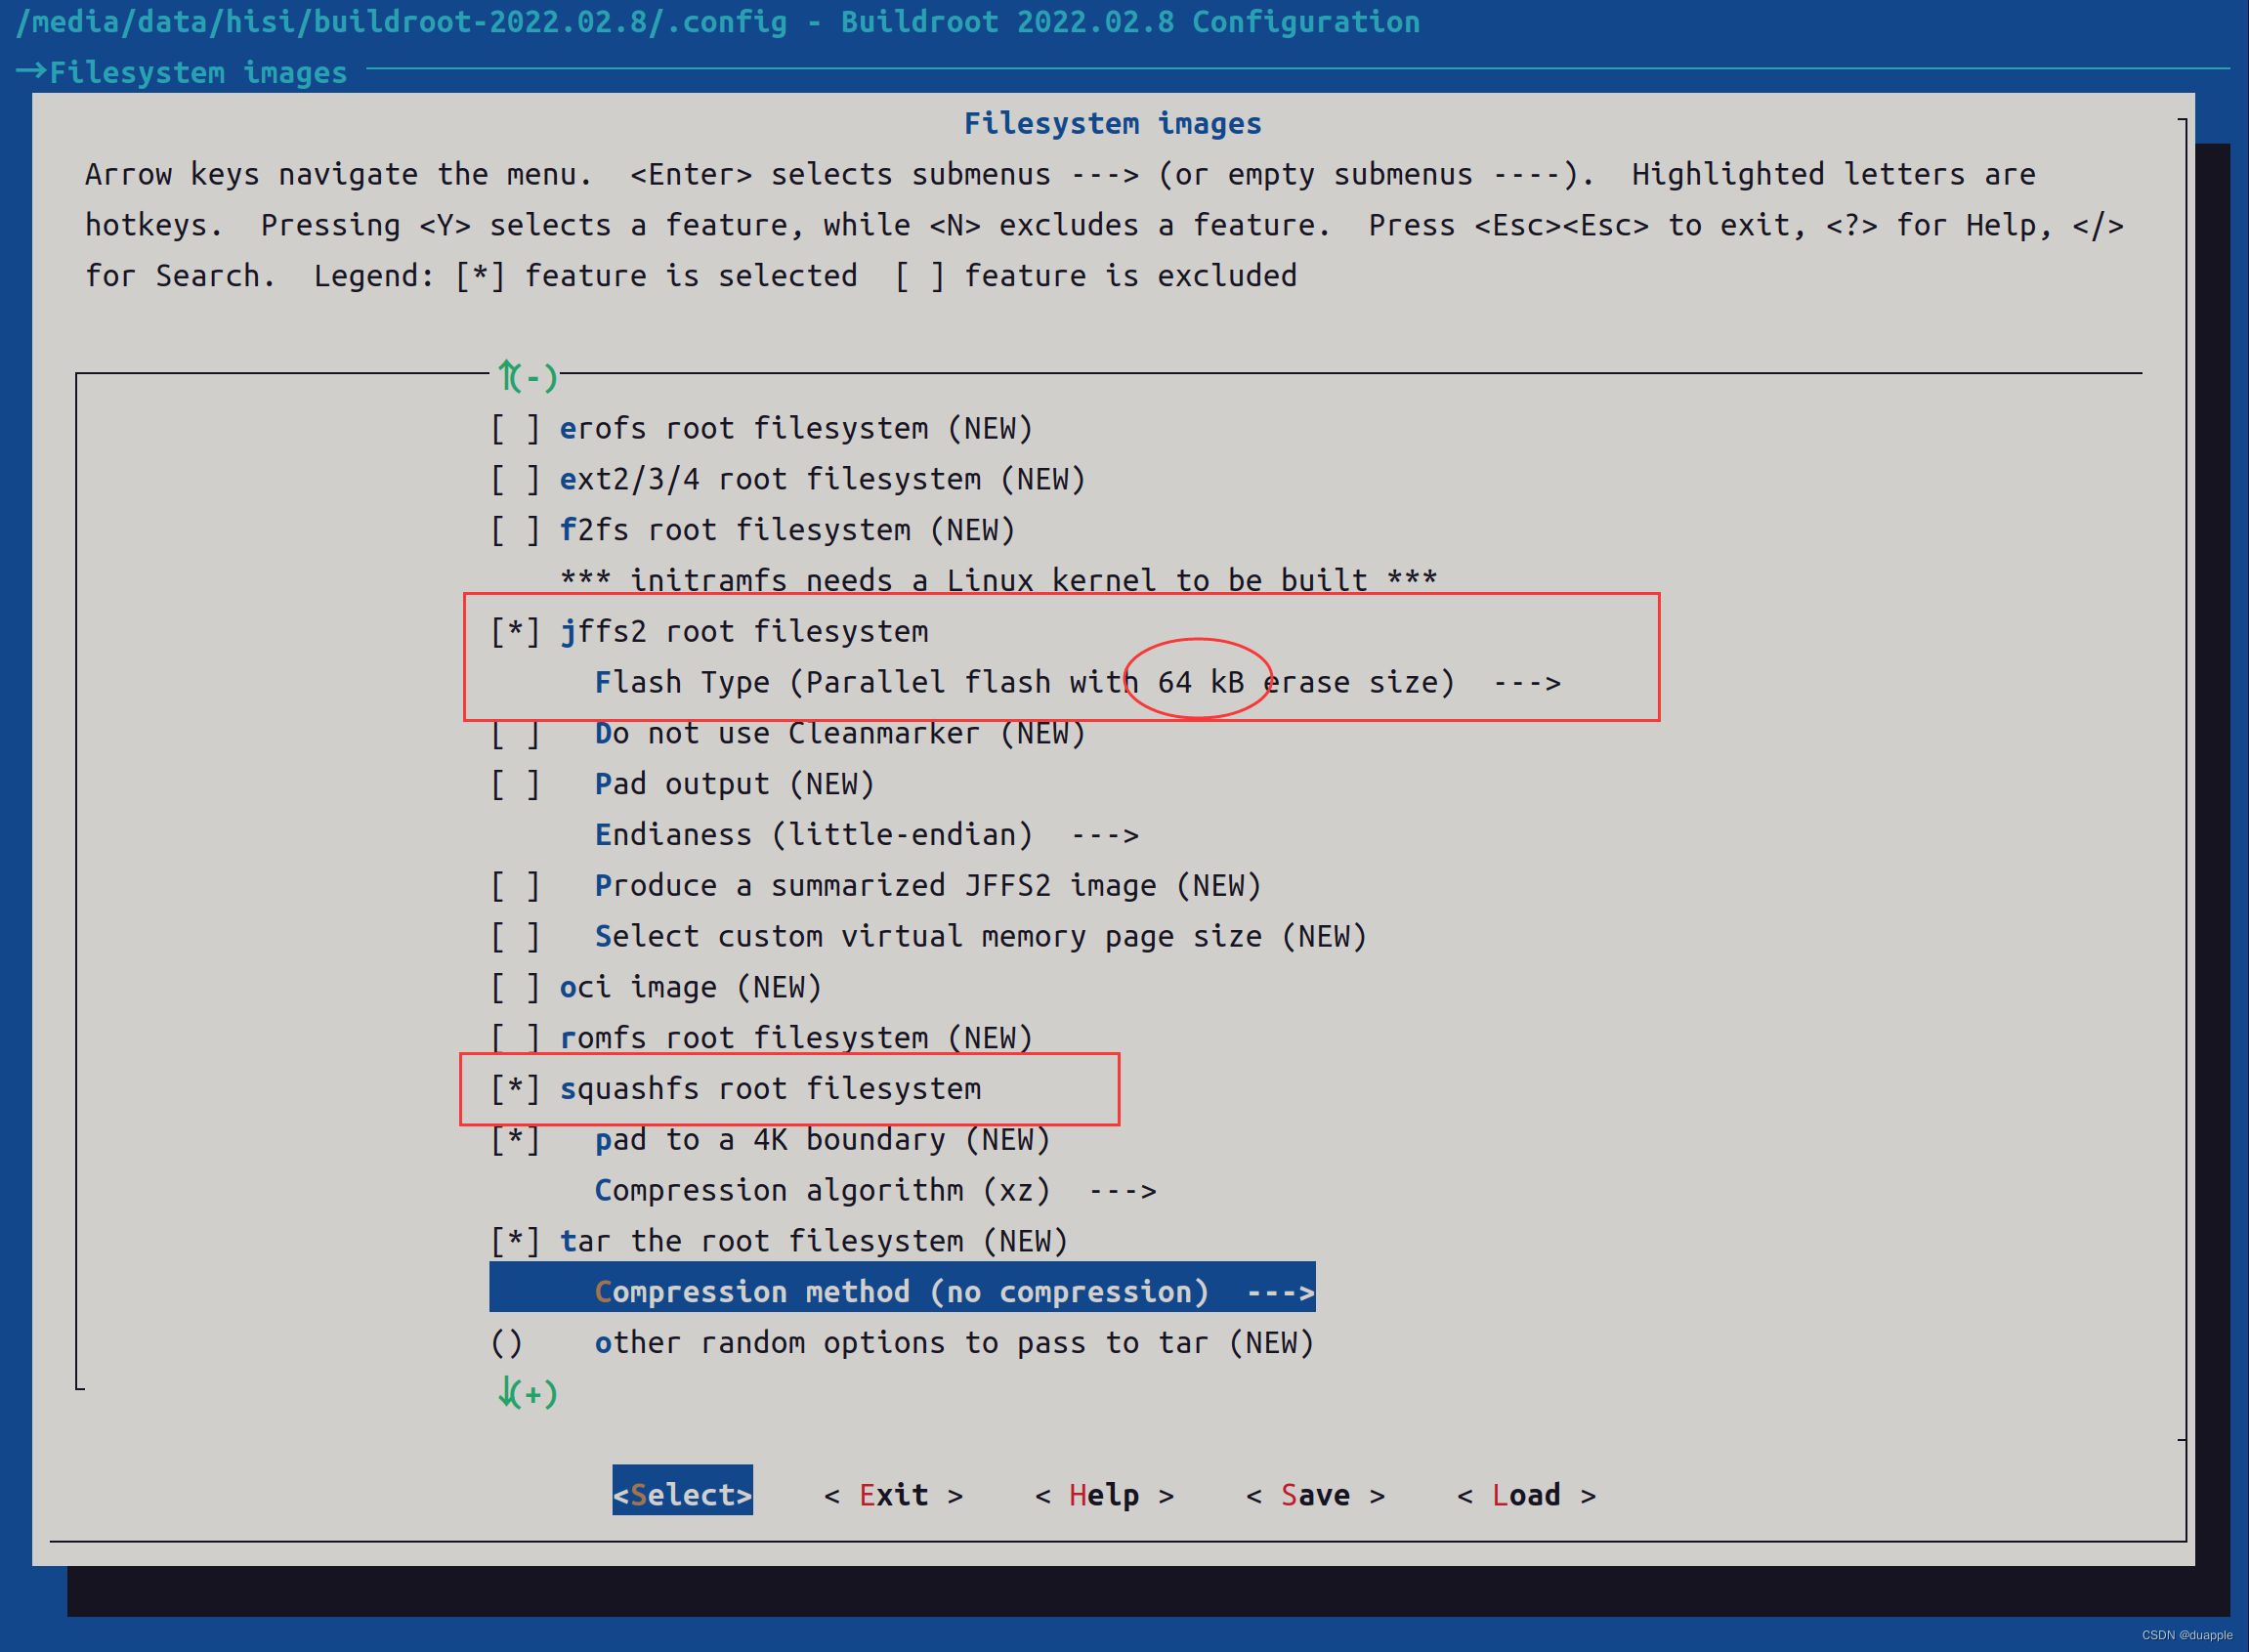
配置Filesystem images
这里选两个常用文件系统格式配置,jffs2和squashfs。注意这里我使用的hisi的flash的jffs2块大小是64k,因此需要配置64kb。jffs2支持写入,squashfs能够做到最大压缩。
取消Kernel编译
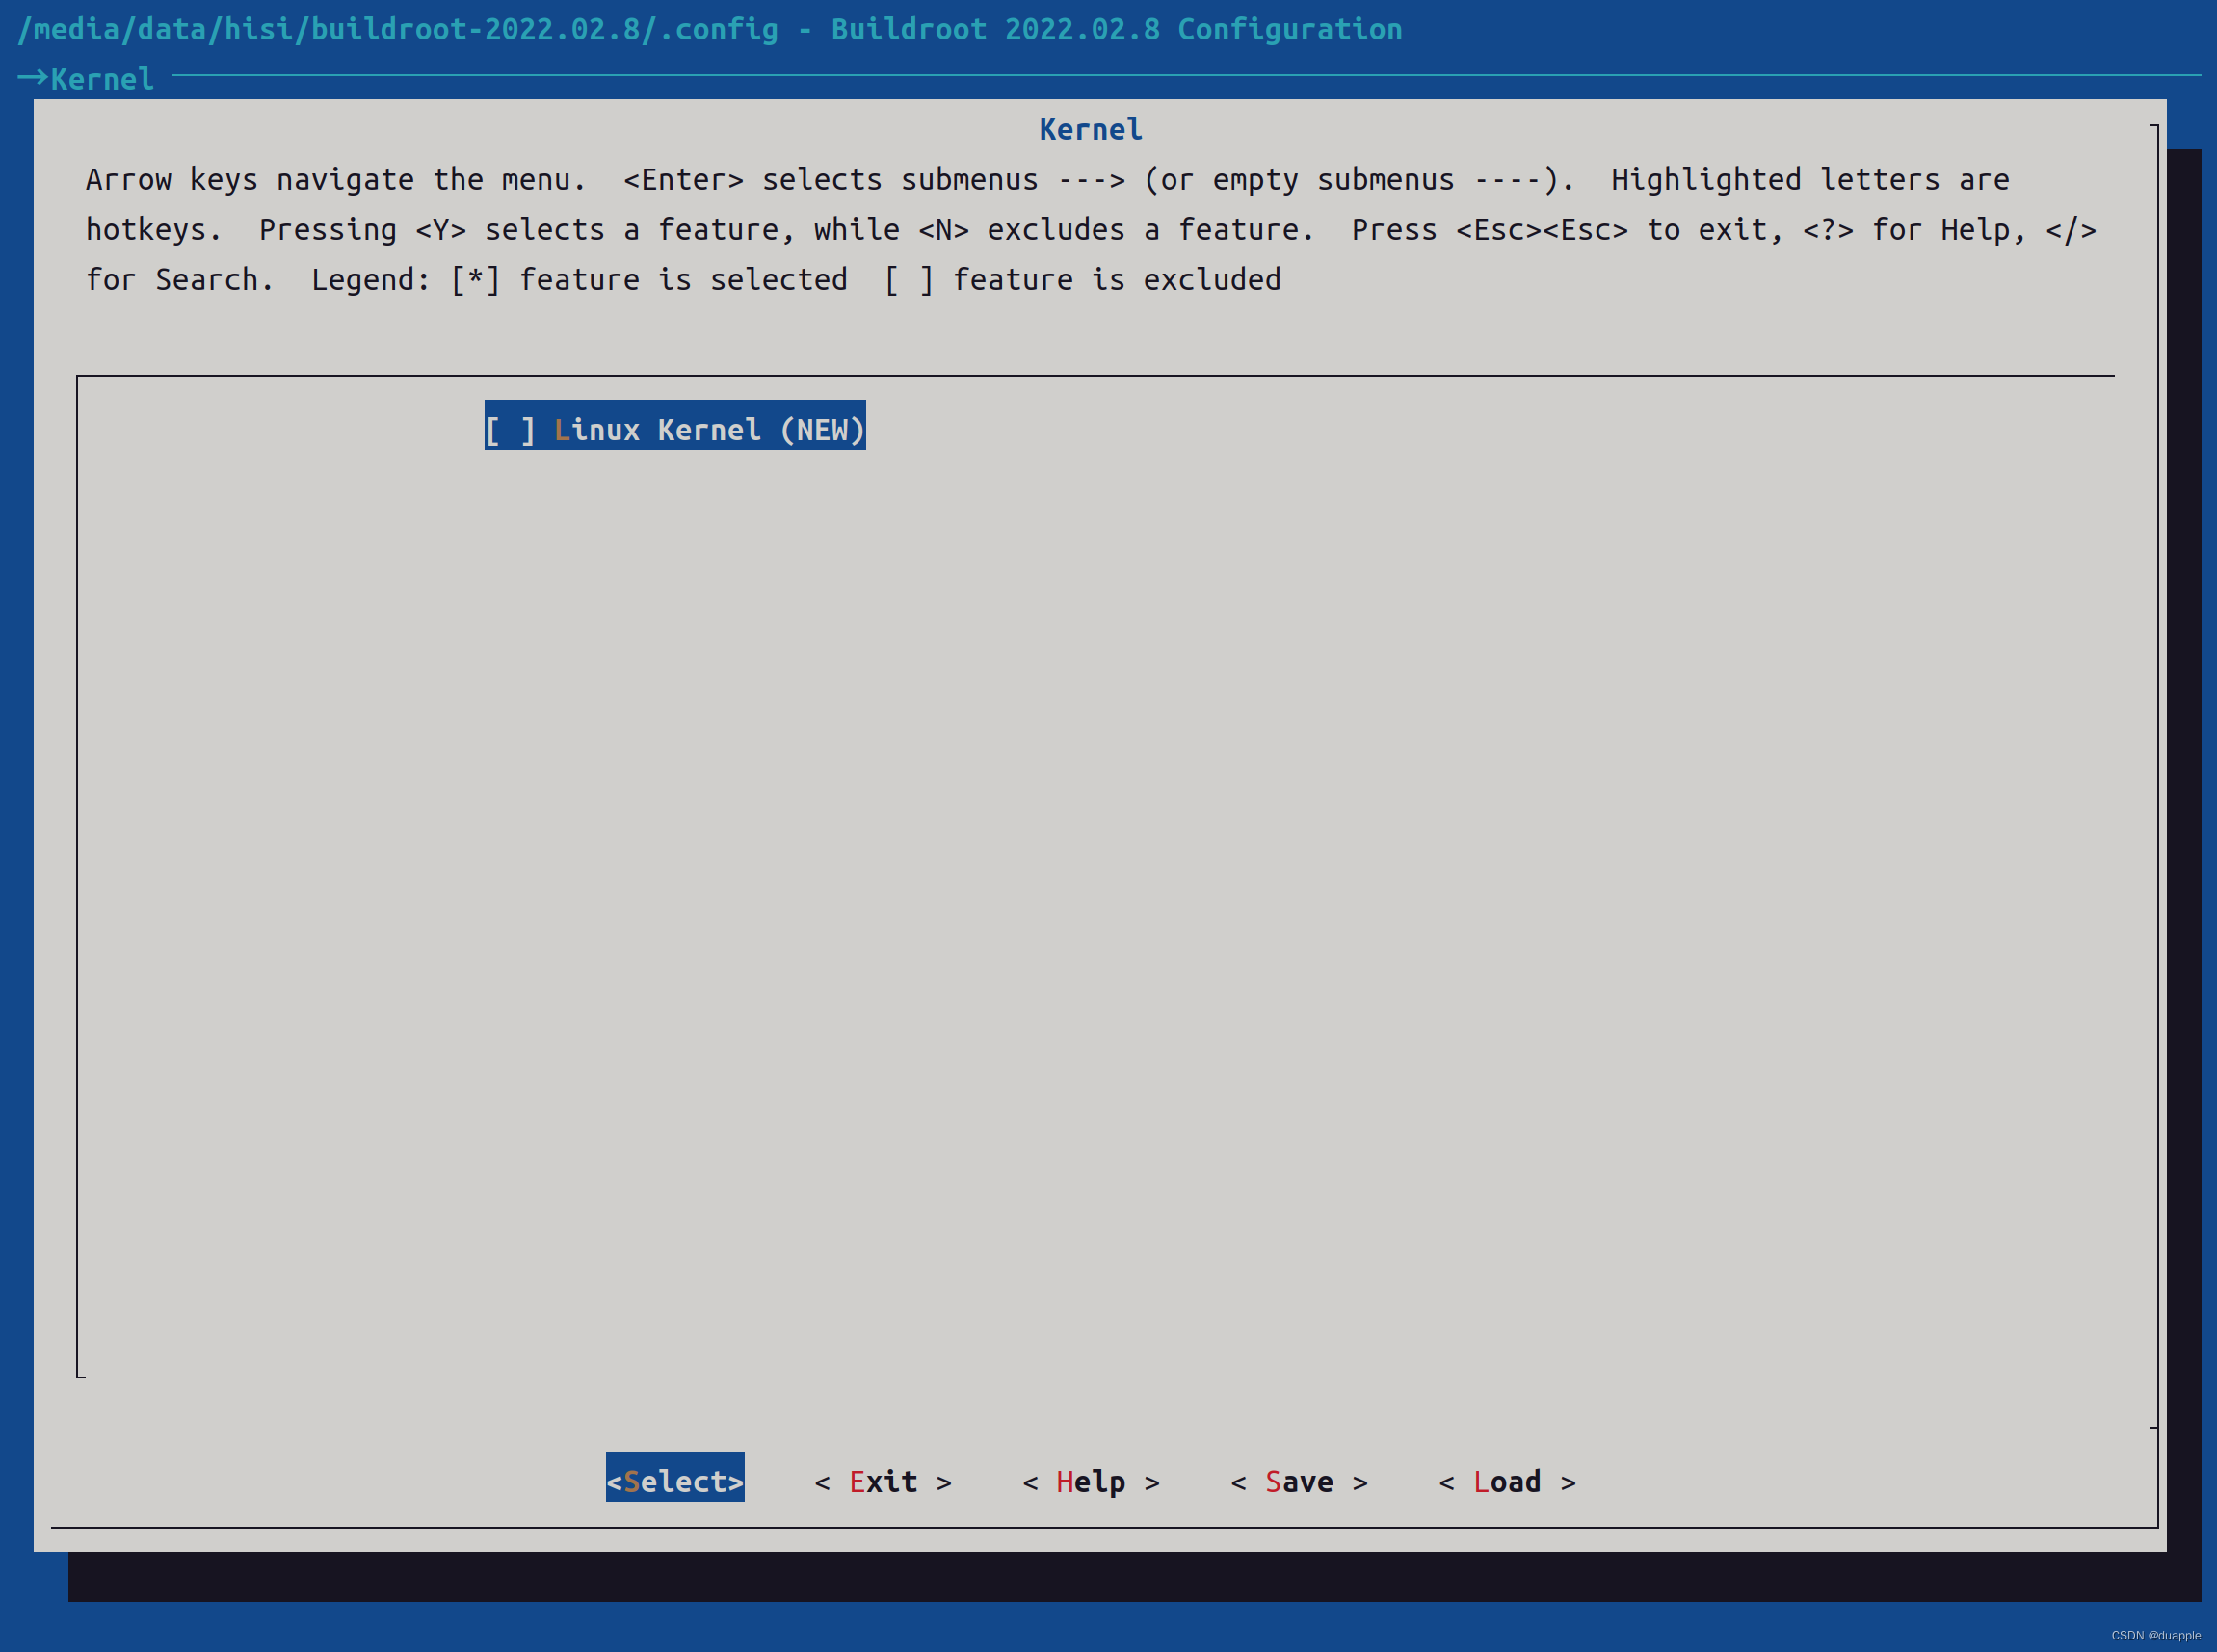
取消Uboot编译

配置完成后退出并保存配置。可以先复制一份配置好的到configs目录备份。
cp .config configs/hi3518e_defconfig
3. 编译Buildroot
编译工具链和Kernel会有很多问题,因此前面选择不编译工具链和Kernel。直接使用Hisi提供的能够直接编译成功的Kernel。但是依然还需要解决一些问题。
执行编译:
sudo make
之后Buildroot会开始根据我们的配置下载软件包进行编译。软件包下载过程,可能会遇到下不动的软件包,我们直接在输出日志中找到链接,手动下载到dl目录下。然后重新执行sudo make 。可以使用proxychains代理wget,或者直接使用浏览器下载。
接下来慢慢等待第一个编译问题。
3.1 手动下载软件包
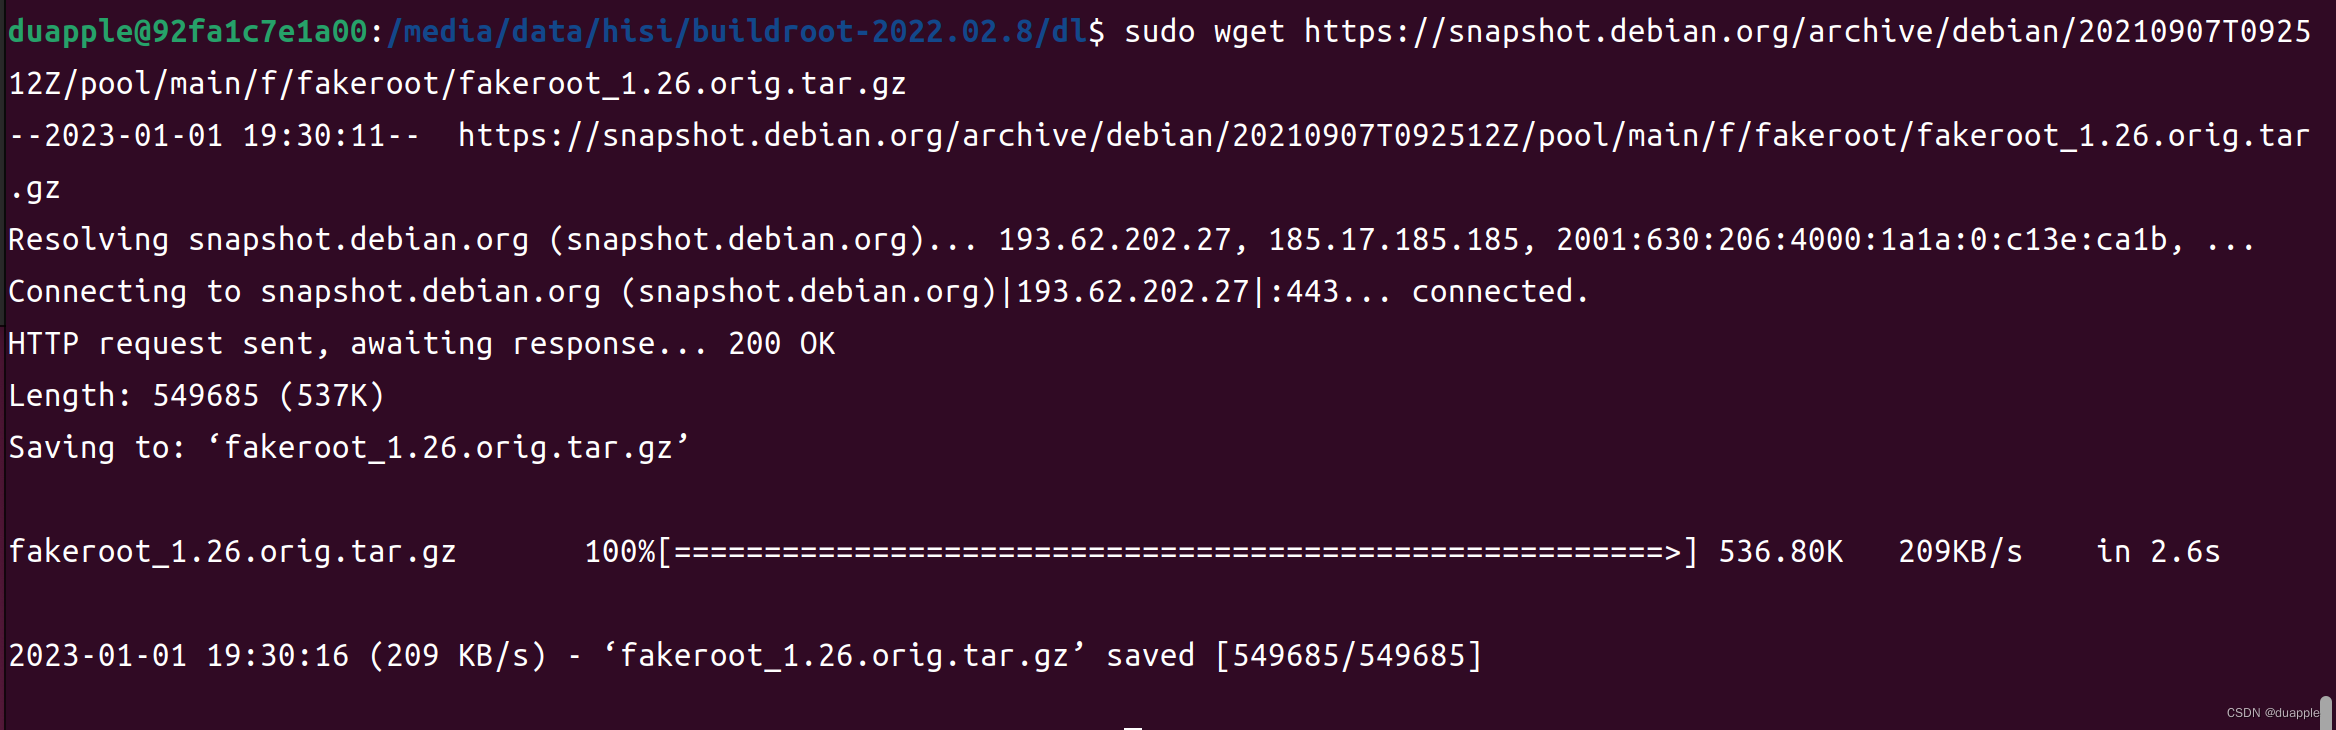
首先就出现了host-fakeroot 软件包下载不动,下载到84%就停住了。这里直接终止编译,手动下载软件包,再重新编译。
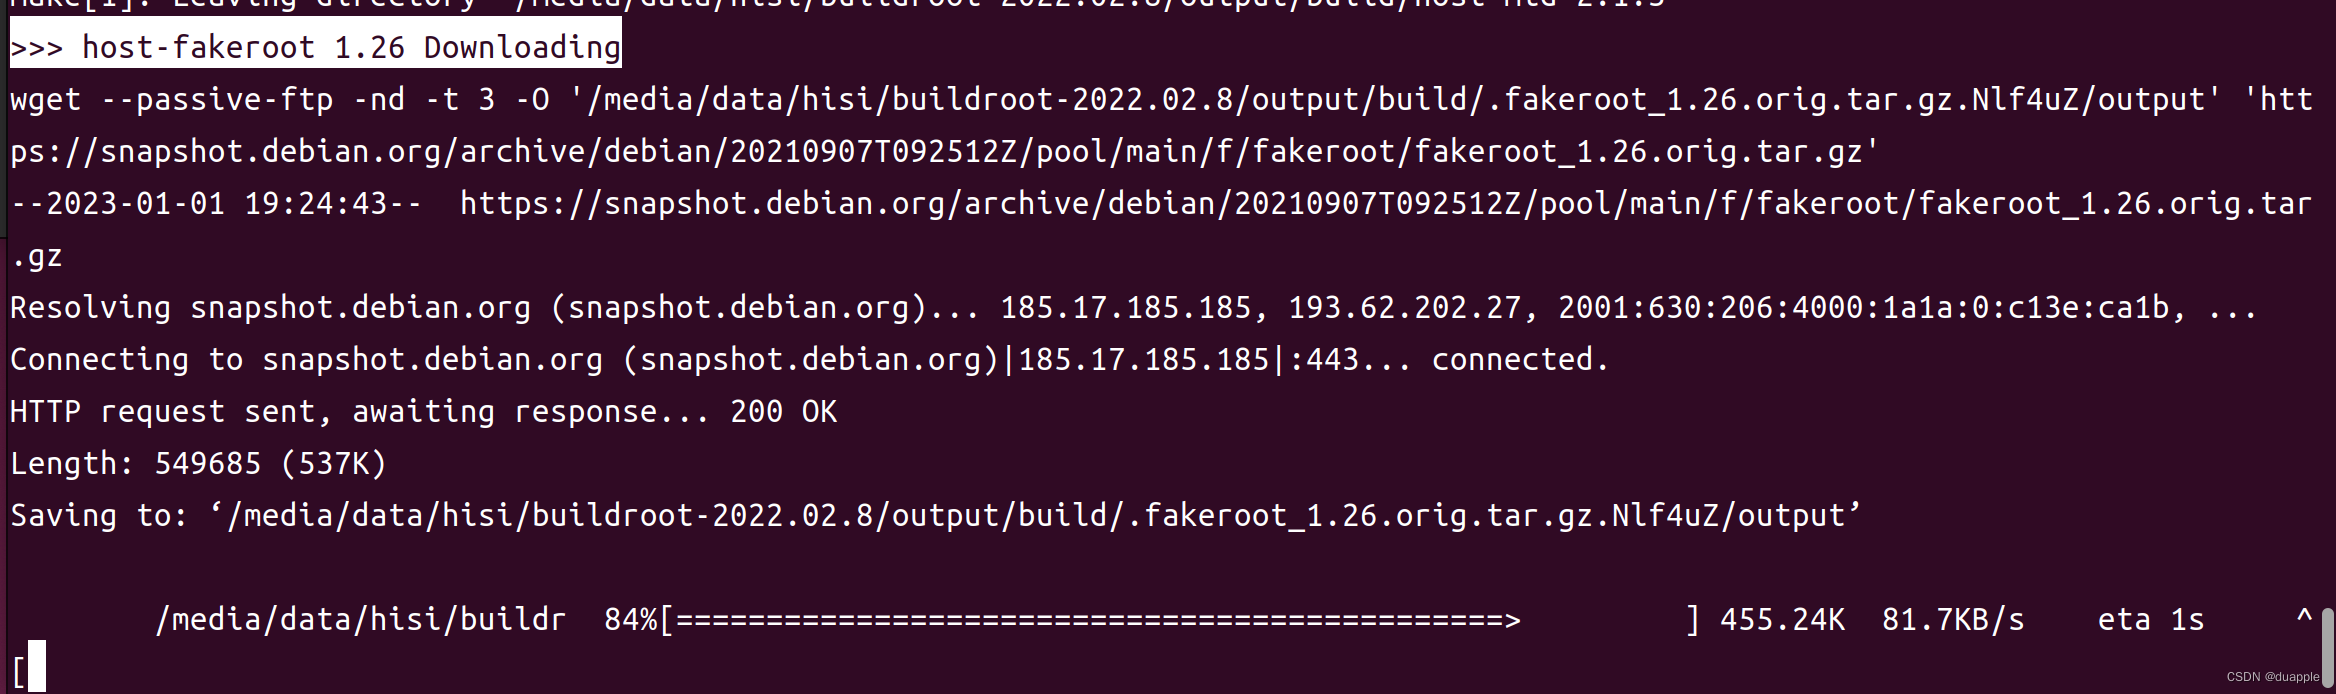
cd dl
sudo wget https://snapshot.debian.org/archive/debian/20210907T092512Z/pool/main/f/fakeroot/fakeroot_1.26.orig.tar.gz
重新编译:
cd ../
sudo make
另外,如果有其它软件包下载不动,也是通过手动下载的方式解决。
3.2 kernel header 报错
>>> toolchain-external-custom  Extracting
>>> toolchain-external-custom  Patching
>>> toolchain-external-custom  Configuring
Incorrect selection of kernel headers: expected 3.4.x, got 3.5.x
make: *** [package/pkg-generic.mk:283: /media/data/hisi/buildroot-2022.02.8/output/build/toolchain-external-custom/.stamp_configured] Error 1
报上面的错,根据旧Buildroot的配置,头文件版本我们配置的3.4.x,这里提示识别到的是3.5.x。因此在menuconfig中,修改其为3.5.x 。同样的,gcc版本,前面也是修改过的,以我们的实际版为准。
修改后,保存,并备份.config ,重新编译。
3.3 arm-hisiv300-linux-gcc-ar:cannot find plugin liblto_plugin.so
参考:https://developer.aliyun.com/ask/130445
修改arm-hisiv300-linux-gcc-ar软链接到arm-hisiv300-linux-ar 。
sudo apt install lib32z1-dev
cd output/host/bin
sudo ln -sf /opt/hisi-linux/x86-arm/arm-hisiv300-linux/target/bin/arm-hisiv300-linux-ar arm-hisiv300-linux-gcc-ar
3.4 /media/data/hisi/buildroot-2022.02.8/output/host/arm-buildroot-linux-uclibcgnueabi/sysroot/usr/lib/armv5te_arm9_soft/libm.so: file not recognized: Is a directory
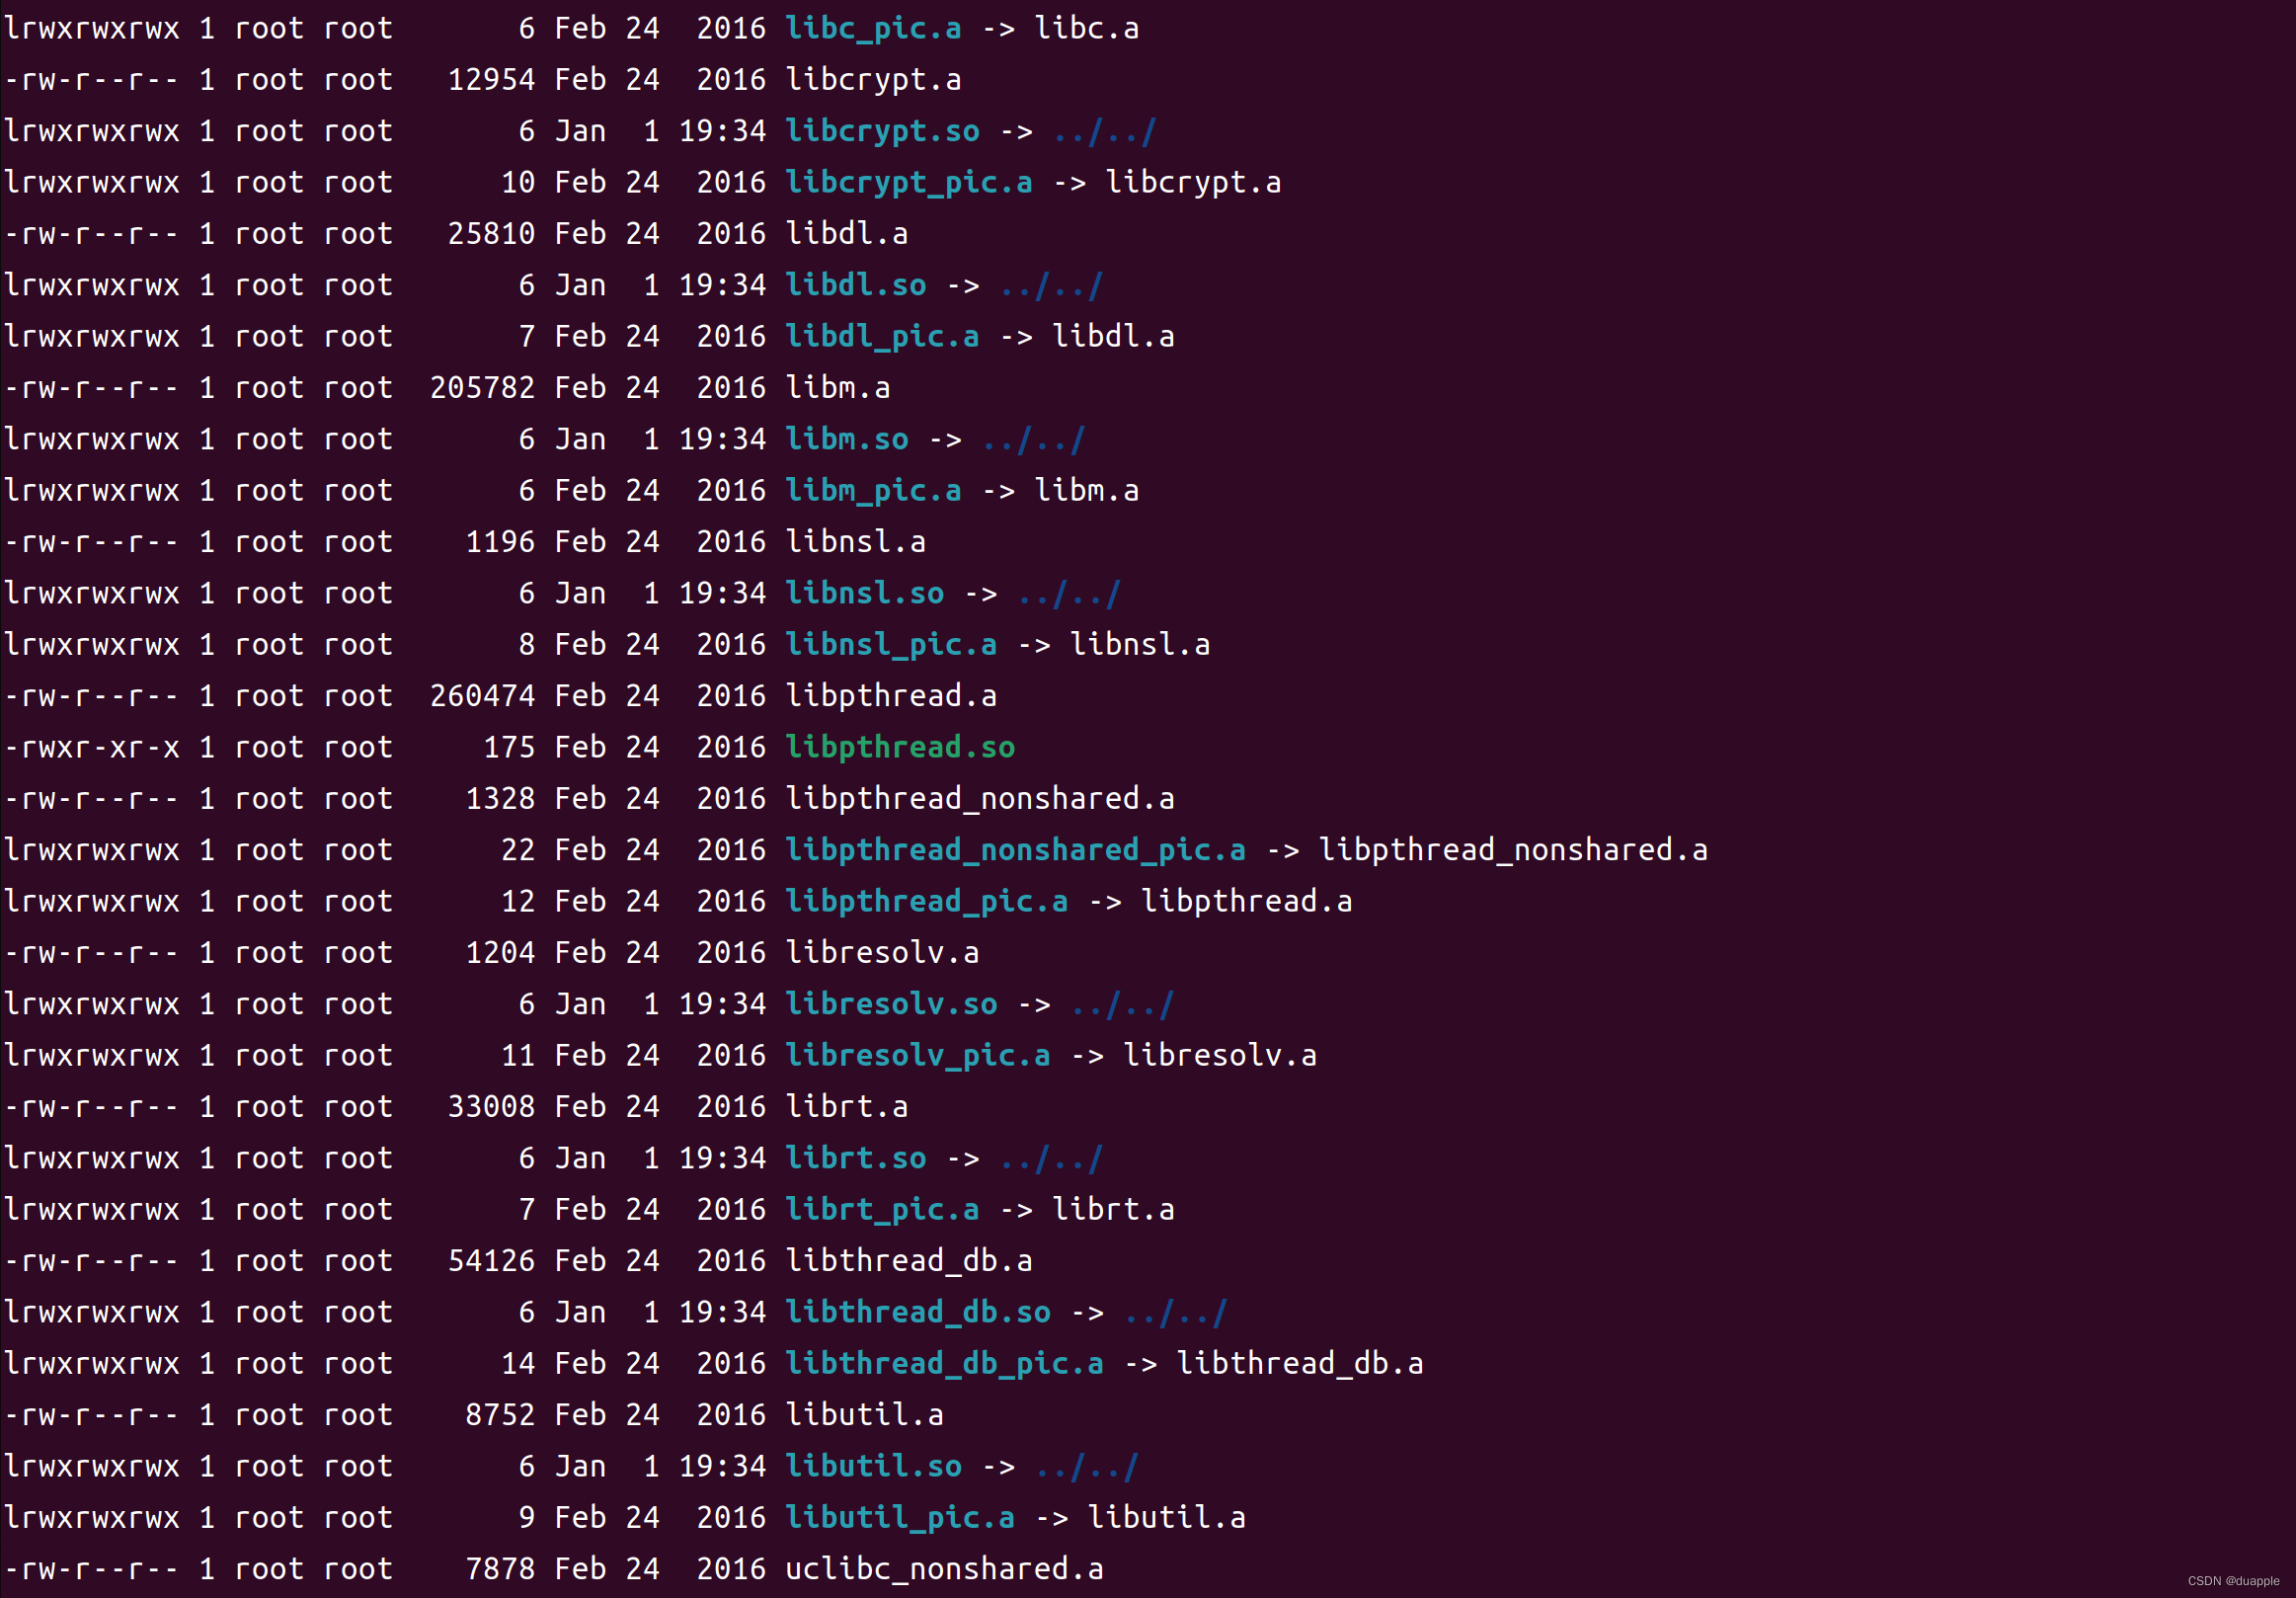
进入这个/media/data/hisi/buildroot-2022.02.8/output/host/arm-buildroot-linux-uclibcgnueabi/sysroot/usr/lib/armv5te_arm9_soft/目录。可以看到文件动态库的链接都被链接到目录上了。因此报错libm.so是一个目录,并不是一个动态库。
解决办法是将hisi工具链中的动态库复制到这个目录,重新生成这些软链接。
先进入hisi交叉编译工具链目录,然后查找这些动态库。
duapple@92fa1c7e1a00:/media/data/hisi/buildroot-2022.02.8/output/host/arm-buildroot-linux-uclibcgnueabi/sysroot/usr/lib/armv5te_
arm9_soft$ cd /opt/hisi-linux/x86-arm/arm-hisiv300-linux/
duapple@92fa1c7e1a00:/opt/hisi-linux/x86-arm/arm-hisiv300-linux$ find . -name libm.so
./target/usr/lib/a9_softfp_vfp/libm.so
./target/usr/lib/a7_softfp_neon-vfpv4/libm.so
./target/usr/lib/libm.so
./target/usr/lib/a9_vfpv3_neon/libm.so
./target/usr/lib/a9_hard_neon/libm.so
./target/usr/lib/armv5te_arm9_soft/libm.so
./target/usr/lib/a9_soft/libm.so
./target/usr/lib/armv5te_arm9_vfp/libm.so
./target/usr/lib/a9_softfp_vfpv3-d16/libm.so
./target/usr/lib/a7_softfp_vfpv4/libm.so
./target/usr/lib/a7_hard_neon-vfpv4/libm.so
./target/usr/lib/a7_soft/libm.so
上面报错的目录是arm-buildroot-linux-uclibcgnueabi/sysroot/usr/lib/armv5te_ arm9_soft,因此在我们查找到的结果中,找到对应的目录文件,应该./target/usr/lib/armv5te_arm9_soft/libm.so ,复制到上面报错的目录。但是由于这个文件是软链接,我们需要复制实际链接到的文件libm.so.0。
lrwxrwxrwx 1 root root 36 Feb 24 2016 libm.so -> ../../../armv5te_arm9_soft/libm.so.0
在../../../armv5te_arm9_soft/目录下,复制完成后,重新生成报错目录下的软链接。
sudo cp ./target/armv5te_arm9_soft/libm.so.0 /media/data/hisi/buildroot-2022.02.8/output/host/arm-buildroot-linux-uclibcgnueabi/sysroot/usr/lib/armv5te_arm9_soft
cd /media/data/hisi/buildroot-2022.02.8/output/host/arm-buildroot-linux-uclibcgnueabi/sysroot/usr/lib/armv5te_arm9_soft
sudo rm libm.so
sudo ln -s libm.so.0 libm.so
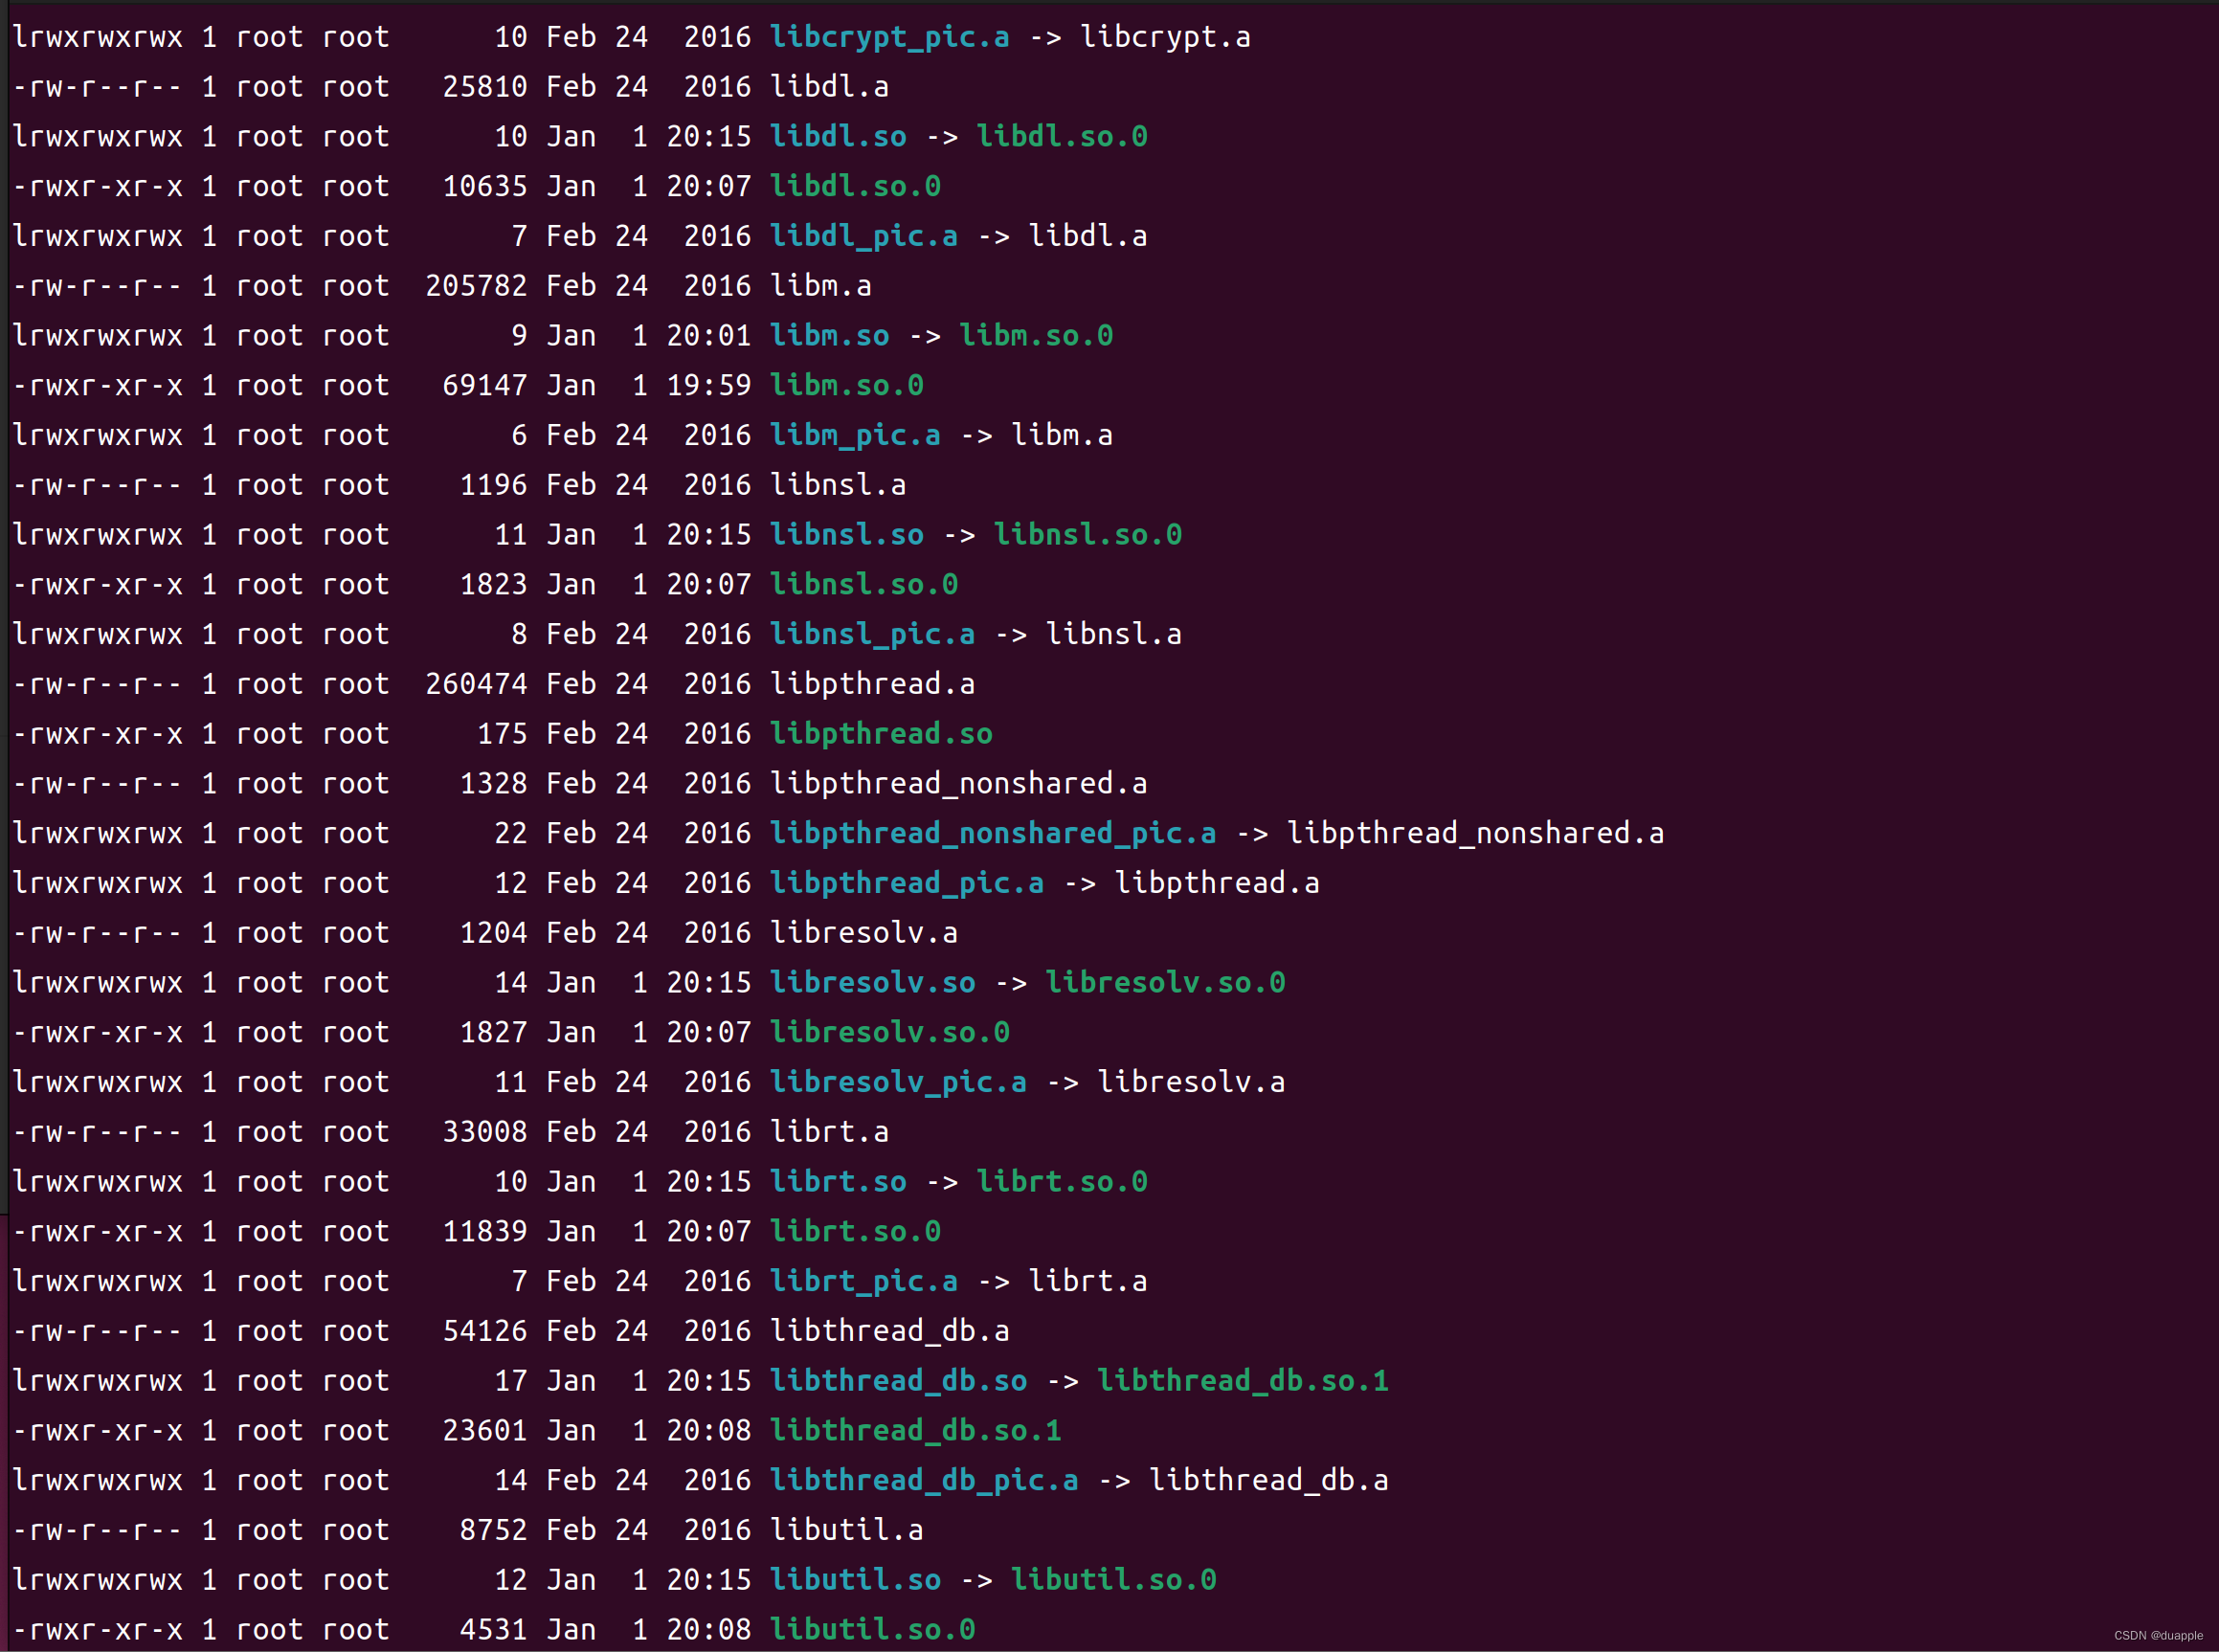
重新生成软链接成功:
lrwxrwxrwx 1 root root       9 Jan  1 20:01 libm.so -> libm.so.0
-rwxr-xr-x 1 root root   69147 Jan  1 19:59 libm.so.0
同样的,将其它链接到目录的动态库链接以同样的方式重新生成。
cd /opt/hisi-linux/x86-arm/arm-hisiv300-linux/
sudo cp target/armv5te_arm9_soft/libcrypt.so.0 /media/data/hisi/buildroot-2022.02.8/output/host/arm-buildroot-linux-uclibcgnueabi/sysroot/usr/lib/armv5te_arm9_soft
sudo cp target/armv5te_arm9_soft/libdl.so.0 /media/data/hisi/buildroot-2022.02.8/output/host/arm-buildroot-linux-uclibcgnueabi/sysroot/usr/lib/armv5te_arm9_soft
sudo cp target/armv5te_arm9_soft/libnsl.so.0 /media/data/hisi/buildroot-2022.02.8/output/host/arm-buildroot-linux-uclibcgnueabi/sysroot/usr/lib/armv5te_arm9_soft
sudo cp target/armv5te_arm9_soft/libresolv.so.0 /media/data/hisi/buildroot-2022.02.8/output/host/arm-buildroot-linux-uclibcgnueabi/sysroot/usr/lib/armv5te_arm9_soft
sudo cp target/armv5te_arm9_soft/librt.so.0 /media/data/hisi/buildroot-2022.02.8/output/host/arm-buildroot-linux-uclibcgnueabi/sysroot/usr/lib/armv5te_arm9_soft
sudo cp target/armv5te_arm9_soft/libthread_db.so.1 /media/data/hisi/buildroot-2022.02.8/output/host/arm-buildroot-linux-uclibcgnueabi/sysroot/usr/lib/armv5te_arm9_soft
sudo cp target/armv5te_arm9_soft/libutil.so.0 /media/data/hisi/buildroot-2022.02.8/output/host/arm-buildroot-linux-uclibcgnueabi/sysroot/usr/lib/armv5te_arm9_soft
cd /media/data/hisi/buildroot-2022.02.8/output/host/arm-buildroot-linux-uclibcgnueabi/sysroot/usr/lib/armv5te_arm9_soft
sudo rm libcrypt.so
sudo ln -s libcrypt.so.0 libcrypt.so
sudo rm libdl.so
sudo ln -s libdl.so.0 libdl.so
sudo rm libnsl.so
sudo ln -s libnsl.so.0 libnsl.so
sudo rm libresolv.so
sudo ln -s libresolv.so.0 libresolv.so
sudo rm librt.so
sudo ln -s librt.so.0 librt.so
sudo rm libthread_db.so
sudo ln -s libthread_db.so.1 libthread_db.so
sudo rm libutil.so
sudo ln -s libutil.so.0 libutil.so
修改后,全部动态库链接都正常了,再次尝试重新编译。
3.5 /opt/hisi-linux/x86-arm/arm-hisiv300-linux/bin/../lib/gcc/arm-hisiv300-linux-uclibcgnueabi/4.8.3/../../../../arm-hisiv300-linux-uclibcgnueabi/bin/ld: cannot find libc.so.0
参考上面的解决方式,在工具链目录找到对应的libc.so.0,复制到对应的目录下。为了防止找不到其它的库,直接将工具链target/armv5te_arm9_soft 目录下的所有文件复制过去。
sudo cp -d target/armv5te_arm9_soft/* /media/data/hisi/buildroot-2022.02.8/output/host/arm-buildroot-linux-uclibcgnueabi/sysroot/usr/lib/armv5te_arm9_soft
3.6 fallocate.c:(.text.fallocate_main+0xa0): undefined reference to 'posix_fallocate'
参考:https://blog.csdn.net/qq_44045338/article/details/109368225。
在busybox中关闭该模块。
sudo make busybox-menuconfig
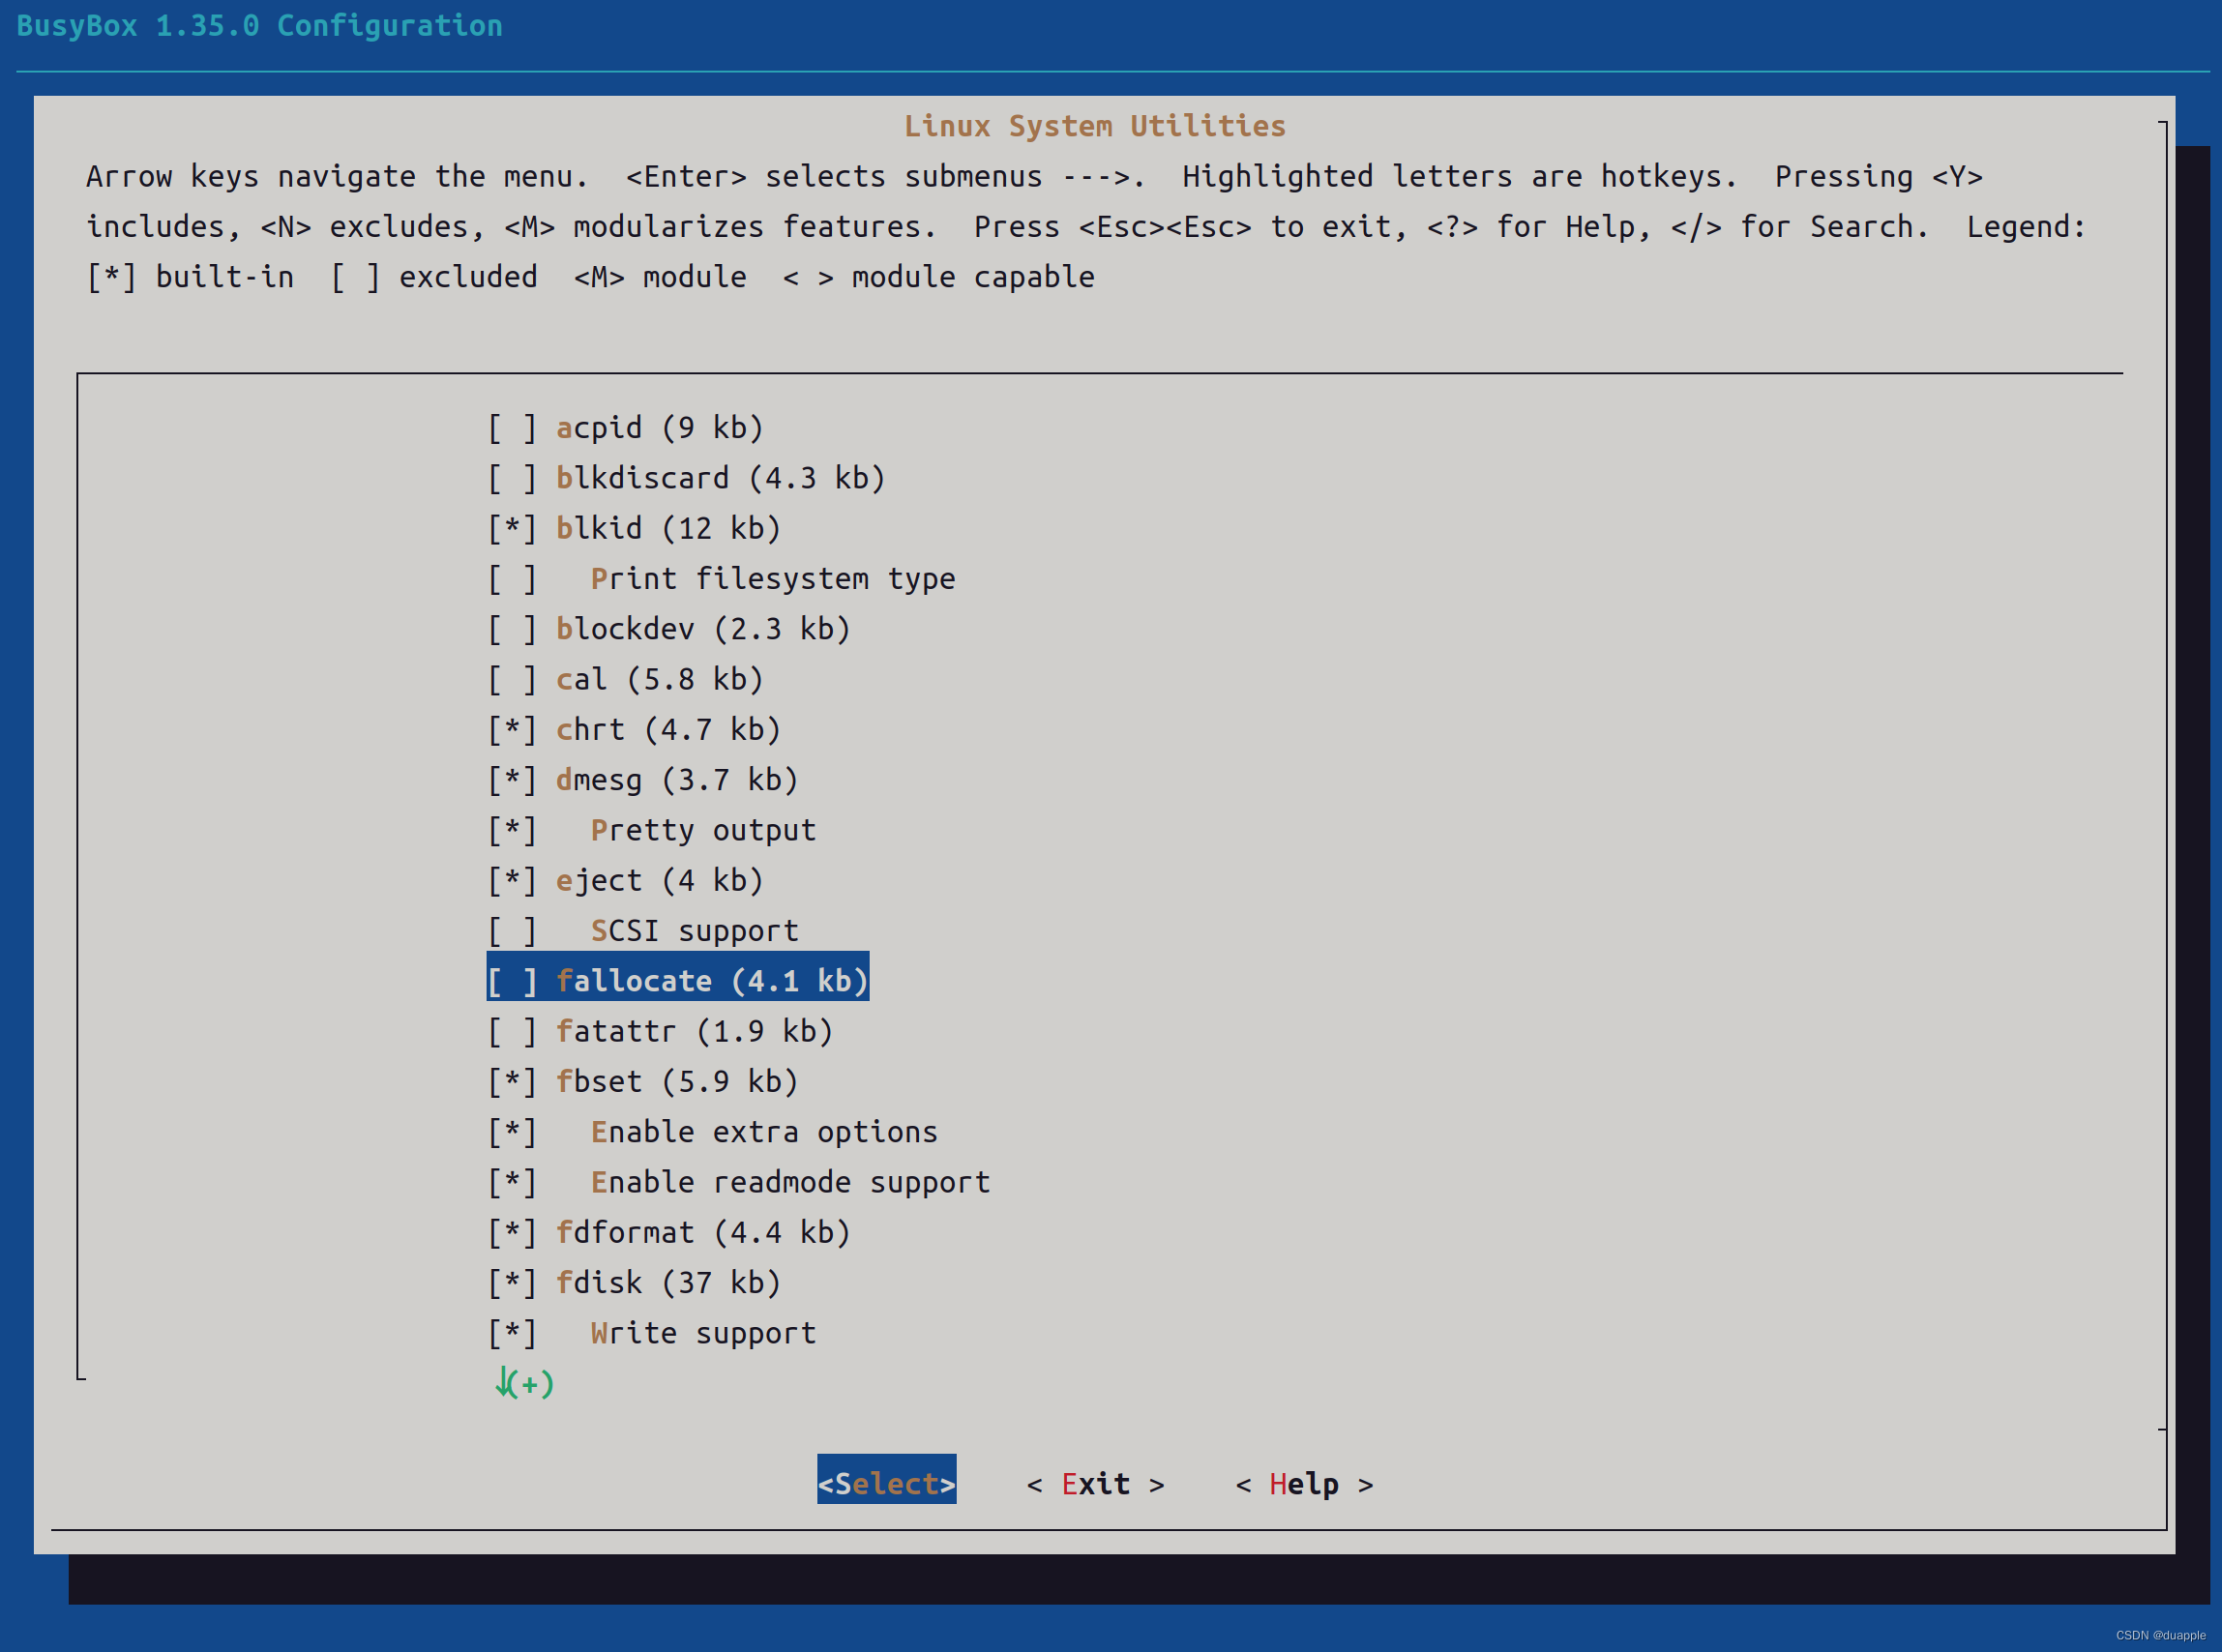
保存并退出,然后重新编译。
3.7 其它错误
在打印下面的内容后,根文件系统已经编译完成了,生成了我们需要的镜像文件。
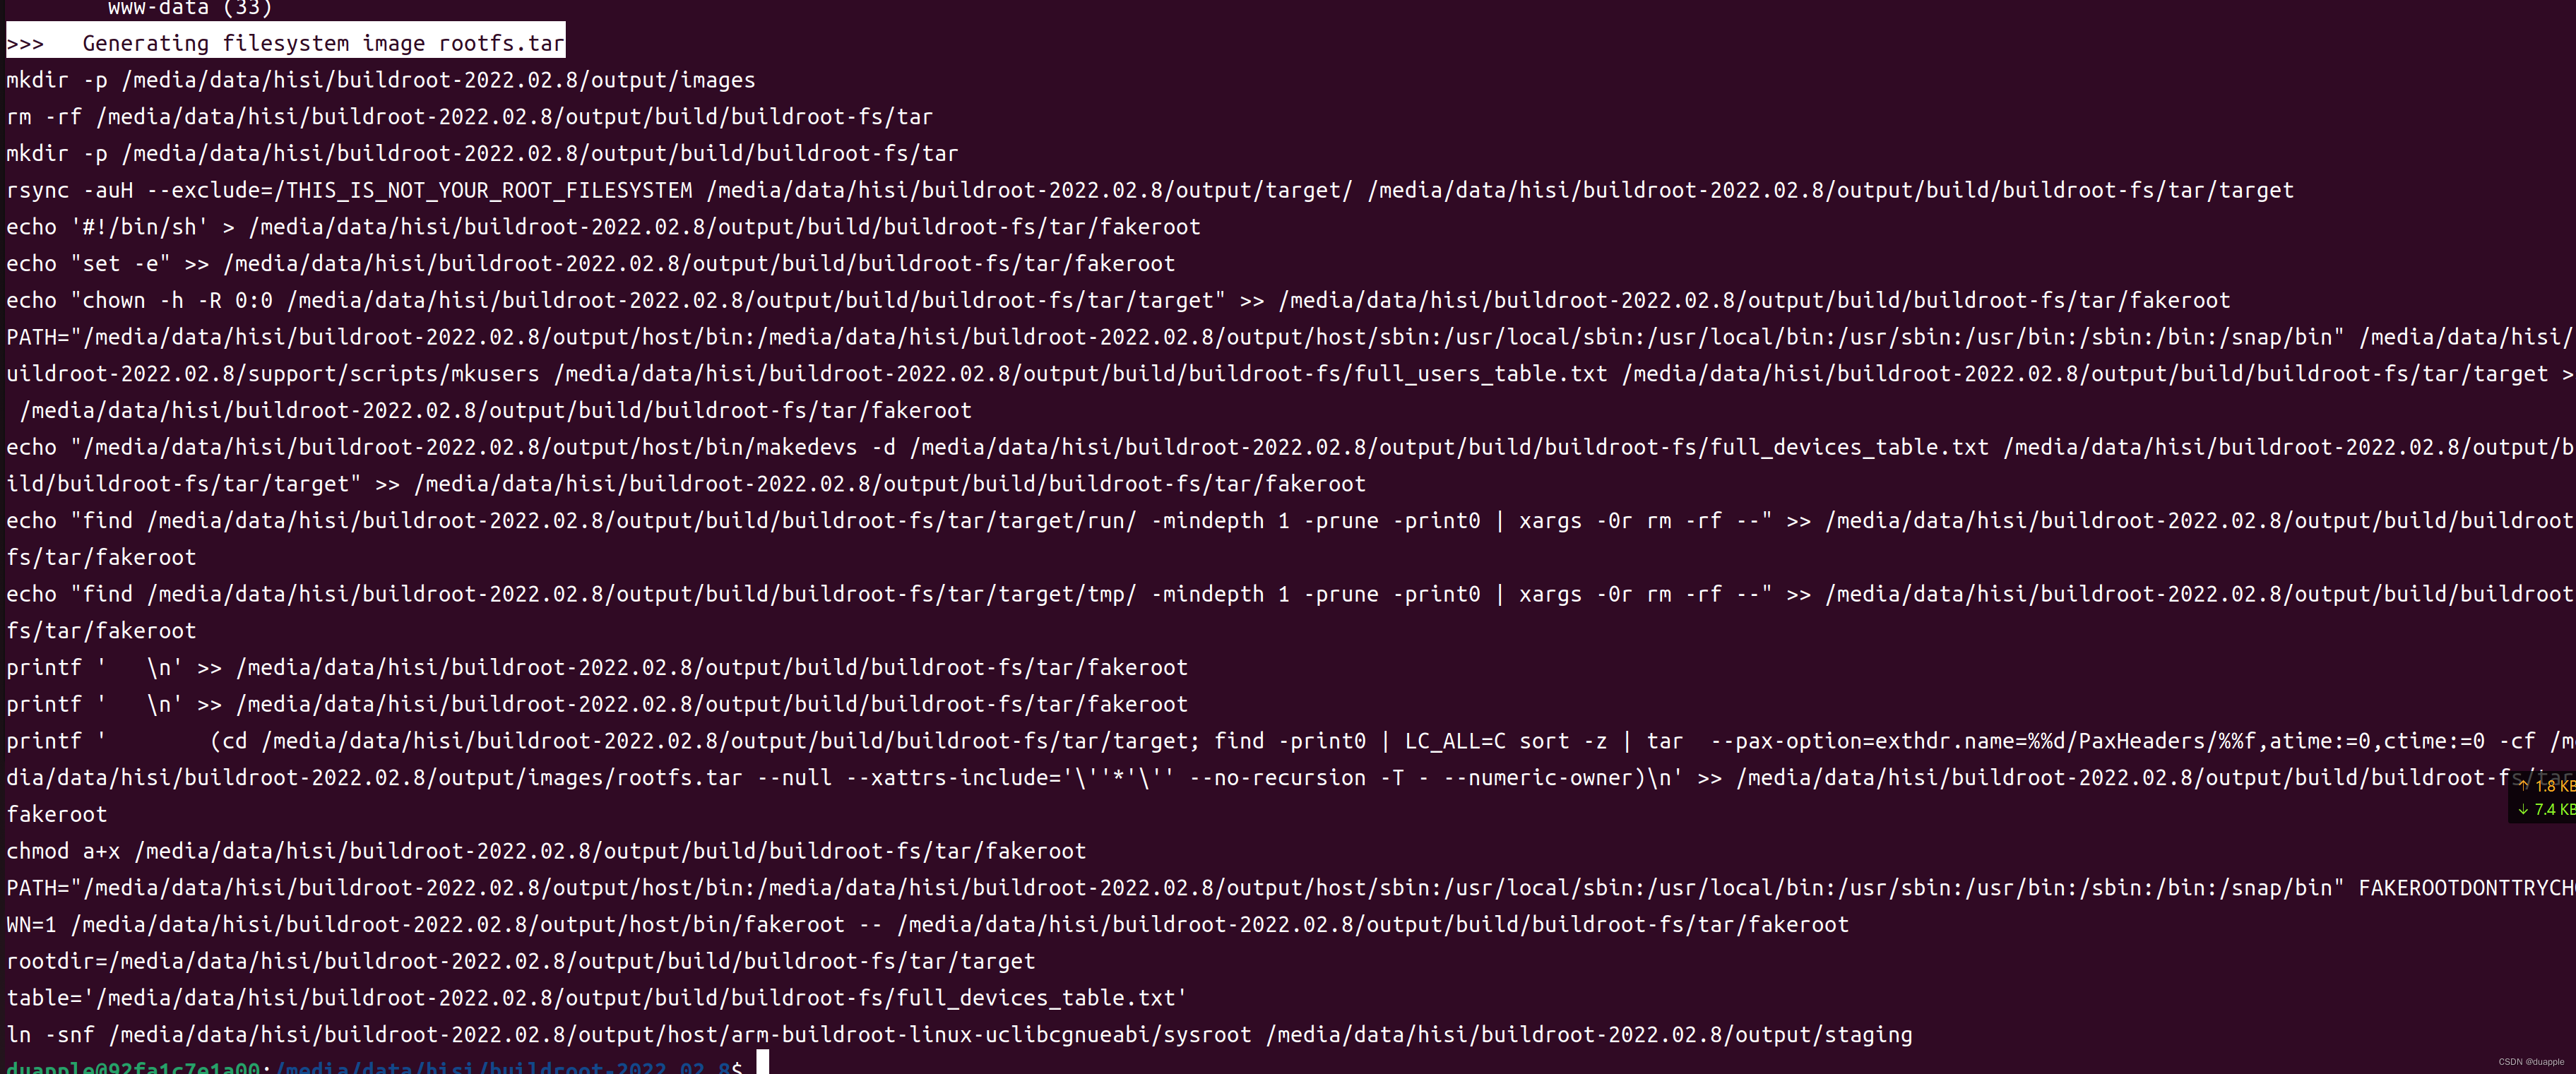
>>>   Generating filesystem image rootfs.jffs2
>>>   Generating filesystem image rootfs.squashfs
>>>   Generating filesystem image rootfs.tar
镜像文件路径output/images:
duapple@92fa1c7e1a00:/media/data/hisi/buildroot-2022.02.8/output/images$ ls -lh
total 3.9M
-rw-r--r-- 1 root root 995K Jan  1 20:30 rootfs.jffs2
-rw-r--r-- 1 root root 632K Jan  1 20:30 rootfs.squashfs
-rw-r--r-- 1 root root 2.3M Jan  1 20:31 rootfs.tar
注意,还有一些错误是编译期间不会暴露出来的,但是等到烧录根文件系统后,会导致启动报错。因为之前我已经解决了,因此可以直接进行修改。
先解压看看我们的rootfs文件夹及文件是否正常:
sudo mkdir rootfs
sudo tar -xvf rootfs.tar -C rootfs
主要看两个地方,因为我使用buildroot2020.2版本编译,复制交叉编译工具链的mk执行会报错,由于解决不了,我在mk中忽略了该错误,最后会导致生成的根文件系统中缺少系统动态库,启动脚本缺少S10mdev。然后手动复制交叉编译工具链的动态库到output/target 目录中去,操作和前面的复制动态库一致,再复制package/busybox/S10mdev 脚本到output/target/etc/init.d/ 。
由于最终打包的根文件系统目录是output/target,因此我们需要添加到根文件系统的文件都是可以直接放到这个目录对应位置的。
检查rootfs目录中的etc/init.d/S10mdev 、lib 、usr/lib ,动态库路径是否有必须的动态库,没有就直接把工具链对应架构版本的所有的动态库都复制到lib 中。
但是我在当前版本(buildroot-2022.02.8)中,没有遇到这个问题。
4. 烧录测试
搭建tftp服务器
配置好tftp服务器。将rootfs.jffs2 和 rootfs.squashfs 复制到tftp服务器目录。
cp rootfs.jffs2 rootfs.squashfs /media/data/tftp/
配置uboot网络
启动hisi的开发板,启动过程键入任意键进入到uboot中。配置uboot的网络和虚拟机再同一网段。
setenv serverip 192.168.10.100
setenv ipaddr 192.168.10.101
setenv ethaddr 12:23:34:45:56:67
setenv netmask 255.255.255.0
setenv gatewayip 192.168.10.1
ping 192.168.10.100
烧录jffs2根文件系统
mw.b 82000000 ff C00000; tftp 0x82000000 rootfs.jffs2; sf probe 0; sf erase 400000 C00000; sf write 82000000 400000 C00000
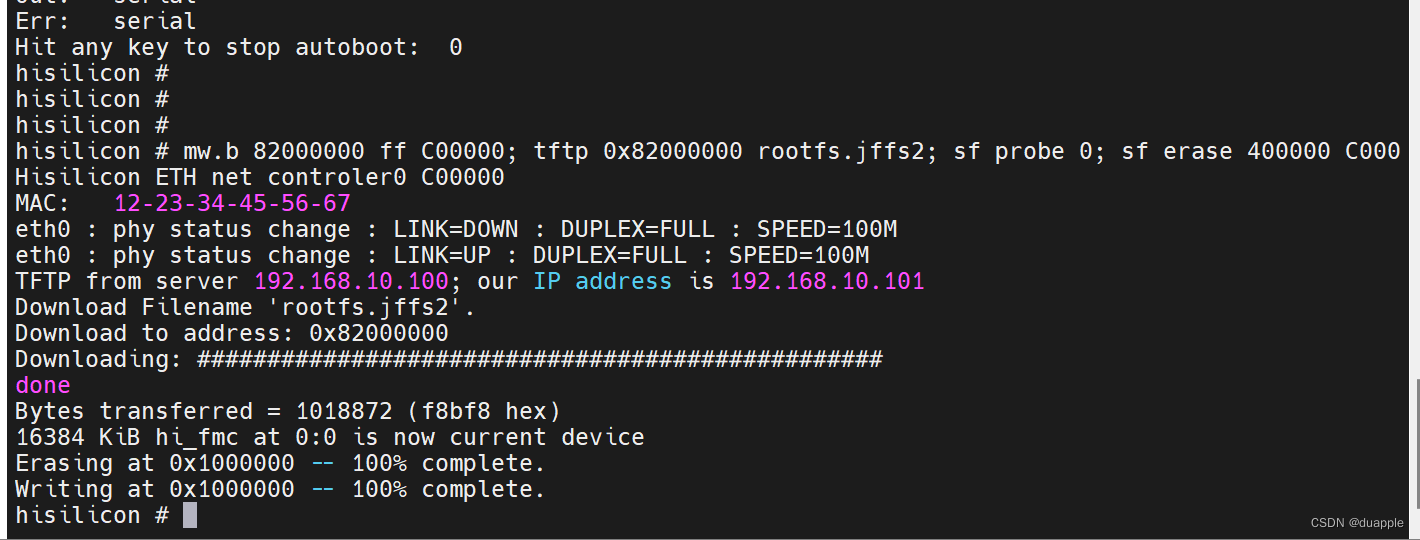
设置启动参数
需要设置jffs2根文件系统的启动参数并保存:
setenv bootargs 'mem=64M console=ttyAMA0,115200 root=/dev/mtdblock2 rootfstype=jffs2 mtdparts=hi_sfc:1M(boot),3M(kernel),12M(rootfs)'
setenv bootcmd 'sf probe 0;sf read 0x82000000 0x100000 0x300000;bootm 0x82000000'
sa
重启系统
hisilicon # reset
果然,还是报错了。
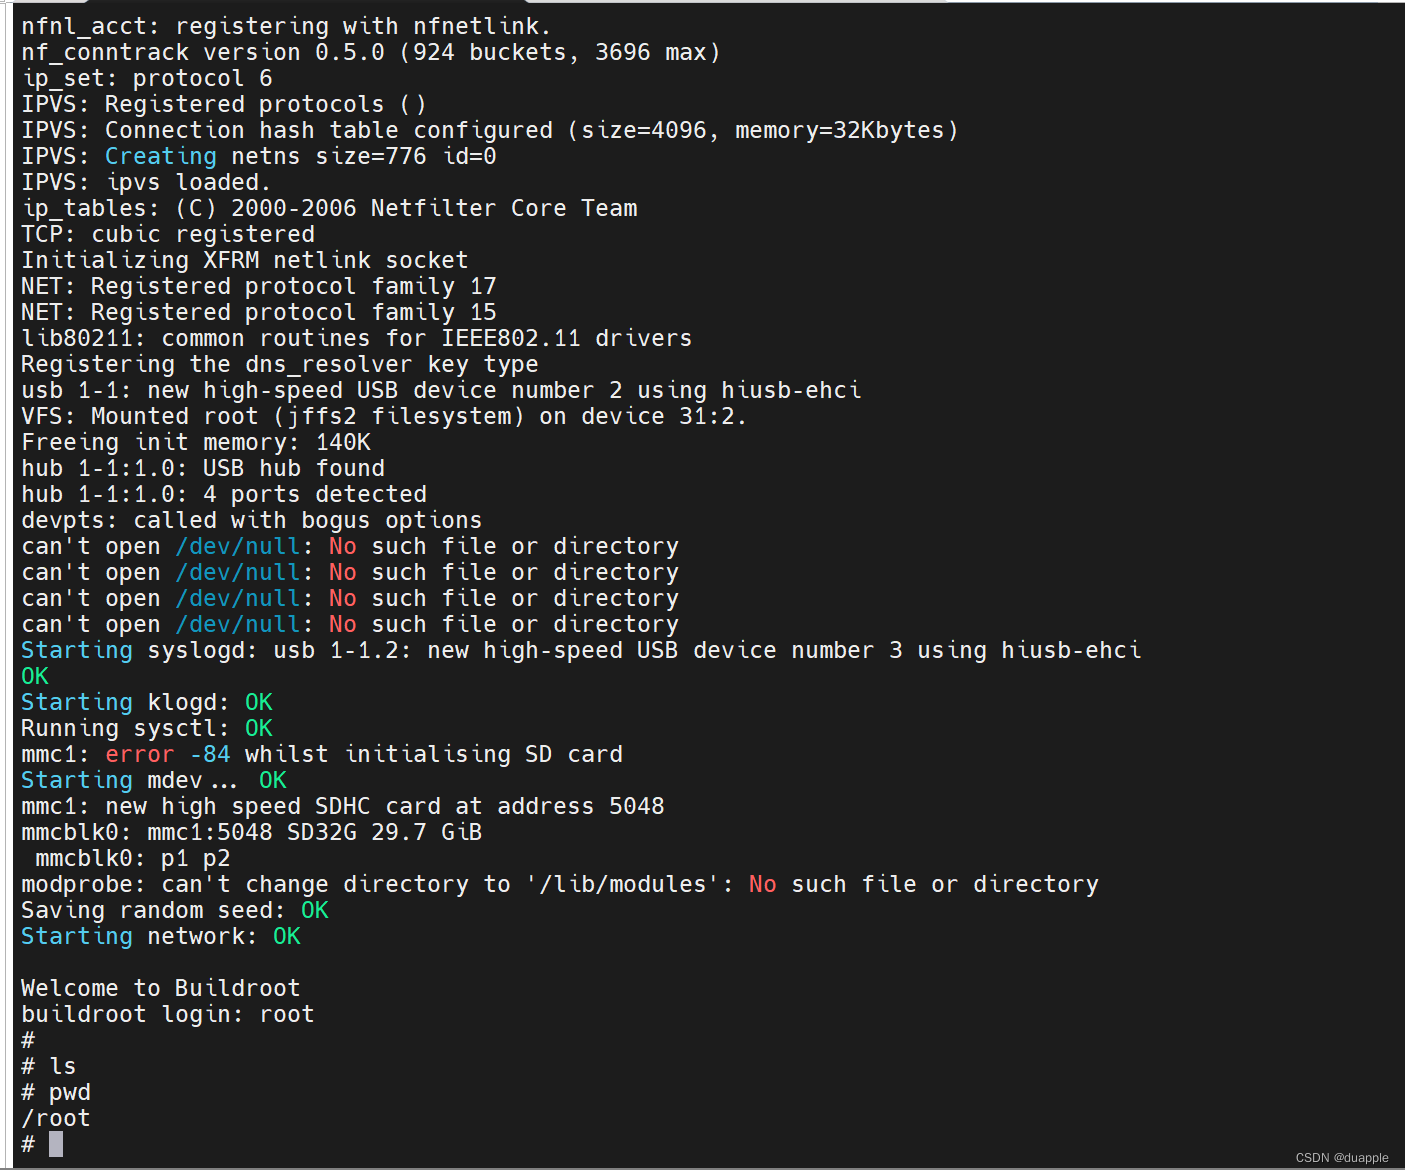
TCP: cubic registered
Initializing XFRM netlink socket
NET: Registered protocol family 17
NET: Registered protocol family 15
lib80211: common routines for IEEE802.11 drivers
Registering the dns_resolver key type
VFS: Mounted root (jffs2 filesystem) on device 31:2.
Freeing init memory: 140K
usb 1-1: new high-speed USB device number 2 using hiusb-ehci
/sbin/init: can't load library 'libc.so.0'
Kernel panic - not syncing: Attempted to kill init! exitcode=0x00001000
缺少libc.so.o,说明根文件系统还是缺少某些必要的动态库。这里再按照上面所说的方法,复制一下动态库到output/target/lib 中去。这里由于我的target/usr/lib 目录是空的,因此我还是把所有的库放到这个目录,以和output/target/lib/ 中存在的目录做一个区分。如果是init 、linuxrc 相关的kernel启动错误,也可能是由于缺少必要的动态库导致的。
duapple@92fa1c7e1a00:/opt/hisi-linux/x86-arm/arm-hisiv300-linux$ sudo cp -d target/armv5te_arm9_soft/* /media/data/hisi/buildroot-2022.02.8/output/target/usr/lib/duapple@92fa1c7e1a00:/opt/hisi-linux/x86-arm/arm-hisiv300-linux$ sudo cp -d arm-hisiv300-linux-uclibcgnueabi/lib/armv5te_arm9_soft/* /media/data/hisi/buildroot-2022.02.8/output/target/usr/lib
重新编译,重新烧录。
启动成功✿✿ヽ(°▽°)ノ✿
烧录squashfs根文件系统
操作步骤和烧录jffs2根文件系统保持一致。但是需要修改bootargs为squashfs对应的。
mw.b 82000000 ff C00000; tftp 0x82000000 rootfs.squashfs; sf probe 0; sf erase 400000 C00000; sf write 82000000 400000 C00000
setenv bootargs 'mem=64M console=ttyAMA0,115200 root=/dev/mtdblock2 rootfstype=squashfs mtdparts=hi_sfc:1M(boot),3M(kernel),12M(rootfs)'
setenv bootcmd 'sf probe 0;sf read 0x82000000 0x100000 0x300000;bootm 0x82000000'
sa
重启系统:
reset
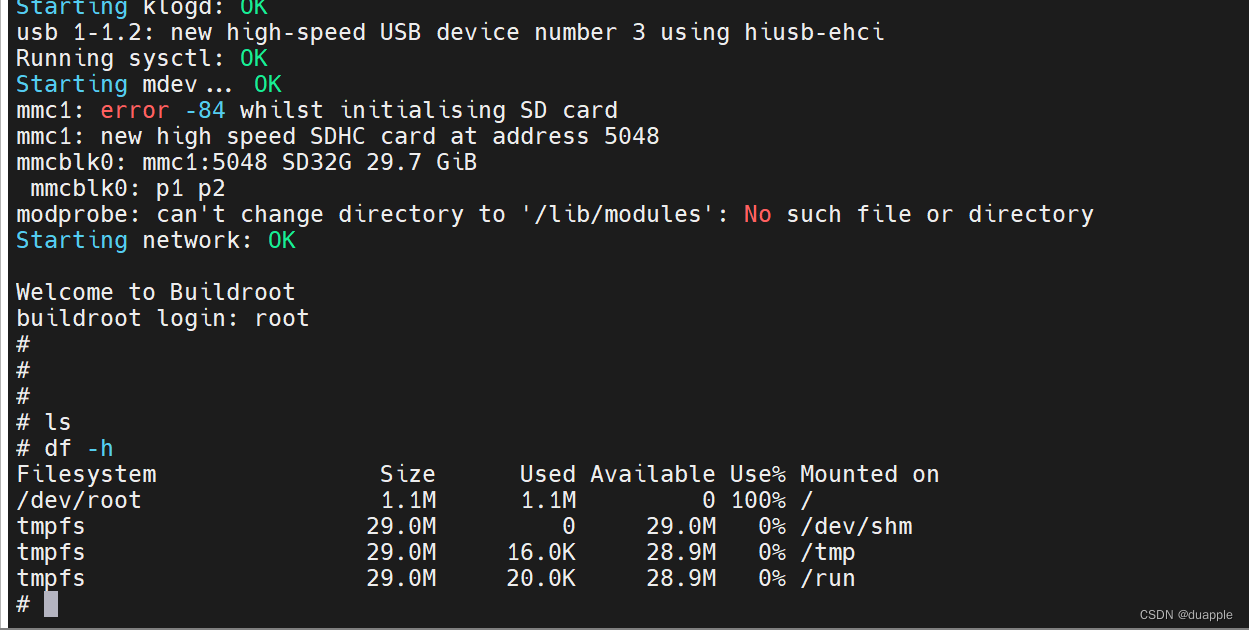
报错:
devpts: called with bogus options
can't open /dev/null: No such file or directory
can't open /dev/null: No such file or directory
can't open /dev/null: No such file or directory
can't open /dev/null: No such file or directory
Starting syslogd: OK
Starting klogd: OK
Running sysctl: /etc/init.d/S02sysctl: line 37: can't create /dev/null: Read-only file system
usb 1-1.2: new high-speed USB device number 3 using hiusb-ehci
OK
Starting mdev... OK
mmc1: error -84 whilst initialising SD card
mmc1: new high speed SDHC card at address 5048
mmcblk0: mmc1:5048 SD32G 29.7 GiBmmcblk0: p1 p2
modprobe: can't change directory to '/lib/modules': No such file or directory
Starting network: OK
can't open /dev/console: No such file or directory
can't open /dev/console: No such file or directory
can't open /dev/console: No such file or directory
can't open /dev/console: No such file or directory
can't open /dev/console: No such file or directory
由于squashfs是只读文件系统,mdev创建不了这些设备,因此手动创建。
cd output/target/dev
sudo mknod console c 5 1
sudo mknod ttyAMA0 c 204 64
sudo mknod null c 1 3
sudo chmod 666 console ttyAMA0 null
重新编译打包文件系统,再烧录,启动成功: