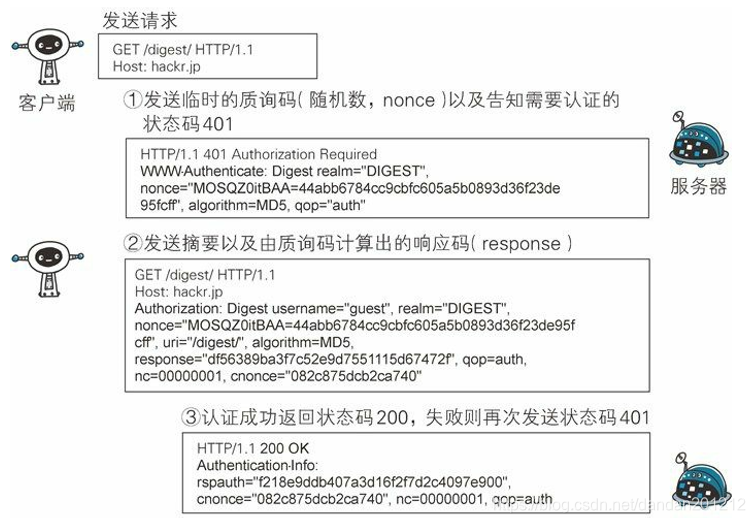
核心步骤:
步骤 1: 请求需认证的资源时,服务器会随着状态码 401Authorization Required,返回带WWW-Authenticate 首部字段的响应。该字段内包含质问响应方式认证所需的临时质询码(随机数,nonce)。首部字段 WWW-Authenticate 内必须包含realm 和nonce 这两个字段的信息。客户端就是依靠向服务器回送这两个值进行认证的。nonce 是一种每次随返回的 401 响应生成的任意随机字符串。该字符串通常推荐由Base64 编码的十六进制数的组成形式,但实际内容依赖服务器的具体实现。
步骤 2:接收到401状态码的客户端,返回的响应中包含 DIGEST 认证必须的首部字段 Authorization 信息。首部字段 Authorization 内必须包含 username、realm、nonce、uri 和response的字段信息。其中,realm 和 nonce 就是之前从服务器接收到的响应中的字段。
username是realm 限定范围内可进行认证的用户名。
uri(digest-uri)即Request-URI的值,但考虑到经代理转发后Request-URI的值可能被修改因此事先会复制一份副本保存在 uri内。
response 也可叫做 Request-Digest,存放经过 MD5 运算后的密码字符串,形成响应码。
步骤 3:接收到包含首部字段 Authorization 请求的服务器,会确认认证信息的正确性。认证通过后则返回包含 Request-URI 资源的响应。并且这时会在首部字段 Authentication-Info 写入一些认证成功的相关信息。不过我下面的例子没有去写这个Authentication-Info,而是直接返回的数据。因为我实在session里缓存的认证结果。

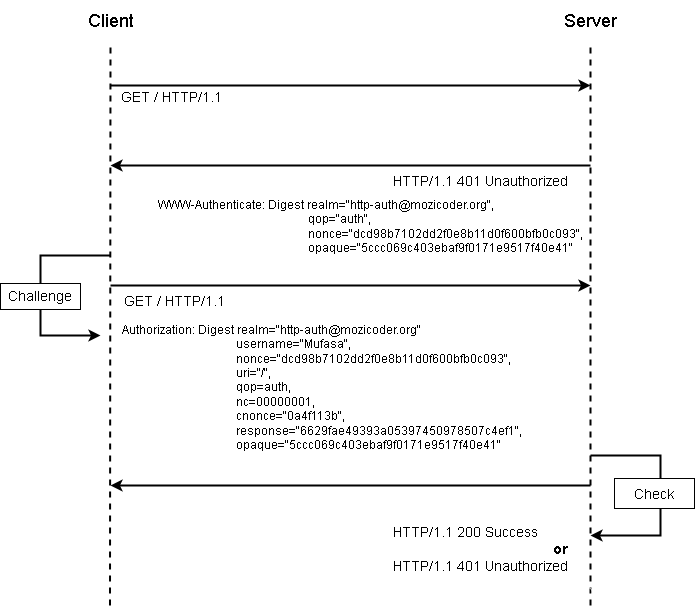
校验 response 的算法 浏览器 Authorization 的内容举例:
Digest username="q", realm="test", nonce="T53sV+xXH3FrrER4YZwpFQ==", uri="/portal/applications",
response="f80492644b0700b404f2fb3f4d62861e", qop=auth, nc=00000001, cnonce="25c980f9f95fd544"
其中 response 是根据如下算法计算得到:
response = MD5(MD5(username:realm:password):nonce:nc:cnonce:qop:MD5(<request-method>:url))
服务端代码(SpringBoot项目):
自定义注解 RequireAuth
import java.lang.annotation.ElementType;
import java.lang.annotation.Retention;
import java.lang.annotation.RetentionPolicy;
import java.lang.annotation.Target;/*** 自定义注解 , 用于授权认证的拦截* * @author LZHH** 2022年10月11日*/
// can be used to method
@Retention(RetentionPolicy.RUNTIME)
@Target(ElementType.METHOD)
public @interface RequireAuth {}
拦截器 RequireAuthInterceptor
import java.text.MessageFormat;import javax.servlet.http.HttpServletRequest;
import javax.servlet.http.HttpServletResponse;import org.springframework.web.method.HandlerMethod;
import org.springframework.web.servlet.handler.HandlerInterceptorAdapter;/*** 拦截器 RequireAuthInterceptor* @author LZHH** 2022年10月11日*/
public class RequireAuthInterceptor extends HandlerInterceptorAdapter {// 为了 测试Digest nc 值每次请求增加private int nc = 0;@Overridepublic boolean preHandle(HttpServletRequest req, HttpServletResponse res, Object handler) throws Exception {// 请求目标为 method of controller,需要进行验证if (handler instanceof HandlerMethod) {HandlerMethod handlerMethod = (HandlerMethod) handler;Object object = handlerMethod.getMethodAnnotation(RequireAuth.class);/* 方法没有 @RequireAuth 注解, 放行 */if (object == null) {return true; // 放行}/* 方法有 @RequireAuth 注解,需要拦截校验 */// 没有 Authorization 请求头,或者 Authorization 认证信息验证不通过,拦截if (!isAuth(req, res)) {// 验证不通过,拦截return false;}// 验证通过,放行return true;}// 请求目标不是 mehod of controller, 放行return true;}private boolean isAuth(HttpServletRequest req, HttpServletResponse res) {String authStr = req.getHeader("Authorization");System.out.println("请求 Authorization 的内容:" + authStr);if (authStr == null || authStr.length() <= 7) {// 没有 Authorization 请求头,开启质询return challenge(res);}DigestAuthInfo authObject = DigestUtils.getAuthInfoObject(authStr);// System.out.println(authObject);/** 生成 response 的算法:*  response = MD5(MD5(username:realm:password):nonce:nc:cnonce:qop:MD5(<request-method>:url))*/// 这里密码固定为 123456, 实际应用需要根据用户名查询数据库或缓存获得String HA1 = DigestUtils.MD5(authObject.getUsername() + ":" + authObject.getRealm() + ":123456");String HD = String.format(authObject.getNonce() + ":" + authObject.getNc() + ":" + authObject.getCnonce() + ":"+ authObject.getQop());String HA2 = DigestUtils.MD5(req.getMethod() + ":" + authObject.getUri());String responseValid = DigestUtils.MD5(HA1 + ":" + HD + ":" + HA2);// 如果 Authorization 中的 response(浏览器生成的) 与期望的 response(服务器计算的) 相同,则验证通过System.out.println("Authorization 中的 response: " + authObject.getResponse());System.out.println("期望的 response: " + responseValid);if (responseValid.equals(authObject.getResponse())) {/* 判断 nc 的值,用来防重放攻击 */// 判断此次请求的 Authorization 请求头里面的 nc 值是否大于之前保存的 nc 值// 大于,替换旧值,然后 return true// 否则,return false// 测试代码 startint newNc = Integer.parseInt(authObject.getNc(), 16);System.out.println("old nc: " + this.nc + ", new nc: " + newNc);if (newNc > this.nc) {this.nc = newNc;return true;}return false;// 测试代码 end}// 验证不通过,重复质询return challenge(res);}/*** 质询:返回状态码 401 和 WWW-Authenticate 响应头* * @param res 返回false,则表示拦截器拦截请求*/private boolean challenge(HttpServletResponse res) {// 质询前,重置或删除保存的与该用户关联的 nc 值(nc:nonce计数器,是一个16进制的数值,表示同一nonce下客户端发送出请求的数量)// 将 nc 置为初始值 0, 这里代码省略// 测试代码 startthis.nc = 0;// 测试代码 endres.setStatus(401);String str = MessageFormat.format("Digest realm={0},nonce={1},qop={2}", "\"no auth\"","\"" + DigestUtils.generateToken() + "\"", "\"auth\"");res.addHeader("WWW-Authenticate", str);return false;}}
注册拦截器 WebConfig
import org.springframework.context.annotation.Configuration;
import org.springframework.web.servlet.config.annotation.InterceptorRegistry;
import org.springframework.web.servlet.config.annotation.WebMvcConfigurer;/*** 注册拦截器 WebConfig* @author LZHH** 2022年10月11日*/
@Configuration
public class WebConfig implements WebMvcConfigurer {@Overridepublic void addInterceptors(InterceptorRegistry registry) {RequireAuthInterceptor requireAuthInterceptor = new RequireAuthInterceptor();registry.addInterceptor(requireAuthInterceptor);}}
DIGEST认证信息model类 DigestAuthInfo
/*** DIGEST认证信息model类 DigestAuthInfo* @author LZHH** 2022年10月11日*/
public class DigestAuthInfo {private String username;private String realm;private String nonce;private String uri;private String response;private String qop;private String nc;public String cnonce;public String getUsername() {return username;}public void setUsername(String username) {this.username = username;}public String getRealm() {return realm;}public void setRealm(String realm) {this.realm = realm;}public String getNonce() {return nonce;}public void setNonce(String nonce) {this.nonce = nonce;}public String getUri() {return uri;}public void setUri(String uri) {this.uri = uri;}public String getResponse() {return response;}public void setResponse(String response) {this.response = response;}public String getQop() {return qop;}public void setQop(String qop) {this.qop = qop;}public String getNc() {return nc;}public void setNc(String nc) {this.nc = nc;}public String getCnonce() {return cnonce;}public void setCnonce(String cnonce) {this.cnonce = cnonce;}@Overridepublic String toString() {return "DigestAuthInfo [username=" + username + ", realm=" + realm + ", nonce=" + nonce + ", uri=" + uri+ ", response=" + response + ", qop=" + qop + ", nc=" + nc + ", cnonce=" + cnonce + "]";}}
DIGEST认证的工具类 DigestUtils
import java.security.MessageDigest;
import java.security.NoSuchAlgorithmException;
import java.util.Base64;
import java.util.Random;import org.junit.Test;/*** DIGEST认证的工具类 DigestUtils* @author LZHH** 2022年10月11日*/
public class DigestUtils {/*** 根据当前时间戳生成一个随机字符串* @return*/public static String generateToken() {String s = String.valueOf(System.currentTimeMillis() + new Random().nextInt());try {MessageDigest messageDigest = MessageDigest.getInstance("md5");byte[] digest = messageDigest.digest(s.getBytes());return Base64.getEncoder().encodeToString(digest);} catch (NoSuchAlgorithmException e) {throw new RuntimeException();}}@Testpublic void testGenerateToken() {// heL2WICEml8/UGfAQsS9mQ==System.out.println(generateToken());}public static String MD5(String inStr) {MessageDigest md5 = null;try {md5 = MessageDigest.getInstance("MD5");} catch (Exception e) {System.out.println(e.toString());e.printStackTrace();return "";}char[] charArray = inStr.toCharArray();byte[] byteArray = new byte[charArray.length];for (int i = 0; i < charArray.length; i++) {byteArray[i] = (byte) charArray[i];}byte[] md5Bytes = md5.digest(byteArray);StringBuffer hexValue = new StringBuffer();for (int i = 0; i < md5Bytes.length; i++) {int val = ((int) md5Bytes[i]) & 0xff;if (val < 16)hexValue.append("0");hexValue.append(Integer.toHexString(val));}return hexValue.toString();}/*** 该方法用于将 Authorization 请求头的内容封装成一个对象。* * Authorization 请求头的内容为:*     Digest username="aaa", realm="no auth", nonce="b2b74be03ff44e1884ba0645bb961b53",*     uri="/BootDemo/login", response="90aff948e6f2207d69ecedc5d39f6192", qop=auth,*     nc=00000002, cnonce="eb73c2c68543faaa"*/public static DigestAuthInfo getAuthInfoObject(String authStr) {if (authStr == null || authStr.length() <= 7)return null;if (authStr.toLowerCase().indexOf("digest") >= 0) {// 截掉前缀 DigestauthStr = authStr.substring(6);}// 将双引号去掉authStr = authStr.replaceAll("\"", "");DigestAuthInfo digestAuthObject = new DigestAuthInfo();String[] authArray = new String[8];authArray = authStr.split(",");// System.out.println(java.util.Arrays.toString(authArray));for (int i = 0, len = authArray.length; i < len; i++) {String auth = authArray[i];String key = auth.substring(0, auth.indexOf("=")).trim();String value = auth.substring(auth.indexOf("=") + 1).trim();switch (key) {case "username":digestAuthObject.setUsername(value);break;case "realm":digestAuthObject.setRealm(value);break;case "nonce":digestAuthObject.setNonce(value);break;case "uri":digestAuthObject.setUri(value);break;case "response":digestAuthObject.setResponse(value);break;case "qop":digestAuthObject.setQop(value);break;case "nc":digestAuthObject.setNc(value);break;case "cnonce":digestAuthObject.setCnonce(value);break;}}return digestAuthObject;}}
测试接口类 loginController
import javax.servlet.http.HttpServletRequest;
import javax.servlet.http.HttpServletResponse;import org.springframework.stereotype.Controller;
import org.springframework.web.bind.annotation.RequestMapping;
import org.springframework.web.bind.annotation.ResponseBody;@Controller
public class LoginController {@RequireAuth@RequestMapping("/login")@ResponseBodypublic String login(HttpServletRequest req, HttpServletResponse res) {return "{code: 0, data: {username:\"test\"}}";}@RequireAuth@RequestMapping("/index")@ResponseBodypublic String index(HttpServletRequest req, HttpServletResponse res) {return "{code: 0, data: {xxx:\"xxx\"}}";}@RequestMapping("/index2")@ResponseBodypublic String index2(HttpServletRequest req, HttpServletResponse res) {return "{code: 0, data: {666:\"666\"}}";}
}
浏览器测试:
 输入用户名和密码123456

客户端接口测试
import org.apache.http.HttpResponse;
import org.apache.http.auth.AuthScope;
import org.apache.http.auth.UsernamePasswordCredentials;
import org.apache.http.client.CredentialsProvider;
import org.apache.http.client.methods.HttpPost;
import org.apache.http.entity.StringEntity;
import org.apache.http.impl.client.BasicCredentialsProvider;
import org.apache.http.impl.client.CloseableHttpClient;
import org.apache.http.impl.client.HttpClients;
import org.apache.http.util.EntityUtils;import java.io.IOException;
import java.net.URI;/*** HTTP摘要认证***/
public class HttpDigestClientUtil {public static String httpSendRequest(String url, String userName, String passWord, String param, String headValue) {CloseableHttpClient httpClient = null;String result = null;try {URI serverURI = new URI(url);CredentialsProvider credsProvider = new BasicCredentialsProvider();credsProvider.setCredentials(new AuthScope(serverURI.getHost(), serverURI.getPort()),new UsernamePasswordCredentials(userName, passWord));httpClient = HttpClients.custom().setDefaultCredentialsProvider(credsProvider).build();HttpPost post = new HttpPost(url);// 构造消息头post.setHeader("Content-type", "application/json; charset=utf-8");if (headValue != null)post.setHeader("User-Identify", headValue);post.setEntity(new StringEntity(param, "UTF-8"));// JSON 参数HttpResponse response = httpClient.execute(post);result = EntityUtils.toString(response.getEntity());System.out.println("######返回的结果:"+ result);System.out.println("######返回的状态和类型:"+ response.getStatusLine().getStatusCode()+";"+response.getEntity().getContentType());EntityUtils.consume(response.getEntity());httpClient.close();} catch (Exception e) {e.printStackTrace();} finally {if (httpClient != null) {try {httpClient.close();} catch (IOException e) {e.printStackTrace();}}}return result;}}
直接调用接口:
public class HttpDigestClientTest {public static void main(String[] args) {String result = HttpDigestClientUtil.httpSendRequest("http://localhost:8080/login","aaa","123456","111","66666666666666");System.out.println("6666666666666");System.out.println(result);}
}
结果:

通过接口调用只请求一次,其实是httpClient架包里面有判断,发现接口返回401,需要认证的时候,会再次加上摘要再次请求接口。


参考:HTTP的几种认证方式之DIGEST 认证(摘要认证) - wenbin_ouyang - 博客园