图像暗光增强(一)
- Retinex简介
- Single Scale Retinex(SSR)
- 多尺度MSR Multi-Scale Retinex
- 带色彩恢复的多尺度MSR,即MSRCR(Multi-Scale Retinex with Color Restoration)
- MSRCP
Retinex简介
Retinex由两个单词合成的一个词语,他们分别是retina 和cortex,即:视网膜和皮层。Land的retinex模式是建立在以下三个假设之上的:
(1)真实世界是无颜色的,我们所感知的颜色是光与物质的相互作用的结果。我们见到的水是无色的,但是水膜—肥皂膜却是显现五彩缤纷,那是薄膜表面光干涉的结果。
(2)每一颜色区域由给定波长的红、绿、蓝三原色构成的;
(3)三原色决定了每个单位区域的颜色。
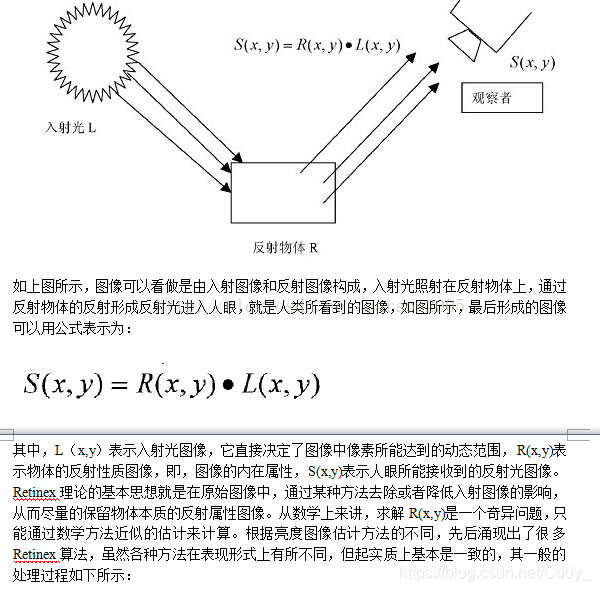
Retinex理论的基础理论是物体的颜色是由物体对长波(红色)、中波(绿色)、短波(蓝色)光线的反射能力来决定的,而不是由反射光强度的绝对值来决定的,物体的色彩不受光照非均匀性的影响,具有一致性,即retinex是以色感一致性(颜色恒常性)为基础的。不同于传统的线性、非线性的只能增强图像某一类特征的方法,Retinex可以在动态范围压缩、边缘增强和颜色恒常三个方面打到平衡,因此可以对各种不同类型的图像进行自适应的增强。
根据另一篇博客讲,Retinex核心包括两方面:
(1)在颜色感知时,人眼对局部相对光强敏感程度要优于绝对光强。
(2)反射分量R(x,y)储存有无光源物体的真实模样,一幅图像对其光照分量L(x,y)的估计越准确,求得的R(x,y)也就越准确。
对于第一点,人对颜色的认知并不是基于绝对光强,反应在图像上时可以理解成,人眼对一像素点(X0,Y0)的颜色的认知不是基于其RGB三通道绝对值大小,而是与俩个因素相关:
1、(X0,Y0)点三通道值的差异,它会致使色偏。
2、(X0,Y0)一个邻域内其余像素的RGB值,它会形成颜色的感觉,RGB三通道绝对值主导亮度感觉。
对于第二点,在给定场景的时候,如果场景内无光源,那么R(x,y)应该是一常量。无论光照L(x,y)如何改变,R(x,y)该不变。也就是说,无论我光照是什么颜色什么强度,我都应该能将其矫正到标准光照情况下。这也是色彩恒常性的体现。
Single Scale Retinex(SSR)
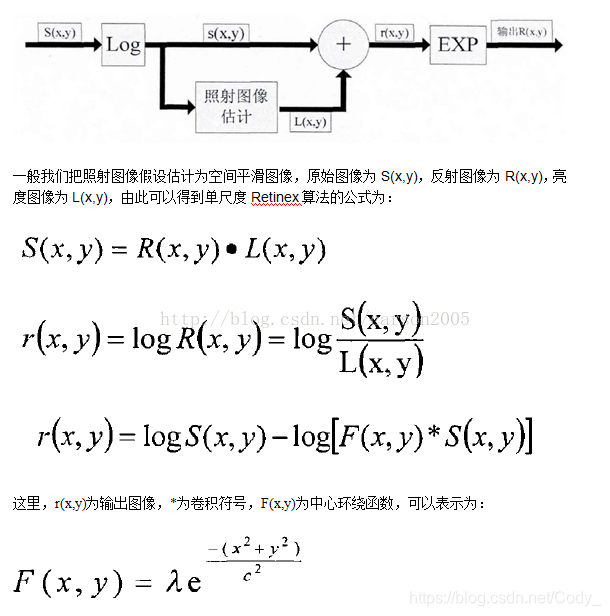
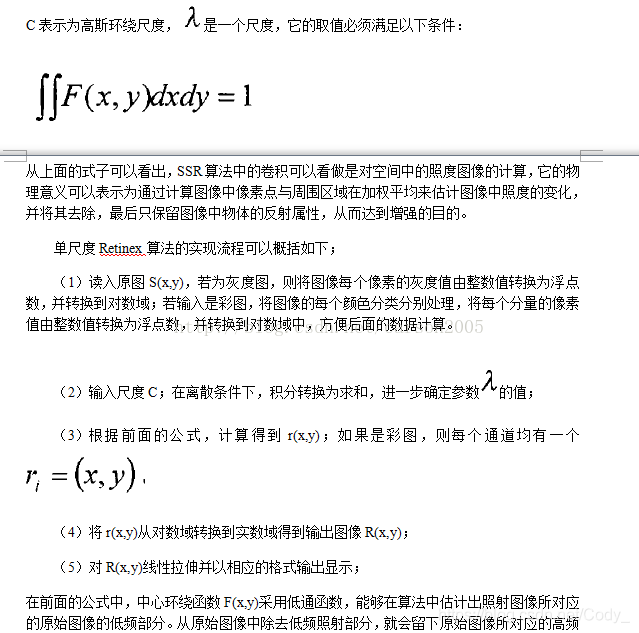
一幅给定的图像S(x,y)可以分解为两个不同的图像:反射图像R(x,y)和亮度图像(也有人称之为入射图像)L(x,y),其原理如下图所示:

Python实现
def single_scale_retinex(img, sigma):"""Single Scale RetinexArguments:img {np.ndarray} -- process imagesigma {int} -- [description]Returns:retinex {np.ndarray} -- float64, needs to rescale to 0~255"""retinex = np.log10(img) - np.log10(cv2.GaussianBlur(img, (0, 0), sigma))return retinex
第二种算法的实现,这种好像更清晰理解:
#SSR
def replaceZeroes(data):min_nonzero = min(data[nonzero(data)])data[data == 0] = min_nonzeroreturn datadef SSR(img,size):L_blur = cv2.GaussianBlur(img,(size,size),0)eps = float(1e-10)h,w = img.shape[:2]dst_img = zeros((h,w),dtype = float32)dst_Lblur = zeros((h, w),dtype=float32)dst_R = zeros((h, w), dtype=float32)img = replaceZeroes(img)L_blur = replaceZeroes(L_blur)cv2.log(img,dst_img)cv2.log(L_blur,dst_Lblur)log_R = cv2.subtract(dst_img,dst_Lblur)#减法,两个图作差cv2.normalize(log_R,dst_R,0,255,cv2.NORM_MINMAX)log_uint8 = cv2.convertScaleAbs(dst_R)#将像素点进行绝对值计算, src表示当前图片minvalue,maxvalue,minloc,maxloc = cv2.minMaxLoc(log_R)#返回矩阵的最小值,最大值,并得到最大值,最小值的索引for i in range(h):for j in range(w):log_R[i,j] = (log_R[i,j]-minvalue)*255.0/(maxvalue-minvalue)log_uint8 = cv2.convertScaleAbs(log_R)return log_uint8
多尺度MSR Multi-Scale Retinex
MSR是在SSR基础上发展来的,优点是可以同时保持图像高保真度与对图像的动态范围进行压缩的同时,MSR也可实现色彩增强、颜色恒常性、局部动态范围压缩、全局动态范围压缩,也可以用于X光图像增强。
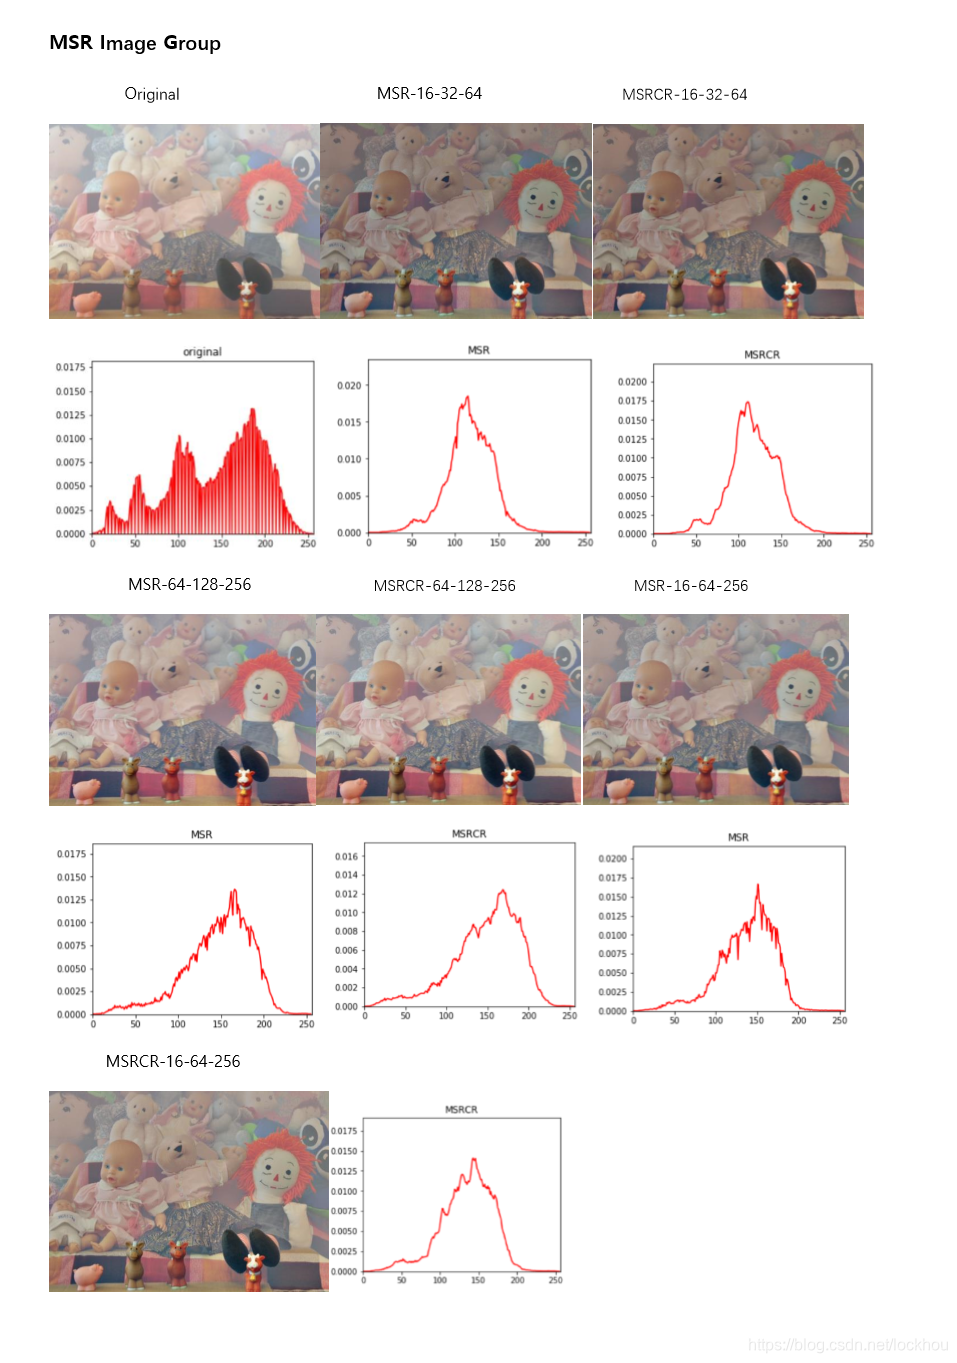
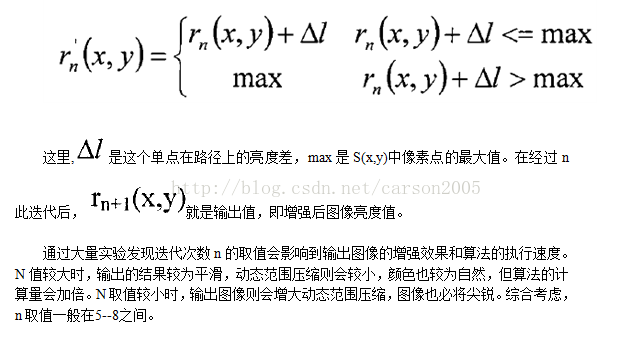
为了得到更好的效果,人们又开发出所谓的多尺度视网膜增强算法(MSR, Multi-Scale Retinex),最为经典的就是3尺度的,大、中、小,既能实现图像动态范围的压缩,又能保持色感的一致性较好。同单尺度相比,该算法有在计算Log[R(x,y)]的值时步骤有所不同:
(1)需要对原始图像进行每个尺度的高斯模糊,得到模糊后的图像Li(x,y),其中小标i表示尺度数。
(2) 对每个尺度下进行累加计算
Log[R(x,y)] = Log[R(x,y)] + Weight(i)* ( Log[Ii(x,y)]-Log[Li(x,y)]);
其中Weight(i)表示每个尺度对应的权重,要求各尺度权重之和必须为1,经典的取值为等权重。
其他的步骤和单尺度的没有区别。
为表述方便,还是贴出其基本的计算原理:

上式中,I为原始输入图像,F是滤波函数,一般为高斯函数,N为尺度的数量,W为每个尺度的权重,一般都为1/N, R表示在对数域的图像的输出。
python实现:
def multi_scale_retinex(img, sigma_list):"""Multi Scale RetinexArguments:img {np.ndarray} -- process imagesigma_list {list of int} -- list of sigma for SSRReturns:retinex {np.ndarray} -- float64, needs to rescale to 0~255"""retinex = np.zeros_like(img)for sigma in sigma_list:retinex += single_scale_retinex(img, sigma)retinex = retinex / len(sigma_list)return retinex
第二种,更清晰的
#MSR
def replaceZeroes(data):min_nonzero = min(data[nonzero(data)])data[data == 0] = min_nonzeroreturn datadef MSR(img, scales):weight = 1/3.0scales_size = 3h, w = img.shape[:2]dst_img = zeros((h, w), dtype=float32)dst_Lblur = zeros((h, w), dtype=float32)dst_R = zeros((h, w), dtype=float32)log_R = zeros((h, w), dtype=float32)for i in range(0,scales_size):img = replaceZeroes(img)L_blur = cv2.GaussianBlur(img, (scales[i], scales[i]), 0)L_blur = replaceZeroes(L_blur)cv2.log(img, dst_img)cv2.log(L_blur, dst_Lblur)log_R += weight*cv2.subtract(dst_img, dst_Lblur)cv2.normalize(log_R, dst_R, 0, 255, cv2.NORM_MINMAX)log_uint8 = cv2.convertScaleAbs(dst_R)return log_uint8
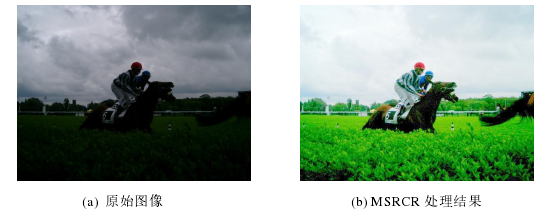
带色彩恢复的多尺度MSR,即MSRCR(Multi-Scale Retinex with Color Restoration)
由于R是对数域的输出,要转换为数字图像,必须将他们量化为[0,255]的数字图像范畴,关于这个量化的算法,有这极为重要的意义,他的好坏直接决定了最终输出的图像的品质。
目前,结合上述文章中提出的一些过程,有4种方式进行处理:
第一种,也是最容易想到的就是,直接线性量化,即采用下式进行处理

第二种,就是在经典的MSRCR文章《A Multiscale Retinex for Bridging the Gap Between Color Images and the Human Observation of Scenes》中提出的Canonical Gain/set 算法。计算公式如:

其中G和b为经验参数。
第三种,实在上述文章中提到的Simplest Color Balance(我简写为SCR)方式,这种方式的处理类似于Photoshop中的自动色阶,他把数据按照一定的百分比去除最小和最大的部分,然后中间的部分重新线性量化到0和255之间。
还有一种方式,就是大家知道HDR的过程吧,他也是将高动态的数据量化到图像的可视范围,因此可以直接将这类算法应用与这个问题上。效果似乎一般。
在用第二种或第三种方式处理时,最好还需要有个Color Restoration的过程,因为如果直接对MSR处理的结果进行量化,得到的图像往往整体偏灰度,这是由于原始的彩色值经过log处理后的数据范围就比较小了,这样各通道之间的差异也很小,而之后的线性量化比log曲线要平滑很多,因此整体就丧失了彩色。


其中β=46,α=125为经验参数,但是最终我的分析认为β不可能取这么大,取1试验表明效果还不错。
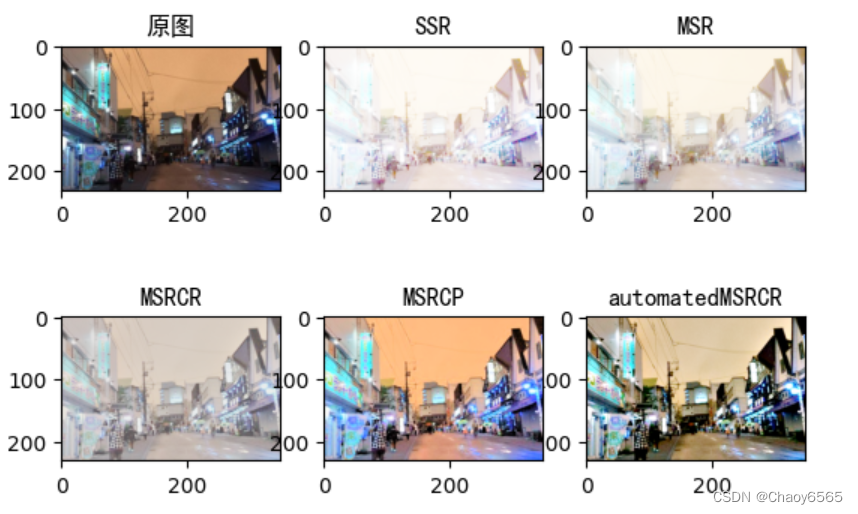
对于一些原始图像HUE较为合理的图,如果用经典的MSRCR算法,会导致处理后的图容易偏色,上述论文提出了对图像的Intensity数据进行Retinex处理,然后再把数据根据原始的RGB的比例映射到每个通道,这样就能在保留原始颜色分布的基础上增强图像,文章中称其为MSRCP。
算法简易版实现:
def multi_scale_retinex(img, sigma_list):"""Multi Scale RetinexArguments:img {np.ndarray} -- process imagesigma_list {list of int} -- list of sigma for SSRReturns:retinex {np.ndarray} -- float64, needs to rescale to 0~255"""retinex = np.zeros_like(img)for sigma in sigma_list:retinex += single_scale_retinex(img, sigma)retinex = retinex / len(sigma_list)return retinex
def color_restoration(img, alpha, beta):"""color restorationArguments:img {np.ndarray} -- process imagealpha {float} -- [description]beta {float} -- [description]Returns:img_color_restoration {np.ndarray} -- float64"""img_sum = np.sum(img, axis=2, keepdims=True)img_color_restoration = beta * (np.log10(alpha * img) - np.log10(img_sum))return img_color_restorationdef simple_color_balance(img, low_clip, high_clip):"""simple color balanceArguments:img {np.ndarray} -- process imagelow_clip {float} -- [description]high_clip {float} -- [description]Returns:img {np.ndarray} -- same dtype with input img"""total = img.shape[0] * img.shape[1]for i in range(img.shape[2]):unique, counts = np.unique(img[:, :, i], return_counts=True)current = 0for uni, count in zip(unique, counts):if float(current) / total < low_clip:low_val = uniif float(current) / total < high_clip:high_val = unicurrent += countimg[:, :, i] = np.maximum(np.minimum(img[:, :, i], high_val), low_val)return imgdef multi_scale_retinex_color_restoration(img, \sigma_list, \gain, bias, \alpha, beta, \low_clip, high_clip):"""multi_scale_retinex_color_restorationArguments:img {np.ndarray} -- process imagesigma_list {list of int} -- list of sigma for SSRgain {float} -- gainbias {float} -- biasalpha {float} -- parameter for color restorationbeta {float} -- parameter for color restorationlow_clip {float} -- parameter for color balancehigh_clip {float} -- parameter for color balanceReturns:[type] -- [description]"""img = np.float64(img) + 1.0img_retinex = multi_scale_retinex(img, sigma_list)img_color = color_restoration(img, alpha, beta)img_msrcr = gain * (img_retinex * img_color + bias)# basic MSRCR formulafor i in range(img_msrcr.shape[2]):img_msrcr[:, :, i] = (img_msrcr[:, :, i] - np.min(img_msrcr[:, :, i])) / \(np.max(img_msrcr[:, :, i]) - np.min(img_msrcr[:, :, i])) * \255img_msrcr = np.uint8(np.minimum(np.maximum(img_msrcr, 0), 255))img_msrcr = simple_color_balance(img_msrcr, low_clip, high_clip)return img_msrcr
详细版:
#MSRCR
def replaceZeroes(data):min_nonzero = min(data[nonzero(data)])data[data == 0] = min_nonzeroreturn data#simple color balance
def simple_color_balance(input_img,out_img,s1,s2):h,w = input_img.shape[:2]sort_img = input_img.copy()one_dim_array = sort_img.flatten()#转化为一维数组sort_array = sorted(one_dim_array)#对一维数组按升序排序per1 = int((h*w)*s1/100)minvalue = sort_array[per1]per2 = int((h*w)*s2/100)maxvalue = sort_array[(h*w)-1-per2]#实施简单白平衡算法if(maxvalue<=minvalue):for i in range(h):for j in range(w):out_img[i,j] = maxvalueelse:scale = 255.0/(maxvalue-minvalue)for m in range(h):for n in range(w):if(input_img[m,n] < minvalue):out_img[m,n] = 0elif(input_img[m,n] > maxvalue):out_img[m, n] = 255else:out_img[m, n] = scale*(input_img[m,n]-minvalue)#映射中间段的图像像素out_img= cv2.convertScaleAbs(out_img)def MSRCR(img,MSRCR_Out,scles,s1,s2):h,w = img.shape[:2]scles_size = 3epc = float(1e-4)B = img[:,:,0]G = img[:, :, 1]R = img[:, :, 2]dst_img = zeros((h, w), dtype=float32)dst_Lblur = zeros((h, w), dtype=float32)log_R = zeros((h, w), dtype=float32)I =  zeros((h, w), dtype=float32)I = (B+G+R)I = replaceZeroes(I)for j in range(3):img[:, :, j] = replaceZeroes(img[:, :, j])for i in range(0, scles_size):L_blur = cv2.GaussianBlur(img[:, :, j], (scales[i], scales[i]), 0)L_blur = replaceZeroes(L_blur)cv2.log(img[:, :, j], dst_img)cv2.log(L_blur, dst_Lblur)log_R += cv2.subtract(dst_img, dst_Lblur)MSR = log_R / 3.0MSRCR = MSR*(cv2.log(125.0*img[:, :, j]) - cv2.log(I))simple_color_balance(MSRCR,MSRCR_Out[:,:,j],s1,s2)
MSRCP
理论上就是对多尺度MSR结果做了色彩平衡,归一化,增益和偏差线性加权。
代码:
def multi_scale_retinex_chromaticity_preservation(img, sigma_list, low_clip, high_clip):"""multi_scale_retinex_chromaticity_preservationbased on original channel to refineArguments:img {np.ndarray} -- process imagesigma_list {list of int} -- list of sigma for SSRlow_clip {float} -- [description]high_clip {float} -- [description]Returns:[type] -- [description]"""img = np.float64(img) + 1.0intensity = np.sum(img, axis=2) / img.shape[2]retinex = multi_scale_retinex(intensity, sigma_list)intensity = np.expand_dims(intensity, 2)retinex = np.expand_dims(retinex, 2)intensity1 = simple_color_balance(retinex, low_clip, high_clip)intensity1 = (intensity1 - np.min(intensity1)) / \(np.max(intensity1) - np.min(intensity1)) * \255.0 + 1.0img_msrcp = np.zeros_like(img)for axis_y in range(img_msrcp.shape[0]):for axis_x in range(img_msrcp.shape[1]):max_pixel = np.max(img[axis_y, axis_x])min_pixel = np.minimum(256.0 / max_pixel, \intensity1[axis_y, axis_x, 0] / intensity[axis_y, axis_x, 0])img_msrcp[axis_y, axis_x, 0] = min_pixel * img[axis_y, axis_x, 0]img_msrcp[axis_y, axis_x, 1] = min_pixel * img[axis_y, axis_x, 1]img_msrcp[axis_y, axis_x, 2] = min_pixel * img[axis_y, axis_x, 2]img_msrcp = np.uint8(img_msrcp - 1.0)return img_msrcp