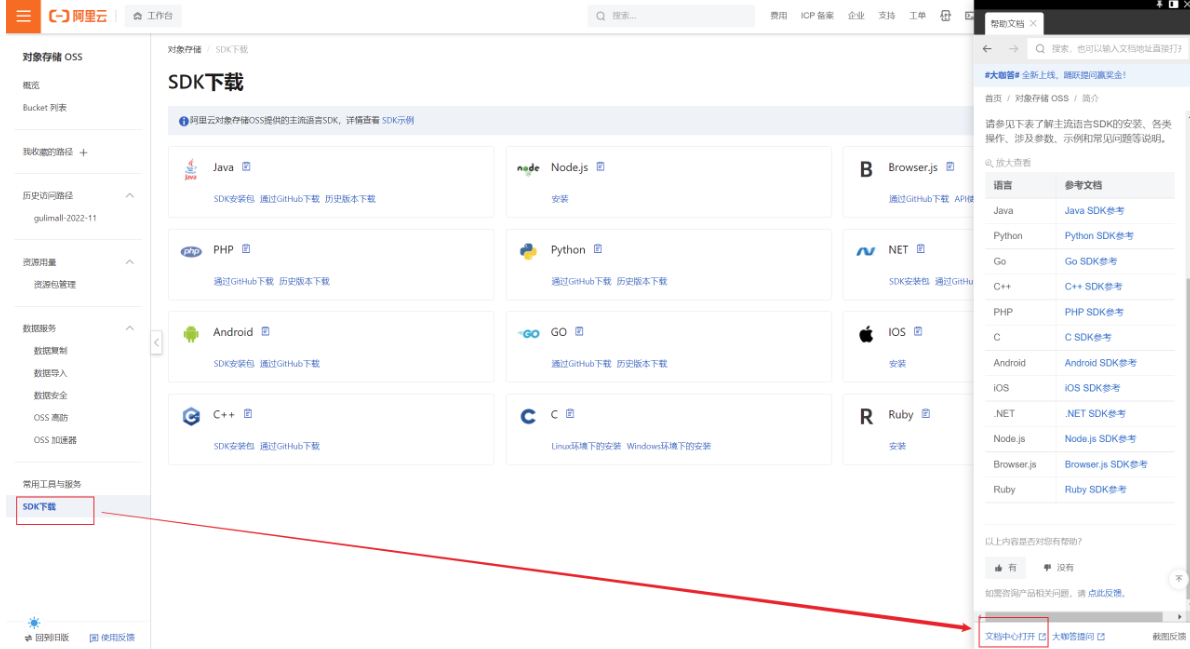
6 商品服务
6.1 三级分类
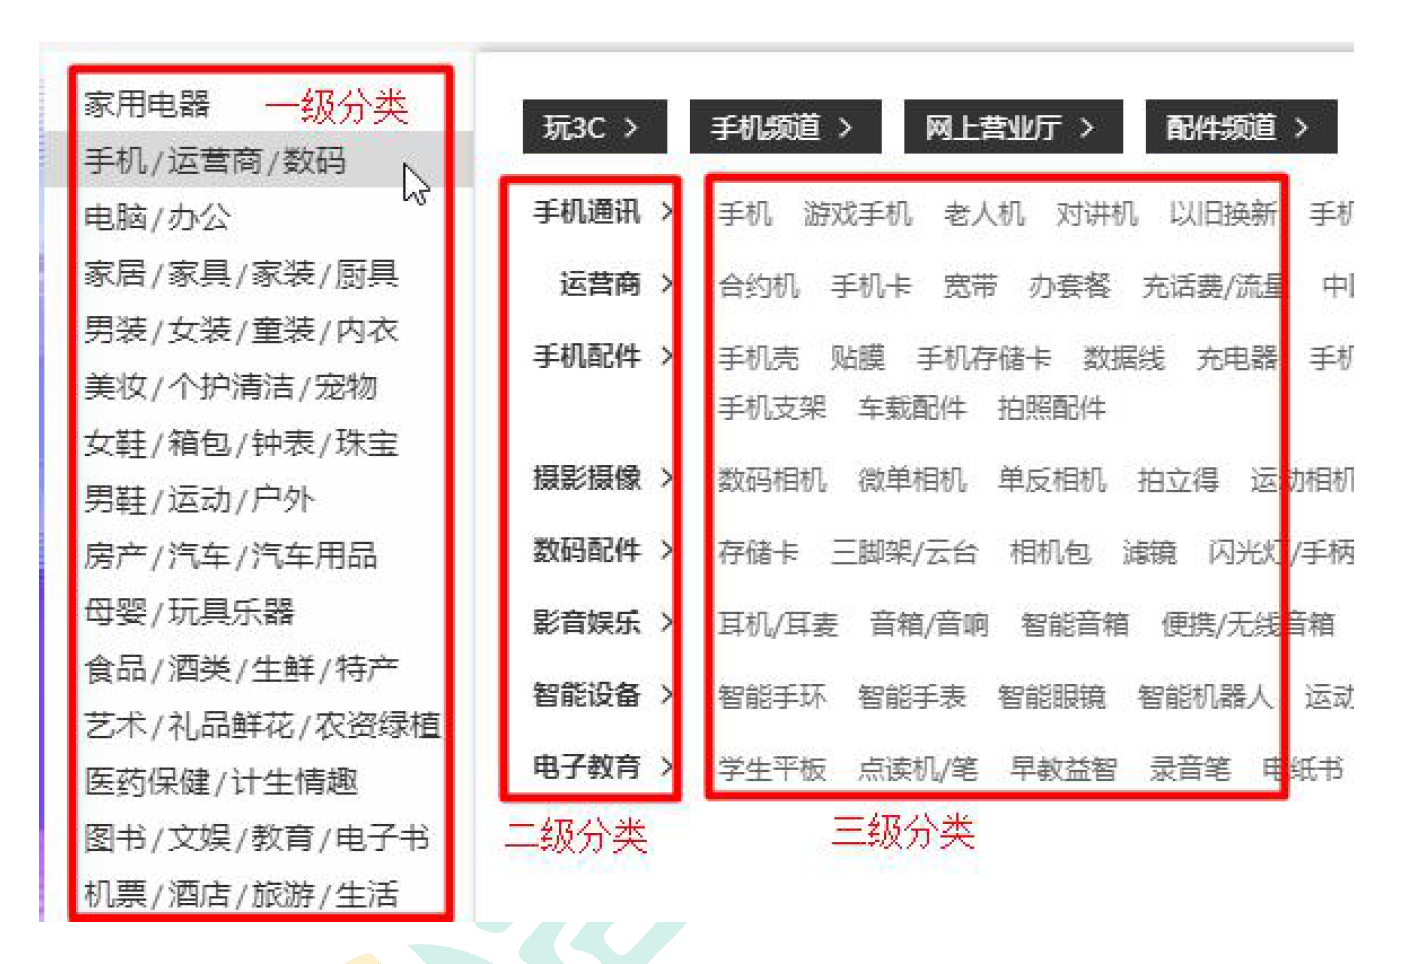
商城的商品页面展示是一个三级分类的。有一级分类、二级分类、三级分类。这就是我们接下来要进行的操作。
6.1.1 数据库
- 首先我们在
gulimall_pms这个数据库中的pms_category这个表下插入数据
商品三级分类SQL代码
6.1.2 查出所有分类及其子分类
1、CategoryController
gulimall-product中的controller包下的CategoryController
- 在类中对原来逆向生成的代码进行修改,
@RestController
@RequestMapping("product/category")
public class CategoryController {@Autowiredprivate CategoryService categoryService;/*** 查出所有分类以及子分类,以树形结构组装起来*/@RequestMapping("/list/tree")public R list(){List<CategoryEntity> entities =  categoryService.listWithTree();return R.ok().put("data", entities);}}
2、CategoryService
接着我们使用idea自带的工具帮助我们生成相应的方法。
/*** 商品三级分类*/
public interface CategoryService extends IService<CategoryEntity> {List<CategoryEntity> listWithTree();
}
3、CategoryServiceImpl
@Service("categoryService")
public class CategoryServiceImpl extends ServiceImpl<CategoryDao, CategoryEntity> implements CategoryService {// @Autowired// CategoryDao  categoryDao; //其实这里因为继承了ServiceImpl,且其泛型就是 CategoryDao,// 所以我们可以直接使用 ServiceImpl里面的 baseMapper来直接注入......./*** 1、Lambda表达式* 1、举例:(o1, o2)->Integer.compare(o1, o2)** 2、格式:** -> :lambda操作符 或 箭头操作符* -> 左边: lambda形参列表(其实就是接口中的抽象方法的形参)* -> 右边: lambda体(其实就是重写的抽象方法的方法体)* 3、总结:** -> 左边: lambda形参列表的参数类型可以省略(类型推断),如果形参列表只有一个参数,其一对()也可以省略** -> 右边: lambda体应该使用一对{}包裹;如果lambda体只执行一条语句(可能是return语句),可以省略这一对{}和return关键字*右边*/@Overridepublic List<CategoryEntity> listWithTree() {//1.查出所有分类//没有查询条件,就是代表查询所有List<CategoryEntity> entities = baseMapper.selectList(null);//2.组装成父子的树形结构//2.1 找到所有的一级分类  (categoryEntity) -> {} lambda 表达式List<CategoryEntity> level1Menus = entities.stream()// .filter((categoryEntity) -> { return categoryEntity.getParentCid() == 0}) 下面的lambda表达式省略了return及{}及().filter(categoryEntity -> categoryEntity.getParentCid() == 0)   //过滤出一级分类,因为其父类id是0.map((menu) -> {   //在菜单收集成list之前先通过递归找到菜单的所有子分类,放在map中,然后排序,即将当前菜单改了之后重新返回, 然后再收集菜单。//设置一级分类的子分类menu.setChildren(getChildren(menu, entities));return menu;}).sorted((menu1, menu2) -> {//排序,menu1:之前的菜单     menu2:之后的菜单return (menu1.getSort() == null ? 0 : menu1.getSort()) - (menu2.getSort() == null ? 0 : menu2.getSort());//子菜单肯定有有前一个和后一个之分}).collect(Collectors.toList());return level1Menus;}//递归查找所有菜单的子菜单// root 当前菜单   all 所有菜单private List<CategoryEntity> getChildren(CategoryEntity root, List<CategoryEntity> all) {List<CategoryEntity> children = all.stream().filter(categoryEntity -> {return categoryEntity.getParentCid() == root.getCatId();   //二级菜单的父分类id == 一级分类的catid}).map(categoryEntity -> {//1.找到子菜单//递归查找categoryEntity.setChildren(getChildren(categoryEntity, all));//二级菜单下还有三级菜单,继续查找return categoryEntity;//2.菜单的排序}).sorted((menu1, menu2) -> {   //sorted() 定制排序return (menu1.getSort() == null ? 0 : menu1.getSort() - (menu2.getSort() == null ? 0 : menu2.getSort()));}).collect(Collectors.toList());return children;}
这里使用的是流式编程,对于这方面我们可去参考java8新特性的StreamAPI来进行相应的学习。

在学习的过程中,看到老师使用TODO才知道IDEA有一个类似备忘录的功能。
4、启动测试
我们启动gulimall-product微服务进行测试查询。
-
我们接着进行测试,浏览器发送
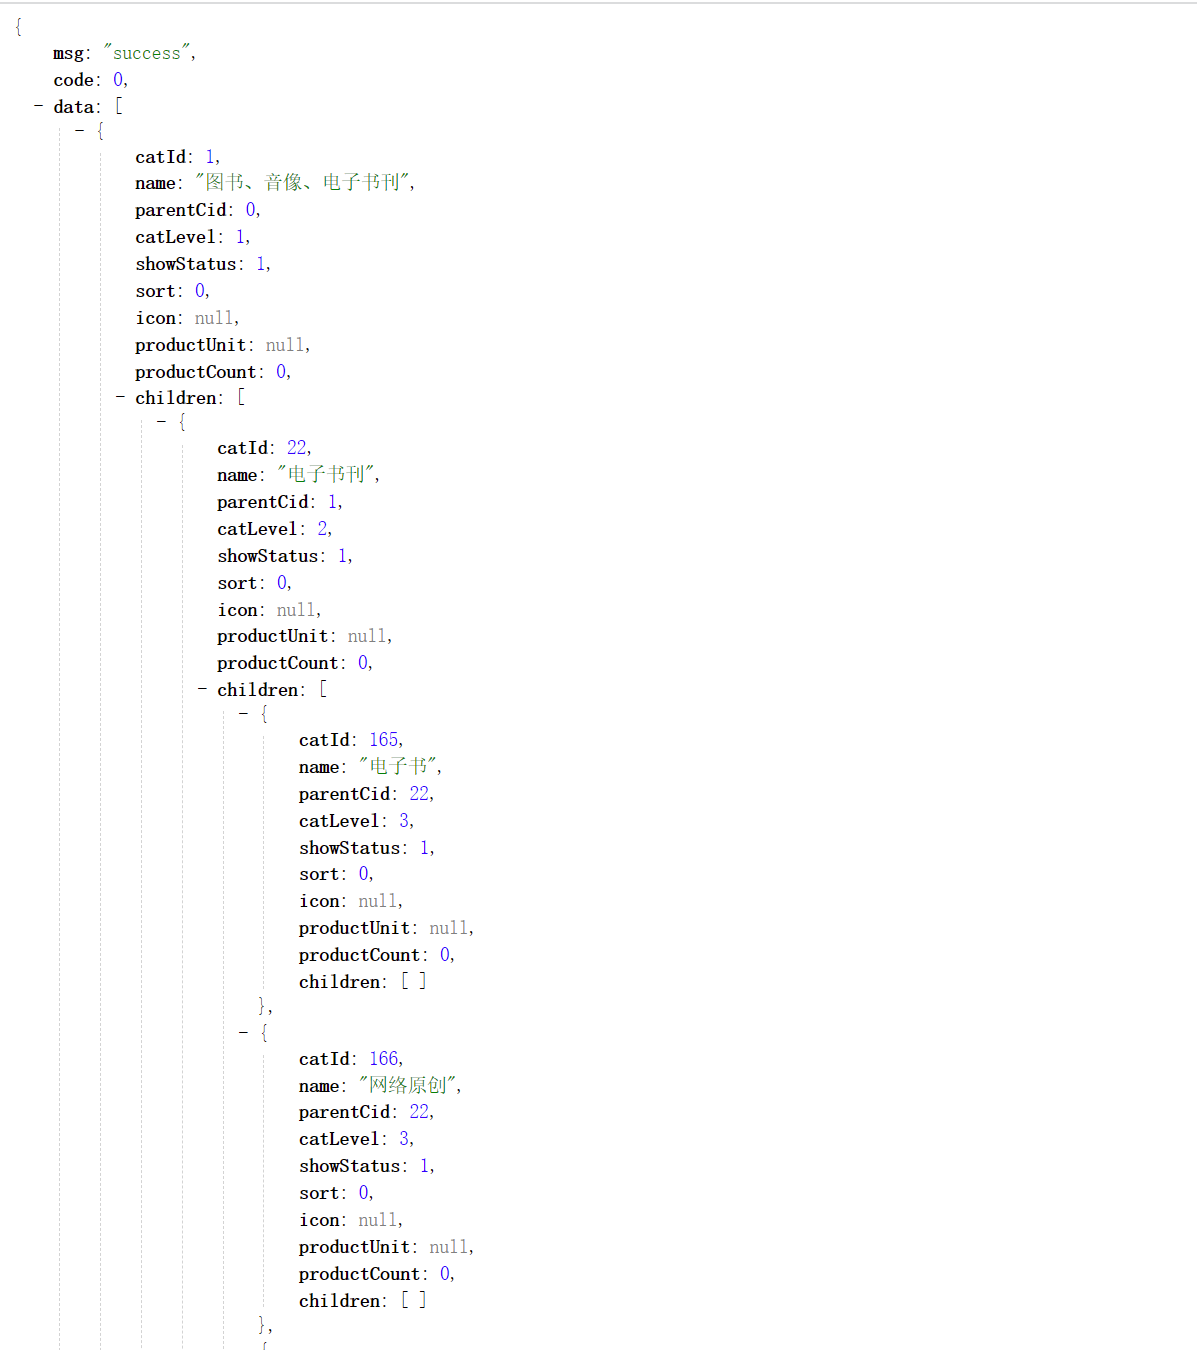
http://localhost:10000/product/category/list/tree,测试结果如下图,显示正确。这里我们推荐浏览器装一个Json格式的处理的插件可以很好的帮助我们查看Json数据。 -

6.1.3 配置网关路由与路径重写
前后端联调:
启动后台:renren-fast微服务(idea);
启动前端:renren-fast-vue(vscode);
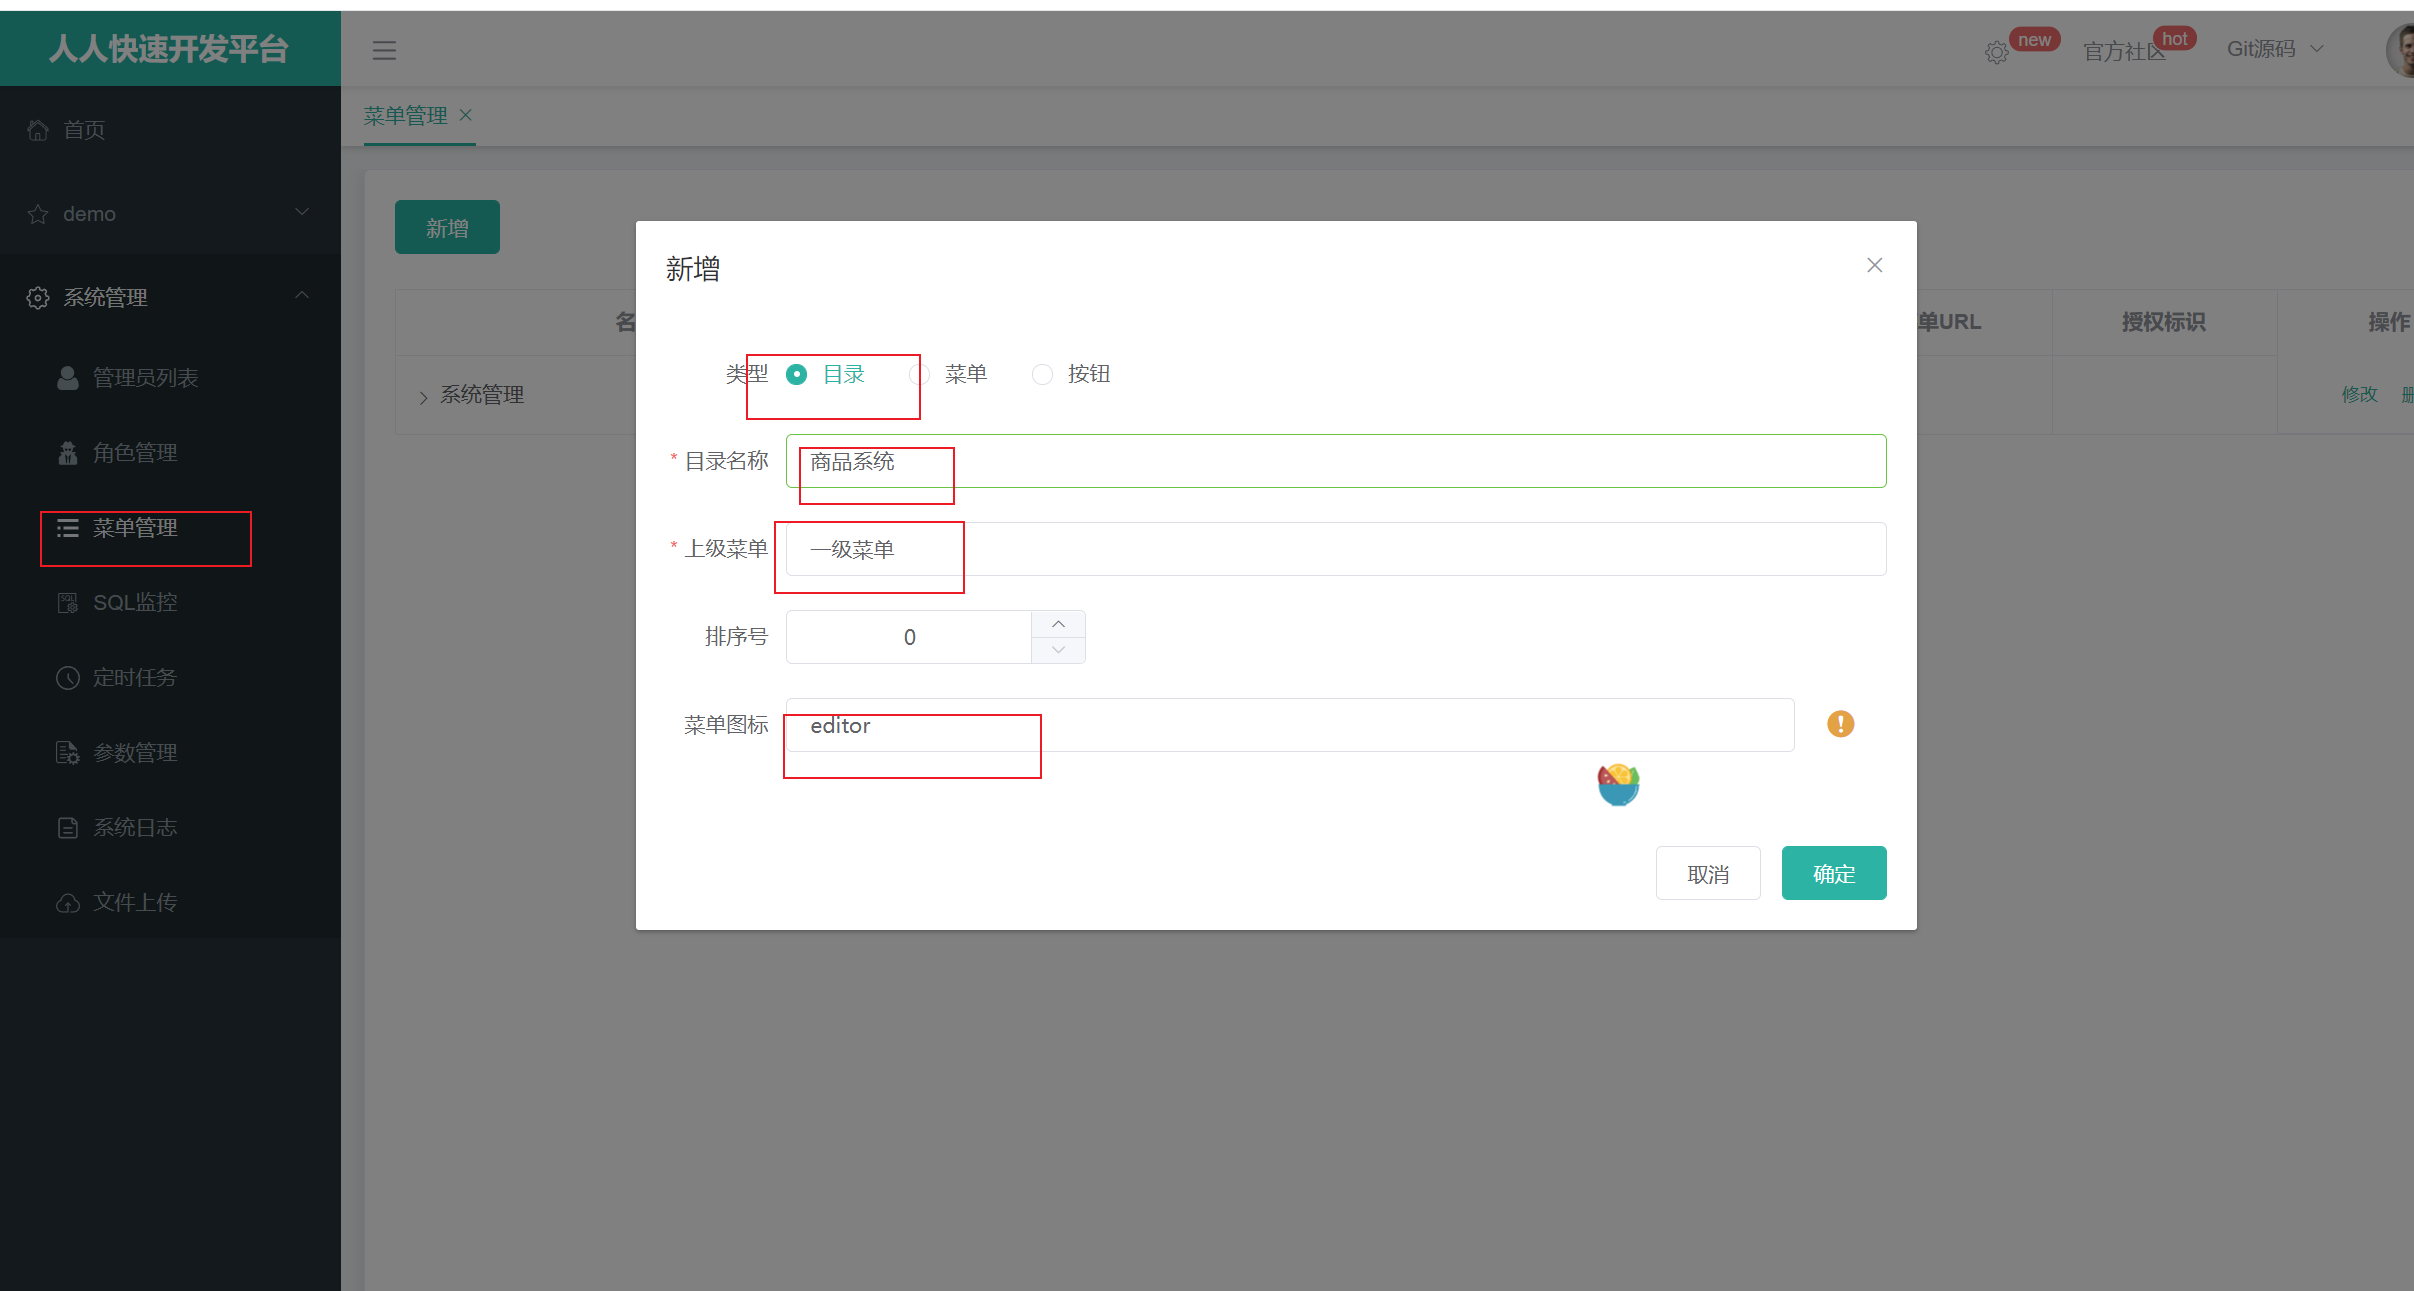
接着我们来到后台系统进行菜单模块的添加。
1、 后台添加目录和菜单
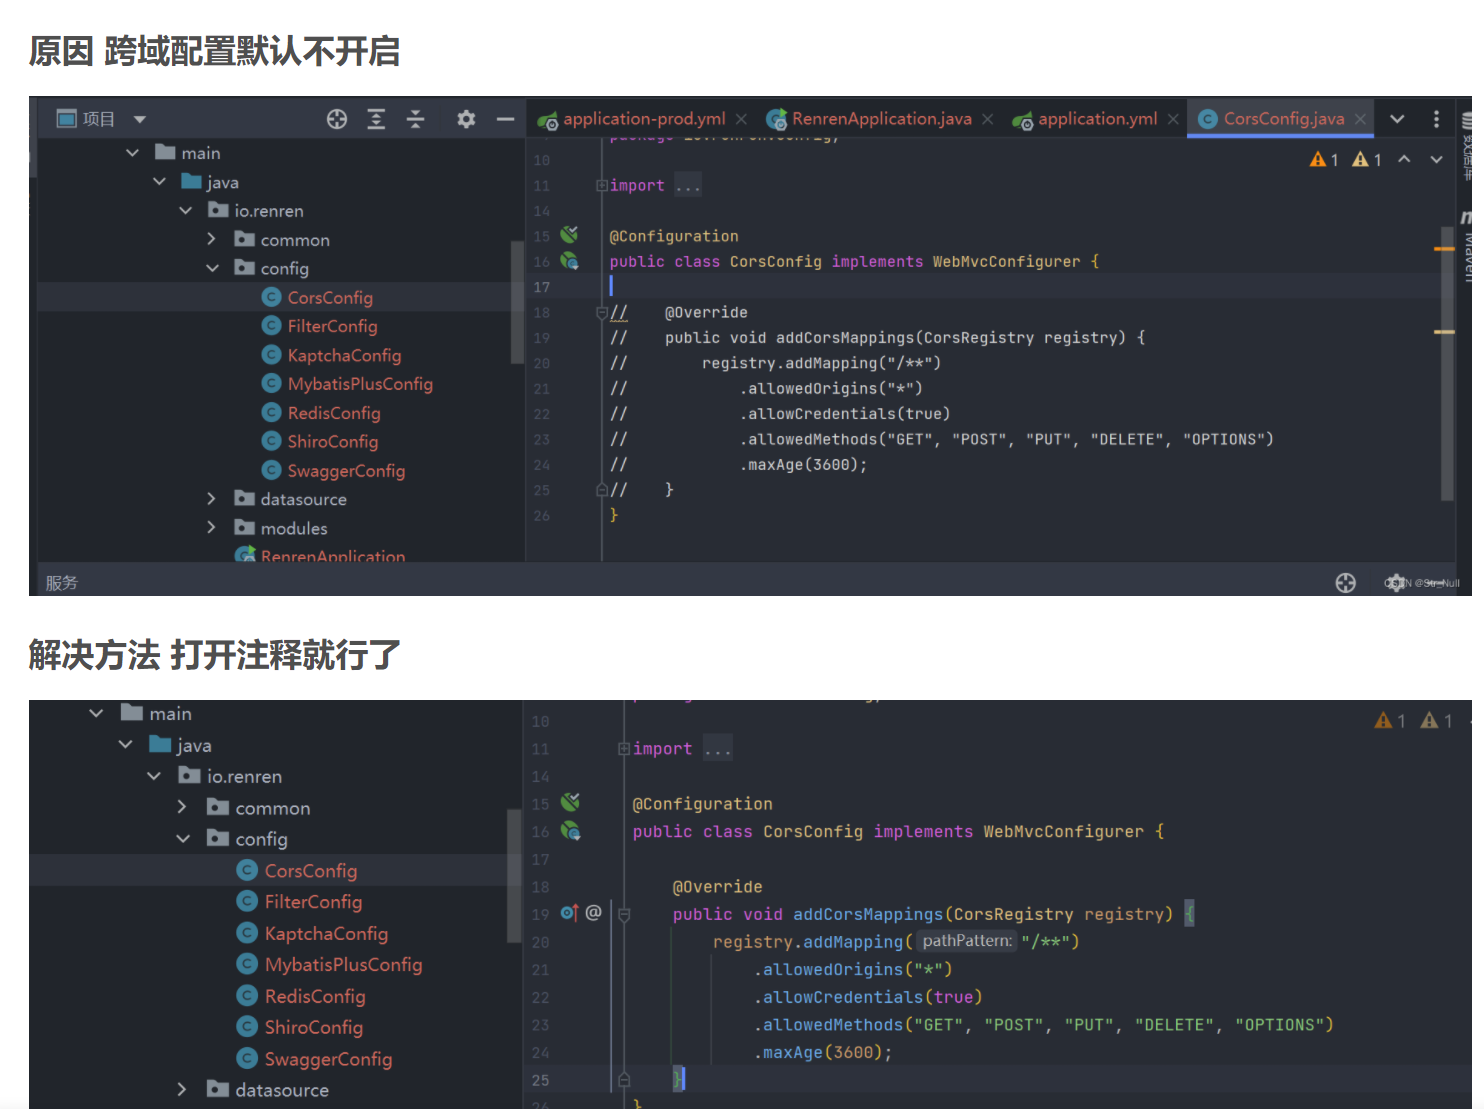
注意:避坑指南
如果系统登录不上,可能是 跨域配置默认不开启
登录成功之后,我们就可以开始进行后台系统的编辑和完善了。
-
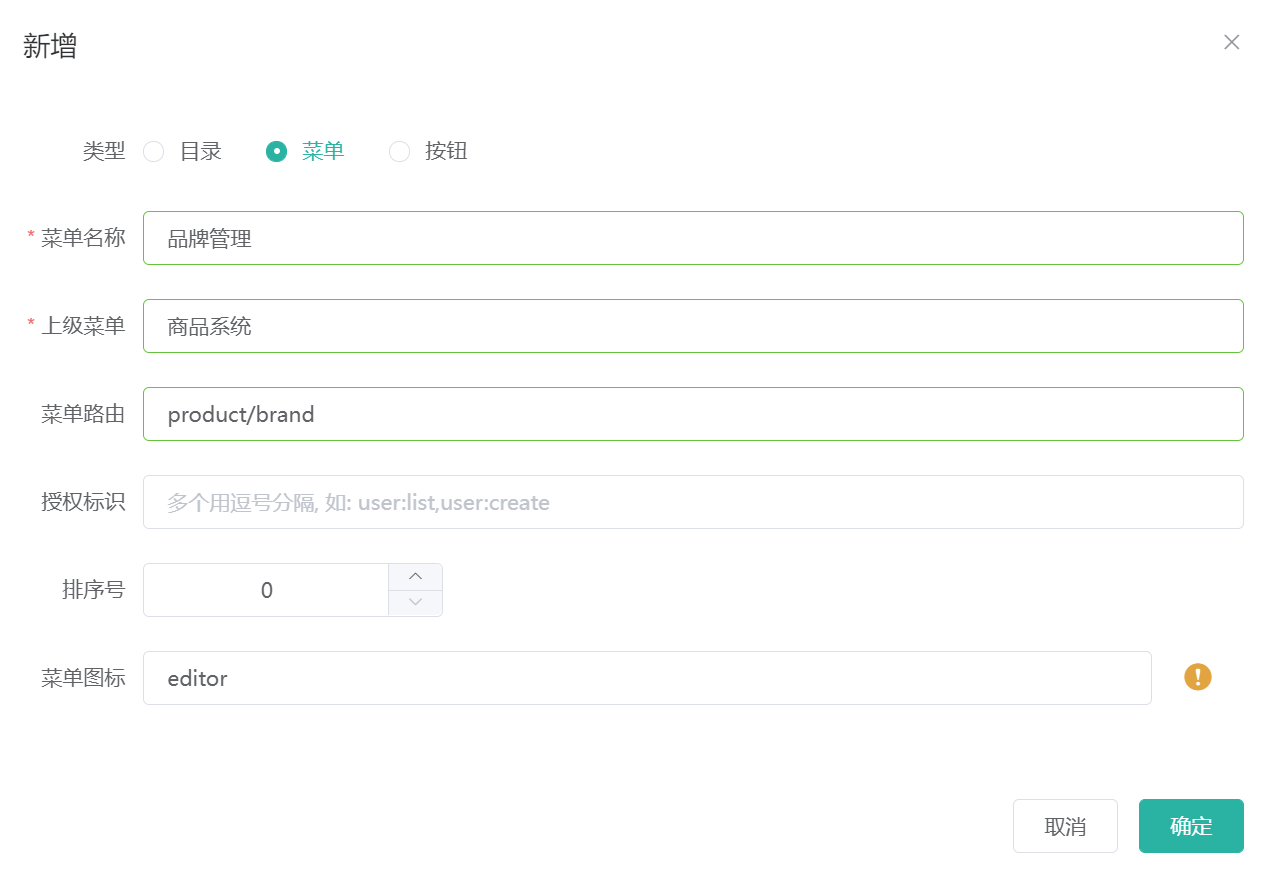
在菜单管理中添加一个商品系统的目录。如下图。
-
在商品系统中新增一个分类维护的菜单。菜单的路由其实就是我们商品微服务中的访问路径。
希望的效果:在左侧点击【分类维护】,希望在此展示3级分类
注意地址栏http://localhost:8001/#/product-category 可以注意到product-category我们的/被替换为了-

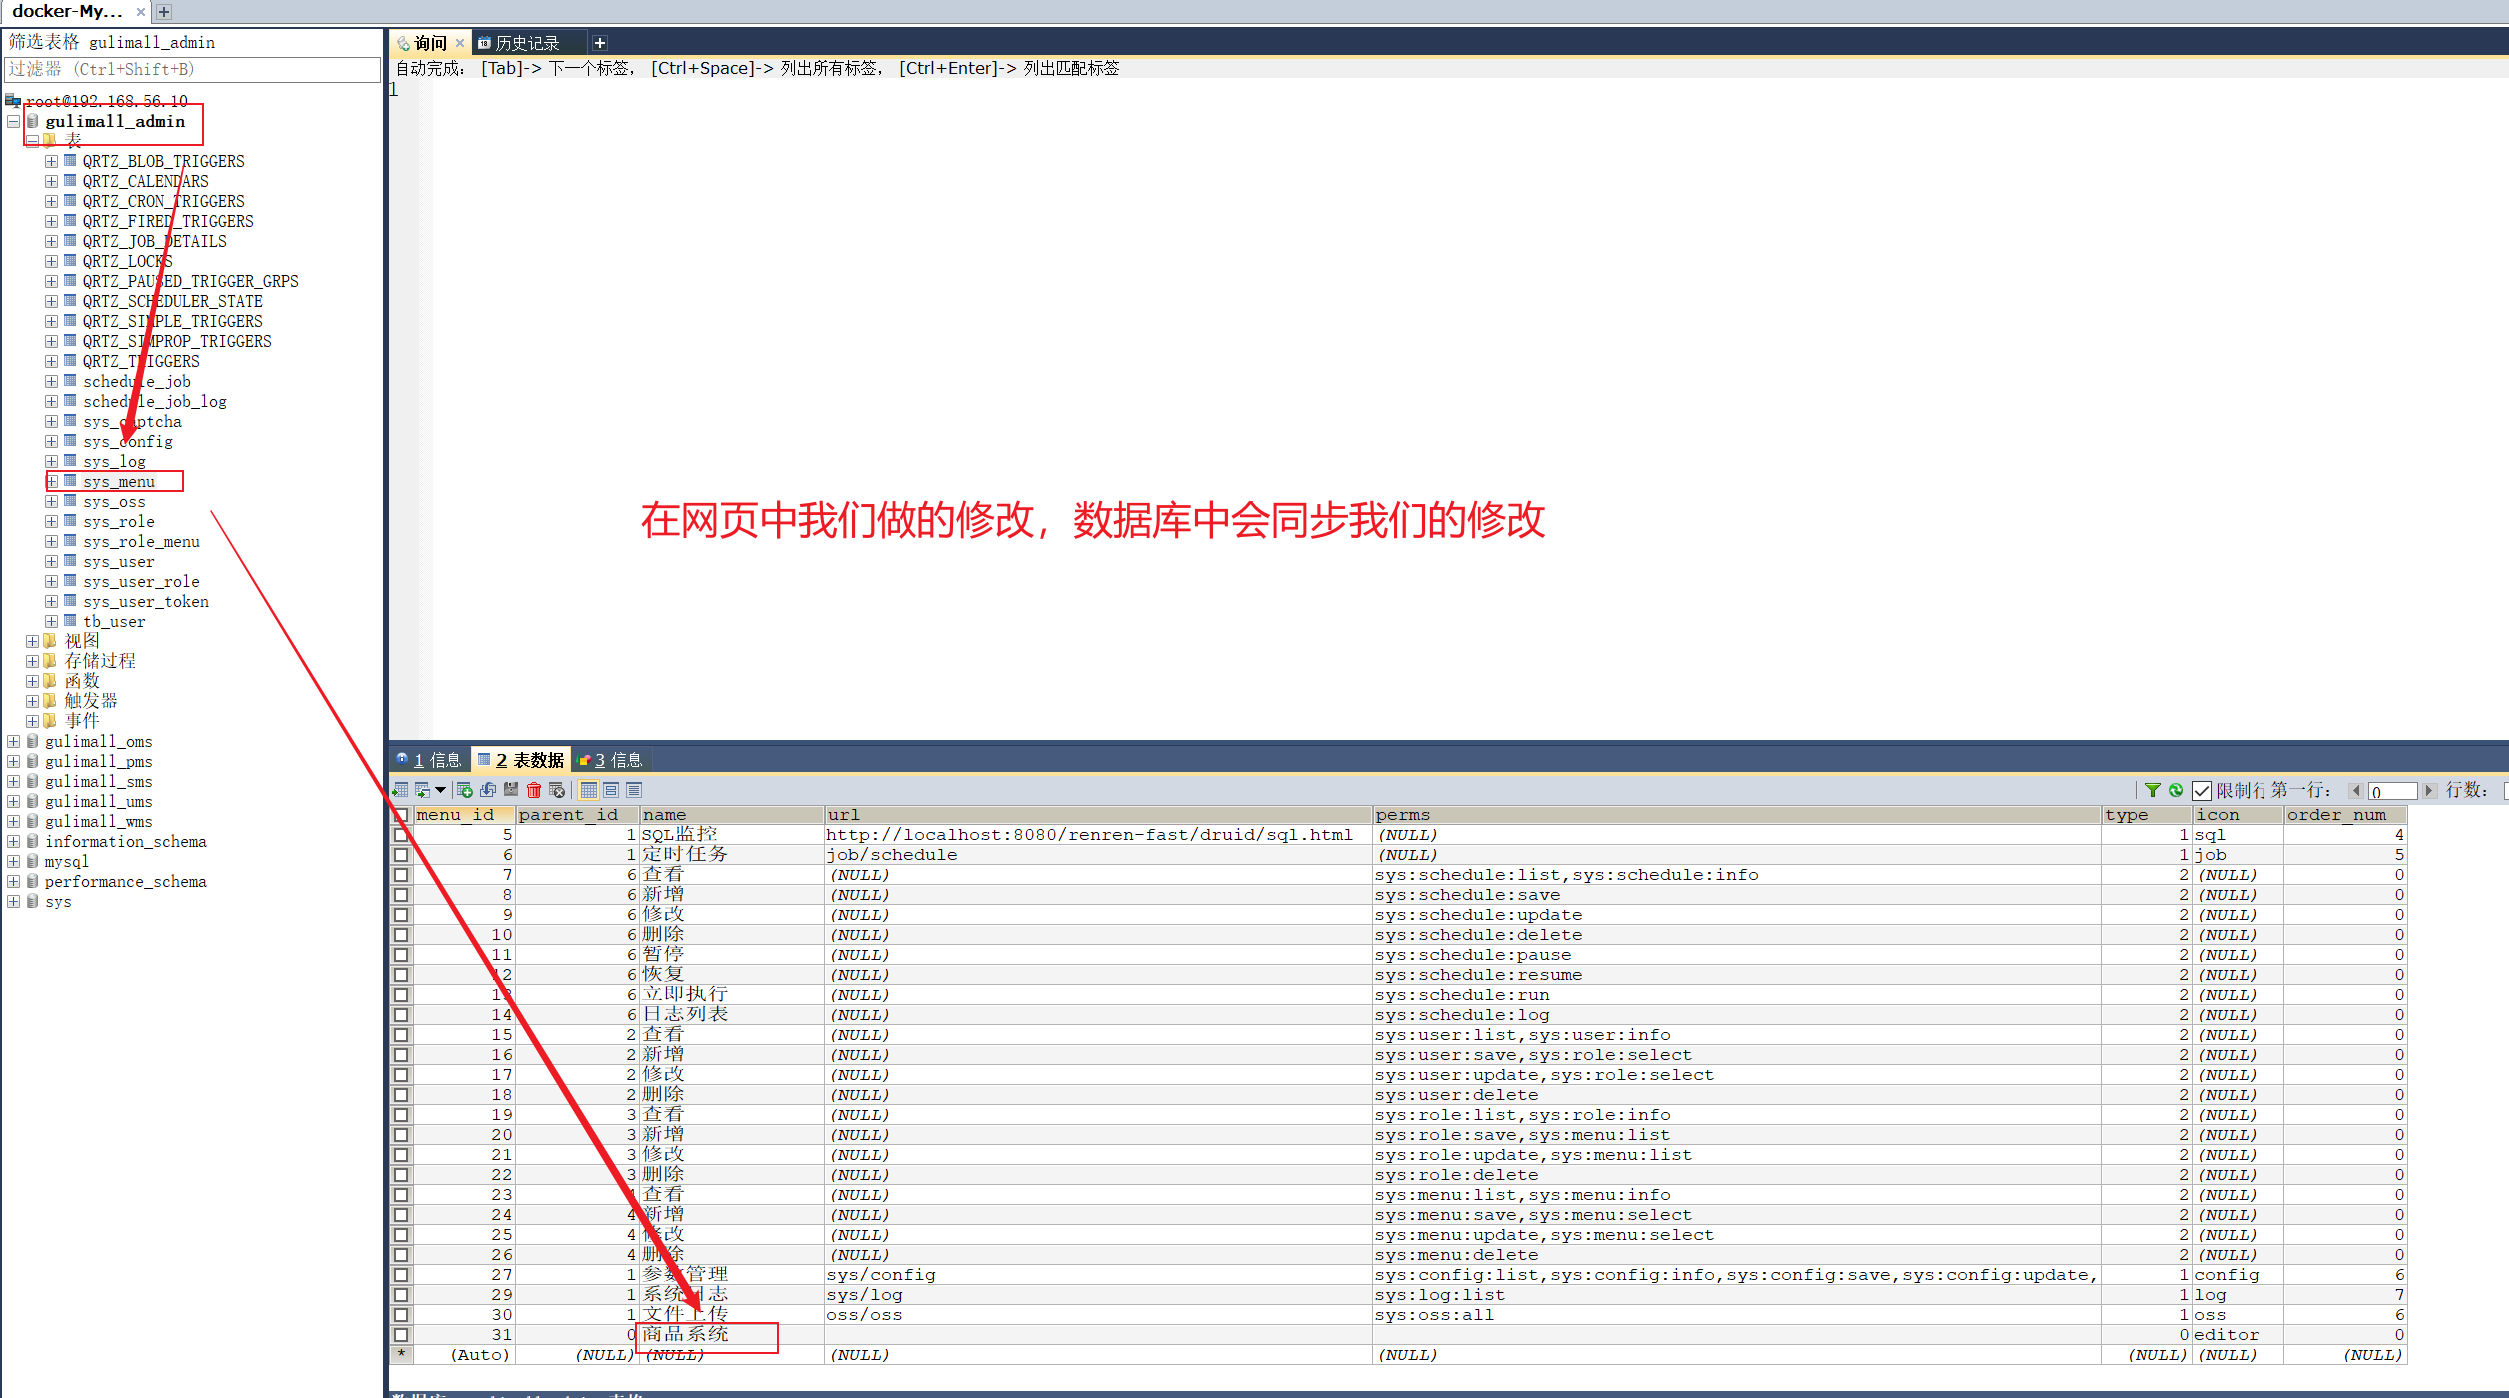
我们在后台系统中修改的,在数据库的gulimall-admin中也会同步进行修改。
-
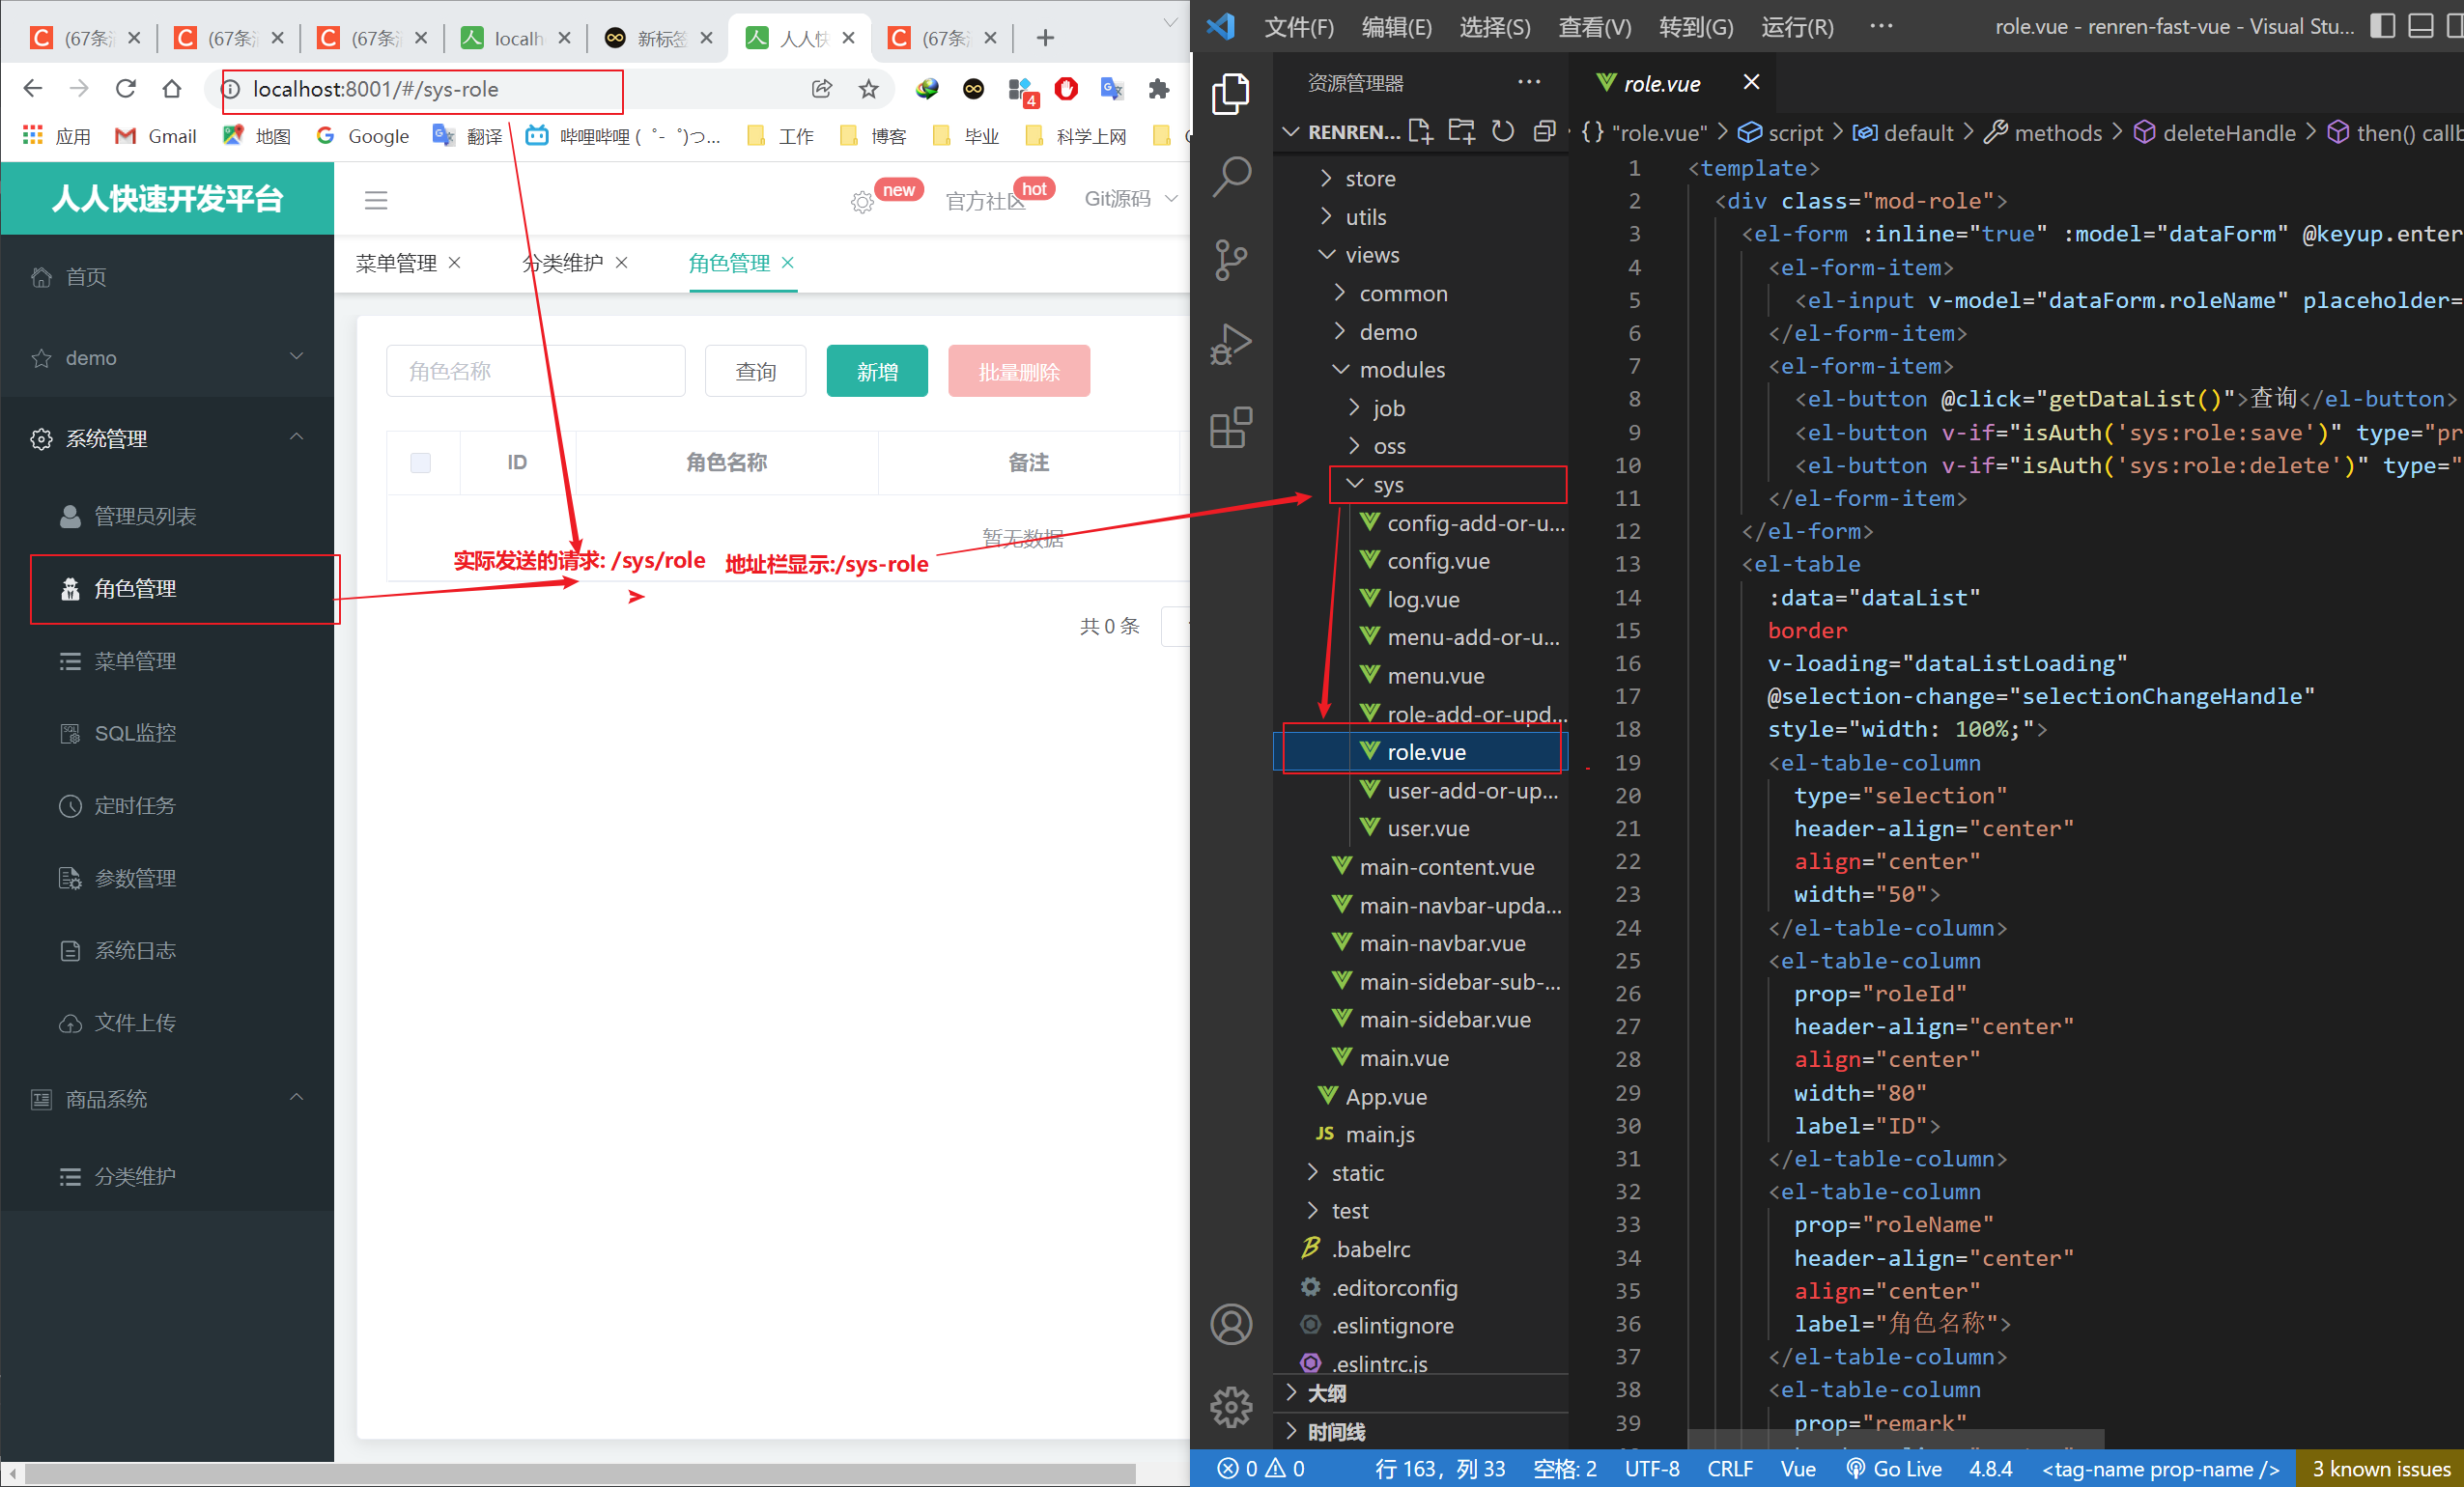
我们可以看到如果我们点击角色管理的话,地址栏是
/sys-role,但是我们实际发送的请求应该是/sys/role,sys-role 具体的视图在 renren-fast-vue/views/modules/sys/role.vue
所以由此可以知道后台会将
/自动转换为-,同理我们去访问/product/category也会自动被转换为/product-category。具体地址栏如下所示:


-
我们在
renren-fast-vue中可以看到有一个文件,对应的其实就是/sys-role对应的页面视图,,即sys文件夹下的role.vue对应的就是角色管理这个页面的展示。所以对于商品分类/product/category,我们接下来要做的就是在renren-fast-vue下创建一个product文件夹,文件夹中创建一个category.vue来进行页面展示。

2、编写树形结构
- 对于这一段前端开发的代码,我们可以借鉴
element.eleme.cn中的快速开发指南进行编写。
<template><el-tree :data="data" :props="defaultProps" @node-click="handleNodeClick"></el-tree>
</template><script>
export default {name: 'category',components: {},directives: {},data() {return {data: [],defaultProps: {children: 'children',label: 'label'}};},mounted() {},methods: {handleNodeClick(data) {console.log(data);},getMenus(){this.$http({url: this.$http.adornUrl('/product/category/list/tree'),method: 'get'}).then(data=>{console.log(data)})}},created(){this.getMenus();}
};
</script><style scoped></style>
- 进行测试
测试中发现检查网页源代码发现,本来应该是给商品微服务10000端口发送的查询的,但是发送到了renren-fast 8080端口去了。
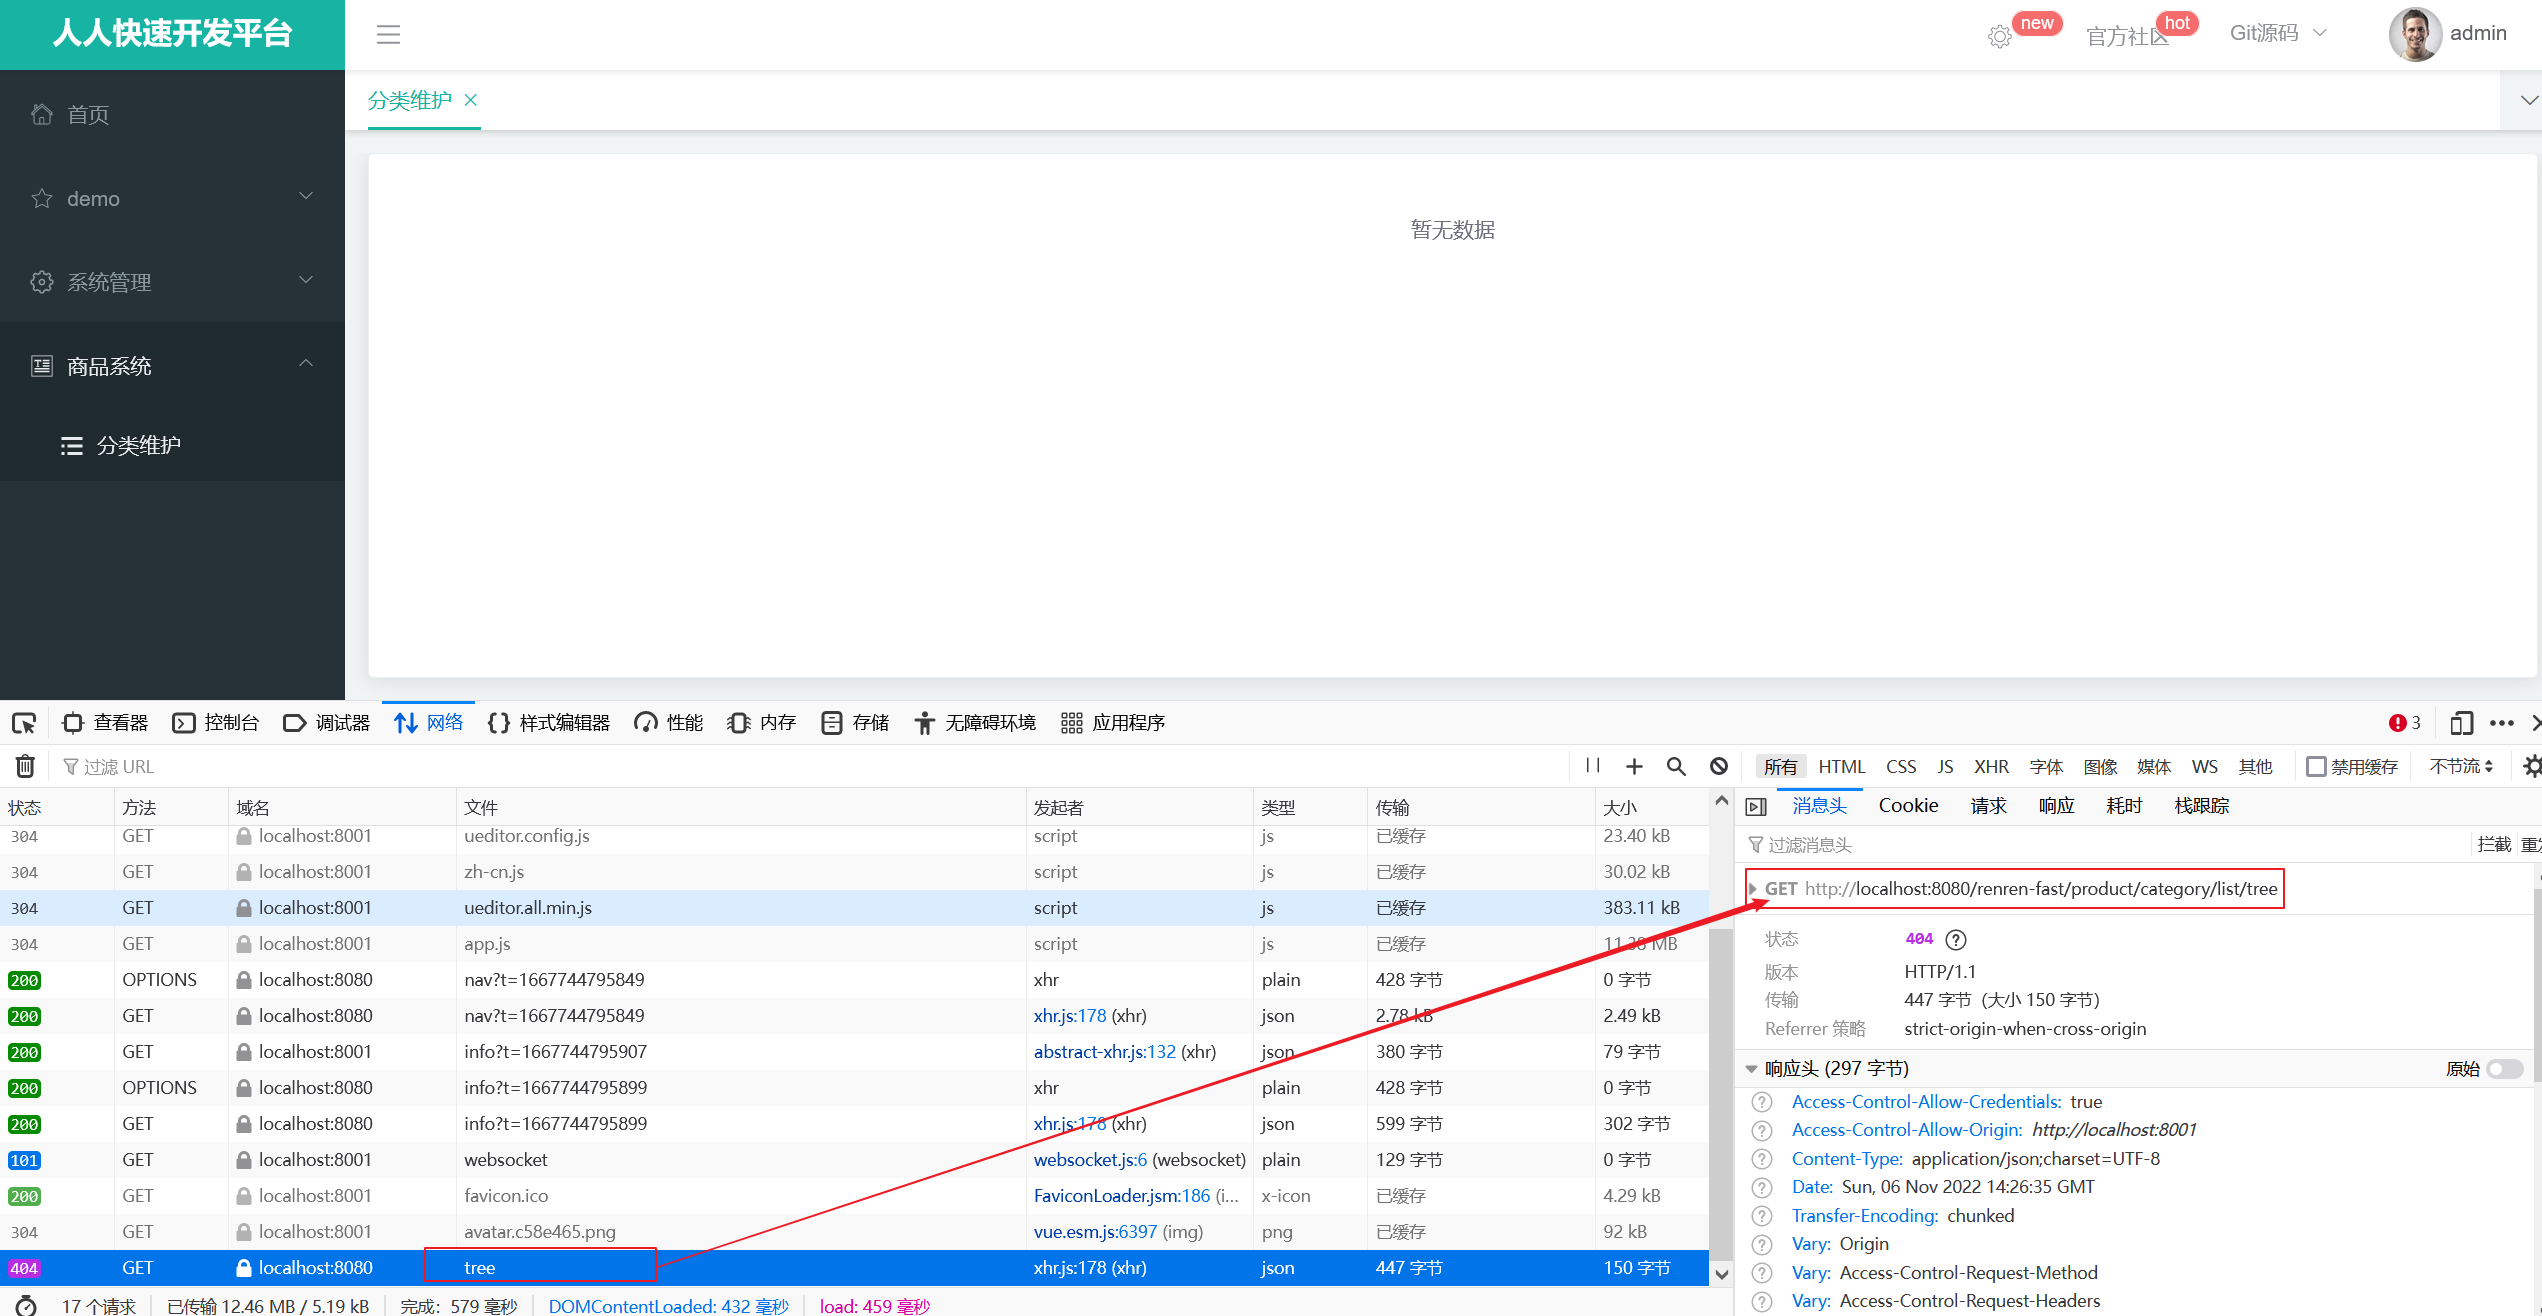

我们以后还会同时发向更多的端口,所以需要配置网关,前端只向网关发送请求,然后由网关自己路由到相应服务器端口。
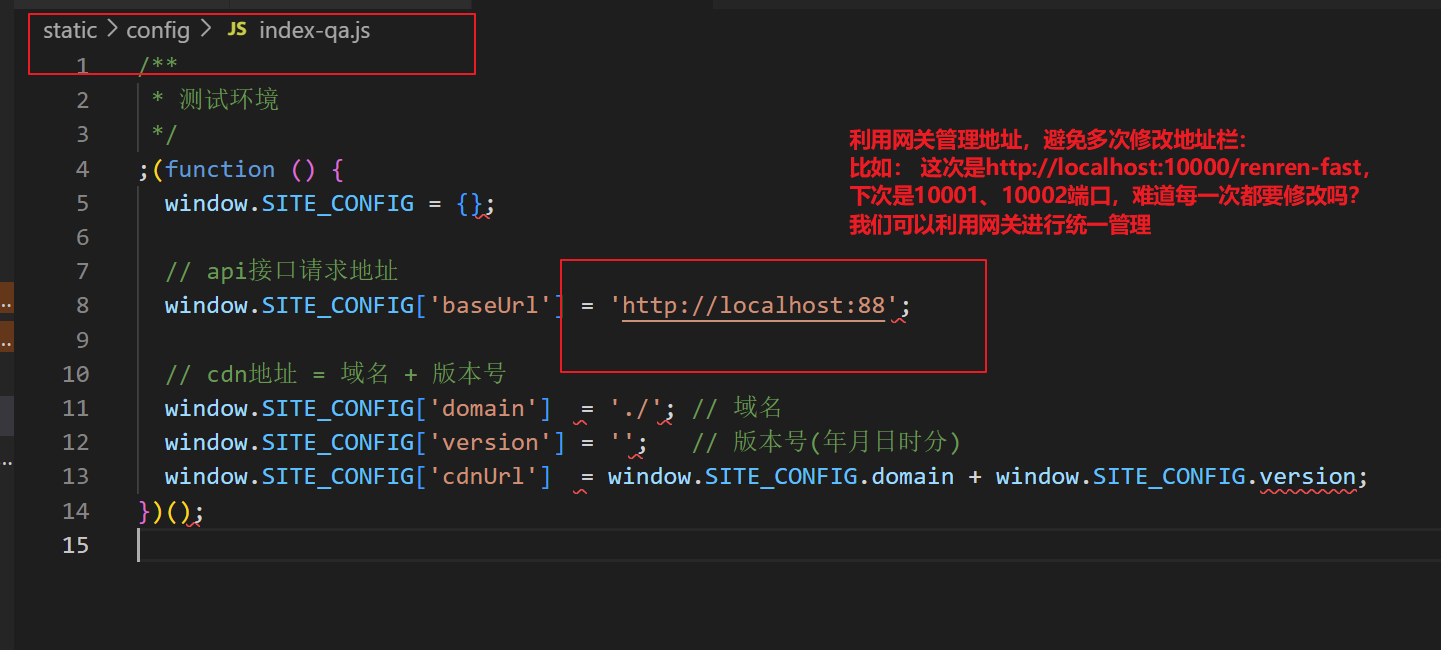
renren-fast-vue中有一个 Index.js是管理 api 接口请求地址的,如下图。如果我们本次只是简单的将8080改为10000端口,那么当下次如果是10001呢?难道每次都要改吗?所以我们的下一步做法是使用网关进行路由。通过网关映射到具体的请求地址。
ps:此处也可以参考其他人的理解:
借鉴:他要给8080发请求读取数据,但是数据是在10000端口上,如果找到了这个请求改端口那改起来很麻烦。方法1是改vue项目里的全局配置,方法2是搭建个网关,让网关路由到10000。
ps: 上面这个图明显有错误,vscode 已经报错,这里我没有注意到,以致 后面处理 跨域问题的时候 白白浪费了我 9个半 小时的时间啊!!!!1
前端项目报错也会影响!!!
切记!!!!!!!!!!!!!!!!
在这里,对于微服务,后面我们统一改为加 api 前缀能路由过去。
// api接口请求地址window.SITE_CONFIG['baseUrl'] = 'http://localhost:88/api'
接下来进行测试访问

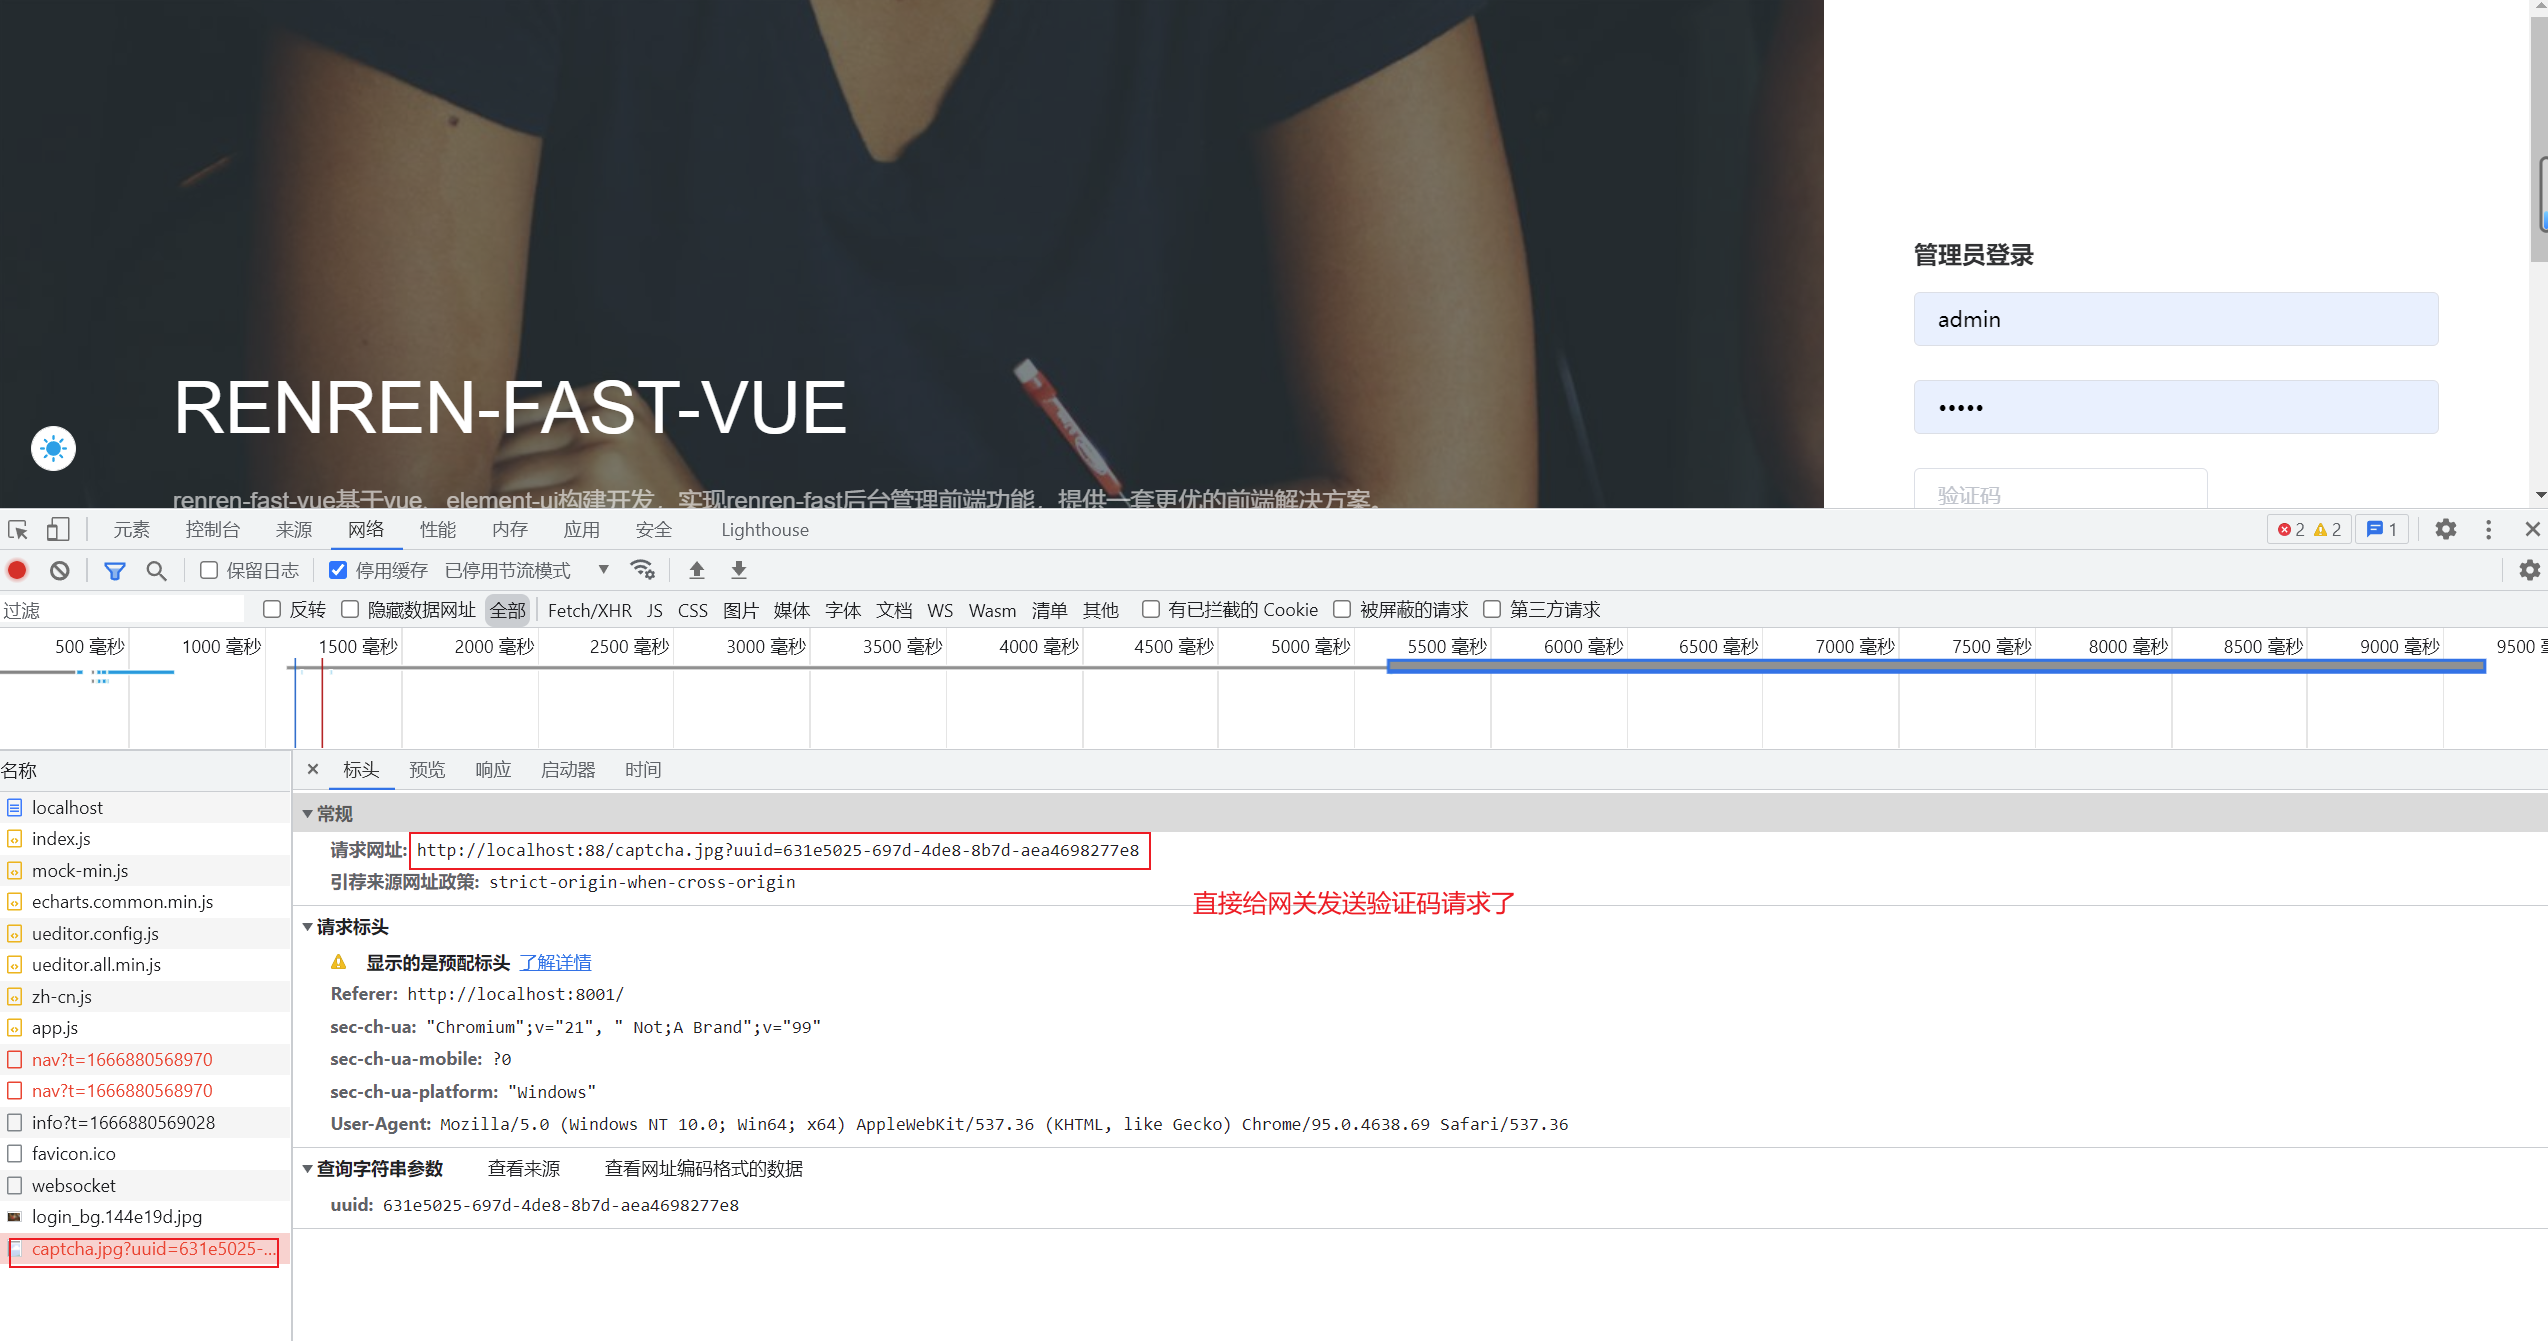
我们发现 验证码 一直加载不出来。检查网页源代码发现是因为我们直接给网关发送验证码请求了。但是真实的应该是给 renren-fast 发送请求。
分析原因:前端给网关发验证码请求,但是验证码请求在 renren-fast服务里,所以要想使验证码好使,需要把 renren-fast服务注册到服务中心,并且由网关进行路由
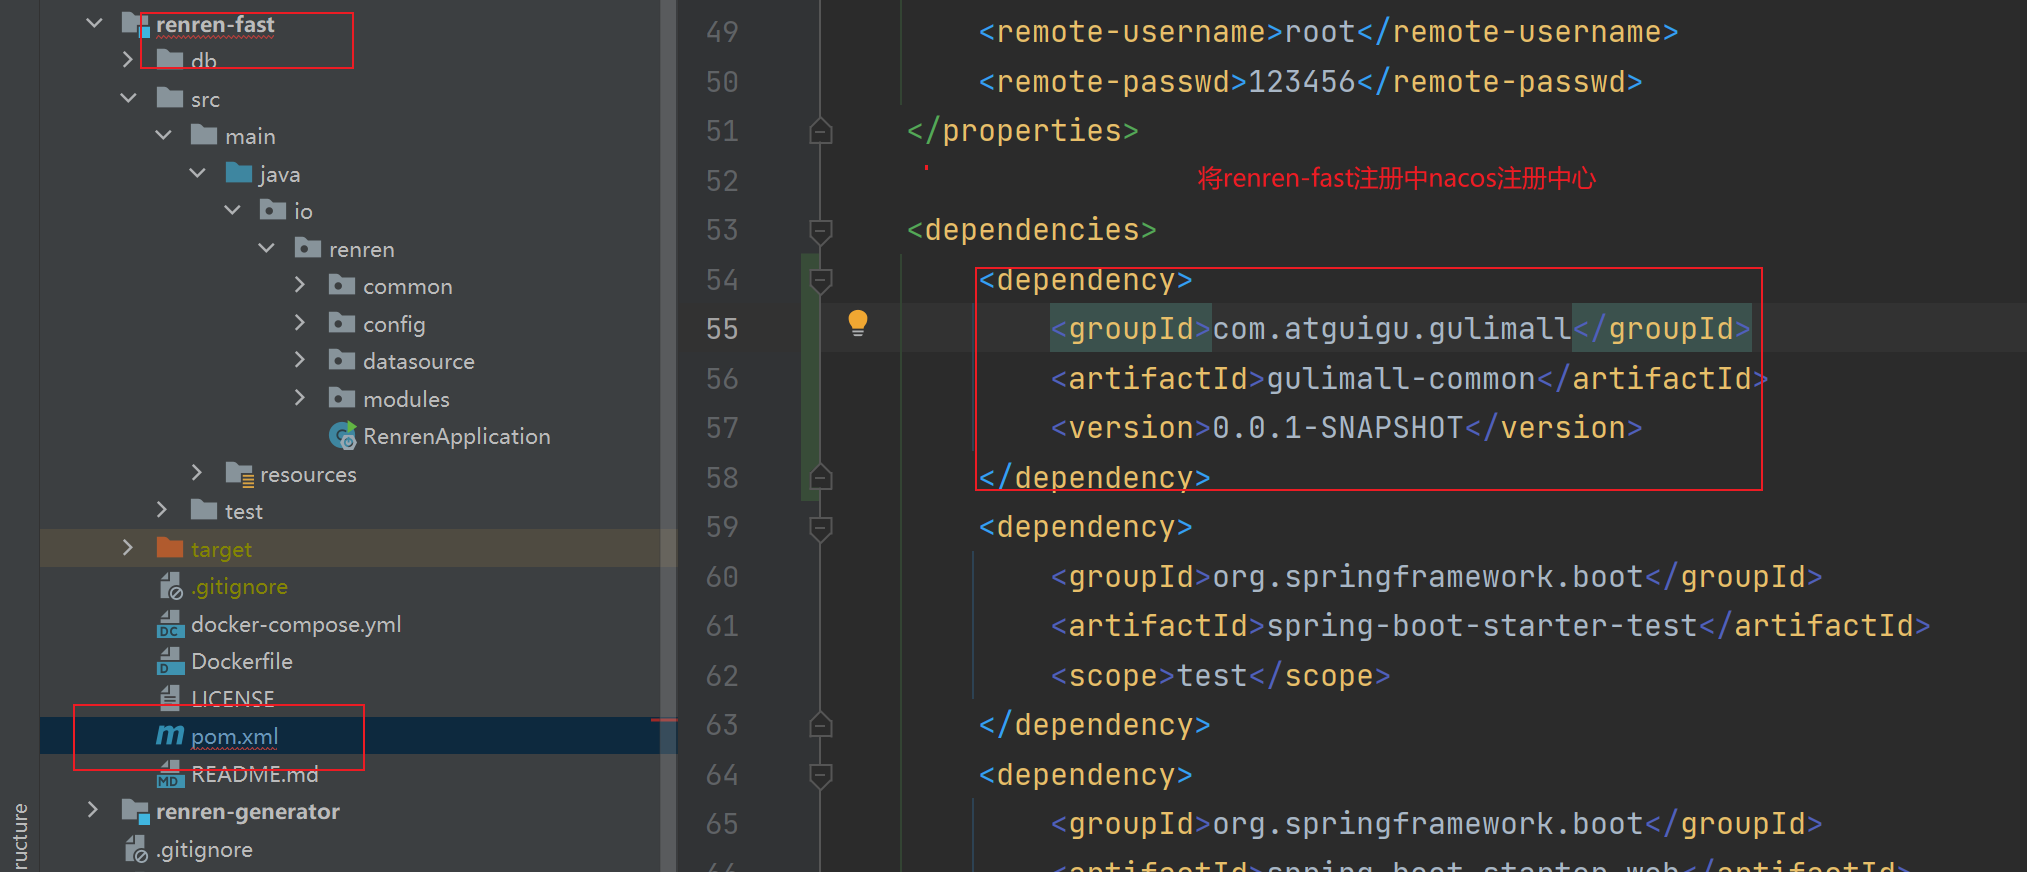
3、将renren-fast注册进 nacos ,使用网关进行统一管理
问题引入:他要去 nacos 中查找api服务,但是nacos里是fast服务,就通过把api改成fast服务,所以让fast注册到服务注册中心,这样请求88网关转发到8080fast。
让fast里加入注册中心的依赖,所以引入common
- 引入gulimall-common
-
在renren-fast的 application.yml文件中配置nacos注册中心地址
spring:application:name: renren-fast //给 renren-fast 起一个名字,方便nacos服务注册发现cloud:nacos:discovery:server-addr: 127.0.0.1:8848 //注册进nacos -
在renren-fast的主启动类上加入
@EnableDiscoveryClient注解,使得该微服务会被注册中心发现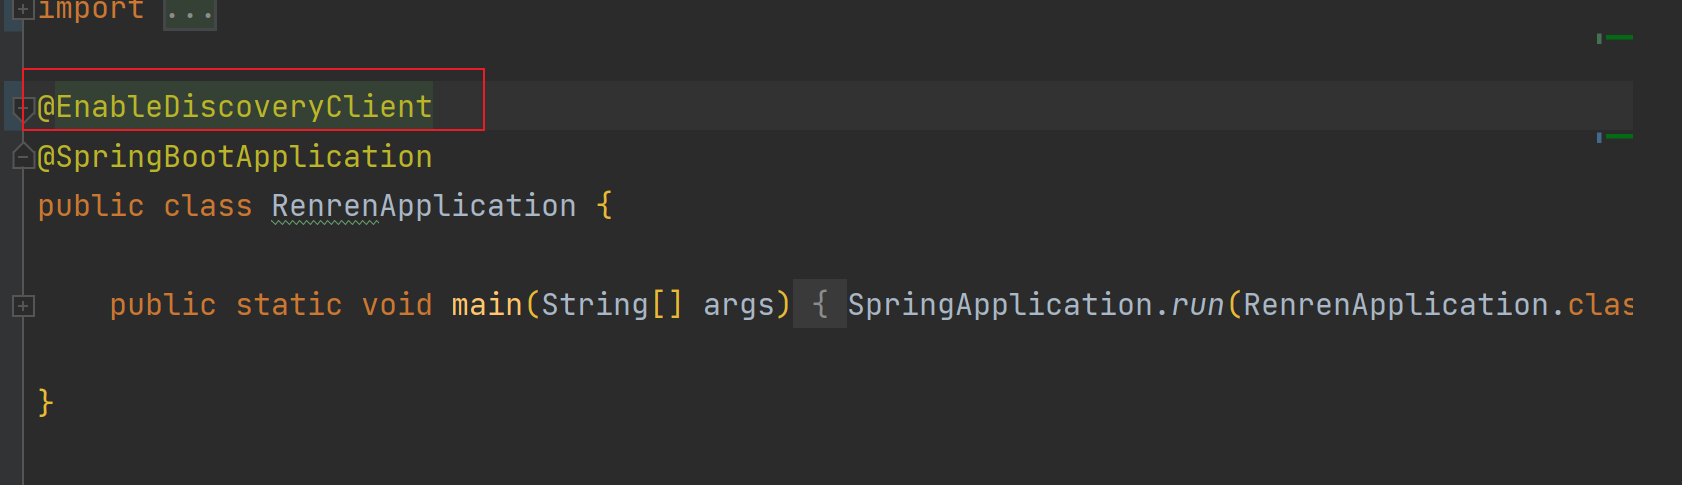
-
注册成功

4、启动测试
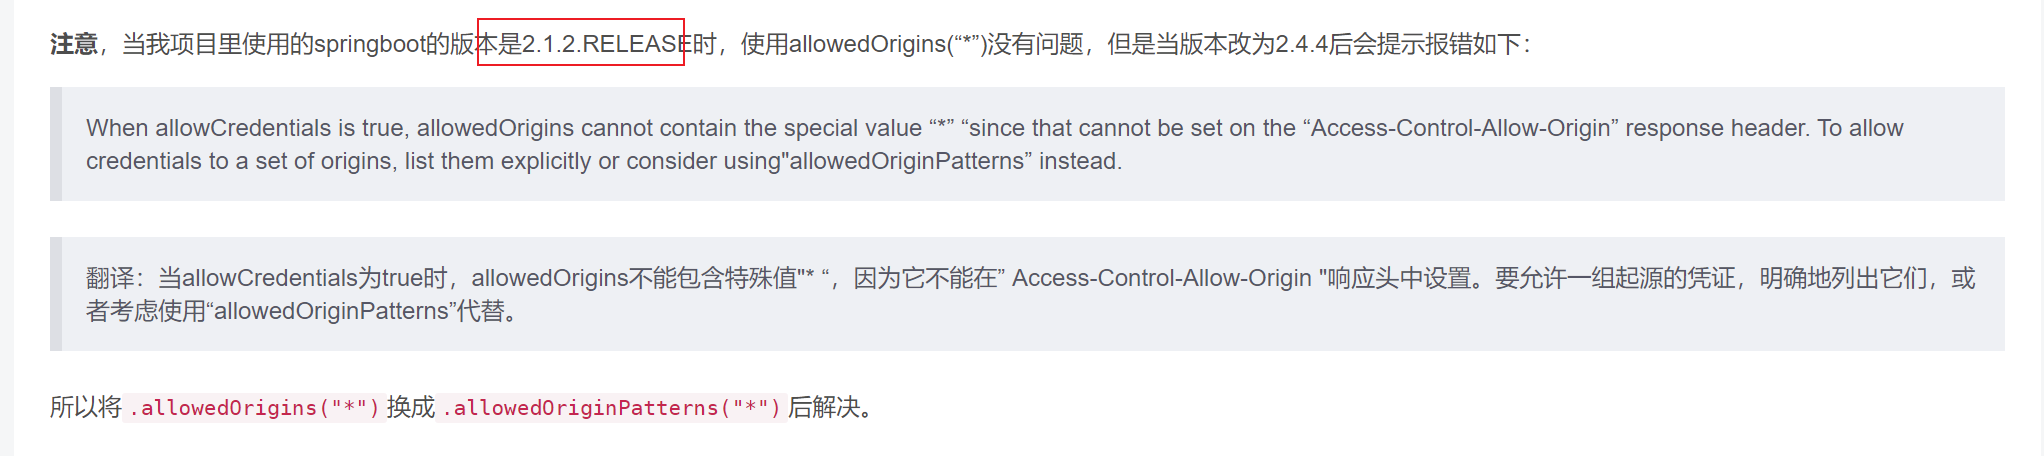
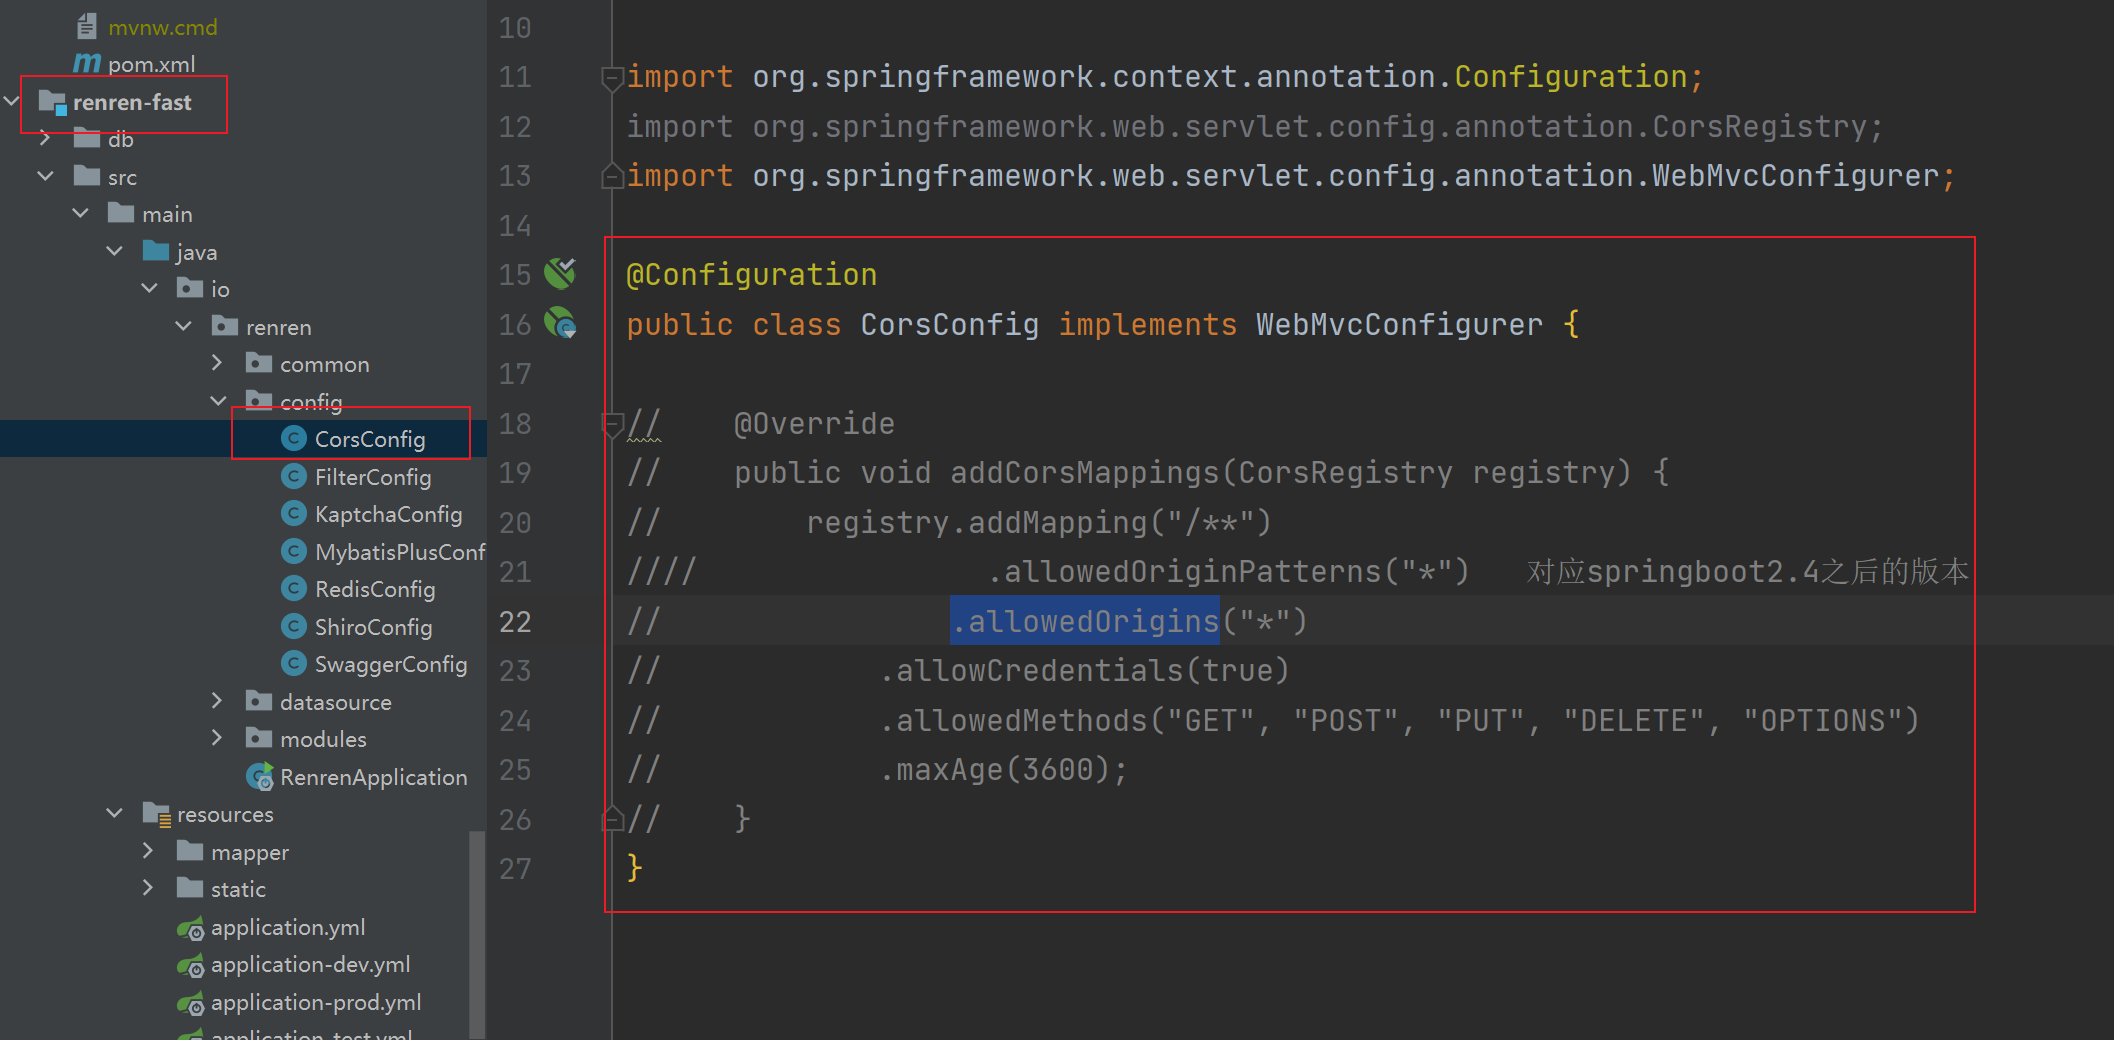
- 最开始进行启动,在renren-fast的CorsConfig跨域配置中,allowedOriginPatterns报错。出现原因是因为:我们使用的springboot版本是2.1.8.RELEASE。所以将这个.allowedOriginPatterns换成.allowedOrigins即可。

-
最开始报错,在b站看了评论和弹幕之后将gulimall-common这个依赖给取消了,因为启动报依赖循环报错。后面我将所有的依赖都换成老师的同样的版本之后就没有了。
启动报错:
java: Annotation processing is not supported for module cycles. Please ensure that all modules from cycle [gulimall-common,renren-fast] are excluded from annotation processing
指的是 循环依赖的问题
 >解决办法:不要引入公共依赖,直接引入 nacos的服务注册发现的依赖
<!--nacos作为注册中心,服务注册与发现--><dependency><groupId>com.alibaba.cloud</groupId><artifactId>spring-cloud-starter-alibaba-nacos-discovery</artifactId><version>2.1.0.RELEASE</version></dependency><!--<dependency>--><!-- <groupId>com.atguigu.gulimall</groupId>--><!-- <artifactId>gulimall-common</artifactId>--><!-- <version>0.0.1-SNAPSHOT</version>--><!--</dependency>-->启动成功

鉴于上面出现很多错误,但是老师视频中没有出现这些错误,大概率是因为依赖的原因,所以对于gulimall中所有的依赖进行统一,按照老师的依赖进行配置。以防止后面出现很多突发的错误。
- 根据老师的依赖进行重新设置,然后重新运行网关。
启动报错:Caused by: org.yaml.snakeyaml.scanner.ScannerException: mapping values are not allowed here
这个地方报错的原因大概率是yml文件语法错误:注意这个坑找了好久,id uri predicates filters都要对齐,同一层级。
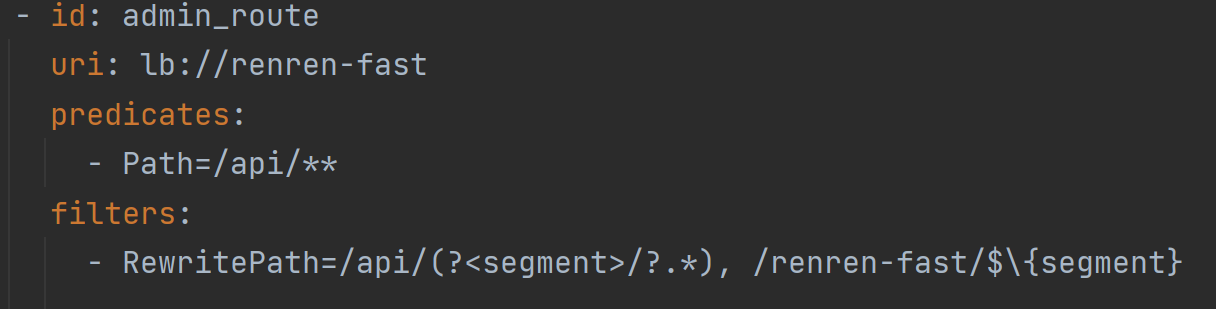
完整代码示例如下:
# 在 yml  配置文件中配置,可以很方便的让我们在 项目上线后将配置直接转移到配置中心
spring:cloud:gateway:routes:- id: admin_routeuri: lb://renren-fast    # 路由给renren-fast,lb代表负载均衡predicates:            # 什么情况下路由给它- Path=/api/**     # 把所有api开头的请求都转发给renren-fast:因为默认前端项目都带上api前缀,filters:- RewritePath=/api/(?<segment>/?.*), /renren-fast/$\{segment}# 默认规则, 请求过来:http://localhost:88/api/captcha.jpg   转发-->  http://renren-fast:8080/api/captcha.jpg# 但是真正的路径是http://renren-fast:8080/renren-fast/captcha.jpg# 所以使用路径重写把/api/* 改变成 /renren-fast/*
修改后运行成功,验证码出现。
5、浏览器跨域问题
上面我们验证码出现了,但是我们登录却报错,原因在于浏览器的跨域问题。
从 8001访问88,引发 CORS 跨域请求,浏览器会拒绝跨域请求

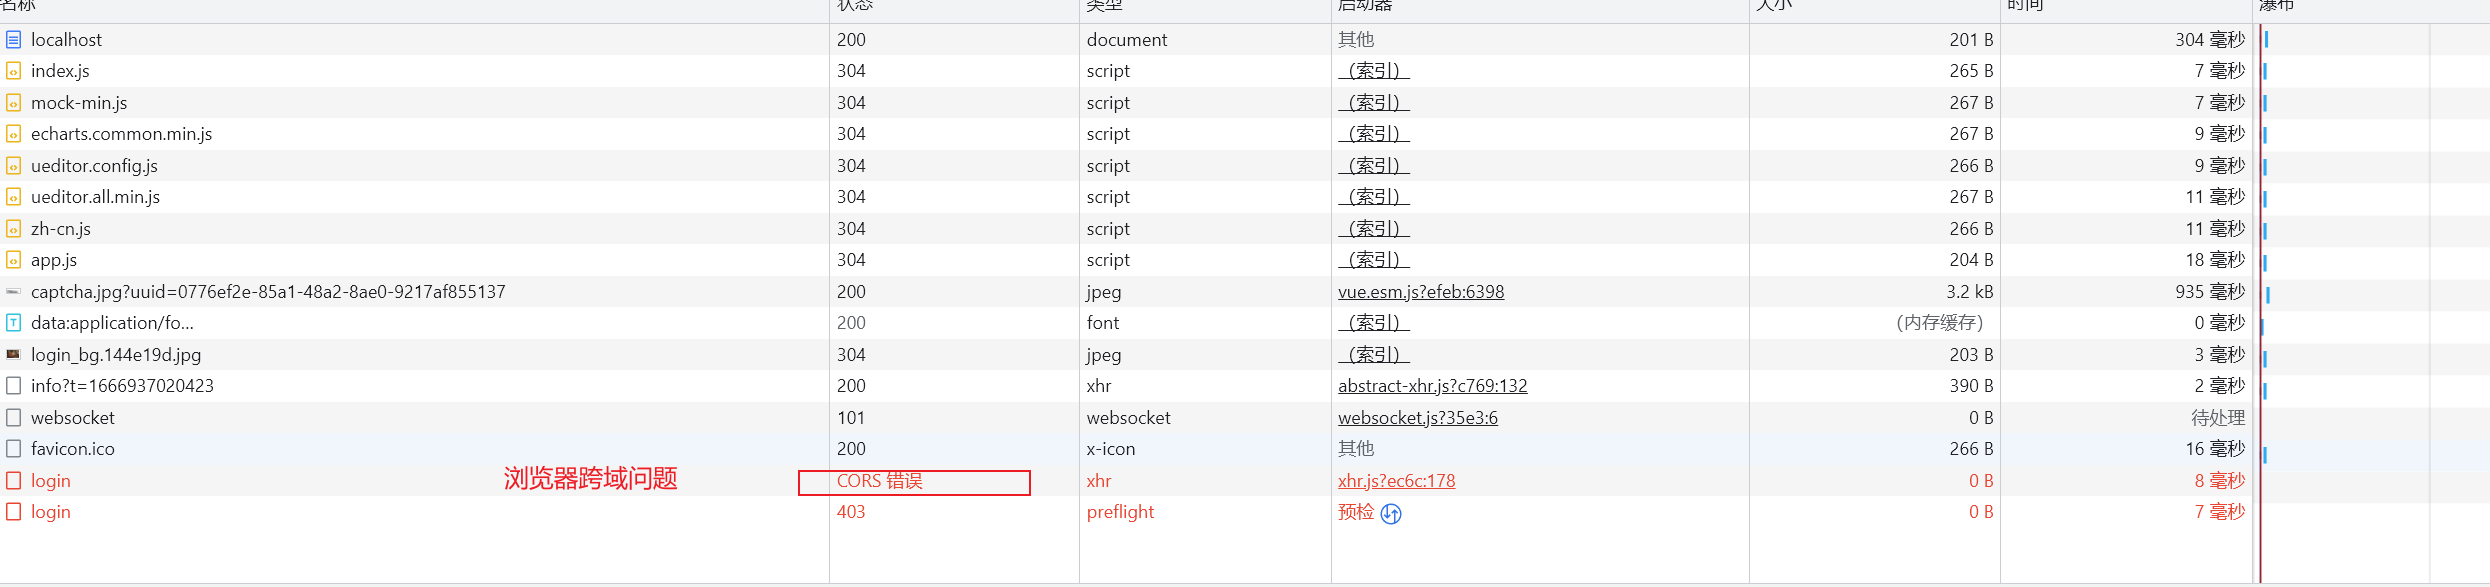
跨域
问题描述:已拦截跨源请求:同源策略禁止读取位于 http://localhost:88/api/sys/login 的远程资源。(原因:CORS 头缺少 ‘Access-Control-Allow-Origin’)。
问题分析:这是一种跨域问题。访问的域名和端口和原来的请求不同,请求就会被限制
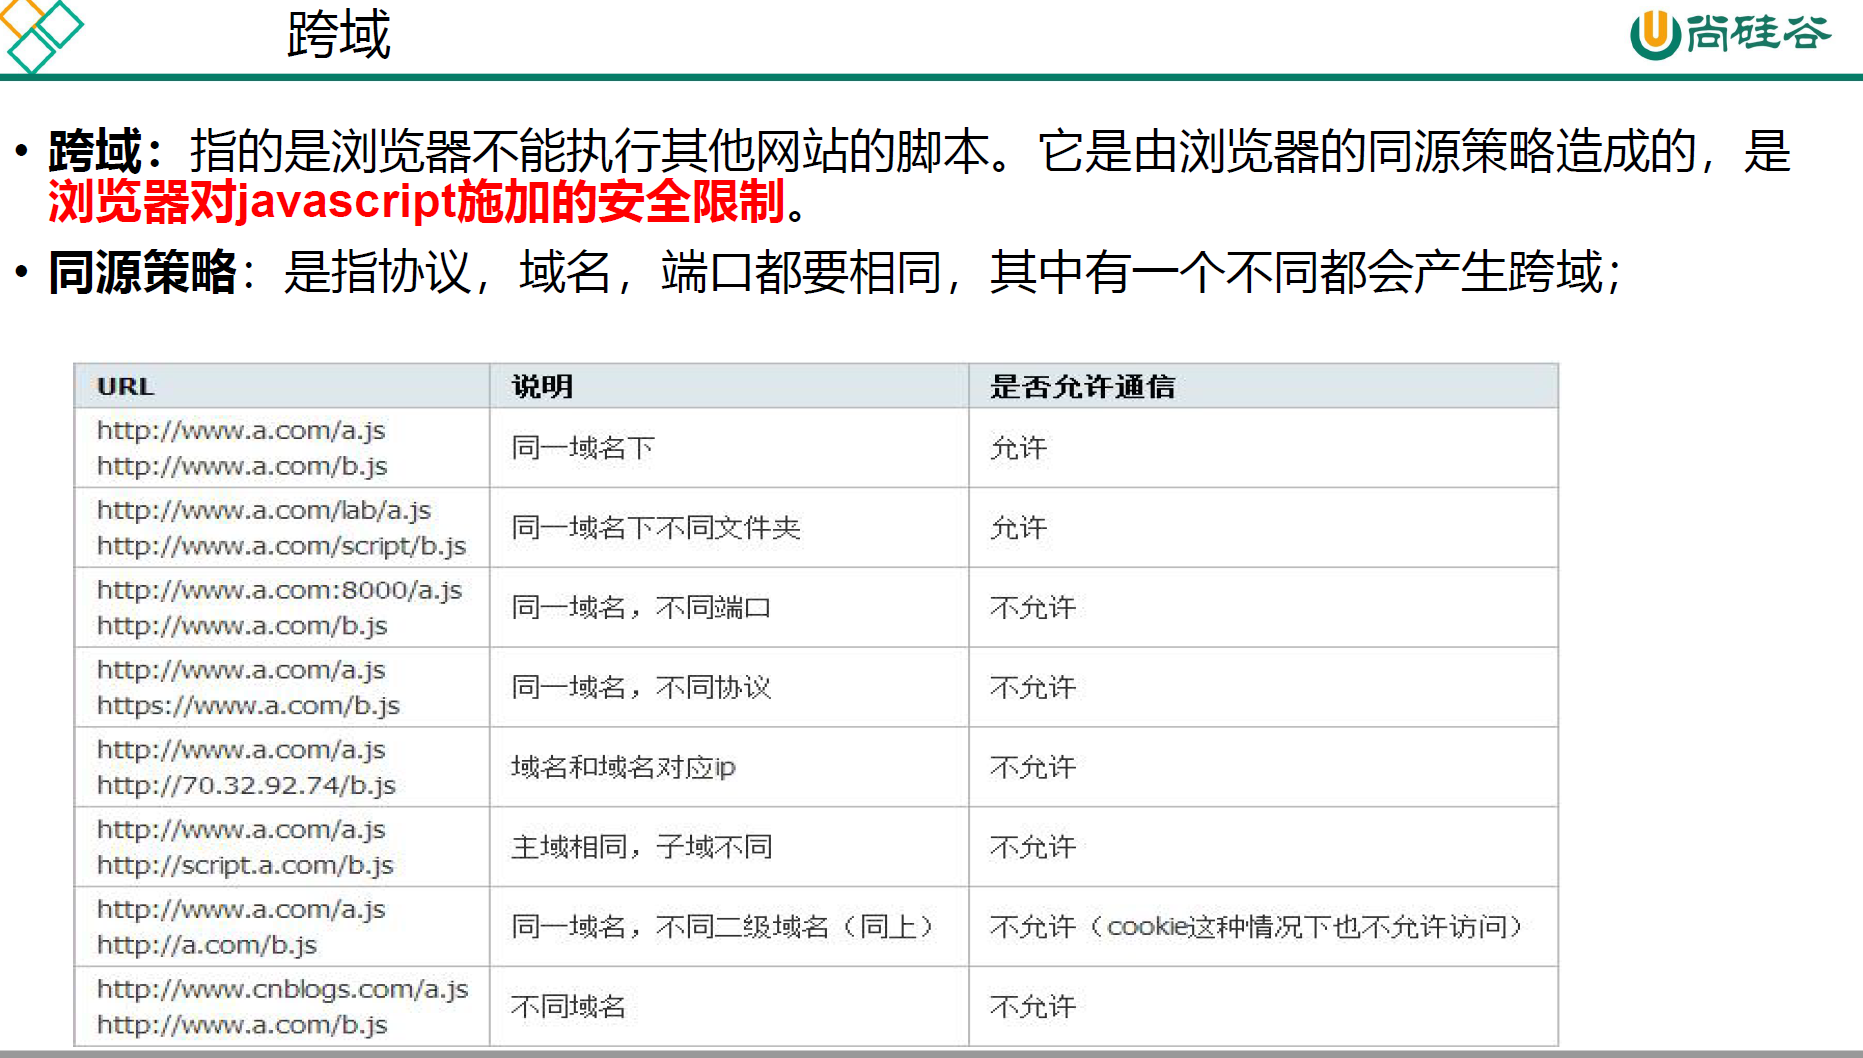
跨域:指的是浏览器不能执行其他网站的脚本。它是由浏览器的同源策略造成的,是浏览器对js施加的安全限制。(ajax可以)
同源策略:是指协议,域名,端囗都要相同,其中有一个不同都会产生跨域;
-
引入浏览器跨域知识
跨域流程:
这个跨域请求的实现是通过预检请求实现的,先发送一个OPSTIONS探路,收到响应允许跨域后再发送真实请求

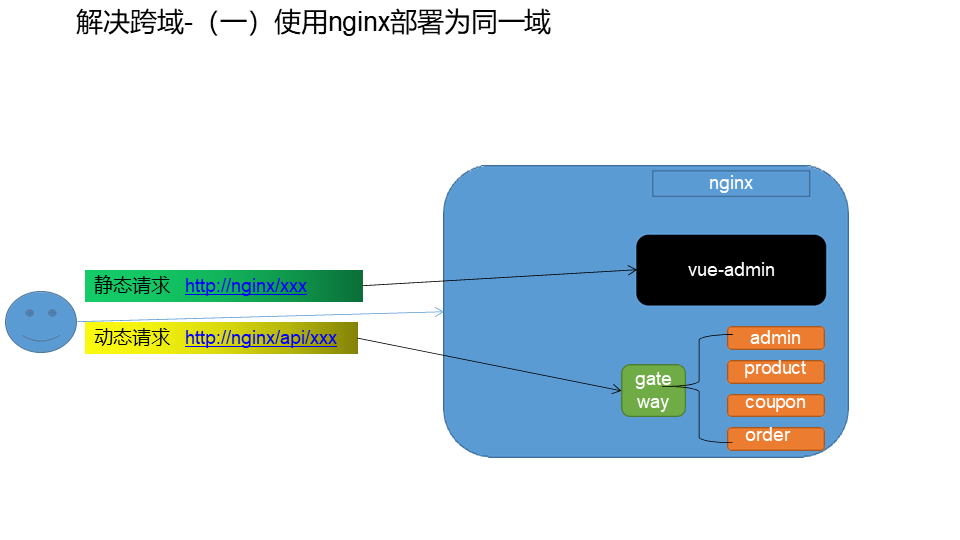
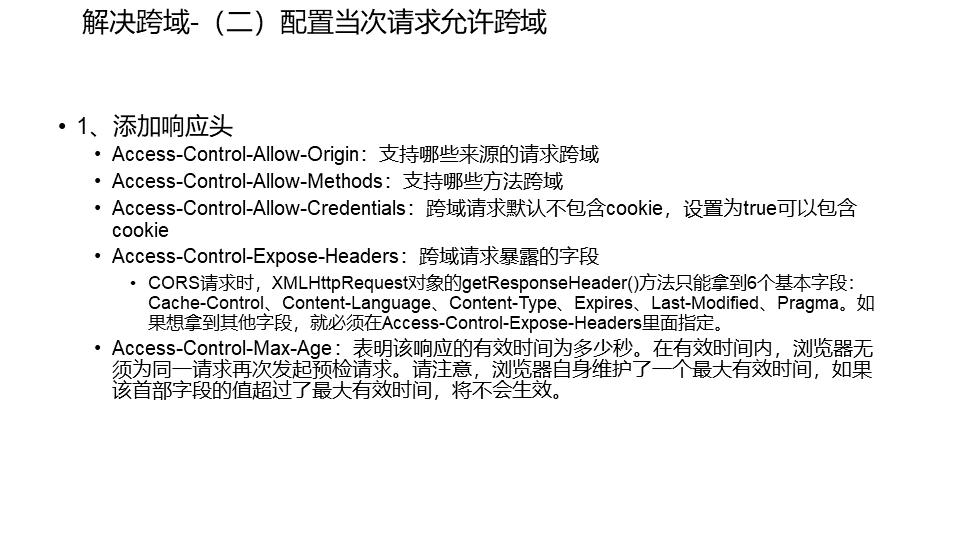
前面跨域的解决方案:
方法1:设置nginx包含admin和gateway
方法2:让服务器告诉预检请求能跨域- 这里我们采用的解决办法:在
gulimall-gateway中配置跨域配置列GulimallCorsConfiguration解决跨域问题------配置filter,每个请求来了以后,返回给浏览器之前都添加上那些字段
我们在gulimall-gateway中创建一个config来存放GulimallCorsConfiguration。注意这个包一定是要在gateway这个包下,否则启动报错(坑)。
@Configuration public class GulimallCorsConfiguration {@Bean // 添加过滤器,当请求一过来走完 corsWebFilter 就给他们添加上跨域的相应配置public CorsWebFilter corsWebFilter(){// 基于url路径跨域,选择reactive包下的UrlBasedCorsConfigurationSource source = new UrlBasedCorsConfigurationSource();// 跨域配置信息CorsConfiguration corsConfiguration = new CorsConfiguration();// 允许跨域的头corsConfiguration.addAllowedHeader("*");// 允许跨域的请求方式corsConfiguration.addAllowedMethod("*");// 允许跨域的请求来源corsConfiguration.addAllowedOrigin("*");// 是否允许携带cookie跨域corsConfiguration.setAllowCredentials(true);// 任意url都要进行跨域配置//对接口进行配置,“/*”代表所有,“/**”代表适配的所有接口source.registerCorsConfiguration("/**",corsConfiguration);//CorsWebFilter的构造器需要传递一个//org.springframework.web.cors.reactive.CorsConfigurationSource的接口作为参数//接口不能实例化,所以选择CorsConfigurationSource的实现类//UrlBasedCorsConfigurationSource作为参数return new CorsWebFilter(source);} }- 再次启动测试
浏览器检查报错,报错的原因是:renren-fast 中也配置了跨域,但是我们只需要一个,所以要给注释掉。
http://localhost:8001/renren已拦截跨源请求:同源策略禁止读取位于 http://localhost:88/api/sys/login 的远程资源。(原因:不允许有多个 ‘Access-Control-Allow-Origin’ CORS 头)n-fast/captcha.jpg?uuid=69c79f02-d15b-478a-8465-a07fd09001e6
出现了多个请求,并且也存在多个跨源请求。
为了解决这个问题,需要修改renren-fast项目,注释掉“io.renren.config.CorsConfig”类。然后再次进行访问。

-
跨域问题困扰了我 9个半小时的时间,最后发现 竟然是 renren-fast-vue 前端代码 格式问题,真是崩溃了。
这里也给了我一个 提醒,有时候需要从多方面进行问题的查找!!!!
前端 有时候也会报错,一定要注意。 其实只要依赖版本和老师的一样,有很多坑是可以避免的。
- 这里我们采用的解决办法:在
6.1.4 树形展示三级分类数据
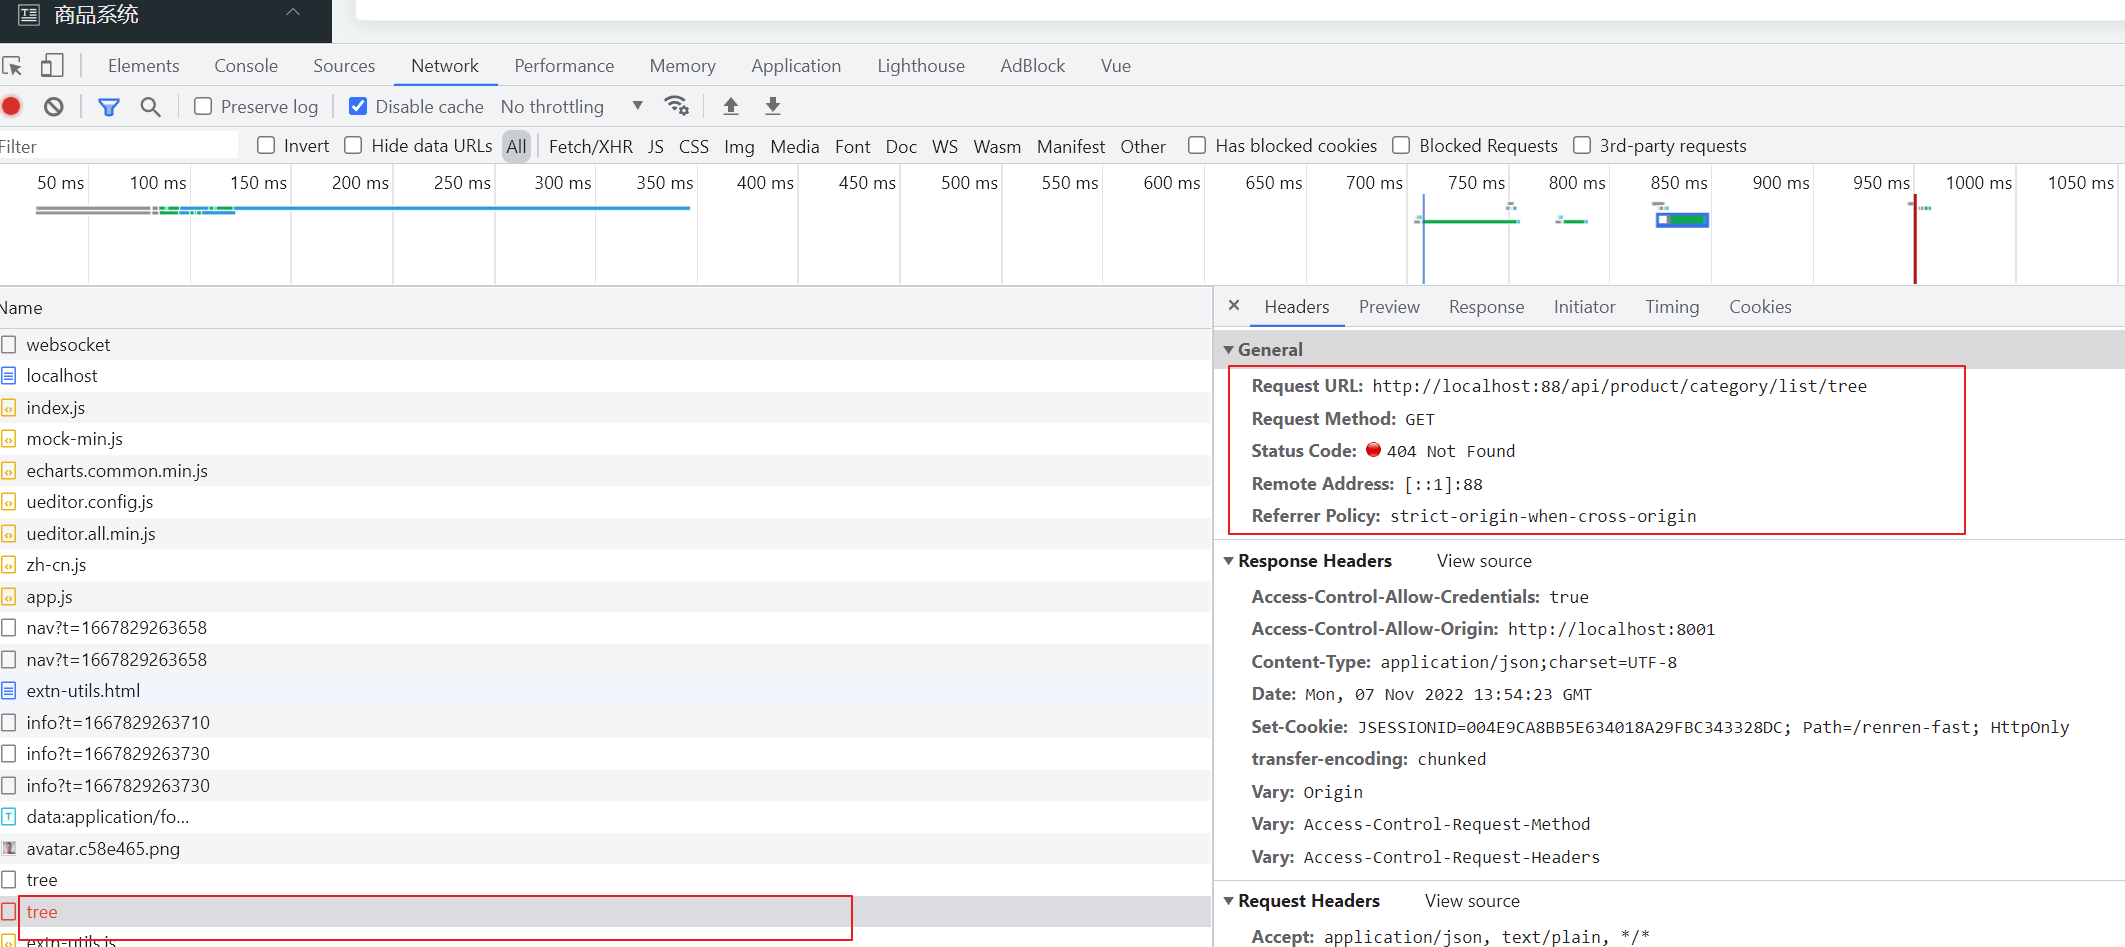

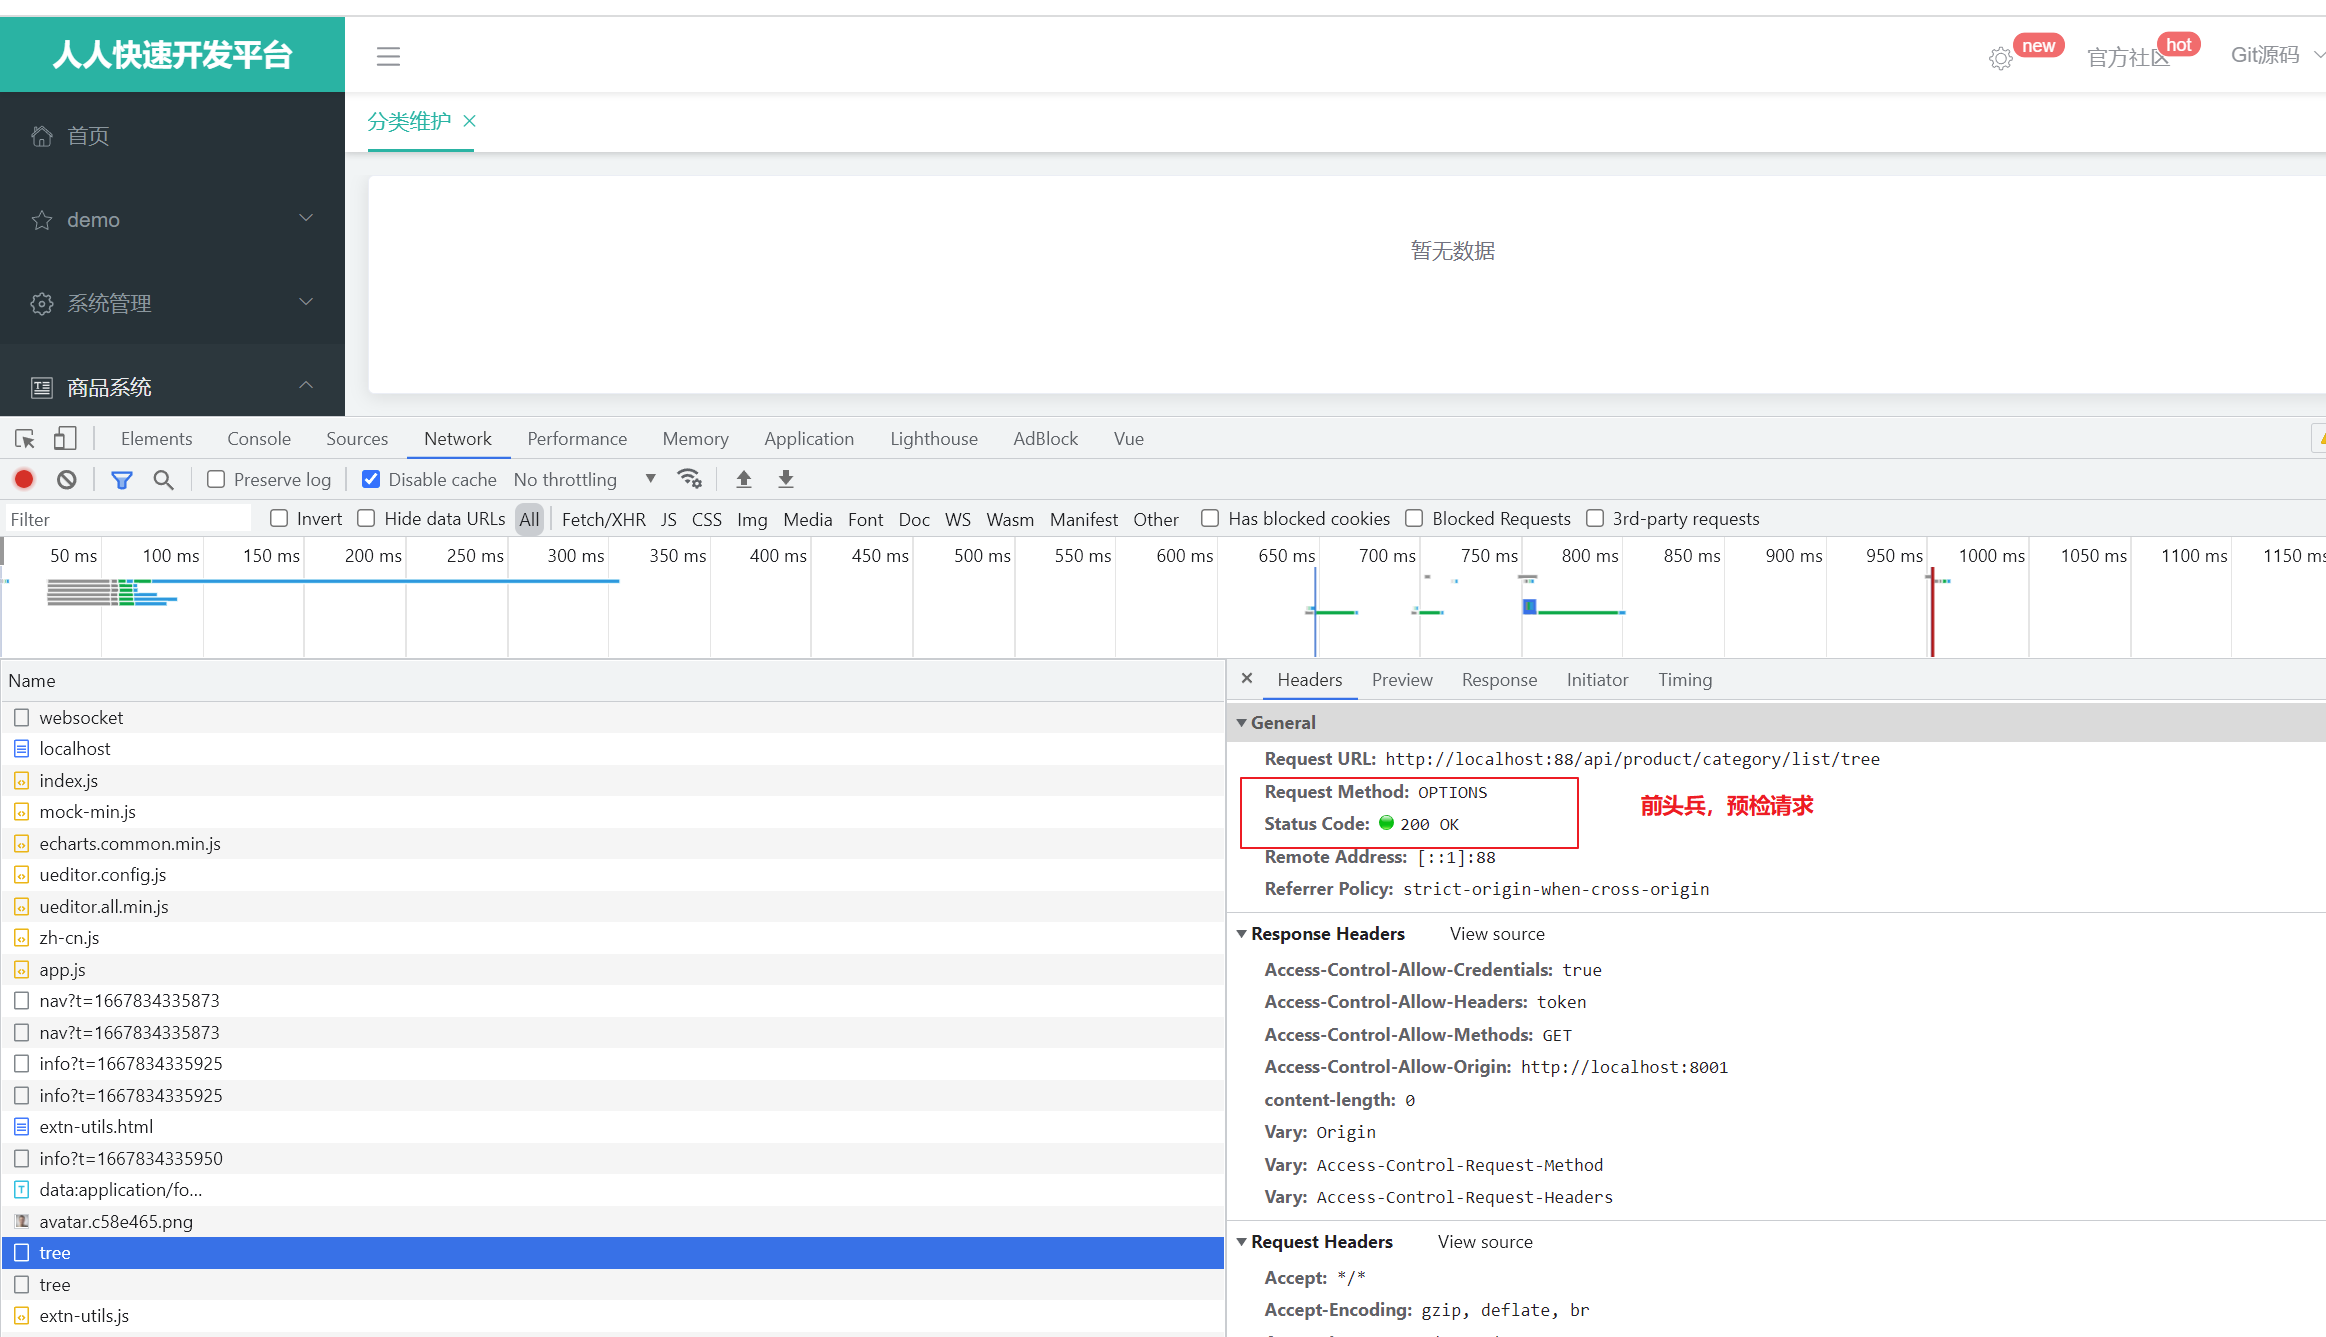
在显示商品系统/分类信息的时候,出现了404异常,请求的http://localhost:88/api/product/category/list/tree不存在
只有通过http://localhost:10000/product/category/list/tree路径才能够正常访问,所以会报404异常。这是路径映射错误。我们需要在网关中进行路径重写,让网关帮我们转到正确的地址。

1、 商品微服务注册进nacos
首先我们需要将 gulimall-product 服务 注册进 nacos,方便网关进行路由。
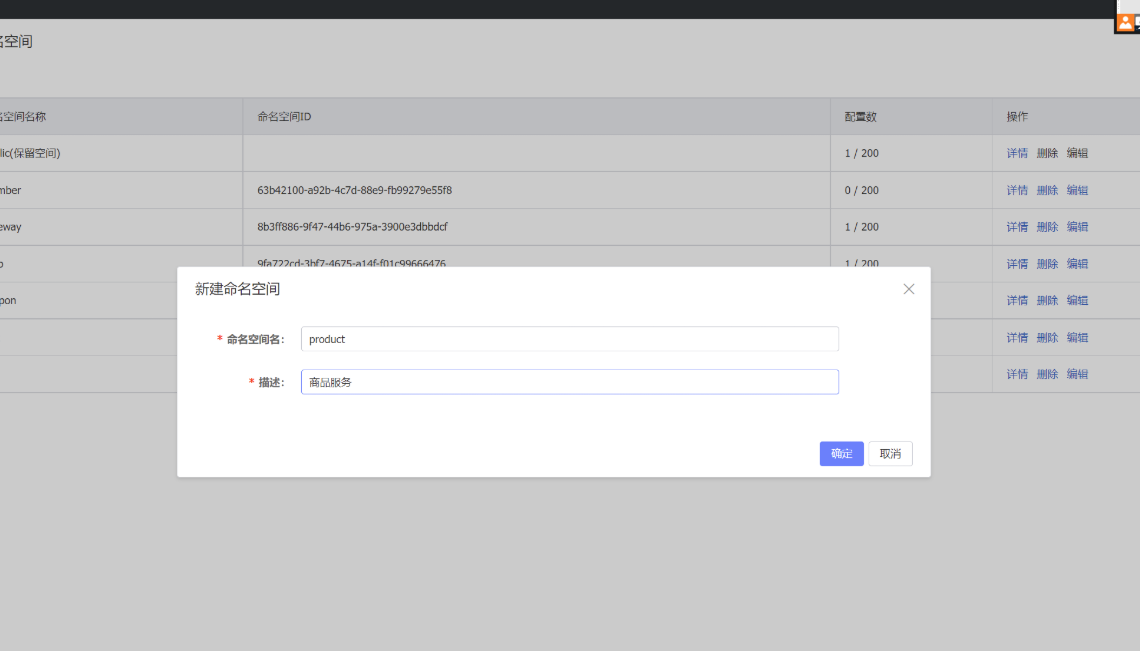
我们在nacos中新建一个 product 命名空间,以后关于 product商品微服务下的配置就放在该命名空间下,目前我们注册微服务的话,都默认放在 public 命名空间下就行,配置文件放在各自微服务的命名空间下即可。
首先这里我们先回顾一下 nacos的配置步骤:
- 微服务注册进nacos:
- 首先 需要在 application.yml / application.properties 文件中配置nacos的服务注册地址,并且最好每一个微服务都有属于自己的一个 应用名字
spring:cloud:nacos:discovery:server-addr: 127.0.0.1:8848
- 微服务 配置 进 nacos
- 如果想要 用nacos作为配置中心 ,需要 新建 bootstrap.properties 文件,然后在里面配置nacos 配置中心的地址; 此外,我们规定每一个微服务都有属于自己的命名空间,以后隶属于该微服务下的配置文件都配置在 该命名空间中。
spring.application.name=gulimall-product# 配置nacos 配置中心地址spring.cloud.nacos.config.server-addr=127.0.0.1:8848spring.cloud.nacos.config.namespace=832f36b7-7878-47b7-8968-408f7b98b1e6
- 在启动类 上 添加注解 @EnableDiscoveryClient : 为了发现服务注册和配置

注册和配置成功。
2、在网关配置文件中配置路由规则,进行路径重写
在 gulimall-gateway 下的 application.yml中进行配置
- id: product_routeuri: lb://gulimall_productpredicates:- Path=/api/product/**filters:- RewritePath=/api/(?<segment>/?.*), /$\{segment}# http://localhost:88/api/product/category/list/tree http://localhost:10000/product/category/list/tree
注意:
如果直接访问 localhost:88/api/product/category/list/tree invalid token这个url地址的话,会提示非法令牌,后台管理系统中没有登录,所以没有带令牌

原因:先匹配的先路由,renren-fast 和 product 路由重叠,fast 要求登录
修正:在路由规则的顺序上,将精确的路由规则放置到模糊的路由规则的前面,否则的话,精确的路由规则将不会被匹配到,类似于异常体系中try catch子句中异常的处理顺序。
http://localhost:88/api/product/category/list/tree 正常
访问http://localhost:8001/#/product-category,正常
原因是:先访问网关88,网关路径重写后访问nacos8848,nacos找到服务

成功访问。
3、前端代码修改

因为我们 对 整个对象 中的 data 数据感兴趣 ,所以我们 将 对象中的 data 解构出来。
我们使用{}将data的数据进行解构:data.data是我们需要的数组内容
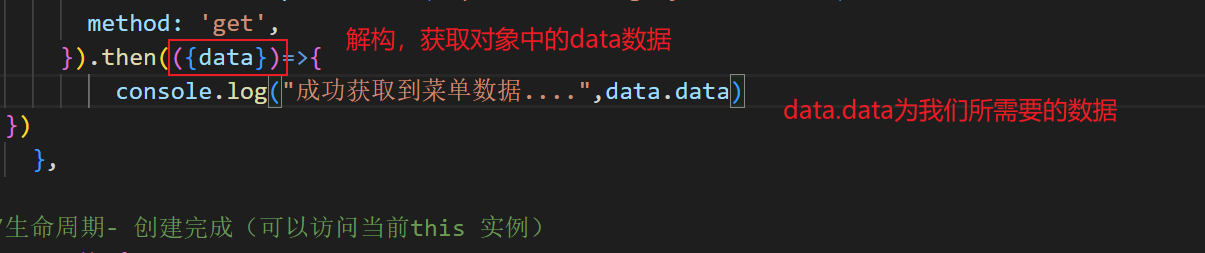
//获取菜单集合methods: {handleNodeClick(data) {console.log(data);},//获取后台数据getMenus() {this.$http({url: this.$http.adornUrl('/product/category/list/tree'),method: 'get'}).then(({data}) => { //将整个对象中的data数据结构出来,因为只有data才是我们需要的console.log("成功了获取到菜单数据....", data.data)this.menus = data.data; // 数组内容,把数据给menus,就是给了vue实例,最后绑定到视图上})}},
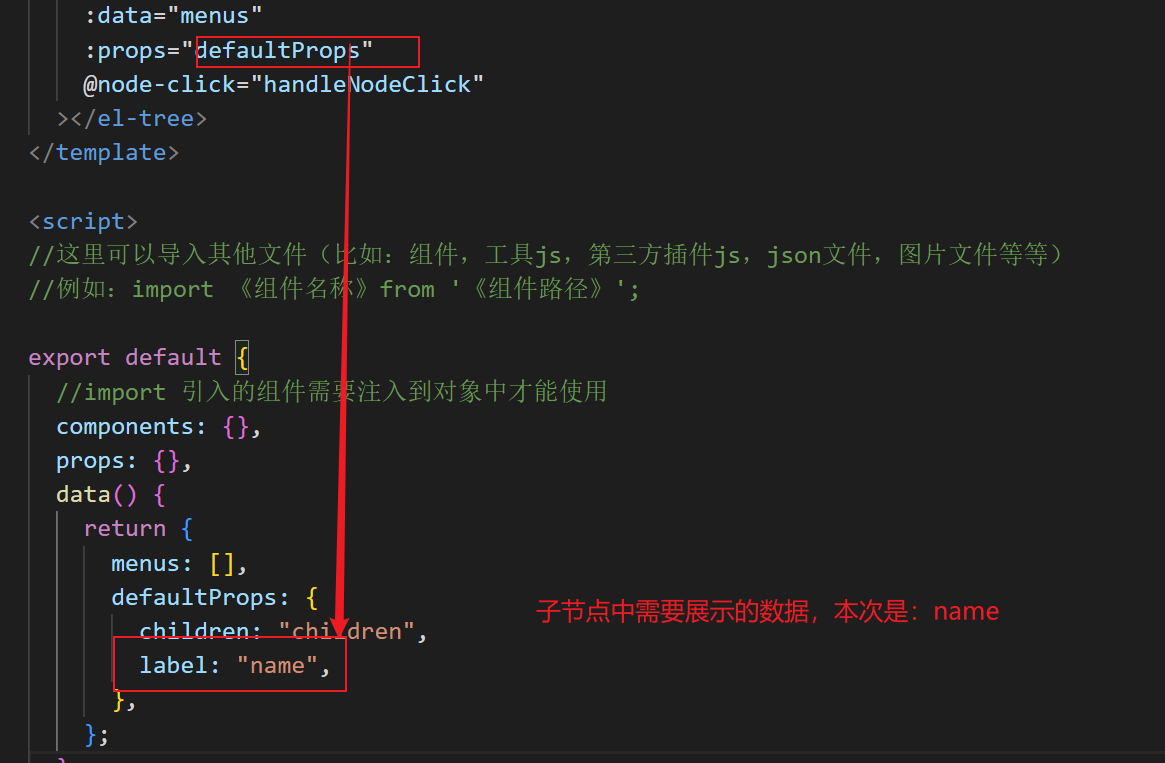
此时有了3级结构,但是没有数据,在category.vue的模板中,数据是menus,而还有一个props。这是element-ui的规则
<template><el-tree :data="menus" :props="defaultProps" @node-click="handleNodeClick"></el-tree>
</template>export default {//import引入的组件需要注入到对象中才能使用components: {},data() {return {menus: [],  //真正的数据需要发送请求从数据库中进行查找defaultProps: {children: 'children', //子节点label: 'name'  //name属性作为标签的值,展示出来}};},
修改完毕后,测试:
6.1.5 删除数据----逻辑删除
1、前端代码
node 与 data
在element-ui的tree中,有2个非常重要的属性node代表当前节点对象(是否展开等信息,element-ui自带属性)
data是节点数据,是自己的数据。
data从哪里来:前面ajax发送请求,拿到data,赋值给menus属性,而menus属性绑定到标签的data属性。而node是 ui 的默认规则
删除效果预想:
- 在每一个菜单后面添加 append, delete
- 点击按钮时,不进行菜单的打开合并:expand-on-click-node=“false”
- 当没有子菜单或者没有引用(后台数据库判断是否有被引用,这里暂时不考虑)的时候,才可以显示delete按钮。当为一级、二级菜单时,才显示append按钮
- 利用 v-if 进行判断是否显示 按钮:
- 如果 当前节点 node 的等级 ≤ 2,表示是一级菜单或二级菜单,不显示删除按钮------- v-if=“node.level <= 2”, level表示当前 是几级节点;
- 如果 当前节点 的子节点的 数组长度为0,表示 没有子菜单----v-if=“node.childNodes.length == 0”
- 添加多选框 show-checkbox ,可以多选
- 设置 node-key=""标识每一个节点的不同
<!-- -->
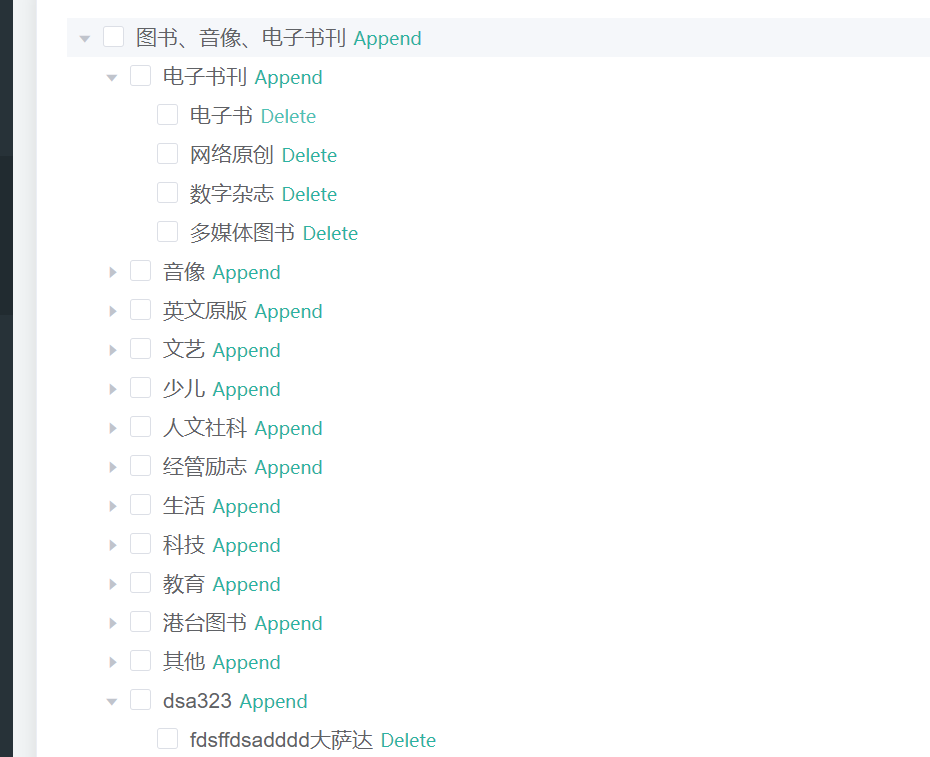
<template><el-tree:data="menus"show-checkbox:props="defaultProps"@node-click="handleNodeClick":expand-on-click-node="false"node-key="catId"><span class="custom-tree-node" slot-scope="{ node, data }"><span>{{ node.label }}</span><span><el-buttontype="text"v-if="node.level <= 2"size="mini"@click="() => append(data)">Append</el-button><el-buttontype="text"v-if="node.childNodes.length == 0"size="mini"@click="() => remove(node, data)">Delete</el-button></span></span></el-tree>
</template><script>
//这里可以导入其他文件(比如:组件,工具js,第三方插件js,json文件,图片文件等等)
//例如:import 《组件名称》 from '《组件路径》';export default {//import引入的组件需要注入到对象中才能使用components: {},data() {return {menus: [],defaultProps: {children: "children", //子节点label: "name", //name属性作为标签的值,展示出来},};},methods: {handleNodeClick(data) {},getMenus() {this.$http({url: this.$http.adornUrl("/product/category/list/tree"),method: "get",}).then(({ data }) => {console.log("成功了获取到菜单数据....", data.data);this.menus = data.data;});},append(data) {console.log("append", data);},remove(node, data) {console.log("remove", node, data);},},//监听属性 类似于data概念computed: {},//监控data中的数据变化watch: {},//生命周期 - 创建完成(可以访问当前this实例)created() {this.getMenus();},//生命周期 - 挂载完成(可以访问DOM元素)mounted() {},beforeCreate() {}, //生命周期 - 创建之前beforeMount() {}, //生命周期 - 挂载之前beforeUpdate() {}, //生命周期 - 更新之前updated() {}, //生命周期 - 更新之后beforeDestroy() {}, //生命周期 - 销毁之前destroyed() {}, //生命周期 - 销毁完成activated() {}, //如果页面有keep-alive缓存功能,这个函数会触发
};
</script>
<style scoped>
</style>效果展示:
2、逻辑删除
- 首先我们先测试一下 gulimall-product中的 CategoryController删除功能。
测试删除数据,打开postman(APIfox也可以)输入“ http://localhost:88/api/product/category/delete ”,请求方式设置为POST,请求体body选 json 数组
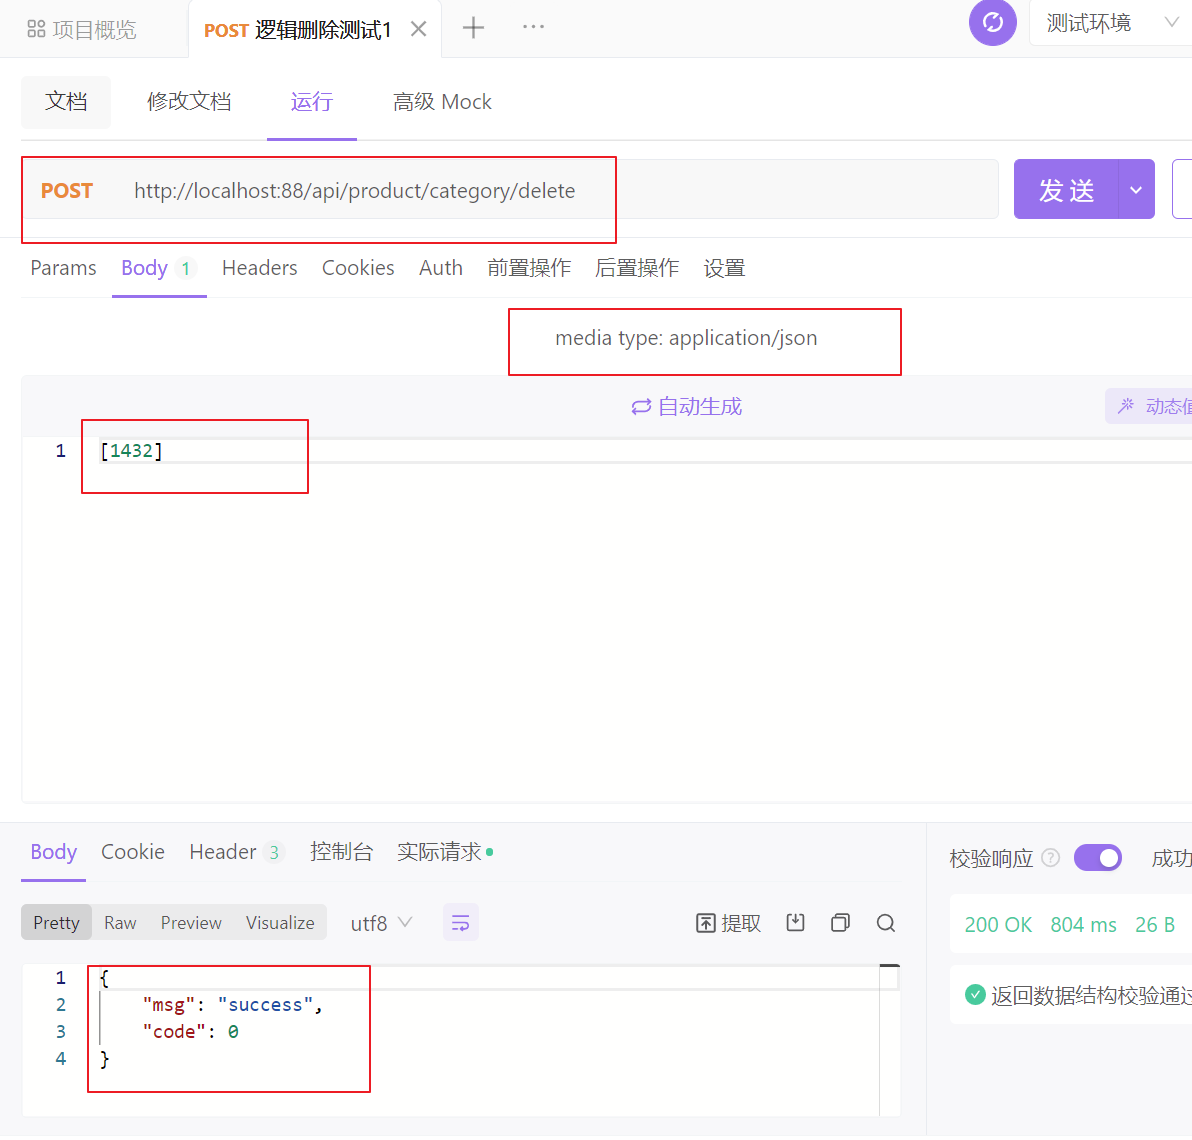
可以看到删除成功,而且数据库中也没有该数据了。
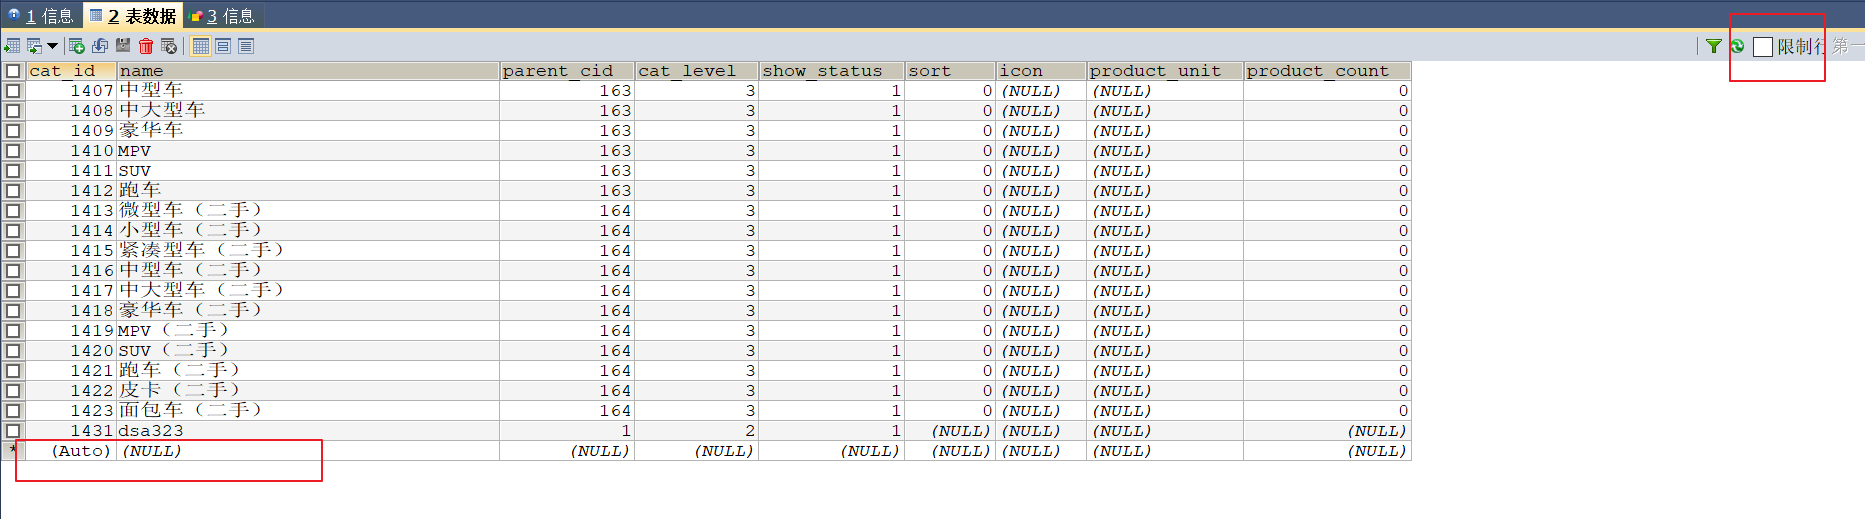
ps:这里将限制行数给取消勾选,不然默认是只显示 1000行。
这是一种 物理删除(不推荐),数据库中也同样被修改了。
接下来我们正式编写删除逻辑。
- 在真正的删除之前,我们要先检查该菜单是否被引用了。
- 修改gulimall-product 中的CategoryController类
 @RequestMapping("/delete")public R delete(@RequestBody Long[] catIds){//删除之前需要判断待删除的菜单那是否被别的地方所引用。
//		categoryService.removeByIds(Arrays.asList(catIds));categoryService.removeMenuByIds(Arrays.asList(catIds));return R.ok();}
- CategoryServiceImpl类
@Overridepublic void removeMenuByIds(List<Long> asList) {//TODO 1.检查当前删除的菜单,是否被别的地方引用//其实开发中使用的都是逻辑删除,并不是真正物理意义上的删除baseMapper.deleteBatchIds(asList);}
这里我们还不清楚后面有哪些服务需要用到product,所以我们建一个备忘录,以后再来补充。
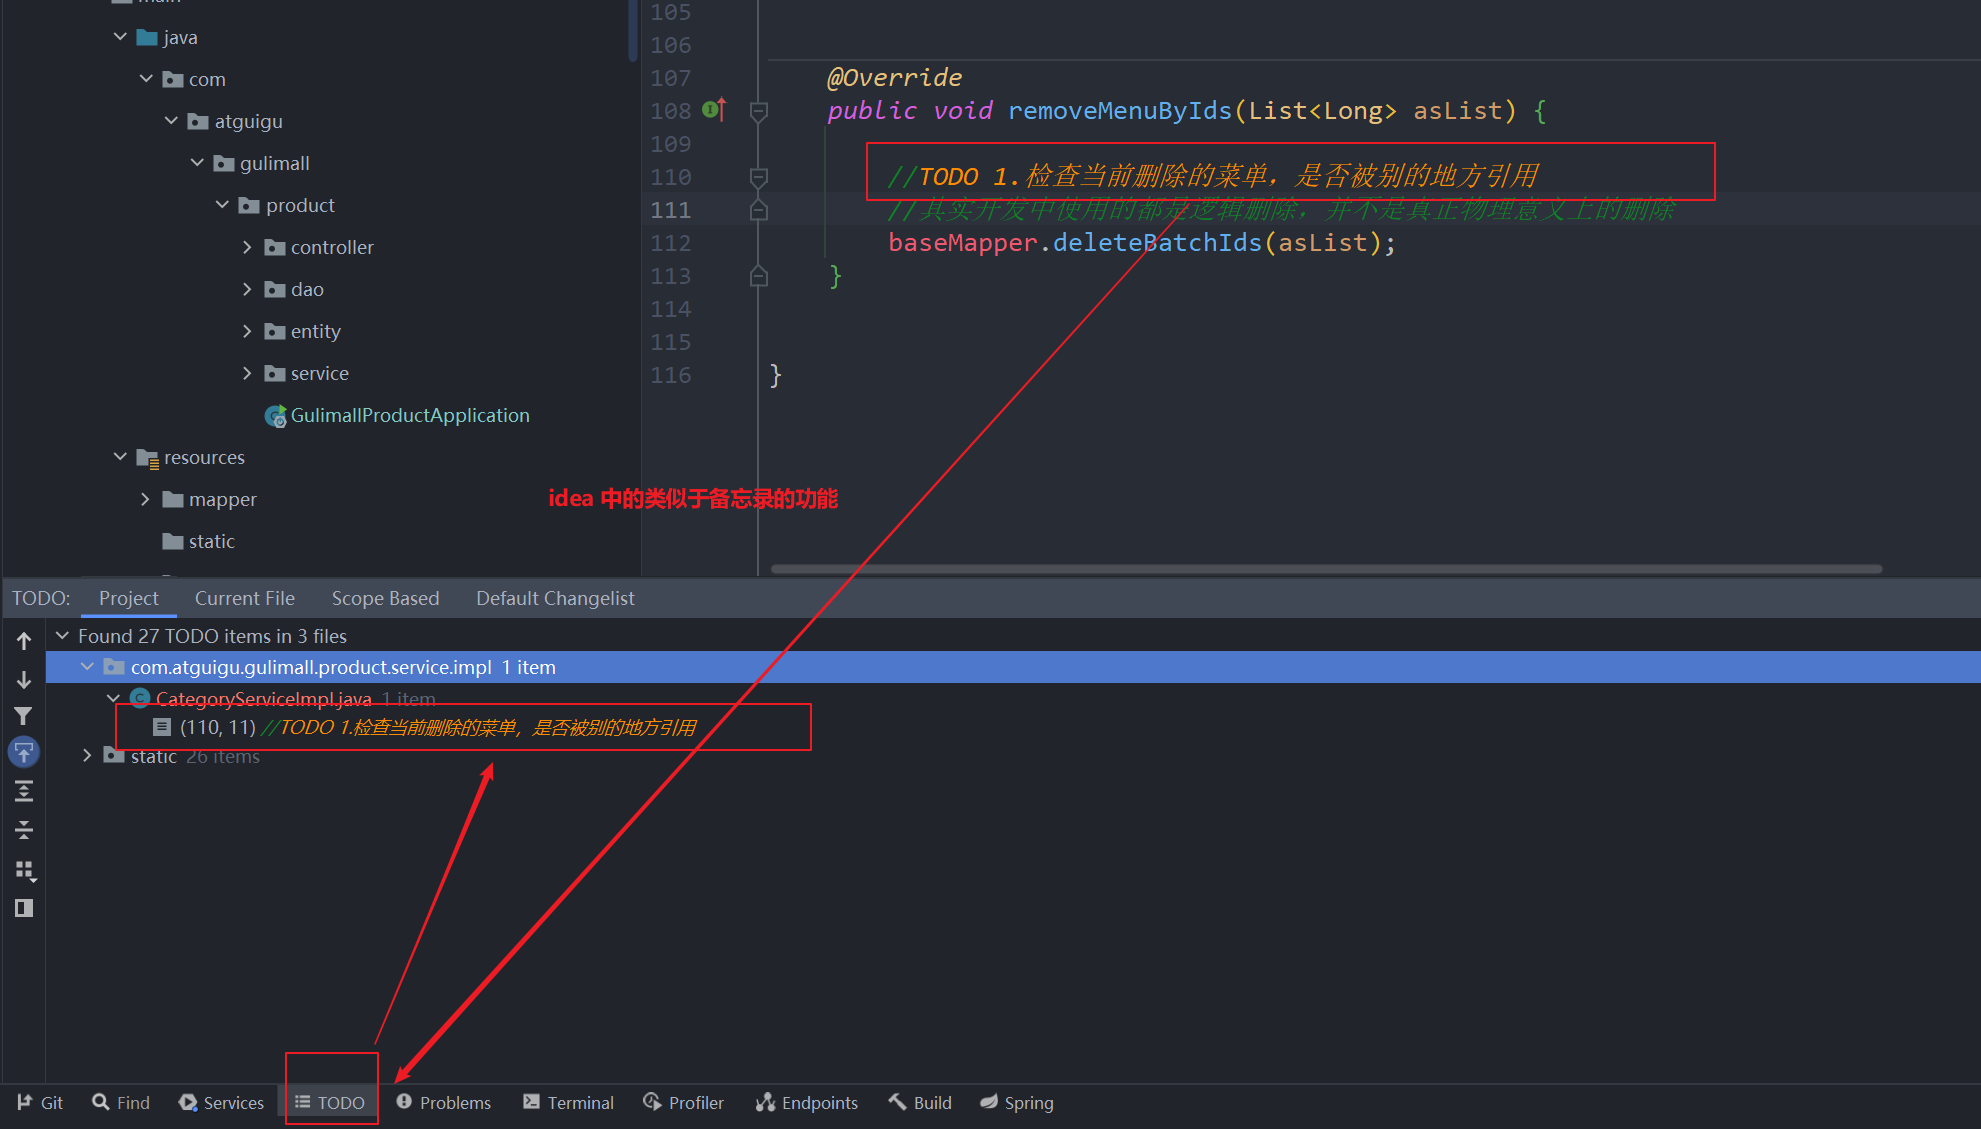
在学习的过程中,看到老师使用TODO才知道IDEA有一个类似备忘录的功能。
-
对于开发中,我们常常采用的是逻辑删除(我们并不希望删除数据,而是标记它被删除了,这就是逻辑删除),即在数据库表设计时设计一个表示逻辑删除状态的字段,在
pms_category我们选择 show_status 字段,当它为0,表示被删除。逻辑删除是mybatis-plus 的内容,会在项目中配置一些内容,告诉此项目执行delete语句时并不删除,只是标志位。
我们使用mybatis-plus中的逻辑删除语法:
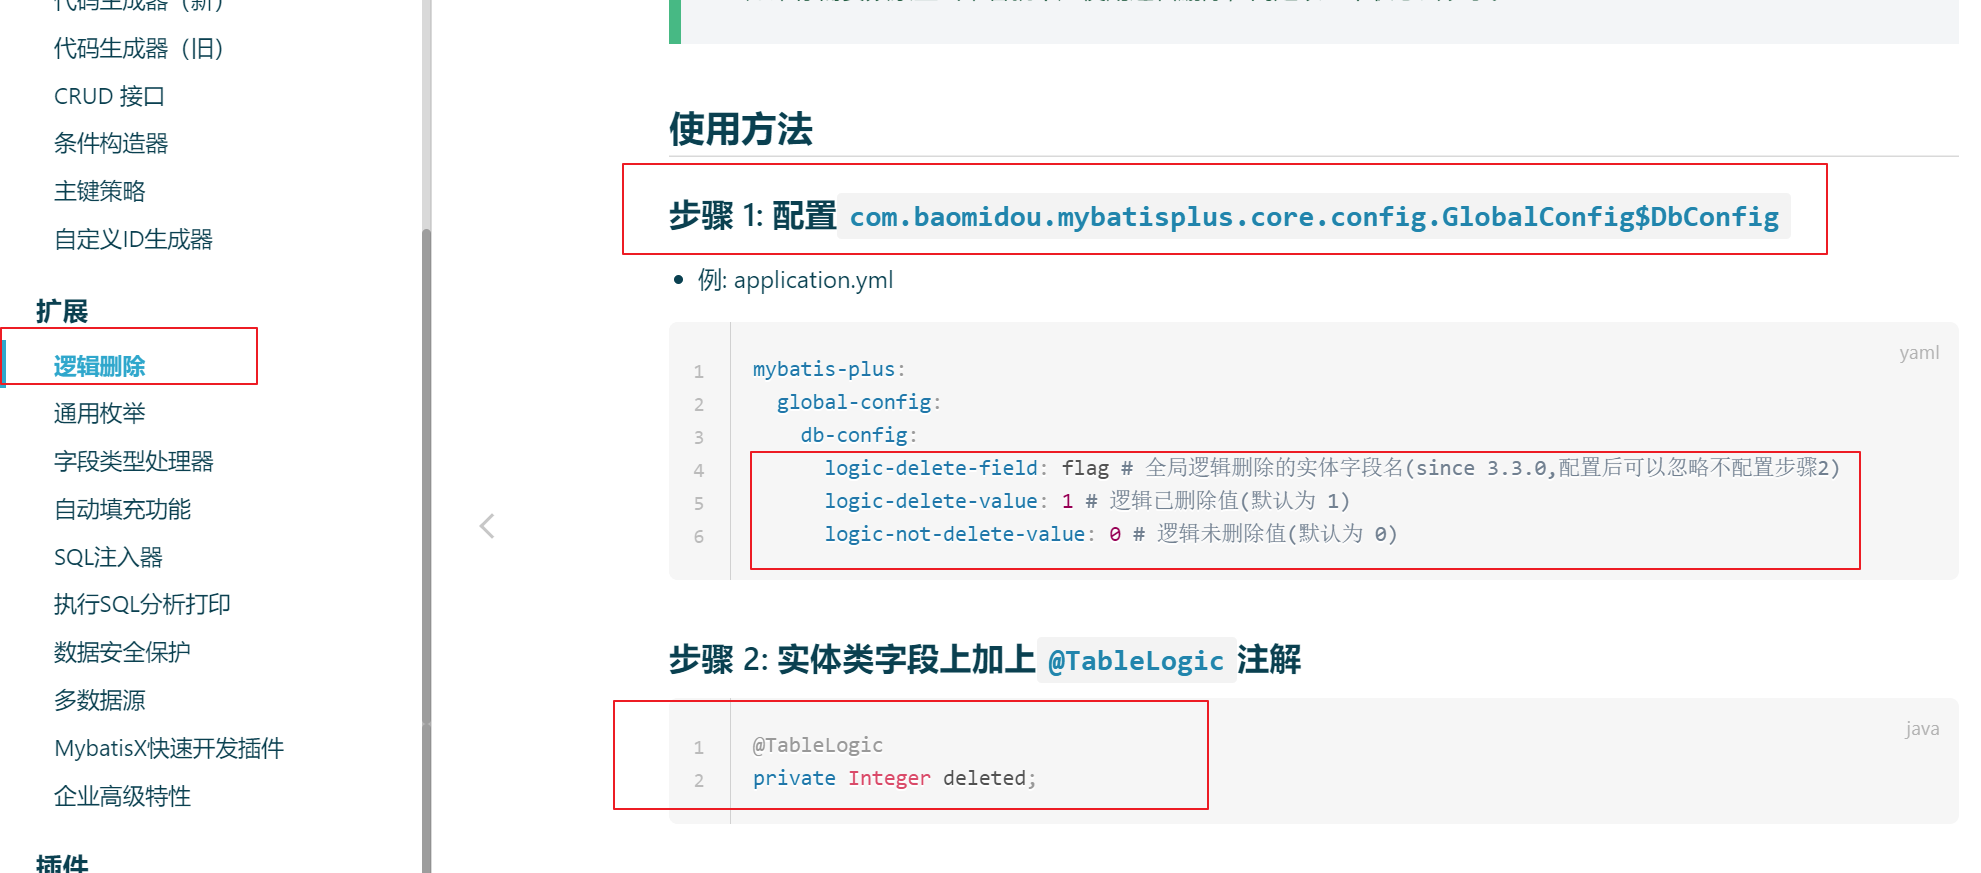
1)、配置全局逻辑删除规则
application.yml中
mybatis-plus:mapper-locations: classpath*:/mapper/**/*.xmlglobal-config:db-config:id-type: auto #主键自增logic-delete-value: 1 #1表示删除logic-not-delete-value: 0 #0表示未删除
注意:这里有一个坑,数据库中我们最开始设置的是1:未删除,0:删除。这个坑马上解决。
/*** 是否显示[0-不显示,1显示]*/@TableLogic(value = "1",delval = "0")//因为application.yml和数据库中的设置刚好相反,所以我们这里按数据库中的效果单独设置 private Integer showStatus;
配置之后,我们可以继续使用APIFox进行测试,实际测试成功。为了验证,我们也可以在application.yml设置一个全局打印日志,将sql语句打印出来。

logging:level:com.atguigu.gulimall: debug #设置日志打印级别
3、测试删除
测试删除数据,打开postman或者是APIFox都可以(推荐使用APIFox)
输入“ http://localhost:88/api/product/category/delete ”,请求方式设置为POST,为了比对效果,可以在删除之前查询数据库的pms_category表:
delete请求传入的是数组,所以我们使用json数据。

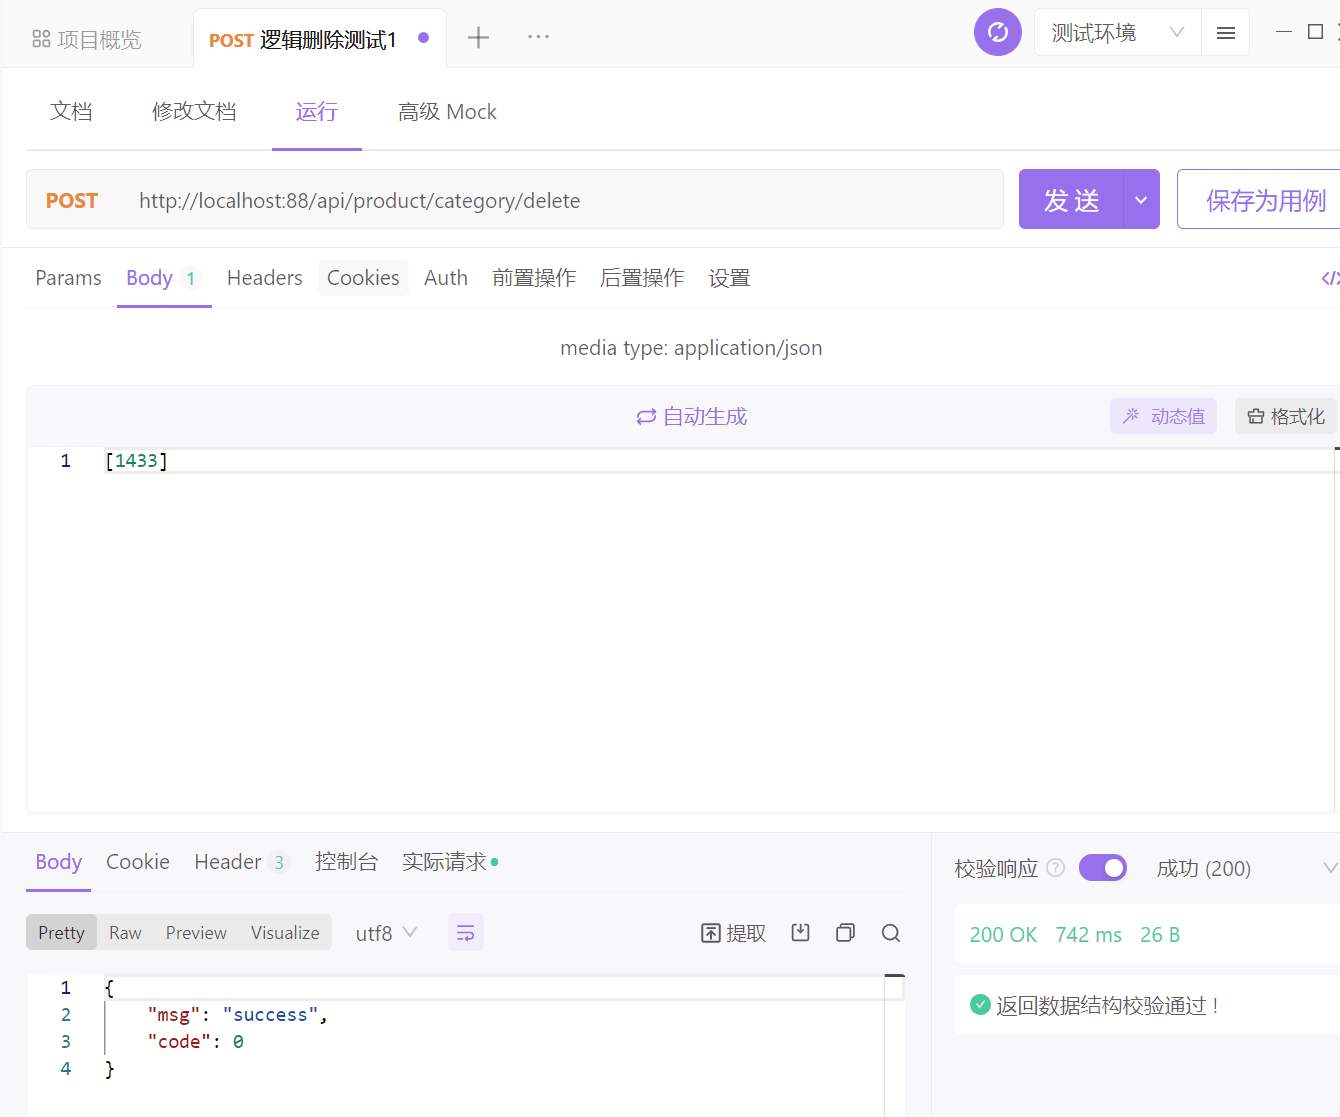
删除1433,之后从 数据库中 show_status 1—>0,即逻辑删除正确。

控制台打印的SQL语句:
Preparing: UPDATE pms_category SET show_status=0 WHERE cat_id IN ( ? ) AND show_status=1
Parameters: 1433(Long)
Updates: 1
由此可见,逻辑删除成功,SQL语句为 更新字段。
4、前端代码编写
发送的请求:delete
发送的数据:this.$http.adornData(ids, false)
util/httpRequest.js中,封装了一些拦截器
http.adornParams是封装get请求的数据
http.adornData封装post请求的数据
ajax 的 get 请求第一次向服务器请求数据之后,后续的请求可能会被缓存,就不会请求服务器要新的数据了。
所以为了不缓存,我们在url后面拼接个 date时间戳 或者一个随机数,让他每次都请求服务器获取实时的数据了。
- 编写前端 remove 方法,实现向后端发送请求
- 点击delete弹出提示框,是否删除这个节点: elementui 中 MessageBox 弹框中的确认消息添加到删除之前
- 删除成功后有消息提示: elementui 中 Message 消息提示
- 原来展开状态的菜单栏,在删除之后也应该展开: el-tree组件的 default-expanded-keys 属性,默认展开。 每次删除之后,把删除菜单的父菜单的id值赋给默认展开值即可。
注意:
前端向后端发送post请求和get请求。对于这个我们可以设置一个自定义的代码块。文件->首选项->用户片段,以后我们就可以通过快捷键直接进行输出了。
"http-get请求": {"prefix": "httpget","body":["this.\\$http({","url: this.\\$http.adornUrl(''),","method:'get',","params:this.\\$http.adornParams({})","}).then(({data})=>{","})"],"description":"httpGET请求"},"http-post请求":{"prefix":"httppost","body":["this.\\$http({","url:this.\\$http.adornUrl(''),","method:'post',","data: this.\\$http.adornData(data, false)","}).then(({data})=>{ })"],"description":"httpPOST请求"}
要求:删除之后,显示弹窗,而且展开的菜单仍然展开。

//在el-tree中设置默认展开属性,绑定给expandedKey
:default-expanded-keys="expandedKey"//data中添加属性
expandedKey: [],//完整的remove方法remove(node, data) {var ids = [data.catId];this.$confirm(`是否删除【${data.name}】菜单?`, "提示", {confirmButtonText: "确定",cancelButtonText: "取消",type: "warning",}).then(() => {this.$http({url: this.$http.adornUrl("/product/category/delete"),method: "post",data: this.$http.adornData(ids, false),}).then(({ data }) => {this.$message({message: "菜单删除成功",type: "success",});//刷新出新的菜单this.getMenus();//设置需要默认展开的菜单this.expandedKey = [node.parent.data.catId]});}).catch(() => {});},
6.1.6 新增分类
1、elementui中 Dialog 对话框
- 一个会话的属性为:visible.sync=“dialogVisible”
- 导出的data中"dialogVisible = false"
- 点击确认或者取消后的逻辑都是@click=“dialogVisible = false” 关闭会话即关闭弹框
2、点击 append,弹出对话框,输入分类名称
3、点击确定,添加到数据库: 新建方法addCategory发送post请求到后端; 因为要把数据添加到数据库,所以在前端数据中按照数据库的格式声明一个category。点击append时,计算category属性(比如 父id,以及当前层级等),点击确定时发送 post 请求(后台代码使用的是 @RequestBody 注解,需要发送 post请求)。
4、点击确定后,需要刷新菜单,显示出新的菜单;此外还需要展开菜单方便查看。
<!--对话框组件--><el-dialog title="提示" :visible.sync="dialogVisible" width="30%"><el-form :model="categroy"><el-form-item label="分类名称"><el-input v-model="categroy.name" autocomplete="off"></el-input></el-form-item></el-form><span slot="footer" class="dialog-footer"><el-button @click="dialogVisible = false">取 消</el-button><el-button type="primary" @click="addCategory">确 定</el-button></span></el-dialog>//data中新增数据
//按照数据库格式声明的数据categroy: { name: "", parentCid: 0, catLevel: 0, showStatus: 1, sort: 0 },
//判断是否显示对话框dialogVisible: false,//修改append方法,新增addCategory方法
//点击append后,计算category属性,显示对话框append(data) {console.log("append", data);this.dialogVisible = true;this.categroy.parentCid = data.catId;this.categroy.catLevel = data.catLevel * 1 + 1;},//点击确定后,发送post请求
//成功后显示添加成功,展开刚才的菜单addCategory() {console.log("提交的数据", this.categroy);this.$http({url: this.$http.adornUrl("/product/category/save"),method: "post",data: this.$http.adornData(this.categroy, false),}).then(({ data }) => {this.$message({message: "添加成功",type: "success",});//刷新出新的菜单this.getMenus();//设置需要默认展开的菜单this.expandedKey = [this.categroy.parentCid];this.dialogVisible = false;});6.1.7 修改分类
gulimall-product中的CategoryController下
/*** 信息*/@RequestMapping("/info/{catId}")//@RequiresPermissions("product:category:info")public R info(@PathVariable("catId") Long catId){CategoryEntity category = categoryService.getById(catId);return R.ok().put("data", category); //我们统一 为 data}
2.前端代码
实现修改名称,图标,计量单位。
1、新增Edit按钮:复制之前的append
2、查看controller,发现updata方法是由id进行更新的,所以data中的category中新增catId
3、增加、修改的时候也修改图标和计量单位,所以data的category新增inco,productUnit
4、新建edit方法,用来绑定Edit按钮。新建editCategory方法,用来绑定对话框的确定按钮。
5、复用对话框:
data数据中新增dialogType,用来标记此时对话框是由 edit打开的,还是由 append打开的。
新建方法 submitData,与对话框的确定按钮进行绑定,在方法中判断,如果 dialogTypeadd调用addCategory(),如果 dialogTypeedit调用editCategory()
data数据中新增 title,绑定对话框的title,用来做提示信息。判断dialogType的值,来选择提示信息。
6、防止多个人同时操作,对话框中的回显的信息应该是由数据库中读出来的:点击Edit按钮,发送httpget请求。(看好返回的数据)7、编辑editCategory方法:
controller之中的更新是动态更新,根据id,发回去什么值修改什么值,所以把要修改的数据发回后端就好。
成功之后发送提示消息,展开刚才的菜单。
8、编辑之后,再点击添加,发现会回显刚才编辑的信息。所以在append方法中重置回显的信息。9、这里给 对话框 添加一个 close-on-click-modal = false:这样我们点对话框之外的空白处就不会直接不显示对话框了。

<!--编辑按钮--><el-button type="text" size="mini" @click="() => edit(data)">Edit</el-button><!--可复用的对话框--><el-dialog :title="title" :visible.sync="dialogVisible" width="30%" :close-on-click-modal="false"><el-form :model="category"><el-form-item label="分类名称"><el-input v-model="category.name" autocomplete="off"></el-input></el-form-item><el-form-item label="图标"><el-input v-model="category.icon" autocomplete="off"></el-input></el-form-item><el-form-item label="计量单位"><el-input v-model="category.productUnit" autocomplete="off"></el-input></el-form-item></el-form><span slot="footer" class="dialog-footer"><el-button @click="dialogVisible = false">取 消</el-button><el-button type="primary" @click="submitData">确 定</el-button></span></el-dialog>//data, 新增了title、dialogType。 categroy中新增了inco、productUnit、catIddata() {return {title: "",dialogType: "", //edit,adddialogVisible: false,menus: [],expandedKey: [],category: {name: "",parentCid: 0,catLevel: 0,showStatus: 1,sort: 0,icon: "",productUnit: "",catId: null,},defaultProps: {children: "children", //子节点label: "name", //name属性作为标签的值,展示出来},};},//方法//绑定对话框的确定按钮,根据dialogType判断调用哪个函数submitData() {if (this.dialogType == "add") {this.addCategory();}if (this.dialogType == "edit") {this.editCategory();}},//绑定Edit按钮,设置dialogType、title,从后台读取数据,展示到对话框内edit(data) {console.log("要修改的数据", data);this.dialogType = "edit";this.title = "修改分类";// 发送请求获取节点最新的数据this.$http({url: this.$http.adornUrl(`/product/category/info/${data.catId}`),method: "get",}).then(({ data }) => {// 请求成功console.log("要回显的数据", data);this.category.name = data.data.name;this.category.catId = data.data.catId;this.category.icon = data.data.icon;this.category.productUnit = data.data.productUnit;this.category.parentCid = data.data.parentCid;this.dialogVisible = true;});},//修改三级分类数据//绑定对话框的确定按钮,向后台发送更新请求,传过去想要修改的字段editCategory() {var { catId, name, icon, productUnit } = this.category;this.$http({url: this.$http.adornUrl("/product/category/update"),method: "post",data: this.$http.adornData({ catId, name, icon, productUnit }, false),}).then(({ data }) => {this.$message({type: "success",message: "菜单修改成功!",});// 关闭对话框this.dialogVisible = false;// 刷新出新的菜单this.getMenus();// 设置需要默认展开的菜单this.expandedKey = [this.category.parentCid];}).catch(() => { });},//点击append按钮,清空编辑之后的回显数据append(data) {console.log("append----", data);this.dialogType = "add";this.title = "添加分类";this.category.parentCid = data.catId;this.category.catLevel = data.catLevel * 1 + 1;this.category.catId = null;this.category.name = null;this.category.icon = "";this.category.productUnit = "";this.category.sort = 0;this.category.showStatus = 1;this.dialogVisible = true;},
6.1.8 拖曳效果
1、前端代码
1、拖拽功能的前端实现:ementui树型控件->可拖拽节点
- 在中加入属性 draggable表示节点可拖拽。
- 在中加入属性 :allow-drop=“allowDrop”,拖拽时判定目标节点能否被放置。
- allowDrop有三个参数: draggingNode表示拖拽的节点, dropNode表示拖拽到哪个节点,type表示拖拽的类型 ’prev’、‘inner’ 和 ‘next’,表示拖拽到目标节点之前、里面、之后。
- allowDrop函数实现判断,拖拽后必须保持树形的三层结构。
- 节点的深度 = 最深深度 - 当前深度 + 1
- 当拖拽节点拖拽到目标节点的内部,要满足: 拖拽节点的深度 + 目标节点的深度 <= 3
- 当拖拽节点拖拽的目标节点的两侧,要满足: 拖拽节点的深度 + 目标节点的父节点的深度 <= 3
<!--el-tree中添加属性-->draggable:allow-drop="allowDrop"
// data中新增属性,用来记录当前节点的最大深度
maxLevel: 0,//新增方法allowDrop(draggingNode, dropNode, type) {//1、被拖动的当前节点以及所在的父节点总层数不能>3//1)、被拖动的当前节点总层数console.log("allowDrop", draggingNode, dropNode, type);this.countNodeLevel(draggingNode.data);//当前正在拖动的节点+父节点所在的深度不大于3即可let deep = this.maxLevel - draggingNode.data.catLevel + 1;console.log("深度:", deep);//this.maxLevelif (type == "inner") {return (deep + dropNode.level) <= 3;} else {return (deep + dropNode.parent.level) <= 3;}},//计算当前节点的最大深度countNodeLevel(node) {//找到所有子节点,求出最大深度if (node.children != null && node.children.length > 0) {for (let i = 0; i < node.children.length; i++) {if (node.children[i].catLevel > this.maxLevel) {this.maxLevel = node.children[i].catLevel;}this.countNodeLevel(node.children[i]);}}},
- 拖拽功能的数据收集
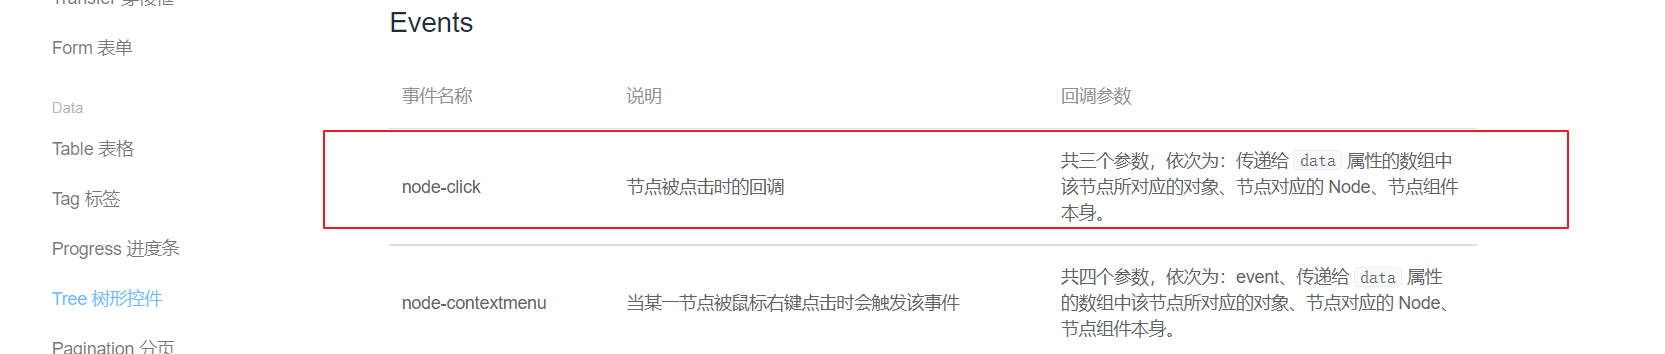
- 在中加入属性@node-drop=“handleDrop”, 表示拖拽事件结束后触发事件handleDrop,handleDrop共四个参数:
- draggingNode:被拖拽节点对应的 Node;
- dropNode:结束拖拽时最后进入的节点;
- dropType:被拖拽节点的放置位置(before、after、inner);
- ev:event
- 拖拽可能影响的节点的数据:parentCid、catLevel、sort
- data中新增updateNodes ,把所有要修改的节点都传进来。
- 要修改的数据:拖拽节点的parentCid、catLevel、sort
- 要修改的数据:新的兄弟节点的sort (把新的节点收集起来,然后重新排序)
- 要修改的数据:子节点的catLeve
//el-tree中新增属性,绑定handleDrop,表示拖拽完触发
@node-drop="handleDrop"//data 中新增数据,用来记录需要更新的节点(拖拽的节点(parentCid、catLevel、sort),拖拽后的兄弟节点(sort),拖拽节点的子节点(catLevel))
updateNodes: [],//新增方法handleDrop(draggingNode, dropNode, dropType, ev) {console.log("handleDrop: ", draggingNode, dropNode, dropType);//1、当前节点最新父节点的idlet pCid = 0;//拖拽后的兄弟节点,分两种情况,一种是拖拽到两侧,一种是拖拽到内部let sibings = null;if (dropType == "before" || dropType == "after") {pCid = dropNode.parent.data.catId == undefined ? 0: dropNode.parent.data.catId;sibings = dropNode.parent.childNodes;} else {pCid = dropNode.data.catId;sibings = dropNode.childNodes;}//2、当前拖拽节点的最新顺序//遍历所有的兄弟节点,如果是拖拽节点,传入(catId,sort,parentCid,catLevel),如果是兄弟节点传入(catId,sort)for (let i = 0; i < sibings.length; i++) {if (sibings[i].data.catId == draggingNode.data.catId){//如果遍历的是当前正在拖拽的节点let catLevel = draggingNode.level;if (sibings[i].level != draggingNode.level){//当前节点的层级发生变化catLevel = sibings[i].level;//修改他子节点的层级this.updateChildNodeLevel(sibings[i]);}this.updateNodes.push({catId:sibings[i].data.catId, sort: i, parentCid: pCid, catLevel:catLevel});}else{this.updateNodes.push({catId:sibings[i].data.catId, sort: i});}}//3 当前拖拽节点的最新层级console.log("updateNodes", this.updateNodes);}// 修改拖拽节点的子节点的层级
updateChildNodeLevel(node){if (node.childNodes.length > 0){for (let i = 0; i < node.childNodes.length; i++){//遍历子节点,传入(catId,catLevel)var cNode = node.childNodes[i].data;this.updateNodes.push({catId:cNode.catId,catLevel:node.childNodes[i].level});//处理子节点的子节点this.updateChildNodeLevel(node.childNodes[i]);}}},
- 拖拽功能实现
- 在后端编写批量修改的方法
update/sort- 前端发送post请求,把要修改的数据发送过来
- 提示信息,展开拖拽节点的父节点
CategoryController修改方法
@RestController
@RequestMapping("product/category")
public class CategoryController {@Autowiredprivate CategoryService categoryService;/*** 批量修改分类*/@RequestMapping("/update/sort")// @RequiresPermissions("product:category:update")public R update(@RequestBody CategoryEntity[] category){categoryService.updateBatchById(Arrays.asList(category));return R.ok();}}
利用 APIfox 测试 批量修改效果
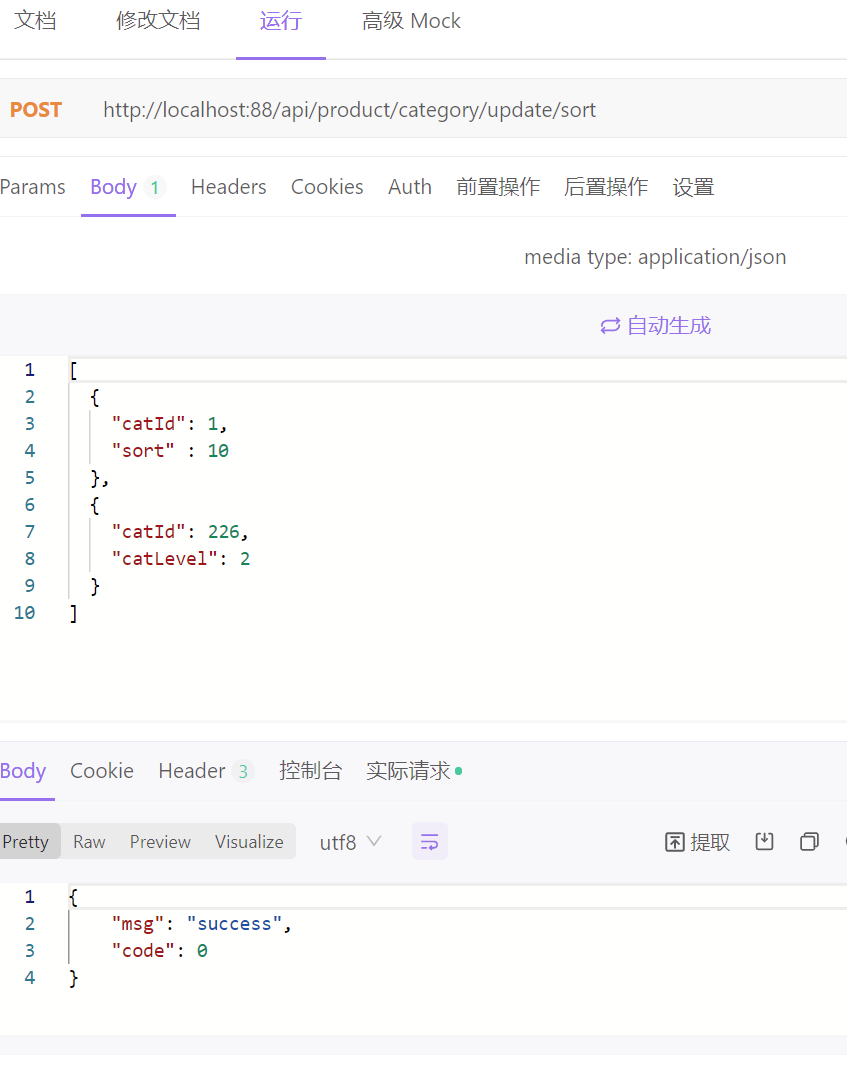
测试成功。接下来我们完善下 前端的代码。
前端发送请求:
//3 当前拖拽节点的最新层级console.log("updateNodes", this.updateNodes);this.$http({url: this.$http.adornUrl("/product/category/update/sort"),method: 'post',data: this.$http.adornData(this.updateNodes, false)}).then(({ data }) => {this.$message({message: "菜单顺序等修改成功",type: "success",});//刷新出新的菜单this.getMenus();//设置需要默认展开的菜单this.expandedKey = [pCid];//每次拖拽后把数据清空,否则要修改的节点将会越拖越多this.updateNodes = [],this.maxLevel = 0});
- 批量拖拽功能
- 添加开关,控制拖拽功能是否开启
- 每次拖拽都要和数据库交互,不合理。批量拖拽过后,一次性保存。
<!--添加拖拽开关和批量保存按钮--><el-switchv-model="draggable"active-text="开启拖拽"inactive-text="关闭拖拽"></el-switch><el-button v-if="draggable" size="small" round @click="batchSave">批量保存</el-button><el-tree :draggable="draggable"</el-tree>
//data中新增数据pCid:[], //批量保存过后要展开的菜单iddraggable: false, //绑定拖拽开关是否打开//修改了一些方法,修复bug,修改过的方法都贴在下面了//点击批量保存按钮,发送请求batchSave() {this.$http({url: this.$http.adornUrl("/product/category/update/sort"),method: 'post',data: this.$http.adornData(this.updateNodes, false)}).then(({ data }) => {this.$message({message: "菜单顺序等修改成功",type: "success",});//刷新出新的菜单this.getMenus();//设置需要默认展开的菜单this.expandedKey = this.pCid;//每次拖拽后把数据清空,否则要修改的节点将会越拖越多this.updateNodes = [],this.maxLevel = 0;// this.pCid = 0;}).catch(() => { });},handleDrop(draggingNode, dropNode, dropType, ev) {console.log("handleDrop: ", draggingNode, dropNode, dropType);//1、当前节点最新父节点的idlet pCid = 0;//拖拽后的兄弟节点,分两种情况,一种是拖拽到两侧,一种是拖拽到内部let sibings = null;if (dropType == "before" || dropType == "after") {pCid = dropNode.parent.data.catId == undefined ? 0 : dropNode.parent.data.catId;sibings = dropNode.parent.childNodes;} else {pCid = dropNode.data.catId;sibings = dropNode.childNodes;}this.pCid.push(pCid);//2、当前拖拽节点的最新顺序//遍历所有的兄弟节点,如果是拖拽节点,传入(catId,sort,parentCid,catLevel),如果是兄弟节点传入(catId,sort)for (let i = 0; i < sibings.length; i++) {if (sibings[i].data.catId == draggingNode.data.catId) {//如果遍历的是当前正在拖拽的节点let catLevel = draggingNode.level;if (sibings[i].level != draggingNode.level) {//当前节点的层级发生变化catLevel = sibings[i].level;//修改他子节点的层级this.updateChildNodeLevel(sibings[i]);}this.updateNodes.push({ catId: sibings[i].data.catId, sort: i, parentCid: pCid, catLevel: catLevel });} else {this.updateNodes.push({ catId: sibings[i].data.catId, sort: i });}}//3 当前拖拽节点的最新层级console.log("updateNodes", this.updateNodes);},// 修改拖拽判断逻辑allowDrop(draggingNode, dropNode, type) {//1 被拖动的当前节点以及所在的父节点总层数不能大于3//1 被拖动的当前节点总层数console.log("allowDrop:", draggingNode, dropNode, type);var level = this.countNodeLevel(draggingNode);// 当前正在拖动的节点+父节点所在的深度不大于3即可let deep = Math.abs(this.maxLevel - draggingNode.level) + 1;console.log("深度:", deep);// this.maxLevelif (type == "innner") {return deep + dropNode.level <= 3;} else {return deep + dropNode.parent.level <= 3;}},//计算当前节点的最大深度countNodeLevel(node) {// 找到所有子节点,求出最大深度if (node.childNodes != null && node.childNodes.length > 0) {for (let i = 0; i < node.childNodes.length; i++) {if (node.childNodes[i].level > this.maxLevel) {this.maxLevel = node.childNodes[i].level;}this.countNodeLevel(node.childNodes[i]);}}},6.1.9 批量删除
前端代码
- 新增删除按钮
<el-button type="danger" size="small" @click="batchDelete" round>批量删除</el-button><!--eltree中新增属性,用作组件的唯一标示-->
ref="menuTree"- 批量删除方法
//批量删除batchDelete() {let catIds = [];let catNames = [];let checkedNodes = this.$refs.menuTree.getCheckedNodes();console.log("被选中的元素", checkedNodes);for (let i = 0; i < checkedNodes.length; i++) {catIds.push(checkedNodes[i].catId);catNames.push(checkedNodes[i].name);}this.$confirm(`是否删除【${catNames}】菜单?`, "提示", {confirmButtonText: "确定",cancelButtonText: "取消",type: "warning",}).then(() => {this.$http({url: this.$http.adornUrl("/product/category/delete"),method: 'post',data: this.$http.adornData(catIds, false)}).then(({ data }) => {this.$message({message: "菜单删除成功",type: "success",});//刷新出新的菜单this.getMenus();}).catch(() => { });}).catch(() => { });},
6.1.10 前端代码(总)
<!--  -->
<template><div><el-switch v-model="draggable" active-text="开启拖拽" inactive-text="关闭拖拽"></el-switch><el-button v-if="draggable" size="small" round @click="batchSave">批量保存</el-button><el-button type="danger" size="small" @click="batchDelete" round>批量删除</el-button><el-tree :data="menus" :props="defaultProps" :expand-on-click-node="false" show-checkbox node-key="catId":default-expanded-keys="expandedKey" :draggable="draggable" :allow-drop="allowDrop" @node-drop="handleDrop"ref="menuTree"><span class="custom-tree-node" slot-scope="{ node, data }"><span>{{ node.label }}</span><span><el-button v-if="node.level <= 2" type="text" size="mini" @click="() => append(data)">Append</el-button><el-button type="text" size="mini" @click="() => edit(data)">Edit</el-button><el-button v-if="node.childNodes.length == 0" type="text" size="mini"@click="() => remove(node, data)">Delete</el-button></span></span></el-tree><el-dialog :title="title" :visible.sync="dialogVisible" width="30%" :close-on-click-modal="false"><el-form :model="category"><el-form-item label="分类名称"><el-input v-model="category.name" autocomplete="off"></el-input></el-form-item><el-form-item label="图标"><el-input v-model="category.icon" autocomplete="off"></el-input></el-form-item><el-form-item label="计量单位"><el-input v-model="category.productUnit" autocomplete="off"></el-input></el-form-item></el-form><span slot="footer" class="dialog-footer"><el-button @click="dialogVisible = false">取 消</el-button><el-button type="primary" @click="submitData">确 定</el-button></span></el-dialog></div>
</template><script>
//这里可以导入其他文件(比如:组件,工具js,第三方插件js,json文件,图片文件等等)
//例如:import 《组件名称》 from '《组件路径》';export default {//import引入的组件需要注入到对象中才能使用components: {},props: {},data() {return {pCid: [], //批量保存过后需要展开的菜单iddraggable: false, //绑定拖拽开关是否打开title: "",dialogType: "", //edit,adddialogVisible: false,menus: [],expandedKey: [],maxLevel: 0, // data中新增属性,用来记录初始化当前节点的最大深度updateNodes: [],//data 中新增数据,用来记录需要更新的节点(拖拽的节点(parentCid、catLevel、sort),拖拽后的兄弟节点(sort),拖拽节点的子节点(catLevel))category: {name: "",parentCid: 0,catLevel: 0,showStatus: 1,sort: 0,icon: "",productUnit: "",catId: null,},defaultProps: {children: "children",  //子节点label: "name",  //name属性作为标签的值,展示出来},};},//监听属性 类似于data概念computed: {},//监控data中的数据变化watch: {},//获取菜单集合methods: {handleNodeClick(data) {console.log(data);},//获取后台数据getMenus() {this.$http({url: this.$http.adornUrl('/product/category/list/tree'),method: 'get'}).then(({ data }) => {  //将整个对象中的data数据结构出来,因为只有data才是我们需要的console.log("成功了获取到菜单数据....", data.data)this.menus = data.data; // 数组内容,把数据给menus,就是给了vue实例,最后绑定到视图上})},//点击append按钮,清空编辑之后的回显数据append(data) {console.log("append----", data);this.dialogType = "add";this.title = "添加分类";this.category.parentCid = data.catId;this.category.catLevel = data.catLevel * 1 + 1;this.category.catId = null;this.category.name = null;this.category.icon = "";this.category.productUnit = "";this.category.sort = 0;this.category.showStatus = 1;this.dialogVisible = true;},//添加三级分类// 点击确定按钮后,因为后台是@RequestBody 注解,所以需要发送post请求//成功后显示添加成功,展开刚才的菜单addCategory() {console.log("提交的数据", this.category);this.$http({url: this.$http.adornUrl("/product/category/save"),method: 'post',data: this.$http.adornData(this.category, false)}).then(({ data }) => {this.$message({message: "添加成功",type: "success",});//刷新出新的菜单this.getMenus();//设置需要默认展开的菜单this.expandedKey = [this.category.parentCid];//关闭对话框this.dialogVisible = false;}).catch(() => { });},//绑定对话框的确定按钮,根据dialogType判断调用哪个函数submitData() {if (this.dialogType == "add") {this.addCategory();}if (this.dialogType == "edit") {this.editCategory();}},//绑定Edit按钮,设置dialogType、title,从后台读取数据,展示到对话框内edit(data) {console.log("要修改的数据", data);this.dialogType = "edit";this.title = "修改分类";// 发送请求获取节点最新的数据this.$http({url: this.$http.adornUrl(`/product/category/info/${data.catId}`),method: "get",}).then(({ data }) => {// 请求成功console.log("要回显的数据", data);this.category.name = data.data.name;this.category.catId = data.data.catId;this.category.icon = data.data.icon;this.category.productUnit = data.data.productUnit;this.category.parentCid = data.data.parentCid;this.dialogVisible = true;});},//修改三级分类数据//绑定对话框的确定按钮,向后台发送更新请求,传过去想要修改的字段editCategory() {var { catId, name, icon, productUnit } = this.category;this.$http({url: this.$http.adornUrl("/product/category/update"),method: "post",data: this.$http.adornData({ catId, name, icon, productUnit }, false),}).then(({ data }) => {this.$message({type: "success",message: "菜单修改成功!",});// 关闭对话框this.dialogVisible = false;// 刷新出新的菜单this.getMenus();// 设置需要默认展开的菜单this.expandedKey = [this.category.parentCid];}).catch(() => { });},allowDrop(draggingNode, dropNode, type) {//1 被拖动的当前节点以及所在的父节点总层数不能大于3//1 被拖动的当前节点总层数console.log("allowDrop:", draggingNode, dropNode, type);var level = this.countNodeLevel(draggingNode);// 当前正在拖动的节点+父节点所在的深度不大于3即可let deep = Math.abs(this.maxLevel - draggingNode.level) + 1;console.log("深度:", deep);// this.maxLevelif (type == "inner") {return deep + dropNode.level <= 3;} else {return deep + dropNode.parent.level <= 3;}},//计算当前节点的最大深度countNodeLevel(node) {// 找到所有子节点,求出最大深度if (node.childNodes != null && node.childNodes.length > 0) {for (let i = 0; i < node.childNodes.length; i++) {if (node.childNodes[i].level > this.maxLevel) {this.maxLevel = node.childNodes[i].level;}this.countNodeLevel(node.childNodes[i]);}}},//点击批量保存按钮,发送请求batchSave() {this.$http({url: this.$http.adornUrl("/product/category/update/sort"),method: 'post',data: this.$http.adornData(this.updateNodes, false)}).then(({ data }) => {this.$message({message: "菜单顺序等修改成功",type: "success",});//刷新出新的菜单this.getMenus();//设置需要默认展开的菜单this.expandedKey = this.pCid;//每次拖拽后把数据清空,否则要修改的节点将会越拖越多this.updateNodes = [],this.maxLevel = 0;// this.pCid = 0;}).catch(() => { });},handleDrop(draggingNode, dropNode, dropType, ev) {console.log("handleDrop: ", draggingNode, dropNode, dropType);//1、当前节点最新父节点的idlet pCid = 0;//拖拽后的兄弟节点,分两种情况,一种是拖拽到两侧,一种是拖拽到内部let sibings = null;if (dropType == "before" || dropType == "after") {pCid = dropNode.parent.data.catId == undefined ? 0 : dropNode.parent.data.catId;sibings = dropNode.parent.childNodes;} else {pCid = dropNode.data.catId;sibings = dropNode.childNodes;}this.pCid.push(pCid);//2、当前拖拽节点的最新顺序//遍历所有的兄弟节点,如果是拖拽节点,传入(catId,sort,parentCid,catLevel),如果是兄弟节点传入(catId,sort)for (let i = 0; i < sibings.length; i++) {if (sibings[i].data.catId == draggingNode.data.catId) {//如果遍历的是当前正在拖拽的节点let catLevel = draggingNode.level;if (sibings[i].level != draggingNode.level) {//当前节点的层级发生变化catLevel = sibings[i].level;//修改他子节点的层级this.updateChildNodeLevel(sibings[i]);}this.updateNodes.push({ catId: sibings[i].data.catId, sort: i, parentCid: pCid, catLevel: catLevel });} else {this.updateNodes.push({ catId: sibings[i].data.catId, sort: i });}}//3 当前拖拽节点的最新层级console.log("updateNodes", this.updateNodes);},// 修改拖拽节点的子节点的层级updateChildNodeLevel(node) {if (node.childNodes.length > 0) {for (let i = 0; i < node.childNodes.length; i++) {//遍历子节点,传入(catId,catLevel)var cNode = node.childNodes[i].data;this.updateNodes.push({ catId: cNode.catId, catLevel: node.childNodes[i].level });//处理子节点的子节点this.updateChildNodeLevel(node.childNodes[i]);}}},//批量删除batchDelete() {let catIds = [];let catNames = [];let checkedNodes = this.$refs.menuTree.getCheckedNodes();console.log("被选中的元素", checkedNodes);for (let i = 0; i < checkedNodes.length; i++) {catIds.push(checkedNodes[i].catId);catNames.push(checkedNodes[i].name);}this.$confirm(`是否删除【${catNames}】菜单?`, "提示", {confirmButtonText: "确定",cancelButtonText: "取消",type: "warning",}).then(() => {this.$http({url: this.$http.adornUrl("/product/category/delete"),method: 'post',data: this.$http.adornData(catIds, false)}).then(({ data }) => {this.$message({message: "菜单删除成功",type: "success",});//刷新出新的菜单this.getMenus();}).catch(() => { });}).catch(() => { });},remove(node, data) {var ids = [data.catId];this.$confirm(`是否删除【${data.name}】菜单?`, "提示", {confirmButtonText: "确定",cancelButtonText: "取消",type: "warning",}).then(() => {this.$http({url: this.$http.adornUrl("/product/category/delete"),method: "post",data: this.$http.adornData(ids, false),}).then(({ data }) => {this.$message({message: "菜单删除成功",type: "success",});//刷新出新的菜单this.getMenus();//设置需要默认展开的菜单this.expandedKey = [node.parent.data.catId]});}).catch(() => { });},},//生命周期 - 创建完成(可以访问当前this实例)created() {//创建完成时,就调用getMenus函数this.getMenus();},//生命周期 - 挂载完成(可以访问DOM元素)mounted() {},beforeCreate() { }, //生命周期 - 创建之前beforeMount() { }, //生命周期 - 挂载之前beforeUpdate() { }, //生命周期 - 更新之前updated() { }, //生命周期 - 更新之后beforeDestroy() { }, //生命周期 - 销毁之前destroyed() { }, //生命周期 - 销毁完成activated() { }, //如果页面有keep-alive缓存功能,这个函数会触发
}
</script>
<style scoped></style>
至此三级分类告一段落。
6.2 品牌管理
这次要用到的代码是通过renren-generator代码生成器中生成的前端代码。在前面中如果我们不小心进行删除了,可以通过idea自带的恢复功能进行恢复。
步骤:
- 右键点击resources->Local History->Show History
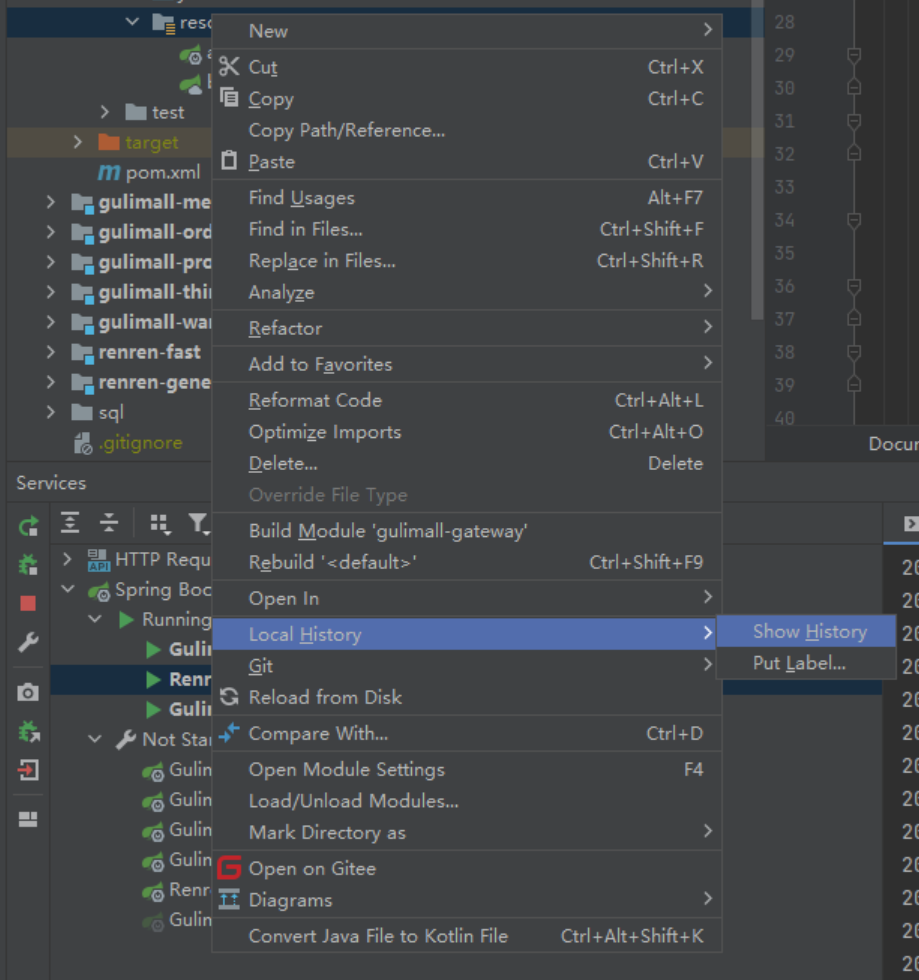
- 找到删除前端的记录
- 右键->Revert。 找回成功!
6.2.1 使用逆向工程前端代码
- 菜单管理—新增菜单
- 将gulimall-product中的前端代码复制到前端工程product下。

- 没有新增删除按钮: 修改权限,Ctrl+Shift+F查找
isAuth,全部返回为true


- 查看效果

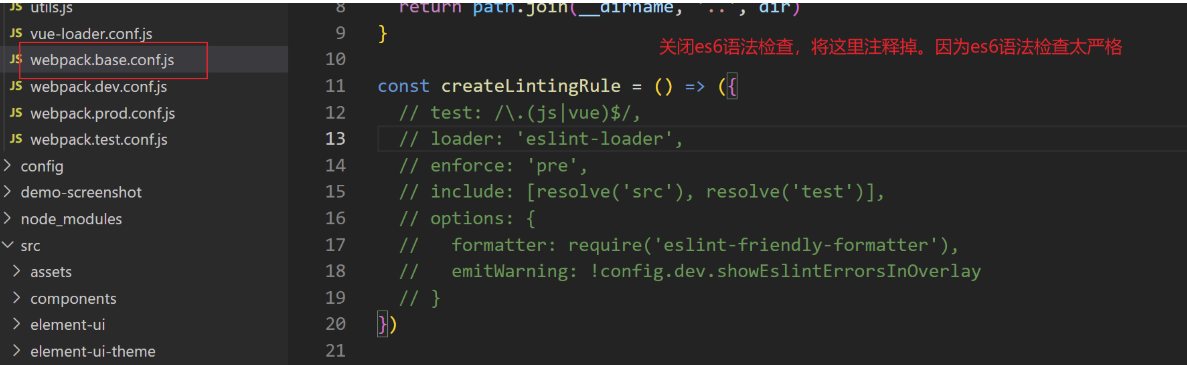
这里提一嘴,我们可以将es6语法检查关闭。
6.2.2 效果优化-快速显示开关
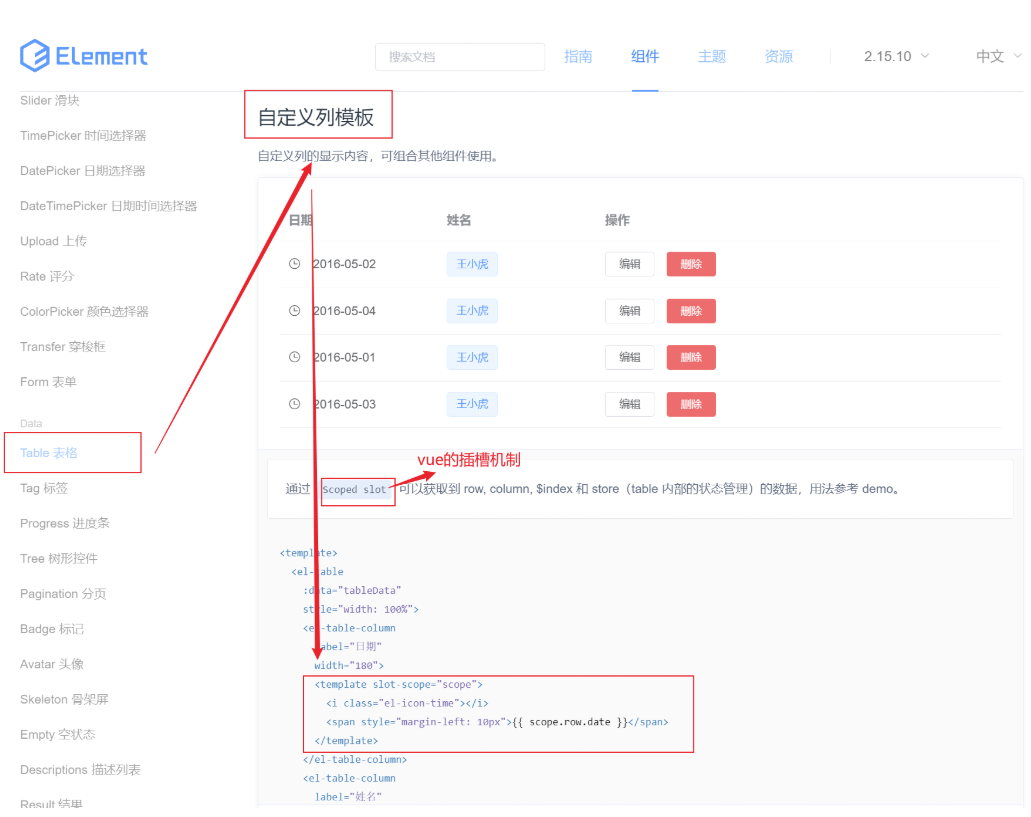
- 在列表中添加自定义列:中间加标签。可以通过 Scoped slot 可以获取到 row, column, $index 和 store(table 内部的状态管理)的数据
- 修改开关状态,发送修改请求
- 数据库中showStatus是0和1,开关默认值是true/false。 所以在开关中设置:active-value=“1” 、:inactive-value="0"属性,与数据库同步

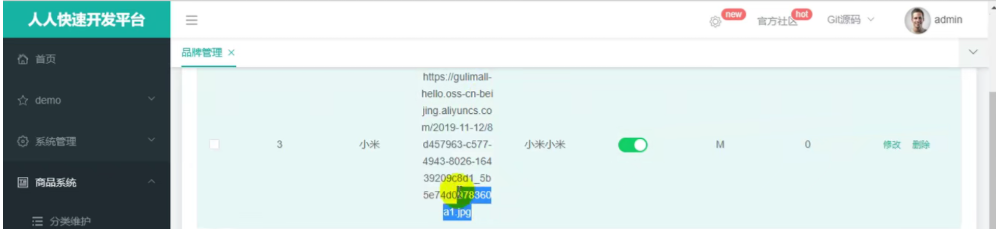
<!--brand.vue中显示状态那一列--><el-table-columnprop="showStatus"header-align="center"align="center"label="显示状态"><template slot-scope="scope"><el-switchv-model="scope.row.showStatus"active-color="#13ce66"inactive-color="#ff4949":active-value="1" :inactive-value="0"@change="updateBrandStatus(scope.row)" ></el-switch></template></el-table-column><!--brand-add-or-update.vue中显示状态那一列--><el-form-item label="显示状态" prop="showStatus"><el-switchv-model="dataForm.showStatus"active-color="#13ce66"inactive-color="#ff4949"></el-switch></el-form-item>
效果如下:品牌logo地址显示在一栏了。

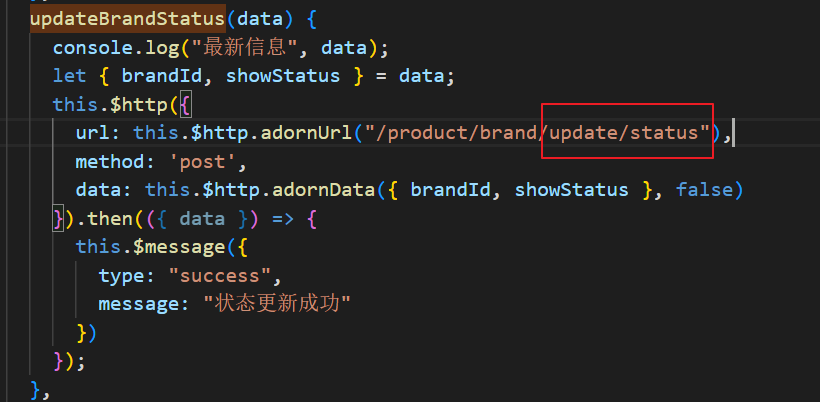
//brand.vue中新增方法,用来修改状态
updateBrandStatus(data) {console.log("最新信息",data);let { brandId, showStatus } = data;this.$http({url: this.$http.adornUrl("/product/brand/update"),method: 'post',data: this.$http.adornData({brandId,showStatus}, false)}).then(({ data }) => { this.$message({type:"success",message:"状态更新成功"})});},
6.2.3 文件上传功能
- 知识补充
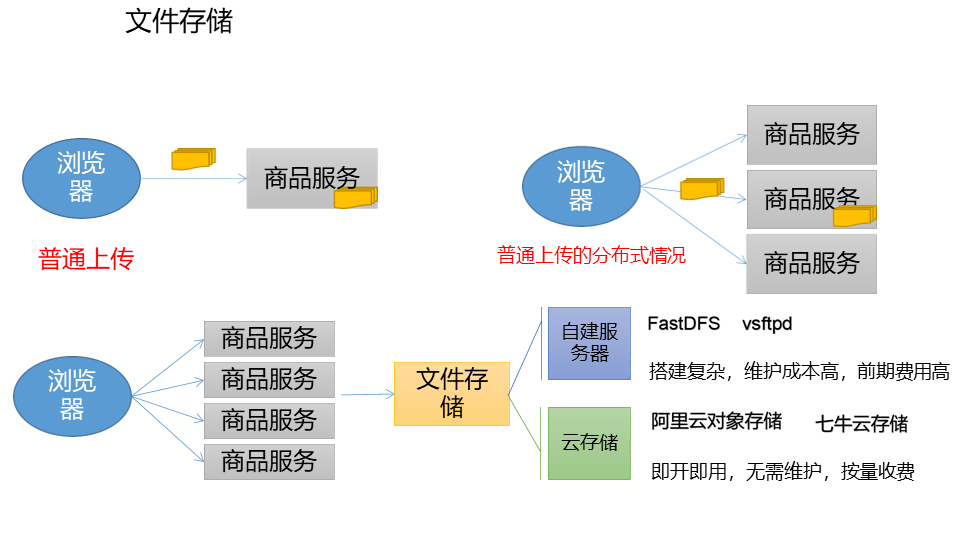
这里我们选用服务端签名后直传进行文件上传功能,好处是:
上传的账号信息存储在应用服务器
上传先找应用服务器要一个policy上传策略,生成防伪签名
- 开通阿里云OSS对象存储服务,并创建新的Bucket
https://help.aliyun.com/document_detail/32007.html sdk–java版本
- 如何使用
阿里云关于文件上传的帮助文档
根据官网的文档,我们可以直接在项目中引入依赖进行安装
这个依赖是最原始的。配置什么要写一大堆。
<dependency><groupId>com.aliyun.oss</groupId><artifactId>aliyun-sdk-oss</artifactId><version>3.15.0</version>
</dependency>
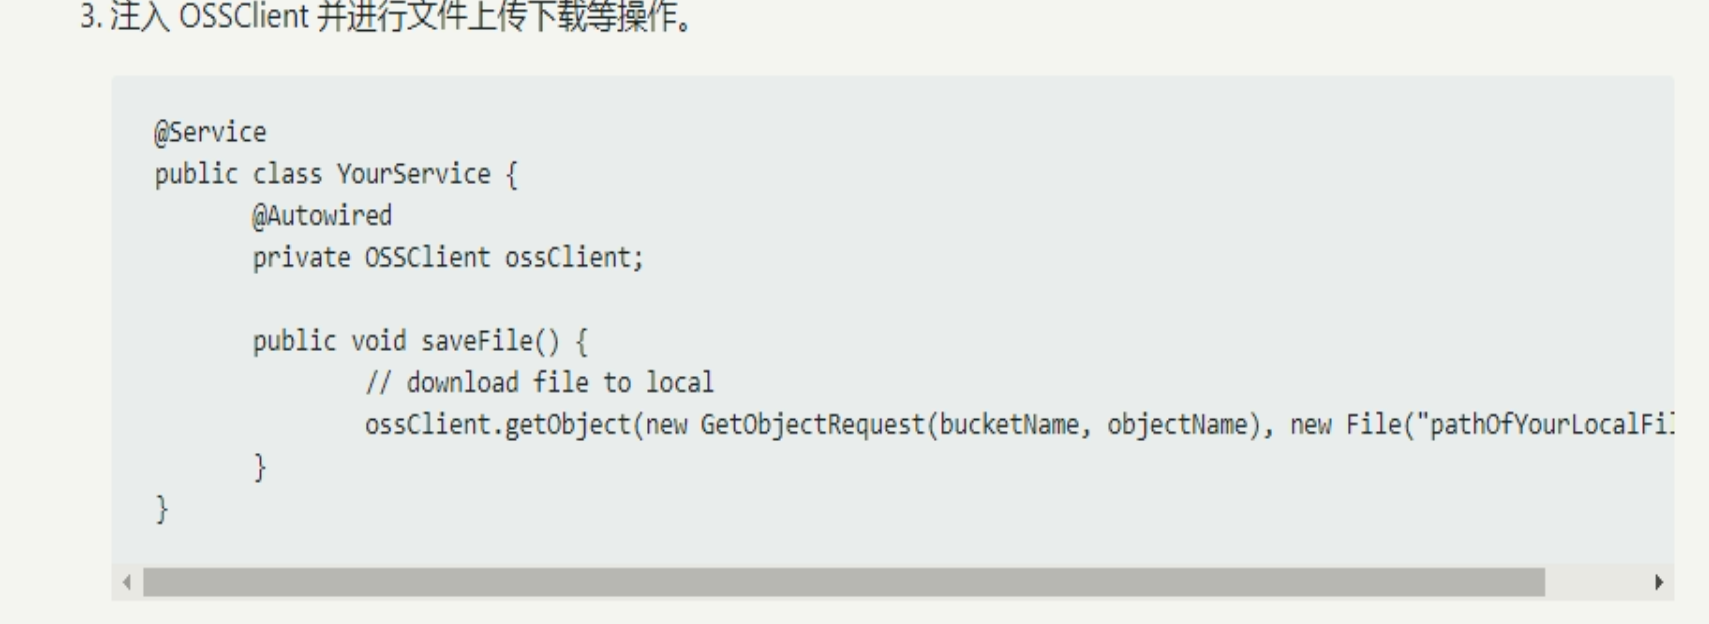
文件上传的具体配置,我们在 gulimall-product 的 test 包下的 GulimallProductApplicationTests类中进行测试,代码如下:
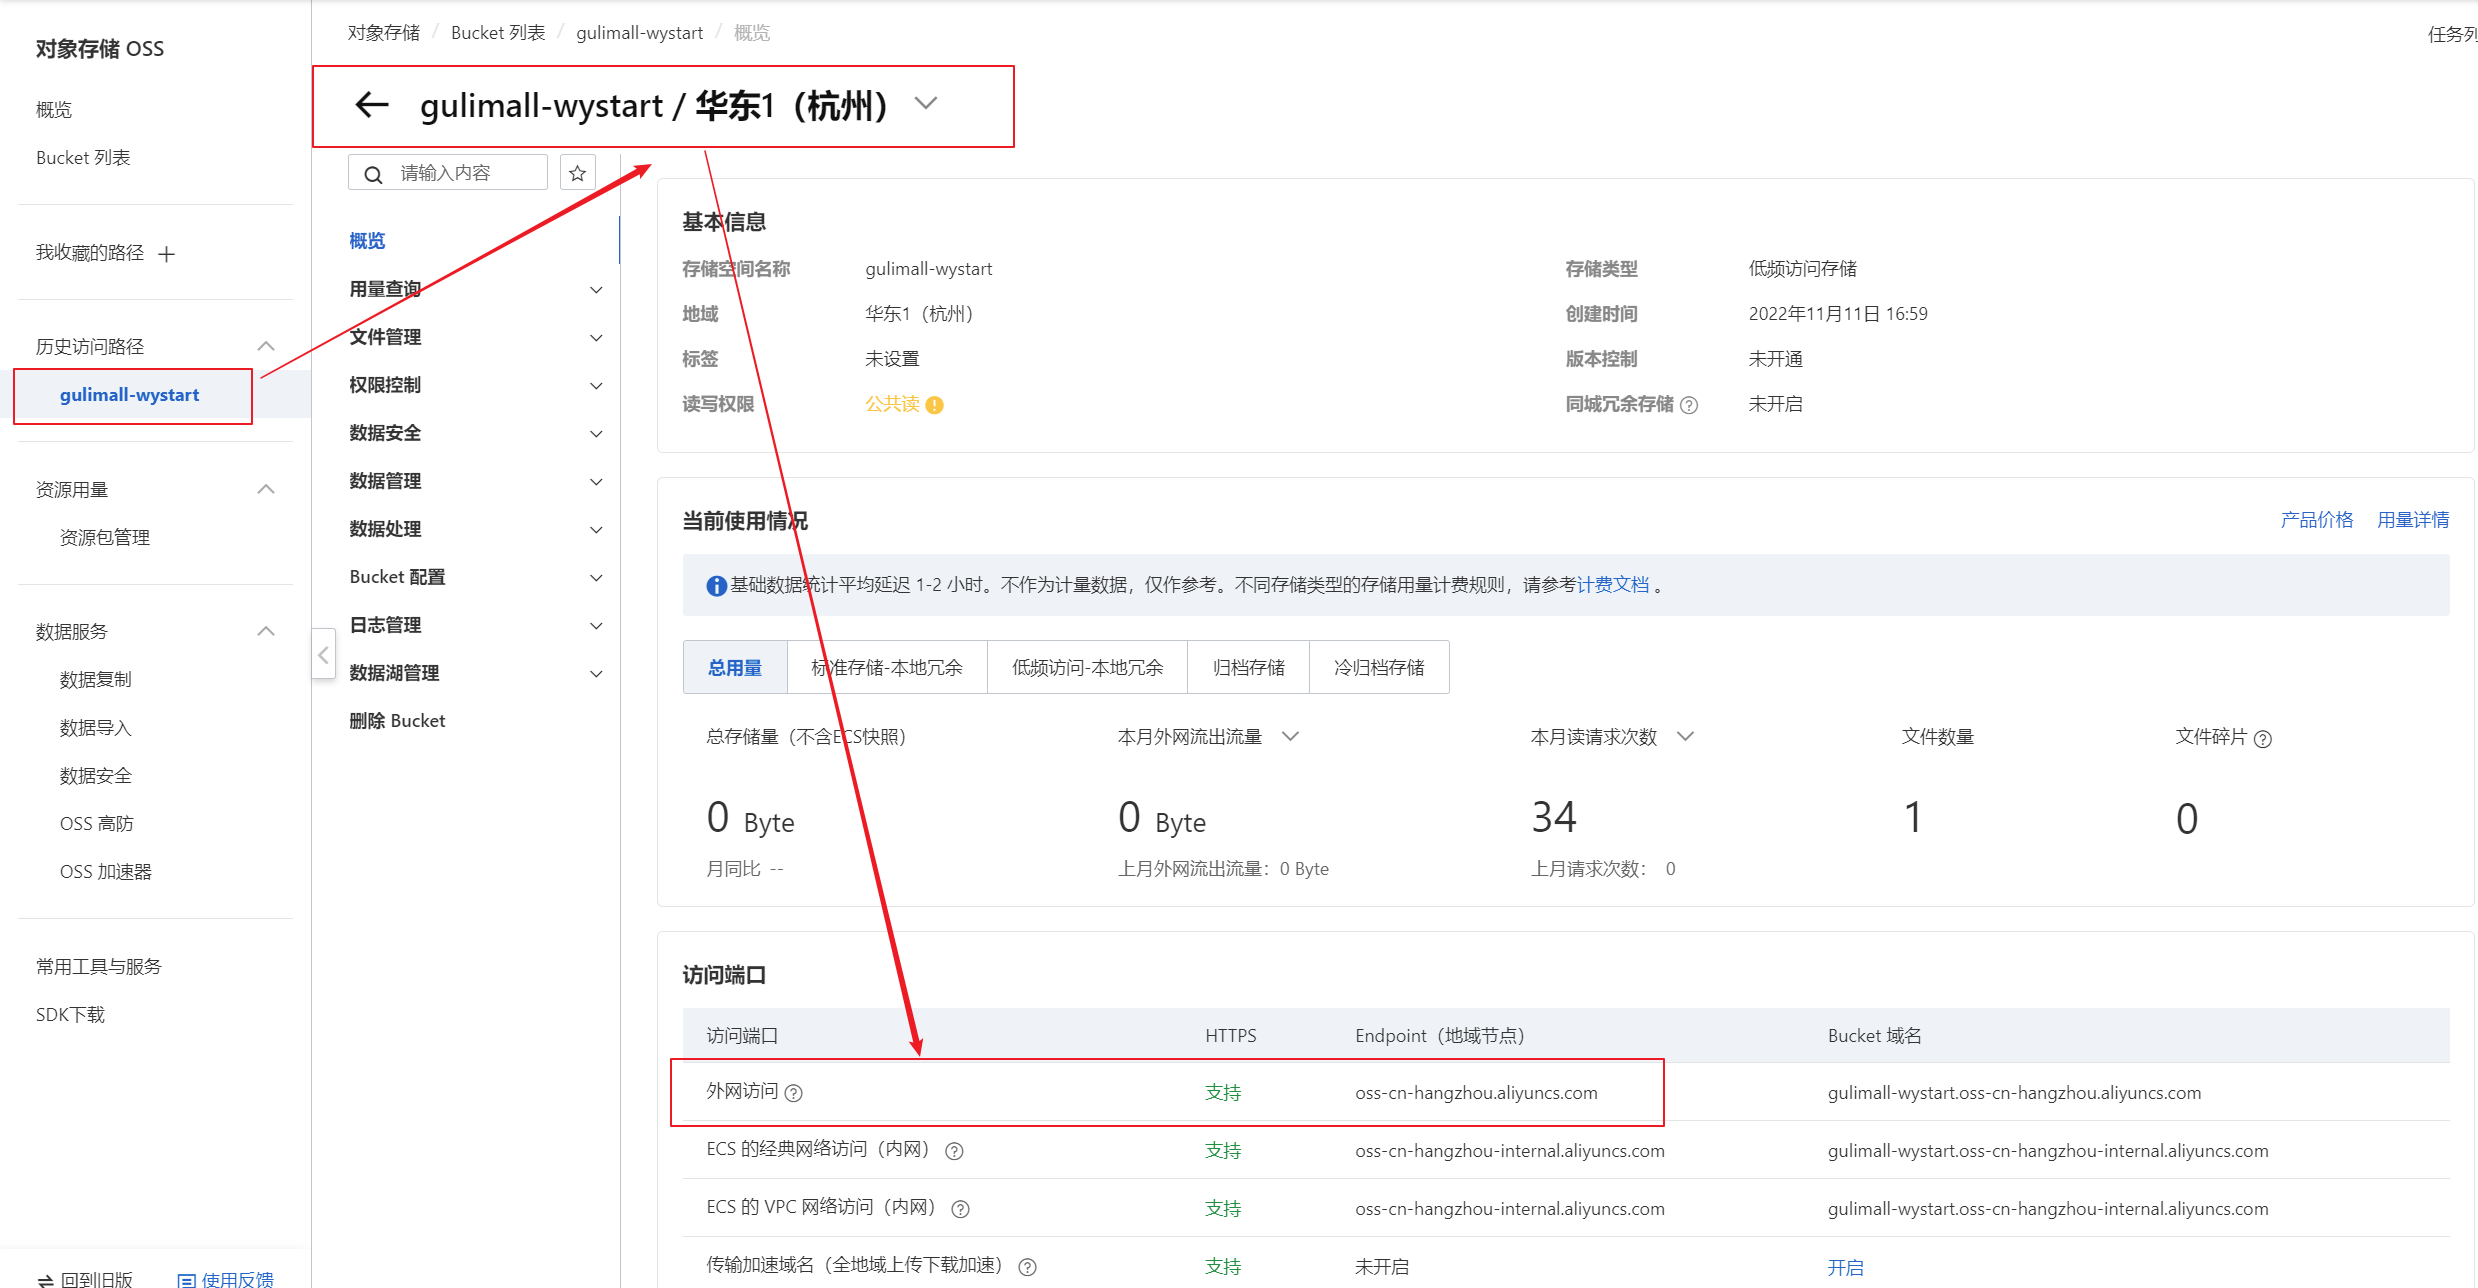
@Testpublic void testUpload() throws FileNotFoundException {// Endpoint以杭州为例,其它Region请按实际情况填写。String endpoint = "oss-cn-hangzhou.aliyuncs.com";// 云账号AccessKey有所有API访问权限,建议遵循阿里云安全最佳实践,创建并使用RAM子账号进行API访问或日常运维,请登录 https://ram.console.aliyun.com 创建。String accessKeyId = "LTAI5tABh1pjUprZGrKi92w1";String accessKeySecret = "enVYmXd9p1sHvVub5gBf21E3tjuIFJ";// // 创建OSSClient实例。OSS ossClient = new OSSClientBuilder().build(endpoint, accessKeyId, accessKeySecret);// 上传文件流。InputStream inputStream = new FileInputStream("F:\\JAVA listen\\尚硅谷Java学科全套教程(总207.77GB)\\谷粒商城\\课件\\课件和文档\\基础篇\\资料\\pics\\0d40c24b264aa511.jpg");ossClient.putObject("gulimall-wystart", "0d40c24b264aa511.jpg", inputStream);// 关闭OSSClient。ossClient.shutdown();System.out.println("上传成功");}
endpoint的取值:点击概览就可以看到你的endpoint信息,endpoint在
这里就是上海等地区,如 oss-cn-qingdao.aliyuncs.com
bucket域名:就是签名加上bucket,如gulimall-fermhan.oss-cn-qingdao.aliyuncs.com
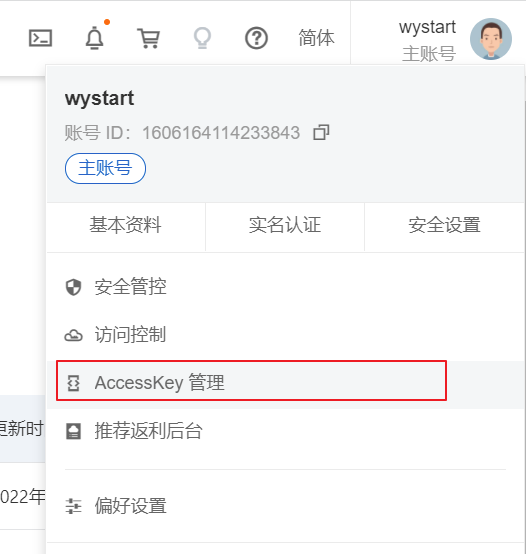
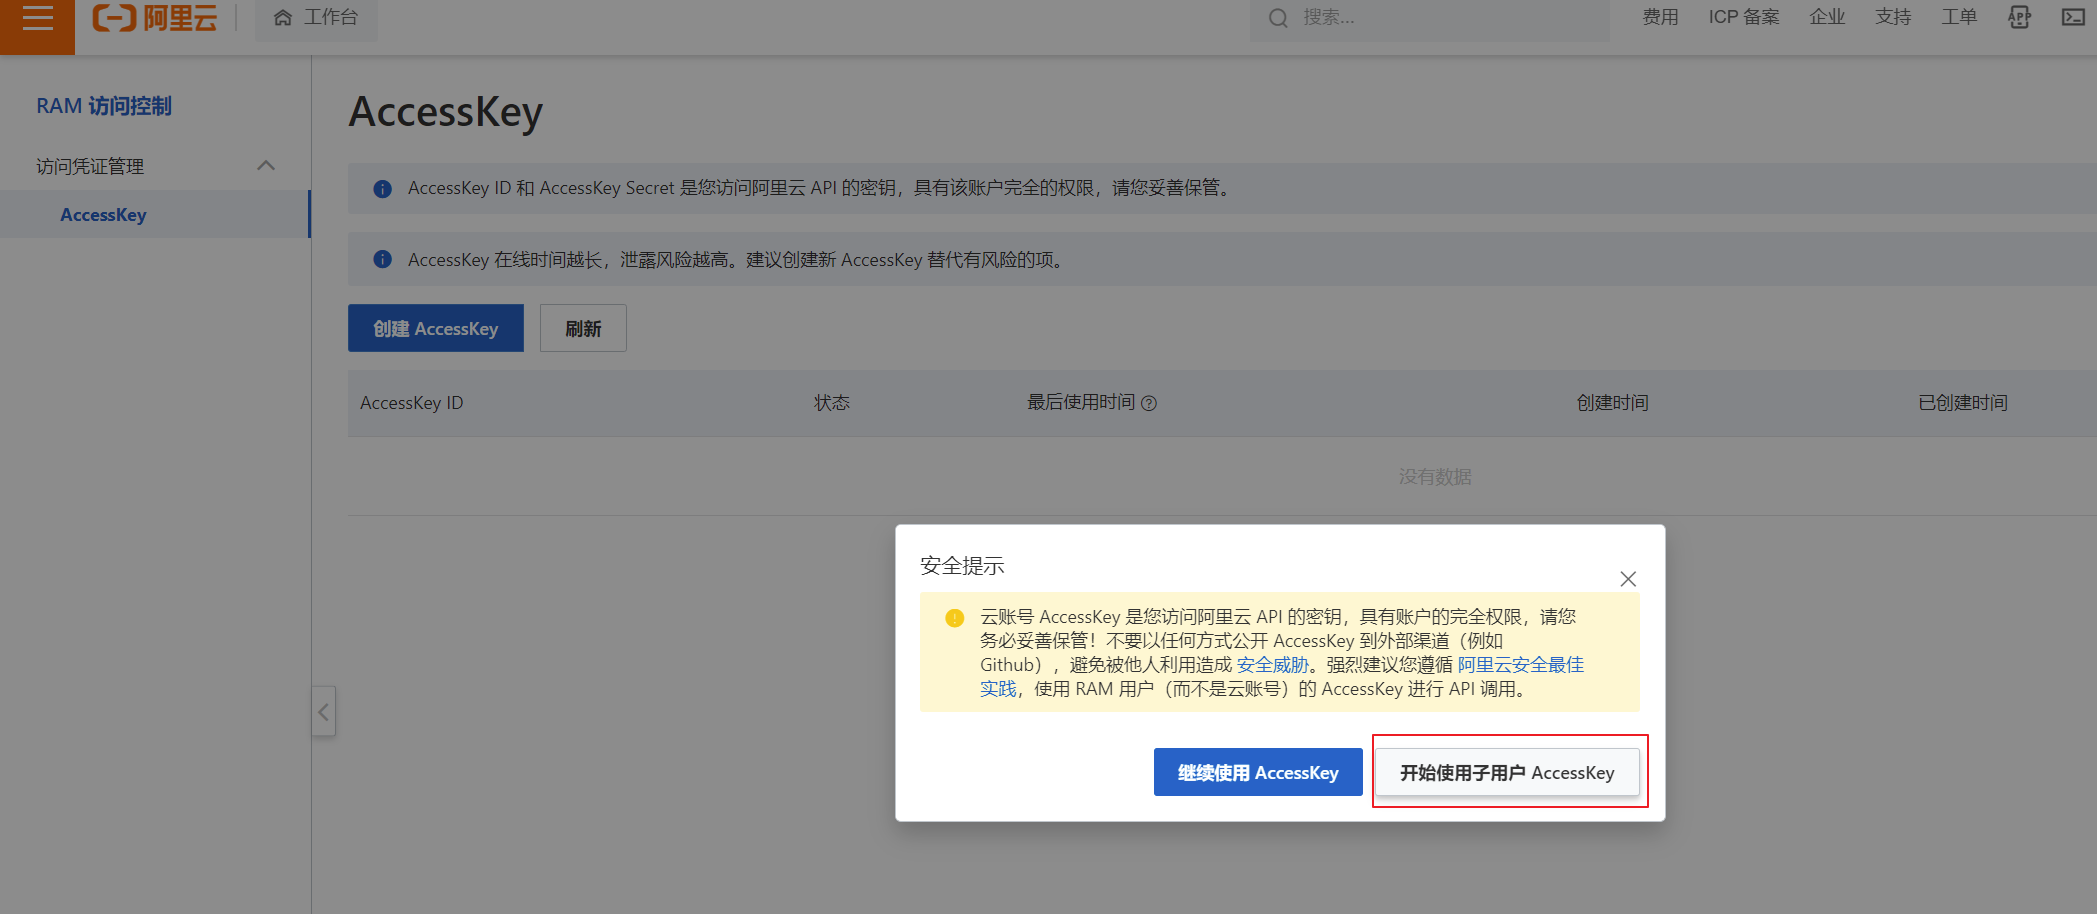
accessKeyId和accessKeySecret需要创建一个RAM账号:
接下来就是具体如何获取的示例:
-
获取Endpoint
、AccessKey ID、AccessKey Secret-
Endpoint
-
AccessKey ID
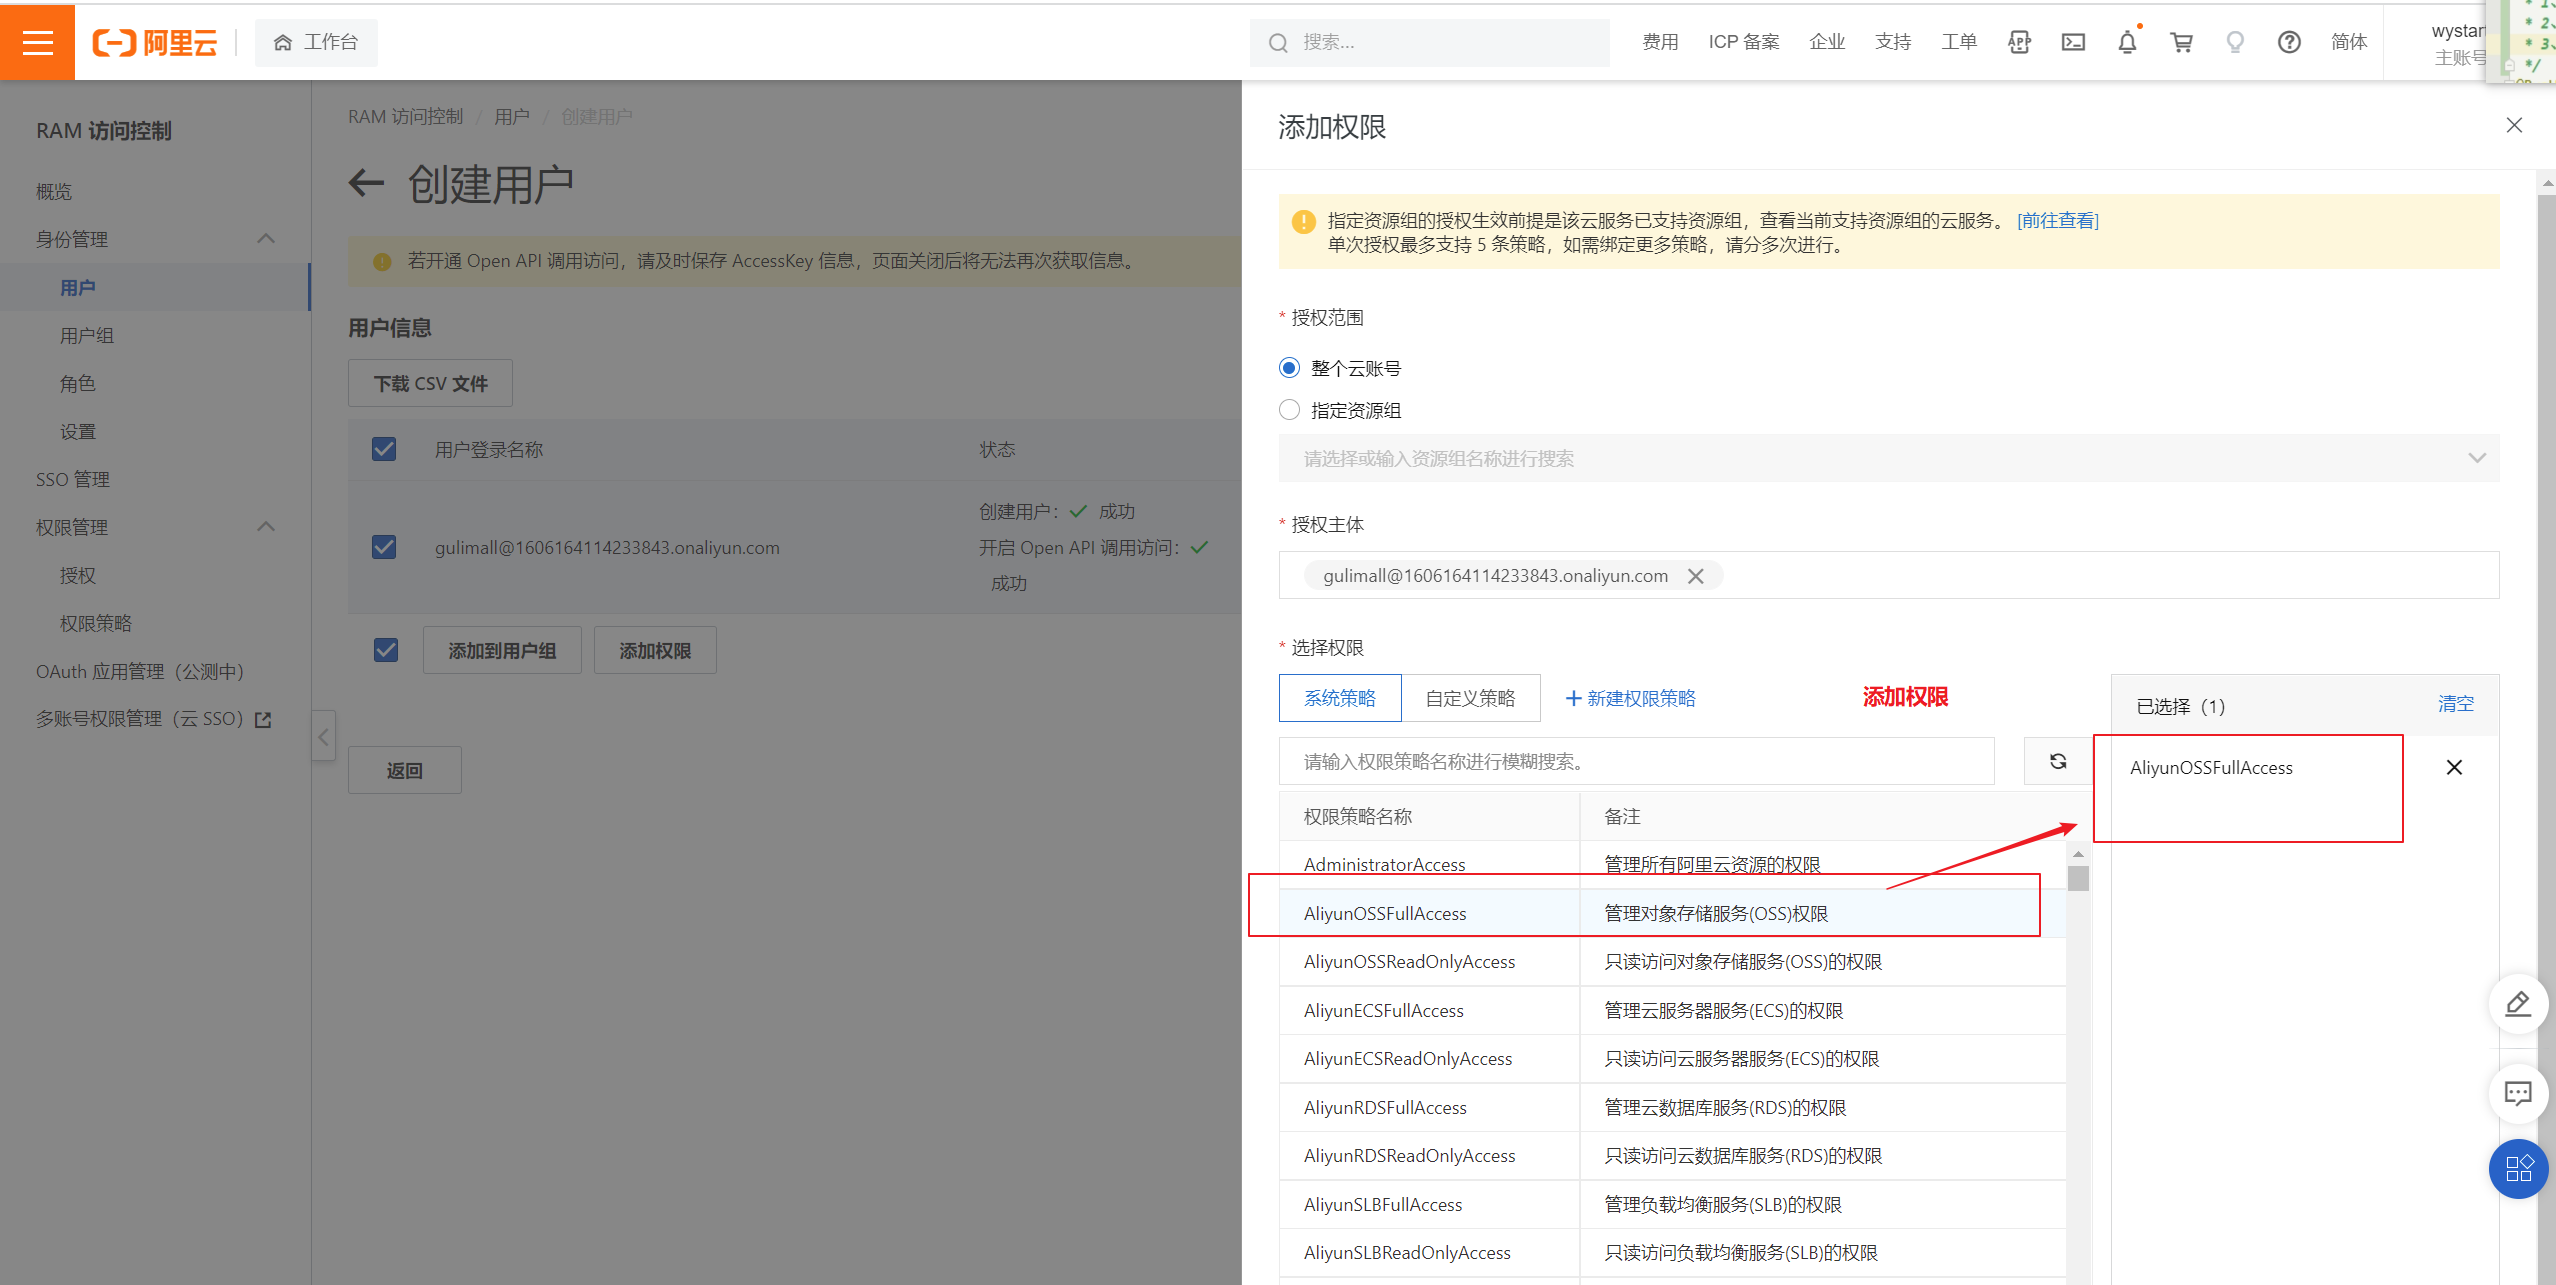
、AccessKey Secret 注意,这里我们需要创建阿里云的子账户,这样可以避免我们主账号直接在网络上进行暴露。
-
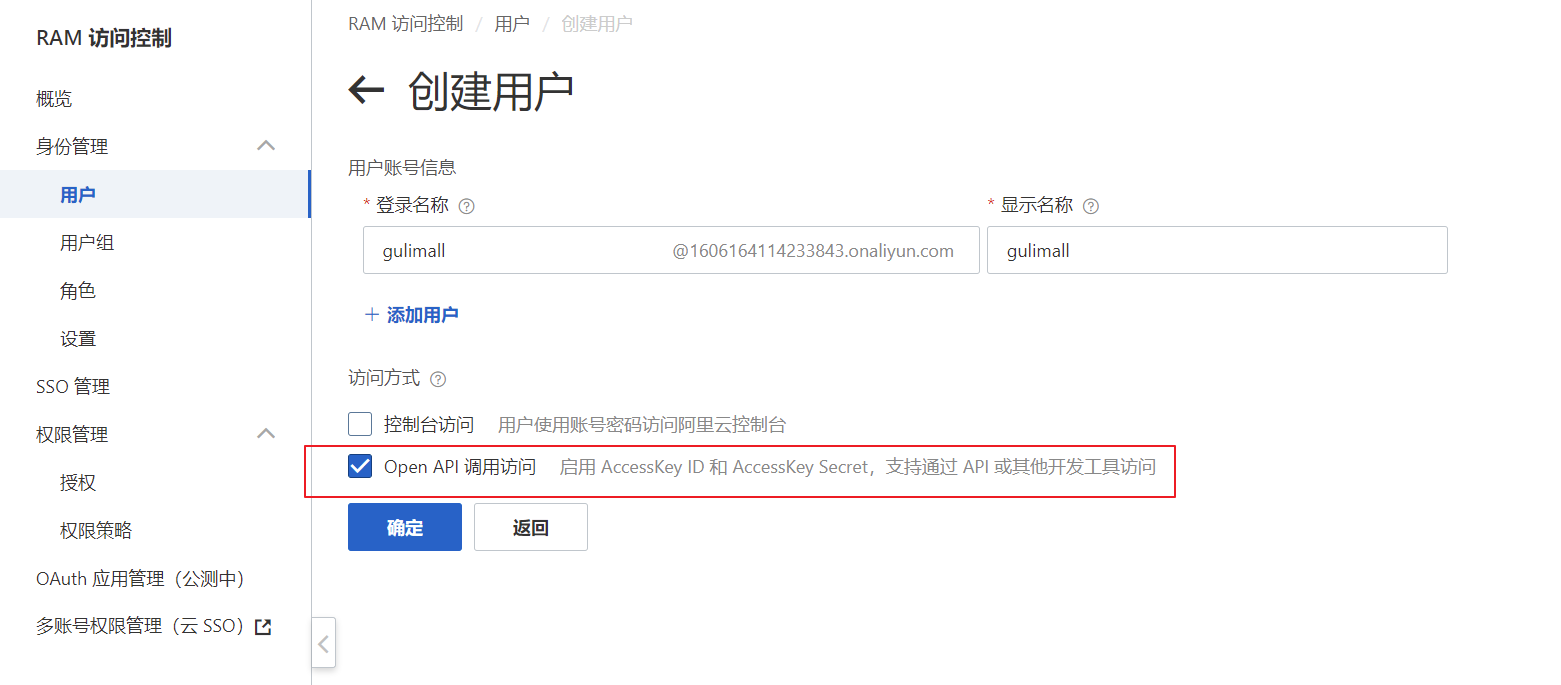
对子账户分配权限,管理OSS对象存储服务。这里我们允许读和写,方便我们实现上传功能。
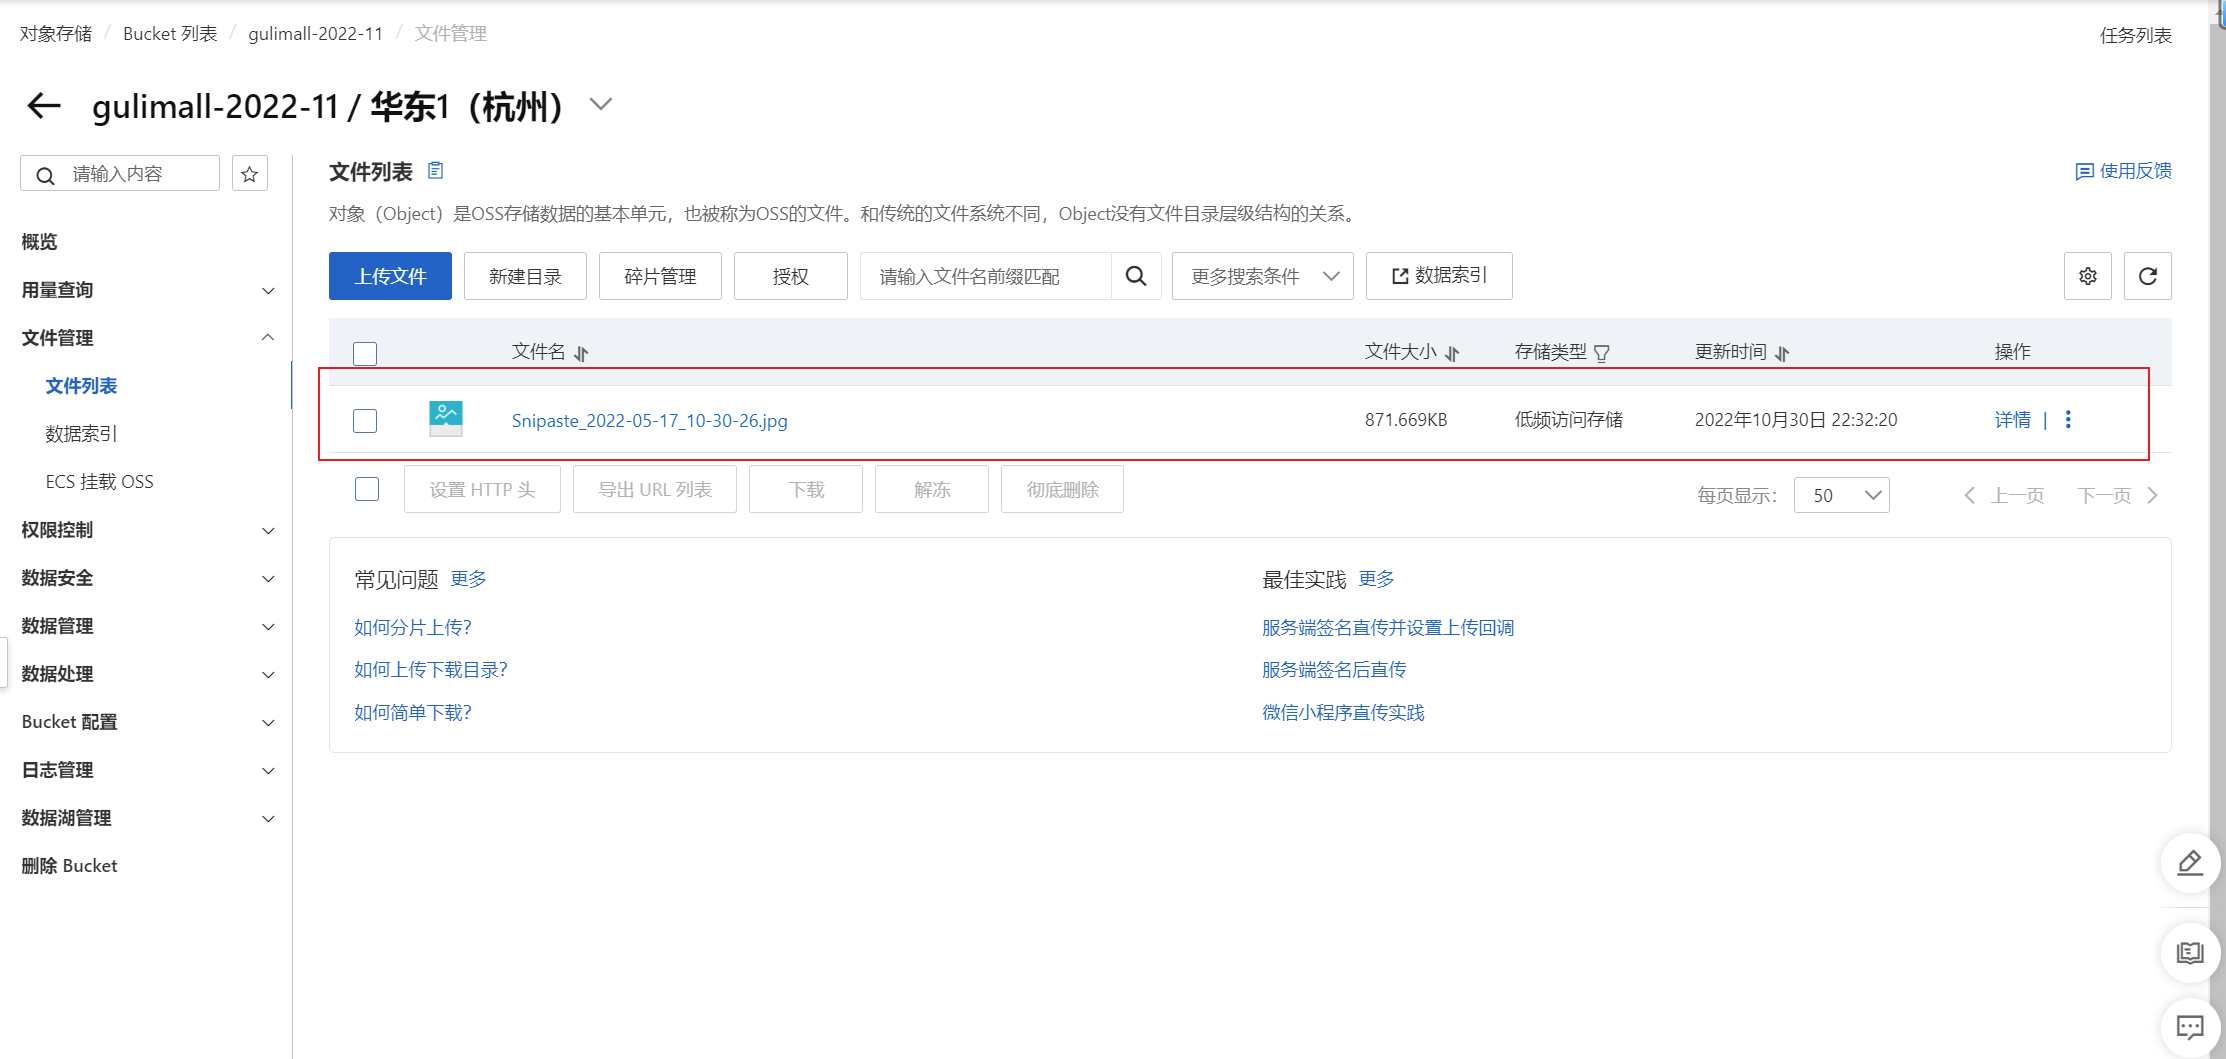
测试: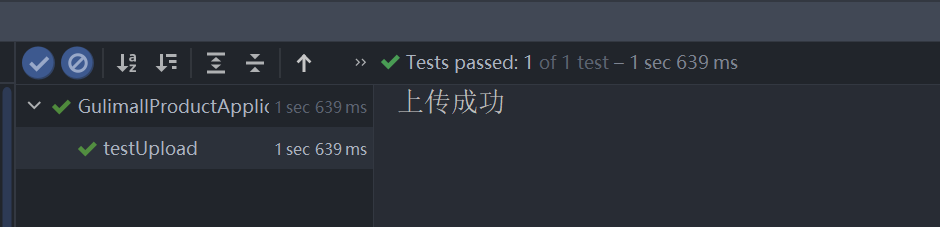

可以看到上传到云服务成功。
-
直接使用
SpringCloud Alibaba已经封装好的 oss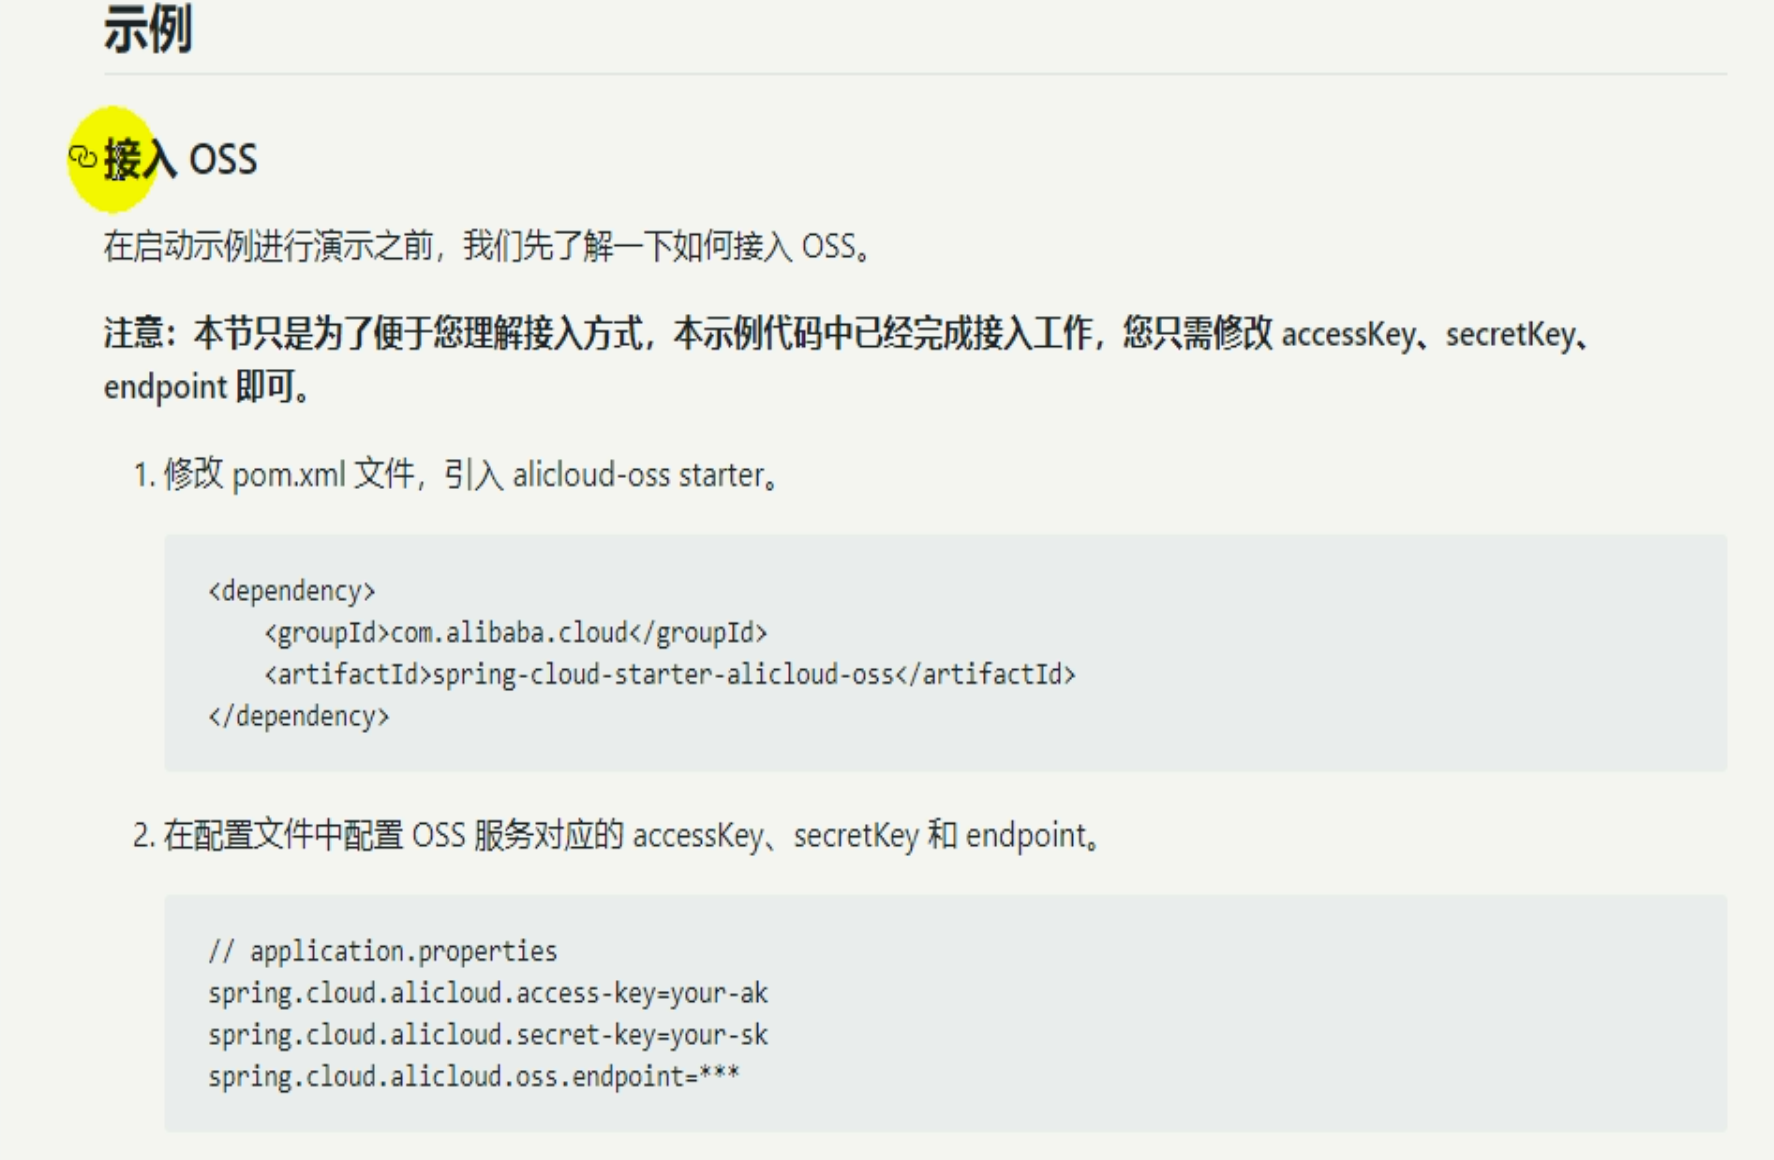
-
引入依赖(和老师版本一致)
<dependency><groupId>com.alibaba.cloud</groupId><artifactId>spring-cloud-starter-alicloud-oss</artifactId><version>2.1.0.RELEASE</version></dependency> -
在 gulimall-product 的 application.yml文件中配置
1 创建“AccessKey ID”和“AccessKeySecret”2 配置key,secret和endpoint相关信息alicloud:access-key: LTAI5tABh1pjUprZGrKi92w1secret-key: enVYmXd9p1sHvVub5gBf21E3tjuIFJoss:endpoint: oss-cn-hangzhou.aliyuncs.com测试:
@AutowiredOSSClient ossClient;@Testpublic void testUpload() throws FileNotFoundException {// // Endpoint以杭州为例,其它Region请按实际情况填写。// String endpoint = "oss-cn-hangzhou.aliyuncs.com";// // 云账号AccessKey有所有API访问权限,建议遵循阿里云安全最佳实践,创建并使用RAM子账号进行API访问或日常运维,请登录 https://ram.console.aliyun.com 创建。// String accessKeyId = "LTAI5tABh1pjUprZGrKi92w1";// String accessKeySecret = "enVYmXd9p1sHvVub5gBf21E3tjuIFJ";//// // // 创建OSSClient实例。// OSS ossClient = new OSSClientBuilder().build(endpoint, accessKeyId, accessKeySecret);// 上传文件流。InputStream inputStream = new FileInputStream("F:\\JAVA listen\\尚硅谷Java学科全套教程(总207.77GB)\\谷粒商城\\课件\\课件和文档\\基础篇\\资料\\pics\\0d40c24b264aa511.jpg");ossClient.putObject("gulimall-wystart", "0d40c24b264aa511.jpg", inputStream);// 关闭OSSClient。ossClient.shutdown();System.out.println("上传成功");}测试,同样可以成功上传。
注意:
视频中将阿里巴巴oss存储服务依赖加到gulimall-common中,但是这个时候如果启动product是会报错的,原因是其他微服务都依赖了gulimall-common服务,如果其他微服务没有进行相关配置,会报依赖循环的错误,导致启动失败。但是后面我们创建一个专属于第三方服务的微服务,所以如果你要在这里跟着老师的步骤,进行测试的话,最好的建议就是将阿里云服务的oss进行单独引入到product服务,并将common中的注释掉。
6.2.4 新建第三方服务微服务工程并完成文件上传功能
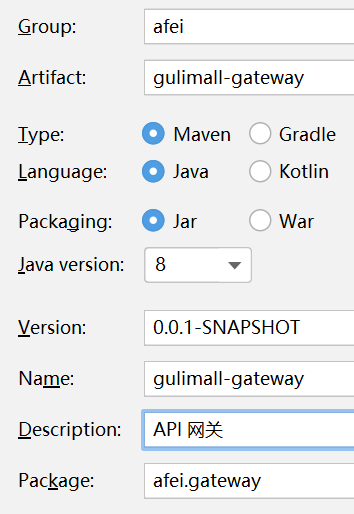
我们将文件上传或者以后的短信验证这些第三方服务抽取出来放到一个专门的第三方微服务的工程项目中。gulimall-third-party
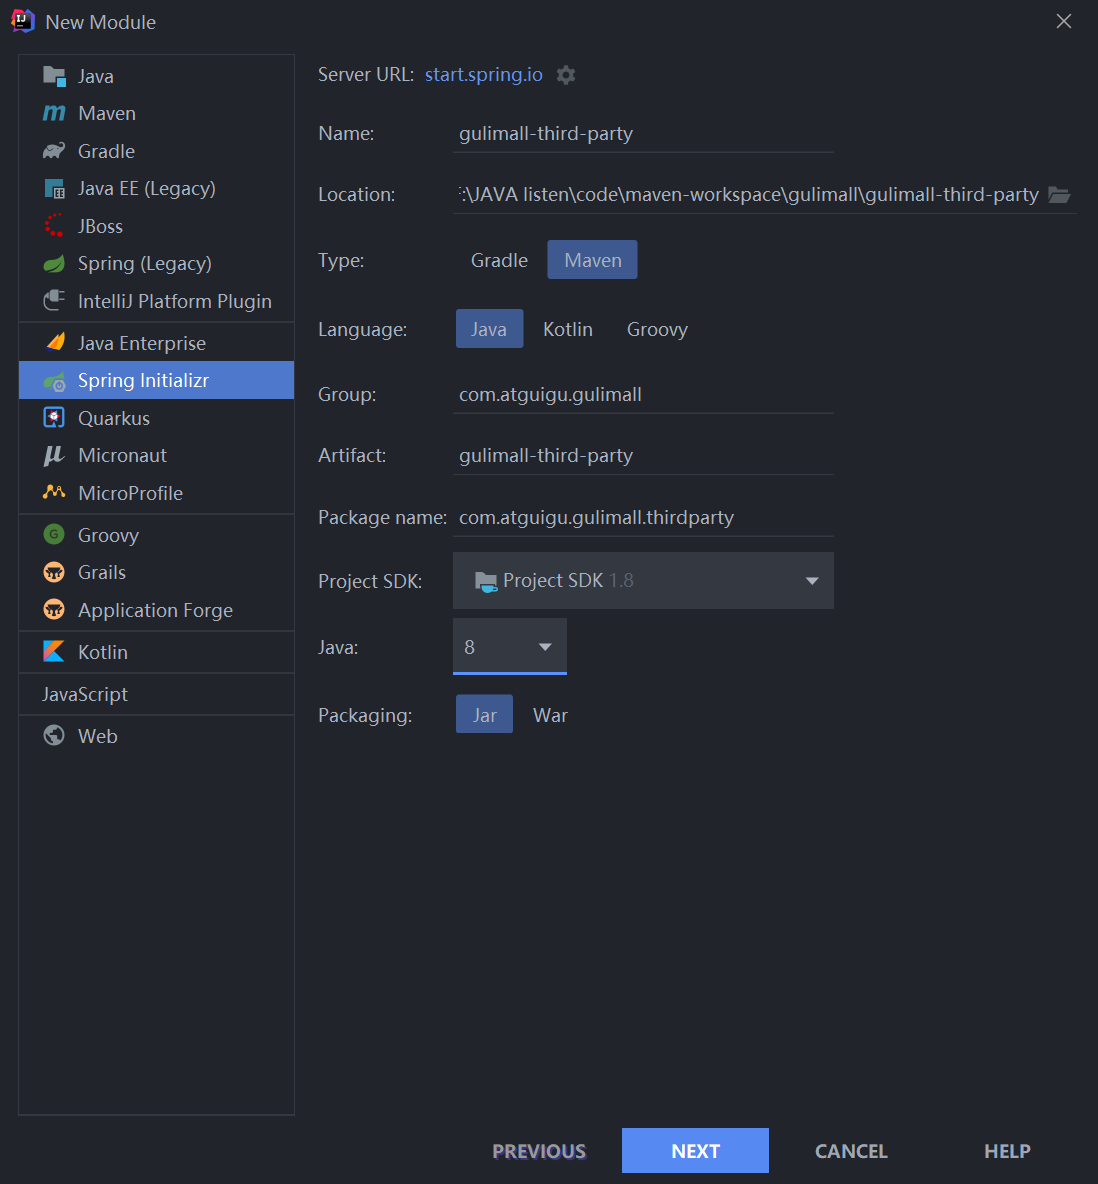
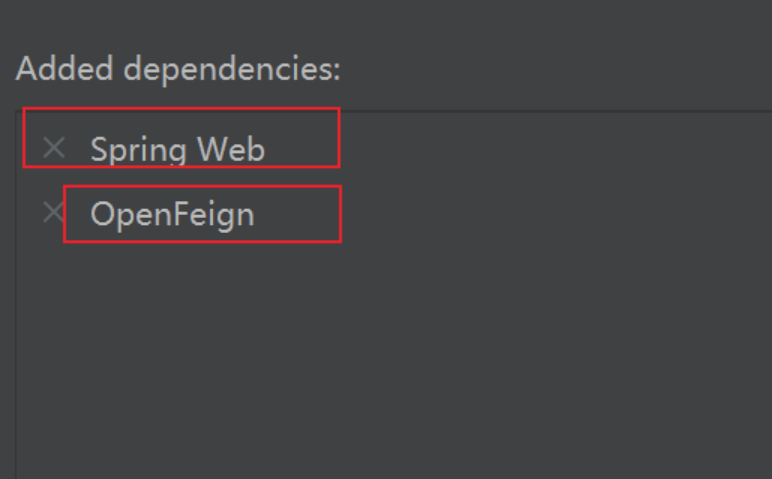
- 照例引入springweb和openfeign
- 完善 gulimall-third-party 的 pom 文件
oss依赖
添加依赖,将原来 gulimall-common 中的“spring-cloud-starter-alicloud-oss”依赖移动到该项目中,让该微服务专门管理第三方服务<!--        阿里云oss存储服务--><dependency><groupId>com.alibaba.cloud</groupId><artifactId>spring-cloud-starter-alicloud-oss</artifactId><version>2.1.0.RELEASE</version></dependency>引入gulimall-common,注意在其中排除mybatisplus依赖。如果不排除,启动会报错。<dependency><groupId>com.atguigu.gulimall</groupId><artifactId>gulimall-common</artifactId><version>0.0.1-SNAPSHOT</version><exclusions><exclusion><groupId>com.baomidou</groupId><artifactId>mybatis-plus-boot-starter</artifactId></exclusion></exclusions></dependency>另外也需要在“pom.xml”文件中,添加如下的依赖管理
<dependencyManagement><dependencies><dependency><groupId>org.springframework.cloud</groupId><artifactId>spring-cloud-dependencies</artifactId><version>${spring-cloud.version}</version><type>pom</type><scope>import</scope></dependency><dependency><groupId>com.alibaba.cloud</groupId><artifactId>spring-cloud-alibaba-dependencies</artifactId><version>2.1.0.RELEASE</version><type>pom</type><scope>import</scope></dependency></dependencies></dependencyManagement>-
将服务注册和配置到nacos中
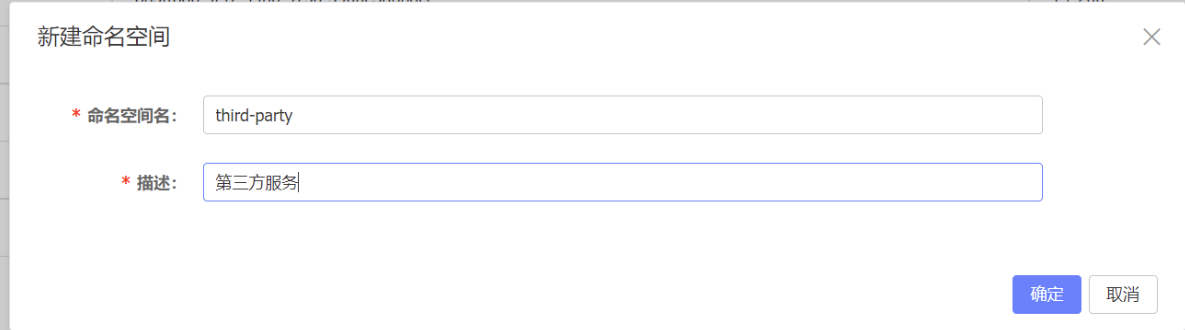
-
新建 第三方服务的命名空间 ,以后相关配置我们就放在该命名空间下。
-
创建 oss.yml配置文件,以后线上生产时文件上传配置就放在此配置文件中

-
创建 bootstrap.properties文件,进行nacos的配置,此外每一个微服务都需要有对应的微服务名字
spring.application.name=gulimall-third-party # nacos配置中心配置 spring.cloud.nacos.config.server-addr=127.0.0.1:8848 spring.cloud.nacos.config.namespace=844086b8-9b51-4e08-a69d-1e76cfbf4485#以后我们就将文件上传的相关配置放在oss.yml下 spring.cloud.nacos.config.ext-config[0].data-id=oss.yml spring.cloud.nacos.config.ext-config[0].group=DEFAULT_GROUP spring.cloud -
在 application.yml 文件中将服务注册进nacos:这里我们将 oss相关配置也先配置进来,以后线上生产的时候再放到 nacos 上。
spring:cloud:nacos:discovery:server-addr: 127.0.0.1:8848alicloud:access-key: LTAI5tABh1pjUprZGrKi92w1secret-key: enVYmXd9p1sHvVub5gBf21E3tjuIFJoss:endpoint: oss-cn-hangzhou.aliyuncs.combucket: gulimall-wystartapplication:name: gulimall-third-partyserver:port: 30000 -
在 主启动类中添加服务发现注解
@EnableDiscoveryClient  //服务发现
@SpringBootApplication
public class GulimallThirdPartyApplication {
-
1、单元测试
@AutowiredOSSClient ossClient;//测试文件上传到云服务器@Testpublic void testUpload() throws FileNotFoundException {// // Endpoint以杭州为例,其它Region请按实际情况填写。// String endpoint = "oss-cn-hangzhou.aliyuncs.com";// // 云账号AccessKey有所有API访问权限,建议遵循阿里云安全最佳实践,创建并使用RAM子账号进行API访问或日常运维,请登录 https://ram.console.aliyun.com 创建。// String accessKeyId = "LTAI5tABh1pjUprZGrKi92w1";// String accessKeySecret = "enVYmXd9p1sHvVub5gBf21E3tjuIFJ";//// // // 创建OSSClient实例。// OSS ossClient = new OSSClientBuilder().build(endpoint, accessKeyId, accessKeySecret);// 上传文件流。InputStream inputStream = new FileInputStream("F:\\JAVA listen\\尚硅谷Java学科全套教程(总207.77GB)\\谷粒商城\\课件\\课件和文档\\基础篇\\资料\\pics\\0d40c24b264aa511.jpg");ossClient.putObject("gulimall-wystart", "hahaha.jpg", inputStream);// 关闭OSSClient。ossClient.shutdown();System.out.println("上传成功");}成功上传。

2、服务端签名直传并设置上传回调
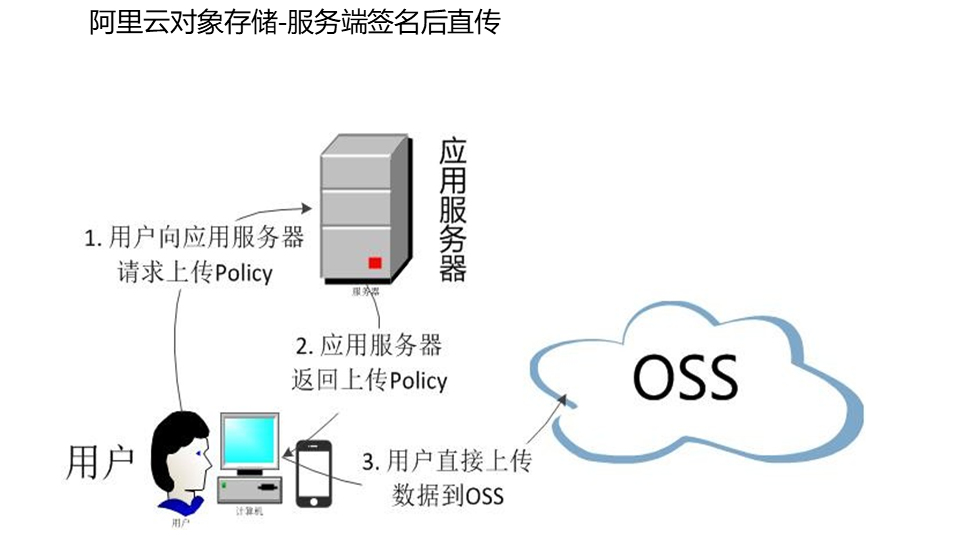
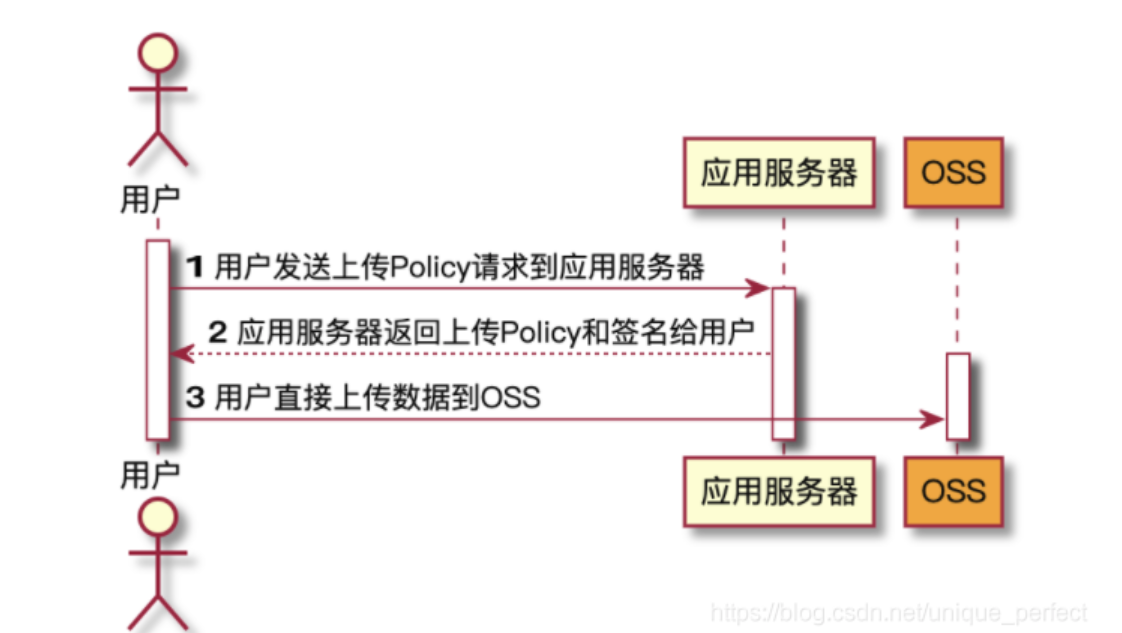
接下来我们仔细讲解一下 利用 服务端签名后直传的原理
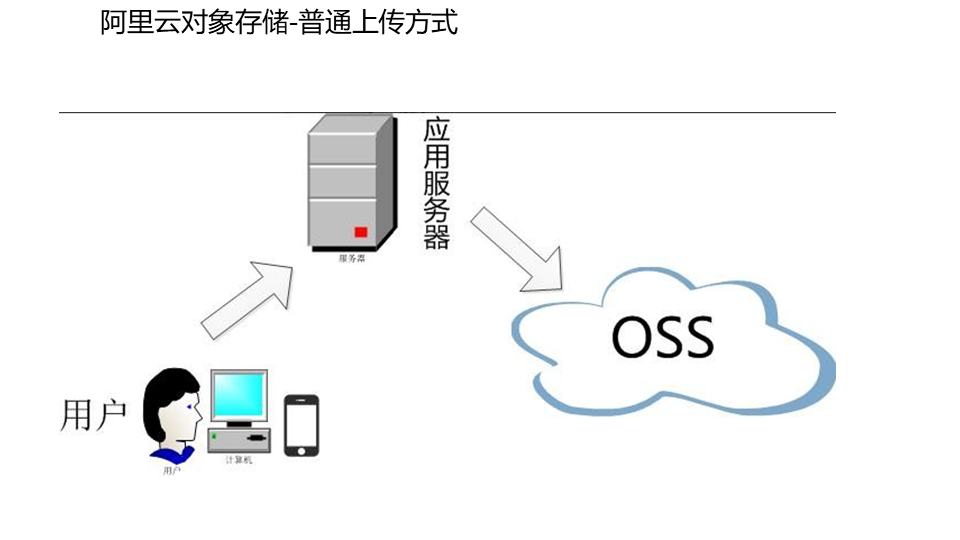
背景
采用JavaScript客户端直接签名(参见JavaScript客户端签名直传)时,AccessKeyID和AcessKeySecret会暴露在前端页面,因此存在严重的安全隐患。因此,OSS提供了服务端签名后直传的方案。

服务端签名后直传的原理如下:
用户发送上传Policy请求到应用服务器。
应用服务器返回上传Policy和签名给用户。
用户直接上传数据到OSS。
- 参考官网进行相关配置
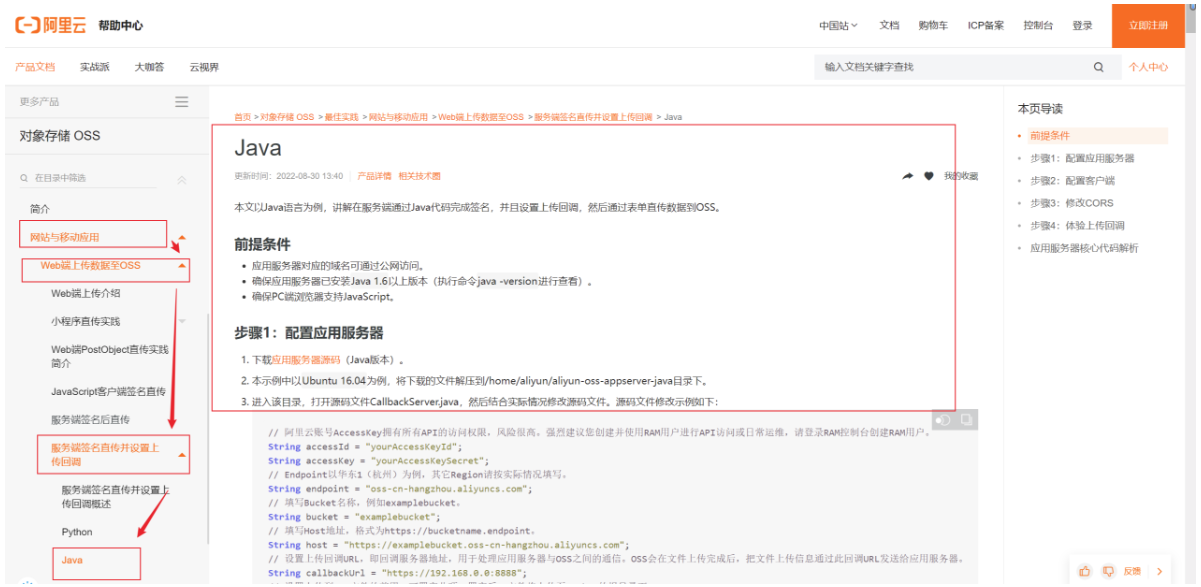
阿里云OSS存储服务中对于服务器签名直传这部分的文档。链接在下面:
https://help.aliyun.com/document_detail/91868.htm?spm=a2c4g.11186623.0.0.1607566a7iSEvF#concept-ahk-rfz-2fb
我们参考这个文档创建属于我们自己的配置。
-
编写 com.atguigu.gulimall.thirdparty.controller.OssController
@RestController
public class OssController {@AutowiredOSS ossClient;@Value("${spring.cloud.alicloud.oss.endpoint}")//从配置文件动态读取,不写死private String endpoint;@Value("${spring.cloud.alicloud.oss.bucket}")private String bucket;@Value("${spring.cloud.alicloud.access-key}")private String accessId;@RequestMapping("/oss/policy")public Map<String,String> policy() {// 填写Host地址,格式为https://bucketname.endpoint。String host = "https://" + bucket + "." + endpoint;//自定义日期格式文件夹,以后上传的文件统一放在当天的文件夹中String format = new SimpleDateFormat("yyyy-MM-dd").format(new Date());// 设置上传到OSS文件的前缀,可置空此项。置空后,文件将上传至Bucket的根目录下。String dir = format + "/";//用户上传时指定的前缀Map<String, String> respMap = null;try {long expireTime = 30;long expireEndTime = System.currentTimeMillis() + expireTime * 1000;Date expiration = new Date(expireEndTime);PolicyConditions policyConds = new PolicyConditions();policyConds.addConditionItem(PolicyConditions.COND_CONTENT_LENGTH_RANGE, 0, 1048576000);policyConds.addConditionItem(MatchMode.StartWith, PolicyConditions.COND_KEY, dir);String postPolicy = ossClient.generatePostPolicy(expiration, policyConds);byte[] binaryData = postPolicy.getBytes("utf-8");String encodedPolicy = BinaryUtil.toBase64String(binaryData);String postSignature = ossClient.calculatePostSignature(postPolicy);respMap = new LinkedHashMap<String, String>();respMap.put("accessId", accessId);respMap.put("policy", encodedPolicy);respMap.put("signature", postSignature);respMap.put("dir", dir);respMap.put("host", host);respMap.put("expire", String.valueOf(expireEndTime / 1000));// respMap.put("expire", formatISO8601Date(expiration));} catch (Exception e) {// Assert.fail(e.getMessage());System.out.println(e.getMessage());}return respMap;}
}
测试 http://localhost:30000/oss/policy

- 以后在上传文件时的统一访问路径为“ http://localhost:88/api/thirdparty/oss/policy”,即利用 网关统一路由,由网关来进行转发。
在“gulimall-gateway”中配置路由规则:
- id: third_party_routeuri: lb://gulimall-third-partypredicates:- Path=/api/thirdparty/**filters:- RewritePath=/api/thirdparty(?<segment>/?.*), /$\{segment}#http://localhost:88/api/thirdparty/oss/policy http://localhost:30000/oss/policy
测试是否能够正常跳转: http://localhost:88/api/thirdparty/oss/policy

成功。
-
前后端联调,实现文件上传。
-
将课件中的有关文件上传的资源复制。

-
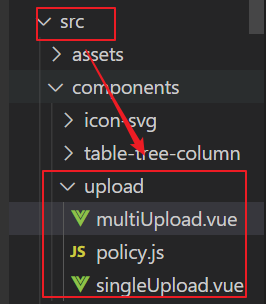
文件上传组件在/renren-fast-vue/src/components中
-
修改组件中
el-upload中的action属性,替换成自己的Bucket域名
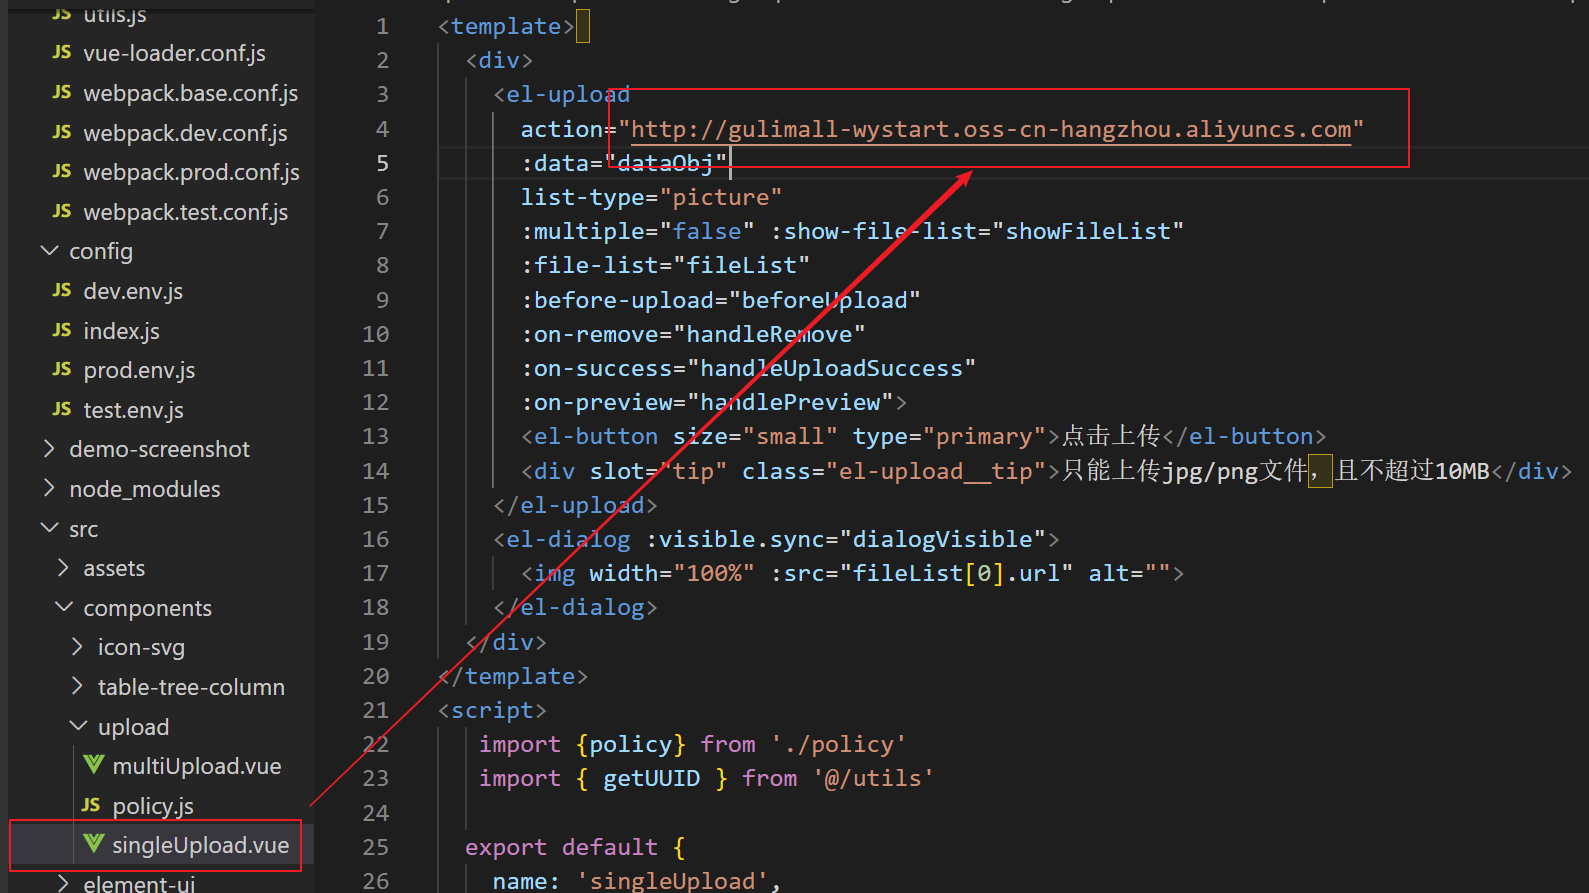
singleUpload.vue是单文件上传,multiUploca.vue是多文件上传。
- 把单个文件上传组件应用到
brand-add-or-update.vue
//在<script>标签中导入组件
import singleUpload from "@/components/upload/singleUpload"//在export default中声明要用到的组件components:{singleUpload},
<!--用新的组件替换原来的输入框--><el-form-item label="品牌logo地址" prop="logo"><singleUpload v-model="dataForm.logo"></singleUpload></el-form-item>我们在后端准备好了签名controller,那么前端是在哪里获取的呢policy.js import http from '@/utils/httpRequest.js' export function policy () {return new Promise((resolve, reject) => {http({url: http.adornUrl('/thirdparty/oss/policy'),method: 'get',params: http.adornParams({})}).then(({ data }) => {resolve(data)})}) }而文件上传前调用的方法: :before-upload=“beforeUpload” 发现该方法返回了一个new Promise,调用了policy(),该方法是policy.js中的 import { policy } from "./policy";.... beforeUpload(file) {let _self = this;return new Promise((resolve, reject) => {policy().then(response => {// 意思是说policy获取到签名后,把签名信息保存起来// console.log("这是什么${filename}");_self.dataObj.policy = response.data.policy;_self.dataObj.signature = response.data.signature;_self.dataObj.ossaccessKeyId = response.data.accessid;_self.dataObj.key = response.data.dir +getUUID()+"_${filename}";_self.dataObj.dir = response.data.dir;_self.dataObj.host = response.data.host;resolve(true);// 总的来说什么意思呢?// 上传之前先请求签名,保存起来签名// 根据action="http://gulimall-wystart.oss-cn-hangzhou.aliyuncs.com"// 结合data信息,提交到云端}).catch(err => {console.log("出错了...",err)reject(false);});});},在vue中看是response.data.policy,在控制台看response.policy。所以去java里面改返回值为R.return R.ok().put(“data”,respMap);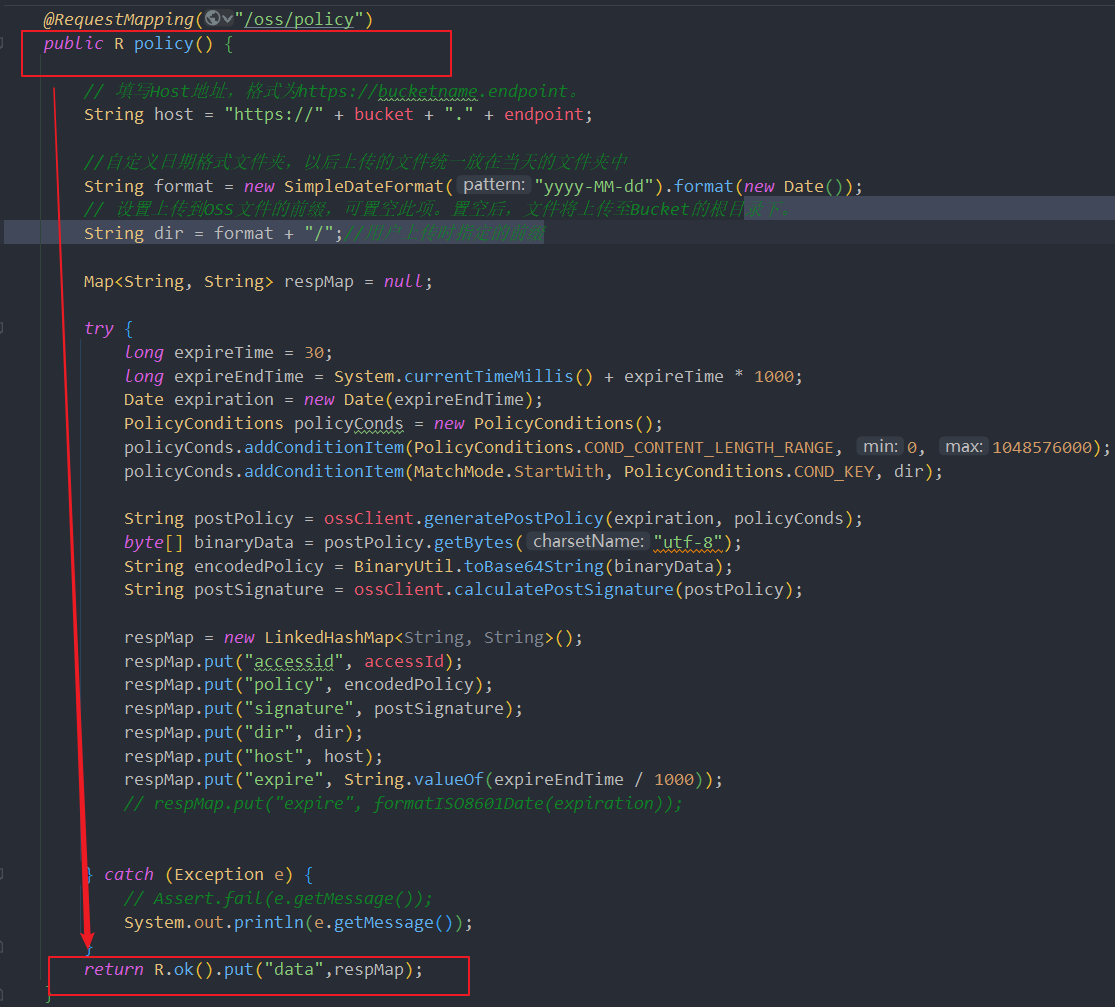
- 我们在进行启动的时候发现存在浏览器跨域问题

- 解决跨域问题,在bucket中设置跨域设置
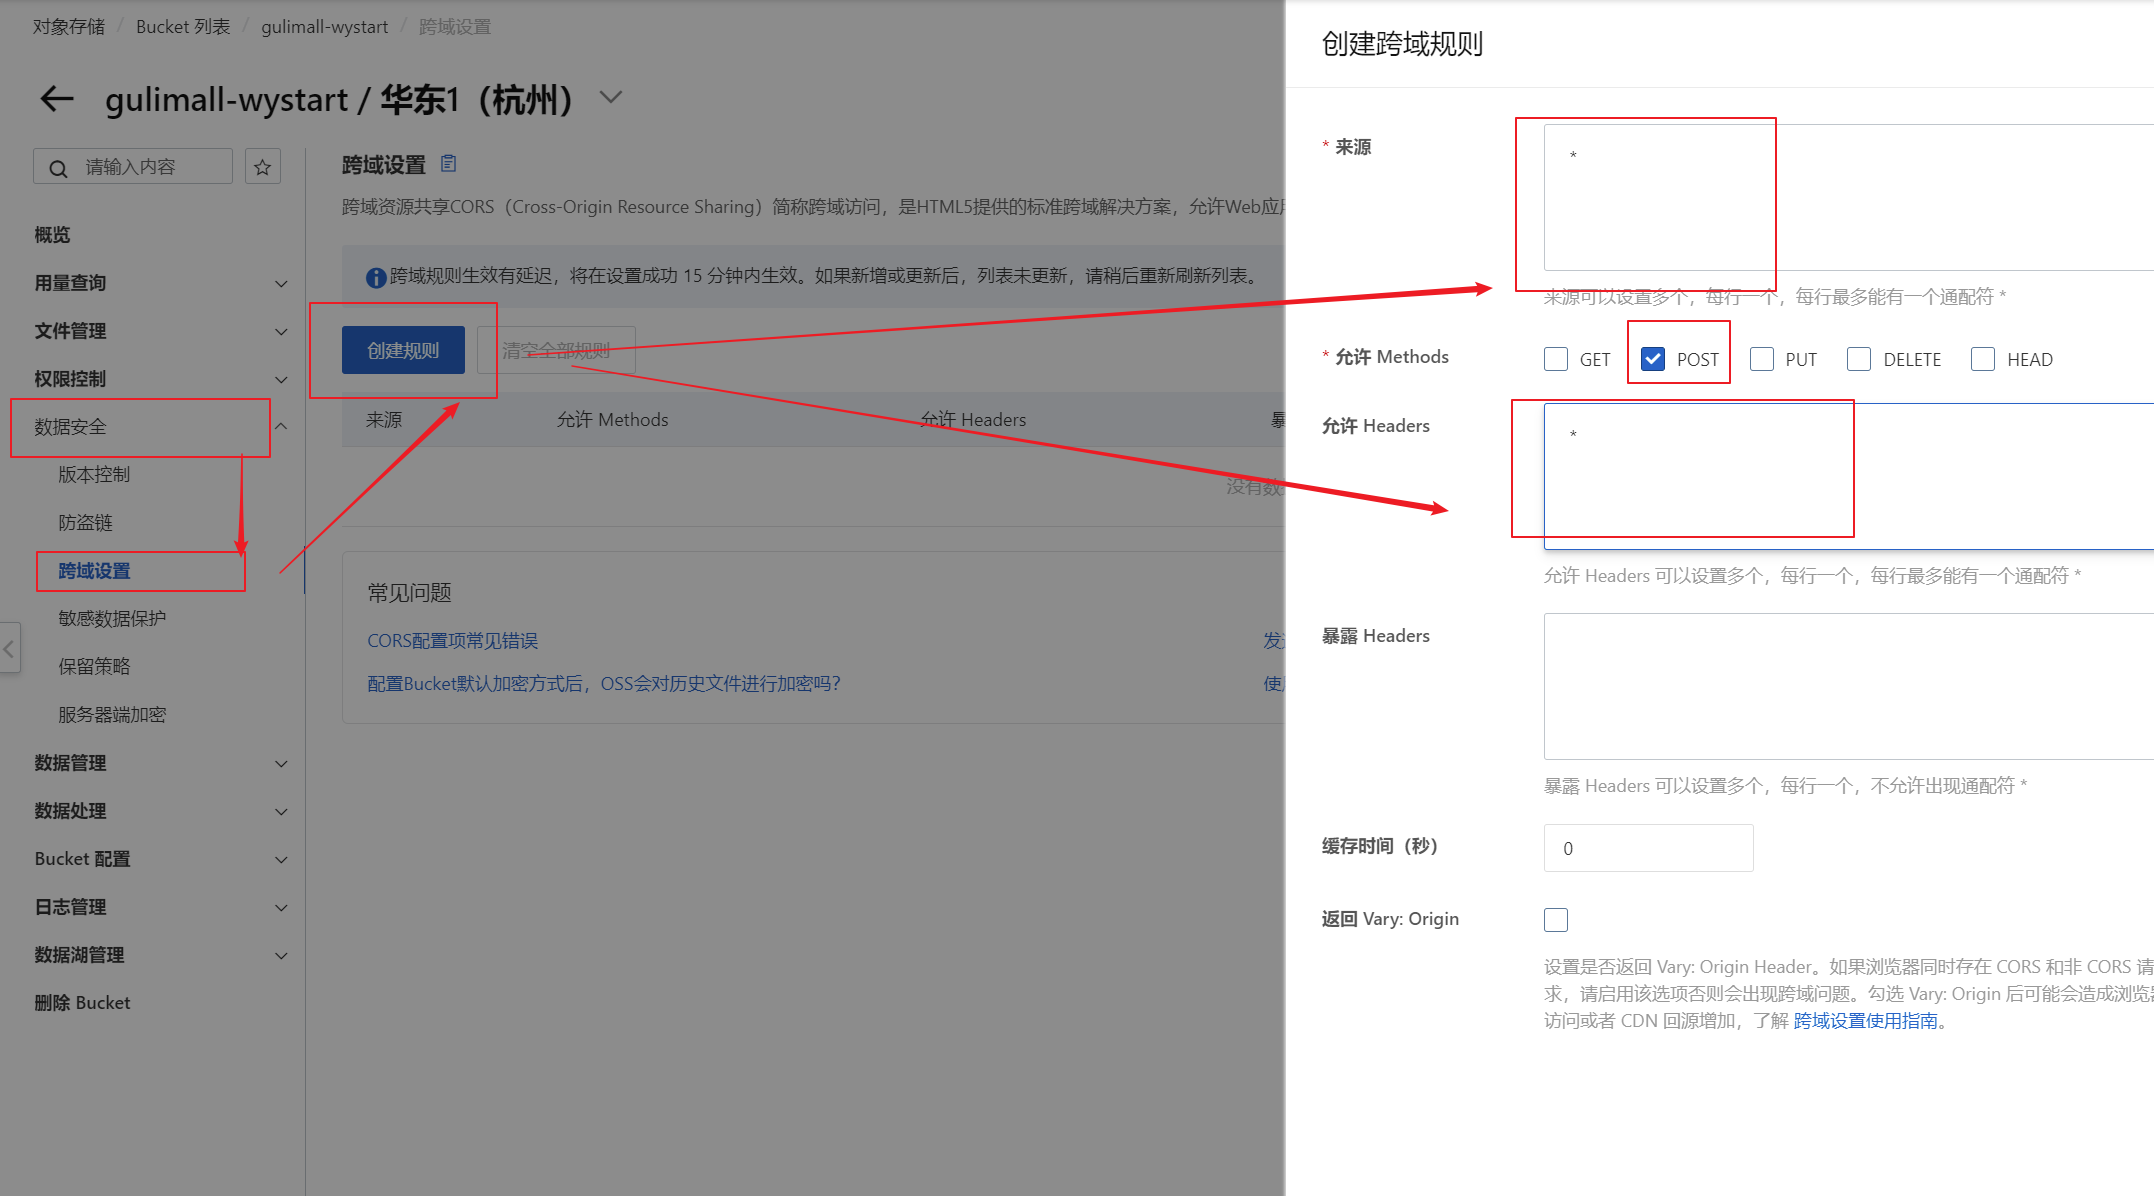
- 配置后点击图片上传,进行测试。
点击上传,拿到policy.阿里云服务器验证,上传。

测试完成。
-
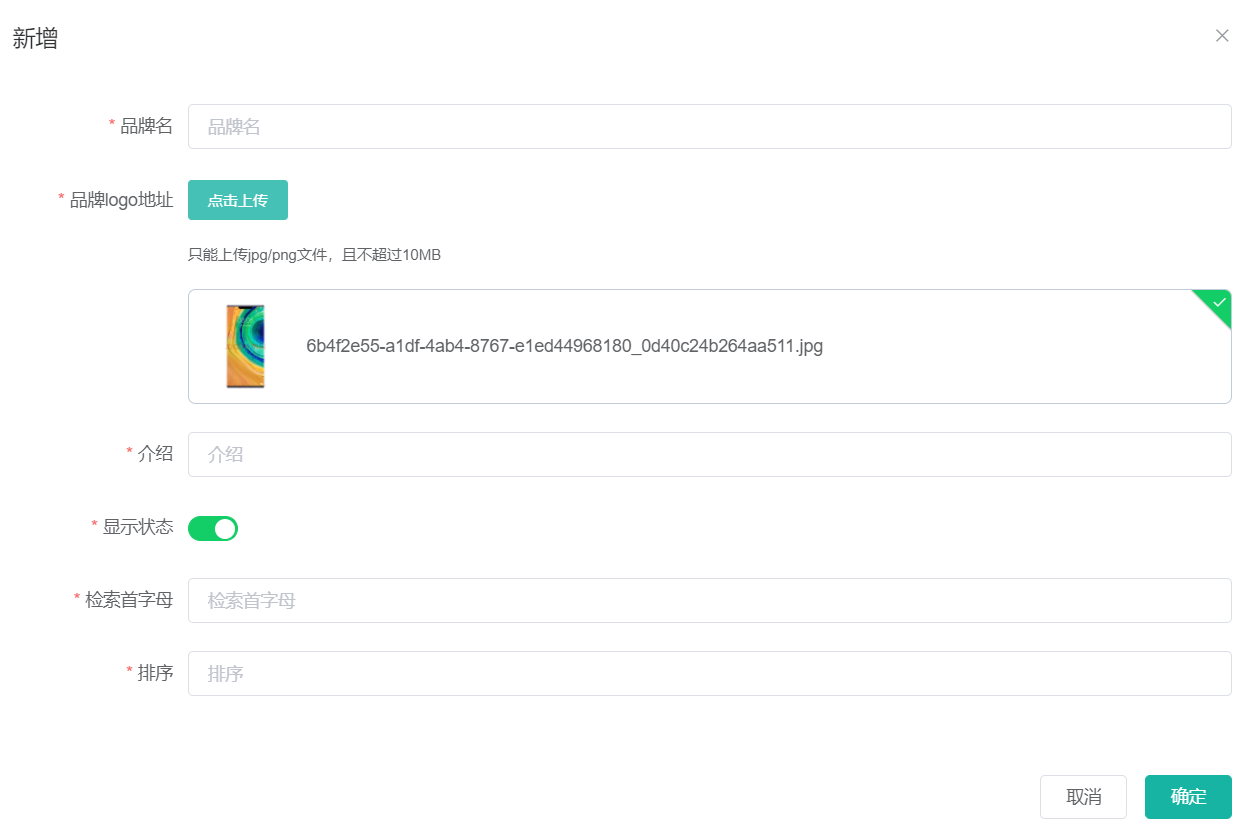
6.2.5 效果优化-显示图片
新增品牌,发现在品牌logo下面显示的是地址。应该显示图片。
- 在品牌logo下添加图片标签
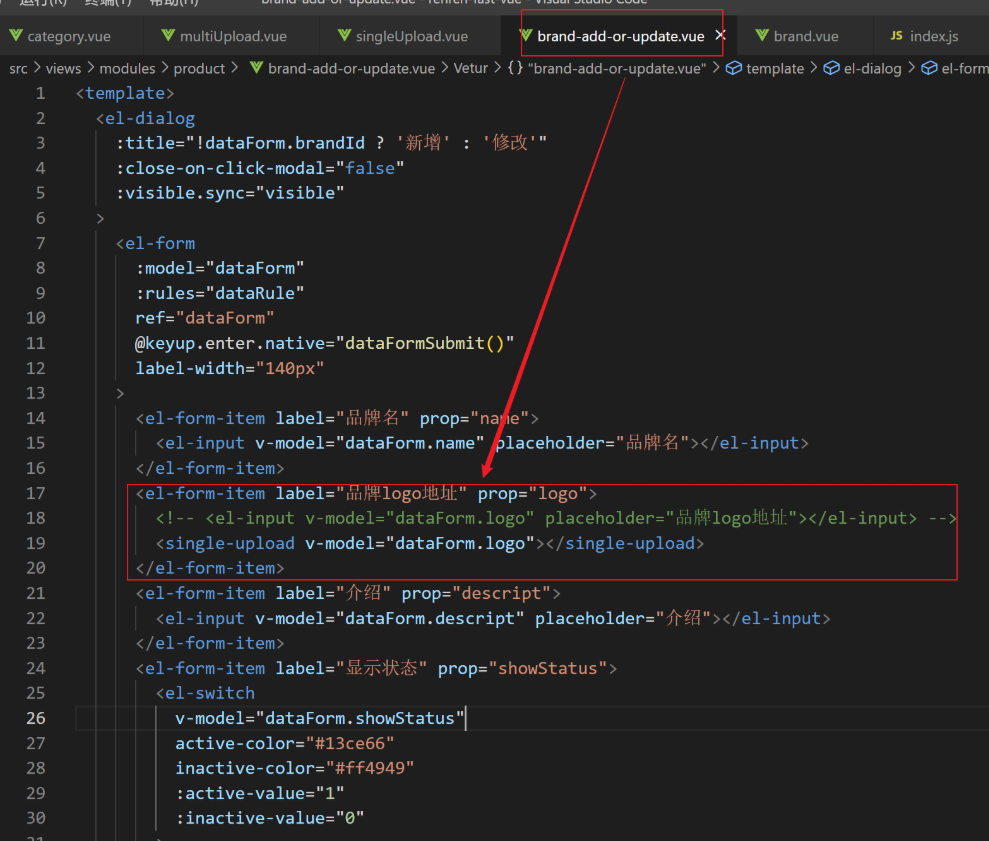
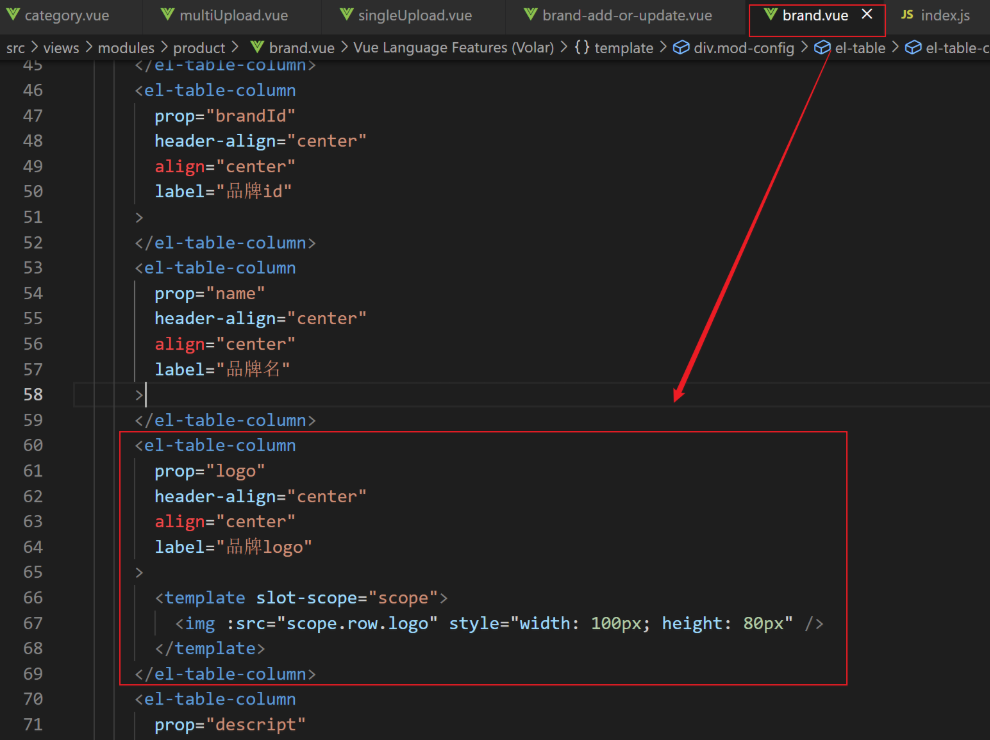
<el-form-item label="品牌logo地址" prop="logo"><!-- <el-input v-model="dataForm.logo" placeholder="品牌logo地址"></el-input> --><single-upload v-model="dataForm.logo"></single-upload>
</el-form-item><el-table-column prop="logo" header-align="center" align="center" label="品牌logo地址"><template slot-scope="scope"><img :src="scope.row.logo" style="width: 100px;height: 80px" /></template>
</el-table-column>
成功显示:

6.2.6 前端表单校验
- 首字母只能为a-z或者A-Z的一个字母
- 排序必须是大于等于0的一个整数
el-form中rules表示校验规则
修改brand-add-or-update如下: :active-value="1"         :inactive-value="0"  # 激活为1,不激活为0<el-switch v-model="dataForm.showStatus" active-color="#13ce66" inactive-color="#ff4949" :active-value="1"  :inactive-value="0">// 添加表单校验&自定义校验器
//排序加上.number表示要接受一个数字
<el-input v-model.number="dataForm.sort" placeholder="排序"></el-input>//首字母校验规则firstLetter: [{validator: (rule, value, callback) => {if (value == '') {callback(new Error('首字母必须填写'));} else if (!/^[a-zA-Z]$/.test(value)) {callback(new Error('首字母必须a-z或者A-Z之间'));} else {callback();}},trigger: 'blur',},],//排序字段校验规则sort: [{validator: (rule, value, callback) => {if (value == "") {callback(new Error("排序字段必须填写"));} else if (!Number.isInteger(parseInt(value)) || parseInt(value) < 0) {callback(new Error("排序字段必须是一个整数"));} else {callback();}},trigger: 'blur'}],
6.2.7 JSR303数字校验
JSR3031)、给Bean添加校验注解:javax.validation.constraints,并定义自己的message提示* 2)、开启校验功能@Valid* 效果:校验错误以后会有默认的响应;* 3)、给校验的bean后紧跟 一个BindingResult,就可以获取到校验的结果* 4)、分组校验(多场景的复杂校验)* 1)、@NotBlank(message = "品牌名必须提交",groups = {AddGroup.class,UpdateGroup.class})* 给校验注解标注什么情况需要进行校验* 2)、@Validated({AddGroup.class})* 3)、默认没有指定分组的校验注解比如@NotBlank这样,在分组校验情况@Validated({AddGroup.class})下不生效,它只会在不分组的情况下生效。* 5)、自定义校验* 1)、编写一个自定义的校验注解* 2)、编写一个自定义的校验器 ConstraintValidator* 3)、关联自定义的校验器和自定义的校验注解* @Documented* @Constraint(validatedBy = {ListValueConstraintValidator.class【可以指定多个不同的校验器,适配不同类型的校验】})* @Target({ElementType.METHOD, ElementType.FIELD, ElementType.ANNOTATION_TYPE, ElementType.CONSTRUCTOR, ElementType.PARAMETER, ElementType.TYPE_USE})* @Retention(RetentionPolicy.RUNTIME)
* 统一的异常处理* @ControllerAdvice* 1)、编写异常处理类,使用@ControllerAdvice。* 2)、使用 @ExceptionHandler 标注方法可以处理的异常。
1、基本校验实现
- 引入validation-api依赖,在gulimall-common中。
<dependency><groupId>javax.validation</groupId><artifactId>validation-api</artifactId><version>2.0.1.Final</version></dependency>
- 在需要校验的bean上添加注解 开启校验功能
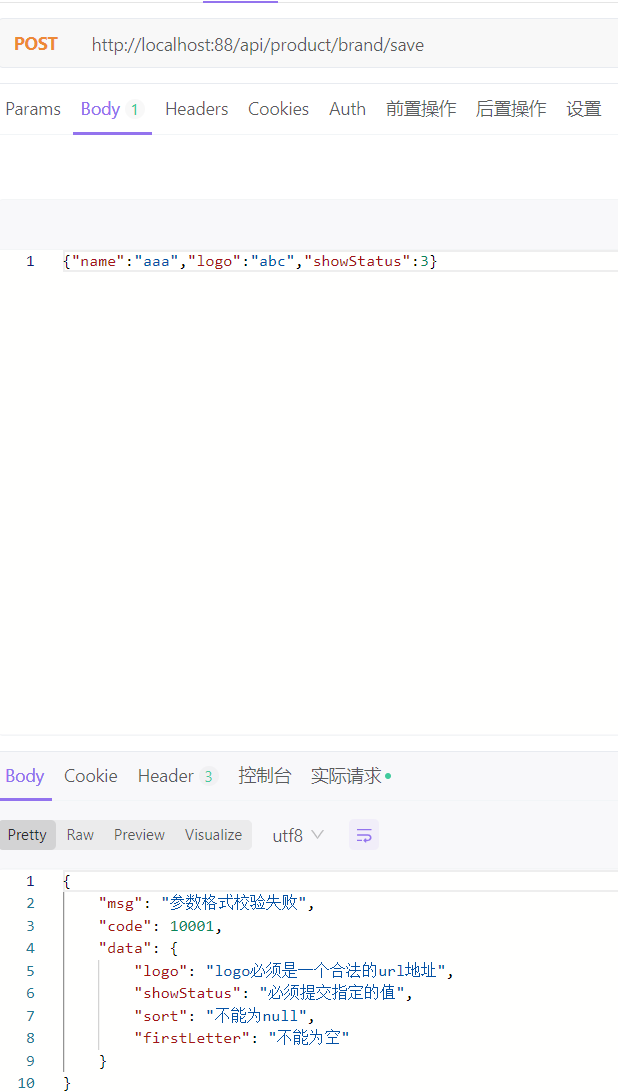
@Data
@TableName("pms_brand")
public class BrandEntity implements Serializable {private static final long serialVersionUID = 1L;/*** 品牌id*/@TableIdprivate Long brandId;/*** 品牌名*/@NotBlank(message = "品牌名必须提交")private String name;/*** 品牌logo地址*/@NotEmpty@URL(message = "logo必须是一个合法的url地址")private String logo;/*** 介绍*/private String descript;/*** 显示状态[0-不显示;1-显示]*/private Integer showStatus;/*** 检索首字母*/@NotEmpty@Pattern(regexp = "^[a-zA-Z]$", message = "检索首字母必须是一个字母")private String firstLetter;/*** 排序*/@NotNull@Min(value = 0, message = "排序必须大于等于0")private Integer sort;}- 在需要校验的方法上添加
@Valid注解,并返回提示信息 - 给校验的bean后紧跟着一个BindingResult,就可以获取到校验的结果
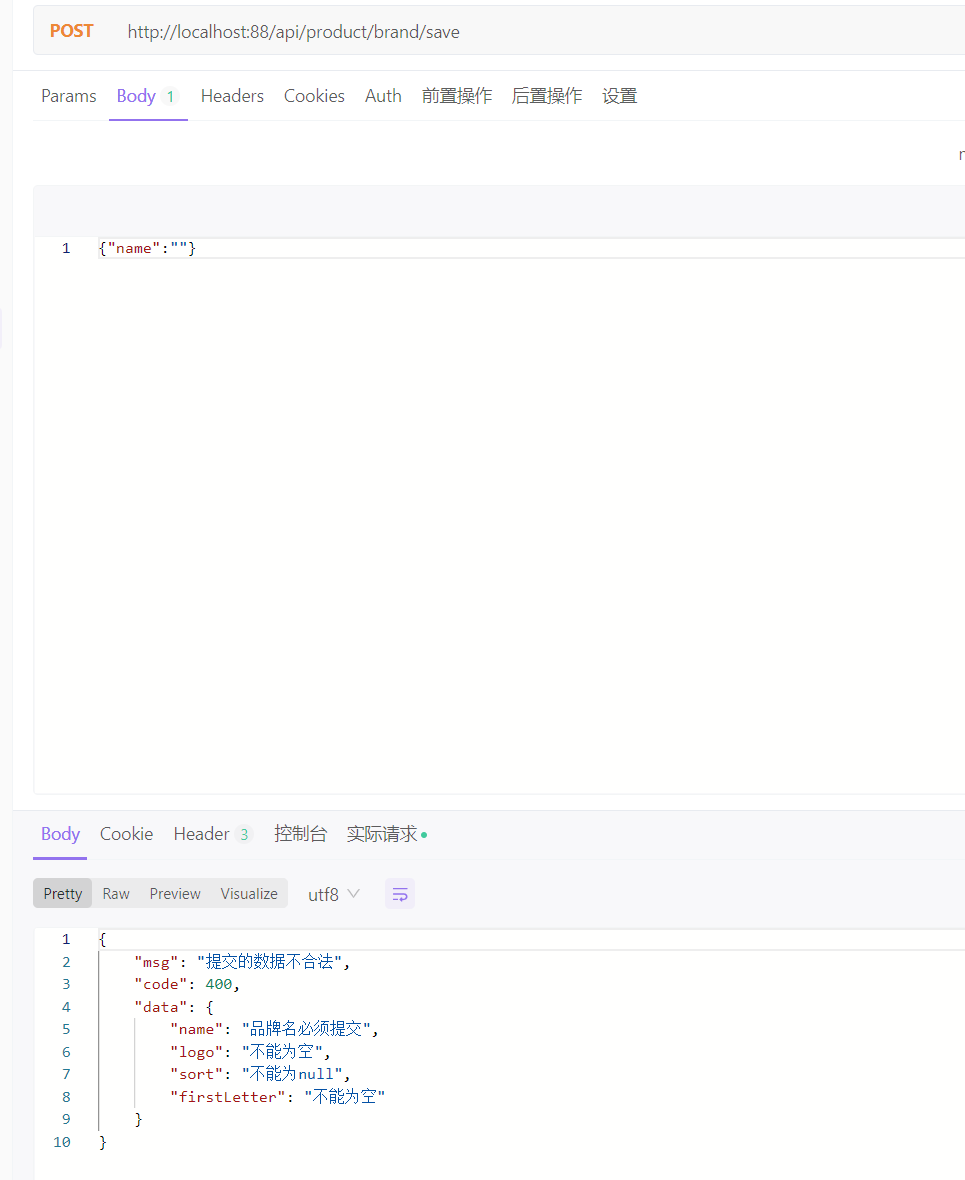
@RequestMapping("/save")//@RequiresPermissions("product:brand:save")public R save(@Valid @RequestBody BrandEntity brand, BindingResult result) {if (result.hasErrors()) {Map<String, String> map = new HashMap<>();//1.获取校验的结果result.getFieldErrors().forEach((item) -> {//获取到错误提示String message = item.getDefaultMessage();//获取到错误属性的名字String field = item.getField();map.put(field, message);});return R.error(400,"提交的数据不合法").put("data", map);} else {brandService.save(brand);}return R.ok();}- 测试
下面是其他网友的笔记,可供参考:
问题引入:填写form时应该有前端校验,后端也应该有校验
前端
前端的校验是element-ui表单验证
Form 组件提供了表单验证的功能,只需要通过 rules 属性传入约定的验证规则,并将 Form-Item 的 prop 属性设置为需校验的字段名即可。后端
@NotNull等
步骤1:使用校验注解
在Java中提供了一系列的校验方式,它这些校验方式在“javax.validation.constraints”包中,提供了如@Email,@NotNull等注解。
<!--jsr3参数校验器-->
<dependency><groupId>org.springframework.boot</groupId><artifactId>spring-boot-starter-validation</artifactId>
</dependency>
里面依赖了hibernate-validator
在非空处理方式上提供了@NotNull,@NotBlank和@NotEmpty
1 @NotNullThe annotated element must not be null. Accepts any type.
注解元素禁止为null,能够接收任何类型2 @NotEmptythe annotated element must not be null nor empty.该注解修饰的字段不能为null或""Supported types are:支持以下几种类型CharSequence (length of character sequence is evaluated)字符序列(字符序列长度的计算)
Collection (collection size is evaluated)
集合长度的计算
Map (map size is evaluated)
map长度的计算
Array (array length is evaluated)
数组长度的计算3 @NotBlankThe annotated element must not be null and must contain at least one non-whitespace character. Accepts CharSequence.
该注解不能为null,并且至少包含一个非空格字符。接收字符序列。@Valid
步骤2:controller中加校验注解@Valid,开启校验,
@RequestMapping("/save")
public R save(@Valid @RequestBody BrandEntity brand){brandService.save(brand);return R.ok();
}
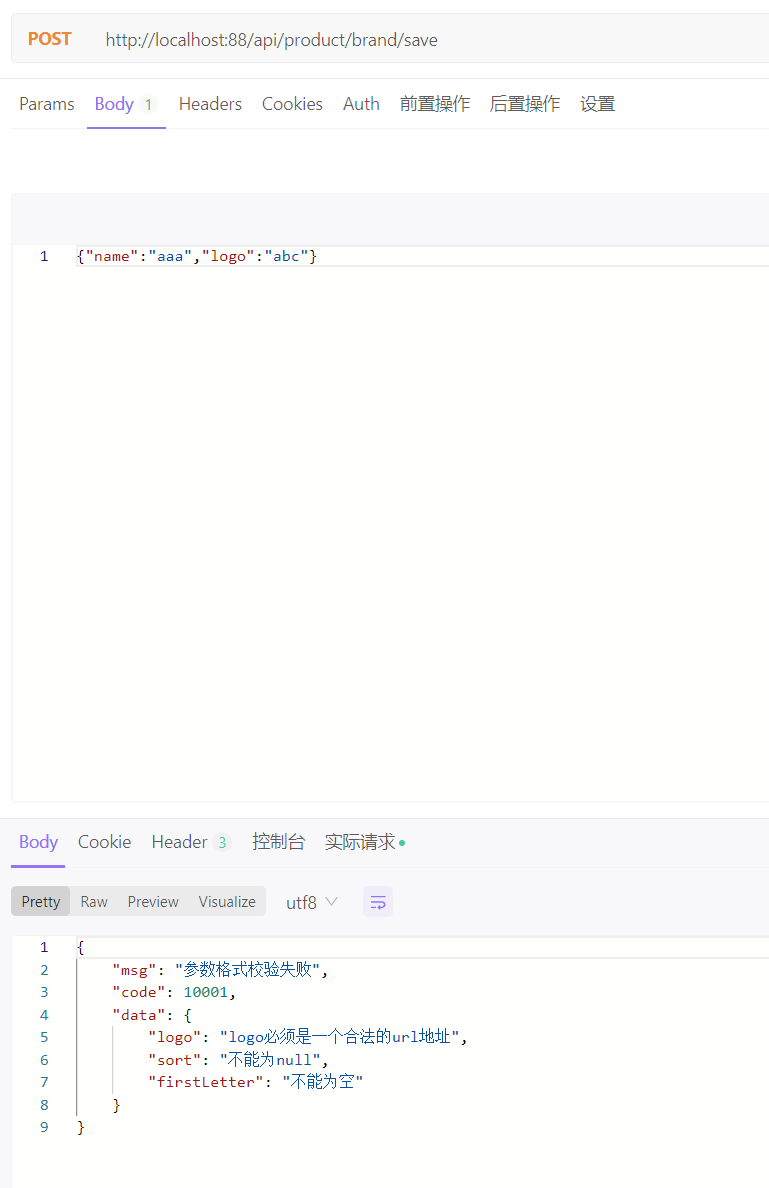
测试: http://localhost:88/api/product/brand/save在postman种发送上面的请求
{"timestamp": "2020-04-29T09:20:46.383+0000","status": 400,"error": "Bad Request","errors": [{"codes": ["NotBlank.brandEntity.name","NotBlank.name","NotBlank.java.lang.String","NotBlank"],"arguments": [{"codes": ["brandEntity.name","name"],"arguments": null,"defaultMessage": "name","code": "name"}],"defaultMessage": "不能为空","objectName": "brandEntity","field": "name","rejectedValue": "","bindingFailure": false,"code": "NotBlank"}],"message": "Validation failed for object='brandEntity'. Error count: 1","path": "/product/brand/save"
}
能够看到"defaultMessage": “不能为空”,这些错误消息定义在“hibernate-validator”的“\org\hibernate\validator\ValidationMessages_zh_CN.properties”文件中。在该文件中定义了很多的错误规则:
javax.validation.constraints.AssertFalse.message = 只能为false
javax.validation.constraints.AssertTrue.message = 只能为true
javax.validation.constraints.DecimalMax.message = 必须小于或等于{value}
javax.validation.constraints.DecimalMin.message = 必须大于或等于{value}
javax.validation.constraints.Digits.message = 数字的值超出了允许范围(只允许在{integer}位整数和{fraction}位小数范围内)
javax.validation.constraints.Email.message = 不是一个合法的电子邮件地址
javax.validation.constraints.Future.message = 需要是一个将来的时间
javax.validation.constraints.FutureOrPresent.message = 需要是一个将来或现在的时间
javax.validation.constraints.Max.message = 最大不能超过{value}
javax.validation.constraints.Min.message = 最小不能小于{value}
javax.validation.constraints.Negative.message = 必须是负数
javax.validation.constraints.NegativeOrZero.message = 必须是负数或零
javax.validation.constraints.NotBlank.message = 不能为空
javax.validation.constraints.NotEmpty.message = 不能为空
javax.validation.constraints.NotNull.message = 不能为null
javax.validation.constraints.Null.message = 必须为null
javax.validation.constraints.Past.message = 需要是一个过去的时间
javax.validation.constraints.PastOrPresent.message = 需要是一个过去或现在的时间
javax.validation.constraints.Pattern.message = 需要匹配正则表达式"{regexp}"
javax.validation.constraints.Positive.message = 必须是正数
javax.validation.constraints.PositiveOrZero.message = 必须是正数或零
javax.validation.constraints.Size.message = 个数必须在{min}和{max}之间org.hibernate.validator.constraints.CreditCardNumber.message = 不合法的信用卡号码
org.hibernate.validator.constraints.Currency.message = 不合法的货币 (必须是{value}其中之一)
org.hibernate.validator.constraints.EAN.message = 不合法的{type}条形码
org.hibernate.validator.constraints.Email.message = 不是一个合法的电子邮件地址
org.hibernate.validator.constraints.Length.message = 长度需要在{min}和{max}之间
org.hibernate.validator.constraints.CodePointLength.message = 长度需要在{min}和{max}之间
org.hibernate.validator.constraints.LuhnCheck.message = ${validatedValue}的校验码不合法, Luhn模10校验和不匹配
org.hibernate.validator.constraints.Mod10Check.message = ${validatedValue}的校验码不合法, 模10校验和不匹配
org.hibernate.validator.constraints.Mod11Check.message = ${validatedValue}的校验码不合法, 模11校验和不匹配
org.hibernate.validator.constraints.ModCheck.message = ${validatedValue}的校验码不合法, ${modType}校验和不匹配
org.hibernate.validator.constraints.NotBlank.message = 不能为空
org.hibernate.validator.constraints.NotEmpty.message = 不能为空
org.hibernate.validator.constraints.ParametersScriptAssert.message = 执行脚本表达式"{script}"没有返回期望结果
org.hibernate.validator.constraints.Range.message = 需要在{min}和{max}之间
org.hibernate.validator.constraints.SafeHtml.message = 可能有不安全的HTML内容
org.hibernate.validator.constraints.ScriptAssert.message = 执行脚本表达式"{script}"没有返回期望结果
org.hibernate.validator.constraints.URL.message = 需要是一个合法的URLorg.hibernate.validator.constraints.time.DurationMax.message = 必须小于${inclusive == true ? '或等于' : ''}${days == 0 ? '' : days += '天'}${hours == 0 ? '' : hours += '小时'}${minutes == 0 ? '' : minutes += '分钟'}${seconds == 0 ? '' : seconds += '秒'}${millis == 0 ? '' : millis += '毫秒'}${nanos == 0 ? '' : nanos += '纳秒'}
org.hibernate.validator.constraints.time.DurationMin.message = 必须大于${inclusive == true ? '或等于' : ''}${days == 0 ? '' : days += '天'}${hours == 0 ? '' : hours += '小时'}${minutes == 0 ? '' : minutes += '分钟'}${seconds == 0 ? '' : seconds += '秒'}${millis == 0 ? '' : millis += '毫秒'}${nanos == 0 ? '' : nanos += '纳秒'}想要自定义错误消息,可以覆盖默认的错误提示信息,如@NotBlank的默认message是
public @interface NotBlank {String message() default "{javax.validation.constraints.NotBlank.message}";
}可以在添加注解的时候,修改message:
@NotBlank(message = "品牌名必须非空")
private String name;当再次发送请求时,得到的错误提示信息:
{"timestamp": "2020-04-29T09:36:04.125+0000","status": 400,"error": "Bad Request","errors": [{"codes": ["NotBlank.brandEntity.name","NotBlank.name","NotBlank.java.lang.String","NotBlank"],"arguments": [{"codes": ["brandEntity.name","name"],"arguments": null,"defaultMessage": "name","code": "name"}],"defaultMessage": "品牌名必须非空","objectName": "brandEntity","field": "name","rejectedValue": "","bindingFailure": false,"code": "NotBlank"}],"message": "Validation failed for object='brandEntity'. Error count: 1","path": "/product/brand/save"
}但是这种返回的错误结果并不符合我们的业务需要。BindResult
步骤3:给校验的Bean后,紧跟一个BindResult,就可以获取到校验的结果。拿到校验的结果,就可以自定义的封装。
@RequestMapping("/save")
public R save(@Valid @RequestBody BrandEntity brand, BindingResult result){if( result.hasErrors()){Map<String,String> map=new HashMap<>();//1.获取错误的校验结果result.getFieldErrors().forEach((item)->{//获取发生错误时的messageString message = item.getDefaultMessage();//获取发生错误的字段String field = item.getField();map.put(field,message);});return R.error(400,"提交的数据不合法").put("data",map);}else {}brandService.save(brand);return R.ok();
}这种是针对于该请求设置了一个内容校验,如果针对于每个请求都单独进行配置,显然不是太合适,实际上可以统一的对于异常进行处理。
2、统一异常处理
- 针对于错误状态码,是我们进行随意定义的,然而正规开发过程中,错误状态码有着严格的定义规则,如该在项目中我们的错误状态码定义
为了定义这些错误状态码,我们可以单独定义一个枚举类,用来存储这些错误状态码。
- 在gulimall-common中新建
BizCodeEnume用来存储状态码
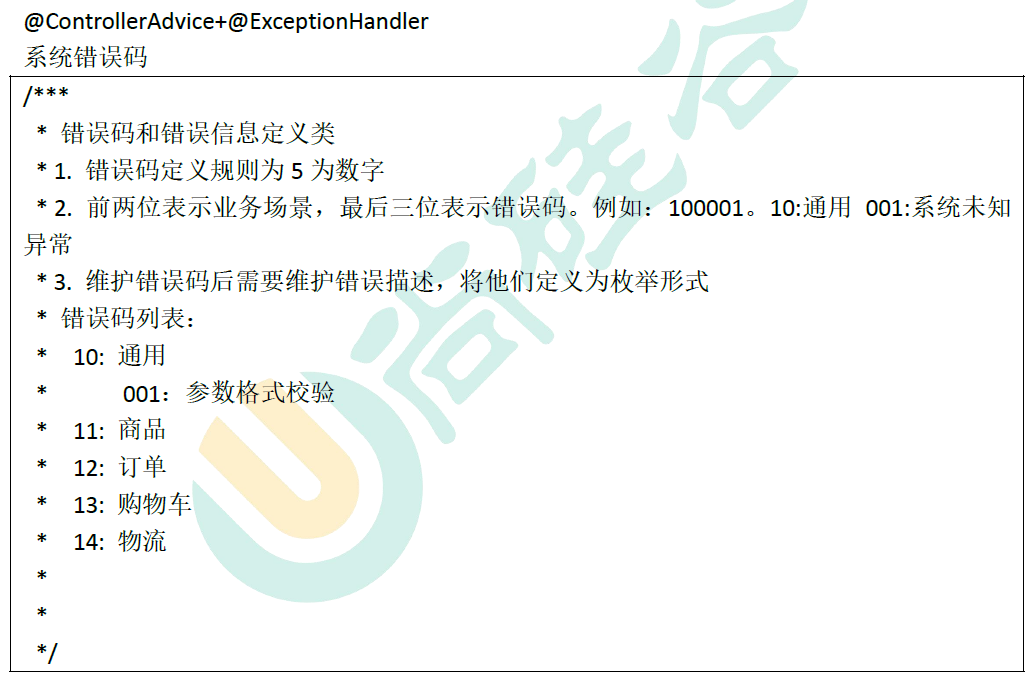
/**** 错误码和错误信息定义类* 1. 错误码定义规则为5为数字* 2. 前两位表示业务场景,最后三位表示错误码。例如:100001。10:通用 001:系统未知异常* 3. 维护错误码后需要维护错误描述,将他们定义为枚举形式* 错误码列表:*  10: 通用*      001:参数格式校验*  11: 商品*  12: 订单*  13: 购物车*  14: 物流*/
public enum BizCodeEnume {UNKNOW_EXCEPTION(10000,"系统未知异常"),VALID_EXCEPTION(10001,"参数格式校验失败");private int code;private String msg;BizCodeEnume(int code, String msg) {this.code = code;this.msg = msg;}public int getCode() {return code;}public String getMsg() {return msg;}
}-
在product里面新建类
GulimallExceptionControllerAdvice,用来集中处理所有异常/*** 集中处理所有异常*/ @Slf4j // @ResponseBody // @ControllerAdvice(basePackages = "com.atguigu.gulimall.product.controller")可以使用SpringMvc所提供的@ControllerAdvice,通过“basePackages”能够说明处理哪些路径下的异常。//@RestControllerAdvice 是 @ResponseBody 和 @ControllerAdvice的复合注解 @RestControllerAdvice(basePackages = "com.atguigu.gulimall.product.controller") public class GulimallExceptionControllerAdvice {// 1 抽取一个异常处理类//具体处理某一类异常,这里以 MethodArgumentNotValidException为例@ExceptionHandler(value = MethodArgumentNotValidException.class)public R handleValidException(MethodArgumentNotValidException e){log.error("数据校验出现问题{},异常类型:{}",e.getMessage(),e.getClass());BindingResult bindingResult = e.getBindingResult();Map<String,String> errorMap = new HashMap<>();bindingResult.getFieldErrors().forEach((fieldError)->{errorMap.put(fieldError.getField(),fieldError.getDefaultMessage());});return R.error(BizCodeEnume.VALID_EXCEPTION.getCode(),BizCodeEnume.VALID_EXCEPTION.getMsg()).put("data",errorMap);}//默认异常处理//处理全局所有异常(前提是没有精确匹配到前面的小范围的异常)@ExceptionHandler(value = Throwable.class)public R handleException(Throwable throwable){log.error("错误",throwable);return R.error(BizCodeEnume.UNKNOW_EXCEPTION.getCode(),BizCodeEnume.UNKNOW_EXCEPTION.getMsg());}} @RestControllerAdvice 是 @ResponseBody 和 @ControllerAdvice的复合注解 -
测试结果
3、分组校验功能
-
在gulimall-common中新建valid包,里面新建两个空接口
AddGroup,UpdateGroup用来分组 -
给校验注解,标注上groups,指定什么情况下才需要进行校验:groups里面的内容要以接口的形式显示出来
如:指定在更新和添加的时候,都需要进行校验:新增时不需要带id,修改时必须带id
@NotNull(message = "修改必须定制品牌id", groups = {UpdateGroup.class})
@Null(message = "新增不能指定id", groups = {AddGroup.class})
@TableId
private Long brandId;
在这种情况下,没有指定分组的校验注解,默认是不起作用的。想要起作用就必须要加groups。
- 业务方法参数上使用@Validated注解,并在value中给出group接口,标记当前校验是哪个组
@RequestMapping("/save")public R save(@Valided({AddGroup.class}) @RequestBody BrandEntity brand){...}-
默认情况下,在分组校验情况下,没有指定指定分组的校验注解,将不会生效,它只会在不分组的情况下生效
-
可以参考其他网友的笔记:
1 groups
1 给校验注解,标注上groups,指定什么情况下才需要进行校验
groups里面的内容要以接口的形式显示出来
如:指定在更新和添加的时候,都需要进行校验。新增时不需要带id,修改时必须带id
@NotNull(message = "修改必须定制品牌id", groups = {UpdateGroup.class})
@Null(message = "新增不能指定id", groups = {AddGroup.class})
@TableId
private Long brandId;在这种情况下,没有指定分组的校验注解,默认是不起作用的。想要起作用就必须要加groups。2 @Validated
2 业务方法参数上使用@Validated注解@Validated的value方法:Specify one or more validation groups to apply to the validation step kicked off by this annotation.
指定一个或多个验证组以应用于此注释启动的验证步骤。JSR-303 defines validation groups as custom annotations which an application declares for the sole purpose of using
them as type-safe group arguments, as implemented in SpringValidatorAdapter.JSR-303 将验证组定义为自定义注释,应用程序声明的唯一目的是将它们用作类型安全组参数,如 SpringValidatorAdapter 中实现的那样。Other SmartValidator implementations may support class arguments in other ways as well.其他SmartValidator 实现也可以以其他方式支持类参数。@RequestMapping("/save")
public R save(@Validated(AddGroup.class) @RequestBody BrandEntity brand) {brandService.save(brand);return R.ok();
}
@RequestMapping("/delete")
//@RequiresPermissions("${moduleNamez}:brand:delete")
public R delete(@RequestBody Long[] brandIds) {brandService.removeByIds(Arrays.asList(brandIds));return R.ok();
}3 分组情况下,校验注解生效问题
3 默认情况下,在分组校验情况下,没有指定指定分组的校验注解,将不会生效,它只会在不分组的情况下生效。
4、自定义校验
gulimall-common中
- 编写一个自定义校验注解ListValue
@Documented
@Constraint(validatedBy = {})
@Target({ElementType.METHOD, ElementType.FIELD, ElementType.ANNOTATION_TYPE, ElementType.CONSTRUCTOR, ElementType.PARAMETER, ElementType.TYPE_USE})
@Retention(RetentionPolicy.RUNTIME)
public @interface ListValue {String message() default "{com.atguigu.common.valid.ListValue.message}";Class<?>[] groups() default {};Class<? extends Payload>[] payload() default {};int[] vals() default {};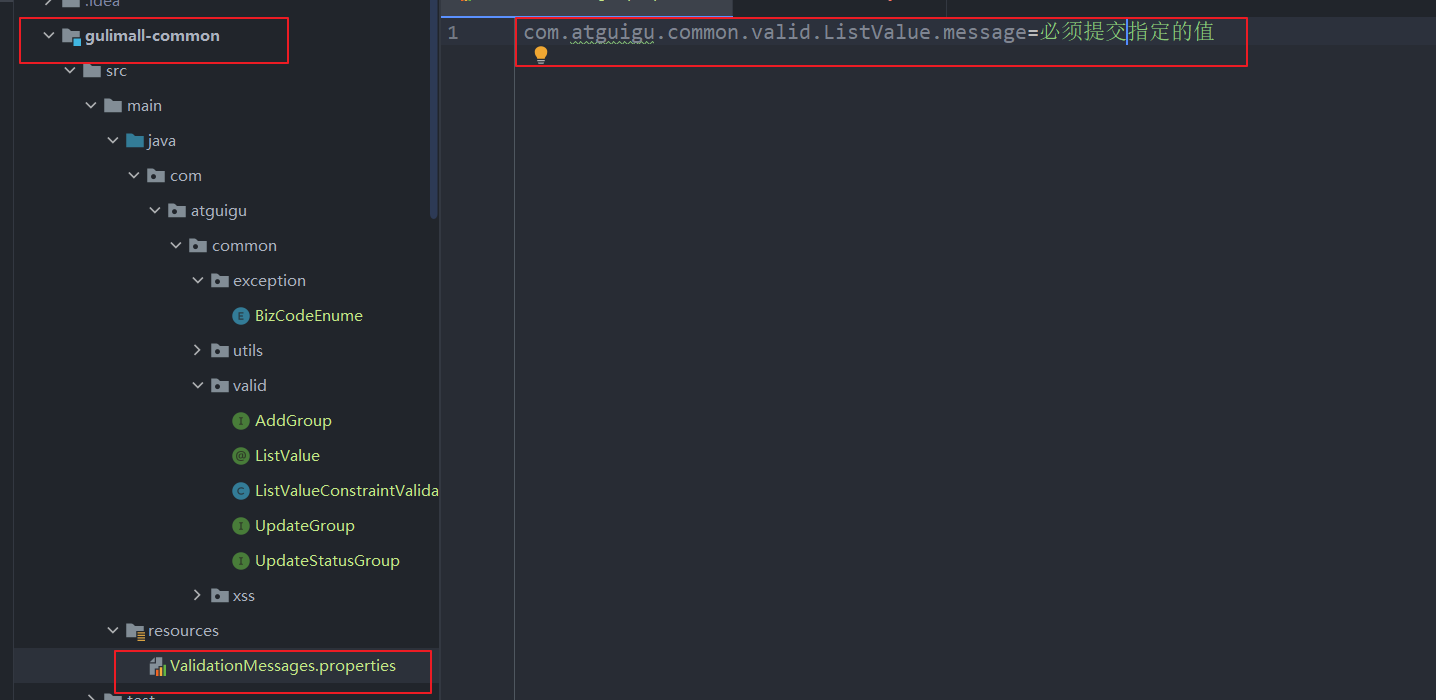
}- 新建配置文件ValidationMessages.properties保存注解信息
- 编写一个自定义校验器ListValueConstraintValidator
public class ListValueConstraintValidator implements ConstraintValidator<ListValue,Integer> {private Set<Integer> set  = new HashSet<>();//初始化方法@Overridepublic void initialize(ListValue constraintAnnotation) {int[] vals = constraintAnnotation.vals();for (int val : vals) {set.add(val);}}/*** 判断是否校验成功* @param value 需要校验的值* @param context* @return*/@Overridepublic boolean isValid(Integer value, ConstraintValidatorContext context) {return set.contains(value);}
}- 关联自定义的校验器和自定义的校验注解(可以指定多个不同的校验器,适配不同类型的校验)
-
关联校验器和校验注解:在校验注解的
@Constraint注解上关联校验器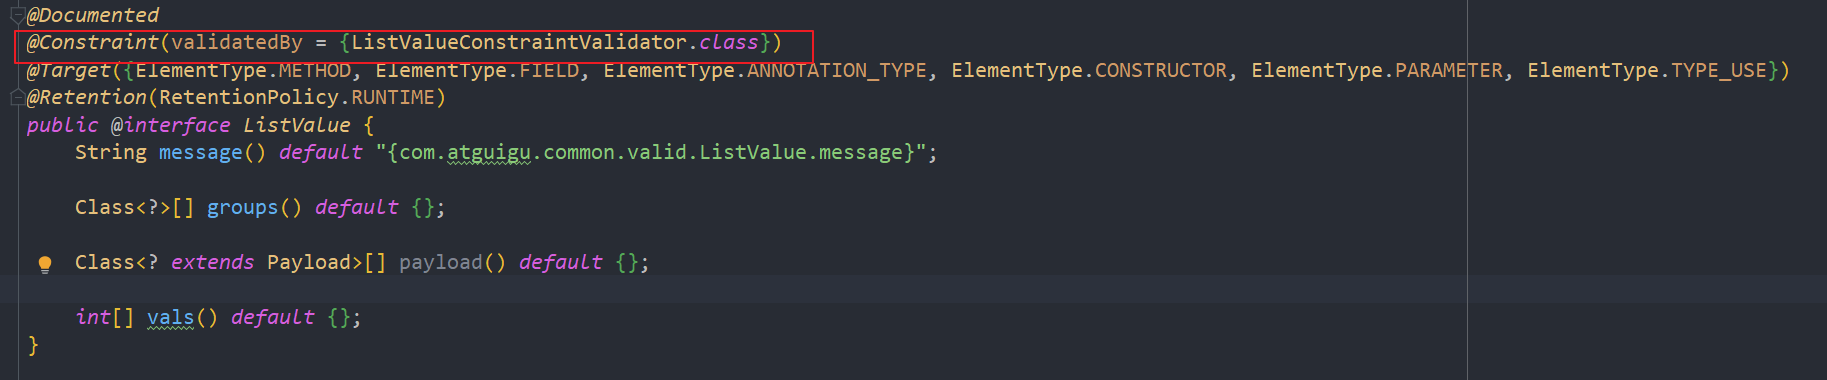
-
校验注解添加到showStatus上,进行测试
这里我们新建一个 关于 修改显示状态的方法,并且新建一个 UpdateStatusGroup 来作为分组专门处理显示状态的校验。
gulimall-product 下的 BrandController 中
/*** 修改显示状态*/@RequestMapping("/update/status")//@RequiresPermissions("product:brand:update")public R updateStatus(@Validated(UpdateStatusGroup.class) @RequestBody BrandEntity brand) {brandService.updateById(brand);return R.ok();}gulimall-common下的 valid 包下
public interface UpdateStatusGroup {
}
gulimall-product下的 BrandEntity
@NotNull(groups = {AddGroup.class, UpdateStatusGroup.class})@ListValue(vals = {0,1},groups = {AddGroup.class, UpdateStatusGroup.class})private Integer showStatus;
前端页面也需要进行修改:
brand.vue 中updateBrandStatus(data) {console.log("最新信息", data);let { brandId, showStatus } = data;this.$http({url: this.$http.adornUrl("/product/brand/update/status"),
- 测试
可以参考其他网友的笔记:
场景:要校验showStatus的01状态,可以用正则,但我们可以利用其他方式解决
复杂场景。比如我们想要下面的场景
/*** 显示状态[0-不显示;1-显示]*/
@NotNull(groups = {AddGroup.class, UpdateStatusGroup.class})
@ListValue(vals = {0,1}, groups = {AddGroup.class, UpdateGroup.class, UpdateStatusGroup.class})
private Integer showStatus;如何做:添加依赖
<dependency><groupId>javax.validation</groupId><artifactId>validation-api</artifactId><version>2.0.1.Final</version>
</dependency>1 编写自定义的校验注解
必须有3个属性message()错误信息
groups()分组校验
payload()自定义负载信息@Documented
@Constraint(validatedBy = { ListValueConstraintValidator.class})
@Target({ METHOD, FIELD, ANNOTATION_TYPE, CONSTRUCTOR, PARAMETER, TYPE_USE })
@Retention(RUNTIME)
public @interface ListValue {// 使用该属性去Validation.properties中取String message() default "{com.atguigu.common.valid.ListValue.message}";Class<?>[] groups() default { };Class<? extends Payload>[] payload() default { };int[] value() default {};
}该属性值取哪里取呢?common创建文件ValidationMessages.properties里面写上com.atguigu.common.valid.ListValue.message=必须提交指定的值 [0,1]2 编写自定义的校验器
public class ListValueConstraintValidator implements ConstraintValidator<ListValue,Integer> {private Set<Integer> set=new HashSet<>();@Overridepublic void initialize(ListValue constraintAnnotation) {int[] value = constraintAnnotation.value();for (int i : value) {set.add(i);}}@Overridepublic boolean isValid(Integer value, ConstraintValidatorContext context) {return  set.contains(value);}
}3 关联校验器和校验注解
@Constraint(validatedBy = { ListValueConstraintValidator.class})
一个校验注解可以匹配多个校验器4 使用实例
/*** 显示状态[0-不显示;1-显示]*/@ListValue(value = {0,1},groups ={AddGroup.class})private Integer showStatus;
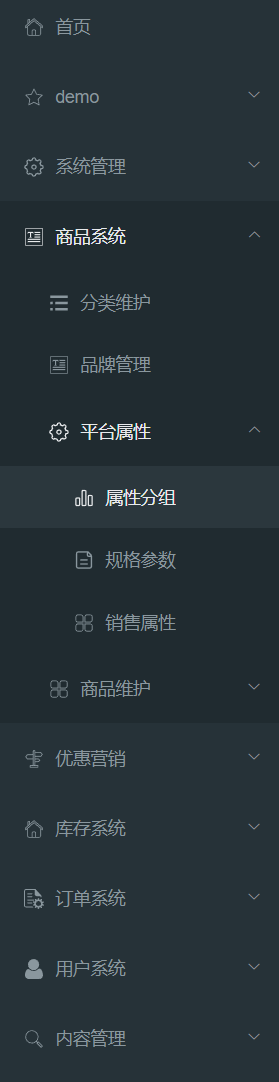
6.3 属性分组
6.3.1 spu和sku
- SPU:Standard Product Unit(标准化产品单元)
是商品信息聚合的最小单位,是一组可复用、易检索的标准化信息的集合,该集合描述了一个产品的特性。

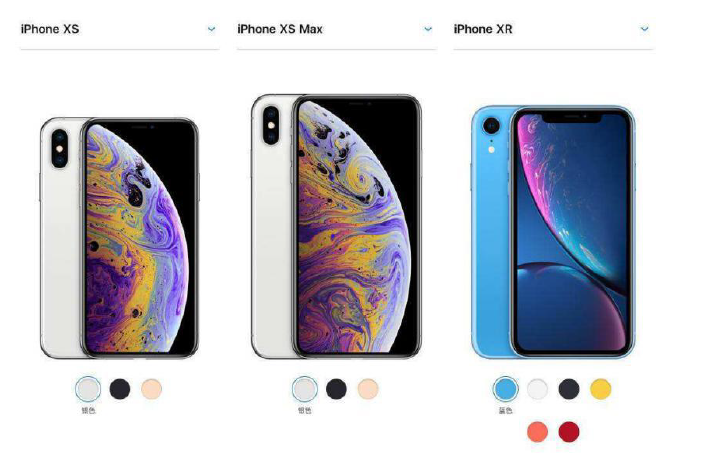
iphoneX 是SPU、MI 8 是SPU
iphoneX 64G 黑曜石是SKU
MI8 8+64G+黑色是SKU
- SKU:Stock Keeping Unit(库存量单位)
即库存进出计量的基本单元,可以是以件,盒,托盘等为单位。SKU 这是对于大型连锁超市
DC(配送中心)物流管理的一个必要的方法。现在已经被引申为产品统一编号的简称,每
种产品均对应有唯一的SKU 号。
6.3.2 基本属性【规格参数】与销售属性
同一个SPU拥有的特性叫基本属性。如机身长度,这个是手机共用的属性。而每
款手机的属性值不同
能决定库存量的叫销售属性。如颜色。
每个分类下的商品共享规格参数,与销售属性。只是有些商品不一定要用这个分类下全部的
属性;
- 属性是以三级分类组织起来的
- 规格参数中有些是可以提供检索的
- 规格参数也是基本属性,他们具有自己的分组
- 属性的分组也是以三级分类组织起来的
- 属性名确定的,但是值是每一个商品不同来决定的
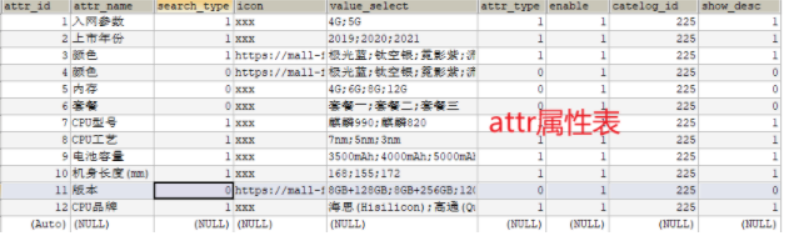
PS:下面是数据库中一些表的理解:
数据库表
pms数据库下的attr属性表,attr-group表attr-group-id:几号分组
catelog-id:什么类别下的,比如手机
根据商品找到spu-id,attr-id属性关系-规格参数-销售属性-三级分类 关联关系
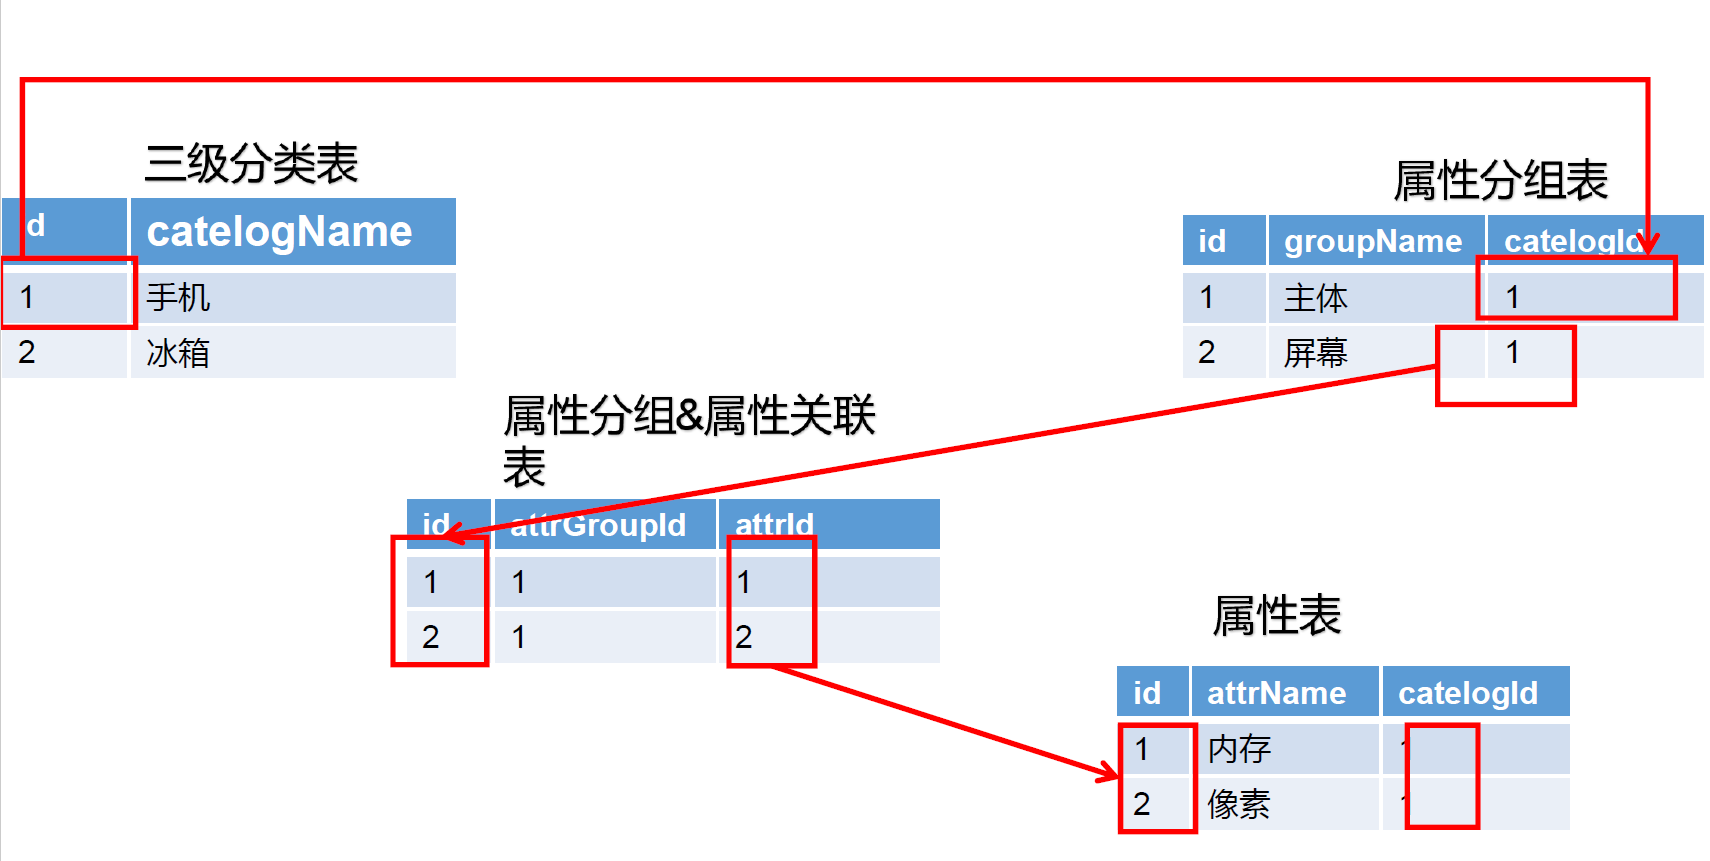
SPU-SKU属性表
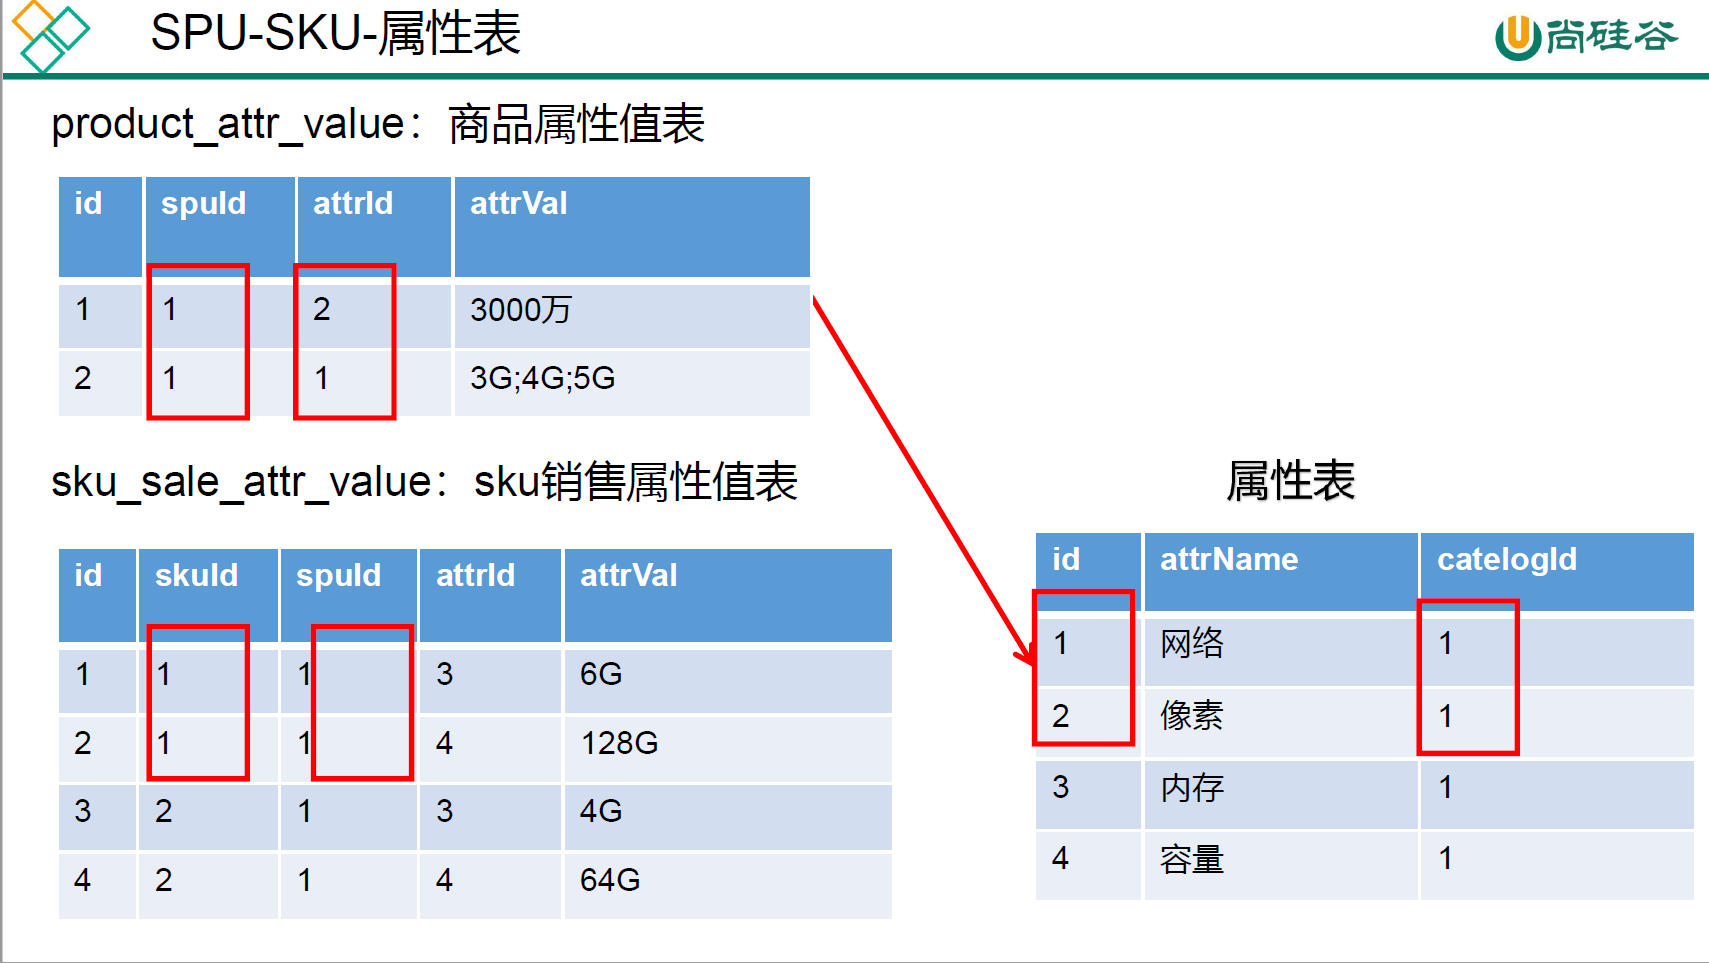
荣耀V20有两个属性,网络和像素,但是这两个属性的spu是同一个,代表是同款
手机。sku表里保存spu是同一手机,sku可能相同可能不同,相同代表是同一款,不同
代表是不同款。
属性表说明每个属性的 枚举值分类表有所有的分类,但有父子关系
6.3.3 属性分组准备工作
如下图,这个是属性分组的效果展示。
1、前端组件
从老师给的课件资源中找到sys_menus.sql,将其复制后,在数据库gulimall_admin中进行找到sys_menus这张表进行完善。即可出现。
- 在moudules下新建common/categroy.vue,这是一个公共组件,后面我们要引用他,即树形结构。这里我们可以直接将以前写过的category.vue复制,然后进行简单的删除即可。
<!--  -->
<template><el-tree :data="menus" :props="defaultProps" node-key="catId" ref="menuTree" @node-click="nodeclick"></el-tree>
</template><script>
//这里可以导入其他文件(比如:组件,工具js,第三方插件js,json文件,图片文件等等)
//例如:import 《组件名称》 from '《组件路径》';export default {//import引入的组件需要注入到对象中才能使用components: {},data() {//这里存放数据return {menus: [],expandedKey: [],defaultProps: {children: "children",  //子节点label: "name",  //name属性作为标签的值,展示出来},};},//监听属性 类似于data概念computed: {},//监控data中的数据变化watch: {},//方法集合methods: {//获取后台数据getMenus() {this.$http({url: this.$http.adornUrl('/product/category/list/tree'),method: 'get'}).then(({ data }) => {  //将整个对象中的data数据结构出来,因为只有data才是我们需要的console.log("成功了获取到菜单数据....", data.data)this.menus = data.data; // 数组内容,把数据给menus,就是给了vue实例,最后绑定到视图上})},nodeclick(data,node,component){console.log("子组件category的节点被点击",data,node,component);//向父组件发送事件this.$emit("tree-node-click",data,node,component);}},//生命周期 - 创建完成(可以访问当前this实例)created() {this.getMenus();},//生命周期 - 挂载完成(可以访问DOM元素)mounted() {},beforeCreate() { }, //生命周期 - 创建之前beforeMount() { }, //生命周期 - 挂载之前beforeUpdate() { }, //生命周期 - 更新之前updated() { }, //生命周期 - 更新之后beforeDestroy() { }, //生命周期 - 销毁之前destroyed() { }, //生命周期 - 销毁完成activated() { }, //如果页面有keep-alive缓存功能,这个函数会触发
}
</script>
<style scoped></style>
-
将逆向生成的前端代码复制到product下面。

-
在modules/product/下创建attgroup.vue组件
- 左侧6 用来显示菜单,右侧18用来显示表格
- 引入公共组件Category, AddOrUpdate
- 剩下的复制生成的
attrgroup.vue
<!--  -->
<template><el-row :gutter="20"><el-col :span="6"><category></category></el-col><el-col :span="18"><div class="mod-config"><el-form:inline="true":model="dataForm"@keyup.enter.native="getDataList()"><el-form-item><el-inputv-model="dataForm.key"placeholder="参数名"clearable></el-input></el-form-item><el-form-item><el-button @click="getDataList()">查询</el-button><el-buttonv-if="isAuth('product:attrgroup:save')"type="primary"@click="addOrUpdateHandle()">新增</el-button><el-buttonv-if="isAuth('product:attrgroup:delete')"type="danger"@click="deleteHandle()":disabled="dataListSelections.length <= 0">批量删除</el-button></el-form-item></el-form><el-table:data="dataList"borderv-loading="dataListLoading"@selection-change="selectionChangeHandle"style="width: 100%"><el-table-columntype="selection"header-align="center"align="center"width="50"></el-table-column><el-table-columnprop="attrGroupId"header-align="center"align="center"label="分组id"></el-table-column><el-table-columnprop="attrGroupName"header-align="center"align="center"label="组名"></el-table-column><el-table-columnprop="sort"header-align="center"align="center"label="排序"></el-table-column><el-table-columnprop="descript"header-align="center"align="center"label="描述"></el-table-column><el-table-columnprop="icon"header-align="center"align="center"label="组图标"></el-table-column><el-table-columnprop="catelogId"header-align="center"align="center"label="所属分类id"></el-table-column><el-table-columnfixed="right"header-align="center"align="center"width="150"label="操作"><template slot-scope="scope"><el-buttontype="text"size="small"@click="addOrUpdateHandle(scope.row.attrGroupId)">修改</el-button><el-buttontype="text"size="small"@click="deleteHandle(scope.row.attrGroupId)">删除</el-button></template></el-table-column></el-table><el-pagination@size-change="sizeChangeHandle"@current-change="currentChangeHandle":current-page="pageIndex":page-sizes="[10, 20, 50, 100]":page-size="pageSize":total="totalPage"layout="total, sizes, prev, pager, next, jumper"></el-pagination><!-- 弹窗, 新增 / 修改 --><add-or-updatev-if="addOrUpdateVisible"ref="addOrUpdate"@refreshDataList="getDataList"></add-or-update></div></el-col></el-row>
</template><script>
//这里可以导入其他文件(比如:组件,工具js,第三方插件js,json文件,图片文件等等)
//例如:import 《组件名称》 from '《组件路径》';
import Category from "../common/category.vue";
import AddOrUpdate from "./attrgroup-add-or-update.vue";export default {//import引入的组件需要注入到对象中才能使用components: { Category, AddOrUpdate},data() {return {dataForm: {key: "",},dataList: [],pageIndex: 1,pageSize: 10,totalPage: 0,dataListLoading: false,dataListSelections: [],addOrUpdateVisible: false,};},activated() {this.getDataList();},methods: {// 获取数据列表getDataList() {this.dataListLoading = true;this.$http({url: this.$http.adornUrl("/product/attrgroup/list"),method: "get",params: this.$http.adornParams({page: this.pageIndex,limit: this.pageSize,key: this.dataForm.key,}),}).then(({ data }) => {if (data && data.code === 0) {this.dataList = data.page.list;this.totalPage = data.page.totalCount;} else {this.dataList = [];this.totalPage = 0;}this.dataListLoading = false;});},// 每页数sizeChangeHandle(val) {this.pageSize = val;this.pageIndex = 1;this.getDataList();},// 当前页currentChangeHandle(val) {this.pageIndex = val;this.getDataList();},// 多选selectionChangeHandle(val) {this.dataListSelections = val;},// 新增 / 修改addOrUpdateHandle(id) {this.addOrUpdateVisible = true;this.$nextTick(() => {this.$refs.addOrUpdate.init(id);});},// 删除deleteHandle(id) {var ids = id? [id]: this.dataListSelections.map((item) => {return item.attrGroupId;});this.$confirm(`确定对[id=${ids.join(",")}]进行[${id ? "删除" : "批量删除"}]操作?`,"提示",{confirmButtonText: "确定",cancelButtonText: "取消",type: "warning",}).then(() => {this.$http({url: this.$http.adornUrl("/product/attrgroup/delete"),method: "post",data: this.$http.adornData(ids, false),}).then(({ data }) => {if (data && data.code === 0) {this.$message({message: "操作成功",type: "success",duration: 1500,onClose: () => {this.getDataList();},});} else {this.$message.error(data.msg);}});});},},
};
</script>
<style scoped>
</style>
踩坑:
Can't resolve './attrgroup-add-or-update' in 'C:\Users\hxld\Desktop\renren-fast-vue\src\views\modules\product'
解决办法:
原来是绝对路径,后面改为相对路径即可。错误原因是因为版本问题可能。
2、父子组件传递数据
我们要实现的功能是点击左侧,右侧表格对应显示。
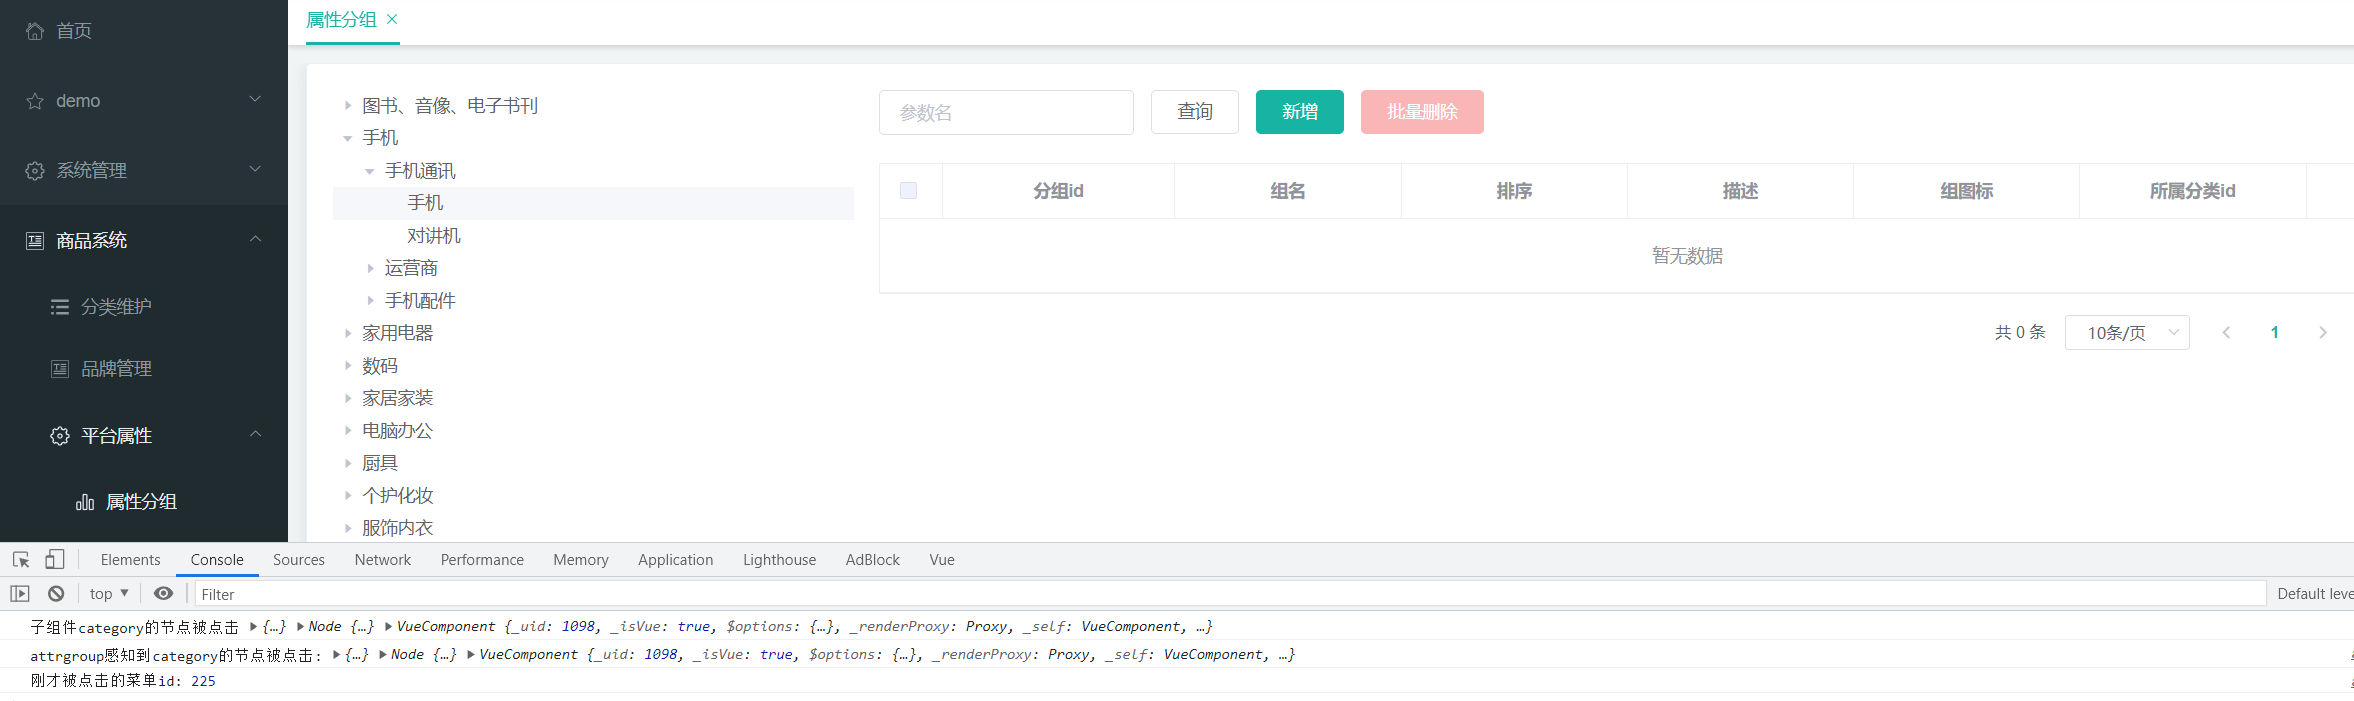
父子组件传递数据:category.vue点击时,引用它的attgroup.vue能感知到, 然后通知到add-or-update。
- 子组件发送事件
- 在category.vue中的树形控件绑定点击事件@node-click=“nodeclick”
- node-click方法中有三个参数(data, node, component),data表示当前数据,node为elementui封装的数据
- 点击之后向父组件发送事件:this.$emit(“tree-node-click”,…) …为参数
//组件绑定事件
<el-tree :data="menus" :props="defaultProps" node-key="catId" ref="menuTree" @node-click="nodeclick">//methods中新增方法nodeclick(data,node,component){console.log("子组件category的节点被点击",data,node,component);//向父组件发送事件this.$emit("tree-node-click",data,node,component);}- 父组件接收事件
//引用的组件,可能会发散tree-node-click事件,当接收到时,触发父组件的treenodeclick方法
<category @tree-node-click="treenodeclick"></category>//methods中新增treenodeclick方法,验证父组件是否接收到//感知树节点被点击treenodeclick(data,node,component){console.log("attrgroup感知到category的节点被点击:",data,node,component);console.log("刚才被点击的菜单id:",data.catId);},
3、启动测试
ps:这里可以参考其他网友的课件
根据请求地址http://localhost:8001/#/product-attrgroup所以应该有product/attrgroup.vue。我们之前写过product/cateory.vue,现在我们
要抽象到common//cateory.vue1 左侧内容:要在左面显示菜单,右面显示表格复制<el-row :gutter="20">,放到attrgroup.vue的<template>。20表示列间距去element-ui文档里找到布局,
<el-row :gutter="20"><el-col :span="6"><div class="grid-content bg-purple"></div></el-col><el-col :span="18"><div class="grid-content bg-purple"></div></el-col>
</el-row>分为2个模块,分别占6列和18列有了布局之后,要在里面放内容。接下来要抽象一个分类vue。新建
common/category,生成vue模板。把之前写的el-tree放到<template><el-tree :data="menus" :props="defaultProps" node-key="catId" ref="menuTree"
@node-click="nodeClick"	></el-tree>
所以他把menus绑定到了菜单上,
所以我们应该在export default {中有menus的信息
该具体信息会随着点击等事件的发生会改变值(或比如created生命周期时),
tree也就同步变化了common/category写好后,就可以在attrgroup.vue中导入使用了
<script>
import Category from "../common/category";
export default {//import引入的组件需要注入到对象中才能使用。组件名:自定义的名字,一致可以省略components: { Category},导入了之后,就可以在attrgroup.vue中找合适位置放好
<template>
<el-row :gutter="20"><el-col :span="6"><category @tree-node-click="treenodeclick"></category></el-col>2 右侧表格内容:开始填写属性分组页面右侧的表格复制gulimall-product\src\main\resources\src\views\modules\product\attrgroup.vue中的部分内
容div到attrgroup.vue批量删除是弹窗add-or-update导入data、结合components父子组件
要实现功能:点击左侧,右侧表格对应内容显示。父子组件传递数据:category.vue点击时,引用它的attgroup.vue能感知到, 然后
通知到add-or-update比如嵌套div,里层div有事件后冒泡到外层div(是指一次点击调用了两个div的点
击函数)子组件(category)给父组件(attrgroup)传递数据,事件机制;去element-ui的tree部分找event事件,看node-click()在category中绑定node-click事件,
<el-tree :data="menus" :props="defaultProps" node-key="catId" ref="menuTree" @node-click="nodeClick"	>
</el-tree>this.$emit()
子组件给父组件发送一个事件,携带上数据;
nodeClick(data,Node,component){console.log("子组件被点击",data,Node,component);this.$emit("tree-node-click",data,Node,component);
},
第一个参数事件名字随便写,
后面可以写任意多的东西,事件发生时都会传出去this.$emit(事件名,“携带的数据”);父组件中的获取发送的事件
在attr-group中写
<category @tree-node-click="treeNodeClick"></category>
表明他的子组件可能会传递过来点击事件,用自定义的函数接收传递过来的参数父组件中进行处理
//获取发送的事件数据treeNodeClick(data,Node,component){console.log("attgroup感知到的category的节点被点击",data,Node,component);console.log("刚才被点击的菜单ID",data.catId);
},
6.3.4 获取分类属性分组
接口在线文档地址:https://easydoc.net/s/78237135/ZUqEdvA4/OXTgKobR
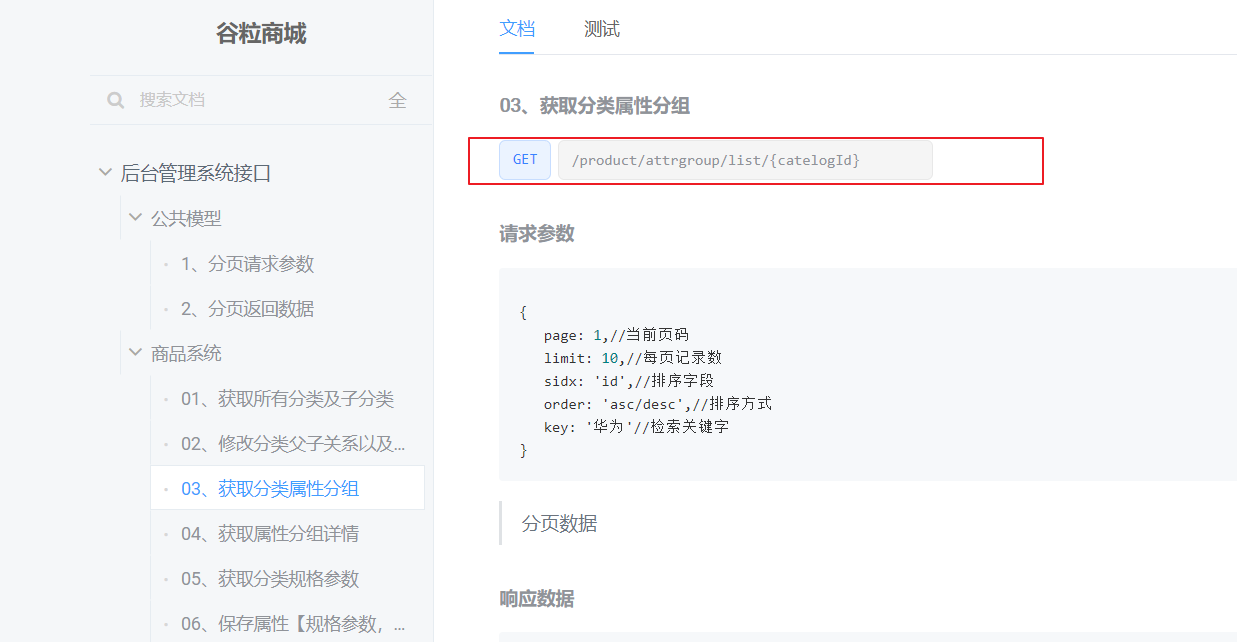
接口地址:/product/attrgroup/list/{catelogId}
- 修改product下的controller
/*** 列表* catelogId 0的话查所有*/@RequestMapping("/list/{catelogId}")//@RequiresPermissions("product:attrgroup:list")public R list(@RequestParam Map<String, Object> params,@PathVariable("catelogId") Long catelogId){// PageUtils page = attrGroupService.queryPage(params);PageUtils page = attrGroupService.queryPage(params,catelogId);return R.ok().put("page", page);}-
service新增接口及其实现,实现类新增方法
Query里面就有个方法getPage(),传入map,将map解析为mybatis-plus的IPage对象;
自定义PageUtils类用于传入IPage对象,得到其中的分页信息;
AttrGroupServiceImpl extends ServiceImpl,其中ServiceImpl的父类中有方法page(IPage, Wrapper)。对于wrapper而言,没有条件的话就是查询所有;
queryPage()返回前还会return new PageUtils(page);,把page对象解析好页码信
息,就封装为了响应数据;
AttrGroupServiceImpl下:
@Overridepublic PageUtils queryPage(Map<String, Object> params, Long catelogId) {if (catelogId == 0) {//如果传过来的id是0,则查询所有属性// this.page两个参数:// 第一个:查询页码信息,其中 Query<>().getPage 方法传入一个map,会自动封装成 Ipage// 第二个:查询条件,空的wapper 就是查询全部IPage<AttrGroupEntity> page = this.page(new Query<AttrGroupEntity>().getPage(params),new QueryWrapper<AttrGroupEntity>());return new PageUtils(page);} else {String key = (String) params.get("key");// select * from pms_attr_group where catelog_id =? and (attr_group_name like key or attr_group_id = key)QueryWrapper<AttrGroupEntity> wrapper = new QueryWrapper<AttrGroupEntity>().eq("catelog_id", catelogId);if (!StringUtils.isEmpty(key)) {wrapper.and((obj) -> {obj.like("attr_group_name", key).or().eq("attr_group_id", key);});}IPage<AttrGroupEntity> page = this.page(new Query<AttrGroupEntity>().getPage(params), wrapper);return new PageUtils(page);}}
-
测试localhost:88/api/product/attrgroup/list/1localhost:88/api/product/attrgroup/list/1?page=1&key=aa{"msg": "success","code": 0,"page": {"totalCount": 0,"pageSize": 10,"totalPage": 0,"currPage": 1,"list": []} } -
我们不让一级和二级分类下,点击的时候也出现表格,只让三级分类的时候才出现相应的表格,所以我们可以设置一个判断。
调整前端
发送请求时url携带id信息,${this.catId},get参数携带page信息
点击第3级分类时才查询,修改attr-group.vue中的函数即可
修改前端代码
- 修改getDataList()中的请求路径
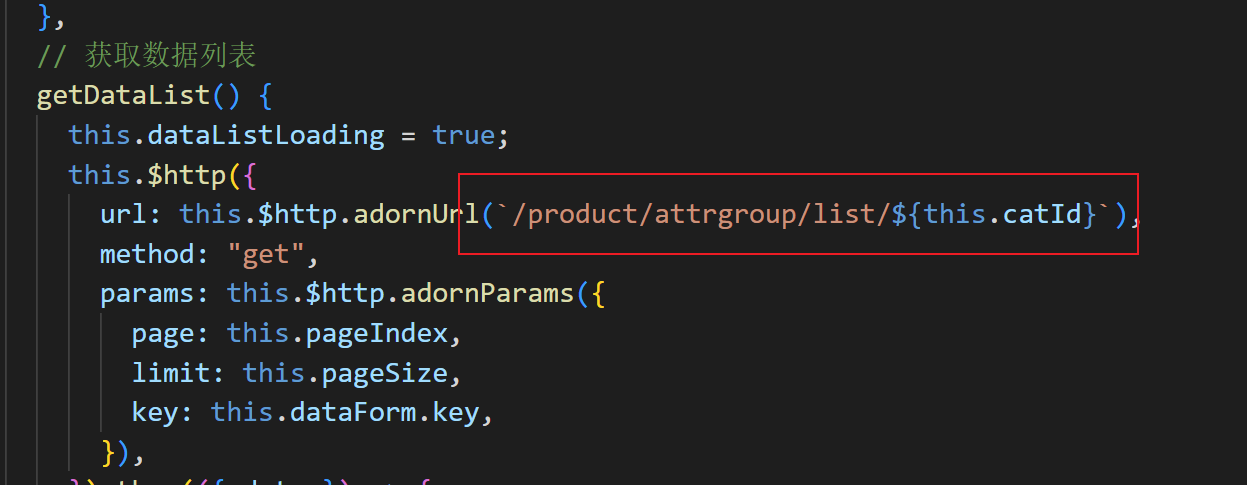
-
data中新增
catId,设置默认为0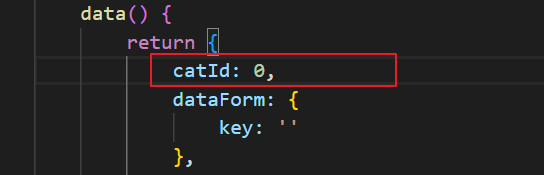
-
methods中修改点击方法
treenodeclick(data, node, component) {....//必须是三级分类,才显示属性if(node.level == 3){this.catId = data.catId;this.getDataList();//重新查询}},
- 数据库中新增数据,进行测试。

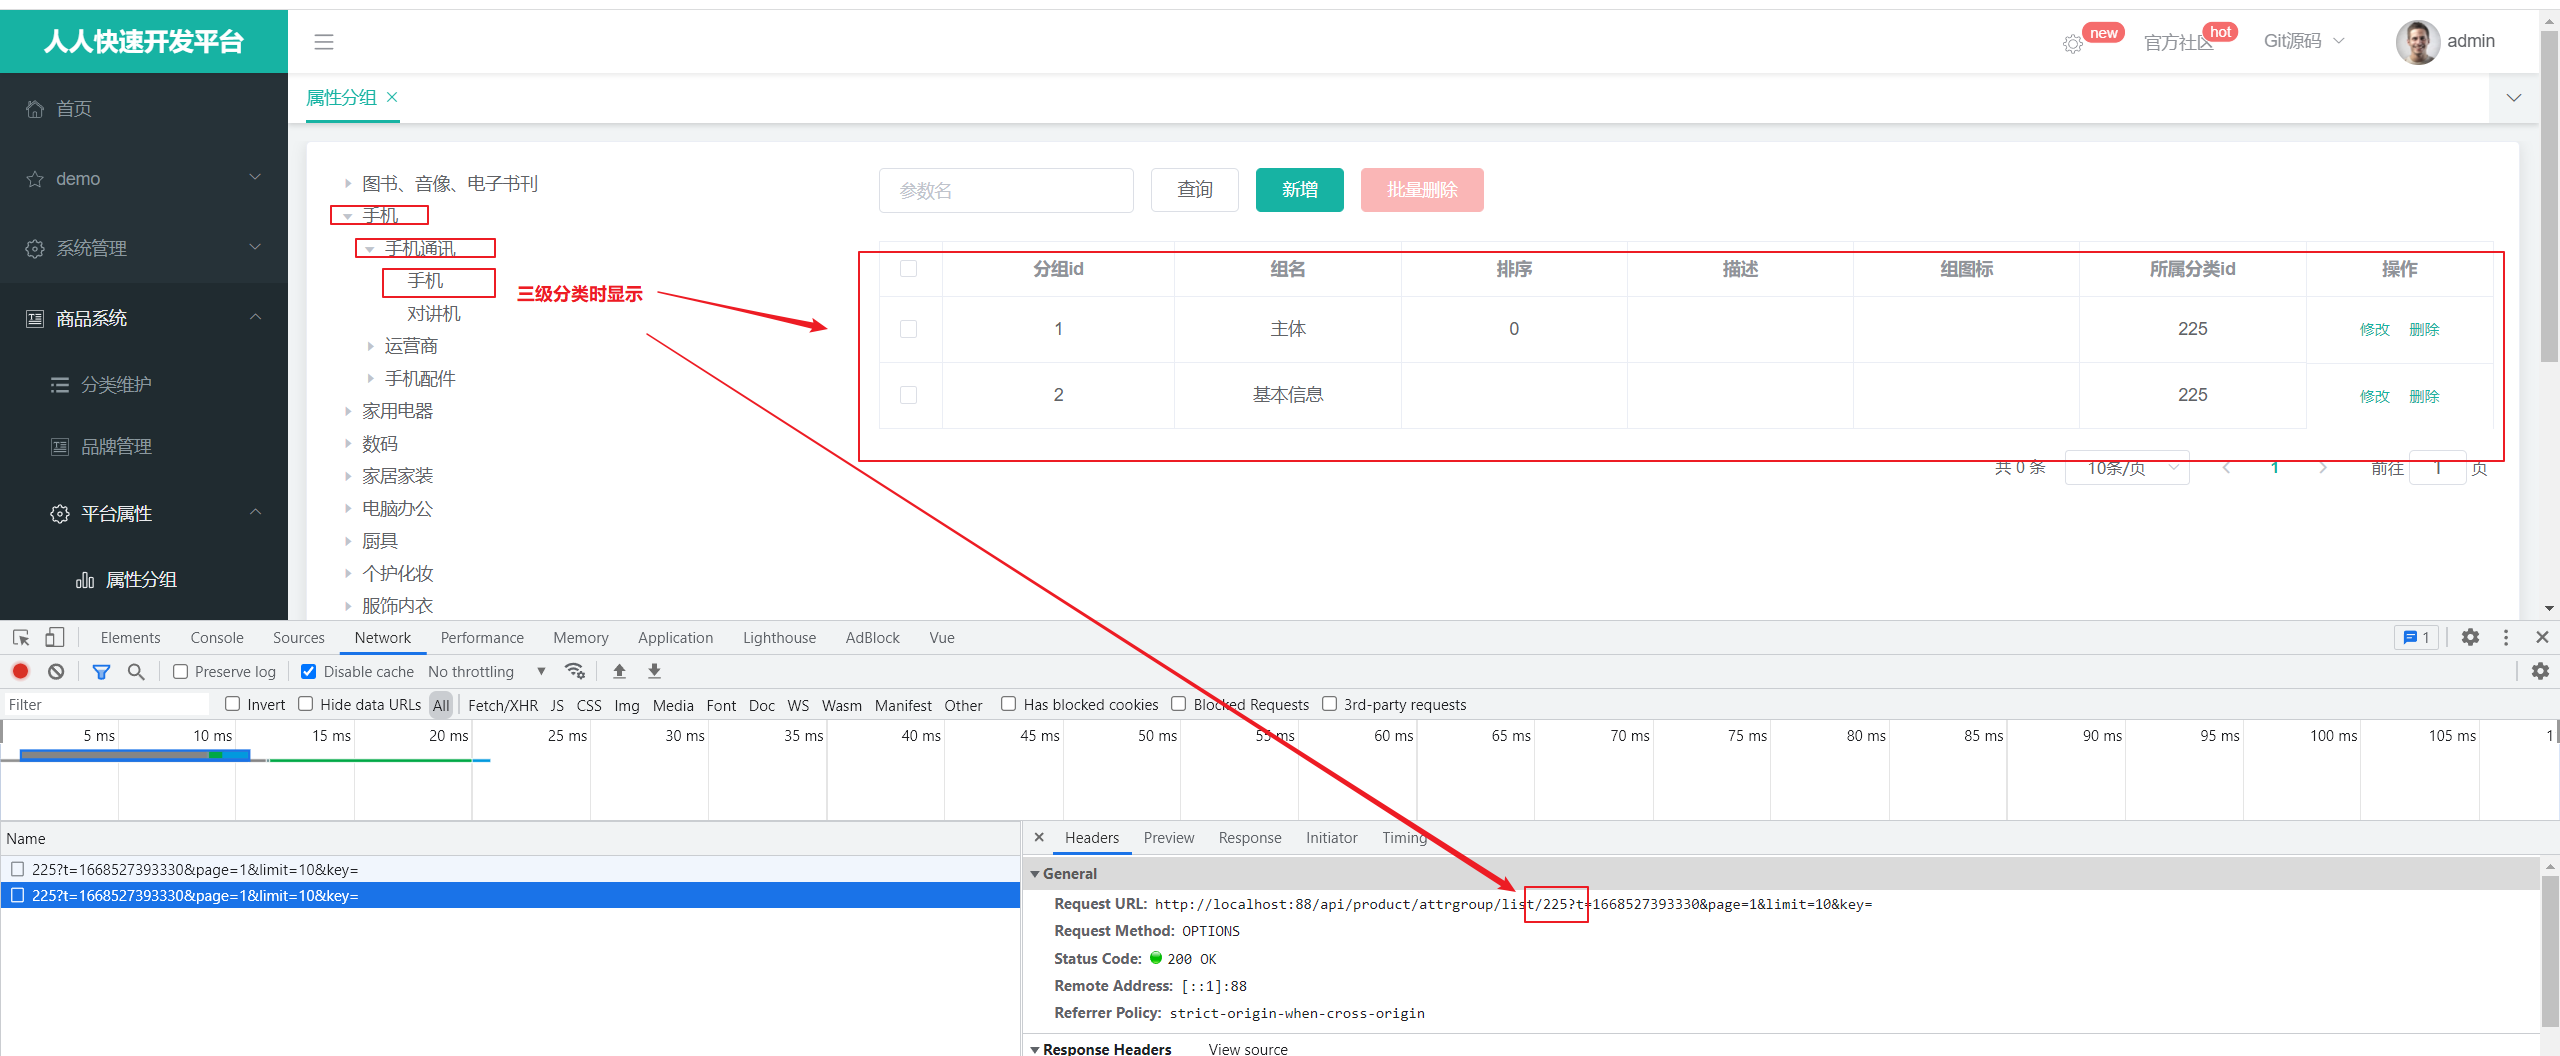
6.3.5 属性分组新增功能
新增时,所属分类id改换为级联选择框
- 新增选择框,添加菜单数据
-
我们发现可以选择分类,但是分类显示的是空白,这个是因为 显示的属性是 label,通过props属性进行绑定
修改attrgroup-add-or-update.vue
<!--v-model 绑定要提交的数据,options绑定选择菜单, props绑定选择框的参数--><el-form-item label="所属分类id" prop="catelogId"><!-- <el-input v-model="dataForm.catelogId" placeholder="所属分类id" @change="handleChange"></el-input> --><el-cascader v-model="dataForm.catelogPath" :options="categorys" :props="props" ></el-cascader></el-form-item>
//data中新增属性,props用来绑定选择框的参数,categorys用来保存菜单props: {value: "catId",label: "name",children: "children"},categorys: [],//方法中新增getCategorys(),用来获取选择菜单的值 getCategorys() {this.$http({url: this.$http.adornUrl('/product/category/list/tree'),method: 'get'}).then(({ data }) => { //将整个对象中的data数据结构出来,因为只有data才是我们需要的console.log("成功了获取到菜单数据....", data.data)this.categorys = data.data; // 数组内容,把数据给menus,就是给了vue实例,最后绑定到视图上})},//组件创建的时候就要获取菜单的值created() {this.getCategorys();}
-
发现返回的数据,三级菜单下面也有children(为空)
@JsonInclude去空字段
优化:没有下级菜单时不要有下一级空菜单,在java端把children属性空值去掉,
空集合时去掉字段,- 解决方法:在 后端
CategoryEntity中设置相应的属性不为空既可。当children为空时,不返回children字段
在children字段上添加注解:当值为空时,不返回当前字段
- 解决方法:在 后端
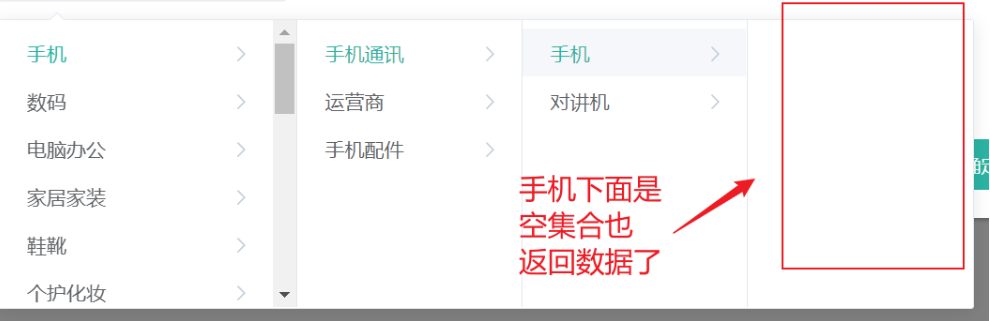
//自定义的属性:用来表示子分类@JsonInclude(JsonInclude.Include.NON_EMPTY) //这个可以判断 是否是字段为空@TableField(exist = false) //表示数据库表中不存在private List<CategoryEntity> children;

- 修改之后仍然报错的原因是:el-cascader 绑定的
dataForm.catelogId是一个数组,其中包含选择框的父节点id和自己的id。而我们要提交的只是他自己的id。
//修改data中的dataFromdataForm: {attrGroupId: 0,attrGroupName: '',sort: '',descript: '',icon: '',catelogId: 0, ///保存要提交的子节点的idcatelogPath: [] //保存父节点和子节点的id},//修改表单提交方法,要传送的数据,只传最后一个子id
// 表单提交dataFormSubmit() {if (valid) {...'catelogId': this.dataForm.catelogPath[this.dataForm.catelogPath.length - 1]})
6.3.6 修改回显分类功能
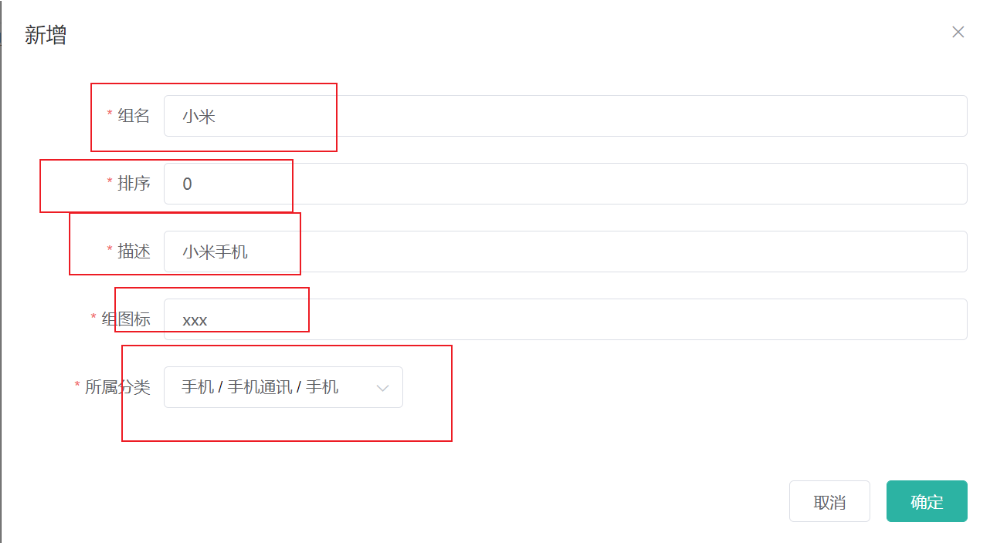
我们要设置选择进行修改的时候将原来本属于这个原信息回显出来。
- 前端 attrgroup-add-or-update.vue新增完整路径
init(id) {this.dataForm.attrGroupId = id || 0this.visible = truethis.$nextTick(() => {this.$refs['dataForm'].resetFields()if (this.dataForm.attrGroupId) {this.$http({url: this.$http.adornUrl(`/product/attrgroup/info/${this.dataForm.attrGroupId}`),method: 'get',params: this.$http.adornParams()}).then(({ data }) => {if (data && data.code === 0) {this.dataForm.attrGroupName = data.attrGroup.attrGroupNamethis.dataForm.sort = data.attrGroup.sortthis.dataForm.descript = data.attrGroup.descriptthis.dataForm.icon = data.attrGroup.iconthis.dataForm.catelogId = data.attrGroup.catelogId;//查出categoryId的完整路径this.dataForm.catelogPath = data.attrGroup.catelogPath;}})}})},
- 后端
AttrGroupEntity新增完整路径属性
/*** 查出categoryId的完整路径*/@TableField(exist = false) //表示数据库中不存在private Long[] catelogPath;
- 修改 AttrGroupController
@Autowiredprivate CategoryService categoryService; /*** 信息*/@RequestMapping("/info/{attrGroupId}")//@RequiresPermissions("product:attrgroup:info")public R info(@PathVariable("attrGroupId") Long attrGroupId){AttrGroupEntity attrGroup = attrGroupService.getById(attrGroupId);Long catelogId = attrGroup.getCatelogId();//设置catelogId的完整路径Long[] path = categoryService.findCatelogPath(catelogId);// 用当前当前分类id查询完整路径并写入 attrGroupattrGroup.setCatelogPath(path);return R.ok().put("attrGroup", attrGroup);}
- 修改categoryService,新增接口,实现方法
//categoryService接口/*** 找到catelogId的完整路径* [父/子/孙]* @param catelogId* @return*/Long[] findCatelogPath(Long catelogId);//categoryServiceImpl实现方法//查找完整路径方法//[2,25,225]@Overridepublic Long[] findCatelogPath(Long catelogId) {List<Long> paths = new ArrayList<>();List<Long> parentPath = findParentPath(catelogId,paths);// 收集的时候是顺序 前端是逆序显示的 所以用集合工具类给它逆序一下//逆序Collections.reverse(parentPath);return parentPath.toArray(new Long[parentPath.size()]);}//递归查找父节点id// 225,25,2private List<Long> findParentPath(Long catelogId,List<Long> paths){//1.收集当前节点idpaths.add(catelogId);CategoryEntity byId = this.getById(catelogId);if (byId.getParentCid() !=0){findParentPath(byId.getParentCid(),paths);}return paths;}测试
在 GulimallProductApplicationTests下:
@AutowiredCategoryService categoryService;@Testpublic void testFindPath(){Long[] catelogPath = categoryService.findCatelogPath(225L);log.info("完整路径:{}", Arrays.asList(catelogPath));}

5、 attrgroup-add-or-update.vue 当对话框关闭时,清空数据,防止不合理回显
<el-dialog:title="!dataForm.attrGroupId ? '新增' : '修改'":close-on-click-modal="false":visible.sync="visible"@closed="dialogClose" //关闭时,绑定方法dialogClose>//新增方法dialogClose() {//关闭时清空之前的路径this.dataForm.catelogPath = [];},- 选择框加上搜索功能:
filterable, 显示提示信息placeholder="试试搜索:手机"
<el-cascader v-model="dataForm.catelogPath" :options="categorys" :props="props" placeholder="试试搜索:手机" filterable></el-cascader>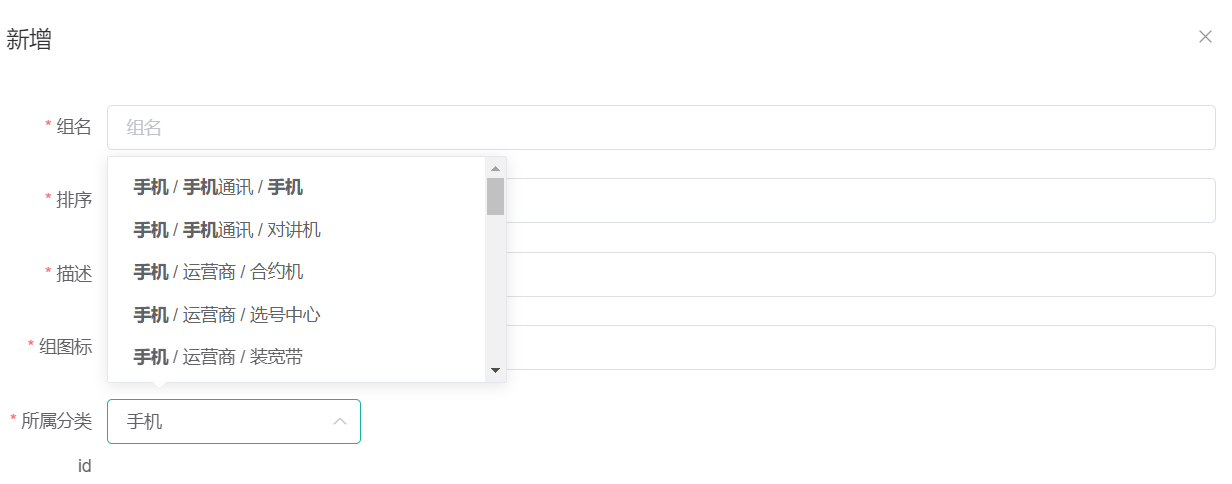
6.3.7 实现分页-引入插件
发现自动生成的分页条不好使,原因是没有引入mybatis-plus的分页插件。新建配置类,引入如下配置

@Configuration
public class MybatisPlusConfig {// 最新版@Beanpublic MybatisPlusInterceptor mybatisPlusInterceptor() {MybatisPlusInterceptor interceptor = new MybatisPlusInterceptor();interceptor.addInnerInterceptor(new PaginationInnerInterceptor(DbType.H2));return interceptor;}}
上面这个是最新版本的分页插件的配置信息。
下面这个是老师课件上的配置信息
@Configuration
@EnableTransactionManagement   //开启事务
@MapperScan("com.atguigu.gulimall.product.dao")
public class MyBatisConfig {//引入分页插件   显示页码@Beanpublic PaginationInterceptor paginationInterceptor(){PaginationInterceptor paginationInterceptor = new PaginationInterceptor();//设置请求的页面大于最大页后操作,true调回到首页,false继续请求,默认falsepaginationInterceptor.setOverflow(true);//设置最大单页限制数量,默认500条,-1不受限制paginationInterceptor.setLimit(1000);return paginationInterceptor;}
}
6.3.8 完善模糊匹配
查询的时候,根据 品牌名字 或品牌id可以进行模糊查询。
首先,通过 BrandController 中的 list 方法,该方法因为是逆向生成的,所以查询功能不太完善。这里因为 调用 了 queryPage 方法进行查询,所以我们修改 queryPage 方法。
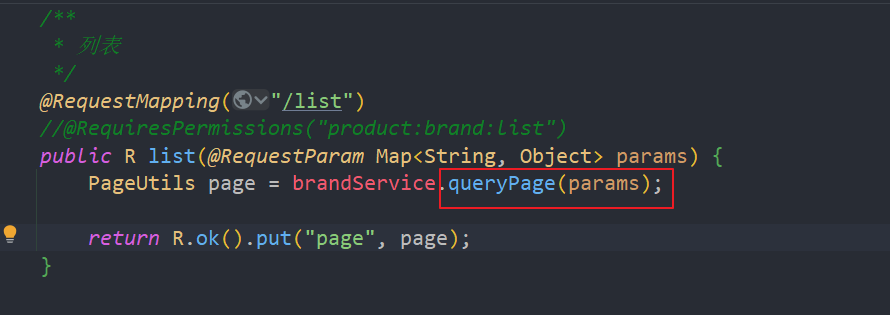
修改 BrandServiceImpl:
@Service("brandService")
public class BrandServiceImpl extends ServiceImpl<BrandDao, BrandEntity> implements BrandService {@Overridepublic PageUtils queryPage(Map<String, Object> params) {//1.获取keyString key = (String) params.get("key");QueryWrapper<BrandEntity> queryWrapper = new QueryWrapper<>();if (!StringUtils.isEmpty(key)){queryWrapper.eq("brand_id",key).or().like("name",key);}IPage<BrandEntity> page = this.page(new Query<BrandEntity>().getPage(params),queryWrapper);return new PageUtils(page);}}
效果:


6.4 关联分类
6.4.1 品牌分类关联
- 复制老师的前端代码到 views下替换逆向生成的前端代码。
文件资料在工程目录下docs文件夹内
成功显示 关联分类
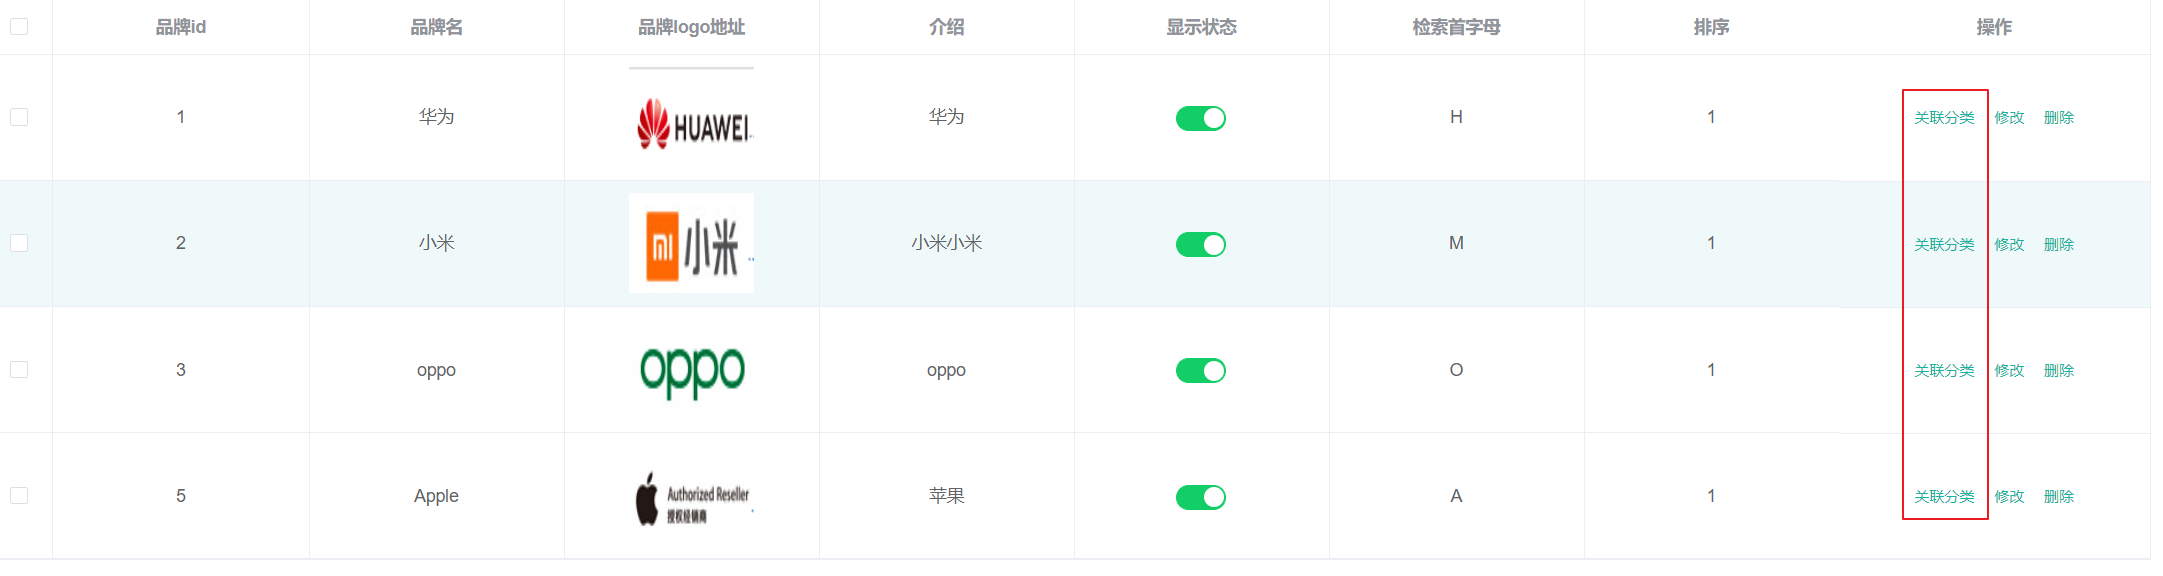
- 小米品牌下面可能包括手机、电器等分类,同样手机分类可能包括小米、华为等多个品牌。所以品牌与分类是多对多的关系。表pms_category_brand_relation保存品牌与分类的多对多关系。
- 查看文档,获取品牌关联的分类: /product/categorybrandrelation/catelog/list
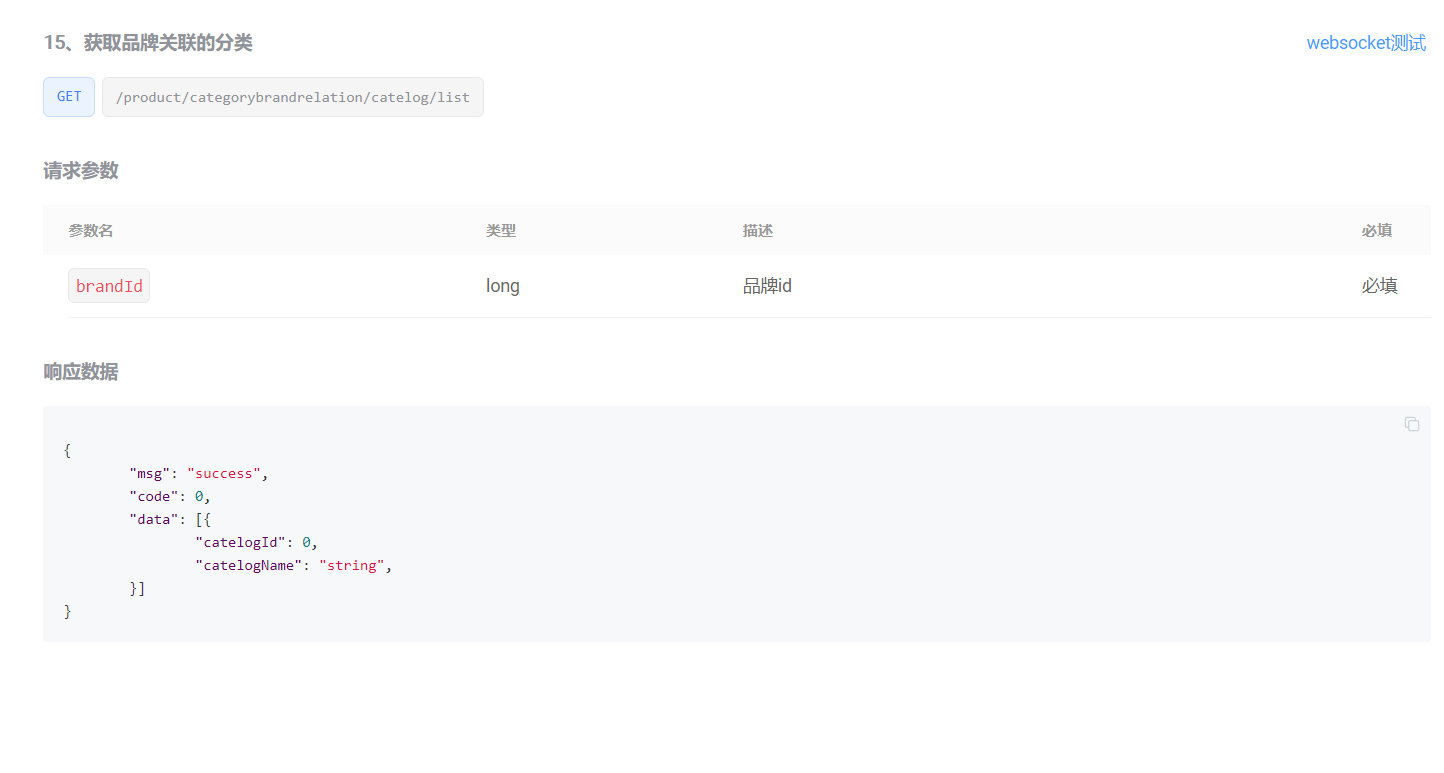
根据传过来的brandId,查找所有的分类信息
CategoryBrandRelationController下
/*** 获取当前品牌关联的所有分类列表*/// @RequestMapping(value = "/catelog/list",method = RequestMethod.GET)@GetMapping("/catelog/list")//@RequiresPermissions("product:categorybrandrelation:list")public R cateloglist(@RequestParam("brandId") Long brandId ){List<CategoryBrandRelationEntity> data = categoryBrandRelationService.list(new QueryWrapper<CategoryBrandRelationEntity>().eq("brand_id", brandId));return R.ok().put("data", data);}
- 新增品牌与分类关联关系:
product/categorybrandrelation/save
保存的时候,前端传过来brandid和categoryid,存储的时候还要存brandName和categoryName,所以在保存之前进行查找
CategoryBrandRelationController
/*** 保存*/@RequestMapping("/save")//@RequiresPermissions("product:categorybrandrelation:save")public R save(@RequestBody CategoryBrandRelationEntity categoryBrandRelation){categoryBrandRelationService.saveDetail(categoryBrandRelation);return R.ok();}service(CategoryBrandRelationServiceImpl)
@AutowiredBrandDao brandDao;@AutowiredCategoryDao categoryDao;@Overridepublic void saveDetail(CategoryBrandRelationEntity categoryBrandRelation) {Long brandId = categoryBrandRelation.getBrandId();Long catelogId = categoryBrandRelation.getCatelogId();//1.查询详细名字BrandEntity brandEntity = brandDao.selectById(brandId);CategoryEntity categoryEntity = categoryDao.selectById(catelogId);categoryBrandRelation.setBrandName(brandEntity.getName());categoryBrandRelation.setCatelogName(categoryEntity.getName());this.save(categoryBrandRelation);}
效果展示:
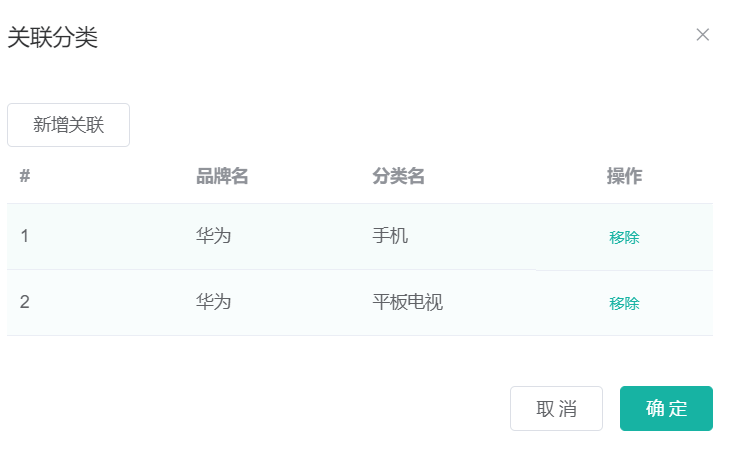
数据库中同样更新成功:

6.4.2 级联更新
-
要对品牌(分类)名字进行修改时,品牌分类关系表之中的名字也要进行修改
SQL数据库中大表尽量不关联,尽量多查询,可以设置冗余字段。
数据同步:冗余字段所在表,真正表 —所有冗余表都需要进行更新
-
品牌名字修改同时修改表数据
BrandController
/*** 修改*/@RequestMapping("/update")//@RequiresPermissions("product:brand:update")public R update(@Validated(UpdateGroup.class) @RequestBody BrandEntity brand) {brandService.updateDetail(brand);return R.ok();}
BrandServiceImpl
@AutowiredCategoryBrandRelationService categoryBrandRelationService; @Transactional@Overridepublic void updateDetail(BrandEntity brand) {//保证冗余字段的数据一致this.updateById(brand);if (!StringUtils.isEmpty(brand.getName())){//同步更新其他关联表中的数据categoryBrandRelationService.updateBrand(brand.getBrandId(),brand.getName());//TODO 更新其他关联}}
CategoryBrandRelationServiceImpl
@Overridepublic void updateBrand(Long brandId, String name) {CategoryBrandRelationEntity relationEntity = new CategoryBrandRelationEntity();relationEntity.setBrandId(brandId);relationEntity.setBrandName(name);this.update(relationEntity,new UpdateWrapper<CategoryBrandRelationEntity>().eq("brand_id",brandId));}
效果展示:修改品牌管理中华为的名字,关联分类中同样修改成功
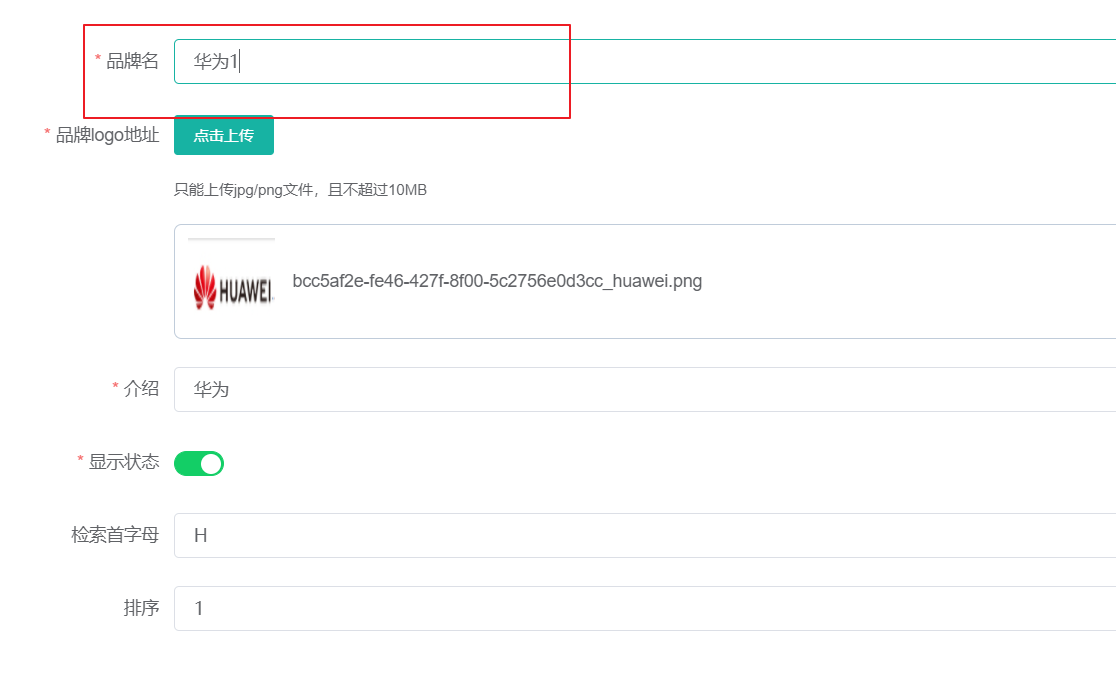

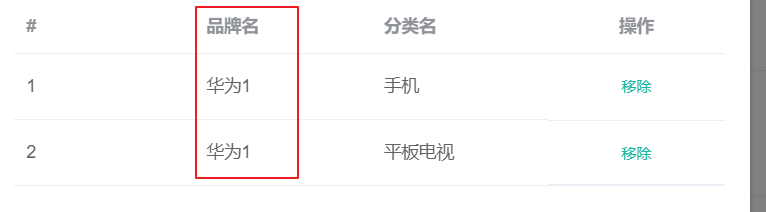
-
分类名字修改同时修改表数据
CategoryController
/*** 修改*/@RequestMapping("/update")//@RequiresPermissions("product:category:update")public R update(@RequestBody CategoryEntity category) {categoryService.updateCascade(category);return R.ok();}
CategroyServiceImpl
 	@AutowiredCategoryBrandRelationService categoryBrandRelationService;
/*** 级联更新所有关联的数据* @param category*/@Transactional@Overridepublic void updateCascade(CategoryEntity category) {this.updateById(category);categoryBrandRelationService.updateCategory(category.getCatId(),category.getName());}
CategoryBrandRelationServiceImpl
@Overridepublic void updateCategory(Long catId, String name) {this.baseMapper.updateCategory(catId,name);}CategoryBrandRelationDao
void updateCategory(@Param("catId") Long catId, @Param("name") String name);
CateBrandRelationDao.xml
<update id="updateCategory">UPDATE `pms_category_brand_relation` SET catelog_name = #{name} WHERE catelog_id = #{catId}</update>
对于品牌 更新,我们使用了 UpdateWrapper ; 对于 分类更新,我们使用了自定义的 SQL语句。
效果展示:
在分类维护中修改,品牌管理处的关联分类也同时更新
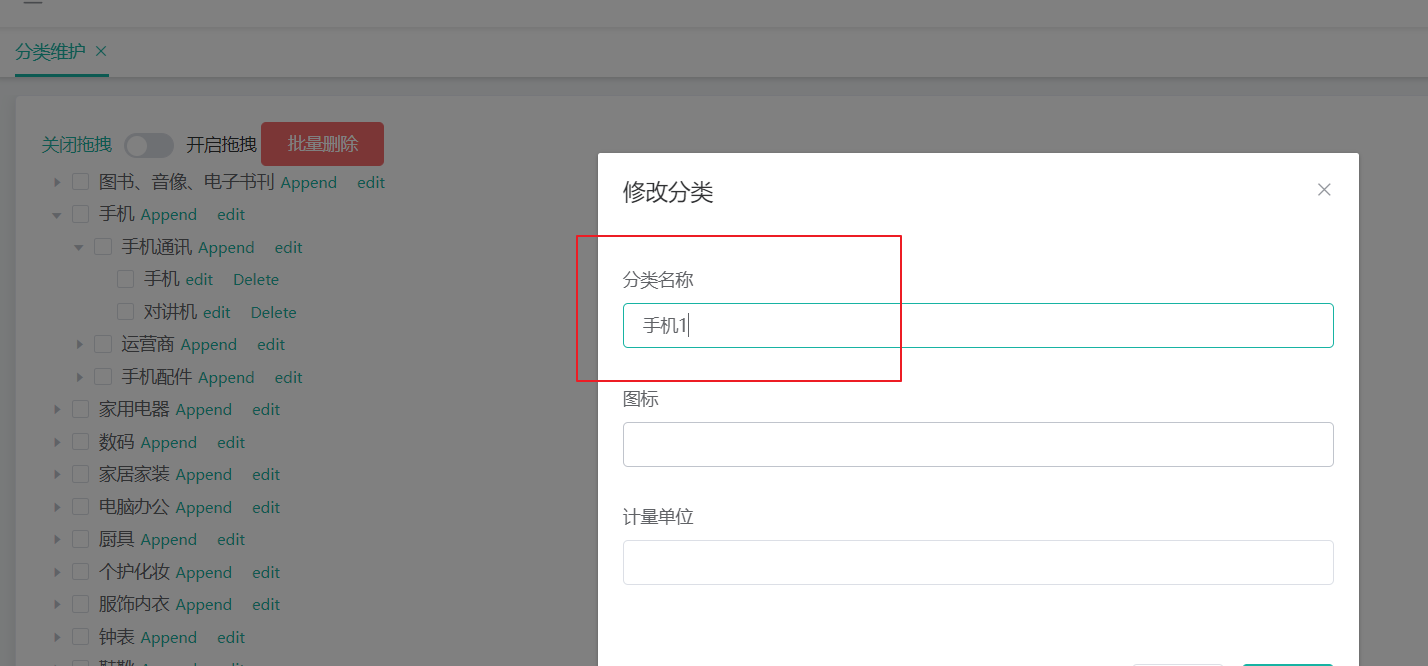
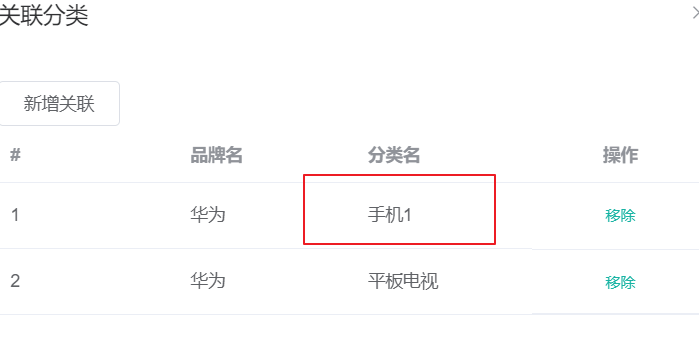
6.4.3 完善属性分组的模糊查询
修改 AttrGroupServiceImpl下的 queryPage方法,实现模糊查询
@Overridepublic PageUtils queryPage(Map<String, Object> params, Long catelogId) {String key = (String) params.get("key");// select * from pms_attr_group where catelog_id =? and (attr_group_name like key or attr_group_id = key)QueryWrapper<AttrGroupEntity> wrapper = new QueryWrapper<AttrGroupEntity>();if (!StringUtils.isEmpty(key)) {wrapper.and((obj) -> {obj.like("attr_group_name", key).or().eq("attr_group_id", key);});}if (catelogId == 0) {//如果传过来的id是0,则查询所有属性// this.page两个参数:// 第一个:查询页码信息,其中 Query<>().getPage 方法传入一个map,会自动封装成 Ipage// 第二个:查询条件,空的wapper 就是查询全部IPage<AttrGroupEntity> page = this.page(new Query<AttrGroupEntity>().getPage(params),wrapper);return new PageUtils(page);} else {wrapper.eq("catelog_id", catelogId);IPage<AttrGroupEntity> page = this.page(new Query<AttrGroupEntity>().getPage(params),wrapper);return new PageUtils(page);}}
效果展示:

6.5 规格参数
知识点补充:
1、Object 划分
- PO(persistant object) 持久对象
PO 就是对应数据库中某个表中的一条记录,多个记录可以用PO 的集合。PO 中应该不包
含任何对数据库的操作。 - DO(Domain Object)领域对象
就是从现实世界中抽象出来的有形或无形的业务实体。 - TO(Transfer Object) ,数据传输对象
不同的应用程序之间传输的对象 - DTO(Data Transfer Object)数据传输对象
这个概念来源于J2EE 的设计模式,原来的目的是为了EJB 的分布式应用提供粗粒度的数据实体,以减少分布式调用的次数,从而提高分布式调用的性能和降低网络负载,但在这里,泛指用于展示层与服务层之间的数据传输对象。 - VO(value object) 值对象
通常用于业务层之间的数据传递,和PO 一样也是仅仅包含数据而已。但应是抽象出的业务对象, 可以和表对应, 也可以不, 这根据业务的需要。用new 关键字创建,由GC 回收的。
View object:视图对象;
接受页面传递来的数据,封装对象
将业务处理完成的对象,封装成页面要用的数据 - BO(business object) 业务对象
从业务模型的角度看, 见UML 元件领域模型中的领域对象。封装业务逻辑的java 对象, 通过调用DAO 方法, 结合PO,VO 进行业务操作。business object: 业务对象主要作用是把业务逻辑封装为一个对象。这个对象可以包括一个或多个其它的对象。比如一个简历,有教育经历、工作经历、社会关系等等。我们可以把教育经历对应一个PO ,工作经历对应一个PO ,社会关系对应一个PO 。建立一个对应简历的BO 对象处理简历,每个BO 包含这些PO 。这样处理业务逻辑时,我们就可以针对BO 去处理。 - POJO(plain ordinary java object) 简单无规则java 对象
传统意义的java 对象。就是说在一些Object/Relation Mapping 工具中,能够做到维护数据库表记录的persisent object 完全是一个符合Java Bean 规范的纯Java 对象,没有增加别的属性和方法。我的理解就是最基本的java Bean ,只有属性字段及setter 和getter方法!。
POJO 是DO/DTO/BO/VO 的统称。 - DAO(data access object) 数据访问对象
是一个sun 的一个标准j2ee 设计模式, 这个模式中有个接口就是DAO ,它负持久层的操作。为业务层提供接口。此对象用于访问数据库。通常和PO 结合使用, DAO 中包含了各种数据库的操作方法。通过它的方法, 结合PO 对数据库进行相关的操作。夹在业务逻辑与数据库资源中间。配合VO, 提供数据库的CRUD 操作.
6.5.1 规格参数新增
-
规格参数新增时,请求的URL:Request URL:/product/attr/save
-
当有新增字段时,我们往往会在entity实体类中新建一个字段,并标注数据库中不存在该字段,然而这种方式并不规范。比较规范的做法是,新建一个vo文件夹,将每种不同的对象,按照它的功能进行了划分。
-
查看前端返回的数据,发现比数据库中的attr多了attrGroupId字段, 所以新建AttrVo
{"attrGroupId": 0, //属性分组id"attrName": "string",//属性名"attrType": 0, //属性类型"catelogId": 0, //分类id"enable": 0, //是否可用 "icon": "string", //图标"searchType": 0, //是否检索"showDesc": 0, //快速展示"valueSelect": "string", //可选值列表"valueType": 0 //可选值模式 } -
查看后端的save方法,只保存的attr,并没有保存attrGroup的信息。所以稍微修改一下。
1)创建Vo:接收前端页面传来的值,并且与 AttrEntity 对应,此外添加一个字段 Long attrGroupId,作为级联属性
View object:视图对象;
接受页面传递来的数据,封装对象
将业务处理完成的对象,封装成页面要用的数据
@Data
public class AttrVo {/*** 属性id*/private Long attrId;/*** 属性名*/private String attrName;/*** 是否需要检索[0-不需要,1-需要]*/private Integer searchType;/*** 值类型[0-为单个值,1-可以选择多个值]*/private Integer valueType;/*** 属性图标*/private String icon;/*** 可选值列表[用逗号分隔]*/private String valueSelect;/*** 属性类型[0-销售属性,1-基本属性,2-既是销售属性又是基本属性]*/private Integer attrType;/*** 启用状态[0 - 禁用,1 - 启用]*/private Long enable;/*** 所属分类*/private Long catelogId;/*** 快速展示【是否展示在介绍上;0-否 1-是】,在sku中仍然可以调整*/private Integer showDesc;private Long attrGroupId;
}
2)AttrController
/*** 保存*/@RequestMapping("/save")//@RequiresPermissions("product:attr:save")public R save(@RequestBody AttrVo attr){attrService.saveAttr(attr);return R.ok();}
3)AttrServiceImpl
@AutowiredAttrAttrgroupRelationDao relationDao;@Transactional@Overridepublic void saveAttr(AttrVo attr) {AttrEntity attrEntity = new AttrEntity();// attrEntity.setAttrName(attr.getAttrName());BeanUtils.copyProperties(attr, attrEntity);//第一个参数 是页面传递过来的值:vo ; 第二个参数是 数据库对应的实体,是 PO//1、保存基本数据this.save(attrEntity);//2、保存关联关系if (attr.getAttrType() == ProductConstant.AttrEnum.ATTR_TYPE_BASE.getCode() && attr.getAttrGroupId() != null){ //基本属性才保存AttrAttrgroupRelationEntity relationEntity = new AttrAttrgroupRelationEntity();relationEntity.setAttrGroupId(attr.getAttrGroupId());relationEntity.setAttrId(attrEntity.getAttrId());relationDao.insert(relationEntity);}}
4)测试
注意有坑:
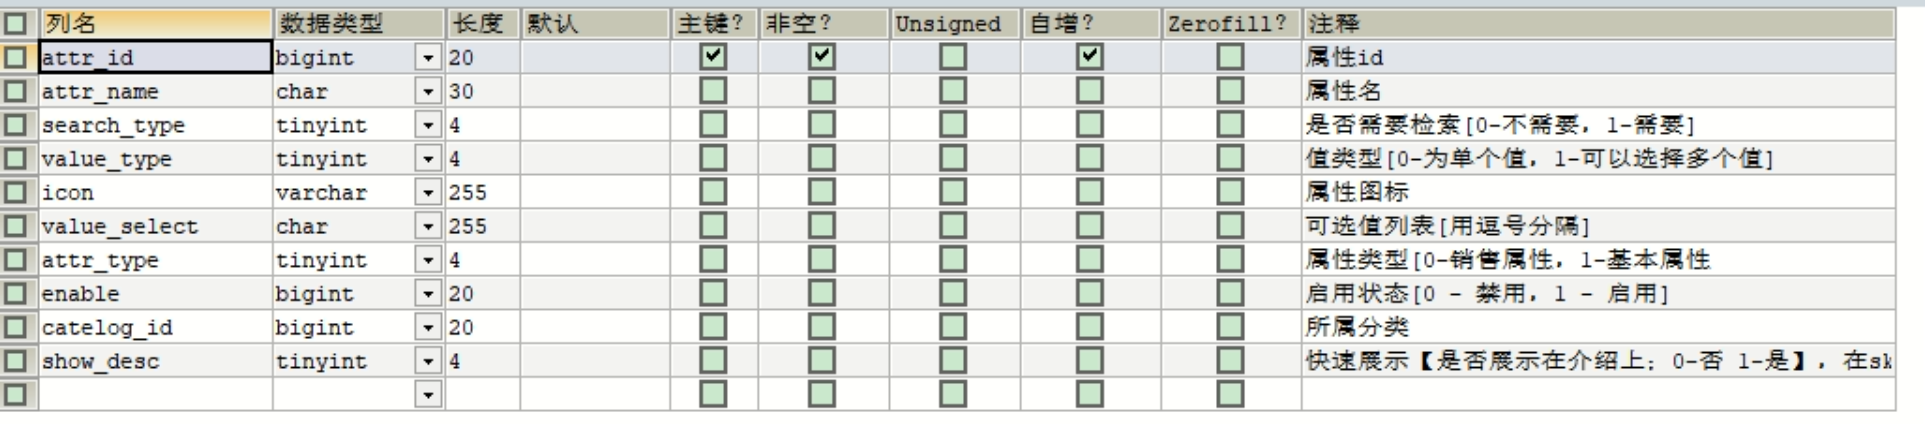
老师给的文件生成的数据库中 pms_attr 少了一个字段 value_type
ALTER TABLE `pms_attr` ADD value_type TINYINT(4)
效果展示:
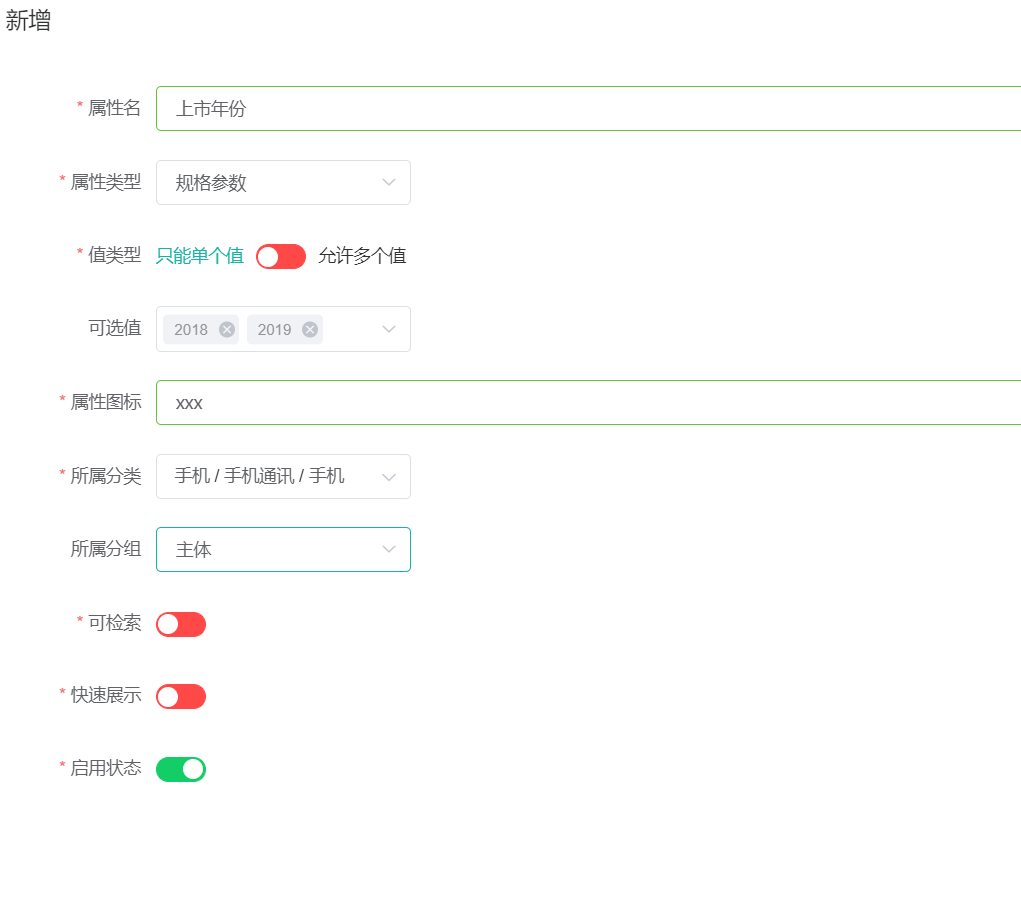
pms_attr

pms_attr_attrgroup_relation
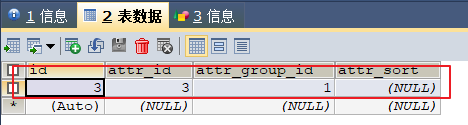
属性 和 属性分组 关联在一起了。
6.5.2 获取分类规格参数
1、URL:/product/attr/base/list/{catelogId}
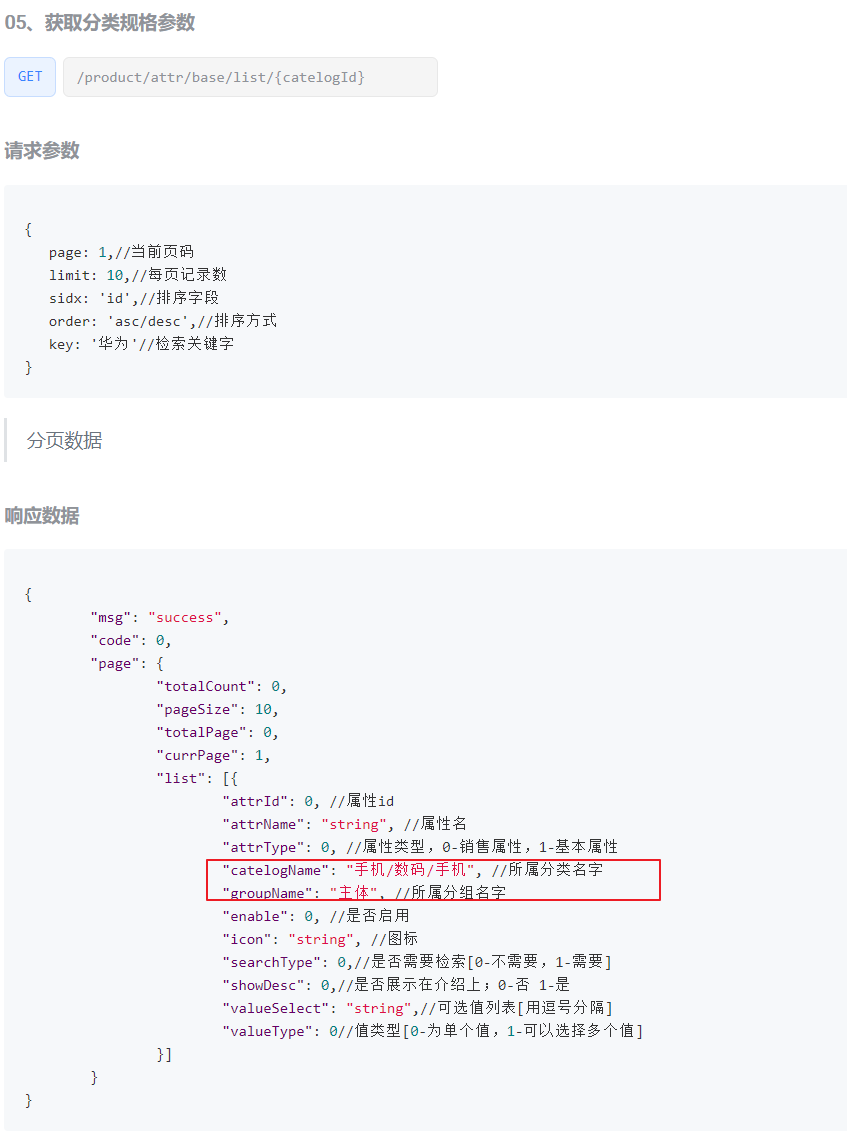
AttrController
// /product/attr/base/list/{catelogId}@RequestMapping("/base/list/{catelogId}")//@RequiresPermissions("product:attr:list")public R baseAttrList(@RequestParam Map<String, Object> params,@PathVariable("catelogId") Long catelogId){PageUtils page = attrService.queryBaseAttrPage(params,catelogId);return R.ok().put("page", page);}AttrServiceImpl
@Overridepublic PageUtils queryBaseAttrPage(Map<String, Object> params, Long catelogId) {QueryWrapper<AttrEntity> queryWrapper = new QueryWrapper<>();//模糊查询if (catelogId != 0){queryWrapper.eq("catelog_id",catelogId);}//检索条件 keyString key = (String) params.get("key");if (!StringUtils.isEmpty(key)){// attr_id attr_namequeryWrapper.and((wrapper)->{wrapper.eq("attr_id",key).or().like("attr_name",key);});}IPage<AttrEntity> page = this.page(new Query<AttrEntity>().getPage(params),queryWrapper);return new PageUtils(page);}
效果展示:

所属分类和所属分组没有查询出来,完善 所属分类和所属分组。
不推荐连表查询,在大数据情况下,造成大量中间表生成,所以通过中间表进行pms_attr_attrgroup_relation多次查询即可。
修改AttrServiceImpl
@Overridepublic PageUtils queryBaseAttrPage(Map<String, Object> params, Long catelogId) {QueryWrapper<AttrEntity> queryWrapper = new QueryWrapper<>();//模糊查询if (catelogId != 0){queryWrapper.eq("catelog_id",catelogId);}//检索条件 keyString key = (String) params.get("key");if (!StringUtils.isEmpty(key)){// attr_id attr_namequeryWrapper.and((wrapper)->{wrapper.eq("attr_id",key).or().like("attr_name",key);});}IPage<AttrEntity> page = this.page(new Query<AttrEntity>().getPage(params),queryWrapper);PageUtils pageUtils = new PageUtils(page);List<AttrEntity> records = page.getRecords();//封装attrRespVoList<AttrRespVo> respVos = records.stream().map((attrEntity) -> {AttrRespVo attrRespVo = new AttrRespVo();BeanUtils.copyProperties(attrEntity, attrRespVo);//将AttrEntity中的属性拷贝到AttrRespVo//1.设置分类和分组的名字//通过 属性id---attrId 查出 分组id ---attrGroupIdAttrAttrgroupRelationEntity attrId = relationDao.selectOne(new QueryWrapper<AttrAttrgroupRelationEntity>().eq("attr_id", attrEntity.getAttrId()));//判断下,可能没有设置分组信息if (attrId != null) {AttrGroupEntity attrGroupEntity = attrGroupDao.selectById(attrId.getAttrGroupId());attrRespVo.setGroupName(attrGroupEntity.getAttrGroupName());}//分类CategoryEntity categoryEntity = categoryDao.selectById(attrEntity.getCatelogId());if (categoryEntity != null) {attrRespVo.setCatelogName(categoryEntity.getName());}return attrRespVo;}).collect(Collectors.toList());//采用最新的结果集pageUtils.setList(respVos);return pageUtils;}
效果展示:
所属分类和所属分组展示出来

模糊查询也可以

6.5.3 查询属性详情
1、url地址:/product/attr/info/{attrId}
2、修改AttrRespVo
@Data
public class AttrRespVo extends AttrVo{// "catelogName": "手机/数码/手机", //所属分类名字//         "groupName": "主体", //所属分组名字private String catelogName;private String groupName;private Long[] catelogPath;
}
3、AttrController
// /product/attr/info/{attrId}/*** 信息*/@RequestMapping("/info/{attrId}")//@RequiresPermissions("product:attr:info")public R info(@PathVariable("attrId") Long attrId){// AttrEntity attr = attrService.getById(attrId);AttrRespVo respVo = attrService.getAttrInfo(attrId);return R.ok().put("attr", respVo);}4、AttrServiceImpl
@Overridepublic AttrRespVo getAttrInfo(Long attrId) {AttrRespVo respVo = new AttrRespVo();AttrEntity attrEntity = this.getById(attrId);BeanUtils.copyProperties(attrEntity, respVo);//1.设置分组信息AttrAttrgroupRelationEntity attrgroupRelation = relationDao.selectOne(new QueryWrapper<AttrAttrgroupRelationEntity>().eq("attr_id", attrId));if (attrgroupRelation != null) {respVo.setAttrGroupId(attrgroupRelation.getAttrGroupId());//得到分组 idAttrGroupEntity attrGroupEntity = attrGroupDao.selectById(attrgroupRelation.getAttrGroupId());if (attrGroupEntity != null) {respVo.setGroupName(attrGroupEntity.getAttrGroupName()); //得到分组 名字}}//2.设置分类信息Long catelogId = attrEntity.getCatelogId();Long[] catelogPath = categoryService.findCatelogPath(catelogId);respVo.setCatelogPath(catelogPath);CategoryEntity categoryEntity = categoryDao.selectById(catelogId);if (categoryEntity != null) {respVo.setCatelogName(categoryEntity.getName());}return respVo;}
4、效果展示:
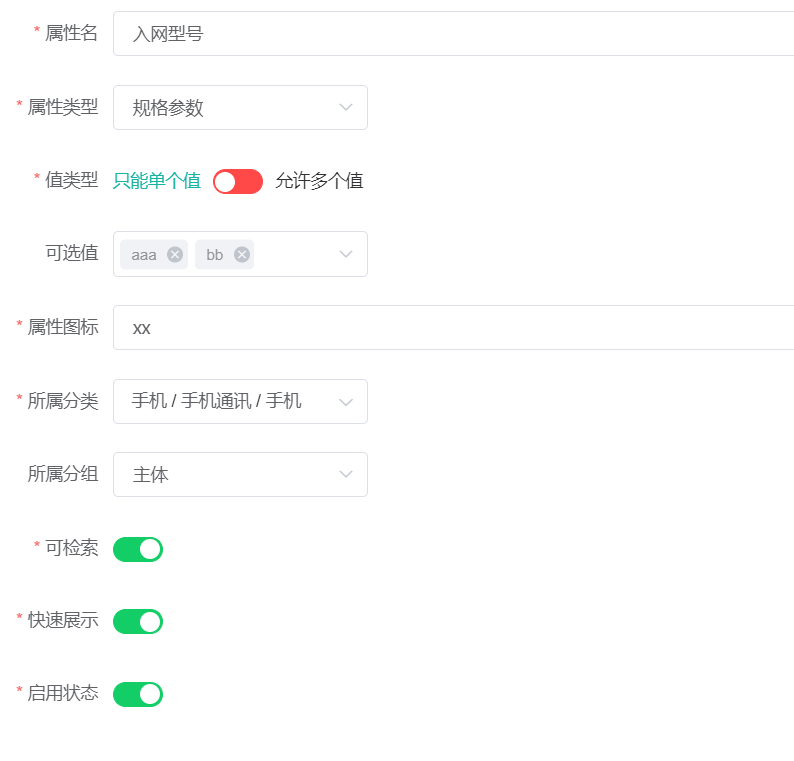
但是我们发现 修改不成功,这是因为 修改操作 是 更新操作,所以接下来我们完善更新操作。
6.5.4 修改属性
1、url:/product/attr/update
2、AttrController
// /product/attr/update/*** 修改*/@RequestMapping("/update")//@RequiresPermissions("product:attr:update")public R update(@RequestBody AttrVo attr){attrService.updateAttr(attr);return R.ok();}
3、AttrServiceImpl
//保存时,要修改两张表@Transactional@Overridepublic void updateAttr(AttrVo attr) {AttrEntity attrEntity = new AttrEntity();BeanUtils.copyProperties(attr, attrEntity);//封装页面传来的基本信息this.updateById(attrEntity);//1.修改分组关联AttrAttrgroupRelationEntity relationEntity = new AttrAttrgroupRelationEntity();relationEntity.setAttrGroupId(attr.getAttrGroupId());relationEntity.setAttrId(attr.getAttrId());//判断饰新增还是修改Integer count = relationDao.selectCount(new QueryWrapper<AttrAttrgroupRelationEntity>().eq("attr_id", attr.getAttrId()));if (count > 0) {//修改relationDao.update(relationEntity, new UpdateWrapper<AttrAttrgroupRelationEntity>().eq("attr_id", attr.getAttrId()));} else {//新增relationDao.insert(relationEntity);}}
4、效果展示
新增所属分组

修改所属分组

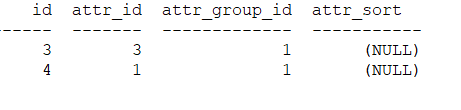
6.6 平台属性
6.6.1 销售属性
1、url:/product/attr/sale/list/{catelogId}
2、可以通过在添加路径变量{attrType}同时用一个方法查询销售属性和规格参数
注意:销售属性,没有分组信息,所以复用方法的时候,要判断是销售属性还是规格参数
AttrController
// /product/attr/base/list/{catelogId}// /product/attr/sale/list/{catelogId}/**** @param params* @param catelogId* @return*/@RequestMapping("/{attrType}/list/{catelogId}")//@RequiresPermissions("product:attr:list")public R baseAttrList(@RequestParam Map<String, Object> params,@PathVariable("catelogId") Long catelogId,@PathVariable("attrType") String type){PageUtils page = attrService.queryBaseAttrPage(params,catelogId,type);return R.ok().put("page", page);}
AttrServiceImpl
PS:ctrl + alt +b 查看接口的实现
@Overridepublic PageUtils queryBaseAttrPage(Map<String, Object> params, Long catelogId, String type) {//"attr_type","base".equalsIgnoreCase(type)?1:0 类型是基本类型就查1,否则查0QueryWrapper<AttrEntity> queryWrapper = new QueryWrapper<AttrEntity>().eq("attr_type","base".equalsIgnoreCase(type)?ProductConstant.AttrEnum.ATTR_TYPE_BASE.getCode():ProductConstant.AttrEnum.ATTR_TYPE_SALE.getCode());//模糊查询if (catelogId != 0) {queryWrapper.eq("catelog_id", catelogId);}//检索条件 keyString key = (String) params.get("key");if (!StringUtils.isEmpty(key)) {// attr_id attr_namequeryWrapper.and((wrapper) -> {wrapper.eq("attr_id", key).or().like("attr_name", key);});}IPage<AttrEntity> page = this.page(new Query<AttrEntity>().getPage(params),queryWrapper);PageUtils pageUtils = new PageUtils(page);List<AttrEntity> records = page.getRecords();//封装attrRespVoList<AttrRespVo> respVos = records.stream().map((attrEntity) -> {AttrRespVo attrRespVo = new AttrRespVo();BeanUtils.copyProperties(attrEntity, attrRespVo);//将AttrEntity中的属性拷贝到AttrRespVo//如果是基本属性才有分组,销售属性不需要分组if ("base".equalsIgnoreCase(type)){//1.设置分类和分组的名字//通过 属性id---attrId 查出 分组id ---attrGroupIdAttrAttrgroupRelationEntity attrId = relationDao.selectOne(new QueryWrapper<AttrAttrgroupRelationEntity>().eq("attr_id", attrEntity.getAttrId()));//判断下,可能没有设置分组信息if (attrId != null && attrId.getAttrGroupId() != null) {AttrGroupEntity attrGroupEntity = attrGroupDao.selectById(attrId.getAttrGroupId());attrRespVo.setGroupName(attrGroupEntity.getAttrGroupName());}}//分类CategoryEntity categoryEntity = categoryDao.selectById(attrEntity.getCatelogId());if (categoryEntity != null) {attrRespVo.setCatelogName(categoryEntity.getName());}return attrRespVo;}).collect(Collectors.toList());//采用最新的结果集pageUtils.setList(respVos);return pageUtils;}
3、当新增/修改规格参数时,会在pms_attr_attrgroup_relation表之中新增数据,但是销售属性没有分组信息。所以在新增/修改时,进行判断
在Common中新建类ProductConstant,用来商品服务中的保存常量
public class ProductConstant {public enum AttrEnum {ATTR_TYPE_BASE(1,"基本属性"), ATTR_TYPE_SALE(0,"销售属性");private int code;private String msg;AttrEnum(int code, String msg) {this.code = code;this.msg = msg;}public int getCode() {return code;}public String getMsg() {return msg;}}
}
在saveAttr,getAttrInfo,updateAttr这三个方法中,设计分组信息之前做判断
if (attr.getAttrType() == ProductConstant.AttrEnum.ATTR_TYPE_BASE.getCode()){ //基本属性才保存
}
5、效果展示:
添加销售属性,数据库 pms_attr_attrgroup_relation表中没有新增信息
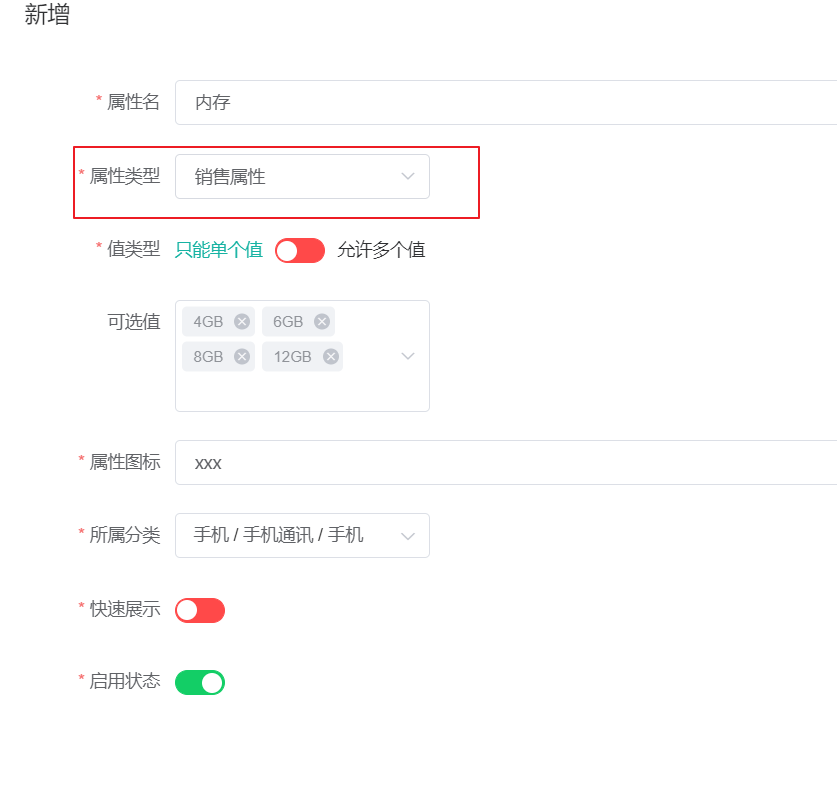
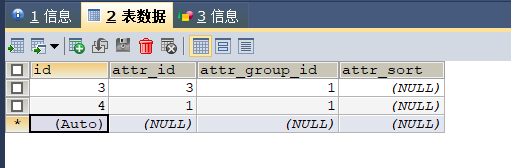
注意:如果前端页面展示没有 快速展示 ,在前端代码中将 attr-add-or-update 和 baseattr这两个 vue文件中,删除 v-if=“type == 1” -----这一步也可以不修改,不使用快速展示这个功能。

6.6.2 获取属性分组的关联的所有属性
1、URL10:/product/attrgroup/{attrgroupId}/attr/relation
AttrgroupController
///product/attrgroup/{attrgroupId}/attr/relation@GetMapping("/{attrgroupId}/attr/relation")public R attrRelation(@PathVariable("attrgroupId") Long attrgroupId){List<AttrEntity> entities = attrService.getRelationAttr(attrgroupId);return R.ok().put("data",entities);}AttrServiceImpl
/*** 根据分组 id查找关联的所有基本属性* @param attrgroupId* @return*/@Overridepublic List<AttrEntity> getRelationAttr(Long attrgroupId) {List<AttrAttrgroupRelationEntity> entities = relationDao.selectList(new QueryWrapper<AttrAttrgroupRelationEntity>().eq("attr_group_id", attrgroupId));List<Long> attrIds = entities.stream().map((attr) -> {return attr.getAttrId();}).collect(Collectors.toList());if (attrIds == null || attrIds.size() == 0){return null;}Collection<AttrEntity> attrEntities = this.listByIds(attrIds);return (List<AttrEntity>) attrEntities;}
2、效果展示:查出 主体关联的属性
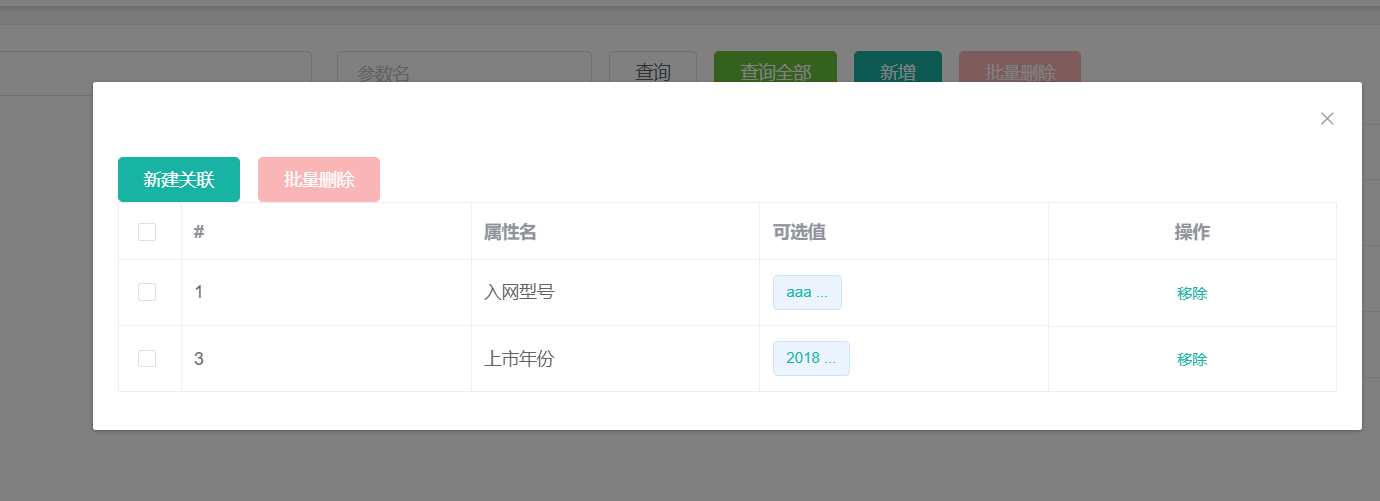
6.6.3 删除属性与分组的关联关系
1、url12:/product/attrgroup/attr/relation/delete
2、新建AttrGroupRelationVo
@Data
public class AttrGroupRelationVo {// [{"attrId":1,"attrGroupId":2}]private Long attrId;private Long attrGroupId;
}
3、AttrGroupController
// /product/attrgroup/attr/relation/delete@PostMapping("/attr/relation/delete")public R deleteRelation(@RequestBody AttrGroupRelationVo[] vos){attrService.deleteRelation(vos);return R.ok();}
4、AttrServiceImpl
public void deleteRelation(AttrGroupRelationVo[] vos) {List<AttrAttrgroupRelationEntity> entities = Arrays.asList(vos).stream().map((item) -> {AttrAttrgroupRelationEntity relationEntity = new AttrAttrgroupRelationEntity();BeanUtils.copyProperties(item, relationEntity);return relationEntity;}).collect(Collectors.toList());//根据 attrId,attrGroupId批量删除关联关系relationDao.deleteBatchRelation(entities);}
5、AttrAttrgroupRelationDao
@Mapper
public interface AttrAttrgroupRelationDao extends BaseMapper<AttrAttrgroupRelationEntity> {void deleteBatchRelation(@Param("entities") List<AttrAttrgroupRelationEntity> entities);
}
6、AttrAttrgroupRelationDao.xml
<delete id="deleteBatchRelation">DELETE FROM `pms_attr_attrgroup_relation` WHERE<foreach collection="entities" item="item" separator=" OR ">(attr_id=#{item.attrId} AND attr_group_id=#{item.attrGroupId})</foreach></delete>7、效果展示:成功移除
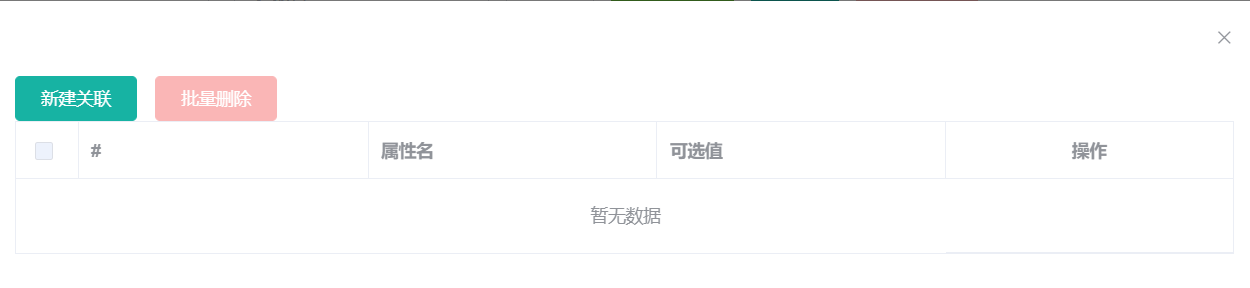
6.6.4 获取属性分组没有关联的其他属性
1、url13:/product/attrgroup/{attrgroupId}/noattr/relation
获取属性分组里面还没有关联的本分类里面的其他基本属性,方便添加新的关联
2、AttrGroupController
// /product/attrgroup/{attrgroupId}/noattr/relation@GetMapping("/{attrgroupId}/noattr/relation")public R attrNoRelation(@PathVariable("attrgroupId") Long attrgroupId,@RequestParam Map<String, Object> params){PageUtils page = attrService.getNoRelationAttr(params,attrgroupId);return R.ok().put("page",page);}
3、AttrServiceImpl
- 当前分组只能关联自己所属分类里面的所有属性
- 当前分组只能关联别的分组没有引用的属性
- 当前分类下的其他分组
- 这些分组关联的属性
- 从当前分类的所有属性中移除这些属性
/*** 获取当前分组没有关联的所有属性* @param params* @param attrgroupId* @return*/@Overridepublic PageUtils getNoRelationAttr(Map<String, Object> params, Long attrgroupId) {//1.当前分组只能关联自己所属的分类里面的所有属性//查询出当前分组所属的分类AttrGroupEntity attrGroupEntity = attrGroupDao.selectById(attrgroupId);Long catelogId = attrGroupEntity.getCatelogId();//2.当前分组只能冠梁别的分组没有引用的属性//2.1 当前分类下的其他分组List<AttrGroupEntity> group = attrGroupDao.selectList(new QueryWrapper<AttrGroupEntity>().eq("catelog_id", catelogId));List<Long> collect = group.stream().map((item) -> {return item.getAttrGroupId();}).collect(Collectors.toList());//2.2 这些分组关联的属性List<AttrAttrgroupRelationEntity> groupId = relationDao.selectList(new QueryWrapper<AttrAttrgroupRelationEntity>().in("attr_group_id", collect));List<Long> attrIds = groupId.stream().map((item) -> {return item.getAttrId();}).collect(Collectors.toList());//2.3 从当前分类的所有属性中移除这些属性;QueryWrapper<AttrEntity> wrapper = new QueryWrapper<AttrEntity>().eq("catelog_id", catelogId).eq("attr_type", ProductConstant.AttrEnum.ATTR_TYPE_BASE.getCode());if (attrIds != null && attrIds.size() > 0){wrapper.notIn("attr_id",attrIds);}//模糊查询String key = (String) params.get("key");if (!StringUtils.isEmpty(key)){wrapper.and((w)->{w.eq("attr_id",key).or().like("attr_name",key);});}IPage<AttrEntity> page = this.page(new Query<AttrEntity>().getPage(params), wrapper);PageUtils pageUtils = new PageUtils(page);return pageUtils;}
4、效果展示:
给 2号分组关联 1号属性
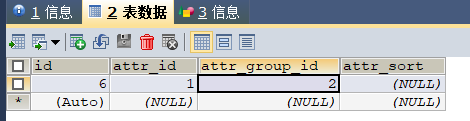
1号分组 新建关联 就不会出现 1号属性,因为已经被 2号分组关联
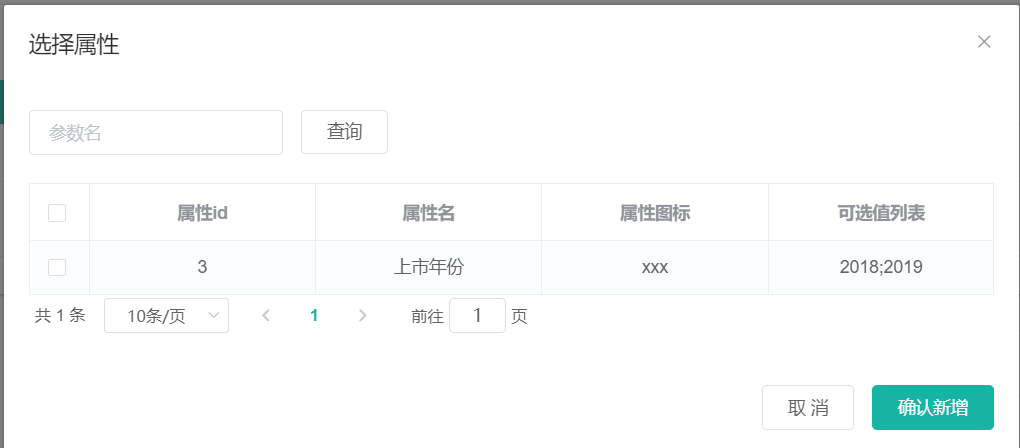
查看2号分组,其关联了1号属性
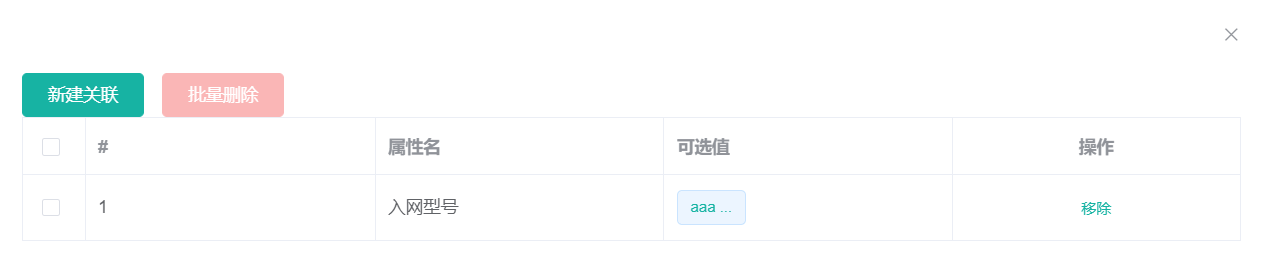
ps:这里只展示部分效果。
6.6.5 添加属性与分组关联关系
1、url11:/product/attrgroup/attr/relation
2、AttrGroupController
@AutowiredAttrAttrgroupRelationService relationService;// /product/attrgroup/attr/relation@PostMapping("/attr/relation")public R addRelation(@RequestBody List<AttrGroupRelationVo> vos){relationService.saveBatch(vos);return R.ok();}
3、AttrAttrgroupRelationServiceImpl
@Overridepublic void saveBatch(List<AttrGroupRelationVo> vos) {List<AttrAttrgroupRelationEntity> collect = vos.stream().map(item -> {AttrAttrgroupRelationEntity relationEntity = new AttrAttrgroupRelationEntity();BeanUtils.copyProperties(item, relationEntity);return relationEntity;}).collect(Collectors.toList());this.saveBatch(collect);}
4、效果展示
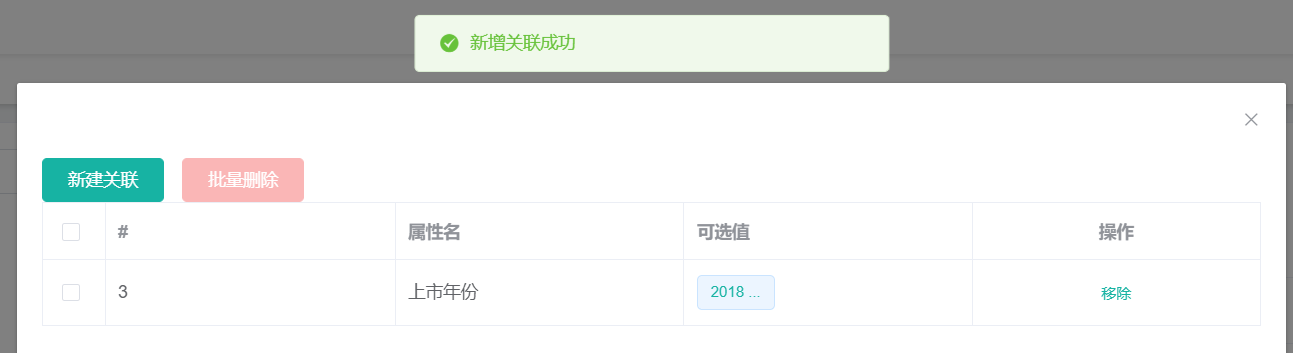
6.7 新增商品
6.7.1 调试会员等级相关接口
1、url:/member/memberlevel/list 获取所有会员等级(这个方法已经自动生成了,启动会员服务即可)
-
把gulimall-member添加到服务注册中心,然后启动gulimall-member服务
-
配置网关路由(在 gulimall-gateway下)
- id: member_routeuri: lb://gulimall-memberpredicates:- Path=/api/member/**filters:- RewritePath=/api/(?<segment>/?.*), /$\{segment}
2、点击 用户系统-会员等级,进行测试
添加一些数据

注意:如果我们想要使用这些前端功能,需要将老师课件中的前端代码 复制 到 modules这个下面。
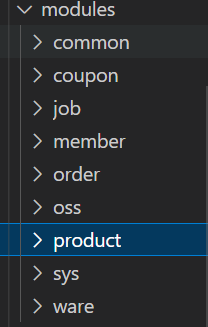
6.7.2 获取分类关联的品牌
1、url:/product/categorybrandrelation/brands/list
- 新增商品时,点击商品的分类,要获取与该分类关联的所有品牌
2、新建BrandVo
@Data
public class BrandVo {//// "brandId": 0,//         "brandName": "string",private Long brandId;private String brandName;
}
3、CategoryBrandRelationController
/*** // /product/categorybrandrelation/brands/list*1.Controller :处理请求,接受和校验数据2.Service接受controller 传来的数据,进行业务处理3.Controller 接受 Service处理完的数据,封装页面指定的vo*/@GetMapping("/brands/list")public R relationBrandsList(@RequestParam(value = "catId", required = true) Long catId){List<BrandEntity> vos = categoryBrandRelationService.getBrandsByCatId(catId);List<BrandVo> collect = vos.stream().map(item -> {BrandVo brandVo = new BrandVo();brandVo.setBrandId(item.getBrandId());brandVo.setBrandName(item.getName());return brandVo;}).collect(Collectors.toList());return R.ok().put("data", collect);}
4、CategoryBrandRelationServiceImpl
public List<BrandEntity> getBrandsByCatId(Long catId) {List<CategoryBrandRelationEntity> catelogId = relationDao.selectList(new QueryWrapper<CategoryBrandRelationEntity>().eq("catelog_id", catId));List<BrandEntity> collect = catelogId.stream().map(item -> {Long brandId = item.getBrandId();BrandEntity byId = brandService.getById(brandId);return byId;}).collect(Collectors.toList());return collect;}5、效果展示
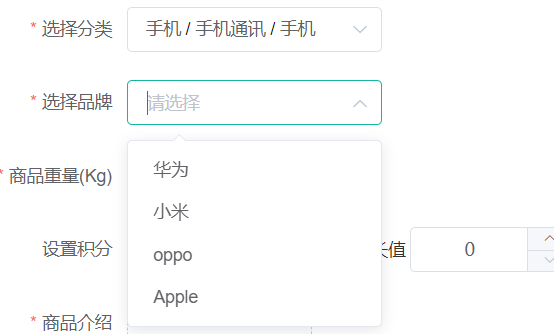
PS:1. 这里需要在品牌管理处添加一些测试数据
pms_category_brand_relation
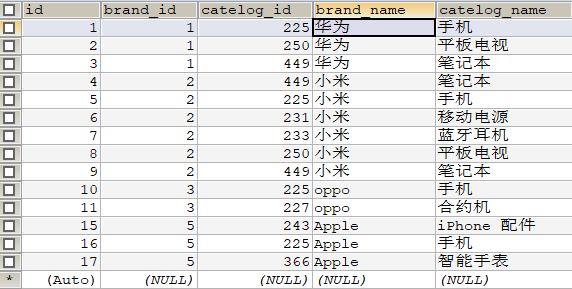
2.这里前端会报错:
pubsub、publish报错
解决如下:1、npm install --save pubsub-js(如果不行的话,可以使用 cnpm install --save pubsub-js)
- 如果 cnpm 命令报错
解决:cnpm : 无法将“cnpm”项识别为 cmdlet、函数、脚本文件或可运行程序的名称:https://blog.csdn.net/ArthurCaoMH/article/details/89535757
解决:cnpm : 无法加载文件 C:\Users\XXX\AppData\Roaming\npm\cnpm.ps1,因为在此系统上禁止运行脚本——解决办法:https://blog.csdn.net/shadow_yi_0416/article/details/116212997
2、在src下的main.js中引用:
import PubSub from ‘pubsub-js’
Vue.prototype.PubSub = PubSub


6.7.3 获取分类下所有分组&关联属性
1、url:/product/attrgroup/{catelogId}/withattr
2、新建AttrGroupWithAttrsVo
@Data
public class AttrGroupWithAttrsVo {/*** 分组id*/private Long attrGroupId;/*** 组名*/private String attrGroupName;/*** 排序*/private Integer sort;/*** 描述*/private String descript;/*** 组图标*/private String icon;/*** 所属分类id*/private Long catelogId;private List<AttrEntity> attrs;
}
3、AttrGroupController
// /product/attrgroup/{catelogId}/withattr@GetMapping("/{catelogId}/withattr")public R getAttrGroupWithAttrs(@PathVariable("catelogId") Long catelogId){//1.查出当前分类下的所有属性分组//2.查出每个属性分组的所有属性List<AttrGroupWithAttrsVo> vos = attrGroupService.getAttrGroupWithAttrsByCatelogId(catelogId);return R.ok().put("data",vos);}
4、AttrGroupServiceImpl
/*** 根据 分类id 查出所有的分组以及这些组里面的属性* @param catelogId* @return*/@Overridepublic List<AttrGroupWithAttrsVo> getAttrGroupWithAttrsByCatelogId(Long catelogId) {//1.查询分组信息List<AttrGroupEntity> attrGroupEntities = this.list(new QueryWrapper<AttrGroupEntity>().eq("catelog_id", catelogId));//2.查询所有属性List<AttrGroupWithAttrsVo> collect = attrGroupEntities.stream().map(group -> {AttrGroupWithAttrsVo attrsVo = new AttrGroupWithAttrsVo();BeanUtils.copyProperties(group, attrsVo);List<AttrEntity> attrs = attrService.getRelationAttr(attrsVo.getAttrGroupId());attrsVo.setAttrs(attrs);return attrsVo;}).collect(Collectors.toList());return collect;}
5、效果展示
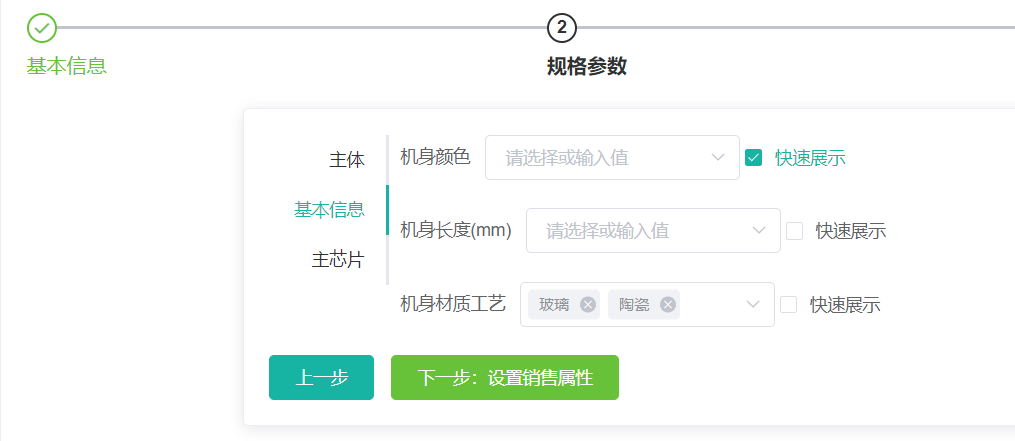
PS :1.如果只想要测试效果,不想填写一些基本信息,例如
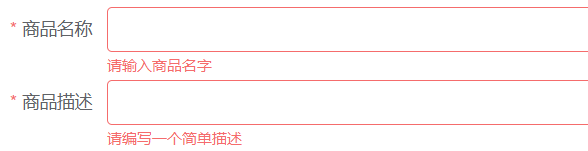
可以在 spuadd.vue 这个前端代码中 将 required: true 设置为 required: false 就行了。
2.控制台foreach报错null
解决如下:
在spuadd.vue的showBaseAttrs()方法中在 //先对表单的baseAttrs进行初始化加上非空判断 if (item.attrs != null)就可以了
data.data.forEach(item => {let attrArray = [];if (item.attrs != null) { //加上非空判断item.attrs.forEach(attr => {attrArray.push({2attrId: attr.attrId,attrValues: "",showDesc: attr.showDesc});});}this.dataResp.baseAttrs.push(attrArray);});
6.7.4 新增商品
1、url:/product/spuinfo/save
2、按照视频添加测试数据,复制要提交的json
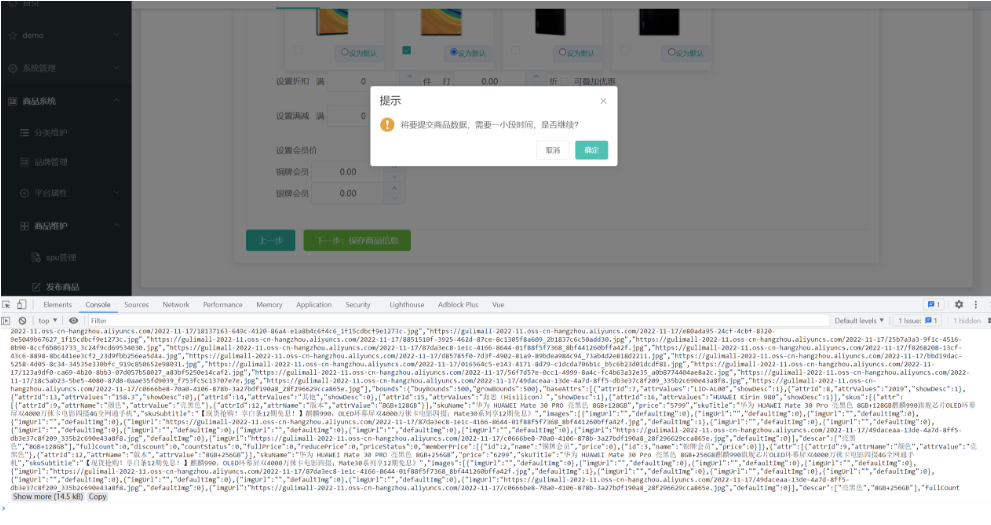
ps:在第4步发布 SKU 信息的时候,添加商品图集控制台报错:

解决办法:将 标签注释掉
3、生成SpuSaveVo
json格式化工具:https://www.bejson.com/,
json生成java类:https://www.bejson.com/json2javapojo/new/
利用json生成SpuSaveVo,生成代码,复制到vo包下
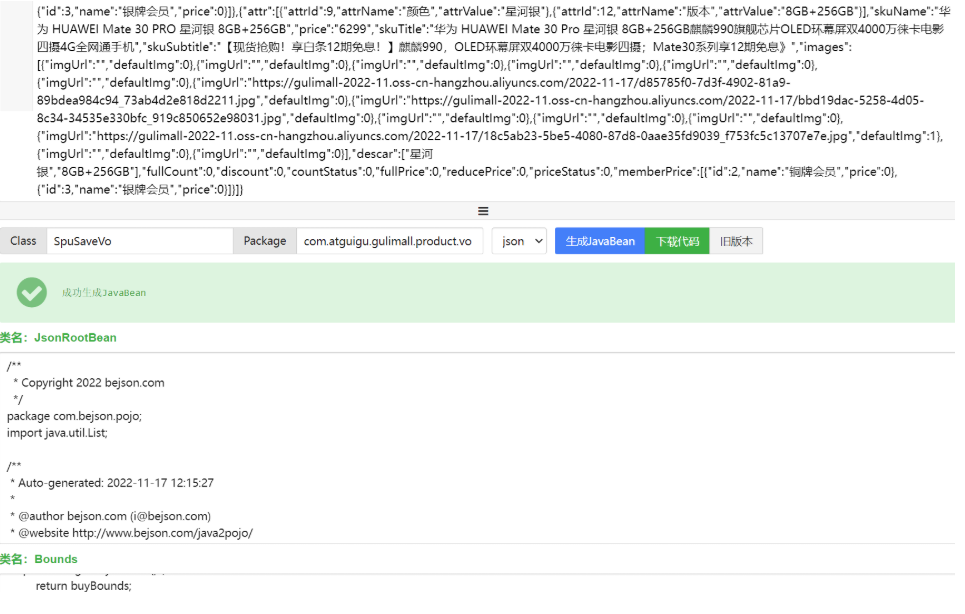
微调vo,把所有id字段改成Long类型,把所有double类型改成BigDecimal类型,将类中的 get和 set方法 使用 lombok中的@Data 注解即可。
真实项目要加上数据校验,校验是当传过来的数据不符合之后,给前端返回相应的异常错误代码。
4、下面是新增商品的接口文档。

5、保存商品涉及到多个表之间的关系。我们先要搞清楚到底需要保存哪些东西?
- 保存spu基本信息 — pms_spu_info
- 保存spu的描述图片 — pms_spu_info_desc
- 保存spu的图片集 — pms_spu_images
- 保存spu的规格参数 — pms_product_attr_value
- 保存spu的积分信息 — gulimall_sms->sms_spu_bounds
- 保存spu对应的所有sku信息
- sku的基本信息 — pms_sku_info
- sku的图片信息 — pms_sku_images
- sku的销售属性信息 — pms_sku_sale_attr_value
- sku的优惠、满减等信息 — gulimall_sms>sms_sku_ladder/sms_sku_full_reduction/sms_member_price
6、 具体实现 (这些基础是要将数据库中表的字段要熟悉)
SpuInfoController
/*** 保存*/@RequestMapping("/save")//@RequiresPermissions("product:spuinfo:save")public R save(@RequestBody SpuSaveVo vo){// spuInfoService.save(spuInfo);spuInfoService.saveSpuInfo(vo);return R.ok();}
SpuInfoServiceImpl(此处代码是下一步debug之后完整可正常运行的代码,和老师讲课正常章节有所出入)
/*** //TODO 高级部分完善* @param vo*/@Transactional@Overridepublic void saveSpuInfo(SpuSaveVo vo) {//1.保存spu基本信息 pms_spu_infoSpuInfoEntity infoEntity = new SpuInfoEntity();BeanUtils.copyProperties(vo,infoEntity); //属性对拷infoEntity.setCreateTime(new Date());infoEntity.setUpdateTime(new Date());this.saveBaseSpuInfo(infoEntity);//2.保存spu的描述图片 pms_spu_info_descList<String> decript = vo.getDecript();SpuInfoDescEntity descEntity = new SpuInfoDescEntity();descEntity.setSpuId(infoEntity.getId());descEntity.setDecript(String.join(",",decript));spuInfoDescService.saveSpuInfoDesc(descEntity);//3.保存spu的图片集 pms_spu_imagesList<String> images = vo.getImages();imagesService.saveImages(infoEntity.getId(),images);//4.保存spu的规格参数 pms_product_attr_valueList<BaseAttrs> baseAttrs = vo.getBaseAttrs();List<ProductAttrValueEntity> collect = baseAttrs.stream().map(attr -> {ProductAttrValueEntity valueEntity = new ProductAttrValueEntity();valueEntity.setAttrId(attr.getAttrId());AttrEntity id = attrService.getById(attr.getAttrId());valueEntity.setAttrName(id.getAttrName());valueEntity.setAttrValue(attr.getAttrValues());valueEntity.setQuickShow(attr.getShowDesc());valueEntity.setSpuId(infoEntity.getId());return valueEntity;}).collect(Collectors.toList());attrValueService.saveProductAttr(collect);//5.保存spu的积分信息 gulimall_sms->sms_spu_boundsBounds bounds = vo.getBounds();SpuBoundTo spuBoundTo = new SpuBoundTo();BeanUtils.copyProperties(bounds,spuBoundTo);spuBoundTo.setSpuId(infoEntity.getId());R r = couponFeignService.saveSpuBounds(spuBoundTo);if (r.getCode() != 0){log.error("远程保存spu积分信息失败");}//6.保存spu对应的所有sku信息List<Skus> skus = vo.getSkus();if (skus != null && skus.size()>0){skus.forEach(item ->{String defaultImg = "";//查找出默认图片for (Images image :item.getImages()){if (image.getDefaultImg() == 1){defaultImg = image.getImgUrl();}}SkuInfoEntity skuInfoEntity = new SkuInfoEntity();BeanUtils.copyProperties(item,skuInfoEntity);skuInfoEntity.setBrandId(infoEntity.getBrandId());skuInfoEntity.setCatalogId(infoEntity.getCatalogId());skuInfoEntity.setSaleCount(0L);skuInfoEntity.setSkuId(infoEntity.getId());skuInfoEntity.setSkuDefaultImg(defaultImg);//6.1 sku的基本信息 pms_sku_infoskuInfoService.saveSkuInfo(skuInfoEntity);//自增主键Long skuId = skuInfoEntity.getSkuId();List<SkuImagesEntity> imagesEntities = item.getImages().stream().map(img -> {SkuImagesEntity skuImagesEntity = new SkuImagesEntity();skuImagesEntity.setSkuId(skuId);skuImagesEntity.setImgUrl(img.getImgUrl());skuImagesEntity.setDefaultImg(img.getDefaultImg());return skuImagesEntity;}).filter(entity ->{//返回 true 就是需要 ,false就是剔除return !StringUtils.isEmpty(entity.getImgUrl());}).collect(Collectors.toList());//6.2 sku的图片信息 pms_sku_imagesskuImagesService.saveBatch(imagesEntities);//TODO 没有图片的路径无需保存List<Attr> attr = item.getAttr();List<SkuSaleAttrValueEntity> skuSaleAttrValueEntities = attr.stream().map(a -> {SkuSaleAttrValueEntity attrValueEntity = new SkuSaleAttrValueEntity();BeanUtils.copyProperties(a, attrValueEntity);attrValueEntity.setSkuId(skuId);return attrValueEntity;}).collect(Collectors.toList());//6.3 sku的销售属性信息 pms_sku_sale_attr_valueskuSaleAttrValueService.saveBatch(skuSaleAttrValueEntities);//6.4 sku的优惠、满减等信息 gulimall_sms->sms_sku_ladder/sms_sku_full_reduction/sms_member_priceSkuReductionTo skuReductionTo = new SkuReductionTo();BeanUtils.copyProperties(item,skuReductionTo);skuReductionTo.setSkuId(skuId);if (skuReductionTo.getFullCount() >0 || skuReductionTo.getFullPrice().compareTo(new BigDecimal("0"))== 1){R r1 = couponFeignService.saveSkuReduction(skuReductionTo);if (r1.getCode() != 0){log.error("远程保存sku优惠信息失败");}}});}}
其中一些自动注入的service方法的实现,主要是使用的保存方法。我们使用service方法自动注入,因为其功能比dao更加全一些。
1. SpuInfoDescServiceImpl@Overridepublic void saveSpuInfoDesc(SpuInfoDescEntity descEntity) {this.baseMapper.insert(descEntity);}2. SpuImagesServiceImpl
@Overridepublic void saveImages(Long id, List<String> images) {if (images == null || images.size() == 0){}else {List<SpuImagesEntity> collect = images.stream().map(img -> {SpuImagesEntity spuImagesEntity = new SpuImagesEntity();spuImagesEntity.setSpuId(id);spuImagesEntity.setImgUrl(img);return spuImagesEntity;}).collect(Collectors.toList());this.saveBatch(collect);}}
3. ProductAttrValueServiceImpl@Overridepublic void saveProductAttr(List<ProductAttrValueEntity> collect) {this.saveBatch(collect);}
4. SkuInfoServiceImpl
@Overridepublic void saveSkuInfo(SkuInfoEntity skuInfoEntity) {this.baseMapper.insert(skuInfoEntity);}
7、对于远程调用,其实就是跨表操作。我们可以创建一个TO来做远程调用
- 在common微服务中创建一个SkuReductionTo用作远程调用
@Data
public class SkuReductionTo {private Long skuId;private int fullCount;private BigDecimal discount;private int countStatus;private BigDecimal fullPrice;private BigDecimal reducePrice;private int priceStatus;private List<MemberPrice> memberPrice;}
-
同时将json自动生成的memberPrice这个vo也复制到common中
@Data
public class MemberPrice {private Long   id;private String name;private BigDecimal pric;}
8、在product包中新建fegin.CouponFeignService用来远程调用Coupon服务
一共调用了两个服务
"coupon/spubounds/save"和"coupon/skufullreduction/saveInfo"对于这些远程调用服务接口,其实最简单的做法就是直接将 对方服务这个 controller中的方法直接复制过来即可。
@FeignClient("gulimall-coupon")
public interface CouponFeignService {/*** 远程调用理解:* 1.CouponFeignService.saveSpuBounds(spuBoundTo);*   1.1 @RequestBody将这个对象转为json。*   1.2 找到 gulimall-coupon 服务,给 /coupon/spubounds/save 发送请求。*        将上一步转的json放在请求体位置,发送请求;*   1.3 对方服务收到请求,请求体里面有json数据。*       (@RequestBody SpuBoundsEntity spuBounds);将请求体的json转为 SpuBoundsEntity** 只要json数据模型是兼容的,双方服务无需使用同一个to:即不需要将  SpuBoundsController中的 save方法中的参数--SpuBoundsEntity spuBounds* 改为 和 CouponFeignService 中的save 方法的参数 SpuBoundTo spuBoundTo 。** 所有的方法都返回 R对象,前后端分离* @param spuBoundTo* @return*/@PostMapping("/coupon/spubounds/save")R saveSpuBounds(@RequestBody SpuBoundTo spuBoundTo);// @RequestBody 将参数转换为json 数据放在请求体中@PostMapping("/coupon/skufullreduction/saveinfo")R saveSkuReduction(@RequestBody SkuReductionTo skuReductionTo);
}
1)、第一个服务使用自动生成,直接调用即可
2)、第二个服务在SkuFullReductionController中新建方法
/*** 列表*/@PostMapping("/saveinfo")//@RequiresPermissions("coupon:skufullreduction:list")public R saveInfo(@RequestBody SkuReductionTo reductionTo){skuFullReductionService.saveSkuReduction(reductionTo);return R.ok();}
3)、在SkuFullReductionServiceImpl中实现
@Overridepublic void saveSkuReduction(SkuReductionTo reductionTo) {//1、 6.4 sku的优惠、满减等信息 gulimall_sms->sms_sku_ladder/sms_sku_full_reduction/sms_member_price// sms_sku_ladderSkuLadderEntity skuLadderEntity = new SkuLadderEntity();skuLadderEntity.setSkuId(reductionTo.getSkuId());skuLadderEntity.setFullCount(reductionTo.getFullCount());skuLadderEntity.setDiscount(reductionTo.getDiscount());skuLadderEntity.setAddOther(reductionTo.getCountStatus());if (reductionTo.getFullCount() >0){skuLadderService.save(skuLadderEntity);}//2、sms_sku_full_reductionSkuFullReductionEntity reductionEntity = new SkuFullReductionEntity();BeanUtils.copyProperties(reductionTo,reductionEntity);if (reductionEntity.getFullPrice().compareTo(new BigDecimal("0")) == 1){this.save(reductionEntity);}//3、sms_member_priceList<MemberPrice> memberPrice = reductionTo.getMemberPrice();List<MemberPriceEntity> collect = memberPrice.stream().map(item -> {MemberPriceEntity priceEntity = new MemberPriceEntity();priceEntity.setSkuId(reductionTo.getSkuId());priceEntity.setMemberLevelId(item.getId());priceEntity.setMemberLevelName(item.getName());priceEntity.setMemberPrice(item.getPrice());priceEntity.setAddOther(1);return priceEntity;}).filter(item ->{return item.getMemberPrice().compareTo(new BigDecimal("0")) == 1;}).collect(Collectors.toList());memberPriceService.saveBatch(collect);}
4)、在给前端返回的R这个类中添加一个getCode方法,方便判断远程调用是否成功(注意这里有坑,后面debug的时候修正)
public Integer getCode(){return Integer.parseInt((String) this.get("code"));
}
5)、GulimallProductApplication
添加扫描注解,指定扫描那个包下的feign服务
@EnableFeignClients(basePackages = "com.atguigu.gulimall.product.feign")
6.7.5 内存调优及一键启停
1.新建Compound
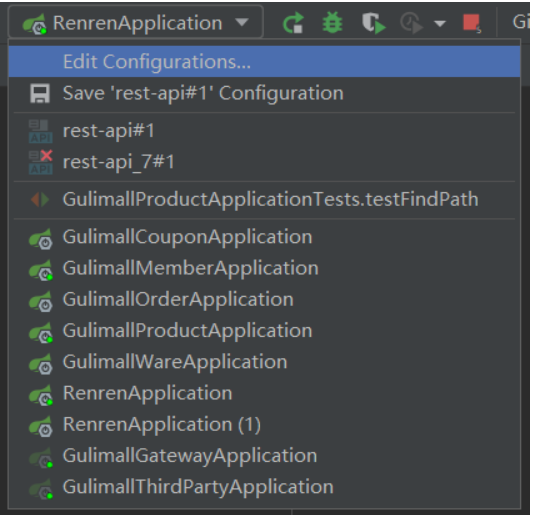
2.把服务添加到新建的compound里
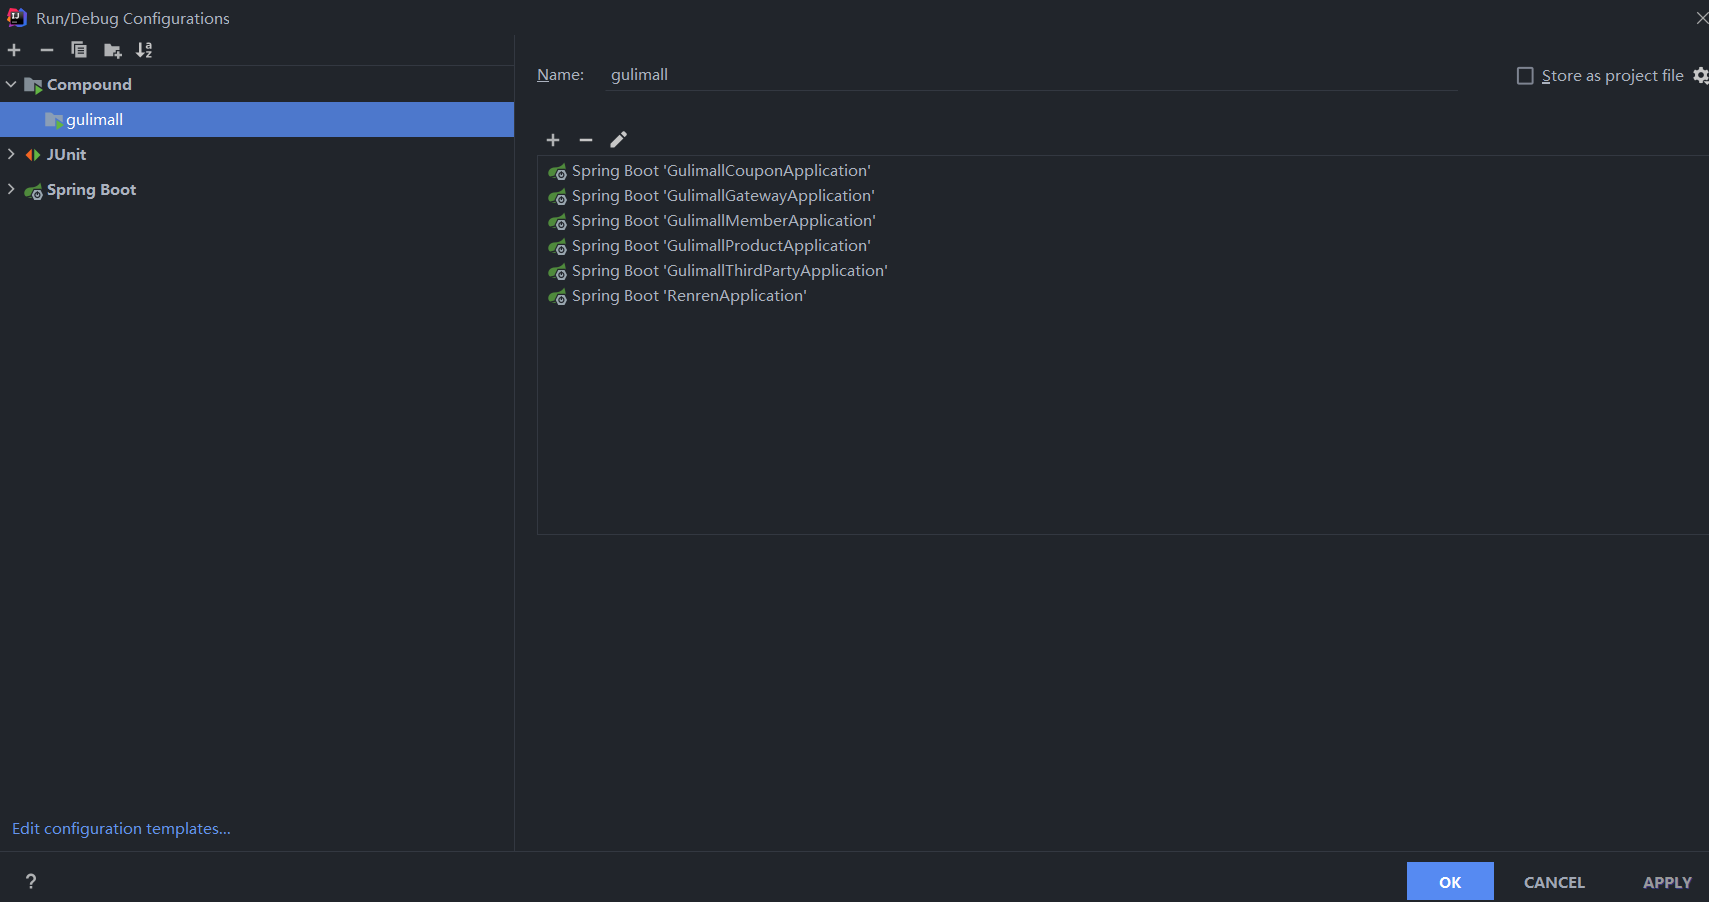
3.设置每个项目最大占用内存为100M
这样可以大大减少内存占用。
6.7.6 商品保存debug
- 我们在进行debug的时候,因为我们在上面设置了事务的原因,而mysql默认是可重复读(REPEATABLE READ),所以我们可以暂时设置隔离级别。
如果我们使用@Transactional,不指定隔离级别,就会使用数据库的默认隔离级别
SET SESSION TRANSACTION ISOLATION LEVEL READ UNCOMMITTED
-
出现问题
SpuInfoDescEntity,mybatis默认主键为自增的,而SpuInfoDescEntity中的主键为自己输入的,所以修改主键注释
/*** 商品id*/@TableId(type = IdType.INPUT)private Long spuId;
- 抛出异常,修改
R中的getCode方法
public Integer getCode(){return (Integer) this.get("code");}- 出现问题,保存sku图片时,有些图片是没有路径的,没有路径的图片,无需保存。
解决办法:在收集图片的时候进行过滤
List<SkuImagesEntity> skuImagesEntities = item.getImages().stream().map(img -> {SkuImagesEntity skuImagesEntity = new SkuImagesEntity();skuImagesEntity.setSkuId(skuId);skuImagesEntity.setImgUrl(img.getImgUrl());skuImagesEntity.setDefaultImg(img.getDefaultImg());return skuImagesEntity;}).filter(entity -> {//返回true是需要,返回false是过滤掉return !StringUtils.isNullOrEmpty(entity.getImgUrl());}).collect(Collectors.toList());skuImagesService.saveBatch(skuImagesEntities);
- 保存折扣信息的时候,满0元打0折这种都是无意义的,要过滤掉
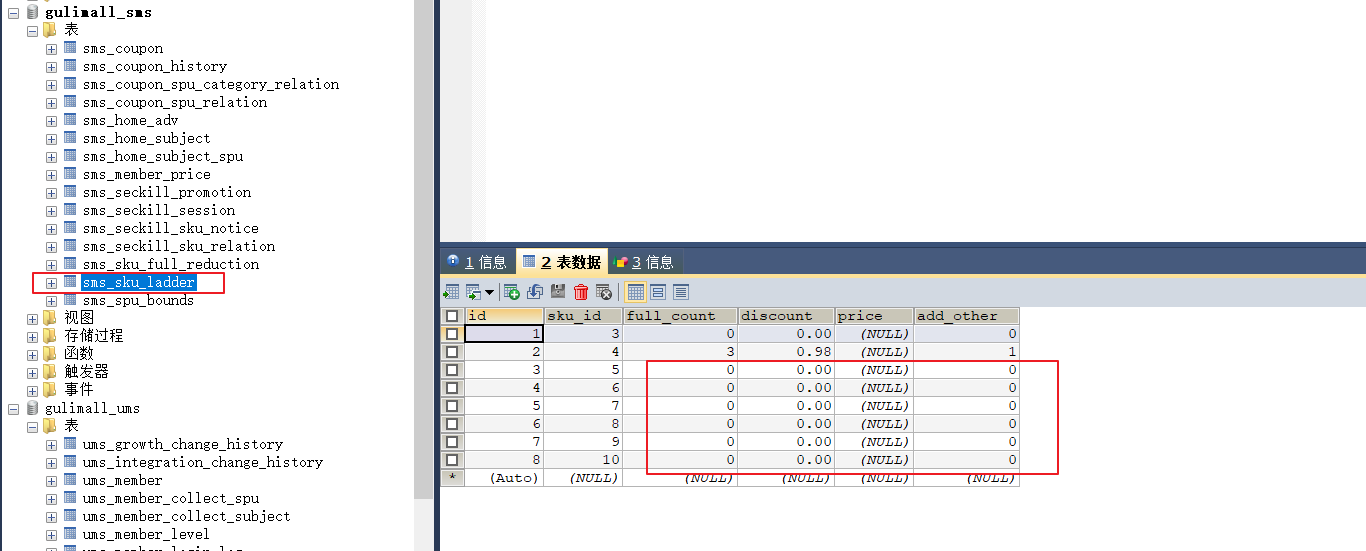
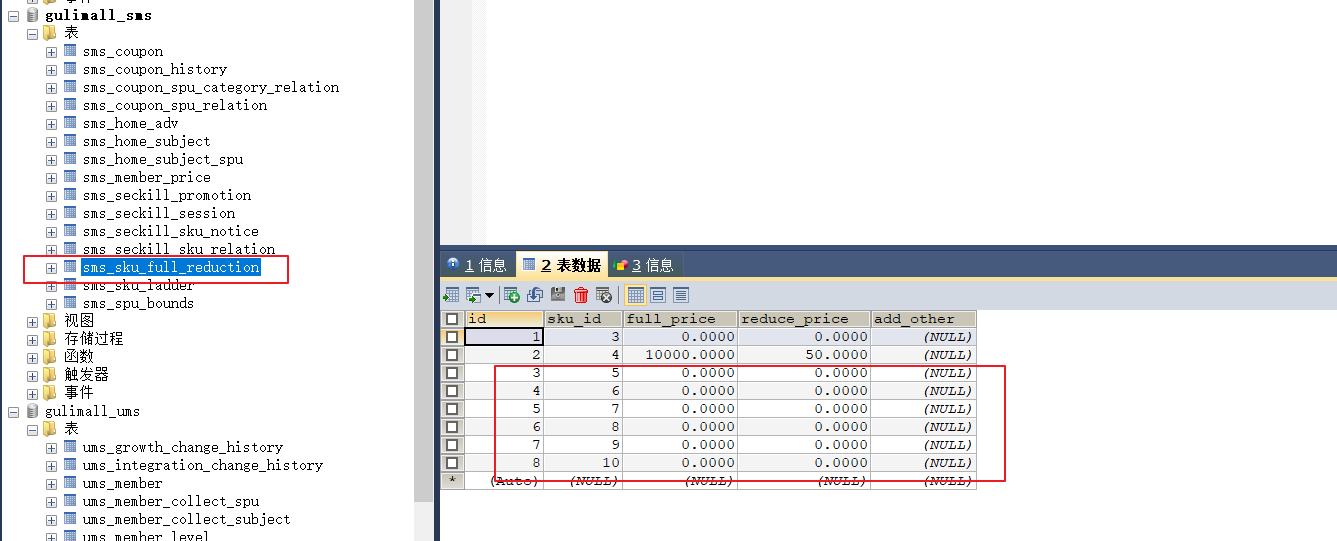
解决方法:在保存之前做判断,过滤掉小于等于0的无意义信息(不贴代码了),要注意的是判断BigDecimal进行判断时,要用compareTo函数。如果是普通的,就不需要做判断。
下面举例:
if(reductionTo.getFullCount() > 0){skuLadderService.save(skuLadderEntity);}
if (skuReductionTo.getFullCount() > 0 || skuReductionTo.getFullPrice().compareTo(new BigDecimal("0")) == 1){R r1 = couponFeignService.saveSkuReduction(skuReductionTo);if (r1.getCode() != 0){log.error("远程保存优惠信息失败");}}
- 保存失败,原因【系统未知异常】的原因及解决办法


保存的时候出现上面这个原因,我们去控制台中查看得知是调用远程服务超时导致。因为会去nacos中进行寻找,我们所要做的就是等待feign稳定即可。
- 按照华为mate30pro新增方法,新增一个apple 11到数据库中。

6.8 商品管理
6.8.1 spu检索
- url:
/product/spuinfo/list

- SpuInfoController.java
@RequestMapping("/list")//@RequiresPermissions("product:spuinfo:list")public R list(@RequestParam Map<String, Object> params){PageUtils page = spuInfoService.queryPageByCondition(params);return R.ok().put("page", page);}- SpuInfoServiceImpl
@Overridepublic PageUtils queryPageByCondition(Map<String, Object> params) {QueryWrapper<SpuInfoEntity> wrapper = new QueryWrapper<>();/*** status:2* key:* brandId:9* catelogId:225*///检索关键字不为空String key = (String) params.get("key");if (!StringUtils.isEmpty(key)){wrapper.and((w) ->{w.eq("id",key).or().like("spu_name",key);});}//状态String status = (String) params.get("status");if (!StringUtils.isEmpty(status)){wrapper.eq("publish_status",status);}//品牌idString brandId = (String) params.get("brandId");if (!StringUtils.isEmpty(brandId) && !"0".equalsIgnoreCase(brandId)){wrapper.eq("brand_id",brandId);}//分类idString catelogId = (String) params.get("catelogId");if (!StringUtils.isEmpty(catelogId) && !"0".equalsIgnoreCase(catelogId)){wrapper.eq("catalog_id",catelogId);}IPage<SpuInfoEntity> page = this.page(new Query<SpuInfoEntity>().getPage(params),wrapper);return new PageUtils(page);}
- 测试

成功。
2022-11-19 21:25:16.559 DEBUG 28484 --- [io-10000-exec-7] c.a.g.product.dao.SpuInfoDao.selectPage  : ==>  Preparing: SELECT COUNT(1) FROM pms_spu_info WHERE (((id = ? OR spu_name LIKE ?)) AND publish_status = ? AND brand_id = ? AND catalog_id = ?)
2022-11-19 21:25:16.560 DEBUG 28484 --- [io-10000-exec-7] c.a.g.product.dao.SpuInfoDao.selectPage  : ==> Parameters: 华(String), %华%(String), 0(String), 1(String), 225(String)
2022-11-19 21:25:16.565 DEBUG 28484 --- [io-10000-exec-7] c.a.g.product.dao.SpuInfoDao.selectPage  : ==>  Preparing: SELECT id,spu_description,spu_name,catalog_id,create_time,brand_id,weight,update_time,publish_status FROM pms_spu_info WHERE (( (id = ? OR spu_name LIKE ?) ) AND publish_status = ? AND brand_id = ? AND catalog_id = ?) LIMIT ?,?
2022-11-19 21:25:16.565 DEBUG 28484 --- [io-10000-exec-7] c.a.g.product.dao.SpuInfoDao.selectPage  : ==> Parameters: 华(String), %华%(String), 0(String), 1(String), 225(String), 0(Long), 10(Long)
2022-11-19 21:25:16.566 DEBUG 28484 --- [io-10000-exec-7] c.a.g.product.dao.SpuInfoDao.selectPage  : <==      Total: 1
- 测试发现时间格式不对,如下图:

我们可以在配置文件中进行设置:

重启进行测试,结果如下,时间格式正确。
6.8.2 sku检索
1、商品系统21,url:/product/skuinfo/list
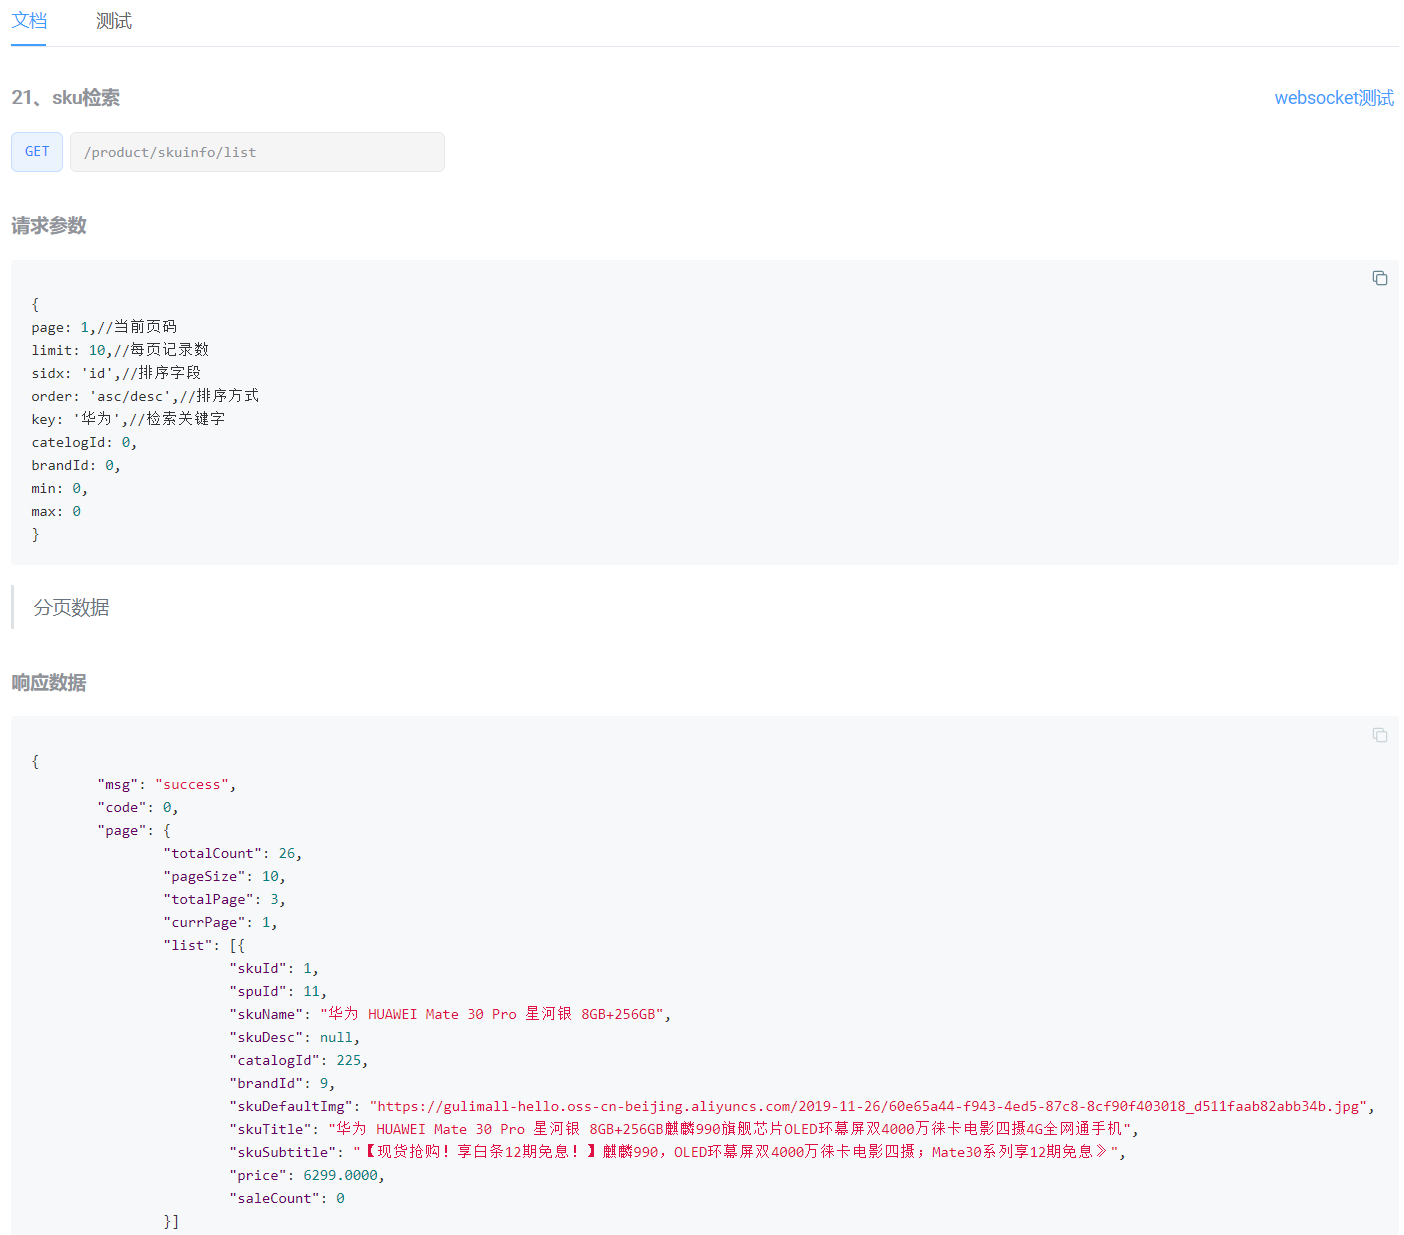
2、SkuInfoController
/*** 列表* /product/skuinfo/list* sku检索*/@RequestMapping("/list")//@RequiresPermissions("product:skuinfo:list")public R list(@RequestParam Map<String, Object> params){PageUtils page = skuInfoService.queryPageByCondition(params);return R.ok().put("page", page);}
3、SkuInfoServiceImpl
@Overridepublic PageUtils queryPageByCondition(Map<String, Object> params) {QueryWrapper<SkuInfoEntity> queryWrapper = new QueryWrapper<>();/*** key:* catelogId: 225* brandId: 1* min: 0* max: 0*/String key = (String) params.get("key");if (!StringUtils.isEmpty(key)) {queryWrapper.and((wrapper) -> {wrapper.eq("sku_id", key).or().like("sku_name", key);});}String catelogId = (String) params.get("catelogId");if (!StringUtils.isEmpty(catelogId) && !"0".equalsIgnoreCase(catelogId)) {queryWrapper.eq("catalog_id", catelogId);}String brandId = (String) params.get("brandId");if (!StringUtils.isEmpty(brandId) && !"0".equalsIgnoreCase(brandId)) {queryWrapper.eq("brand_id", brandId);}String min = (String) params.get("min");if (!StringUtils.isEmpty(min)) {queryWrapper.ge("price", min);}String max = (String) params.get("max");if (!StringUtils.isEmpty(max)) {try {BigDecimal bigDecimal = new BigDecimal(max);if (bigDecimal.compareTo(new BigDecimal("0")) == 1) {queryWrapper.le("price", max);}} catch (Exception e) {}}IPage<SkuInfoEntity> page = this.page(new Query<SkuInfoEntity>().getPage(params),queryWrapper);return new PageUtils(page);}
4、效果展示: