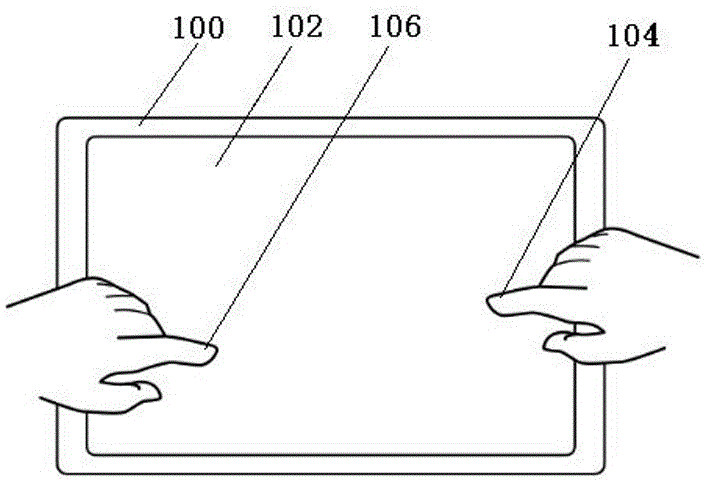
概览
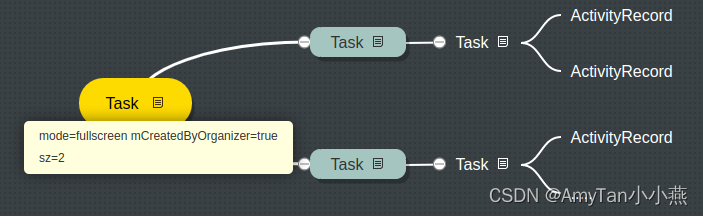
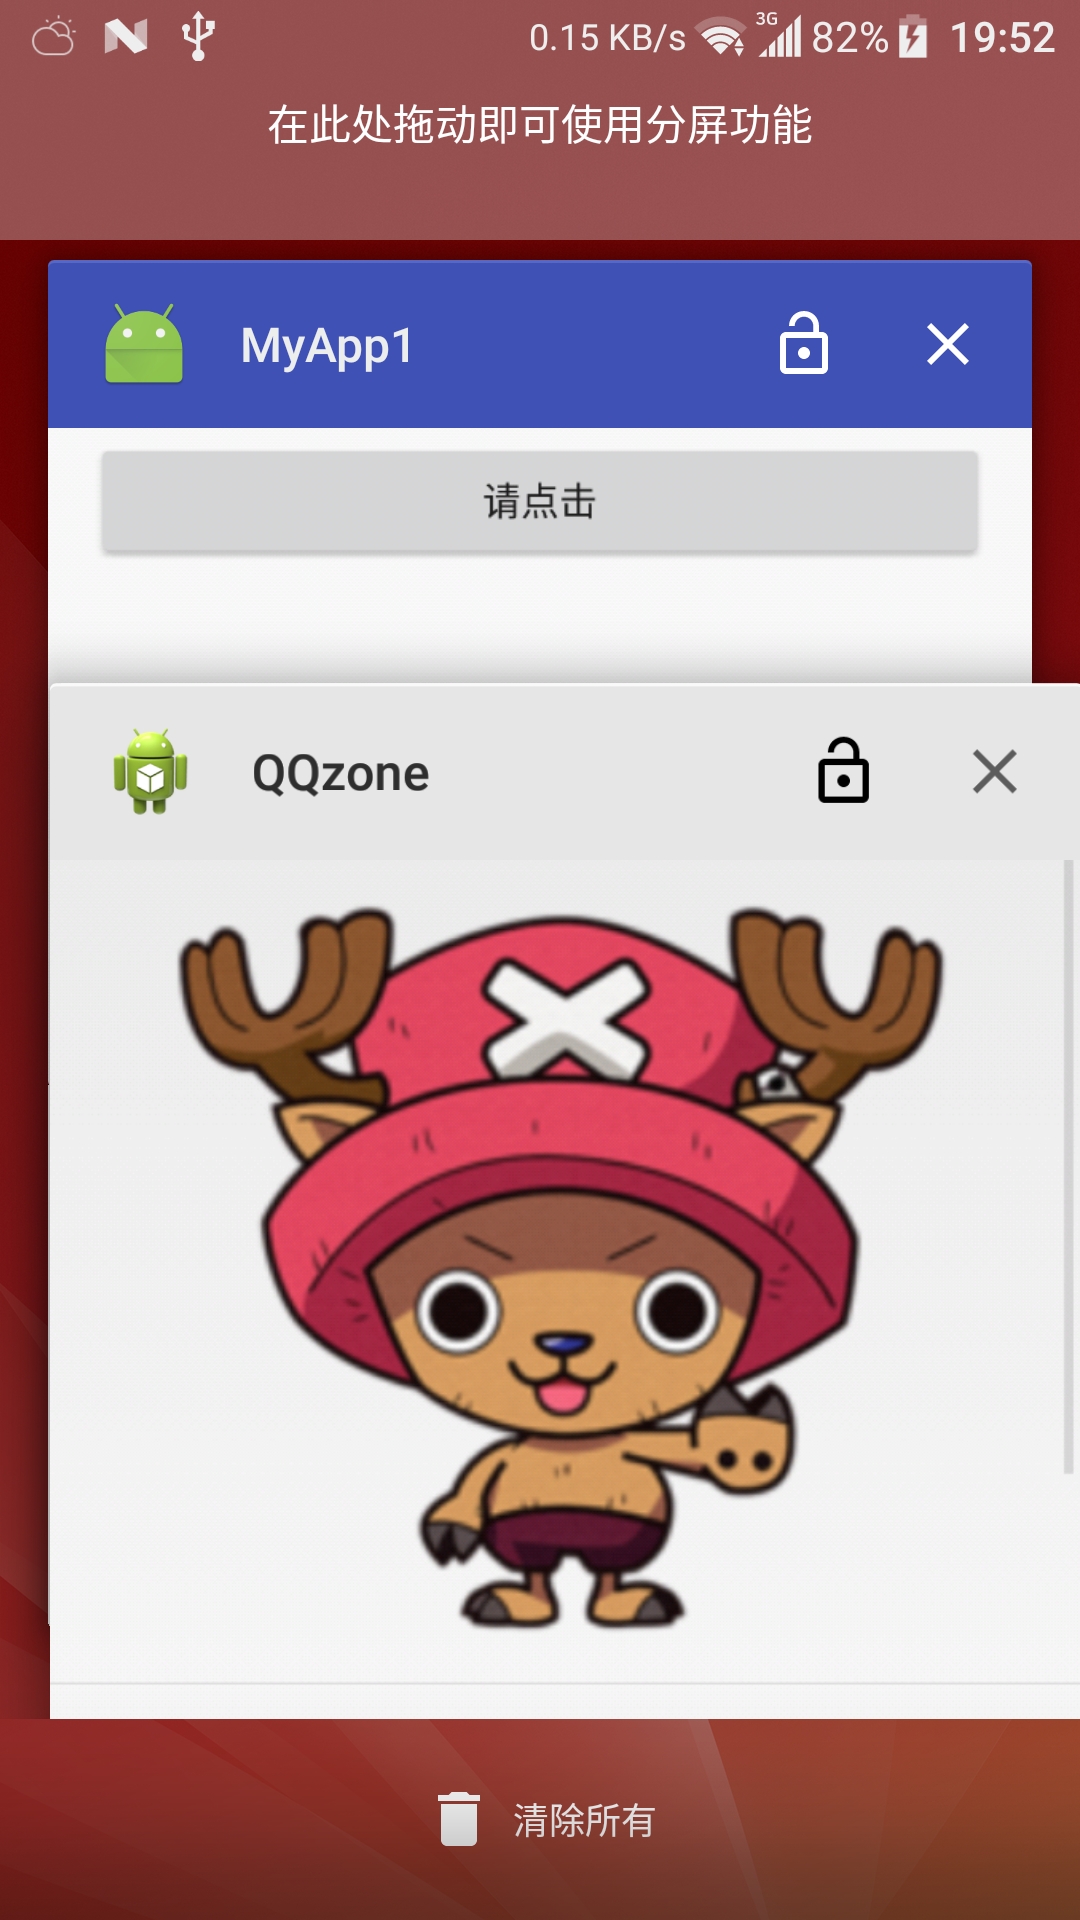
分屏前的order
Task display areas in top down Z order:TaskDisplayArea DefaultTaskDisplayAreamPreferredTopFocusableRootTask=Task{919dc1b #1 type=home ?? U=0 visible=true visibleRequested=true mode=fullscreen translucent=false sz=1}mLastFocusedRootTask=Task{919dc1b #1 type=home ?? U=0 visible=true visibleRequested=true mode=fullscreen translucent=false sz=1}Application tokens in top down Z order:* Task{919dc1b #1 type=home ?? U=0 visible=true visibleRequested=true mode=fullscreen translucent=false sz=1}bounds=[0,0][1080,2520]* Task{95cd9f8 #2 type=home I=com.miui.home/.launcher.Launcher U=0 rootTaskId=1 visible=true visibleRequested=true mode=fullscreen translucent=false sz=1}bounds=[0,0][1080,2520]* ActivityRecord{23a7bec u0 com.miui.home/.launcher.Launcher} t2}* Task{e49cf5a #27 type=standard A=10219:com.miui.weather2 U=0 visible=false visibleRequested=false mode=fullscreen translucent=true sz=1}bounds=[0,0][1080,2520]* ActivityRecord{4788499 u0 com.miui.weather2/.ActivityWeatherMain} t27}* Task{ec94c1a #38 type=undefined ?? U=0 visible=false visibleRequested=false mode=fullscreen translucent=true sz=0}bounds=[0,0][1080,2520]* Task{a07962f #25 type=standard A=10070:android.task.mms U=0 visible=false visibleRequested=false mode=fullscreen translucent=true sz=1}bounds=[0,0][1080,2520]* ActivityRecord{43f400e u0 com.android.mms/.ui.MmsTabActivity} t25}// 分屏的Task位于TaskDisplayArea的最底部* Task{bcbb9ca #39 type=standard ?? U=0 visible=false visibleRequested=false mode=fullscreen translucent=true sz=2}bounds=[0,0][1080,2520]* Task{495d73b #41 type=standard ?? U=0 rootTaskId=39 visible=false visibleRequested=false mode=multi-window translucent=true sz=0}bounds=[0,1317][1080,2520]* Task{65e6135 #40 type=undefined ?? U=0 rootTaskId=39 visible=false visibleRequested=false mode=multi-window translucent=true sz=0}bounds=[0,0][1080,1289]
分屏时的order
Task display areas in top down Z order:TaskDisplayArea DefaultTaskDisplayAreamPreferredTopFocusableRootTask=Task{f555c62 #4 type=standard ?? U=0 visible=true visibleRequested=true mode=fullscreen translucent=false sz=2}mLastFocusedRootTask=Task{f555c62 #4 type=standard ?? U=0 visible=true visibleRequested=true mode=fullscreen translucent=false sz=2}Application tokens in top down Z order:// reorder分屏相关Task到TaskDisplayArea顶部* Task{f555c62 #4 type=standard ?? U=0 visible=true visibleRequested=true mode=fullscreen translucent=false sz=2}bounds=[0,0][1080,2520]* Task{f4a61f3 #6 type=undefined ?? U=0 rootTaskId=4 visible=true visibleRequested=true mode=multi-window translucent=false sz=1}bounds=[0,1295][1080,2520]* Task{9b3720c #80 type=standard A=10213:com.miui.notes U=0 rootTaskId=4 visible=true visibleRequested=true mode=multi-window translucent=false sz=1}bounds=[0,1295][1080,2520]* ActivityRecord{2ab7e0 u0 com.miui.notes/.ui.NotesListActivity} t80}* Task{3c50f2d #5 type=standard ?? U=0 rootTaskId=4 visible=true visibleRequested=true mode=multi-window translucent=false sz=1}bounds=[0,0][1080,1267]* Task{27d1129 #78 type=undefined A=10003:com.miui.gallery.home U=0 rootTaskId=4 visible=true visibleRequested=true mode=multi-window translucent=false sz=2}bounds=[0,0][1080,1267]* ActivityRecord{c63706 u0 com.miui.gallery/.activity.GallerySettingsActivity} t78}* ActivityRecord{1435ba u0 com.miui.gallery/.activity.HomePageActivity} t78}* Task{a48f388 #1 type=home ?? U=0 visible=false visibleRequested=false mode=fullscreen translucent=true sz=1}bounds=[0,0][1080,2520]* Task{e676dd2 #2 type=home I=com.miui.home/.launcher.Launcher U=0 rootTaskId=1 visible=false visibleRequested=false mode=fullscreen translucent=true sz=1}bounds=[0,0][1080,2520]* ActivityRecord{3faca81 u0 com.miui.home/.launcher.Launcher} t2}* Task{ad9de1e #3 type=undefined ?? U=0 visible=false visibleRequested=false mode=fullscreen translucent=true sz=0}bounds=[0,0][1080,2520]
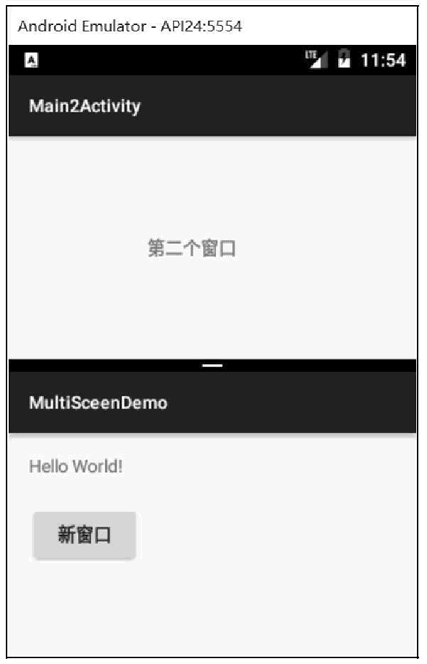
进入分屏
systemui 进程
android T上的分屏是在分屏下屏确定后桌面进程调用位于systemui进程的wm shell下的com.android.wm.shell.splitscreen.SplitScreenController.ISplitScreenImpl的startTasksWithLegacyTransition方法去开启分屏流程。
/*** The interface for calls from outside the host process.*/@BinderThreadprivate static class ISplitScreenImpl extends ISplitScreen.Stub {......@Overridepublic void startTasksWithLegacyTransition(int mainTaskId, @Nullable Bundle mainOptions,int sideTaskId, @Nullable Bundle sideOptions, @SplitPosition int sidePosition,float splitRatio, RemoteAnimationAdapter adapter) {// binder 线程post 到主线程的executor去执行executeRemoteCallWithTaskPermission(mController, "startTasks",(controller) -> controller.mStageCoordinator.startTasksWithLegacyTransition(mainTaskId, mainOptions, sideTaskId, sideOptions, sidePosition,splitRatio, adapter));}

system server进程
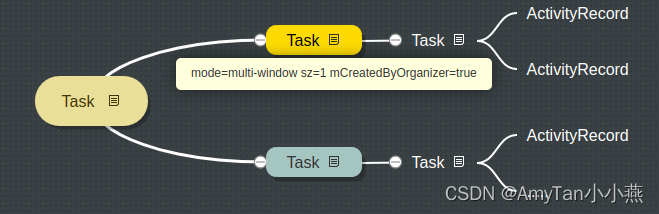
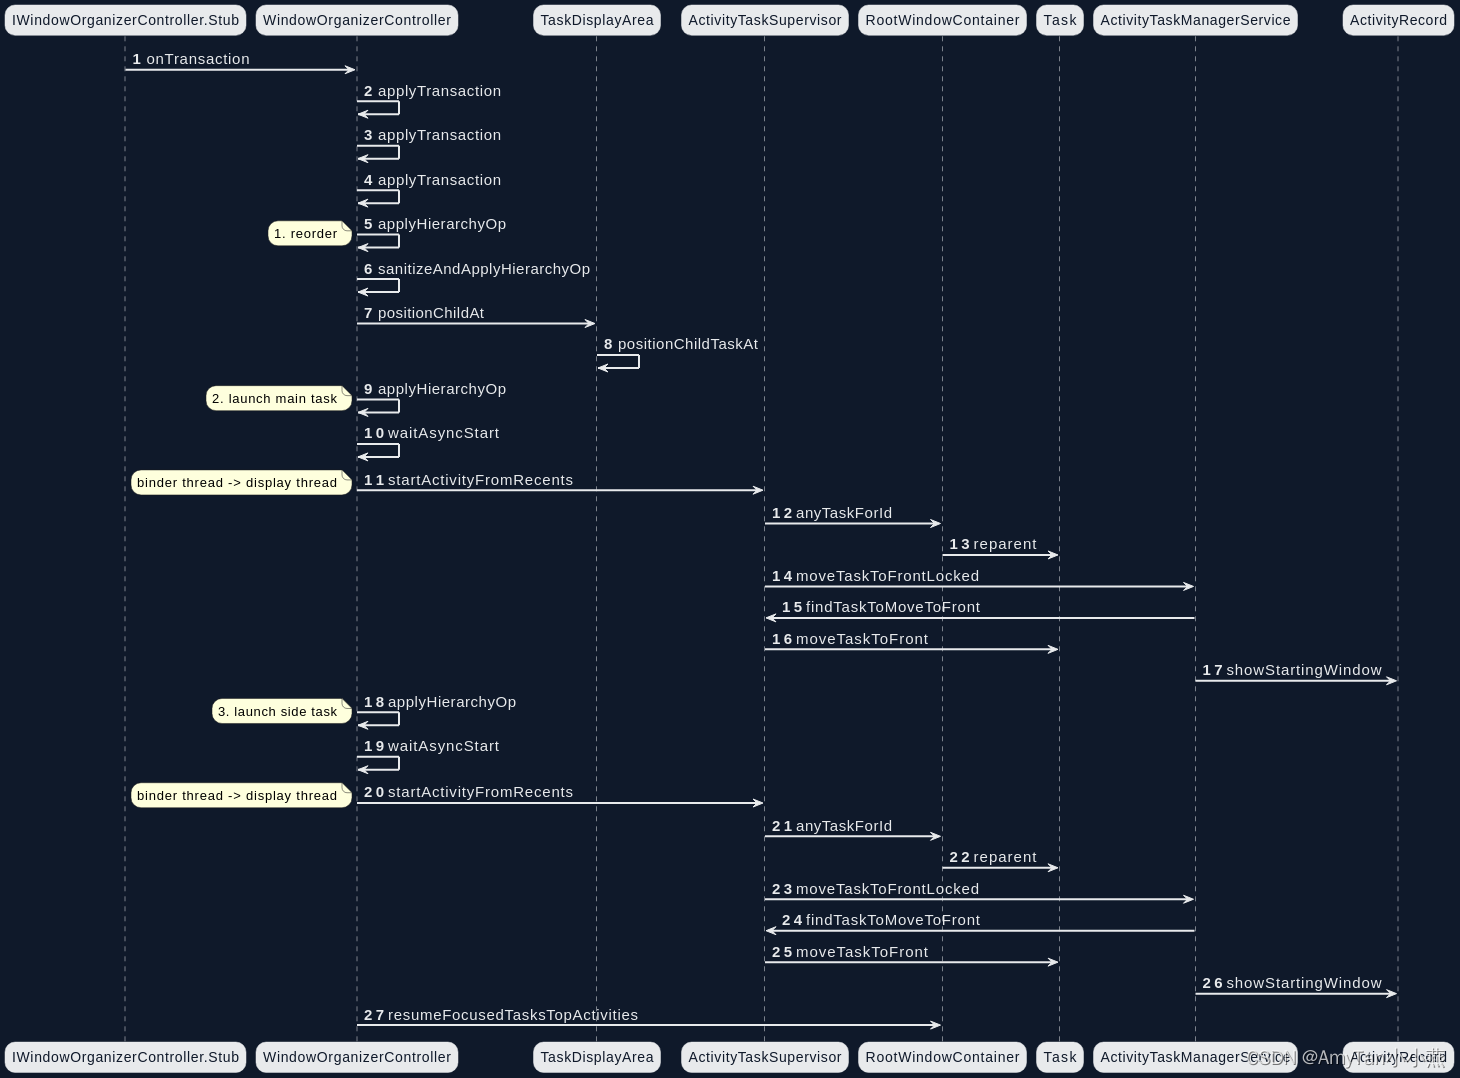
进入分屏时WindowContainerTransaction的HierarchyOp列表包含三个元素:reorder、startTask、startTask

private void applyTransaction(@NonNull WindowContainerTransaction t, int syncId,@Nullable Transition transition, @NonNull CallerInfo caller,@Nullable Transition finishTransition) {......// Hierarchy changesfinal List<WindowContainerTransaction.HierarchyOp> hops = t.getHierarchyOps();final int hopSize = hops.size();if (hopSize > 0) {final boolean isInLockTaskMode = mService.isInLockTaskMode();for (int i = 0; i < hopSize; ++i) {effects |= applyHierarchyOp(hops.get(i), effects, syncId, transition,isInLockTaskMode, caller, t.getErrorCallbackToken(),t.getTaskFragmentOrganizer(), finishTransition);}}......}
退出分屏
systemui进程
system server进程
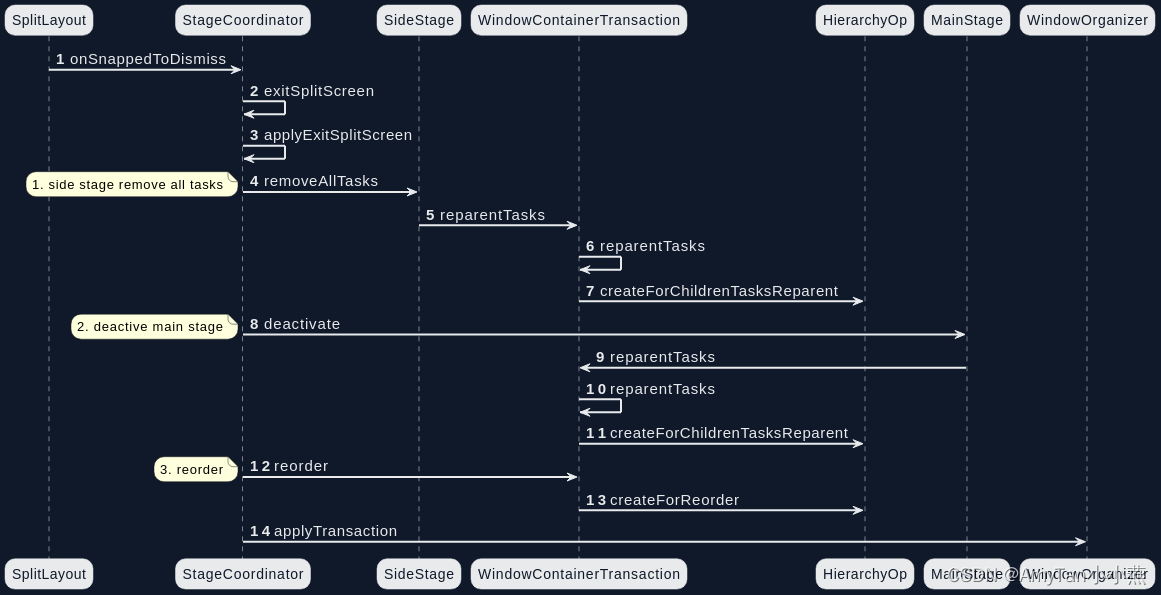
退出分屏时WindowContainerTransaction的HierarchyOp列表也包含三个元素:childrenTasksReparent、childrenTasksReparent、reorder(分屏最外层的fullcscreen task)

{ChildrenTasksReparent: from=RemoteToken{6206d89 Task{495d73b #41 type=standard ?? U=0 rootTaskId=39 visible=true visibleRequested=true mode=multi-window translucent=false sz=1}} to=null mToTop=false mReparentTopOnly=false mWindowingMode=[1, 0, 6] mActivityType=[1]}
{ChildrenTasksReparent: from=RemoteToken{1d0a090 Task{65e6135 #40 type=undefined ?? U=0 rootTaskId=39 visible=true visibleRequested=true mode=multi-window translucent=false sz=1}} to=null mToTop=true mReparentTopOnly=false mWindowingMode=[1, 0, 6] mActivityType=[1]}
{reorder: RemoteToken{aae4b1a Task{bcbb9ca #39 type=standard ?? U=0 visible=true visibleRequested=true mode=fullscreen translucent=false sz=2}} to bottom}
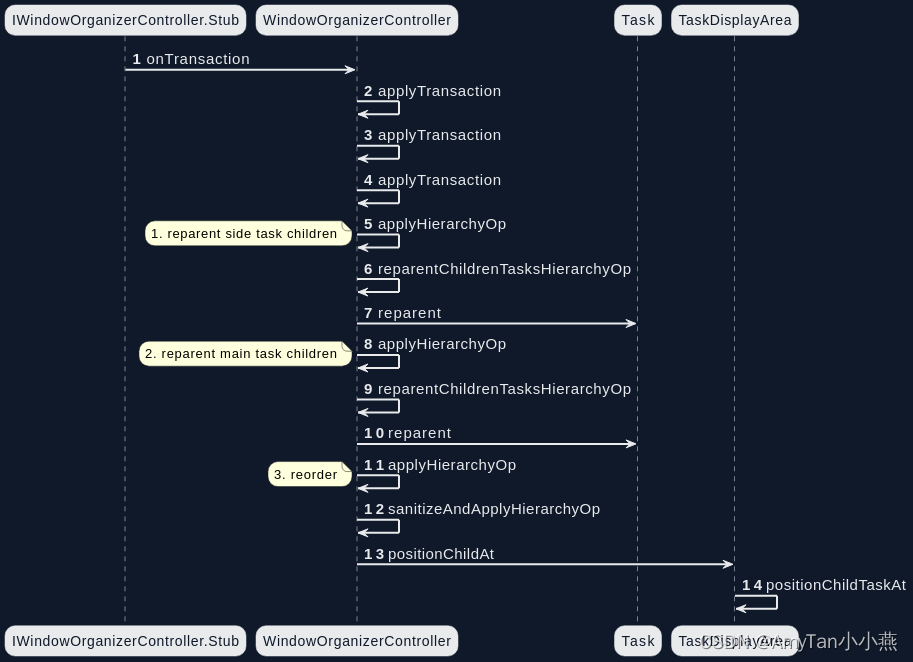
private int reparentChildrenTasksHierarchyOp(WindowContainerTransaction.HierarchyOp hop,@Nullable Transition transition, int syncId) {// 一般为分屏的上下屏Task,mode为multi-windowWindowContainer<?> currentParent = hop.getContainer() != null? WindowContainer.fromBinder(hop.getContainer()) : null;// 这里一般为nullWindowContainer newParent = hop.getNewParent() != null? WindowContainer.fromBinder(hop.getNewParent()) : null;if (currentParent == null && newParent == null) {throw new IllegalArgumentException("reparentChildrenTasksHierarchyOp: " + hop);} else if (currentParent == null) {currentParent = newParent.asTask().getDisplayContent().getDefaultTaskDisplayArea();} else if (newParent == null) {// newParent赋值为TaskDisplayAreanewParent = currentParent.asTask().getDisplayContent().getDefaultTaskDisplayArea();}......// We want to collect the tasks first before re-parenting to avoid array shifting on us.final ArrayList<Task> tasksToReparent = new ArrayList<>();currentParent.forAllTasks(task -> {Slog.i(TAG, " Processing task=" + task);final boolean reparent;if (task.mCreatedByOrganizer || task.getParent() != finalCurrentParent) {// We only care about non-organized task that are direct children of the thing we// are reparenting from.return false;}if (newParentInMultiWindow && !task.supportsMultiWindowInDisplayArea(newParentTda)) {Slog.e(TAG, "reparentChildrenTasksHierarchyOp non-resizeable task to multi window,"+ " task=" + task);return false;}if (!ArrayUtils.contains(hop.getActivityTypes(), task.getActivityType())|| !ArrayUtils.contains(hop.getWindowingModes(), task.getWindowingMode())) {return false;}if (hop.getToTop()) {tasksToReparent.add(0, task);} else {tasksToReparent.add(task);}return hop.getReparentTopOnly() && tasksToReparent.size() == 1;});final int count = tasksToReparent.size();for (int i = 0; i < count; ++i) {final Task task = tasksToReparent.get(i);if (syncId >= 0) {addToSyncSet(syncId, task);}if (transition != null) transition.collect(task);// 执行reparent操作if (newParent instanceof TaskDisplayArea) {// For now, reparenting to display area is different from other reparents...task.reparent((TaskDisplayArea) newParent, hop.getToTop());} else {task.reparent((Task) newParent,hop.getToTop() ? POSITION_TOP : POSITION_BOTTOM,false /*moveParents*/, "processChildrenTaskReparentHierarchyOp");}}if (transition != null) transition.collect(newParent);return TRANSACT_EFFECTS_LIFECYCLE;}