文章目录
- 一、Sharding-JDBC介绍
- 1. Sharding-JDBC介绍
- 2. Sharding-JDBC与JDBC性能对比
- 二、Sharding-JDBC快速入门
- 1. 需求说明
- 2. 环境搭建
- 2.1 环境说明
- 2.2 创建数据库
- 2.3 引入maven依赖
- 3. 编写程序
- 3.1 分片规则配置
- 3.2.数据操作
- 3.3.测试
- 4. 流程分析
- 5. 其他集成方式
- 5.1 Spring Boot properties配置
- 5.2 Spring Boot Yaml 配置
- 5.3 Java 配置
- 5.4 Spring命名空间配置
一、Sharding-JDBC介绍
1. Sharding-JDBC介绍
Sharding-JDBC是当当网研发的开源分布式数据库中间件,从 3.0 开始Sharding-JDBC被包含在 Sharding-Sphere 中,之后该项目进入Apache孵化器,4.0版本之后的版本为Apache版本。
ShardingSphere是一套开源的分布式数据库中间件解决方案组成的生态圈,它由Sharding-JDBC、Sharding- Proxy和Sharding-Sidecar(计划中)这3款相互独立的产品组成。 他们均提供标准化的数据分片、分布式事务和数据库治理功能,可适用于如Java同构、异构语言、容器、云原生等各种多样化的应用场景。
官方地址:https://shardingsphere.apache.org/document/current/cn/overview/
目前只需关注Sharding-JDBC,它定位为轻量级Java框架,在Java的JDBC层提供的额外服务。 它使用客户端直连数据库,以jar包形式提供服务,无需额外部署和依赖,可理解为增强版的JDBC驱动,完全兼容JDBC和各种ORM框架。
Sharding-JDBC的核心功能为数据分片和读写分离,通过Sharding-JDBC,应用可以透明的使用jdbc访问已经分库分表、读写分离的多个数据源,而不用关心数据源的数量以及数据如何分布。
- 适用于任何基于Java的ORM框架,如: Hibernate, Mybatis, Spring JDBC Template或直接使用JDBC。
- 基于任何第三方的数据库连接池,如:DBCP, C3P0, BoneCP, Druid, HikariCP等。
- 支持任意实现JDBC规范的数据库。目前支持MySQL,Oracle,SQLServer和PostgreSQL。
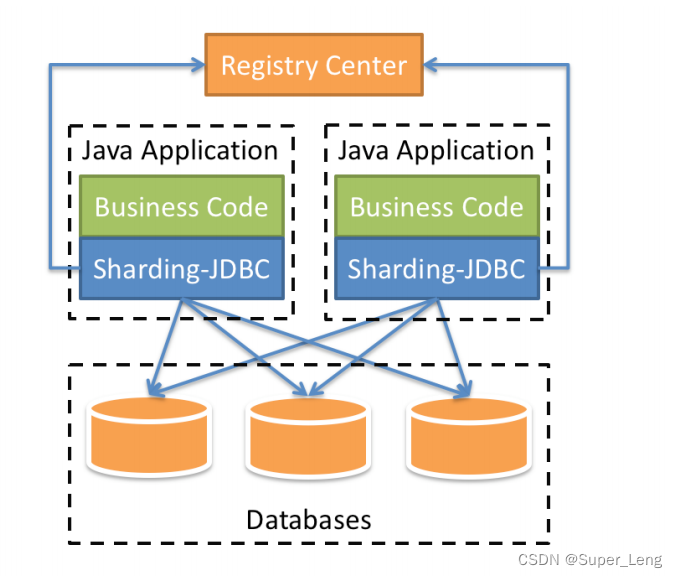
上图展示了Sharding-Jdbc的工作方式,使用Sharding-Jdbc前需要人工对数据库进行分库分表,在应用程序中加入Sharding-Jdbc的Jar包,应用程序通过Sharding-Jdbc操作分库分表后的数据库和数据表,由于Sharding-Jdbc是对Jdbc驱动的增强,使用Sharding-Jdbc就像使用Jdbc驱动一样,在应用程序中是无需指定具体要操作的分库和分表的。
2. Sharding-JDBC与JDBC性能对比
①性能损耗测试:服务器资源充足、并发数相同,比较JDBC和Sharding-JDBC性能损耗,Sharding-JDBC相对JDBC损耗不超过7%。
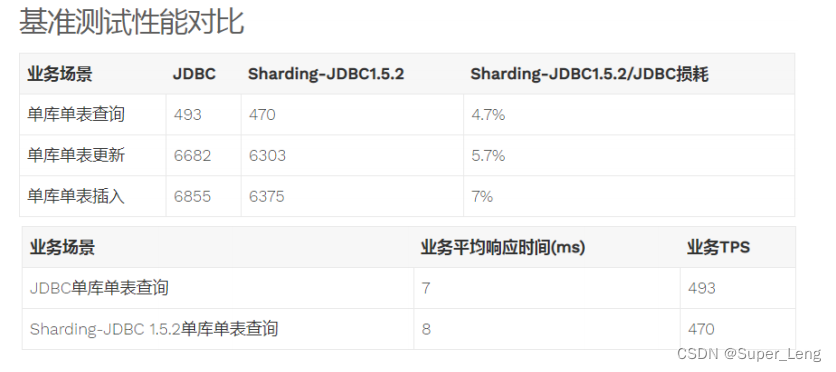
②性能对比测试:服务器资源使用到极限,相同的场景JDBC与Sharding-JDBC的吞吐量相当。
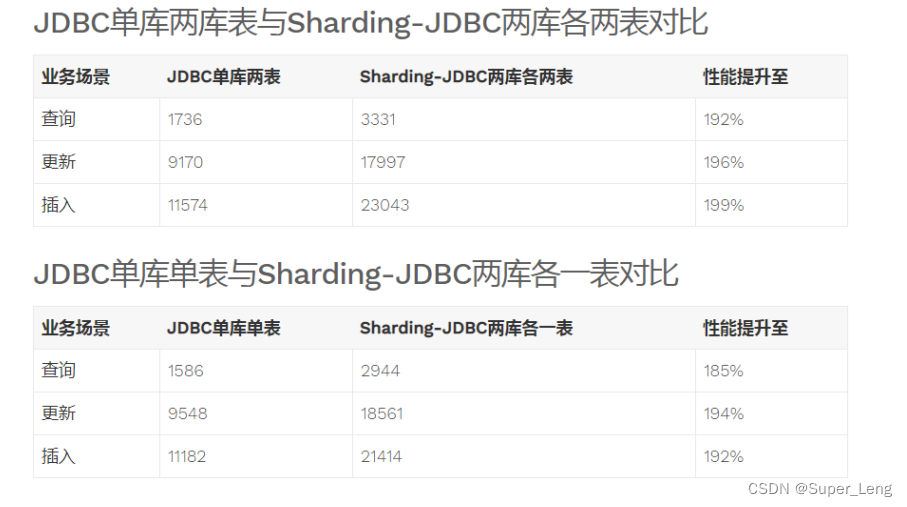
③性能对比测试:服务器资源使用到极限,Sharding-JDBC采用分库分表后,Sharding-JDBC吞吐量较JDBC不分表有接近2倍的提升。
二、Sharding-JDBC快速入门
1. 需求说明
本章节使用Sharding-JDBC完成对订单表的水平分表,通过快速入门程序的开发,快速体验Sharding-JDBC的使用方法。
人工创建两张表,t_order_1和t_order_2,这两张表是订单表拆分后的表,通过Sharding-Jdbc向订单表插入数据,按照一定的分片规则,主键为偶数的进入t_order_1,另一部分数据进入t_order_2,通过Sharding-Jdbc查询数据,根据SQL语句的内容从t_order_1或t_order_2查询数据。
2. 环境搭建
2.1 环境说明
- 操作系统:Win10
- 数据库:MySQL-5.7.25
- JDK:64位 jdk1.8.0_201
- 应用框架:spring-boot-2.1.3.RELEASE,Mybatis3.5.0
- Sharding-JDBC:sharding-jdbc-spring-boot-starter-4.0.0-RC1
2.2 创建数据库
创建订单库order_db
CREATE DATABASE
order_dbCHARACTER SET ‘utf8’ COLLATE ‘utf8_general_ci’;
在order_db中创建t_order_1、t_order_2表
DROP TABLE IF EXISTS
t_order_1;
CREATE TABLEt_order_1(
order_idbigint(20) NOT NULL COMMENT ‘订单id’,
pricedecimal(10, 2) NOT NULL COMMENT ‘订单价格’,
user_idbigint(20) NOT NULL COMMENT ‘下单用户id’,
statusvarchar(50) CHARACTER SET utf8 COLLATE utf8_general_ci NOT NULL COMMENT ‘订单状态’,
PRIMARY KEY (order_id) USING BTREE
) ENGINE = InnoDB CHARACTER SET = utf8 COLLATE = utf8_general_ci ROW_FORMAT = Dynamic;
DROP TABLE IF EXISTS
t_order_2;
CREATE TABLEt_order_2(
order_idbigint(20) NOT NULL COMMENT ‘订单id’,
pricedecimal(10, 2) NOT NULL COMMENT ‘订单价格’,
user_idbigint(20) NOT NULL COMMENT ‘下单用户id’,
statusvarchar(50) CHARACTER SET utf8 COLLATE utf8_general_ci NOT NULL COMMENT ‘订单状态’,
PRIMARY KEY (order_id) USING BTREE
) ENGINE = InnoDB CHARACTER SET = utf8 COLLATE = utf8_general_ci ROW_FORMAT = Dynamic;
2.3 引入maven依赖
引入 sharding-jdbc和SpringBoot整合的Jar包:
<dependency> <groupId>org.apache.shardingsphere</groupId> <artifactId>sharding‐jdbc‐spring‐boot‐starter</artifactId> <version>4.0.0‐RC1</version>
</dependency>
3. 编写程序
3.1 分片规则配置
分片规则配置是sharding-jdbc进行对分库分表操作的重要依据,配置内容包括:数据源、主键生成策略、分片策略等。
在application.properties中配置:
server.port=56081#工程名
spring.application.name = sharding-jdbc-simple-demo#访问路径
server.servlet.context-path = /sharding-jdbc-simple-demo
spring.http.encoding.enabled = true
spring.http.encoding.charset = UTF-8
spring.http.encoding.force = true#覆盖重复的bean定义
spring.main.allow-bean-definition-overriding = true#mybatis驼峰命名
mybatis.configuration.map-underscore-to-camel-case = true#sharding-jdbc分片规则配置
#数据源,自定义名称m1
spring.shardingsphere.datasource.names = m1spring.shardingsphere.datasource.m1.type = com.alibaba.druid.pool.DruidDataSource
spring.shardingsphere.datasource.m1.driver-class-name = com.mysql.jdbc.Driver
spring.shardingsphere.datasource.m1.url = jdbc:mysql://localhost:3306/order_db?useUnicode=true
spring.shardingsphere.datasource.m1.username = root
spring.shardingsphere.datasource.m1.password = root# 指定t_order表的数据分布情况,配置数据节点,逻辑表t_order对应的节点是:m1.t_order_1,m1.t_order_2
spring.shardingsphere.sharding.tables.t_order.actual-data-nodes = m1.t_order_$->{1..2}# 指定t_order表的主键生成策略为SNOWFLAKE,主键为order_id
spring.shardingsphere.sharding.tables.t_order.key-generator.column=order_id
spring.shardingsphere.sharding.tables.t_order.key-generator.type=SNOWFLAKE# 指定t_order表的分片策略,分片策略包括分片键和分片算法
spring.shardingsphere.sharding.tables.t_order.table-strategy.inline.sharding-column = order_id
spring.shardingsphere.sharding.tables.t_order.table-strategy.inline.algorithm-expression = t_order_$->{order_id % 2 + 1}# 打开sql输出日志
spring.shardingsphere.props.sql.show = trueswagger.enable = truelogging.level.root = info
logging.level.org.springframework.web = info
logging.level.com.itheima.dbsharding  = debug
logging.level.druid.sql = debug
1.首先定义数据源m1,并对m1进行实际的参数配置。
2.指定t_order表的数据分布情况,分布在m1.t_order_1,m1.t_order_2
3.指定t_order表的主键生成策略为SNOWFLAKE,SNOWFLAKE是一种分布式自增算法,保证id全局唯一
4.定义t_order分片策略,order_id为偶数的数据落在t_order_1,为奇数的落在t_order_2,分表策略的表达式为 t_order_$->{order_id % 2 + 1}
3.2.数据操作
@Mapper
@Component
public interface OrderDao {/*** 插入订单*/@Insert("insert into t_order(price,user_id,status)values(#{price},#{userId},#{status})")int insertOrder(@Param("price")BigDecimal price,@Param("userId")Long userId,@Param("status")String status);/*** 根据id列表查询订单*/@Select("<script>" +"select" +" * " +" from t_order t " +" where t.order_id in " +" <foreach collection='orderIds' open='(' separator=',' close=')' item='id'>" +" #{id} " +" </foreach>" +"</script>")List<Map> selectOrderbyIds(@Param("orderIds") List<Long> orderIds);
}
3.3.测试
①编写单元测试:
@RunWith(SpringRunner.class)
@SpringBootTest(classes = {ShardingJdbcSimpleBootstrap.class})
public class OrderDaoTest {@AutowiredOrderDao orderDao;@Testpublic void testInsertOrder() {for (int i = 1; i < 20; i++) {orderDao.insertOrder(new BigDecimal(i), 1L, "SUCCESS");}}@Testpublic void testSelectOrderbyIds() {List<Long> ids = new ArrayList<>();ids.add(373897739357913088L);ids.add(373897037306920961L);List<Map> maps = orderDao.selectOrderbyIds(ids);System.out.println(maps);}
}
②执行testInsertOrder:

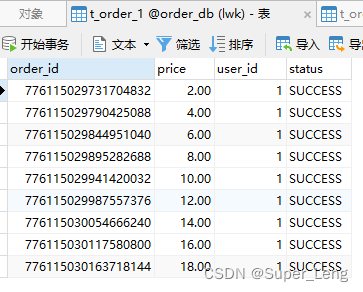
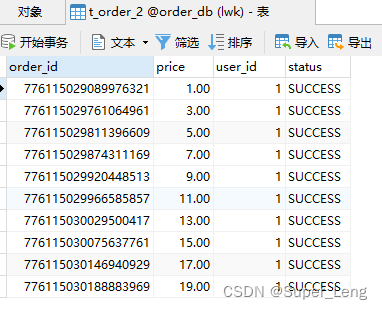
通过日志可以发现order_id为奇数的被插入到t_order_2表,为偶数的被插入到t_order_1表,达到预期目标。
③执行testSelectOrderbyIds:

通过日志可以发现,根据传入order_id的奇偶不同,sharding-jdbc分别去不同的表检索数据,达到预期目标。
4. 流程分析
通过日志分析,Sharding-JDBC在拿到用户要执行的sql之后干了哪些事儿:
(1)解析sql,获取分片键值,在本例中是order_id
(2)Sharding-JDBC通过规则配置 t_order_$->{order_id % 2 + 1},知道了当order_id为偶数时,应该往 t_order_1表插数据,为奇数时,往t_order_2插数据。
(3)于是Sharding-JDBC根据order_id的值改写sql语句,改写后的SQL语句是真实所要执行的SQL语句。
(4)执行改写后的真实sql语句
(5)将所有真正执行sql的结果进行汇总合并,返回。
5. 其他集成方式
Sharding-JDBC不仅可以与spring boot良好集成,它还支持其他配置方式,共支持以下四种集成方式。
5.1 Spring Boot properties配置
#sharding-jdbc分片规则配置
#数据源,自定义名称m1
spring.shardingsphere.datasource.names = m1spring.shardingsphere.datasource.m1.type = com.alibaba.druid.pool.DruidDataSource
spring.shardingsphere.datasource.m1.driver-class-name = com.mysql.jdbc.Driver
spring.shardingsphere.datasource.m1.url = jdbc:mysql://localhost:3306/order_db?useUnicode=true
spring.shardingsphere.datasource.m1.username = root
spring.shardingsphere.datasource.m1.password = root# 指定t_order表的数据分布情况,配置数据节点,逻辑表t_order对应的节点是:m1.t_order_1,m1.t_order_2
spring.shardingsphere.sharding.tables.t_order.actual-data-nodes = m1.t_order_$->{1..2}# 指定t_order表的主键生成策略为SNOWFLAKE,主键为order_id
spring.shardingsphere.sharding.tables.t_order.key-generator.column=order_id
spring.shardingsphere.sharding.tables.t_order.key-generator.type=SNOWFLAKE# 指定t_order表的分片策略,分片策略包括分片键和分片算法
spring.shardingsphere.sharding.tables.t_order.table-strategy.inline.sharding-column = order_id
spring.shardingsphere.sharding.tables.t_order.table-strategy.inline.algorithm-expression = t_order_$->{order_id % 2 + 1}
5.2 Spring Boot Yaml 配置
定义application.yml,内容如下:
server:port: 56081servlet:context-path: /sharding-jdbc-simple-demo
spring:application:name: sharding-jdbc-simple-demohttp:encoding:enabled: truecharset: utf-8force: truemain:allow-bean-definition-overriding: trueshardingsphere:datasource:names: m1m1:type: com.alibaba.druid.pool.DruidDataSourcedriverClassName: com.mysql.jdbc.Driverurl: jdbc:mysql://localhost:3306/order_db?useUnicode=trueusername: rootpassword: rootsharding:tables:t_order:actualDataNodes: m1.t_order_$->{1..2}tableStrategy:inline:shardingColumn: order_idalgorithmExpression: t_order_$->{order_id % 2 + 1}keyGenerator:type: SNOWFLAKEcolumn: order_idprops:sql:show: true
mybatis:configuration:map-underscore-to-camel-case: true
swagger:enable: true
logging:level:root: infoorg.springframework.web: infocom.itheima.dbsharding: debugdruid.sql: debug
5.3 Java 配置
添加配置类:
@Configuration
public class ShardingJdbcConfig {// 配置分片规则// 定义数据源Map<String, DataSource> createDataSourceMap() {DruidDataSource dataSource1 = new DruidDataSource();dataSource1.setDriverClassName("com.mysql.jdbc.Driver");dataSource1.setUrl("jdbc:mysql://localhost:3306/order_db?useUnicode=true");dataSource1.setUsername("root");dataSource1.setPassword("root");Map<String, DataSource> result = new HashMap<>();result.put("m1", dataSource1);return result;}// 定义主键生成策略private static KeyGeneratorConfiguration getKeyGeneratorConfiguration() {KeyGeneratorConfiguration result = new KeyGeneratorConfiguration("SNOWFLAKE","order_id");return result;}// 定义t_order表的分片策略TableRuleConfiguration getOrderTableRuleConfiguration() {TableRuleConfiguration result = new TableRuleConfiguration("t_order","m1.t_order_$->{1..2}");result.setTableShardingStrategyConfig(new InlineShardingStrategyConfiguration("order_id", "t_order_$->{order_id % 2 + 1}"));result.setKeyGeneratorConfig(getKeyGeneratorConfiguration());return result;}// 定义sharding-Jdbc数据源@BeanDataSource getShardingDataSource() throws SQLException {ShardingRuleConfiguration shardingRuleConfig = new ShardingRuleConfiguration();shardingRuleConfig.getTableRuleConfigs().add(getOrderTableRuleConfiguration());//spring.shardingsphere.props.sql.show = trueProperties properties = new Properties();properties.put("sql.show","true");return ShardingDataSourceFactory.createDataSource(createDataSourceMap(), shardingRuleConfig,properties);}}


注意:
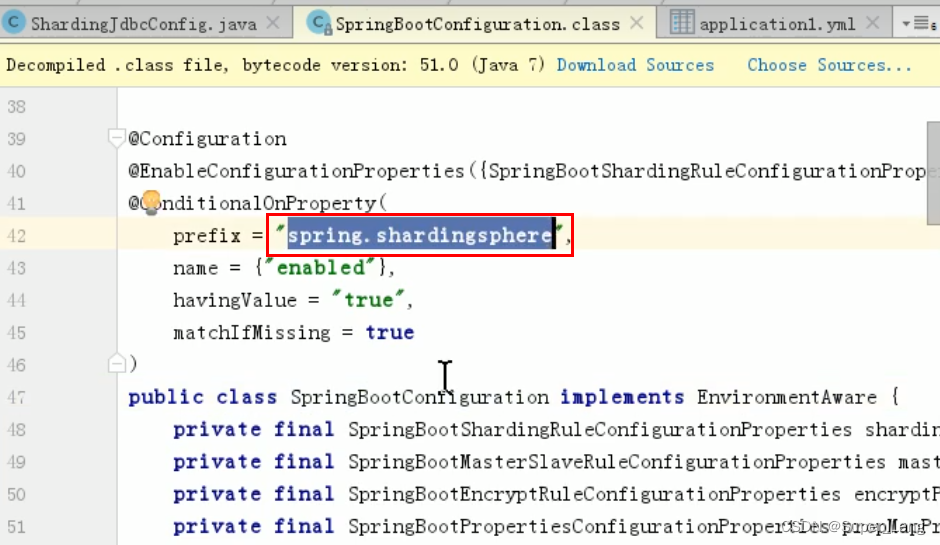
Sharding-Jdbc与SpringBoot集成,会自动从配置文件中读“spring.shardingsphere”前缀的配置
由于使用java配置类方式,没有配置文件,读取不到就会报以上错误
此时需要在启动类中加上@SpringBootApplication(exclude = SpringBootConfiguration.class)
import org.apache.shardingsphere.shardingjdbc.spring.boot.SpringBootConfiguration;
import org.springframework.boot.SpringApplication;
import org.springframework.boot.autoconfigure.SpringBootApplication;@SpringBootApplication(exclude = SpringBootConfiguration.class)
public class ShardingJdbcSimpleBootstrap {public static void main(String[] args) {SpringApplication.run(ShardingJdbcSimpleBootstrap.class, args);}}
5.4 Spring命名空间配置
此方式使用xml方式配置,不推荐使用。
<?xml version="1.0" encoding="UTF‐8"?>
<?xml version="1.0" encoding="UTF‐8"?>xmlns:xsi="http://www.w3.org/2001/XMLSchema‐instance" xmlns:p="http://www.springframework.org/schema/p" xmlns:context="http://www.springframework.org/schema/context" 、xmlns:tx="http://www.springframework.org/schema/tx" xmlns:sharding="http://shardingsphere.apache.org/schema/shardingsphere/sharding"xsi:schemaLocation="http://www.springframework.org/schema/beans http://www.springframework.org/schema/beans/spring‐beans.xsd http://shardingsphere.apache.org/schema/shardingsphere/shardinghttp://shardingsphere.apache.org/schema/shardingsphere/sharding/sharding.xsd http://www.springframework.org/schema/context http://www.springframework.org/schema/context/spring‐context.xsd http://www.springframework.org/schema/tx http://www.springframework.org/schema/tx/spring‐tx.xsd"><context:annotation‐config /><!‐‐定义多个数据源‐‐>
<bean id="m1" class="com.alibaba.druid.pool.DruidDataSource" destroy‐method="close"> <property name="driverClassName" value="com.mysql.jdbc.Driver" /> <property name="url" value="jdbc:mysql://localhost:3306/order_db_1?useUnicode=true" /> <property name="username" value="root" /> <property name="password" value="root" />
</bean><!‐‐定义分库策略‐‐>
<sharding:inline‐strategy id="tableShardingStrategy" sharding‐column="order_id" algorithm‐ expression="t_order_$‐>{order_id % 2 + 1}" /> <!‐‐定义主键生成策略‐‐>
<sharding:key‐generator id="orderKeyGenerator" type="SNOWFLAKE" column="order_id" /> <!‐‐定义sharding‐Jdbc数据源‐‐>
<sharding:data‐source id="shardingDataSource"> <sharding:sharding‐rule data‐source‐names="m1"> <sharding:table‐rules> <sharding:table‐rule logic‐table="t_order" table‐strategy‐ ref="tableShardingStrategy" key‐generator‐ref="orderKeyGenerator" /> </sharding:table‐rules> </sharding:sharding‐rule>
</sharding:data‐source> </beans>


