转载至 : http://my.oschina.net/fufangchun/blog/232895?p=1
目录[-]
- 一、简介:
- 二、Graphite的安装及配置
- 0.Graphite目录
- 1.安装环境
- 2.所需软件
- 3.安装依赖
- 4.安装Graphite组件
- ①.检查依赖:
- ②.安装graphite-web:
- ②.安装whisper:
- ③.安装carbon:
- 5.配置http:
- 6.配置Graphite
- 7.初始化数据库
- 8.重启httpd
- 9.启动cabon
- 10.访问graphite-web
- 11.向Graphite发送数据
- 三、Graphite+collectd自动收集数据
- 1.安装collectd
- 2.效果图
- 四、Graphite+ statsd自动收集数据
- 五、Graphite如何获取数据
- 1.命名方案
- 2.数据保存
- 3. Graphite数据格式
- 4.注意事项
- 六、报错集锦
- 1.初始化数据库报错
- 七、参考文献
| Praphite学习文档 |
| 作者:perofu
|
| Email:perofu.com@gmail.com
版本:version:1.0
|
| 2014/04/26 |
一、简介:
1. Graphite是一个企业级的监控工具,可以在廉价机硬件上运行。
2.最初由Chris Davis在 Orbitz 工作时,作为一个辅助项目在2006年使用Python语言编写,最终成一个基本的监控工具。在2008,Orbitz 允许软件以开源Apache 2.0 license的授权方式发行。从那之后 Chris继续开发这个软件,并将其部署在其它公司,包括 Sears, 使得Graphite成为电子商务监控系统的一个支柱。
3. Graphite仅是一个画图工具,不主动地收集数据,而是将接收到的数据以图形的方式展现出来。
4.因为Graphite不收集数据,所以需要将指定格式的数据发送给Graphite,其在将受到的数据,绘制成图像。
5. Graphite的功能:
①.存储时间序列数据;
②.根据需要呈现数据的图形。
6. Graphite的组成:
①.carbon :一个Twisted守护进程【端口:2003】,监听时间序列数据,即客户端将指定的数据通过nc发送到2003端口即可。
②.whisper :一个简单的数据库库,用来存储时间序列数据,在设计上类似于RRD。
③.graphite webapp :Django webapp,使用 Cairo来根据需要呈现图形。
7.Graphite 是一个用于采集网站实时信息并进行统计的开源项目,可用于采集多种网站服务运行状态信息。
8.Graphite服务平均每分钟有4800次更新操作。实践已经证实要监测网站发发生什么是非常有用的,它的简单文本协议和绘图功能可以方便地即插即用的方式用于任何需要监控的系统上。
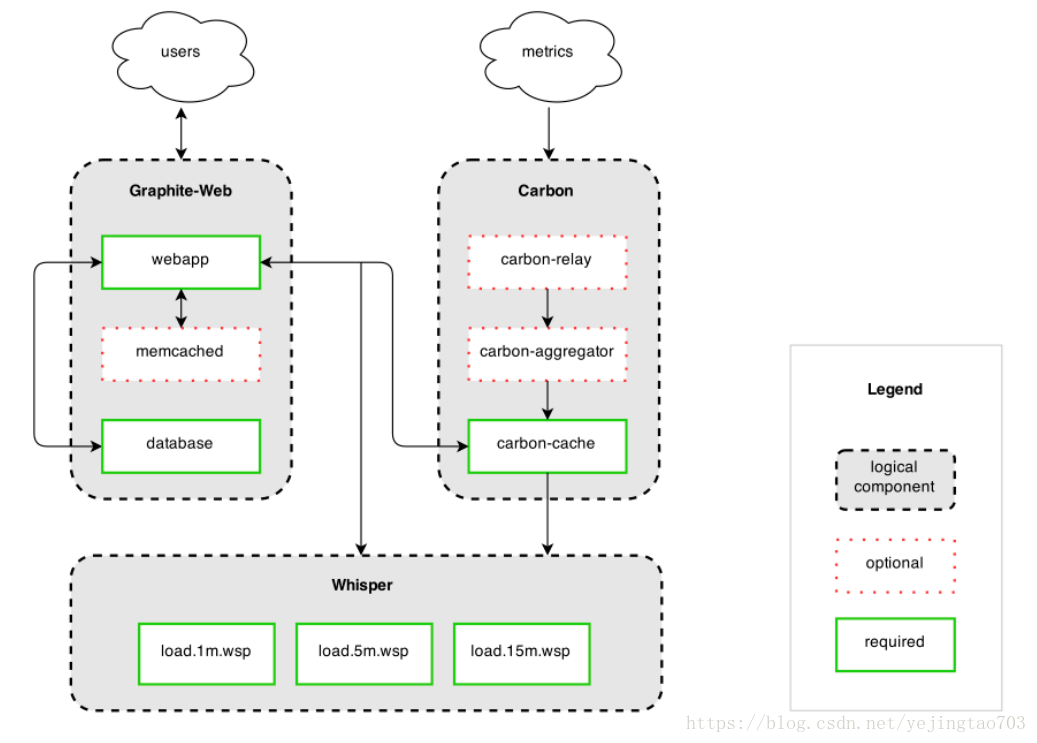
9.原理图:

Carbon接收到数据,再将数据写入到Whisper数据库文件中,然后Graphite Webapp去读取这个数据,然后显示出图形。但是实际上这个体系采用了缓存,数据可能先到缓存中,然后Webapp读取,显示出图形。这也是为什么在主机I/O反应不过来时Webapp的图形仍能以接近实时的方式显示。
接收数据相当简单,通常大部分的精力花在最开始收集数据时。当你发送数据点给Carbon, 他们马上可以在webapp中画图。webapp 提供几种方式创建和显示图形,包括简单的URL API ,这种呈现的方式可以很方便地将图形嵌入到其它Web页面。
二、Graphite的安装及配置
0.Graphite目录
Graphite安装之后,在安装位置(默认为/opt/graphite)的文件布局如下:
| 目录 | 介绍 |
| /opt/graphite/bin | 二进制文件目录 |
| /opt/graphite/conf | 配置文件目录 |
| /opt/graphite/lib | 库目录 |
| /opt/graphite/storage | 数据存放目录,包括log,whisper数据库,索引,rrd数据等 |
| /opt/graphite/webapp | webapp文件存放目录 |
| /opt/graphite/examples | 获取数据的例子 |
1.安装环境
Python版本: 2.6.6
系统版本: CentOS release 6.4 (Final) 2.6.32-358.el6.x86_64
yum源: 系统原有的
2.所需软件
①. carbon-0.9.10.tar.gz
②. graphite-web-0.9.10.tar.gz
③. whisper-0.9.10.tar.gz
④. check-dependencies.py
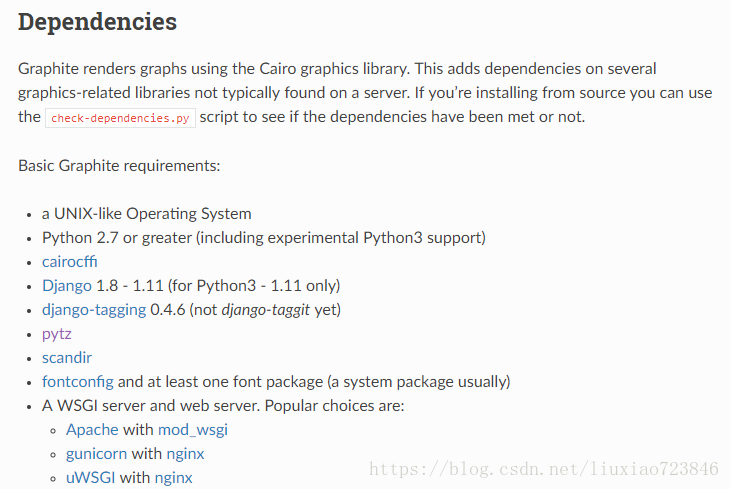
3.安装依赖
vi /etc/yum.repos.d/epel.repo
| [epel] name=Extra Packages for Enterprise Linux 6 - $basearch baseurl=http://download.fedoraproject.org/pub/epel/6/$basearch #mirrorlist=https://mirrors.fedoraproject.org/metalink?repo=epel-6&arch=$basearch failovermethod=priority enabled=1 gpgcheck=0 gpgkey=file:///etc/pki/rpm-gpg/RPM-GPG-KEY-EPEL-6 |
yum install bitmap bitmap-fonts-compat Django django-tagging fontconfig cairo python-devel python-memcached python-twisted pycairo mod_python python-ldap python-simplejson memcached python-zope-interface mod_wsgi python-sqlite2 bitmap Django django-tagging mod_python python-sqlite2 -y
4.安装Graphite组件
Graphite的默认安装位置是/opt/graphite/。
①.检查依赖:
wget https://launchpadlibrarian.net/104073214/check-dependencies.py
python check-dependencies.py
注:少什么,装什么。
②.安装graphite-web:
wget https://launchpadlibrarian.net/106575888/graphite-web-0.9.10.tar.gz
tar -axf graphite-web-0.9.10.tar.gz -C /usr/local/src/
cd /usr/local/src/graphite-web-0.9.10/
python setup.py install
②.安装whisper:
wget https://launchpadlibrarian.net/106575859/whisper-0.9.10.tar.gz
tar -axf whisper-0.9.10.tar.gz -C /usr/local/src/
cd /usr/local/src/whisper-0.9.10/
python setup.py install
③.安装carbon:
wget https://launchpadlibrarian.net/106575865/carbon-0.9.10.tar.gz
tar -axf carbon-0.9.10.tar.gz -C /usr/local/src/
cd /usr/local/src/carbon-0.9.10/
python setup.py install
5.配置http:
vi /etc/httpd/conf.d/graphite.conf
| Listen 8080
# You may need to manually edit this file to fit your needs. # This configuration assumes the default installation prefix # of /opt/graphite/, if you installed graphite somewhere else # you will need to change all the occurances of /opt/graphite/ # in this file to your chosen install location. <VirtualHost *:8080> ServerName graphite DocumentRoot "/opt/graphite/webapp"
# I've found that an equal number of processes & threads tends # to show the best performance for Graphite (ymmv). WSGIDaemonProcess graphite processes=5 threads=5 display-name='%{GROUP}' inactivity-timeout=120 WSGIProcessGroup graphite
# You will need to create this file! There is a graphite.wsgi.example # file in this directory that you can safely use, just copy it to graphite.wgsi WSGIScriptAlias / /opt/graphite/conf/graphite.wsgi
Alias /content/ /opt/graphite/webapp/content/ <Location "/content/"> SetHandler None </Location>
# NOTE: In order for the django admin site media to work you # must change @DJANGO_ROOT@ to be the path to your django # installation, which is probably something like: # /usr/lib/python2.6/site-packages/django Alias /media/ "/usr/lib/python2.4/site-packages/django/contrib/admin/media/" <Location "/media/"> SetHandler None </Location>
# The graphite.wsgi file has to be accessible by apache. It won't # be visible to clients because of the DocumentRoot though. <Directory /opt/graphite/conf/> Order deny,allow Allow from all </Directory>
</VirtualHost> |
vi /etc/httpd/conf.d/wsgi.conf
| LoadModule wsgi_module modules/mod_wsgi.so WSGISocketPrefix /var/run/wsgi |
6.配置Graphite
cd /opt/graphite/conf/
cp graphite.wsgi.example graphite.wsgi
cp carbon.conf.example carbon.conf
cp storage-schemas.conf.example storage-schemas.conf
cp /opt/graphite/webapp/graphite/local_settings.py{.example,}
vi /opt/graphite/webapp/graphite/settings.py
| DATABASE_ENGINE = 'django.db.backends.mysql' # 'postgresql', 'mysql', 'sqlite3' or 'ado_mssql'. #DATABASE_NAME = 'test' # Or path to database file if using sqlite3. #DATABASE_USER = 'test' # Not used with sqlite3. #DATABASE_PASSWORD = '123456' # Not used with sqlite3. #DATABASE_HOST = '' # Set to empty string for localhost. Not used with sqlite3. #DATABASE_PORT = '' # Set to empty string for default. Not used with sqlite3.
DATABASES = { 'default': { 'ENGINE': 'django.db.backends.mysql', # Add 'postgresql_psycopg2', 'mysql', 'sqlite3' or 'oracle'. 'NAME': 'test', # Or path to database file if using sqlite3. 'USER': 'root', # Not used with sqlite3. 'PASSWORD': '123456', # Not used with sqlite3. 'HOST': '', # Set to empty string for localhost. Not used with sqlite3. 'PORT': '3306', # Set to empty string for default. Not used with sqlite3. } } |
注:确保上面的数据库已存在,没有则手动创建。
7.初始化数据库
chown -R apache.apache /opt/graphite
python /opt/graphite/webapp/graphite/manage.py syncdb
| [root@localhost conf.d]# python /opt/graphite/webapp/graphite/manage.py syncdb /usr/lib/python2.6/site-packages/django/conf/__init__.py:75: DeprecationWarning: The ADMIN_MEDIA_PREFIX setting has been removed; use STATIC_URL instead. "use STATIC_URL instead.", DeprecationWarning) /usr/lib/python2.6/site-packages/django/conf/__init__.py:110: DeprecationWarning: The SECRET_KEY setting must not be empty. warnings.warn("The SECRET_KEY setting must not be empty.", DeprecationWarning) /usr/lib/python2.6/site-packages/django/core/cache/__init__.py:82: DeprecationWarning: settings.CACHE_* is deprecated; use settings.CACHES instead. DeprecationWarning Creating tables ... Creating table account_profile Creating table account_variable Creating table account_view Creating table account_window Creating table account_mygraph Creating table dashboard_dashboard_owners Creating table dashboard_dashboard Creating table events_event Creating table auth_permission Creating table auth_group_permissions Creating table auth_group Creating table auth_user_user_permissions Creating table auth_user_groups Creating table auth_user Creating table django_session Creating table django_admin_log Creating table django_content_type Creating table tagging_tag Creating table tagging_taggeditem
You just installed Django's auth system, which means you don't have any superusers defined. Would you like to create one now? (yes/no): y Please enter either "yes" or "no": yes Username (leave blank to use 'root'): root E-mail address: perofu.com@gmail.com Password: Password (again): Superuser created successfully. Installing custom SQL ... Installing indexes ... Installed 0 object(s) from 0 fixture(s)
chown -R apache:apache /opt/graphite/storage/ |
8.重启httpd
/etc/init.d/httpd restart
注:如出现端口被占用,使用一下命令即可:
| pkill httpd /etc/init.d/httpd start |
9.启动cabon
/opt/graphite/bin/carbon-cache.py start
10.访问graphite-web
http://172.22.2.104:8080/

11.向Graphite发送数据
graphite默认接收数据的端口是2003。
/opt/graphite/examples/example-client.py
| [root@localhost ~]# /opt/graphite/examples/example-client.py sending message
-------------------------------------------------------------------------------- system.loadavg_1min 0.03 1397360637 system.loadavg_5min 0.02 1397360637 system.loadavg_15min 0.00 1397360637 |
对应在浏览器窗口中的显示为在system目录下,loadavg_15min、loadavg_5min、loadavg_1min这三条线就是example-client.py的数据产生的图形。
注意事项:默认显示24小时,因此可能好像没有图形出现。可以点击上图中右箭头选择时间范围,如下图:
三、Graphite+collectd自动收集数据
collectd 用来收集被监控服务器的性能指标,然后发送这些数据到Graphite,再将图形绘制出来。
需要在被监控机上安装collectd,即可将被监控机上的数据发送到Graphite服务器上。
注:一定要同步时间。
Graphite 支持的第三方工具很多,Bucky, collectd, Collectl, Charcoal, Diamond, Ganglia, Host sFlow, statsd, Tasseo 等等。这里选用 collectd 来收集机器的各个性能参数,collectd 安装在需要被监控的机器上。
优势:
①.细粒度,非漂移监测:数据精度多,数据可以小数表示,时间可以以毫秒表示
②.低负载:消耗很少的系统资源
③.汇总数据 vs 详细数据:提供汇总数据和详细数据输出,自由选择
④.简要 vs 详细:可以选择简要的数据输出,也可以选择详细的数据输出
⑤.Plot格式:坐标形式,可以将数据导入到gnuplot, Excel等软件进行分析
⑥.对齐监测间隔:当需要监控集群时,可以对齐监控间隔,方便数据查看和比较。
⑦.其它的就不啰嗦了,最重要的特性是子系统,这样可以选择自己需要子系统集进行监控。
1.安装collectd
yum install perl-ExtUtils-MakeMaker -y
yum install collectd -y
chkconfig collectd on
#安装collectd-plugins
git clone https://github.com/indygreg/collectd-carbon.git /opt/collectd-plugins
chmod 755 /opt/collectd-plugins/carbon_writer.py
vi /etc/collectd.conf
| Include "/etc/ collectd.d" |
vi /etc/collectd.d/graphite.conf
| <LoadPlugin "python"> Globals true </LoadPlugin>
<Plugin "python"> # carbon_writer.py is at path /opt/collectd-plugins/carbon_writer.py ModulePath "/opt/collectd-plugins/"
Import "carbon_writer"
<Module "carbon_writer"> LineReceiverHost "172.22.2.104" LineReceiverPort 2003 DifferentiateCountersOverTime true LowercaseMetricNames true TypesDB "/usr/share/collectd/types.db" </Module> </Plugin> |
/etc/init.d/collectd start
| [root@client ~]# /etc/init.d/collectd start Starting collectd: [ OK ] |
查看是否已建立连接
| [root@client ~]# !net netstat -anplt Active Internet connections (servers and established) Proto Recv-Q Send-Q Local Address Foreign Address State PID/Program name tcp 0 0 0.0.0.0:8139 0.0.0.0:* LISTEN 63367/ruby tcp 0 0 0.0.0.0:11211 0.0.0.0:* LISTEN 41669/memcached tcp 0 0 0.0.0.0:6379 0.0.0.0:* LISTEN 60419/redis-server tcp 0 0 0.0.0.0:139 0.0.0.0:* LISTEN 33389/smbd tcp 0 0 0.0.0.0:10000 0.0.0.0:* LISTEN 7938/perl tcp 0 0 0.0.0.0:21 0.0.0.0:* LISTEN 20485/vsftpd tcp 0 0 0.0.0.0:22 0.0.0.0:* LISTEN 1222/sshd tcp 0 0 0.0.0.0:8888 0.0.0.0:* LISTEN 6741/ntopng tcp 0 0 127.0.0.1:25 0.0.0.0:* LISTEN 1298/master tcp 0 0 0.0.0.0:445 0.0.0.0:* LISTEN 33389/smbd tcp 0 0 127.0.0.1:25151 0.0.0.0:* LISTEN 33018/python tcp 0 0 0.0.0.0:3306 0.0.0.0:* LISTEN 3782/mysqld tcp 0 0 127.0.0.1:6379 127.0.0.1:53338 ESTABLISHED 60419/redis-server tcp 0 0 172.22.2.99:22 172.22.150.15:57349 ESTABLISHED 62317/sshd tcp 0 0 127.0.0.1:53338 127.0.0.1:6379 ESTABLISHED 6741/ntopng tcp 0 0 172.22.2.99:33030 172.22.2.89:61613 ESTABLISHED 65466/ruby tcp 0 0 172.22.2.99:41668 172.22.2.104:2003 ESTABLISHED 35996/collectd tcp 0 596 172.22.2.99:22 172.22.150.15:65109 ESTABLISHED 1471/sshd tcp 0 0 :::11211 :::* LISTEN 41669/memcached tcp 0 0 :::139 :::* LISTEN 33389/smbd tcp 0 0 :::80 :::* LISTEN 33102/httpd tcp 0 0 :::22 :::* LISTEN 1222/sshd tcp 0 0 ::1:25 :::* LISTEN 1298/master tcp 0 0 :::443 :::* LISTEN 33102/httpd tcp 0 0 :::445 :::* LISTEN 33389/smbd |
注:等着客户端的 collectd 收集数据发送给监控服务器的 carbon(监听端口为 2003)吧.
2.效果图

四、Graphite+ statsd自动收集数据
StatsD是用来收集数据的,收集完数据就发送到其他服务器进行处理。
StatsD是一个NodeJs的daemon程序,简单,轻巧。使用的UDP协议。可以和Graphite图片渲染应用结合。
UDP好处就是fire-and-forget。你不用去管后台的StatsD 服务器是不是崩了,崩了就崩了,不会影响前台应用。
StatsD有一个时间周期的概念,默认是10秒钟,就是说,StatsD会把收集到的数据(经过处理)每隔10秒,发送给后端。比如Counter,他就会把10秒内该Counter累加的值,发送到后端。比如Time/Timing,他会把次数、最大值、最小值、平均值发往后端。所以,所有的数据都是以10秒为一个周期的。
为了应对非常频繁的计数,可以增加一个取样率的参数:StatsD::increment("adventurer.heartbeat", 0.1); 0.1就是取样率,StatsD会自动帮你换算成100%的取样率,然后发送给后端。
详细请参考:
http://www.linuxidc.com/Linux/2013-06/86597.htm
http://blog.csdn.net/crazyhacking/article/details/8464235
http://my.oschina.net/u/138210/blog/181149
http://blog.csdn.net/crazyhacking/article/details/8363235
http://blog.csdn.net/puncha/article/details/9083061
http://stackoverflow.com/questions/5919629/express-module-not-found-when-installed-with-npm
试了一下,一直出现这个报错:

算了,还是选择collectd吧。
五、Graphite如何获取数据
如果你有一些随时间变化的数值,然后你想他们绘图,那么 Graphite 非常有用。基本上你编写一个程序来收集这些数值,然后将他们发送到graphite的后端即可。
1.命名方案
存储在Graphite的任何东西都有一个路径,这些路径由多个部分组成,每个部分以点号相隔。比如website.orbitz.bookings.air可能表示在orbitz下的air bookings。在产生你的数据之前你需要先选择好你的命令方案。
比如在”foo.bar.baz”这个路径中,每个点周围的东西都称为一个路径组件,因此“foo”,“bar”,“baz”都是路径组件。
每个路径组件必须是明确的,有目的的。路径组件应该和系统层次尽量保持相对应的深度。
2.数据保存
Graphite建立在固定尺寸的数据库上 (参考whisper) ,因此我们必须预先配置我们想存储多少数据和数据的精度。
比如你想以一分钟的精度(即每分钟有一个数据节点)保存2小时的数据。另外你还可以以10分钟的精度保存2周的数据。其理念就是存储开销由你想存储的数据节点决定的,精度越低,那就可以以更少的节点覆盖更长的时间。
要确定最佳的保存配置,你必须回答以下所有问题:
①.你的数据多久产生一次?
②.你要求的最大精度是多少?
③.在那个精度下,你需要查看多久的数据?
③.你能使用的最小精度是多少?
④.你要查看多久之前的数据?(它必须是个有限时,且提前确定好)
一旦你选择好了命令方案和回答了以上所有问题,那么你可以通过创建或修改/opt/graphite/conf/storage-schemas.conf文件来创建一个schema。
schema文件的格式通过示例最容易说明。假设我们已经写了一个脚本,这个脚本会从不同的服务器中收集系统性能数据,它的命名方案类似于:
| servers.HOSTNAME.METRIC |
其中HOSTNAME是服务器的主机名,METRIC是一个像 cpu_load, mem_usage, open_files的性能数据。同时假设我们想以一分钟的精度保存这些数据30天,以15分钟的精度保存10年。
下面是我们要写入到schema文件的内容:
| [server_load] #schema名称,可任意 priority = 100 #优先级 pattern = ^servers\. retentions = 60:43200,900:350400 |
简单来说,当carbon接收到一个指标数据时,Graphtie会确定这个指标数据应该保存到文件系统的哪个whisper数据文件中。如果数据文件不存在,carbon知道它必须创建一个,但是因为whisper是一个确定尺寸的数据库,在创建文件时必须确定某些参数(这就是为什么我们写入schema的原因)。
Carbon查看schema文件,然后根据优先规则选择第一个匹配指标数据名称的schema。如果没有schema匹配,那么默认的schema会被启用 (每分钟一分,保存2小时) 。一旦合适的schema确定之后,carbon会使用schema中的保存配置参数创建whisper数据文件。
现在回到我们的schema内容。
server_load schema名称,你如何写都无所谓。
priority 是一个整数,表示优先级,由高到低。作用:一个是让测试更常使用的schema更快;二是优先级提供了一种方式,通过这种方式可以为已经匹配另外一个schema的指标数据提供一个不同的保存。
pattern 参数是一个正则表达式,它用来匹配一个新的指标名称来查找它适用于哪个schema。在我们的例子中,这个模式就匹配所有以servers.开头的指标数据。
retentions 参数有点复杂,它是这样工作的:
保存配置之间以逗号相隔,每个保存配置的格式为:seconds_per_data_point:data_points_to_store。
因此在我们的例子中,第一个保存配置是每个数据节点为60秒,然后存储43,200个这样的节点。 第二个保存配置是每900秒一个数据节点, 然后保存350,400 这样的点。
3. Graphite数据格式
可以通过shell脚本,向graphite的2003端口发送数据。
| #路径 值 时间戳 metric_path value timestamp … metric_path value timestamp |
例1:
| echo "carbon.agents.client_perofu_com.proc_numbers `ps aux |sed 1d |wc -l` `date +%s`" |nc 172.22.2.104 2003
# carbon.agents.client_perofu_com.proc_numbers 71 1341198181 |

例2:
| #/bin/bash i=1; ip=172.22.2.104 port=2003 while [ $i -le 60 ] do echo "local.system.proc_numbers `ps aux |sed 1d |wc -l` `date +%s`" |nc ${ip} ${port}; sleep 60 ; let "i=i+1"; done |
4.注意事项
修改/opt/graphite/conf/storage-schemas.conf,要重启carbon-cache.py
python /opt/graphite/bin/carbon-cache.py stop
python /opt/graphite/bin/carbon-cache.py start
六、报错集锦
1.初始化数据库报错
问题:
| Traceback (most recent call last): File "/usr/lib/python2.6/site-packages/django/core/handlers/base.py", line 101, in get_response request.path_info) ….. settings.DATABASES is improperly configured. Please supply the ENGINE value. Check settings documentation for more details. |
解决:
| 将 : DATABASE_ENGINE = 'mysql' DATABASE_NAME = 'database' DATABASE_USER = 'root' DATABASE_PASSWORD = '123456' DATABASE_HOST = '' DATABASE_PORT = '3306
改为: DATABASES = { 'default': { 'ENGINE': 'django.db.backends.mysql', # Add 'postgresql_psycopg2', 'mysql', 'sqlite3' or 'oracle'. 'NAME': 'database', # Or path to database file if using sqlite3. 'USER': 'root', # Not used with sqlite3. 'PASSWORD': '123456', # Not used with sqlite3. 'HOST': '', # Set to empty string for localhost. Not used with sqlite3. 'PORT': '3306', # Set to empty string for default. Not used with sqlite3. } } |
更多请参考:http://www.jsxubar.info/graphite-installation.html
七、参考文献
非常感谢!!!
http://www.jsxubar.info/category/system-administration/graphite/
http://blog.csdn.net/puncha/article/details/9137001
http://www.linuxidc.com/Linux/2013-06/86597.htm
http://blog.csdn.net/crazyhacking/article/details/8464235
https://launchpad.net/graphite/+download
http://my.oschina.net/u/138210/blog/181149
http://blog.chinaunix.net/uid-28769783-id-3652037.html
http://blog.csdn.net/crazyhacking/article/details/8363235
http://www.vpsee.com/2012/05/use-collectd-with-graphite-to-monitor-servers/
http://wsq68.blog.51cto.com/2394336/1286410
http://www.oschina.net/p/graphite
http://stackoverflow.com/questions/5919629/express-module-not-found-when-installed-with-npm
http://blog.sina.com.cn/s/blog_90bc5fc6010179mj.html
目录[-]
- 一、简介:
- 二、Graphite的安装及配置
- 0.Graphite目录
- 1.安装环境
- 2.所需软件
- 3.安装依赖
- 4.安装Graphite组件
- ①.检查依赖:
- ②.安装graphite-web:
- ②.安装whisper:
- ③.安装carbon:
- 5.配置http:
- 6.配置Graphite
- 7.初始化数据库
- 8.重启httpd
- 9.启动cabon
- 10.访问graphite-web
- 11.向Graphite发送数据
- 三、Graphite+collectd自动收集数据
- 1.安装collectd
- 2.效果图
- 四、Graphite+ statsd自动收集数据
- 五、Graphite如何获取数据
- 1.命名方案
- 2.数据保存
- 3. Graphite数据格式
- 4.注意事项
- 六、报错集锦
- 1.初始化数据库报错
- 七、参考文献
| Praphite学习文档 |
| 作者:perofu
|
| Email:perofu.com@gmail.com
版本:version:1.0
|
| 2014/04/26 |
一、简介:
1. Graphite是一个企业级的监控工具,可以在廉价机硬件上运行。
2.最初由Chris Davis在 Orbitz 工作时,作为一个辅助项目在2006年使用Python语言编写,最终成一个基本的监控工具。在2008,Orbitz 允许软件以开源Apache 2.0 license的授权方式发行。从那之后 Chris继续开发这个软件,并将其部署在其它公司,包括 Sears, 使得Graphite成为电子商务监控系统的一个支柱。
3. Graphite仅是一个画图工具,不主动地收集数据,而是将接收到的数据以图形的方式展现出来。
4.因为Graphite不收集数据,所以需要将指定格式的数据发送给Graphite,其在将受到的数据,绘制成图像。
5. Graphite的功能:
①.存储时间序列数据;
②.根据需要呈现数据的图形。
6. Graphite的组成:
①.carbon :一个Twisted守护进程【端口:2003】,监听时间序列数据,即客户端将指定的数据通过nc发送到2003端口即可。
②.whisper :一个简单的数据库库,用来存储时间序列数据,在设计上类似于RRD。
③.graphite webapp :Django webapp,使用 Cairo来根据需要呈现图形。
7.Graphite 是一个用于采集网站实时信息并进行统计的开源项目,可用于采集多种网站服务运行状态信息。
8.Graphite服务平均每分钟有4800次更新操作。实践已经证实要监测网站发发生什么是非常有用的,它的简单文本协议和绘图功能可以方便地即插即用的方式用于任何需要监控的系统上。
9.原理图:
Carbon接收到数据,再将数据写入到Whisper数据库文件中,然后Graphite Webapp去读取这个数据,然后显示出图形。但是实际上这个体系采用了缓存,数据可能先到缓存中,然后Webapp读取,显示出图形。这也是为什么在主机I/O反应不过来时Webapp的图形仍能以接近实时的方式显示。
接收数据相当简单,通常大部分的精力花在最开始收集数据时。当你发送数据点给Carbon, 他们马上可以在webapp中画图。webapp 提供几种方式创建和显示图形,包括简单的URL API ,这种呈现的方式可以很方便地将图形嵌入到其它Web页面。
二、Graphite的安装及配置
0.Graphite目录
Graphite安装之后,在安装位置(默认为/opt/graphite)的文件布局如下:
| 目录 | 介绍 |
| /opt/graphite/bin | 二进制文件目录 |
| /opt/graphite/conf | 配置文件目录 |
| /opt/graphite/lib | 库目录 |
| /opt/graphite/storage | 数据存放目录,包括log,whisper数据库,索引,rrd数据等 |
| /opt/graphite/webapp | webapp文件存放目录 |
| /opt/graphite/examples | 获取数据的例子 |
1.安装环境
Python版本: 2.6.6
系统版本: CentOS release 6.4 (Final) 2.6.32-358.el6.x86_64
yum源: 系统原有的
2.所需软件
①. carbon-0.9.10.tar.gz
②. graphite-web-0.9.10.tar.gz
③. whisper-0.9.10.tar.gz
④. check-dependencies.py
3.安装依赖
vi /etc/yum.repos.d/epel.repo
| [epel] name=Extra Packages for Enterprise Linux 6 - $basearch baseurl=http://download.fedoraproject.org/pub/epel/6/$basearch #mirrorlist=https://mirrors.fedoraproject.org/metalink?repo=epel-6&arch=$basearch failovermethod=priority enabled=1 gpgcheck=0 gpgkey=file:///etc/pki/rpm-gpg/RPM-GPG-KEY-EPEL-6 |
yum install bitmap bitmap-fonts-compat Django django-tagging fontconfig cairo python-devel python-memcached python-twisted pycairo mod_python python-ldap python-simplejson memcached python-zope-interface mod_wsgi python-sqlite2 bitmap Django django-tagging mod_python python-sqlite2 -y
4.安装Graphite组件
Graphite的默认安装位置是/opt/graphite/。
①.检查依赖:
wget https://launchpadlibrarian.net/104073214/check-dependencies.py
python check-dependencies.py
注:少什么,装什么。
②.安装graphite-web:
wget https://launchpadlibrarian.net/106575888/graphite-web-0.9.10.tar.gz
tar -axf graphite-web-0.9.10.tar.gz -C /usr/local/src/
cd /usr/local/src/graphite-web-0.9.10/
python setup.py install
②.安装whisper:
wget https://launchpadlibrarian.net/106575859/whisper-0.9.10.tar.gz
tar -axf whisper-0.9.10.tar.gz -C /usr/local/src/
cd /usr/local/src/whisper-0.9.10/
python setup.py install
③.安装carbon:
wget https://launchpadlibrarian.net/106575865/carbon-0.9.10.tar.gz
tar -axf carbon-0.9.10.tar.gz -C /usr/local/src/
cd /usr/local/src/carbon-0.9.10/
python setup.py install
5.配置http:
vi /etc/httpd/conf.d/graphite.conf
| Listen 8080
# You may need to manually edit this file to fit your needs. # This configuration assumes the default installation prefix # of /opt/graphite/, if you installed graphite somewhere else # you will need to change all the occurances of /opt/graphite/ # in this file to your chosen install location. <VirtualHost *:8080> ServerName graphite DocumentRoot "/opt/graphite/webapp"
# I've found that an equal number of processes & threads tends # to show the best performance for Graphite (ymmv). WSGIDaemonProcess graphite processes=5 threads=5 display-name='%{GROUP}' inactivity-timeout=120 WSGIProcessGroup graphite
# You will need to create this file! There is a graphite.wsgi.example # file in this directory that you can safely use, just copy it to graphite.wgsi WSGIScriptAlias / /opt/graphite/conf/graphite.wsgi
Alias /content/ /opt/graphite/webapp/content/ <Location "/content/"> SetHandler None </Location>
# NOTE: In order for the django admin site media to work you # must change @DJANGO_ROOT@ to be the path to your django # installation, which is probably something like: # /usr/lib/python2.6/site-packages/django Alias /media/ "/usr/lib/python2.4/site-packages/django/contrib/admin/media/" <Location "/media/"> SetHandler None </Location>
# The graphite.wsgi file has to be accessible by apache. It won't # be visible to clients because of the DocumentRoot though. <Directory /opt/graphite/conf/> Order deny,allow Allow from all </Directory>
</VirtualHost> |
vi /etc/httpd/conf.d/wsgi.conf
| LoadModule wsgi_module modules/mod_wsgi.so WSGISocketPrefix /var/run/wsgi |
6.配置Graphite
cd /opt/graphite/conf/
cp graphite.wsgi.example graphite.wsgi
cp carbon.conf.example carbon.conf
cp storage-schemas.conf.example storage-schemas.conf
cp /opt/graphite/webapp/graphite/local_settings.py{.example,}
vi /opt/graphite/webapp/graphite/settings.py
| DATABASE_ENGINE = 'django.db.backends.mysql' # 'postgresql', 'mysql', 'sqlite3' or 'ado_mssql'. #DATABASE_NAME = 'test' # Or path to database file if using sqlite3. #DATABASE_USER = 'test' # Not used with sqlite3. #DATABASE_PASSWORD = '123456' # Not used with sqlite3. #DATABASE_HOST = '' # Set to empty string for localhost. Not used with sqlite3. #DATABASE_PORT = '' # Set to empty string for default. Not used with sqlite3.
DATABASES = { 'default': { 'ENGINE': 'django.db.backends.mysql', # Add 'postgresql_psycopg2', 'mysql', 'sqlite3' or 'oracle'. 'NAME': 'test', # Or path to database file if using sqlite3. 'USER': 'root', # Not used with sqlite3. 'PASSWORD': '123456', # Not used with sqlite3. 'HOST': '', # Set to empty string for localhost. Not used with sqlite3. 'PORT': '3306', # Set to empty string for default. Not used with sqlite3. } } |
注:确保上面的数据库已存在,没有则手动创建。
7.初始化数据库
chown -R apache.apache /opt/graphite
python /opt/graphite/webapp/graphite/manage.py syncdb
| [root@localhost conf.d]# python /opt/graphite/webapp/graphite/manage.py syncdb /usr/lib/python2.6/site-packages/django/conf/__init__.py:75: DeprecationWarning: The ADMIN_MEDIA_PREFIX setting has been removed; use STATIC_URL instead. "use STATIC_URL instead.", DeprecationWarning) /usr/lib/python2.6/site-packages/django/conf/__init__.py:110: DeprecationWarning: The SECRET_KEY setting must not be empty. warnings.warn("The SECRET_KEY setting must not be empty.", DeprecationWarning) /usr/lib/python2.6/site-packages/django/core/cache/__init__.py:82: DeprecationWarning: settings.CACHE_* is deprecated; use settings.CACHES instead. DeprecationWarning Creating tables ... Creating table account_profile Creating table account_variable Creating table account_view Creating table account_window Creating table account_mygraph Creating table dashboard_dashboard_owners Creating table dashboard_dashboard Creating table events_event Creating table auth_permission Creating table auth_group_permissions Creating table auth_group Creating table auth_user_user_permissions Creating table auth_user_groups Creating table auth_user Creating table django_session Creating table django_admin_log Creating table django_content_type Creating table tagging_tag Creating table tagging_taggeditem
You just installed Django's auth system, which means you don't have any superusers defined. Would you like to create one now? (yes/no): y Please enter either "yes" or "no": yes Username (leave blank to use 'root'): root E-mail address: perofu.com@gmail.com Password: Password (again): Superuser created successfully. Installing custom SQL ... Installing indexes ... Installed 0 object(s) from 0 fixture(s)
chown -R apache:apache /opt/graphite/storage/ |
8.重启httpd
/etc/init.d/httpd restart
注:如出现端口被占用,使用一下命令即可:
| pkill httpd /etc/init.d/httpd start |
9.启动cabon
/opt/graphite/bin/carbon-cache.py start
10.访问graphite-web
http://172.22.2.104:8080/
11.向Graphite发送数据
graphite默认接收数据的端口是2003。
/opt/graphite/examples/example-client.py
| [root@localhost ~]# /opt/graphite/examples/example-client.py sending message
-------------------------------------------------------------------------------- system.loadavg_1min 0.03 1397360637 system.loadavg_5min 0.02 1397360637 system.loadavg_15min 0.00 1397360637 |
对应在浏览器窗口中的显示为在system目录下,loadavg_15min、loadavg_5min、loadavg_1min这三条线就是example-client.py的数据产生的图形。
注意事项:默认显示24小时,因此可能好像没有图形出现。可以点击上图中右箭头选择时间范围,如下图:
三、Graphite+collectd自动收集数据
collectd 用来收集被监控服务器的性能指标,然后发送这些数据到Graphite,再将图形绘制出来。
需要在被监控机上安装collectd,即可将被监控机上的数据发送到Graphite服务器上。
注:一定要同步时间。
Graphite 支持的第三方工具很多,Bucky, collectd, Collectl, Charcoal, Diamond, Ganglia, Host sFlow, statsd, Tasseo 等等。这里选用 collectd 来收集机器的各个性能参数,collectd 安装在需要被监控的机器上。
优势:
①.细粒度,非漂移监测:数据精度多,数据可以小数表示,时间可以以毫秒表示
②.低负载:消耗很少的系统资源
③.汇总数据 vs 详细数据:提供汇总数据和详细数据输出,自由选择
④.简要 vs 详细:可以选择简要的数据输出,也可以选择详细的数据输出
⑤.Plot格式:坐标形式,可以将数据导入到gnuplot, Excel等软件进行分析
⑥.对齐监测间隔:当需要监控集群时,可以对齐监控间隔,方便数据查看和比较。
⑦.其它的就不啰嗦了,最重要的特性是子系统,这样可以选择自己需要子系统集进行监控。
1.安装collectd
yum install perl-ExtUtils-MakeMaker -y
yum install collectd -y
chkconfig collectd on
#安装collectd-plugins
git clone https://github.com/indygreg/collectd-carbon.git /opt/collectd-plugins
chmod 755 /opt/collectd-plugins/carbon_writer.py
vi /etc/collectd.conf
| Include "/etc/ collectd.d" |
vi /etc/collectd.d/graphite.conf
| <LoadPlugin "python"> Globals true </LoadPlugin>
<Plugin "python"> # carbon_writer.py is at path /opt/collectd-plugins/carbon_writer.py ModulePath "/opt/collectd-plugins/"
Import "carbon_writer"
<Module "carbon_writer"> LineReceiverHost "172.22.2.104" LineReceiverPort 2003 DifferentiateCountersOverTime true LowercaseMetricNames true TypesDB "/usr/share/collectd/types.db" </Module> </Plugin> |
/etc/init.d/collectd start
| [root@client ~]# /etc/init.d/collectd start Starting collectd: [ OK ] |
查看是否已建立连接
| [root@client ~]# !net netstat -anplt Active Internet connections (servers and established) Proto Recv-Q Send-Q Local Address Foreign Address State PID/Program name tcp 0 0 0.0.0.0:8139 0.0.0.0:* LISTEN 63367/ruby tcp 0 0 0.0.0.0:11211 0.0.0.0:* LISTEN 41669/memcached tcp 0 0 0.0.0.0:6379 0.0.0.0:* LISTEN 60419/redis-server tcp 0 0 0.0.0.0:139 0.0.0.0:* LISTEN 33389/smbd tcp 0 0 0.0.0.0:10000 0.0.0.0:* LISTEN 7938/perl tcp 0 0 0.0.0.0:21 0.0.0.0:* LISTEN 20485/vsftpd tcp 0 0 0.0.0.0:22 0.0.0.0:* LISTEN 1222/sshd tcp 0 0 0.0.0.0:8888 0.0.0.0:* LISTEN 6741/ntopng tcp 0 0 127.0.0.1:25 0.0.0.0:* LISTEN 1298/master tcp 0 0 0.0.0.0:445 0.0.0.0:* LISTEN 33389/smbd tcp 0 0 127.0.0.1:25151 0.0.0.0:* LISTEN 33018/python tcp 0 0 0.0.0.0:3306 0.0.0.0:* LISTEN 3782/mysqld tcp 0 0 127.0.0.1:6379 127.0.0.1:53338 ESTABLISHED 60419/redis-server tcp 0 0 172.22.2.99:22 172.22.150.15:57349 ESTABLISHED 62317/sshd tcp 0 0 127.0.0.1:53338 127.0.0.1:6379 ESTABLISHED 6741/ntopng tcp 0 0 172.22.2.99:33030 172.22.2.89:61613 ESTABLISHED 65466/ruby tcp 0 0 172.22.2.99:41668 172.22.2.104:2003 ESTABLISHED 35996/collectd tcp 0 596 172.22.2.99:22 172.22.150.15:65109 ESTABLISHED 1471/sshd tcp 0 0 :::11211 :::* LISTEN 41669/memcached tcp 0 0 :::139 :::* LISTEN 33389/smbd tcp 0 0 :::80 :::* LISTEN 33102/httpd tcp 0 0 :::22 :::* LISTEN 1222/sshd tcp 0 0 ::1:25 :::* LISTEN 1298/master tcp 0 0 :::443 :::* LISTEN 33102/httpd tcp 0 0 :::445 :::* LISTEN 33389/smbd |
注:等着客户端的 collectd 收集数据发送给监控服务器的 carbon(监听端口为 2003)吧.
2.效果图
四、Graphite+ statsd自动收集数据
StatsD是用来收集数据的,收集完数据就发送到其他服务器进行处理。
StatsD是一个NodeJs的daemon程序,简单,轻巧。使用的UDP协议。可以和Graphite图片渲染应用结合。
UDP好处就是fire-and-forget。你不用去管后台的StatsD 服务器是不是崩了,崩了就崩了,不会影响前台应用。
StatsD有一个时间周期的概念,默认是10秒钟,就是说,StatsD会把收集到的数据(经过处理)每隔10秒,发送给后端。比如Counter,他就会把10秒内该Counter累加的值,发送到后端。比如Time/Timing,他会把次数、最大值、最小值、平均值发往后端。所以,所有的数据都是以10秒为一个周期的。
为了应对非常频繁的计数,可以增加一个取样率的参数:StatsD::increment("adventurer.heartbeat", 0.1); 0.1就是取样率,StatsD会自动帮你换算成100%的取样率,然后发送给后端。
详细请参考:
http://www.linuxidc.com/Linux/2013-06/86597.htm
http://blog.csdn.net/crazyhacking/article/details/8464235
http://my.oschina.net/u/138210/blog/181149
http://blog.csdn.net/crazyhacking/article/details/8363235
http://blog.csdn.net/puncha/article/details/9083061
http://stackoverflow.com/questions/5919629/express-module-not-found-when-installed-with-npm
试了一下,一直出现这个报错:
算了,还是选择collectd吧。
五、Graphite如何获取数据
如果你有一些随时间变化的数值,然后你想他们绘图,那么 Graphite 非常有用。基本上你编写一个程序来收集这些数值,然后将他们发送到graphite的后端即可。
1.命名方案
存储在Graphite的任何东西都有一个路径,这些路径由多个部分组成,每个部分以点号相隔。比如website.orbitz.bookings.air可能表示在orbitz下的air bookings。在产生你的数据之前你需要先选择好你的命令方案。
比如在”foo.bar.baz”这个路径中,每个点周围的东西都称为一个路径组件,因此“foo”,“bar”,“baz”都是路径组件。
每个路径组件必须是明确的,有目的的。路径组件应该和系统层次尽量保持相对应的深度。
2.数据保存
Graphite建立在固定尺寸的数据库上 (参考whisper) ,因此我们必须预先配置我们想存储多少数据和数据的精度。
比如你想以一分钟的精度(即每分钟有一个数据节点)保存2小时的数据。另外你还可以以10分钟的精度保存2周的数据。其理念就是存储开销由你想存储的数据节点决定的,精度越低,那就可以以更少的节点覆盖更长的时间。
要确定最佳的保存配置,你必须回答以下所有问题:
①.你的数据多久产生一次?
②.你要求的最大精度是多少?
③.在那个精度下,你需要查看多久的数据?
③.你能使用的最小精度是多少?
④.你要查看多久之前的数据?(它必须是个有限时,且提前确定好)
一旦你选择好了命令方案和回答了以上所有问题,那么你可以通过创建或修改/opt/graphite/conf/storage-schemas.conf文件来创建一个schema。
schema文件的格式通过示例最容易说明。假设我们已经写了一个脚本,这个脚本会从不同的服务器中收集系统性能数据,它的命名方案类似于:
| servers.HOSTNAME.METRIC |
其中HOSTNAME是服务器的主机名,METRIC是一个像 cpu_load, mem_usage, open_files的性能数据。同时假设我们想以一分钟的精度保存这些数据30天,以15分钟的精度保存10年。
下面是我们要写入到schema文件的内容:
| [server_load] #schema名称,可任意 priority = 100 #优先级 pattern = ^servers\. retentions = 60:43200,900:350400 |
简单来说,当carbon接收到一个指标数据时,Graphtie会确定这个指标数据应该保存到文件系统的哪个whisper数据文件中。如果数据文件不存在,carbon知道它必须创建一个,但是因为whisper是一个确定尺寸的数据库,在创建文件时必须确定某些参数(这就是为什么我们写入schema的原因)。
Carbon查看schema文件,然后根据优先规则选择第一个匹配指标数据名称的schema。如果没有schema匹配,那么默认的schema会被启用 (每分钟一分,保存2小时) 。一旦合适的schema确定之后,carbon会使用schema中的保存配置参数创建whisper数据文件。
现在回到我们的schema内容。
server_load schema名称,你如何写都无所谓。
priority 是一个整数,表示优先级,由高到低。作用:一个是让测试更常使用的schema更快;二是优先级提供了一种方式,通过这种方式可以为已经匹配另外一个schema的指标数据提供一个不同的保存。
pattern 参数是一个正则表达式,它用来匹配一个新的指标名称来查找它适用于哪个schema。在我们的例子中,这个模式就匹配所有以servers.开头的指标数据。
retentions 参数有点复杂,它是这样工作的:
保存配置之间以逗号相隔,每个保存配置的格式为:seconds_per_data_point:data_points_to_store。
因此在我们的例子中,第一个保存配置是每个数据节点为60秒,然后存储43,200个这样的节点。 第二个保存配置是每900秒一个数据节点, 然后保存350,400 这样的点。
3. Graphite数据格式
可以通过shell脚本,向graphite的2003端口发送数据。
| #路径 值 时间戳 metric_path value timestamp … metric_path value timestamp |
例1:
| echo "carbon.agents.client_perofu_com.proc_numbers `ps aux |sed 1d |wc -l` `date +%s`" |nc 172.22.2.104 2003
# carbon.agents.client_perofu_com.proc_numbers 71 1341198181 |
例2:
| #/bin/bash i=1; ip=172.22.2.104 port=2003 while [ $i -le 60 ] do echo "local.system.proc_numbers `ps aux |sed 1d |wc -l` `date +%s`" |nc ${ip} ${port}; sleep 60 ; let "i=i+1"; done |
4.注意事项
修改/opt/graphite/conf/storage-schemas.conf,要重启carbon-cache.py
python /opt/graphite/bin/carbon-cache.py stop
python /opt/graphite/bin/carbon-cache.py start
六、报错集锦
1.初始化数据库报错
问题:
| Traceback (most recent call last): File "/usr/lib/python2.6/site-packages/django/core/handlers/base.py", line 101, in get_response request.path_info) ….. settings.DATABASES is improperly configured. Please supply the ENGINE value. Check settings documentation for more details. |
解决:
| 将 : DATABASE_ENGINE = 'mysql' DATABASE_NAME = 'database' DATABASE_USER = 'root' DATABASE_PASSWORD = '123456' DATABASE_HOST = '' DATABASE_PORT = '3306
改为: DATABASES = { 'default': { 'ENGINE': 'django.db.backends.mysql', # Add 'postgresql_psycopg2', 'mysql', 'sqlite3' or 'oracle'. 'NAME': 'database', # Or path to database file if using sqlite3. 'USER': 'root', # Not used with sqlite3. 'PASSWORD': '123456', # Not used with sqlite3. 'HOST': '', # Set to empty string for localhost. Not used with sqlite3. 'PORT': '3306', # Set to empty string for default. Not used with sqlite3. } } |
更多请参考:http://www.jsxubar.info/graphite-installation.html
七、参考文献
非常感谢!!!
http://www.jsxubar.info/category/system-administration/graphite/
http://blog.csdn.net/puncha/article/details/9137001
http://www.linuxidc.com/Linux/2013-06/86597.htm
http://blog.csdn.net/crazyhacking/article/details/8464235
https://launchpad.net/graphite/+download
http://my.oschina.net/u/138210/blog/181149
http://blog.chinaunix.net/uid-28769783-id-3652037.html
http://blog.csdn.net/crazyhacking/article/details/8363235
http://www.vpsee.com/2012/05/use-collectd-with-graphite-to-monitor-servers/
http://wsq68.blog.51cto.com/2394336/1286410
http://www.oschina.net/p/graphite
http://stackoverflow.com/questions/5919629/express-module-not-found-when-installed-with-npm
http://blog.sina.com.cn/s/blog_90bc5fc6010179mj.html


![[CTF/网络安全] 攻防世界 xff_referer 解题详析](https://img-blog.csdnimg.cn/11f390c5dd2c45fda42155833b78bd99.png#pic_center)