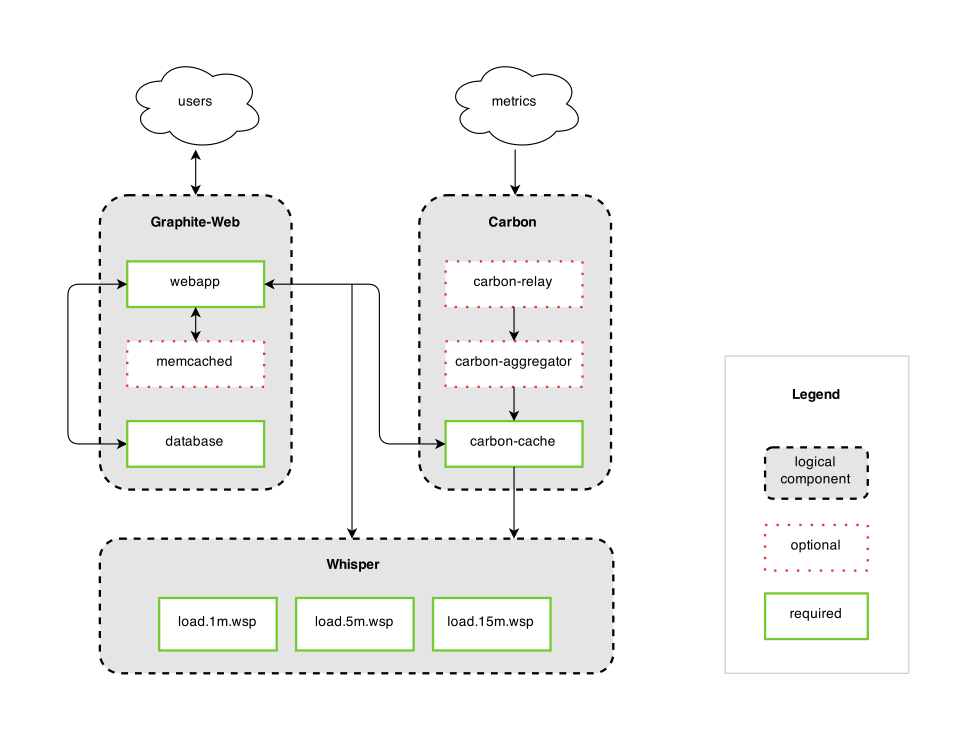
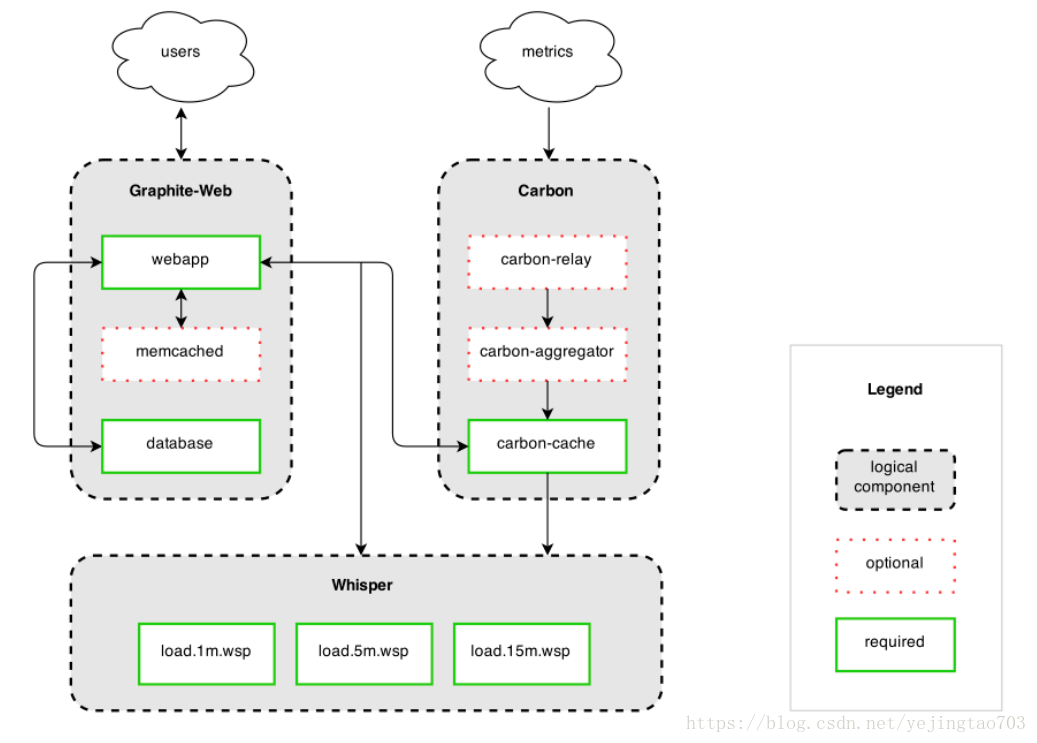
Graphite安装之后,在安装位置(默认为/opt/graphite)的文件布局如下:
| 目录 | 介绍 |
| /opt/graphite/bin | 二进制文件目录 |
| /opt/graphite/conf | 配置文件目录 |
| /opt/graphite/lib | 库目录 |
| /opt/graphite/storage | 数据存放目录,包括log,whisper数据库,索引,rrd数据等 |
| /opt/graphite/webapp | webapp文件存放目录 |
| /opt/graphite/examples | 获取数据的例子 |
1.安装环境
Python版本: 2.6.6
系统版本: CentOS release 6.4 (Final) 2.6.32-358.el6.x86_64
yum源: 系统原有的
2.所需软件
①. carbon-0.9.10.tar.gz
②. graphite-web-0.9.10.tar.gz
③. whisper-0.9.10.tar.gz
④. check-dependencies.py
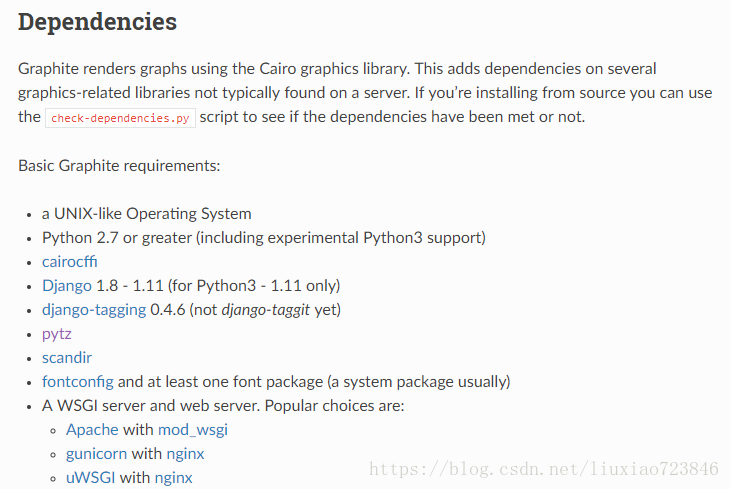
3.安装依赖
vi /etc/yum.repos.d/epel.repo
[epel]
name=Extra Packages for Enterprise Linux 6 - $basearch
baseurl=http://download.fedoraproject.org/pub/epel/6/$basearch
#mirrorlist=https://mirrors.fedoraproject.org/metalink?repo=epel-6&arch=$basearch
failovermethod=priority
enabled=1
gpgcheck=0
gpgkey=file:///etc/pki/rpm-gpg/RPM-GPG-KEY-EPEL-6
yum install bitmap bitmap-fonts-compat Django django-tagging fontconfig cairo python-devel python-memcached python-twisted pycairo mod_python python-ldap python-simplejson memcached python-zope-interface mod_wsgi python-sqlite2 bitmap Django django-tagging mod_python python-sqlite2 -y
可能出现的问题:
(1)yum数据源可能找不到,建议可以配置网易的yum数据源
1、下载新源及将本地源备份
[root@localhost ~]# cd /etc/yum.repos.d/
[root@localhost ~]# wget http://mirrors.163.com/.help/CentOS6-Base-163.repo
[root@localhost ~]# mv CentOS-Base.repo CentOS-Base.repo.bak
[root@localhost ~]# mv CentOS6-Base-163.repo CentOS-Base.repo
下载的CentOS6-Base-163.repo建议将里面的$releaserver统一修改为6或者5(根据lsb_release -a查看系统版本)
2、yum源更新
[root@localhost ~]# yum clean all && yum makecache && yum update -y
(2)需要使用代理
在/etc/yum.conf中加入
proxy=http://ip:port
proxy_username=your_proxy_user
proxy_password=your_proxy_password
4.安装Graphite组件
Graphite的默认安装位置是/opt/graphite/。
①.检查依赖:
wget https://launchpadlibrarian.net/104073214/check-dependencies.py
python check-dependencies.py
注:少什么,装什么。
②.安装graphite-web:
wget https://launchpadlibrarian.net/106575888/graphite-web-0.9.10.tar.gz
tar -axf graphite-web-0.9.10.tar.gz -C /usr/local/src/
cd /usr/local/src/graphite-web-0.9.10/
python setup.py install
②.安装whisper:
wget https://launchpadlibrarian.net/106575859/whisper-0.9.10.tar.gz
tar -axf whisper-0.9.10.tar.gz -C /usr/local/src/
cd /usr/local/src/whisper-0.9.10/
python setup.py install
③.安装carbon:
wget https://launchpadlibrarian.net/106575865/carbon-0.9.10.tar.gz
tar -axf carbon-0.9.10.tar.gz -C /usr/local/src/
cd /usr/local/src/carbon-0.9.10/
python setup.py install
5.配置http:
cp /opt/graphite/examples/example-graphite-vhost.conf /etc/httpd/conf.d/graphite.conf
vi /etc/httpd/conf.d/graphite.conf
# This needs to be in your server's config somewhere, probably # the main httpd.conf # NameVirtualHost *:80 # This line also needs to be in your server's config. # LoadModule wsgi_module modules/mod_wsgi.so # You need to manually edit this file to fit your needs. # This configuration assumes the default installation prefix # of /opt/graphite/, if you installed graphite somewhere else # you will need to change all the occurances of /opt/graphite/ # in this file to your chosen install location. <IfModule !wsgi_module.c> LoadModule wsgi_module modules/mod_wsgi.so </IfModule> # XXX You need to set this up! # Read http://code.google.com/p/modwsgi/wiki/ConfigurationDirectives#WSGISocketPrefix WSGISocketPrefix run/wsgi <VirtualHost *:80> ServerName 10.10.10.10 DocumentRoot "/opt/graphite/webapp" ErrorLog /opt/graphite/storage/log/webapp/error.log CustomLog /opt/graphite/storage/log/webapp/access.log common # I've found that an equal number of processes & threads tends # to show the best performance for Graphite (ymmv). WSGIDaemonProcess graphite processes=5 threads=5 display-name='%{GROUP}' inactivity-timeout=120 WSGIProcessGroup graphite WSGIApplicationGroup %{GLOBAL} WSGIImportScript /opt/graphite/conf/graphite.wsgi process-group=graphite application-group=%{GLOBAL} # XXX You will need to create this file! There is a graphite.wsgi.example # file in this directory that you can safely use, just copy it to graphite.wgsi WSGIScriptAlias / /opt/graphite/conf/graphite.wsgi Alias /content/ /opt/graphite/webapp/content/ <Location "/content/"> SetHandler None </Location> # XXX In order for the django admin site media to work you # must change @DJANGO_ROOT@ to be the path to your django # installation, which is probably something like: # /usr/lib/python2.6/site-packages/django Alias /media/ "@DJANGO_ROOT@/contrib/admin/media/" <Location "/media/"> SetHandler None </Location> # The graphite.wsgi file has to be accessible by apache. It won't # be visible to clients because of the DocumentRoot though. <Directory /opt/graphite/conf/> Order deny,allow Allow from all </Directory> </VirtualHost> |
vi /etc/httpd/conf.d/wsgi.conf
| LoadModule wsgi_module modules/mod_wsgi.so WSGISocketPrefix /var/run/wsgi |
6.启动httpd
service httpd start
可能出现的问题:
httpd启动失败,报错:
(13)Permission denied: httpd: could not open error log file /opt/graphite/storage/log/webapp/error.log.
Unable to open logs
解决办法:
原因是因为系统启动了SELINUX,只要关闭SELINUX就好。
关闭SELINUX
setenforce 0
或
vim /etc/selinux/config
修改
SELINUX=enforcing
改成
SELINUX=disabled
参考:分享Apache 403 error, (13)Permission denied: access to / denied解决办法
7.配置Graphite
cd /opt/graphite/conf/
cp graphite.wsgi.example graphite.wsgi
cp carbon.conf.example carbon.conf
cp storage-schemas.conf.example storage-schemas.conf
vi /opt/graphite/webapp/graphite/settings.py
| #Initialize database settings - Old style (pre 1.2) DATABASE_ENGINE = 'django.db.backends.mysql'# 'postgresql', 'mysql', 'sqlite3' or 'ado_mssql'. #DATABASE_NAME = ''# Or path to database file if using sqlite3. #DATABASE_USER = ''# Not used with sqlite3. #DATABASE_PASSWORD = ''# Not used with sqlite3. #DATABASE_HOST = ''# Set to empty string for localhost. Not used with sqlite3. #DATABASE_PORT = ''# Set to empty string for default. Not used with sqlite3. DATABASES={ 'default': { 'ENGINE': 'django.db.backends.mysql', # Add 'postgresql_psycopg2', 'mysql', 'sqlite3' or 'oracle'. 'NAME': 'test', # Or path to database file if using sqlite3. 'USER': 'graphite', # Not used with sqlite3. 'PASSWORD': '123456', # Not used with sqlite3. 'HOST': '10.92.35.114', # Set to empty string for localhost. Not used with sqlite3. 'PORT': '3306', # Set to empty string for default. Not used with sqlite3. } } |
注:确保上面的数据库已存在,没有则手动创建。
附mysql创建方法
连接数据库 mysql -u root (默认root密码是空)
创建数据库 create database test;
创建用户 CREATE USER 'username'@'host' IDENTIFIED BY 'password'; (host用%表示不限)
授权grant select on 数据库.* to 用户名@登录主机 identified by “密码”
8.初始化数据库
chown -R apache.apache /opt/graphite
python /opt/graphite/webapp/graphite/manage.py syncdb
可能报缺包,缺啥补啥。
9.启动cabon
/opt/graphite/bin/carbon-cache.py start
10.访问graphite-web
http://10.92.1.177

11.向Graphite发送数据
graphite默认接收数据的端口是2003。
/opt/graphite/examples/example-client.py
[root@localhost ~]# /opt/graphite/examples/example-client.py
sending message
--------------------------------------------------------------------------------
system.loadavg_1min 0.03 1397360637
system.loadavg_5min 0.02 1397360637
system.loadavg_15min 0.00 1397360637
对应在浏览器窗口中的显示为在system目录下,loadavg_15min、loadavg_5min、loadavg_1min这三条线就是example-client.py的数据产生的图形。
注意事项:默认显示24小时,因此可能好像没有图形出现。可以点击上图中右箭头选择时间范围。
转载:http://my.oschina.net/fufangchun/blog/232895?fromerr=RjbUoabY#OSC_h2_15


![[CTF/网络安全] 攻防世界 xff_referer 解题详析](https://img-blog.csdnimg.cn/11f390c5dd2c45fda42155833b78bd99.png#pic_center)