一、概述
本文是关于目标检测后根据物体的坐标来确定物体所处的区域,适用于需要根据物体在图像中的位置来分别判断的情况,而且对应的是YOLOv5模型。YOLOv5目标检测的内容可以看看我之前的一篇文章YOLOv5训练自己的数据集_ONEPIECE_00的博客-CSDN博客
本文采用的目标定位的方法,其实就是根据物体检测后得到的数据,比如(x,y,w,h)的坐标,检测结果,以及检测的准确度,然后判断出物体所在的位置。我采用的是重新写一个py文件,放入我的位判断位置的函数,然后再从YOLOv5的detect.py中去调取我的函数,这样比较方便后期的修改。我写的函数中三个形参分别对应的是输入图片的路径source、预测的结果pred、以及标签label包含的数据(是一个列表形式)names,也分别对应detect.py文件中的参数。然后在写py文件的时候要注意命名,因为YOLOv5官方项目文件中包含很多py文件,容易重名。
二、代码详解
下面是YOLOv5中完整detect.py文件,然后我就根据我的三个输入的形参来分别描述。
# YOLOv5 🚀 by Ultralytics, GPL-3.0 license
"""
Run inference on images, videos, directories, streams, etc.Usage:$ python path/to/detect.py --source path/to/img.jpg --weights yolov5s.pt --img 640
"""import argparse
import sys
import time
from pathlib import Pathimport cv2
import numpy as np
import torch
import torch.backends.cudnn as cudnnFILE = Path(__file__).absolute()
sys.path.append(FILE.parents[0].as_posix())  # add yolov5/ to pathfrom models.experimental import attempt_load
from utils.datasets import LoadStreams, LoadImages
from utils.general import check_img_size, check_requirements, check_imshow, colorstr, is_ascii, non_max_suppression, \apply_classifier, scale_coords, xyxy2xywh, strip_optimizer, set_logging, increment_path, save_one_box
from utils.plots import Annotator, colors
from utils.torch_utils import select_device, load_classifier, time_sync@torch.no_grad()
def run(weights='yolov5s.pt',  # model.pt path(s)source='data/images',  # file/dir/URL/glob, 0 for webcamimgsz=[640,640],  # inference size (pixels)conf_thres=0.25,  # confidence thresholdiou_thres=0.45,  # NMS IOU thresholdmax_det=1000,  # maximum detections per imagedevice='',  # cuda device, i.e. 0 or 0,1,2,3 or cpuview_img=False,  # show resultssave_txt=False,  # save results to *.txtsave_conf=False,  # save confidences in --save-txt labelssave_crop=False,  # save cropped prediction boxesnosave=False,  # do not save images/videosclasses=None,  # filter by class: --class 0, or --class 0 2 3agnostic_nms=False,  # class-agnostic NMSaugment=False,  # augmented inferencevisualize=False,  # visualize featuresupdate=False,  # update all modelsproject='runs/detect',  # save results to project/namename='exp',  # save results to project/nameexist_ok=False,  # existing project/name ok, do not incrementline_thickness=3,  # bounding box thickness (pixels)hide_labels=False,  # hide labelshide_conf=False,  # hide confidenceshalf=False,  # use FP16 half-precision inference):save_img = not nosave and not source.endswith('.txt')  # save inference images保留推理的照片webcam = source.isnumeric() or source.endswith('.txt') or source.lower().startswith(('rtsp://', 'rtmp://', 'http://', 'https://'))# Directories目录save_dir = increment_path(Path(project) / name, exist_ok=exist_ok)  # increment run(save_dir / 'labels' if save_txt else save_dir).mkdir(parents=True, exist_ok=True)  # make dir# Initialize初始化set_logging()device = select_device(device)half &= device.type != 'cpu'  # half precision only supported on CUDA# Load model加载模型w = weights[0] if isinstance(weights, list) else weightsclassify, suffix = False, Path(w).suffix.lower()pt, onnx, tflite, pb, saved_model = (suffix == x for x in ['.pt', '.onnx', '.tflite', '.pb', ''])  # backendstride, names = 64, [f'class{i}' for i in range(1000)]  # assign defaultsif pt:model = attempt_load(weights, map_location=device)  # load FP32 modelstride = int(model.stride.max())  # model stridenames = model.module.names if hasattr(model, 'module') else model.names  # get class namesif half:model.half()  # to FP16if classify:  # second-stage classifiermodelc = load_classifier(name='resnet50', n=2)  # initializemodelc.load_state_dict(torch.load('resnet50.pt', map_location=device)['model']).to(device).eval()elif onnx:check_requirements(('onnx', 'onnxruntime'))import onnxruntimesession = onnxruntime.InferenceSession(w, None)else:  # TensorFlow modelscheck_requirements(('tensorflow>=2.4.1',))import tensorflow as tfif pb:  # https://www.tensorflow.org/guide/migrate#a_graphpb_or_graphpbtxtdef wrap_frozen_graph(gd, inputs, outputs):x = tf.compat.v1.wrap_function(lambda: tf.compat.v1.import_graph_def(gd, name=""), [])  # wrapped importreturn x.prune(tf.nest.map_structure(x.graph.as_graph_element, inputs),tf.nest.map_structure(x.graph.as_graph_element, outputs))graph_def = tf.Graph().as_graph_def()graph_def.ParseFromString(open(w, 'rb').read())frozen_func = wrap_frozen_graph(gd=graph_def, inputs="x:0", outputs="Identity:0")elif saved_model:model = tf.keras.models.load_model(w)elif tflite:interpreter = tf.lite.Interpreter(model_path=w)  # load TFLite modelinterpreter.allocate_tensors()  # allocateinput_details = interpreter.get_input_details()  # inputsoutput_details = interpreter.get_output_details()  # outputsint8 = input_details[0]['dtype'] == np.uint8  # is TFLite quantized uint8 modelimgsz = check_img_size(imgsz, s=stride)  # check image sizeascii = is_ascii(names)  # names are ascii (use PIL for UTF-8)# Dataloaderif webcam:view_img = check_imshow()cudnn.benchmark = True  # set True to speed up constant image size inferencedataset = LoadStreams(source, img_size=imgsz, stride=stride, auto=pt)bs = len(dataset)  # batch_sizeelse:dataset = LoadImages(source, img_size=imgsz, stride=stride, auto=pt)bs = 1  # batch_sizevid_path, vid_writer = [None] * bs, [None] * bs# Run inferenceif pt and device.type != 'cpu':model(torch.zeros(1, 3, *imgsz).to(device).type_as(next(model.parameters())))  # run oncet0 = time.time()for path, img, im0s, vid_cap in dataset:if onnx:img = img.astype('float32')else:img = torch.from_numpy(img).to(device)img = img.half() if half else img.float()  # uint8 to fp16/32img = img / 255.0  # 0 - 255 to 0.0 - 1.0if len(img.shape) == 3:img = img[None]  # expand for batch dim# Inferencet1 = time_sync()if pt:visualize = increment_path(save_dir / Path(path).stem, mkdir=True) if visualize else Falsepred = model(img, augment=augment, visualize=visualize)[0]elif onnx:pred = torch.tensor(session.run([session.get_outputs()[0].name], {session.get_inputs()[0].name: img}))else:  # tensorflow model (tflite, pb, saved_model)imn = img.permute(0, 2, 3, 1).cpu().numpy()  # image in numpyif pb:pred = frozen_func(x=tf.constant(imn)).numpy()elif saved_model:pred = model(imn, training=False).numpy()elif tflite:if int8:scale, zero_point = input_details[0]['quantization']imn = (imn / scale + zero_point).astype(np.uint8)  # de-scaleinterpreter.set_tensor(input_details[0]['index'], imn)interpreter.invoke()pred = interpreter.get_tensor(output_details[0]['index'])if int8:scale, zero_point = output_details[0]['quantization']pred = (pred.astype(np.float32) - zero_point) * scale  # re-scalepred[..., 0] *= imgsz[1]  # xpred[..., 1] *= imgsz[0]  # ypred[..., 2] *= imgsz[1]  # wpred[..., 3] *= imgsz[0]  # hpred = torch.tensor(pred)# NMSpred = non_max_suppression(pred, conf_thres, iou_thres, classes, agnostic_nms, max_det=max_det)t2 = time_sync()# Second-stage classifier (optional)if classify:pred = apply_classifier(pred, modelc, img, im0s)# Process predictionsfor i, det in enumerate(pred):  # detections per imageif webcam:  # batch_size >= 1p, s, im0, frame = path[i], f'{i}: ', im0s[i].copy(), dataset.countelse:p, s, im0, frame = path, '', im0s.copy(), getattr(dataset, 'frame', 0)p = Path(p)  # to Pathsave_path = str(save_dir / p.name)  # img.jpgtxt_path = str(save_dir / 'labels' / p.stem) + ('' if dataset.mode == 'image' else f'_{frame}')  # img.txts += '%gx%g ' % img.shape[2:]  # print stringgn = torch.tensor(im0.shape)[[1, 0, 1, 0]]  # normalization gain whwhimc = im0.copy() if save_crop else im0  # for save_cropannotator = Annotator(im0, line_width=line_thickness, pil=not ascii)if len(det):# Rescale boxes from img_size to im0 sizedet[:, :4] = scale_coords(img.shape[2:], det[:, :4], im0.shape).round()# Print resultsfor c in det[:, -1].unique():n = (det[:, -1] == c).sum()  # detections per classs += f"{n} {names[int(c)]}{'s' * (n > 1)}, "  # add to string# Write resultsfor *xyxy, conf, cls in reversed(det):if save_txt:  # Write to filexywh = (xyxy2xywh(torch.tensor(xyxy).view(1, 4)) / gn).view(-1).tolist()  # normalized xywhline = (cls, *xywh, conf) if save_conf else (cls, *xywh)  # label formatwith open(txt_path + '.txt', 'a') as f:f.write(('%g ' * len(line)).rstrip() % line + '\n')if save_img or save_crop or view_img:  # Add bbox to imagec = int(cls)  # integer classlabel = None if hide_labels else (names[c] if hide_conf else f'{names[c]} {conf:.2f}')annotator.box_label(xyxy, label, color=colors(c, True))if save_crop:save_one_box(xyxy, imc, file=save_dir / 'crops' / names[c] / f'{p.stem}.jpg', BGR=True)# Print time (inference + NMS)print(f'{s}Done. ({t2 - t1:.3f}s)')# Stream resultsim0 = annotator.result()if view_img:cv2.imshow(str(p), im0)cv2.waitKey(1)  # 1 millisecond# Save results (image with detections)if save_img:if dataset.mode == 'image':cv2.imwrite(save_path, im0)else:  # 'video' or 'stream'if vid_path[i] != save_path:  # new videovid_path[i] = save_pathif isinstance(vid_writer[i], cv2.VideoWriter):vid_writer[i].release()  # release previous video writerif vid_cap:  # videofps = vid_cap.get(cv2.CAP_PROP_FPS)w = int(vid_cap.get(cv2.CAP_PROP_FRAME_WIDTH))h = int(vid_cap.get(cv2.CAP_PROP_FRAME_HEIGHT))else:  # streamfps, w, h = 30, im0.shape[1], im0.shape[0]save_path += '.mp4'vid_writer[i] = cv2.VideoWriter(save_path, cv2.VideoWriter_fourcc(*'mp4v'), fps, (w, h))vid_writer[i].write(im0)if save_txt or save_img:s = f"\n{len(list(save_dir.glob('labels/*.txt')))} labels saved to {save_dir / 'labels'}" if save_txt else ''print(f"Results saved to {colorstr('bold', save_dir)}{s}")if update:strip_optimizer(weights)  # update model (to fix SourceChangeWarning)print(f'Done. ({time.time() - t0:.3f}s)')from site_pro import site site(source,pred,names)def parse_opt():parser = argparse.ArgumentParser()parser.add_argument('--weights', nargs='+', type=str, default='/content/gdrive/MyDrive/yolov5-master/runs/train/use_1/weights/best.pt', help='model.pt path(s)')parser.add_argument('--source', type=str, default='/content/gdrive/MyDrive/yolov5-master/data/JPEGImages/01.jpg', help='file/dir/URL/glob, 0 for webcam')parser.add_argument('--imgsz', '--img', '--img-size', nargs='+', type=int, default=[640,640], help='inference size h,w')parser.add_argument('--conf-thres', type=float, default=0.25, help='confidence threshold')parser.add_argument('--iou-thres', type=float, default=0.45, help='NMS IoU threshold')parser.add_argument('--max-det', type=int, default=1000, help='maximum detections per image')parser.add_argument('--device', default='', help='cuda device, i.e. 0 or 0,1,2,3 or cpu')parser.add_argument('--view-img', action='store_true', help='show results')parser.add_argument('--save-txt', action='store_true', help='save results to *.txt')parser.add_argument('--save-conf', action='store_true', help='save confidences in --save-txt labels')parser.add_argument('--save-crop', action='store_true', help='save cropped prediction boxes')parser.add_argument('--nosave', action='store_true', help='do not save images/videos')parser.add_argument('--classes', nargs='+', type=int, help='filter by class: --class 0, or --class 0 2 3')parser.add_argument('--agnostic-nms', action='store_true', help='class-agnostic NMS')parser.add_argument('--augment', action='store_true', help='augmented inference')parser.add_argument('--visualize', action='store_true', help='visualize features')parser.add_argument('--update', action='store_true', help='update all models')parser.add_argument('--project', default='runs/detect', help='save results to project/name')parser.add_argument('--name', default='exp', help='save results to project/name')parser.add_argument('--exist-ok', action='store_true', help='existing project/name ok, do not increment')parser.add_argument('--line-thickness', default=3, type=int, help='bounding box thickness (pixels)')parser.add_argument('--hide-labels', default=False, action='store_true', help='hide labels')parser.add_argument('--hide-conf', default=False, action='store_true', help='hide confidences')parser.add_argument('--half', action='store_true', help='use FP16 half-precision inference')opt = parser.parse_args()opt.imgsz *= 2 if len(opt.imgsz) == 1 else 1  # expandreturn optdef main(opt):print(colorstr('detect: ') + ', '.join(f'{k}={v}' for k, v in vars(opt).items()))check_requirements(exclude=('tensorboard', 'thop'))run(**vars(opt))if __name__ == "__main__":opt = parse_opt()main(opt)
1.source(被检测图片的路径)
之所以要将这个图片的路径来作为一个输入,是因为我碰到了一个问题,就是不同的照片,像素值不同,然后得到的坐标也有很大的差异。我是通过得到图片的大小,然后再分别用对应的坐标去除,得到以比例形式存在的坐标。
def site(source,pred,names): #d得到图片的大小img=Image.open(source)x1,x2=img.size#可以通过print查看具体大小#print(x1,x2) 这个基本上就是该参数的全部作用。
2.pred(预测的结果)
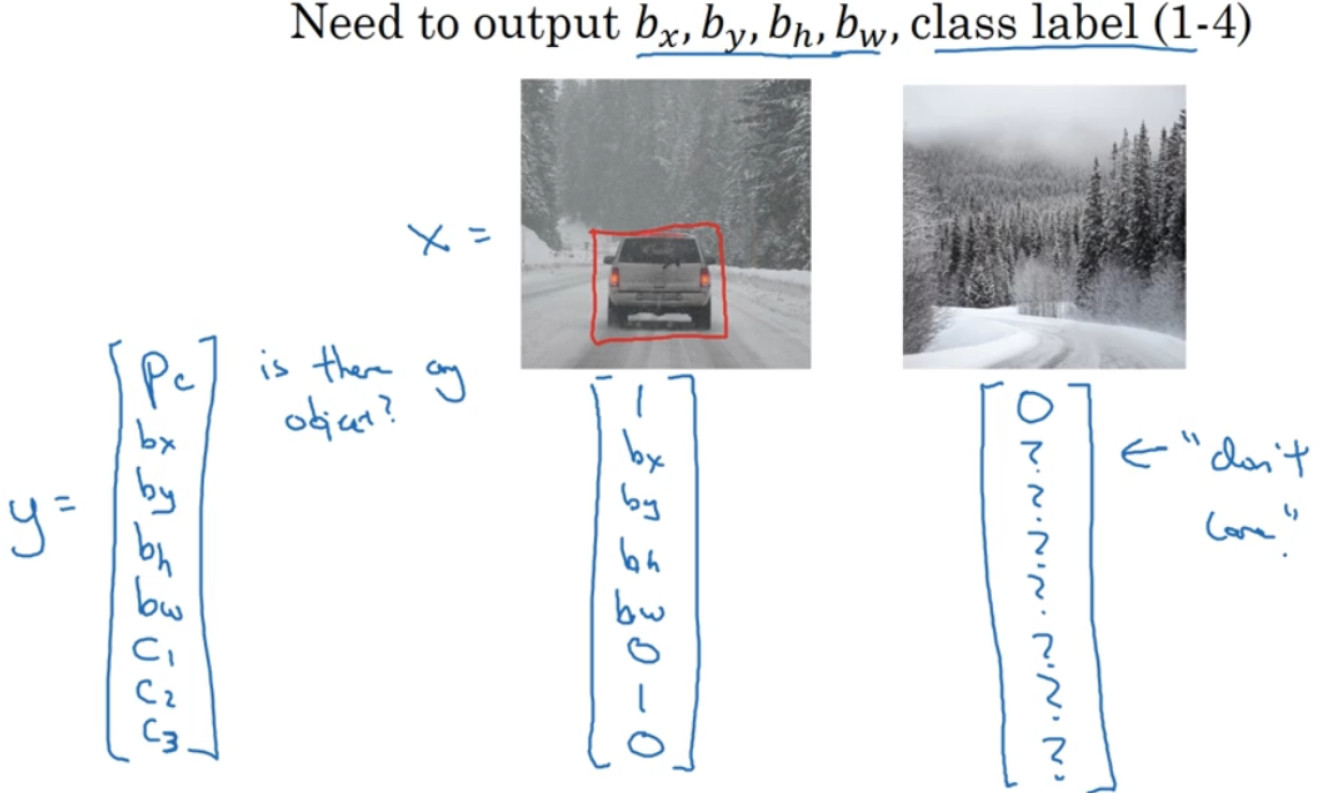
pred是包含的预测的结果,对应(x,y,w,h,识别准确度,物体的类别),其中物体的类别他是用索引对应标签来表示的。下面的图片就是pred内数据的形式,它一个列表,然后保存的一个tensor(张量)形式的数据。

由于pred是一个张量在一个列表中的形式,然后就涉及到一个张量的转化,下面是一个关于张量(tensor)性质的简述。
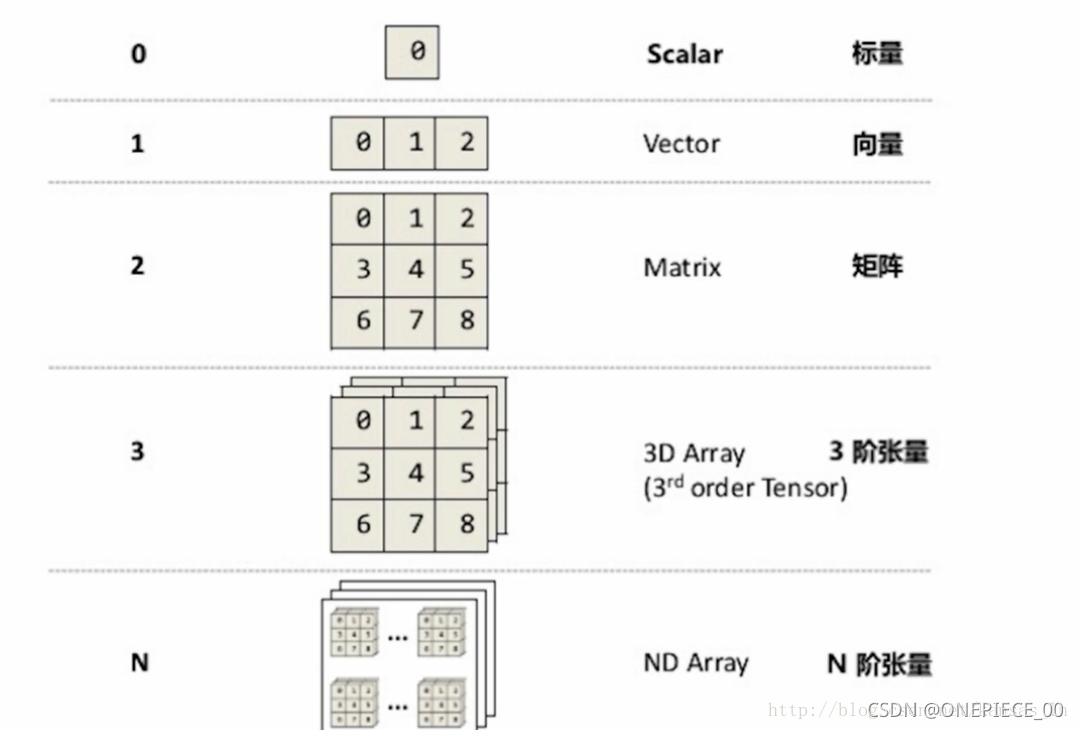
这是张量转化为数组的具体方法,然后具体使用的话还是最好再转化为list(列表形式)
numpy=tensor.numpy()下面就是我的tensor数组化,再列表化投入使用的过程。如果想看到中间的变化过程,可以加print()测试一下。由于pred中坐标(x,y,w,h)中,(x,y)是表示的左上角点的坐标,而(w,h)是代表右下角点的坐标,然后通过求和计算得到其中心点的坐标来参与判断。而且可以根据识别准确度的大小来判断是否采用该数据。需要注意的是将tensor数据转化为numpy型时,如果使用了gpu,生成的数据属于gpu tensor型,需要先转化numpy=gputensor.data.cpu().numpy()。
for i1 in pred:s=[]#转化为数组,并迭代#for i2 in i1.data.cpu().numpy() #使用gpu时for i2 in i1.numpy():s1=[]#列表化s=list(i2)#获取中心的(x,y)坐标x=s[0]=float(round((s[0]+s[2])/x1/2,4))y=s[1]=float(round((s[1]+s[3])/x2/2,4))#位置判断if x<0.5 and y<0.5:w="2 site"elif x<0.5 and y>0.5:w="3 site"elif x>0.5 and y>0.5:w="4 site"else:w="1 site"s1.append(x)s1.append(y)s1.append(s[4])s1.append(names[int(s[5])])if s[4]<0.6:breaks1.append(w)print(s1)3.names(标签label)
names是一个包含你的标签的列表(如下图,这是我的label内容),然后可以通过pred中的最后一个数据,就是对应的索引来得到检测出的物体的类型。
['computer', 'person', 'phone', 'tablet phone', 'cup', 'bag', 'bag2', 'books']4.总结
以上就是我大概的思路以及部分代码,下面是我最后的输出形式,可以根据自己的需求改变。
#(x,y,识别的准确度,,检测出的物体类型,自己设置的位置区域)
[0.5844, 0.6292, 0.8585756, 'person', '4 site']
[0.6292, 0.4757, 0.82431185, 'computer', '1 site']
[0.4219, 0.4757, 0.6576148, 'cup', '2 site']
最后附上完整代码,以及如何从detec.py文件中调用函数,需要注意的是函数的调用要写detect。py中run函数的最后,具体可以看我发出的detect.py代码。
#site_pro 是我的py文件名,site是函数名
from site_pro import site
site(source,pred,names)#函数完整代码
import os
from PIL import Image
def site(source,pred,names): img=Image.open(source)x1,x2=img.sizeprint(x1)print(x2)print(img.size)for i1 in pred:s=[]#如果使用gpu训练自己数据的话,需要先将gpu tensor转化#for i2 in i1.data.cpu().numpy() for i2 in i1.numpy():s1=[]s=list(i2)#获取中心的(x,y)坐标x=s[0]=float(round((s[0]+s[2])/x1/2,4))y=s[1]=float(round((s[1]+s[3])/x2/2,4))#位置判断if x<0.5 and y<0.5:w="2 site"elif x<0.5 and y>0.5:w="3 site"elif x>0.5 and y>0.5:w="4 site"else:w="1 site"s1.append(x)s1.append(y)s1.append(s[4])s1.append(names[int(s[5])])if s[4]<0.6:breaks1.append(w)print(s1)