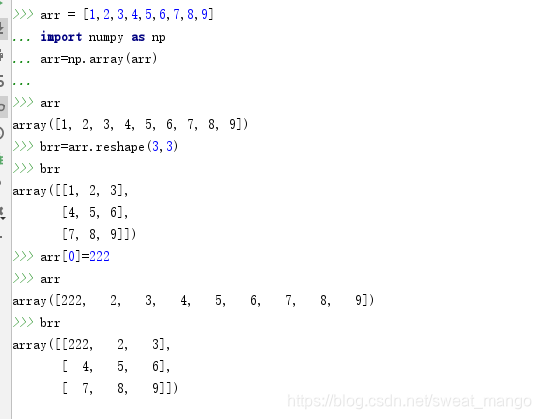
Reshape函数解析
- Reshape()作用:
- Reshape()实例说明:
- 一维reshape() 为 二维
- 二维数组 reshape 切片,逆置
- 三维Reshape情况
Reshape()作用:
Reshape(),函数的作用就是将数据的按照既定的维度进行整理。
- reshape(M,N):可以将数据整理为M X N的大小。
- reshape(M, N)[:,:,:] :”[ ]“ ,方括号可以对而外的 M x N 维度的数据进行顺序的排布。
Reshape()实例说明:
初期数据及库准备:
import numpy as np  # 调用numpy库
# 设置一个1-18的列表
anchors = [1, 2, 3, 4, 5, 6, 7, 8, 9, 10, 11, 12, 13, 14, 15, 16, 17, 18]
#将anchors由列表转换为数组的形式
anchors = np.array(anchors)
一维reshape() 为 二维
18个元素一维度数组,可以转换为2 x 9 及 3 X 6的二维数组
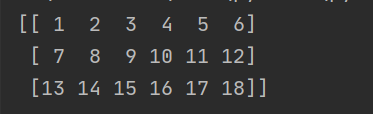
print(anchors.reshape([3,6])) # 生成一个(3,6)的二维数组print(anchors.reshape([2,9])) # 生成一个(2,9)的二维数组# print(anchors.reshape([3,3])) # error,显示维度不匹配,无法生成
- -anchors.reshape([3,6]):
- anchors.reshape([2,9]):
![]](https://img-blog.csdnimg.cn/374c35d44a6148d680b82b630b9d4a06.png#pic_center)
- anchors.reshape([3,3]):

现在得到了一个由维转换到二维的矩阵,但是发现想对现在这个矩阵的一些排布进行调整,就用到了reshape( )[ ] 中的**[ ]** 进行排序,
二维数组 reshape 切片,逆置
list的[]中有三个参数,用冒号分割 list[A:B:C]
A:相当于start_index,可以为空,默认是0 ----开始位置
B:相当于end_index,可以为空,默认是list.size()-----结束位置
C:步长,默认为1。步长为-1时,返回倒序原序列------每一步多走多远
ps:另外AB构成的区间是[A,B)的左闭右开区间,即B的值是取不到的,只会取到B-1的数
print(anchors.reshape([3,6])[:-1,:])
"""
-1表示最后一行或者一列,根据python的切片规则,[A:B]的切片包含A而不包含B,即是[A, B)的取值
原始结果为:
[[ 1  2  3  4  5  6][ 7  8  9 10 11 12][13 14 15 16 17 18]]
结果为:
[[ 1  2  3  4  5  6][ 7  8  9 10 11 12]]
"""
- 在两个维度上切片
print(anchors.reshape([3,6])[:-1,:-1])
"""
-1表示最后一行或者一列,根据python的切片规则,[A:B]的切片包含A而不包含B,即是[A, B)的取值
原始结果为:
[[ 1  2  3  4  5  6][ 7  8  9 10 11 12][13 14 15 16 17 18]]
结果为:
[[ 1  2  3  4  5][ 7  8  9 10 11]]
"""
- 按行逆置
print(anchors.reshape([3,6])[::-1,::])
"""
------------------------------------------------------------
> list的[]中有三个参数,用冒号分割 list[A:B:C]
> A:相当于start_index,可以为空,默认是0 ----开始位置
> B:相当于end_index,可以为空,默认是list.size()-----结束位置
> C:步长,默认为1。步长为-1时,返回倒序原序列------每一步多走多远
> ps:另外AB构成的区间是[A,B)的左闭右开区间,即B的值是取不到的,只会取到B-1的数-----------------------------------------------------------
原始结果为:
[[ 1  2  3  4  5  6]
[ 7  8  9 10 11 12]
[13 14 15 16 17 18]]
结果为:
[[13 14 15 16 17 18]
[ 7  8  9 10 11 12]
[ 1  2  3  4  5  6]]
"""
- 按列逆置
print(anchors.reshape([3,6])[::,::-1])
"""
------------------------------------------------------------
> list的[]中有三个参数,用冒号分割 list[A:B:C]
> A:相当于start_index,可以为空,默认是0 ----开始位置
> B:相当于end_index,可以为空,默认是list.size()-----结束位置
> C:步长,默认为1。步长为-1时,返回倒序原序列------每一步多走多远
> ps:另外AB构成的区间是[A,B)的左闭右开区间,即B的值是取不到的,只会取到B-1的数-----------------------------------------------------------
原始结果为:
[[ 1  2  3  4  5  6]
[ 7  8  9 10 11 12]
[13 14 15 16 17 18]]
结果为:
[[ 6  5  4  3  2  1]
[12 11 10  9  8  7]
[18 17 16 15 14 13]]
"""
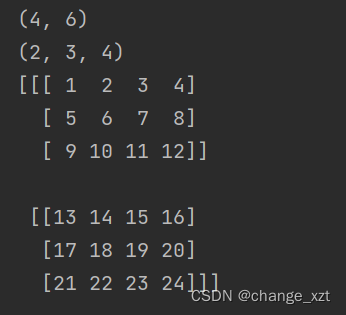
三维Reshape情况
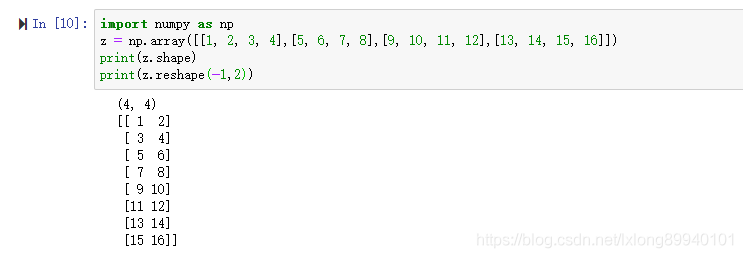
三维情况与二维类似,可以创建验证。下面补充一种在reshape数值中有-1的情况,需要强调的一点就是:若reshape(-1,2),则会生成两列的数据,行数会由系统自动计算。
print(anchors.reshape([-1,2,3]))
"""
[[[ 1  2  3][ 4  5  6]][[ 7  8  9][10 11 12]][[13 14 15][16 17 18]]]
"""
print(anchors.reshape([-1,3]))
"""
[[ 1  2  3][ 4  5  6][ 7  8  9][10 11 12][13 14 15][16 17 18]]
"""