自定义对话框是经常使用的功能,我们常用的弹窗操作,除了使用popwindow就是使用dialog来实现,这两种组件都支持之定义布局和功能来满足我们个性化的需求,也可以不采用自定义而直接使用系统封装好的api来实现功能。今天简单总结下在使用dialog做弹窗功能的方法和会遇到的问题与解决方案。
方法一:直接使用系统的,不自定义布局和功能方式
		/* @setIcon 设置对话框图标* @setTitle 设置对话框标题* @setMessage 设置对话框消息提示    */final AlertDialog.Builder normalDialog = new AlertDialog.Builder(MainActivity.this);normalDialog.setIcon(R.drawable.icon_dialog);normalDialog.setTitle("我是一个普通Dialog")normalDialog.setMessage("你喜欢系统对话框吗?");normalDialog.setPositiveButton("确定", new DialogInterface.OnClickListener() {@Overridepublic void onClick(DialogInterface dialog, int which) {//...To-do}});normalDialog.setNegativeButton("关闭", new DialogInterface.OnClickListener() {@Overridepublic void onClick(DialogInterface dialog, int which) {//...To-do}});//如果想自定义三个按钮的对话框,可以把下面的方法注释打开
//            normalDialog.setNeutralButton("第三个按钮",
//                    new DialogInterface.OnClickListener() {
//                        @Override
//                        public void onClick(DialogInterface dialog, int which) {
//                            // ...To-do
//                        }
//                    });// 显示normalDialog.show();
方法二:采用自定义布局和功能方式
自定义对话框布局: high_opinion_dialog_layout.xml
<?xml version="1.0" encoding="utf-8"?>
<LinearLayout xmlns:android="http://schemas.android.com/apk/res/android"android:layout_width="match_parent"android:layout_height="wrap_content"android:paddingTop="@dimen/dp_20"android:paddingBottom="@dimen/dp_10"android:paddingLeft="@dimen/dp_15"android:paddingRight="@dimen/dp_15"android:orientation="vertical"><TextViewandroid:text="Rate US"android:gravity="center"android:textSize="@dimen/sp_18"android:textColor="@color/black"android:layout_gravity="center_horizontal"android:layout_width="wrap_content"android:layout_height="wrap_content" /><TextViewandroid:text="We're glad you're enjoying using our app! Would you mind giving us a review?"android:gravity="center"android:textSize="@dimen/sp_12"android:layout_marginTop="@dimen/dp_5"android:textColor="@color/black"android:layout_gravity="center_horizontal"android:layout_width="wrap_content"android:layout_height="wrap_content" /><LinearLayoutandroid:layout_width="match_parent"android:layout_marginTop="@dimen/dp_15"android:layout_height="@dimen/dp_37"><Buttonandroid:id="@+id/btn_cancel_high_opion"android:layout_width="0dp"android:layout_height="match_parent"android:text="Maybe later"android:background="@drawable/btn_cancer_high_opion_shape"android:textColor="@color/white"android:layout_weight="1"/><Viewandroid:layout_width="@dimen/dp_20"android:layout_height="match_parent"/><Buttonandroid:id="@+id/btn_agree_high_opion"android:layout_width="0dp"android:text="Sure"android:textColor="@color/white"android:background="@drawable/btn_agree_high_opinion_shape"android:layout_height="match_parent"android:layout_weight="1"/></LinearLayout></LinearLayout>
然后在activity或者fragment中想要加点击弹出对话框的控件的监听事件中调用初始化下面方法
public class HomeActivity extends AppCompatActivity{@Overrideprotected void onCreate(Bundle savedInstanceState) {super.onCreate(savedInstanceState);   setContentView(R.layout.activity_home);Button btn= findViewById(R.id.btn)//点击按钮弹出对话框btn.setOnClickListener(new View.OnClickListener() {@Overridepublic void onClick(View v) {showDialog();}});}//初始化并弹出对话框方法
private void showDialog(){View view = LayoutInflater.from(this).inflate(R.layout.high_opinion_dialog_layout,null,false);final AlertDialog dialog = new AlertDialog.Builder(this).setView(view).create();Button btn_cancel_high_opion = view.findViewById(R.id.btn_cancel_high_opion);Button btn_agree_high_opion = view.findViewById(R.id.btn_agree_high_opion);btn_cancel_high_opion.setOnClickListener(new View.OnClickListener() {@Overridepublic void onClick(View v) {SharedPreferencesUnitls.setParam(getApplicationContext(),"HighOpinion","false");//... To-dodialog.dismiss();}});btn_agree_high_opion.setOnClickListener(new View.OnClickListener() {@Overridepublic void onClick(View v) {//... To-dodialog.dismiss();}});dialog.show();//此处设置位置窗体大小,我这里设置为了手机屏幕宽度的3/4  注意一定要在show方法调用后再写设置窗口大小的代码,否则不起效果会dialog.getWindow().setLayout((ScreenUtils.getScreenWidth(this)/4*3),LinearLayout.LayoutParams.WRAP_CONTENT);
}}
此处附上ScreenUtils工具类代码
public class ScreenUtils {/*** 获取屏幕高度(px)*/public static int getScreenHeight(Context context) {return context.getResources().getDisplayMetrics().heightPixels;}/*** 获取屏幕宽度(px)*/public static int getScreenWidth(Context context) {return context.getResources().getDisplayMetrics().widthPixels;}}需要注意的问题总结:系统的dialog的宽度默认是固定的,即使你自定义布局的怎么修改宽高也不起作用,如果想修改弹出窗体大小,可以使用下面这段代码在调用dialog.show()方法之后来实现改变对话框的宽高的需求
//此处设置位置窗体大小,dialog.getWindow().setLayout(width,height);
Android4.0的Alertdialog对话框,设置点击其他位置不消失
Android4.0以上AlertDialog,包括其他自定义的dialog,在触摸对话框边缘外部,对话框消失。可以设置这么一条属性,当然必须先AlertDialog.Builder.create()之后才能调用这两个方法方法一:setCanceledOnTouchOutside(false);调用这个方法时,按对话框以外的地方不起作用。按返回键还起作用方法二:setCancelable(false);调用这个方法时,按对话框以外的地方不起作用。按返回键也不起作用
如果你需要自定义样式日期时间选择对话框控件,可以点击这里传送你过去
改变Android Dialog弹出后的Activity背景亮度:
在代码中修改.lp.alpha大小随自己要求设置
// 设置屏幕背景变暗
private void setScreenBgDarken() {WindowManager.LayoutParams lp = getWindow().getAttributes();lp.alpha = 0.5f;lp.dimAmount = 0.5f;getWindow().setAttributes(lp);
}
// 设置屏幕背景变亮
private void setScreenBgLight() {WindowManager.LayoutParams lp = getWindow().getAttributes();lp.alpha = 1.0f;lp.dimAmount = 1.0f;getWindow().setAttributes(lp);
}
如何控制弹窗弹出的位置:
一般都是在屏幕正中间弹出默认,但也可以控制从别的地方弹出,比如从底部弹出,可以这样写
View view = LayoutInflater.from(this).inflate(R.layout.send_dialog, null);final Dialog dialog = new AlertDialog.Builder(this, R.style.home_dialog).setView(view).setCancelable(true).create();dialog.show();Window win = dialog.getWindow();win.setGravity(Gravity.BOTTOM); // 这里控制弹出的位置win.getDecorView().setPadding(0, 0, 0, 0);WindowManager.LayoutParams lp = win.getAttributes();lp.width = WindowManager.LayoutParams.MATCH_PARENT;lp.height = WindowManager.LayoutParams.WRAP_CONTENT;dialog.getWindow().setBackgroundDrawable(null);win.setAttributes(lp);view.findViewById(R.id.cancle_dialog).setOnClickListener(new View.OnClickListener() {@Overridepublic void onClick(View v) {dialog.dismiss();}});再补充一点爬坑的经验:
有时候会遇到定义dialog布局的时候出现加载出来的弹窗和自己布局里面定义的大小宽高不一致的效果,然后用dialog.getWindow().setLayout(width,height)方法怎么设置调节都不管用,我就遇到过一次,特别坑,后来发现了一点造成这种异常情况的原因:
出现问题时的dialog布局代码:
<?xml version="1.0" encoding="utf-8"?>
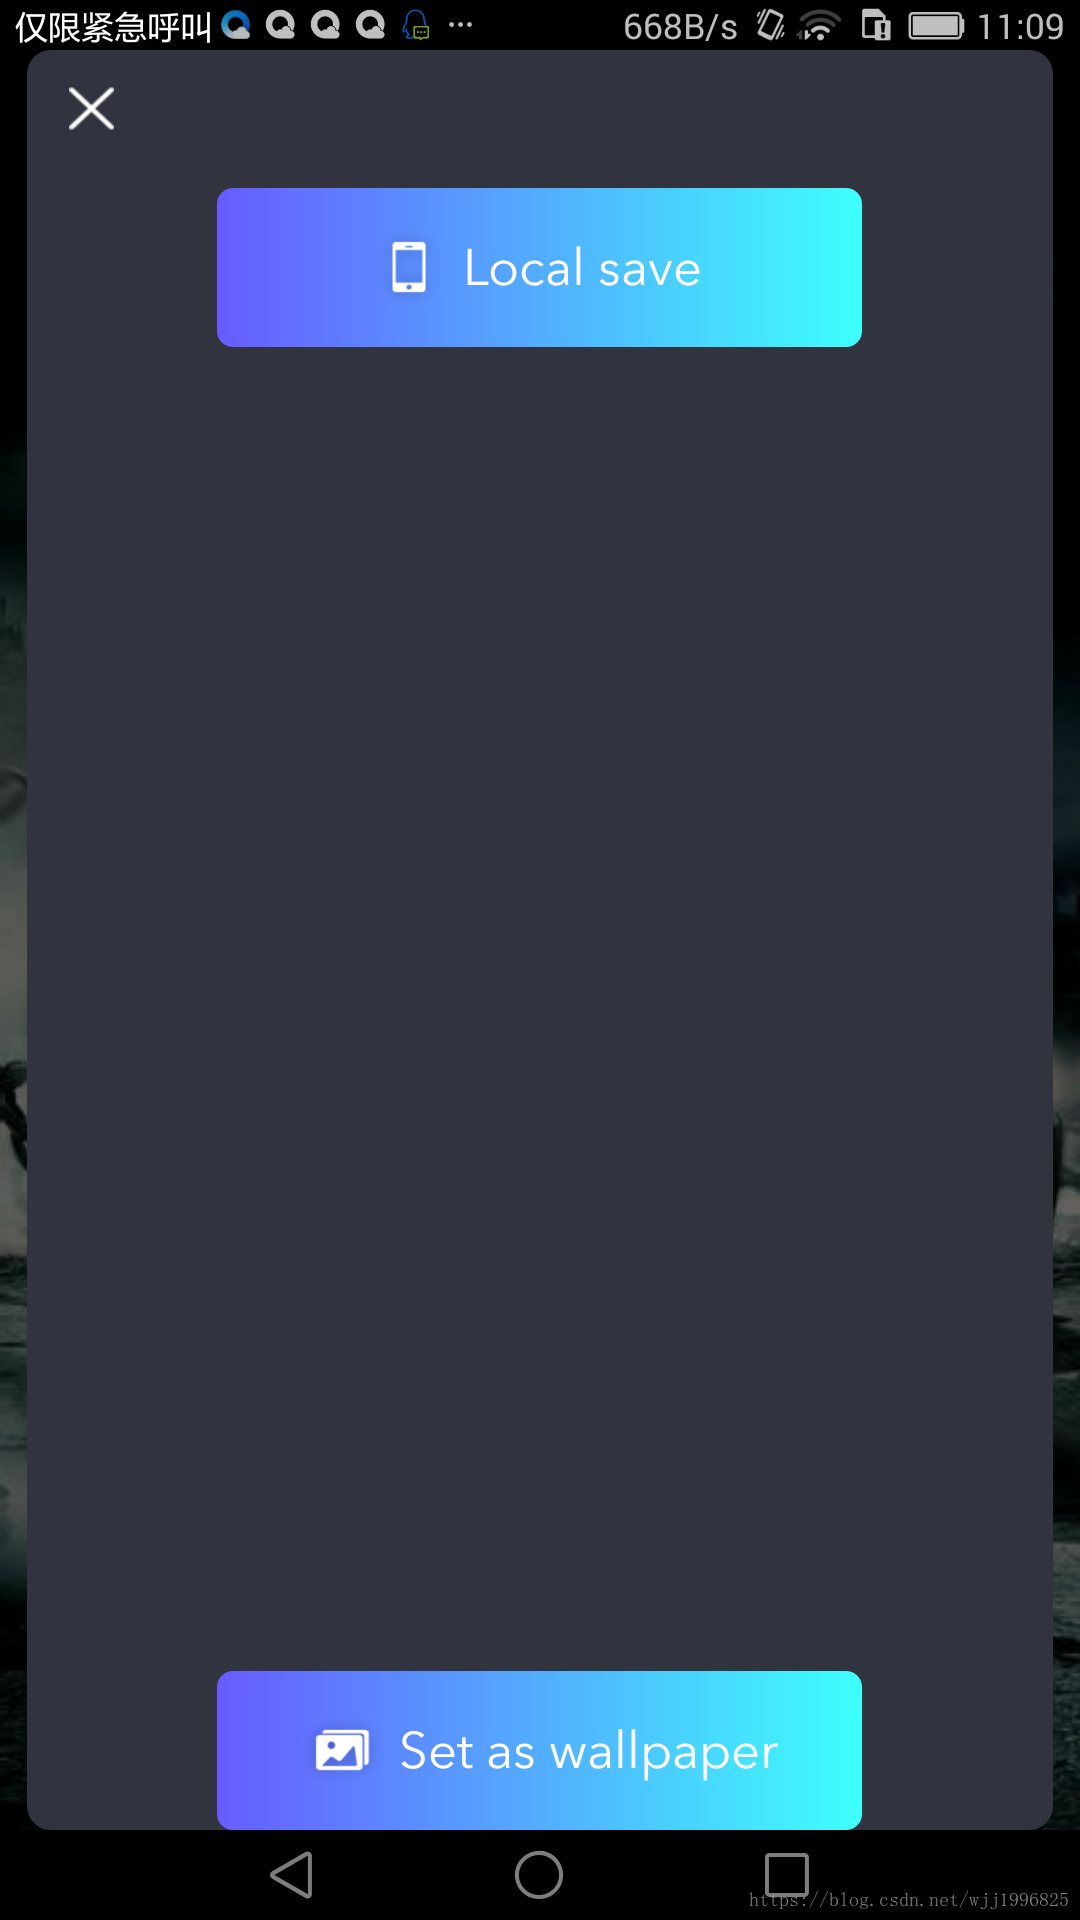
<RelativeLayout xmlns:android="http://schemas.android.com/apk/res/android"android:layout_width="@dimen/dp_310"android:layout_height="@dimen/dp_236"android:background="@drawable/wallpaper_downloadorsace_outside_shape"><RelativeLayoutandroid:id="@+id/rl_close_dialog"android:layout_width="@dimen/dp_40"android:layout_height="@dimen/dp_40"><ImageViewandroid:id="@+id/iv_close_dialog"android:layout_width="@dimen/dp_15"android:layout_height="@dimen/dp_15"android:scaleType="fitXY"android:layout_marginLeft="@dimen/dp_14"android:layout_marginTop="@dimen/dp_12"android:src="@drawable/icon_close" /></RelativeLayout><RelativeLayoutandroid:layout_marginTop="@dimen/dp_46"android:layout_marginBottom="@dimen/dp_35"android:layout_centerInParent="true"android:layout_width="wrap_content"android:layout_height="wrap_content"><LinearLayoutandroid:id="@+id/ll_localsave_out"android:layout_width="@dimen/dp_215"android:layout_height="@dimen/dp_53"android:layout_centerHorizontal="true"android:background="@drawable/wallpaper_downloadorsace_shape"android:gravity="center"><LinearLayoutandroid:id="@+id/ll_localsave"android:background="@drawable/local_save_water_selector"android:clickable="true"android:gravity="center"android:layout_width="match_parent"android:layout_height="match_parent"><!--android:background="?android:attr/selectableItemBackground" 系统自带水波纹效果 --><ImageViewandroid:layout_width="@dimen/dp_22"android:layout_height="@dimen/dp_28"android:scaleType="fitXY"android:src="@drawable/icon_phone" /><com.blossom.ripple.widget.AvenirNextRegularTextViewandroid:layout_width="wrap_content"android:layout_height="wrap_content"android:layout_marginLeft="@dimen/dp_7"android:text="Local save"android:textColor="@color/white"android:textSize="@dimen/sp_17" /></LinearLayout></LinearLayout><LinearLayoutandroid:layout_alignParentBottom="true"android:layout_marginBottom="@dimen/dp_45"android:layout_width="@dimen/dp_215"android:layout_height="@dimen/dp_53"android:layout_centerHorizontal="true"android:background="@drawable/wallpaper_downloadorsace_shape"android:gravity="center"><LinearLayoutandroid:id="@+id/ll_setaswallpaper"android:background="@drawable/local_save_water_selector"android:clickable="true"android:gravity="center"android:layout_width="match_parent"android:layout_height="match_parent"><!--android:background="?android:attr/selectableItemBackground" 系统自带水波纹效果 --><ImageViewandroid:layout_width="@dimen/dp_28"android:layout_height="@dimen/dp_24"android:scaleType="fitXY"android:src="@drawable/icon_album" /><com.blossom.ripple.widget.AvenirNextRegularTextViewandroid:layout_width="wrap_content"android:layout_height="wrap_content"android:layout_marginLeft="@dimen/dp_5"android:text="Set as wallpaper"android:textColor="@color/white"android:textSize="@dimen/sp_17" /></LinearLayout></LinearLayout></RelativeLayout></RelativeLayout>运行效果如下图
运行出来的效果很头痛,虽然我在布局代码里面写死了弹窗布局的宽高大小,然后想通过window的setlayout方法控制改变弹窗的大小,但无论如何都不行,后来仔细检查布局代码发现了猫腻,在一个子布局LinearLayout的标签下引用了一个android:layout_alignParentBottom="true"的属性,然后稍微调整了下代码再次运行便解决了上面的问题。下面贴下修改后的正确代码,我在里面加了问题原因的注释还:
<?xml version="1.0" encoding="utf-8"?>
<RelativeLayout xmlns:android="http://schemas.android.com/apk/res/android"android:layout_width="@dimen/dp_310"android:layout_height="@dimen/dp_236"android:background="@drawable/wallpaper_downloadorsace_outside_shape"><RelativeLayoutandroid:id="@+id/rl_close_dialog"android:layout_width="@dimen/dp_40"android:layout_height="@dimen/dp_40"><ImageViewandroid:id="@+id/iv_close_dialog"android:layout_width="@dimen/dp_15"android:layout_height="@dimen/dp_15"android:scaleType="fitXY"android:layout_marginLeft="@dimen/dp_14"android:layout_marginTop="@dimen/dp_12"android:src="@drawable/icon_close" /></RelativeLayout><RelativeLayoutandroid:layout_marginTop="@dimen/dp_46"android:layout_marginBottom="@dimen/dp_35"android:layout_centerInParent="true"android:layout_width="wrap_content"android:layout_height="wrap_content"><LinearLayoutandroid:id="@+id/ll_localsave_out"android:layout_width="@dimen/dp_215"android:layout_height="@dimen/dp_53"android:layout_centerHorizontal="true"android:background="@drawable/wallpaper_downloadorsace_shape"android:gravity="center"><LinearLayoutandroid:id="@+id/ll_localsave"android:background="@drawable/local_save_water_selector"android:clickable="true"android:gravity="center"android:layout_width="match_parent"android:layout_height="match_parent"><!--android:background="?android:attr/selectableItemBackground"   系统自带水波纹效果 --><ImageViewandroid:layout_width="@dimen/dp_22"android:layout_height="@dimen/dp_28"android:scaleType="fitXY"android:src="@drawable/icon_phone" /><com.blossom.ripple.widget.AvenirNextRegularTextViewandroid:layout_width="wrap_content"android:layout_height="wrap_content"android:layout_marginLeft="@dimen/dp_7"android:text="Local save"android:textColor="@color/white"android:textSize="@dimen/sp_17" /></LinearLayout></LinearLayout><LinearLayoutandroid:layout_width="@dimen/dp_215"android:layout_height="@dimen/dp_53"android:layout_centerHorizontal="true"android:layout_below="@+id/ll_localsave_out"android:layout_marginTop="@dimen/dp_30"android:background="@drawable/wallpaper_downloadorsace_shape"android:gravity="center"><!--android:layout_alignParentBottom="true"    这个属性曾经导致过弹窗特别大,会挨着屏幕顶部和底部--><LinearLayoutandroid:id="@+id/ll_setaswallpaper"android:background="@drawable/local_save_water_selector"android:clickable="true"android:gravity="center"android:layout_width="match_parent"android:layout_height="match_parent"><!--android:background="?android:attr/selectableItemBackground"   系统自带水波纹效果 --><ImageViewandroid:layout_width="@dimen/dp_28"android:layout_height="@dimen/dp_24"android:scaleType="fitXY"android:src="@drawable/icon_album" /><com.blossom.ripple.widget.AvenirNextRegularTextViewandroid:layout_width="wrap_content"android:layout_height="wrap_content"android:layout_marginLeft="@dimen/dp_5"android:text="Set as wallpaper"android:textColor="@color/white"android:textSize="@dimen/sp_17" /></LinearLayout></LinearLayout></RelativeLayout></RelativeLayout>
问题解决后感觉又积累了一点弹窗方面的经验,收获满满的,赶紧记录下来吧,省的以后忘记了再犯同样的错误!
还有一个关于弹窗容易遇到的异常:Unable to add window – token android.os.BinderProxy@d80e90e is not valid; is your activity running?android.view.ViewRootImpl.setView(ViewRootImpl.java:688)
该异常表示不能添加窗口,通常是所要依附的view已经不存在导致的。
[解决方案]:Dialog&AlertDialog,WindowManager不能正确使用时,经常会报出该异常,原因比较多,几个常见的场景如下:
1.上一个页面没有destroy的时候,之前的Activity已经接收到了广播。如果此时之前的Activity进行UI层面的操作处理,就会造成crash。UI层面的刷新,一定要注意时机,建议使用set_result来代替广播的形式进行刷新操作,避免使用广播的方式,代码不直观且容易出错。
2.Dialog在Actitivty退出后弹出。在Dialog调用show方法进行显示时,必须要有一个Activity作为窗口的载体,如果Activity被销毁,那么导致Dialog的窗口载体找不到。建议在Dialog调用show方法之前先判断Activity是否已经被销毁。
3.Service&Application弹出对话框或WindowManager添加view时,没有设置window type为TYPE_SYSTEM_ALERT。需要在调用dialog.show()方法前添加dialog.getWindow().SetType(WindowManager.LayoutParams.TYPE_SYSTEM_ALERT)。
4.6.0的系统上, (非定制 rom 行为)若没有给予悬浮窗权限, 会弹出该问题, 可以通过Settings.canDrawOverlays来判断是否有该权限.
5.某些不稳定的MIUI系统bug引起的权限问题,系统把Toast也当成了系统级弹窗,android6.0的系统Dialog弹窗需要用户手动授权,若果app没有加入SYSTEM_ALERT_WINDOW权限就会报这个错。需要加入给app加系统Dialog弹窗权限,并动态申请权限,不满足第一条会出现没权限闪退,不满足第二条会出现没有Toast的情况。
今天的分享先到这里,后续会不断添加和更新更多更好的学习资料,如果你喜欢可以关注加好友,互相探讨学习,我们互相学习一起成长!