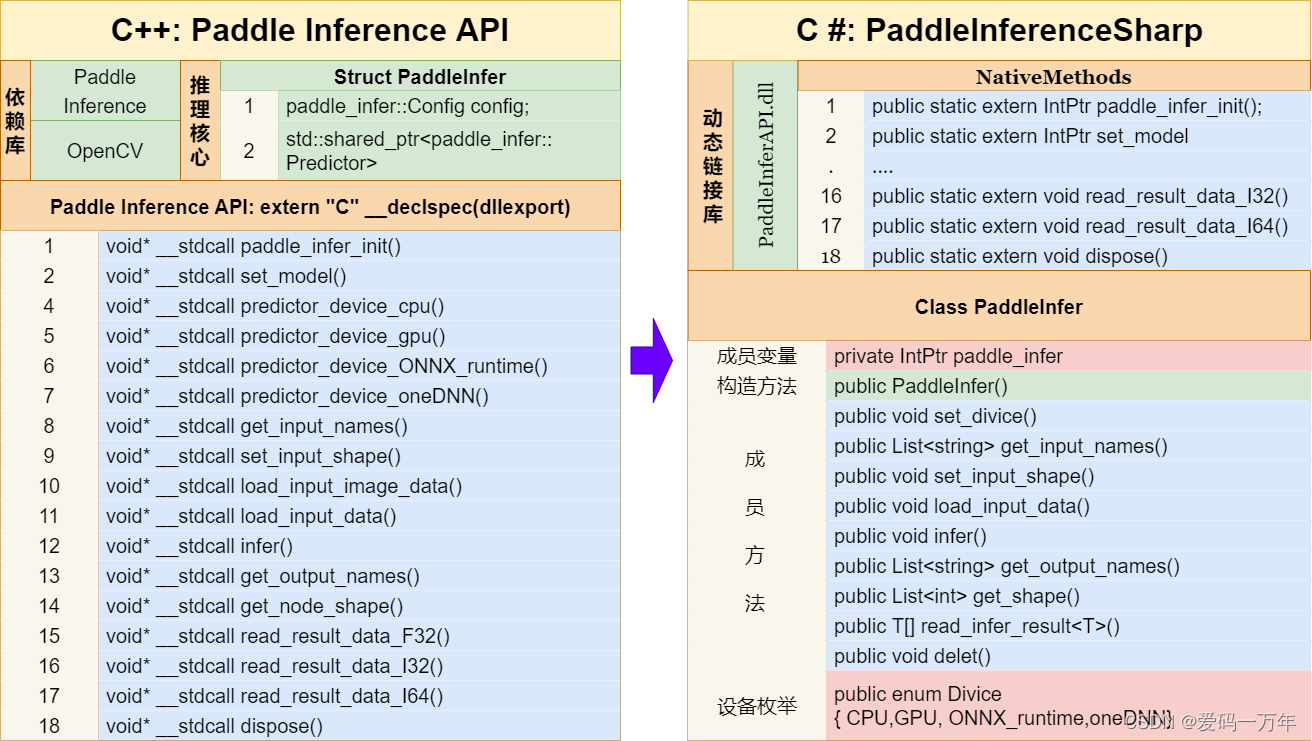
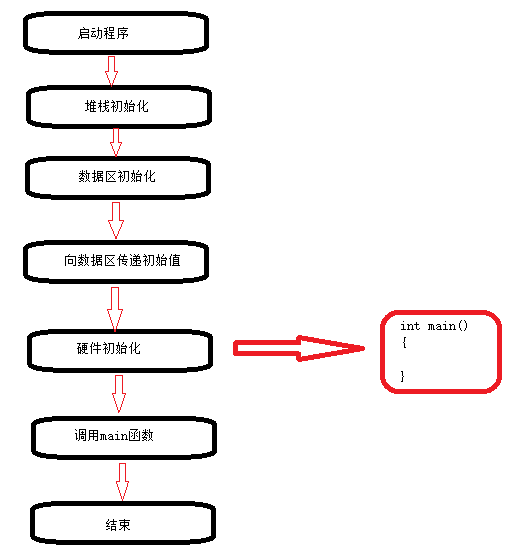
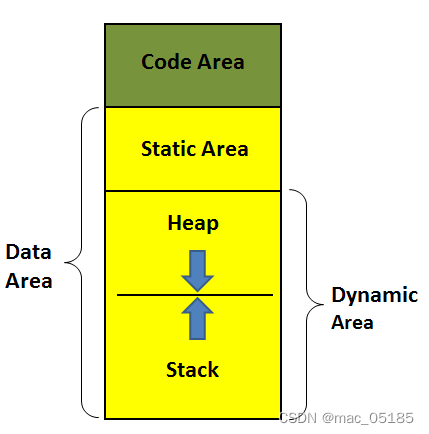
一、Paddle推理生态

二、API说明
create_predictor 方法
# 根据 Config 构建预测执行器 Predictor
# 参数: config - 用于构建 Predictor 的配置信息
# 返回: Predictor - 预测执行器
paddle.inference.create_predictor(config: Config)
加载预测模型 - 非Combined模型
import paddle.inference as paddle_infer# 创建 config
config = paddle_infer.Config("./mobilenet_v1")# 根据 config 创建 predictor
predictor = paddle_infer.create_predictor(config)
加载预测模型 - Combined模型
# 引用 paddle inference 预测库
import paddle.inference as paddle_infer# 创建 config
config = paddle_infer.Config("./mobilenet_v2/__model__", "./mobilenet_v2/__params__")# 根据 config 创建 predictor
predictor = paddle_infer.create_predictor(config)
Predictor 类
Paddle Inference的预测器,由 create_predictor 根据 Config 进行创建。用户可以根据Predictor提供的接口设置输入数据、执行模型预测、获取输出等。
import numpy# 引用 paddle inference 预测库
import paddle.inference as paddle_infer# 创建 config
config = paddle_infer.Config("./mobilenet_v1")# 根据 config 创建 predictor
predictor = paddle_infer.create_predictor(config)# 获取输入 Tensor
input_names = predictor.get_input_names()
input_tensor = predictor.get_input_handle(input_names[0])# 从 CPU 获取数据,设置到 Tensor 内部
fake_input = numpy.random.randn(1, 3, 224, 224).astype("float32")
input_tensor.copy_from_cpu(fake_input)# 执行预测
predictor.run()# 获取输出 Tensor
output_names = predictor.get_output_names()
output_tensor = predictor.get_output_handle(output_names[0])# 释放中间Tensor
predictor.clear_intermediate_tensor()# 释放内存池中的所有临时 Tensor
predictor.try_shrink_memory()
三、自建线性模型推理
1、保存模型跟参数
'''
1.1.1 动态图存储载入体系
为提升框架使用体验,飞桨框架2.0将主推动态图模式,动态图模式下的存储载入接口包括:paddle.save #训练调优,只保存参数
paddle.loadpaddle.jit.save # 训练部署,保存模型与参数
paddle.jit.load
'''import numpy as np
import paddle
import paddle.nn as nn
from paddle.io import Dataset,DataLoader
import paddle.optimizer as optBATCH_SIZE = 4
BATCH_NUM = 4
EPOCH_NUM = 4IMAGE_SIZE = 16
CLASS_NUM = 10# define a random dataset
class RandomDataset(Dataset):def __init__(self,nums):super(RandomDataset,self).__init__()self.num_samples = numsdef __getitem__(self, idx):image = np.random.random([IMAGE_SIZE]).astype('float32')label = np.random.randint(0,CLASS_NUM-1,(1,)).astype('int64')return image,labeldef __len__(self):return self.num_samplesclass LinearNet(nn.Layer):def __init__(self):super(LinearNet,self).__init__()self.linear = paddle.nn.Linear(IMAGE_SIZE,700)self.linear1 = paddle.nn.Linear(700, CLASS_NUM)# @paddle.jit.to_static 保存模型跟参数的时候需要转化def forward(self, x):x = self.linear(x)return self.linear1(x)# create data loader
dataset = RandomDataset(BATCH_NUM*BATCH_SIZE)loader = DataLoader(dataset,batch_size=BATCH_SIZE)def train(layer,loader,loss_fn,opt):for epoch_id in range(EPOCH_NUM):for batch_id,(image,label) in enumerate(loader):print(image.shape)out = layer(image)loss = loss_fn(out,label)loss.backward()opt.step()opt.clear_grad()print("Epoch[{}/{}] batch {}: loss = {}".format(epoch_id,EPOCH_NUM,batch_id,np.mean(loss.numpy())))# create network
layer = LinearNet()
loss_fn = nn.CrossEntropyLoss()
adam = opt.Adam(learning_rate=0.001, parameters=layer.parameters())# train
train(layer, loader, loss_fn, adam)'''
动转静训练 + 模型&参数存储class LinearNet(nn.Layer):def __init__(self):super(LinearNet, self).__init__()self._linear = nn.Linear(IMAGE_SIZE, CLASS_NUM)@paddle.jit.to_staticdef forward(self, x):return self._linear(x)
'''
# from paddle.static import InputSpec
# save
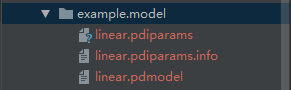
path = "example.model/linear"
paddle.jit.save(layer, path)# save
path = "example.dy_model/linear"
paddle.jit.save(layer=layer,path=path,input_spec=[InputSpec(shape=[None, 784], dtype='float32')])还有一种方法如下:
net = to_static(model, input_spec=[InputSpec(shape=[None, 1, 28, 28], name='x')])
paddle.jit.save(net, 'inference_model/lenet')
结果如下:
2、Paddle Inference
# model_inference.py
import argparse
import numpy as np# 引用 paddle inference 预测库
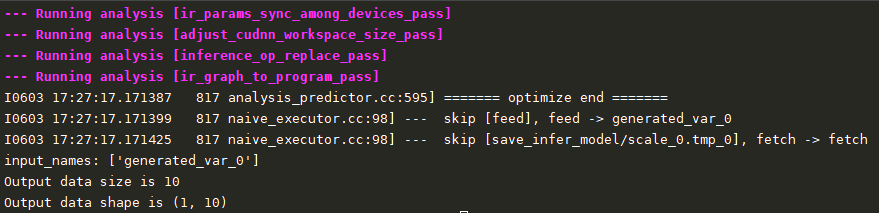
import paddle.inference as paddle_inferdef main():args = parse_args()# 创建 configconfig = paddle_infer.Config(args.model_file, args.params_file)config.disable_gpu() # 使用cpu预测# 根据 config 创建 predictorpredictor = paddle_infer.create_predictor(config)# 获取输入的名称input_names = predictor.get_input_names()print("input_names:",input_names)input_handle = predictor.get_input_handle(input_names[0])# 设置输入fake_input = np.random.randn(args.batch_size, 16).astype("float32")input_handle.reshape([args.batch_size, 16])input_handle.copy_from_cpu(fake_input)# 运行predictorpredictor.run()# 获取输出output_names = predictor.get_output_names()output_handle = predictor.get_output_handle(output_names[0])output_data = output_handle.copy_to_cpu() # numpy.ndarray类型print("Output data size is {}".format(output_data.size))print("Output data shape is {}".format(output_data.shape))def parse_args():parser = argparse.ArgumentParser()parser.add_argument("--model_file", type=str,default='./example.model/linear.pdmodel', help="model filename")parser.add_argument("--params_file", type=str,default='./example.model/linear.pdiparams', help="parameter filename")parser.add_argument("--batch_size", type=int, default=1, help="batch size")return parser.parse_args()if __name__ == "__main__":main()'''
# 参数输入上面生成的linear模型
python model_inference.py --model_file ./example.model/linear.pdmodel --params_file ./example.model/linear.pdiparams --batch_size 2
'''
结果如下:
四、检测网络YOLOV3推理
总共需要三个文件:
1、Paddle模型和参数
2、utils.py包括图像的处理
3、infer_yolov3.py实现模型的推理
获取模型
wget https://paddle-inference-dist.bj.bcebos.com/Paddle-Inference-Demo/yolov3_r50vd_dcn_270e_coco.tgz
tar xzf yolov3_r50vd_dcn_270e_coco.tgz
# utils.py
import cv2
import numpy as np
from PIL import Image, ImageDrawdef resize(img, target_size):"""resize to target size"""if not isinstance(img, np.ndarray):raise TypeError('image type is not numpy.')im_shape = img.shapeprint(im_shape)im_size_min = np.min(im_shape[0:2])im_size_max = np.max(im_shape[0:2])im_scale_x = float(target_size) / float(im_shape[1])im_scale_y = float(target_size) / float(im_shape[0])img = cv2.resize(img, None, None, fx=im_scale_x, fy=im_scale_y)return imgdef normalize(img, mean, std):img = img / 255.0mean = np.array(mean)[np.newaxis, np.newaxis, :]std = np.array(std)[np.newaxis, np.newaxis, :]img -= meanimg /= stdreturn imgdef preprocess(img, img_size):mean = [0.485, 0.456, 0.406]std = [0.229, 0.224, 0.225]img = resize(img, img_size)img = img[:, :, ::-1].astype('float32')  # bgr -> rgbimg = normalize(img, mean, std)img = img.transpose((2, 0, 1))  # hwc -> chwimg = img[np.newaxis, :]print(img.shape)return img"""
def draw_bbox(img, result, threshold=0.5, save_name='res.jpg'):"""draw bbox"""draw = ImageDraw.Draw(img)for res in result:cat_id, score, bbox = res[0], res[1], res[2:]if score < threshold:continuexmin, ymin, xmax, ymax = bboxdraw.line([(xmin, ymin), (xmin, ymax), (xmax, ymax), (xmax, ymin),(xmin, ymin)],width=2,fill=(255, 0, 0))print('category id is {}, bbox is {}'.format(cat_id, bbox))img.save(save_name, quality=95)
"""def draw_box(img,result,threshold=0.5):for res in result:cat_id, score, bbox = res[0], res[1], res[2:]if score < threshold:continuexmin, ymin, xmax, ymax = int(bbox[0]),int(bbox[1]),int(bbox[2]),int(bbox[3])print('category id is {}, bbox is {}'.format(cat_id, bbox))cv2.rectangle(img,(xmin,ymax),(xmax,ymin),(255,0,0),2)cv2.namedWindow("detection",cv2.WINDOW_NORMAL)cv2.imshow("detection",img)cv2.waitKey(0)if __name__ == '__main__':img = cv2.imread('kite.jpg')# xmin, ymin, xmax, ymax = [216, 697, 268, 848]# cv2.rectangle(img, (xmin, ymax), (xmax, ymin), (255, 0, 0), 2)cv2.namedWindow("detection1",cv2.WINDOW_GUI_NORMAL)cv2.imshow("detection1",img)cv2.waitKey(0)
# -*- coding: utf-8 -*-
"""
Created on : 2021/6/3 21:10@author: Jeremy
"""import numpy as np
import argparse
import cv2
from PIL import Imagefrom paddle.inference import Config
from paddle.inference import create_predictorfrom PaddlePaddle.utils import preprocess, draw_bbox,draw_boxdef init_predictor(args):if args.model_dir != "":config = Config(args.model_dir)else:config = Config(args.model_file, args.params_file)config.enable_memory_optim()if args.use_gpu:config.enable_use_gpu(1000, 0)else:# If not specific mkldnn, you can set the blas thread.# The thread num should not be greater than the number of cores in the CPU.config.set_cpu_math_library_num_threads(4)config.enable_mkldnn()predictor = create_predictor(config)return predictordef run(predictor, img):# copy img data to input tensorinput_names = predictor.get_input_names()# print("input_names:",input_names)for i, name in enumerate(input_names):input_tensor = predictor.get_input_handle(name)input_tensor.reshape(img[i].shape)# print("input_tensor:",img[i].shape)input_tensor.copy_from_cpu(img[i].copy())# do the inferencepredictor.run()results = []# get out data from output tensoroutput_names = predictor.get_output_names()for i, name in enumerate(output_names):output_tensor = predictor.get_output_handle(name)output_data = output_tensor.copy_to_cpu()results.append(output_data)return resultsdef parse_args():parser = argparse.ArgumentParser()parser.add_argument("--model_file",type=str,default="./yolov3_coco/model.pdmodel",help="Model filename, Specify this when your model is a combined model.")parser.add_argument("--params_file",type=str,default="./yolov3_coco/model.pdiparams",help="Parameter filename, Specify this when your model is a combined model.")parser.add_argument("--model_dir",type=str,default="",help="Model dir, If you load a non-combined model, specify the directory of the model.")parser.add_argument("--use_gpu",type=int,default=0,help="Whether use gpu.")return parser.parse_args()if __name__ == '__main__':args = parse_args()img_name = 'kite.jpg'save_img_name = 'res.jpg'im_size = 608pred = init_predictor(args)img = cv2.imread(img_name)data = preprocess(img, im_size)scale_factor = np.array([im_size * 1. / img.shape[0], im_size * 1. / img.shape[1]]).reshape((1, 2)).astype(np.float32)im_shape = np.array([im_size, im_size]).reshape((1, 2)).astype(np.float32)result = run(pred, [im_shape, data,scale_factor])# img = Image.open(img_name).convert('RGB')# draw_bbox(img, result[0], save_name=save_img_name)draw_box(img,result[0])