原文
1 vue安装
1.1 直接用 script标签引入
对于制作原型或学习,你可以这样使用最新版本:
<script src="https://cdn.jsdelivr.net/npm/vue/dist/vue.js"></script>
对于生产环境,我们推荐链接到一个明确的版本号和构建文件,以避免新版本造成的不可预期的破坏:
<script src="https://cdn.jsdelivr.net/npm/vue@2.6.11"></script>
1.2 NPM创建
//安装vue
npm install vue
npm install -g @vue/cli
//创建vue项目
vue create project_name
//q
cd project_name
npm run serve
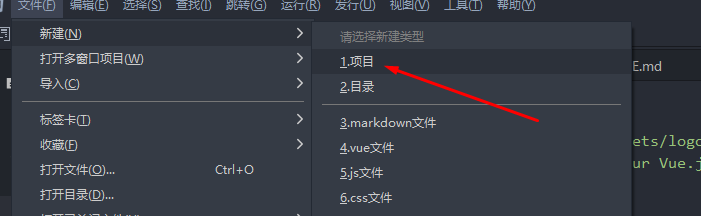
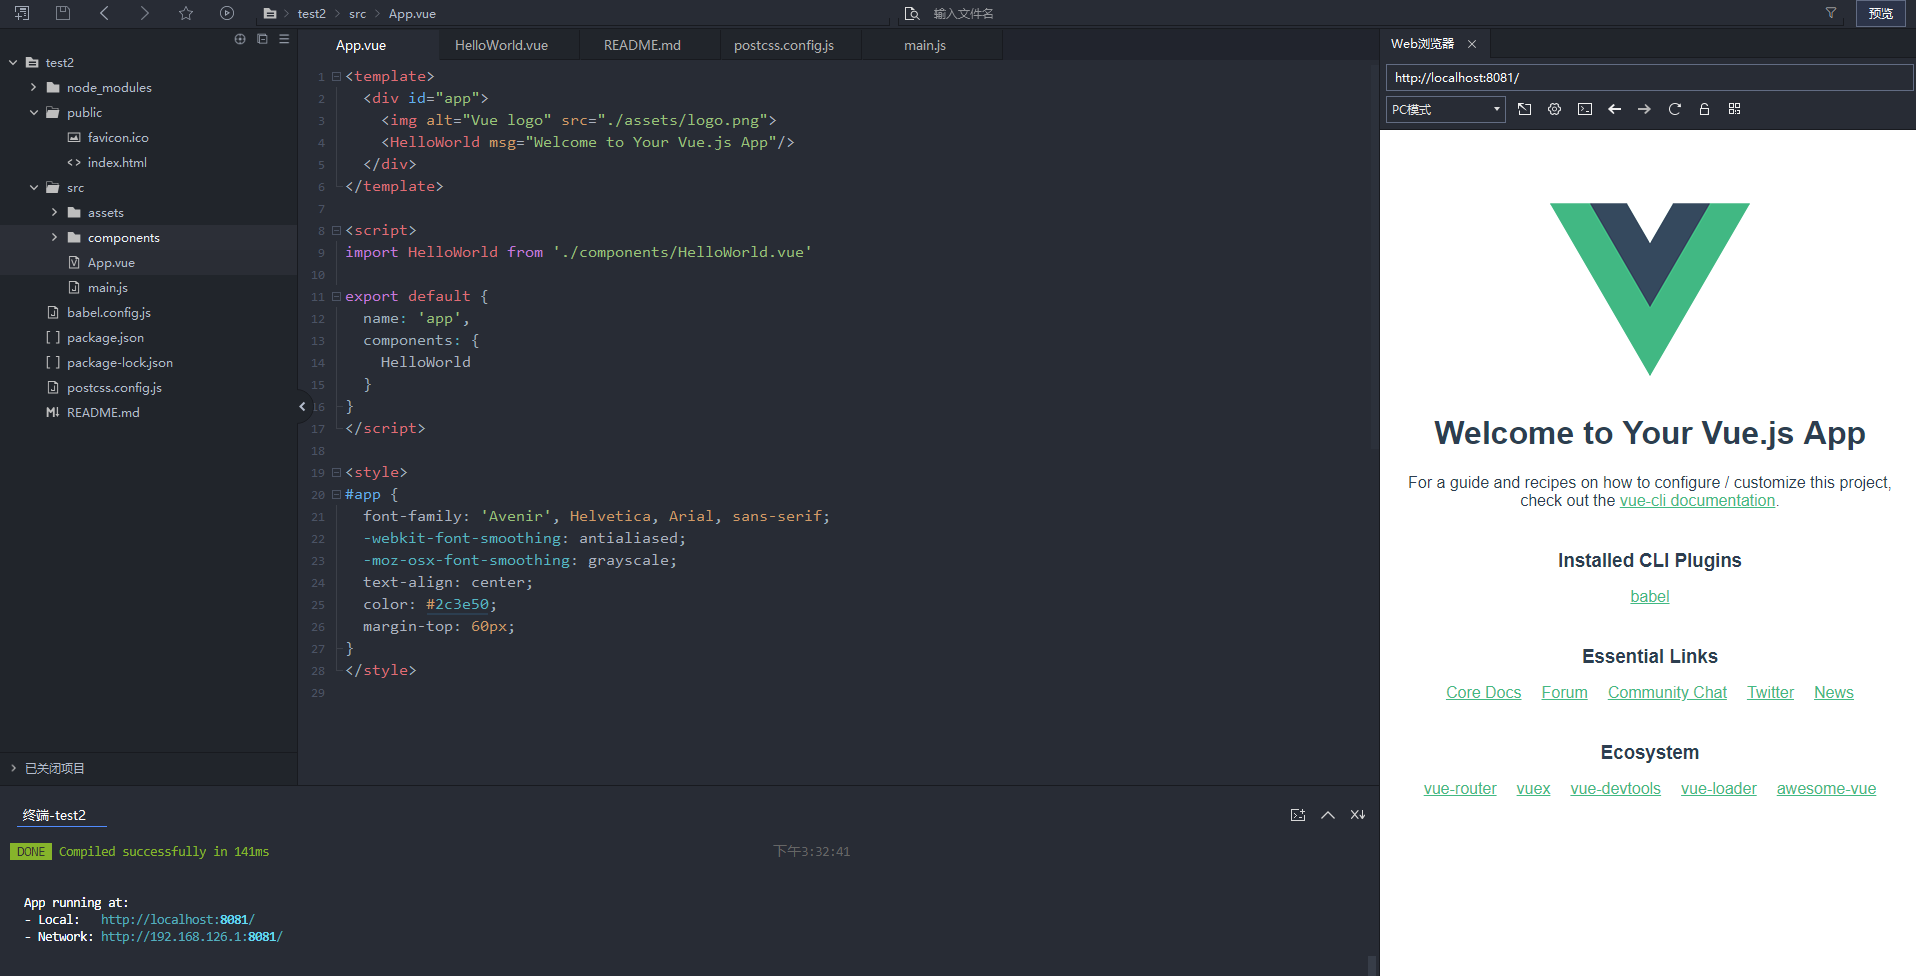
1.3 使用HbuilderX创建vue项目

1.4 快速启动vue-element-admin
# clone the project
git clone https://github.com/PanJiaChen/vue-admin-template.git# enter the project directory
cd vue-admin-template# install dependency
npm install# develop
npm run dev

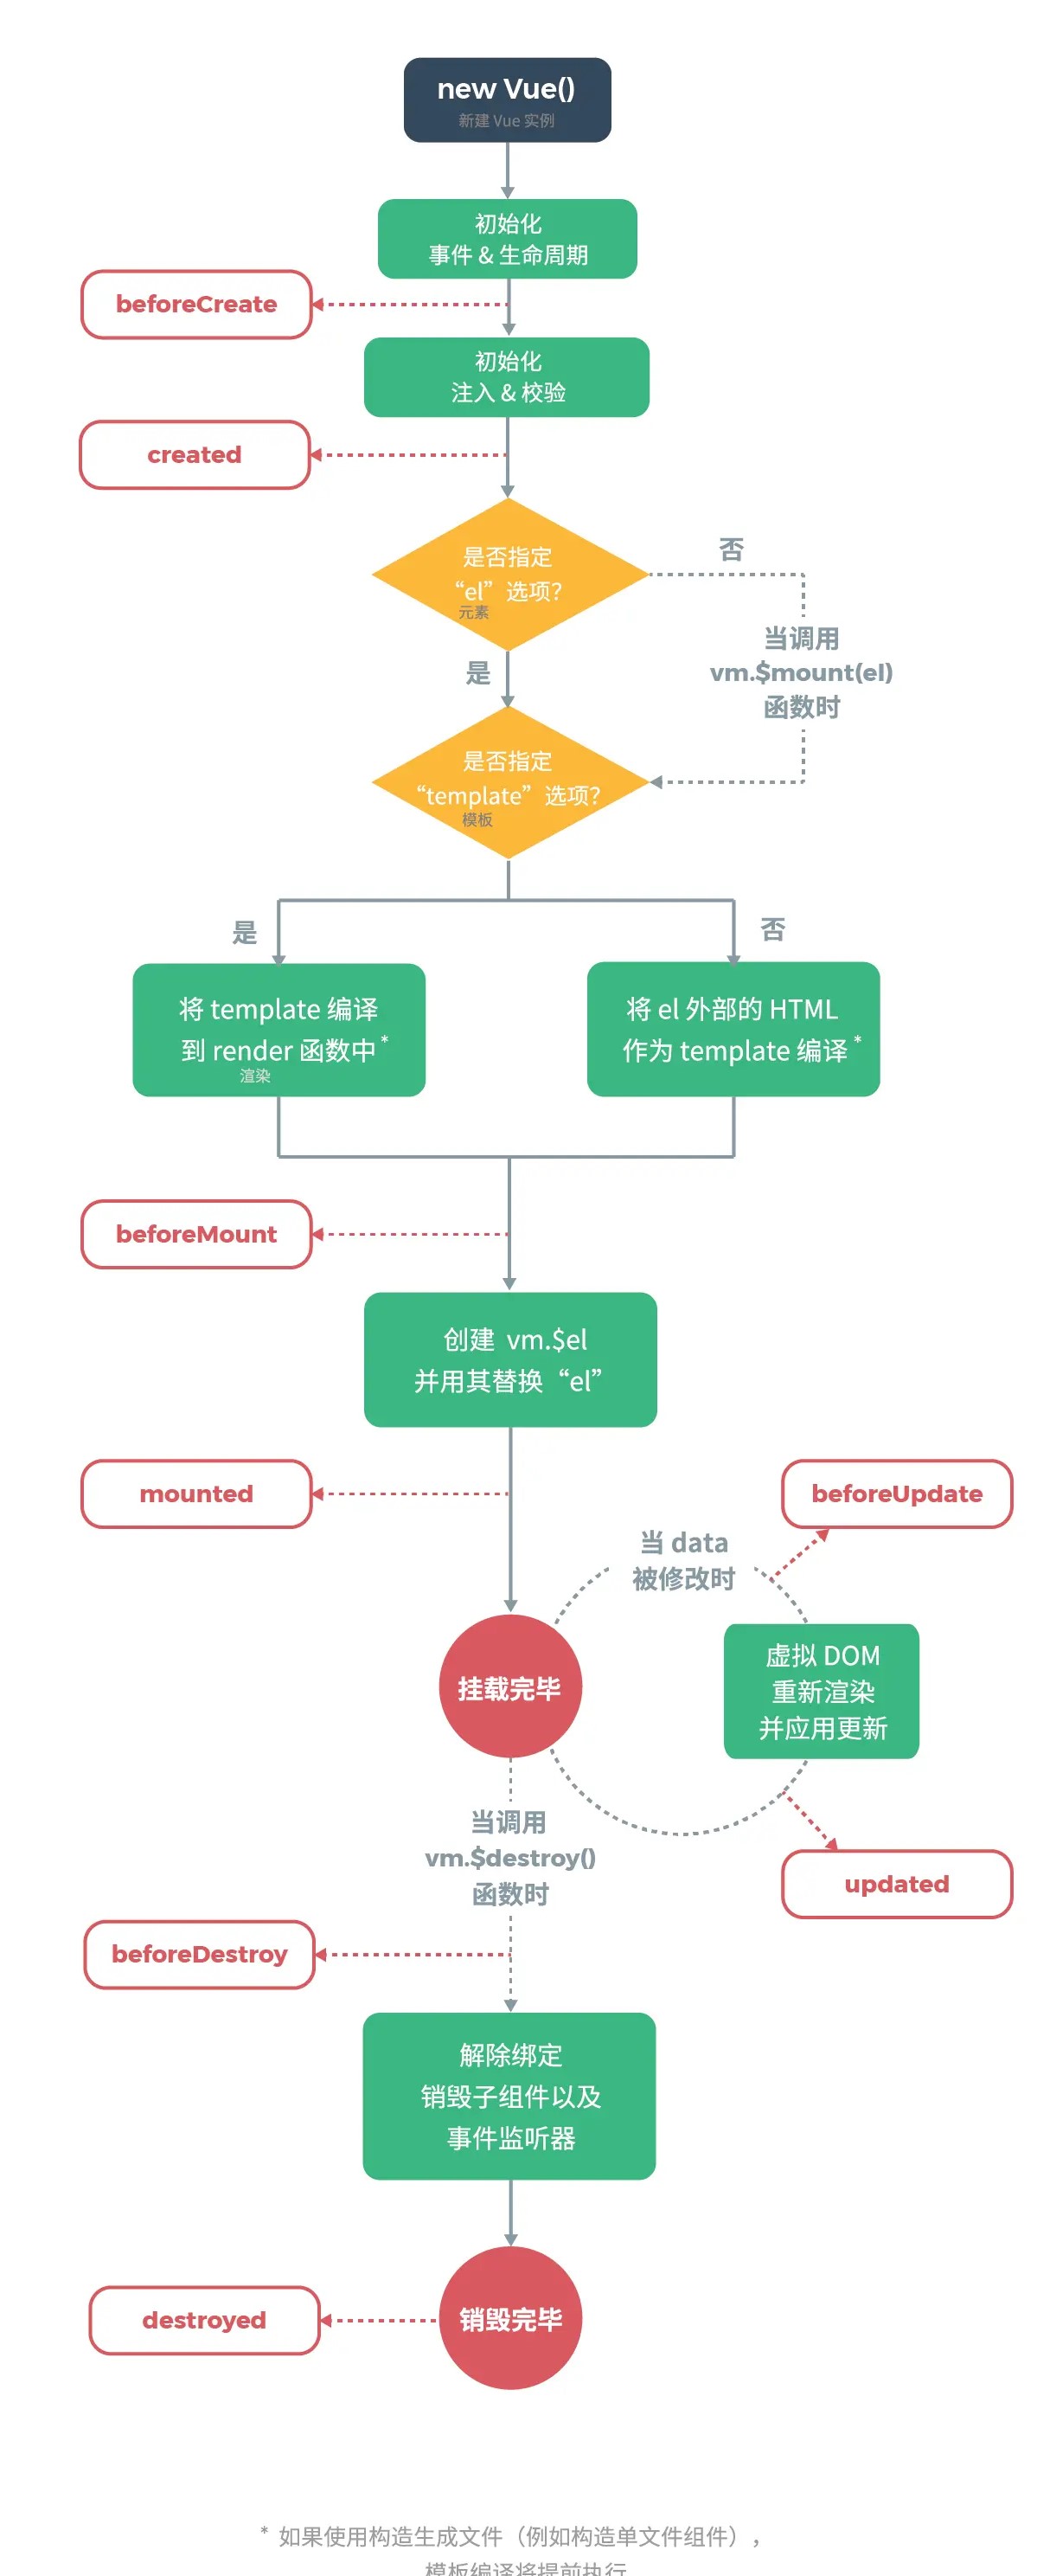
2 vue执行顺序
3 vue基础语法
4 vue特性
5 组件
5.1 定义组件的固定写法:
<template>...  //这里写组件中的HTML代码,可复用
</template><script>...  //这里写一些动态的脚本
</script><!-- Add "scoped" attribute to limit CSS to this component only -->
<style scoped>...  //这里写一些样式,如果加上scoped则表示当前样式仅限该组件使用,一般组件中的样式都是局部样式
</style>
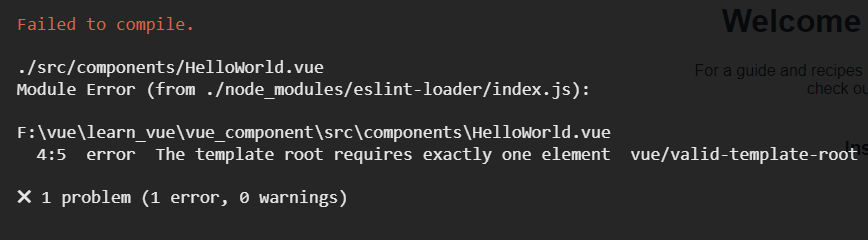
5.2 vue官方的helloworld组件写法:
<template><div class="hello">  //一般会在模板中定义一个大盒子,否则会报一个如图2所示的错误<h1>{{ msg }}</h1><p>For a guide and recipes on how to configure / customize this project,<br>check out the<a href="https://cli.vuejs.org" target="_blank" rel="noopener">vue-cli documentation</a>.</p><h3>Installed CLI Plugins</h3><ul><li><a href="https://github.com/vuejs/vue-cli/tree/dev/packages/%40vue/cli-plugin-babel" target="_blank" rel="noopener">babel</a></li><li><a href="https://github.com/vuejs/vue-cli/tree/dev/packages/%40vue/cli-plugin-eslint" target="_blank" rel="noopener">eslint</a></li></ul><h3>Essential Links</h3><ul><li><a href="https://vuejs.org" target="_blank" rel="noopener">Core Docs</a></li><li><a href="https://forum.vuejs.org" target="_blank" rel="noopener">Forum</a></li><li><a href="https://chat.vuejs.org" target="_blank" rel="noopener">Community Chat</a></li><li><a href="https://twitter.com/vuejs" target="_blank" rel="noopener">Twitter</a></li><li><a href="https://news.vuejs.org" target="_blank" rel="noopener">News</a></li></ul><h3>Ecosystem</h3><ul><li><a href="https://router.vuejs.org" target="_blank" rel="noopener">vue-router</a></li><li><a href="https://vuex.vuejs.org" target="_blank" rel="noopener">vuex</a></li><li><a href="https://github.com/vuejs/vue-devtools#vue-devtools" target="_blank" rel="noopener">vue-devtools</a></li><li><a href="https://vue-loader.vuejs.org" target="_blank" rel="noopener">vue-loader</a></li><li><a href="https://github.com/vuejs/awesome-vue" target="_blank" rel="noopener">awesome-vue</a></li></ul></div>
</template><script>
export default {name: 'HelloWorld',props: {  //从外部获取参数,组件之间传递参数msg: String}
}
</script><!-- Add "scoped" attribute to limit CSS to this component only -->
<style scoped>
h3 {margin: 40px 0 0;
}
ul {list-style-type: none;padding: 0;
}
li {display: inline-block;margin: 0 10px;
}
a {color: #42b983;
}
</style>
5.3 使用自定义组件
<div id="app">//写法1,其中的msg是传到到组件中的参数,msg必须与组件中定义的接收变量一致,等于号后面的部分至变量值<HelloWorld msg="this parma is from props"/>//写法2<HelloWorld msg="this parma is from props"></HelloWorld>
</div>
6 组件间通信
6.1 方式1-props/$emit
- 父组件A 向 子组件B 传递数据 通过
props的方法 - 子组件B 向 父组件A 发送数据 通过
emit
使用该方式传递参数时,官方提供了两种写法:
写法1:
为了简化代码,可以使用数组的写法
props: ['var1', 'var2', ...]
写法2:
如果你想指定每一个变量的类型,可以使用对象的写法
props: {var1: String,var2: Number,var3: Boolean,var4: Array,var5: Object,var6: Function
}
prop的特性(单向数据流)
所有的 prop 都使得其父子 prop 之间形成了一个单向下行绑定:父级 prop 的更新会向下流动到子组件中,但是反过来则不行。这样会防止从子组件意外变更父级组件的状态,从而导致你的应用的数据流向难以理解。
额外的,每次父级组件发生变更时,子组件中所有的 prop 都将会刷新为最新的值。这意味着你不应该在一个子组件内部改变 prop。如果你这样做了,Vue 会在浏览器的控制台中发出警告。
props 只可以从上一级组件传递到下一级组件,也就是父子组件,即这就是单向数据流
props是只读,不可以被修改,所有被修改都会失效和被警告
注意:
注意在 JavaScript 中对象和数组是通过引用传入的,所以对于一个数组或对象类型的 prop 来说,在子组件中改变变更这个对象或数组本身将会影响到父组件的状态。
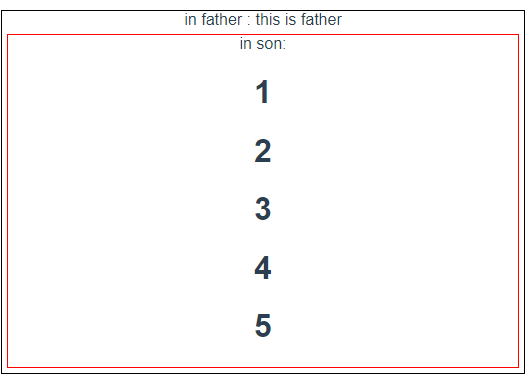
示例1(父组件向子组件传递数据)
father.vue:
<template><div class="father">in father : {{msg}}<son :msg="[1,2,3,4,5]"></son></div>
</template><script>
import son from "./son.vue"export default {name: 'father',components: {son},props: {msg: String}
}
</script><!-- Add "scoped" attribute to limit CSS to this component only -->
<style scoped>
.father {border: #000000 1px solid;
}
</style>
son.vue:
<template><div class="son">in son:<h1 v-for="(item,index) in msg" :key="index">{{item}}</h1></div>
</template><script>export default {name: 'son',props: {msg: Array}}
</script><!-- Add "scoped" attribute to limit CSS to this component only -->
<style scoped>
.son {border: red 1px solid;margin: 5px;;
}
</style>
app.vue:
<template><div id="app"><fater msg="this is father"/></div>
</template><script>
import fater from './components/fater.vue'export default {name: 'app',components: {fater}
}
</script><style>
#app {font-family: 'Avenir', Helvetica, Arial, sans-serif;-webkit-font-smoothing: antialiased;-moz-osx-font-smoothing: grayscale;text-align: center;color: #2c3e50;margin-top: 60px;
}
</style>
main.js:
import Vue from 'vue'
import App from './App.vue'Vue.config.productionTip = falsenew Vue({el: "#app",render: h => h(App),
});
效果:
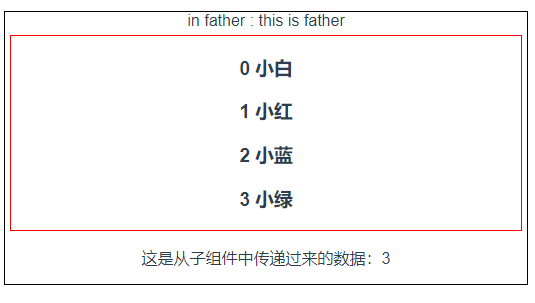
示例2(子组件向父组件传递参数)
father.vue:
<template><div class="father">in father : {{msg}}<son :msg="sonList" @onEmitIndex="onEmitIndex"></son><p>{{currentIndex}}</p></div>
</template><script>import son from "./son.vue"export default {name: 'father',components: {son},props: {msg: String},data() {return {currentIndex: -1,sonList: ['小白', '小红', '小蓝', '小绿']}},methods: {onEmitIndex(idx) {this.currentIndex = idx}}}
</script><!-- Add "scoped" attribute to limit CSS to this component only -->
<style scoped>.father {border: #000000 1px solid;}
</style>
son.vue:
<template><div class="son"><h3 v-for="(item, index) in msg" :key="index" @click="emitIndex(index)">{{index}}  {{item}}</h3></div>
</template><script>export default {name: 'son',props: {msg: Array},methods: {emitIndex(index) {this.$emit('onEmitIndex', index)}}}
</script><!-- Add "scoped" attribute to limit CSS to this component only -->
<style scoped>.son {border: red 1px solid;margin: 5px;}
</style>
其他文件与上面的例子保持一致,效果如下:
当你点击子组件中的某一行时,会子组件中的行索引打印在父组件中。
6.2 vuex
6.2.0 搭建vuex环境:
可以直接在命令行输入以下命令安装插件
$ npm i vuex
也可以在项目的package.json文件中的dependencies属性下添加一行记录,然后执行npm install更新项目的依赖
{"name": "default","version": "0.1.0","private": true,"scripts": {"serve": "vue-cli-service serve","build": "vue-cli-service build"},"dependencies": {"core-js": "^2.6.5","vue": "^2.6.10","vuex": "^3.1.0" //这是添加的依赖},"devDependencies": {"@vue/cli-plugin-babel": "^3.8.0","@vue/cli-service": "^3.8.0","vue-template-compiler": "^2.6.10"}
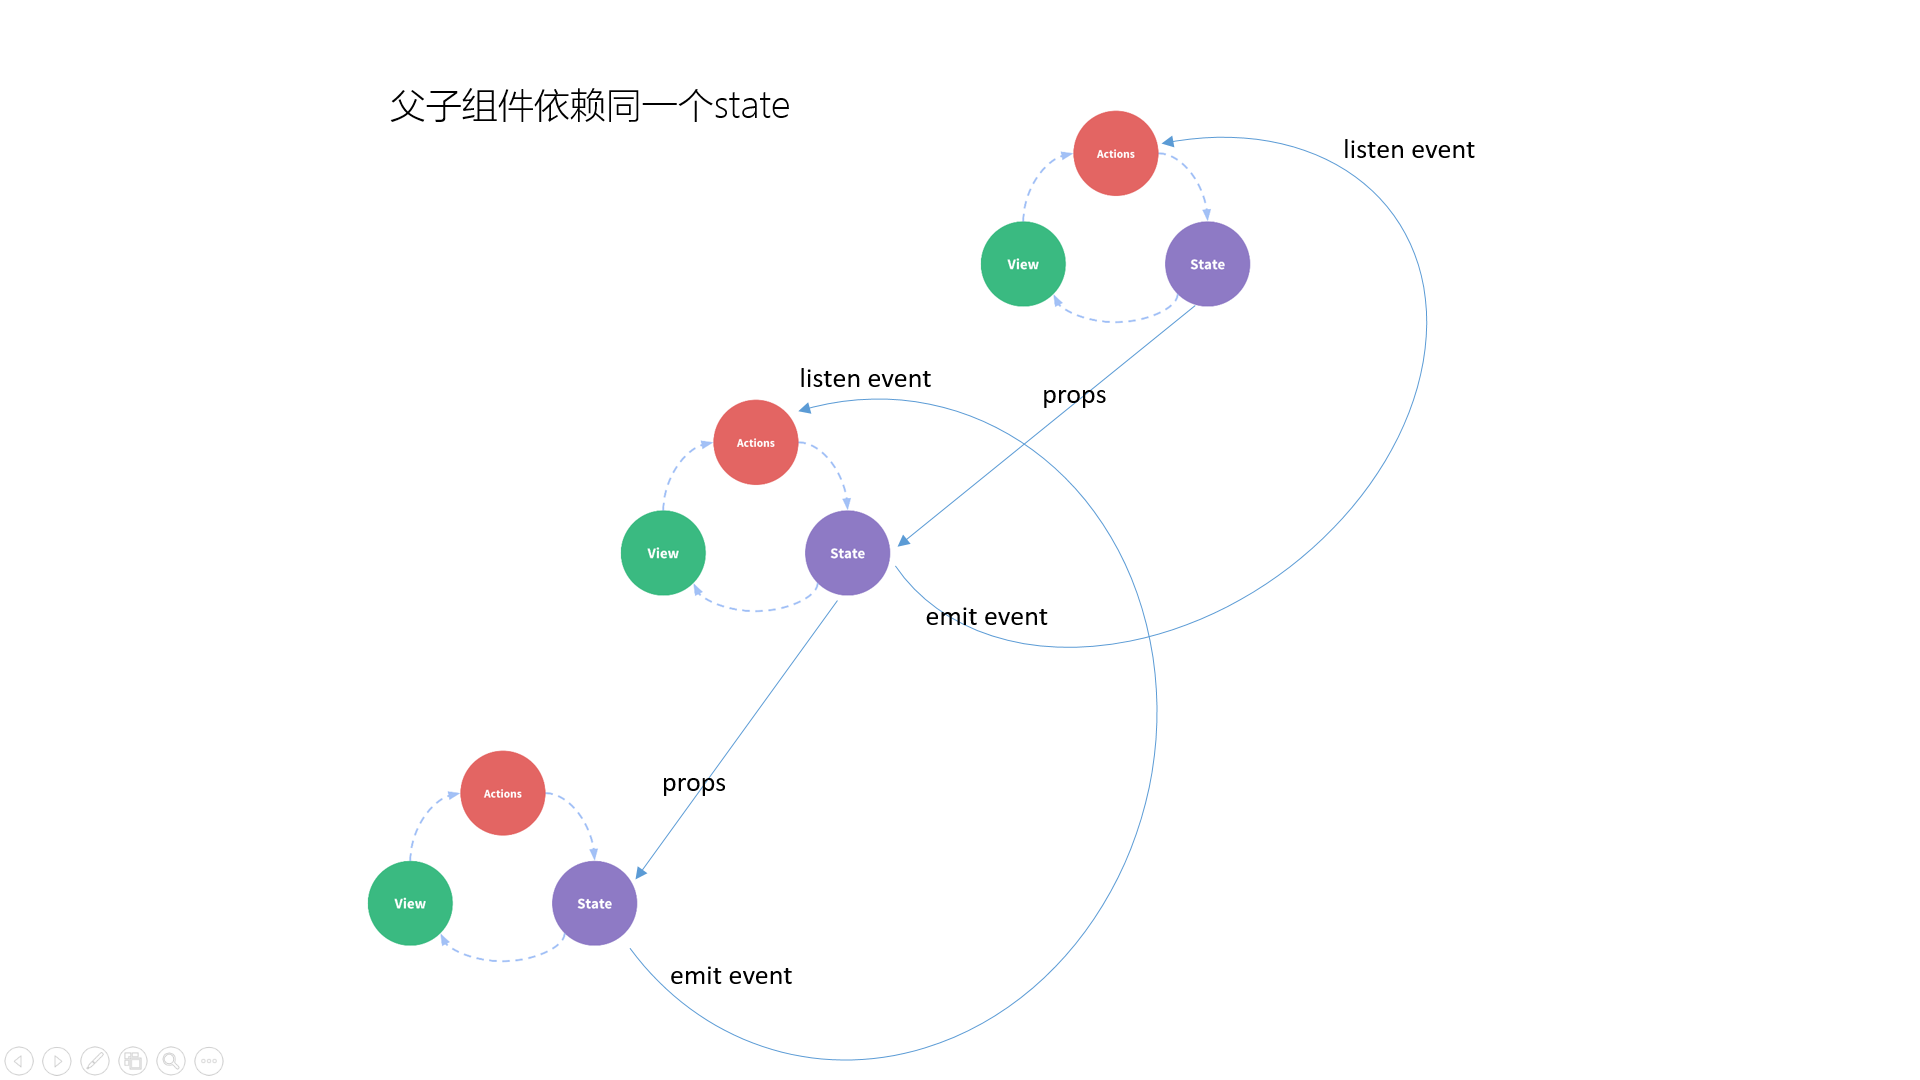
}6.2.1 如果不用vuex
如果不用vuex,那么多个组件之间如果需要公用某一个变量,我们称之为state,那么使用props/emit是如何通信的呢
-
父子组件之间通信
-
兄弟组件之间通信
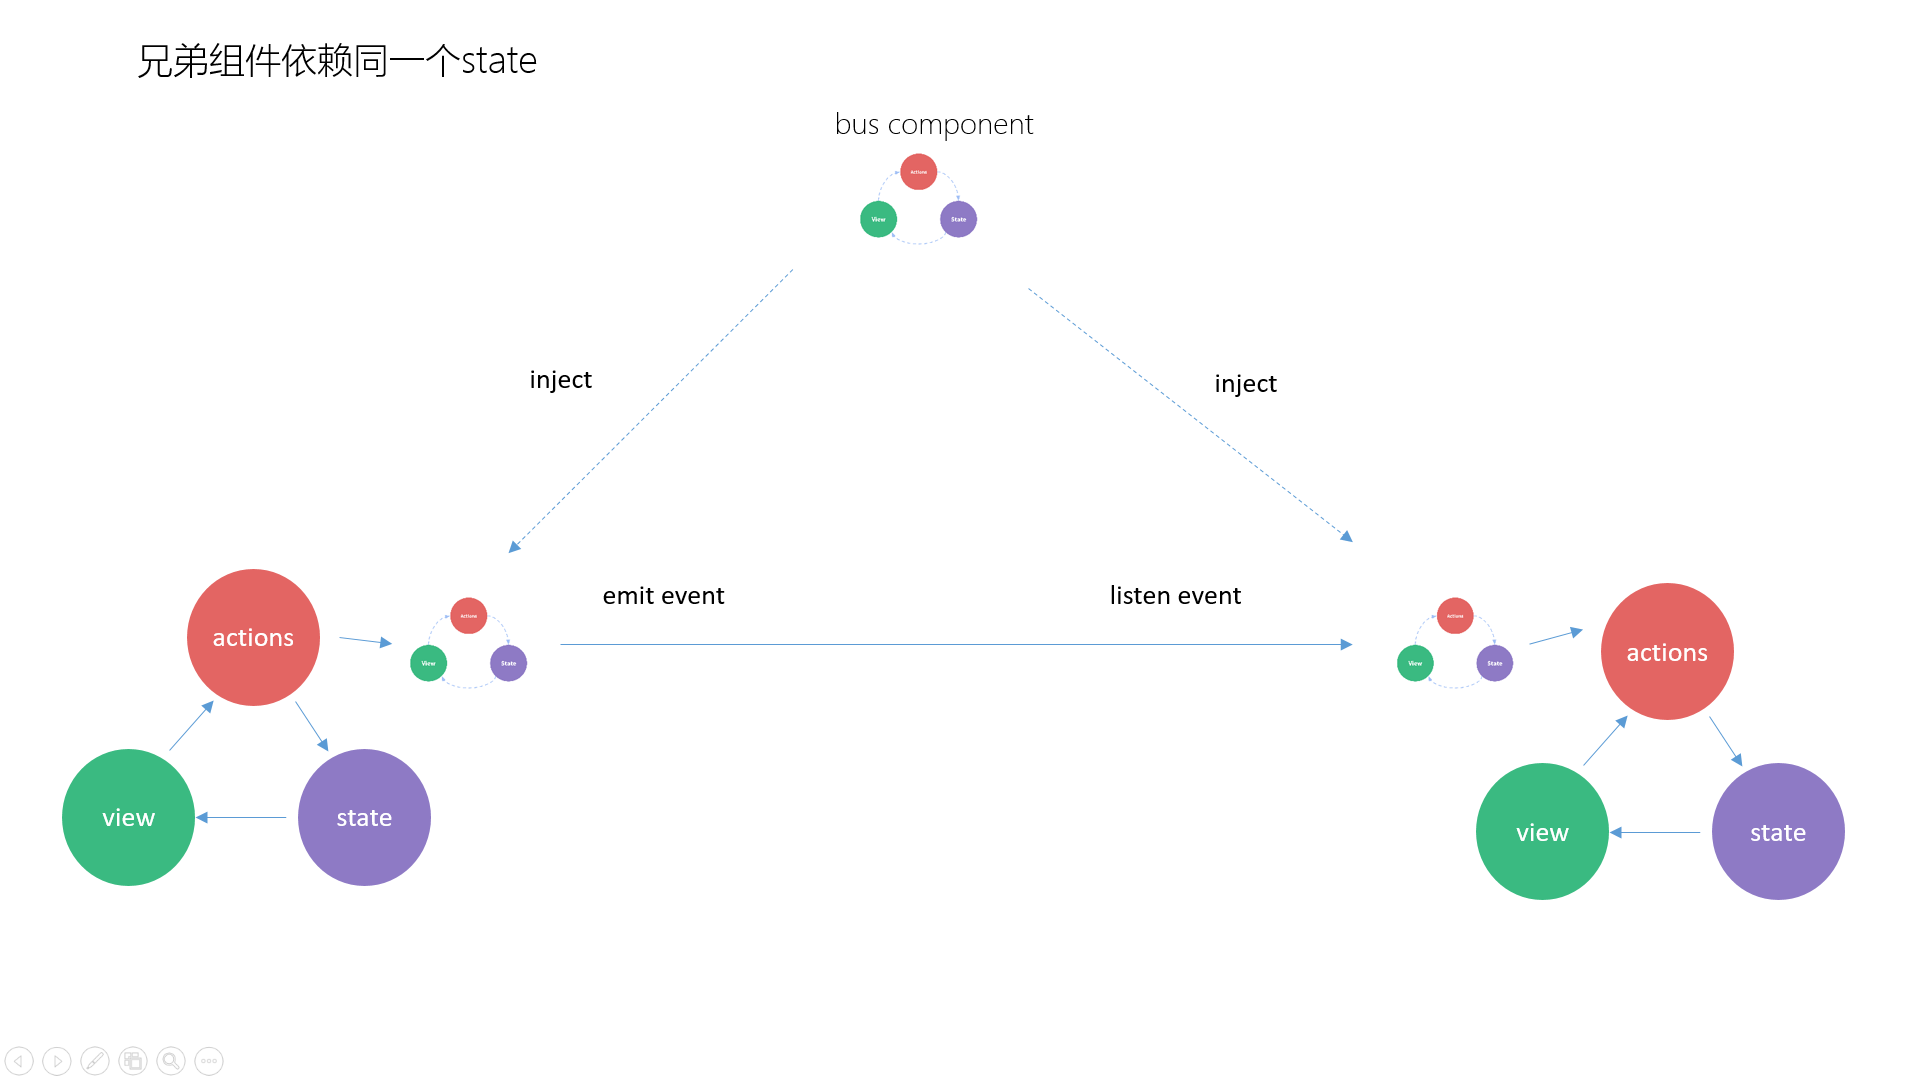
-
vuex通信
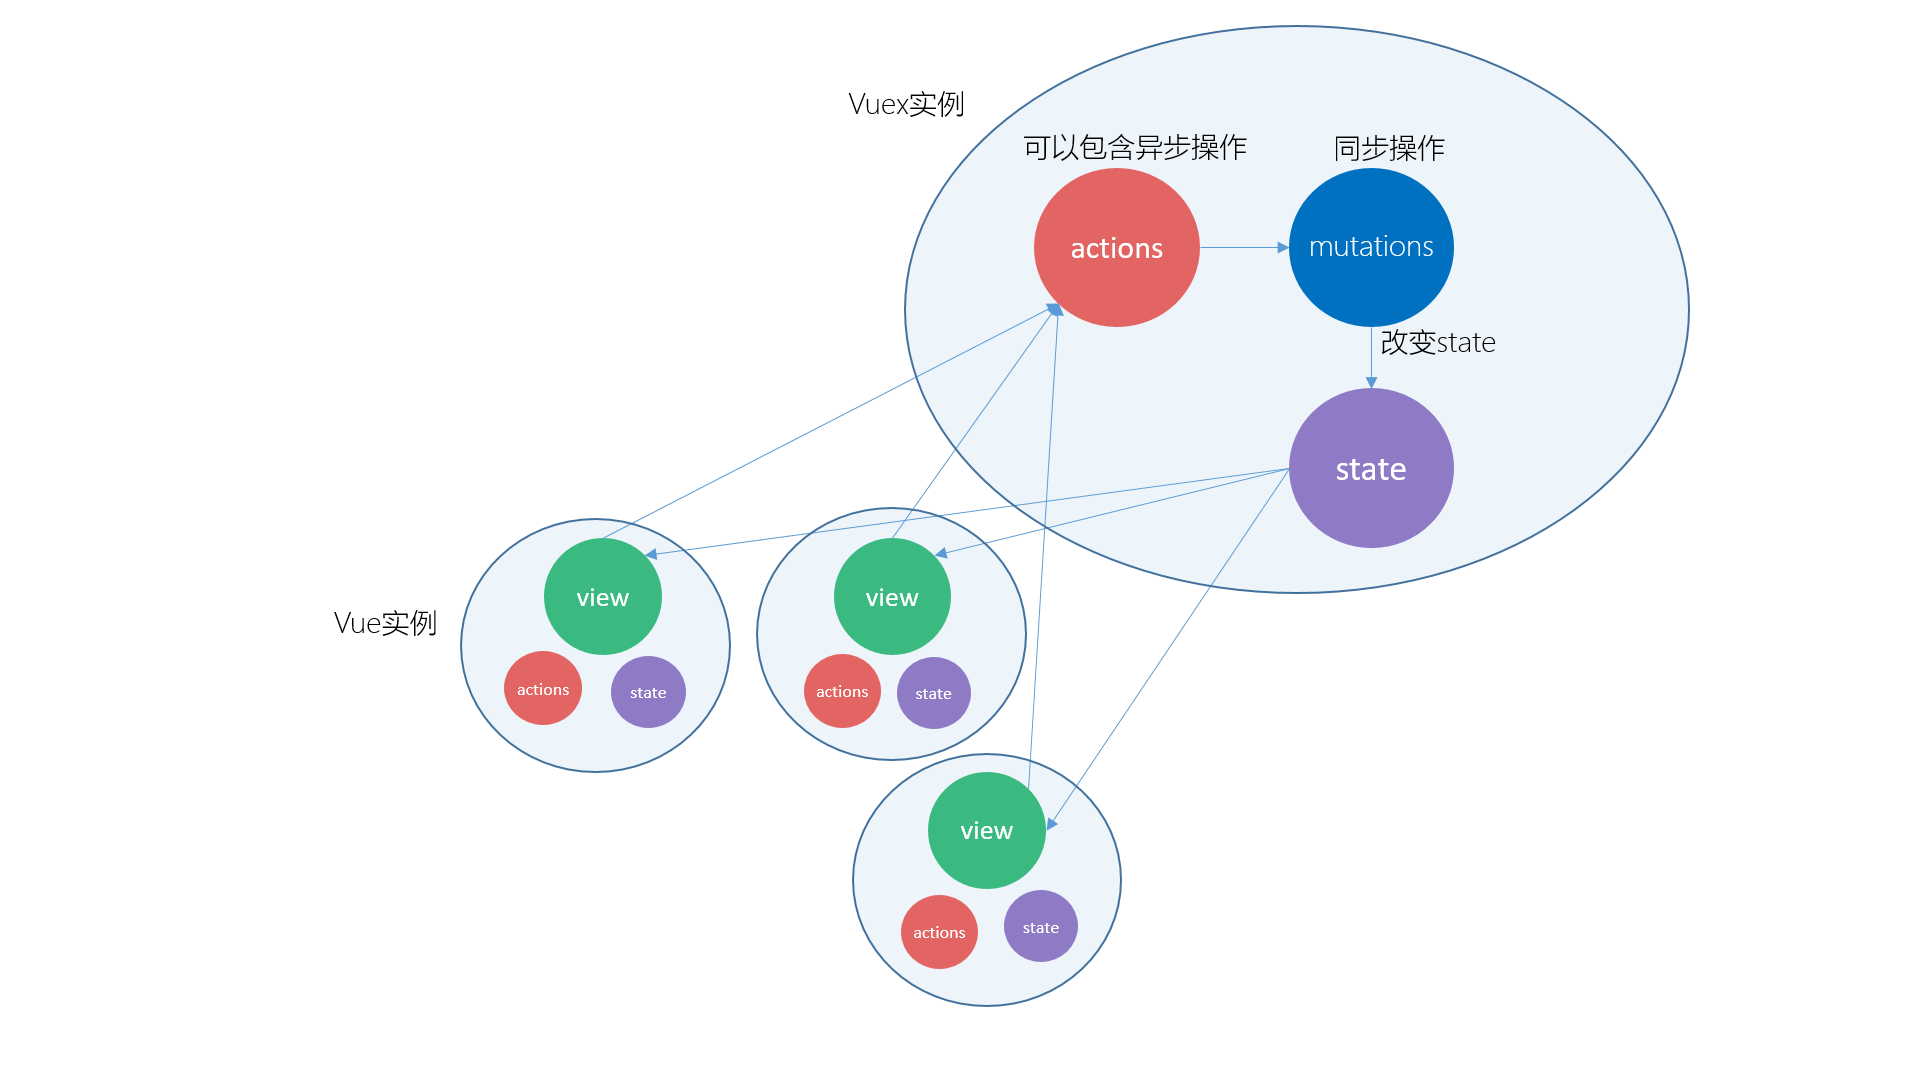
6.2.2 示例
目录结构:
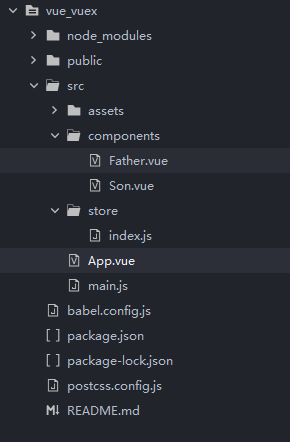
App.vue:
import Vue from 'vue'
import App from './App.vue'
import store from './store'Vue.config.productionTip = falsenew Vue({el: '#app',store,render: h => h(App),
})
main.js:
import Vue from 'vue'
import App from './App.vue'
import store from './store'Vue.config.productionTip = falsenew Vue({el: '#app',store,render: h => h(App),
})
Father.vue:
<template><div id="app"><Father></Father><Son></Son><h1> IN FATHER</h1><h1>num = {{$store.state.num}}</h1><br /><button @click="selfadd">加1</button><br /><button @click="selfsub">减1</button><br /></div>
</template><script>import Father from './components/Father.vue'import Son from './components/Son.vue'export default {name: 'app',components: {Father,Son},methods: {selfadd() {this.$store.dispatch('selfadd', 1)},selfsub() {this.$store.dispatch('selfsub', 1)}}}
</script><style>#app {font-family: 'Avenir', Helvetica, Arial, sans-serif;-webkit-font-smoothing: antialiased;-moz-osx-font-smoothing: grayscale;text-align: center;color: #2c3e50;margin-top: 60px;padding: 5px;border: #002B36 1px solid;}
</style>
Son.vue:
<template><div class="son"><h1> IN SON</h1><h1>num = {{$store.state.num}}</h1><br /></div>
</template><script>export default {name: 'Son'}
</script><!-- Add "scoped" attribute to limit CSS to this component only -->
<style scoped>.son {border: #0000FF 1px solid;margin: 5px;}
</style>
store/index.js:
//这里存放vuex的核心代码
import Vuex from 'vuex'
import Vue from 'vue'Vue.use(Vuex)const actions = {selfadd(context, value) {console.log("actions is run", context, value)context.commit('SELFADD', value)},selfsub(context, value) {console.log("actions is run", context, value)context.commit('SELFSUB', value)}
}const mutations = {SELFADD(state, value) {console.log("mutaions SELFADD is run", state, value)state.num += value},SELFSUB(state, value) {console.log("mutaions SELFSUB is run", state, value)state.num -= value}
}const state = {num: 0
}export default new Vuex.Store({actions,mutations,state
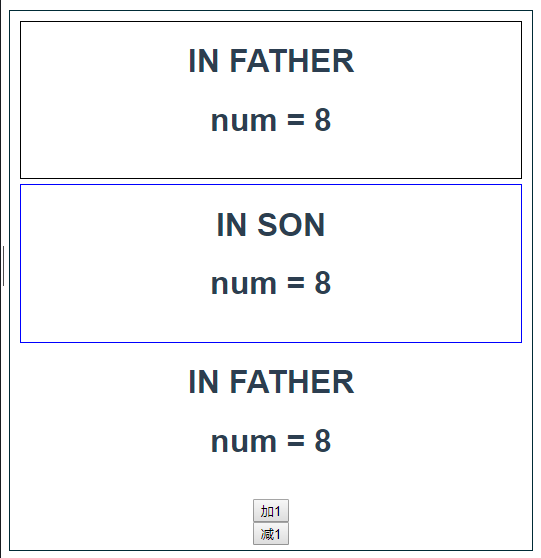
})
效果:在App组件中操作vuex管理的变量num,则所有使用到该变量的地方都发生了变化
7 路由
通过路由请求后端接口数据,所有这里使用axios来作为ajax工具。
7.1 安装vue-router
-
方法1
$ npm install vue-router //安装vue路由 $ npm install axios //安装axios -
方法2
直接在项目的
package.json文件中添加对应的依赖以及版本号{"name": "default","version": "0.1.0","private": true,"scripts": {"serve": "vue-cli-service serve","build": "vue-cli-service build"},"dependencies": {"axios": "^0.24.0", //用来异步请求接口"core-js": "^2.6.5","vue": "^2.6.10","vue-resource": "^1.5.3","vue-router": "^3.5.3" //添加版本号以及依赖},"devDependencies": {"@vue/cli-plugin-babel": "^3.8.0","@vue/cli-service": "^3.8.0","vue-template-compiler": "^2.6.10"} }
7.2 示例
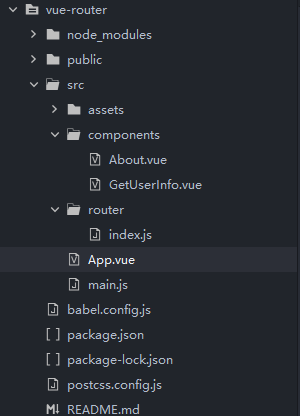
目录结构:
About.vue:
<template><div class="about"><h1>IN About</h1><br /></div>
</template><script>export default {name: 'About',}
</script><!-- Add "scoped" attribute to limit CSS to this component only -->
<style scoped>.about {border: #002B36 1px solid;margin: 5PX;;}
</style>
GetUserInfo.vue:
<template><div class="userinfo"><h1>IN GetUserInfo</h1><br />请求参数:{{this.$route.query.name}}   //vue-router插件会给所有组件身上安装一个$route属性,该属性下有一个query用来存放query型参数<h1> userinfo :<p v-if="hasInfo">{{ userinfo }}</p><p v-else>null</p></h1>{{name}}</div>
</template><script>import axios from "axios"export default {name: 'GetUserInfo',data() {return {userinfo: {},hasInfo: false}},mounted() {axios.get('http://www.zhgblog.com:84/getUserInfo', {params: {name: this.$route.query.name}}).then(response => {this.hasInfo = truethis.userinfo = response.data.dataconsole.log(response.data)},error => {this.userinfo = error.messageconsole.log('error :' + error.message)})}}
</script><!-- Add "scoped" attribute to limit CSS to this component only -->
<style scoped>.userinfo {border: #000000 1px solid;margin: 5PX;;}
</style>
main.js:
import Vue from 'vue'
import App from './App.vue'
import router from './router/index.js'Vue.config.productionTip = falsenew Vue({el: "#app",router,render: h => h(App)
})
App.vue:
<template><div id="app">IN APP<br /><router-link to="/about" class='btn' active-class="active">about</router-link><br /><router-link to="/get-user-info?name=vuetest" class='btn' active-class="active">getUserInfo</router-link><router-view></router-view></div>
</template><script>import GetUserInfo from './components/GetUserInfo.vue'import About from './components/About.vue'export default {name: 'app',components: {GetUserInfo}}
</script><style>#app {font-family: 'Avenir', Helvetica, Arial, sans-serif;-webkit-font-smoothing: antialiased;-moz-osx-font-smoothing: grayscale;text-align: center;color: #2c3e50;margin-top: 60px;border: #0000FF 2px solid;}.btn {background-color: #F06431;display: block;color: #ffffff;width: 80px;height: 20px;padding: 5px;margin: 10px;border: #0000FF 2px solid;}.active {background-color: #002B36;}
</style>
router/index.js定义路由:
import Vue from "vue"
import VueRouter from "vue-router"
import About from '../components/About.vue'
import GetUserInfo from '../components/GetUserInfo.vue'Vue.use(VueRouter)export default new VueRouter({routes: [{path: '/about',  //路由路劲component: About   //渲染的组件},{path: '/get-user-info',component: GetUserInfo}]
})
效果:
-
默认情况下,此时鼠标没有点任何按钮,且从地址栏可以看出,
vue-router已经开始工作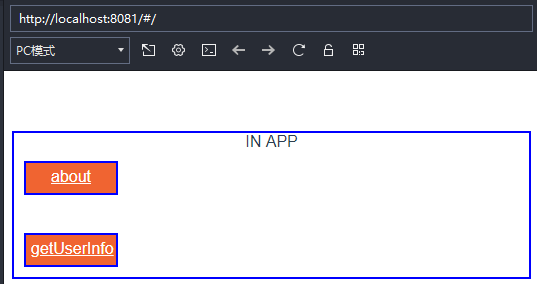
-
此时点击
about按钮,此组件只是做一个跳转展示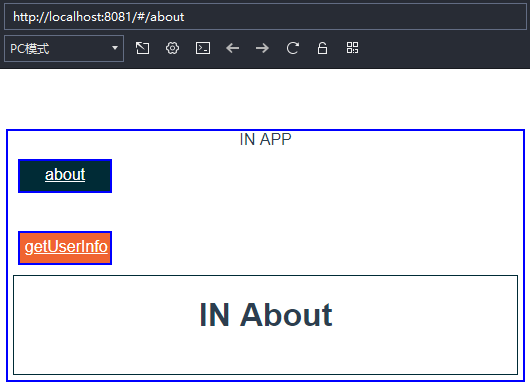
-
此时点击
getUserInfo按钮,该组件中通过axios调用了用php写的接口,通过get请求回去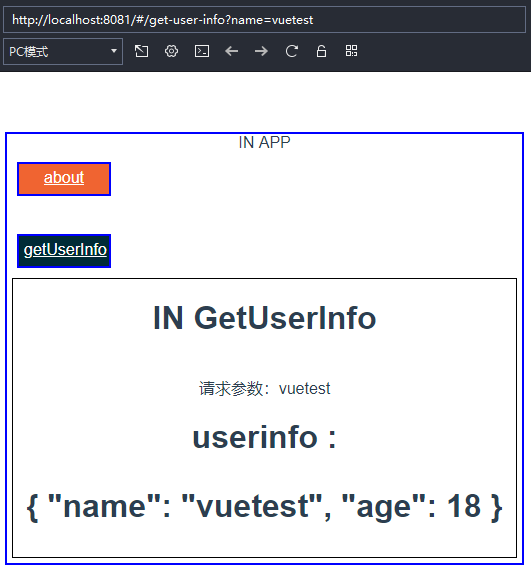
postman请求结果:
[外链图片转存失败,源站可能有防盗链机制,建议将图片保存下来直接上传(img-yAaXOPZs-1641734879400)(https://jums.club/images/article2/Screenshot_11.png)]
Reference
- Vue开发者工具: Vue.js devtools
- Vue中import用法
- 官方文档
- Vue组件间通信的6种方式
- Axios 各种请求方式传递参数格式
写在最后
欢迎大家关注鄙人的公众号【麦田里的守望者zhg】,让我们一起成长,谢谢。