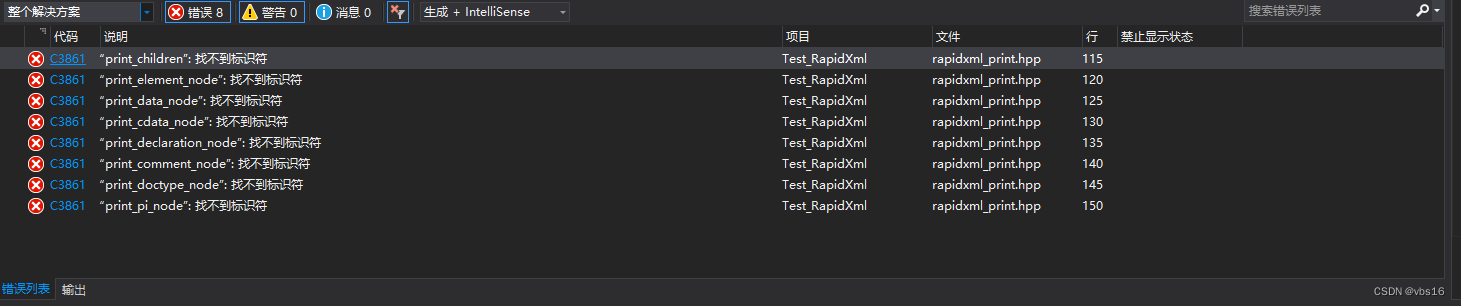
ibatis 历史
Eight years ago in 2002, I created the iBATIS Data Mapper and introduced SQL Mapping as an approach to persistence layer development. Shortly thereafter, I donated the iBATIS name and code to the Apache Software Foundation. The ASF has been the home of iBATIS for the past six years.
A lot changes in six years. By 2010 we’ve seen a great deal of innovation and change in the areas of development methodology, source control, social networking and open-source infrastructure.
……
Therefore, the entire core development team of iBATIS has decided to continue the development of the framework at a new home and with a new name(mybatis).
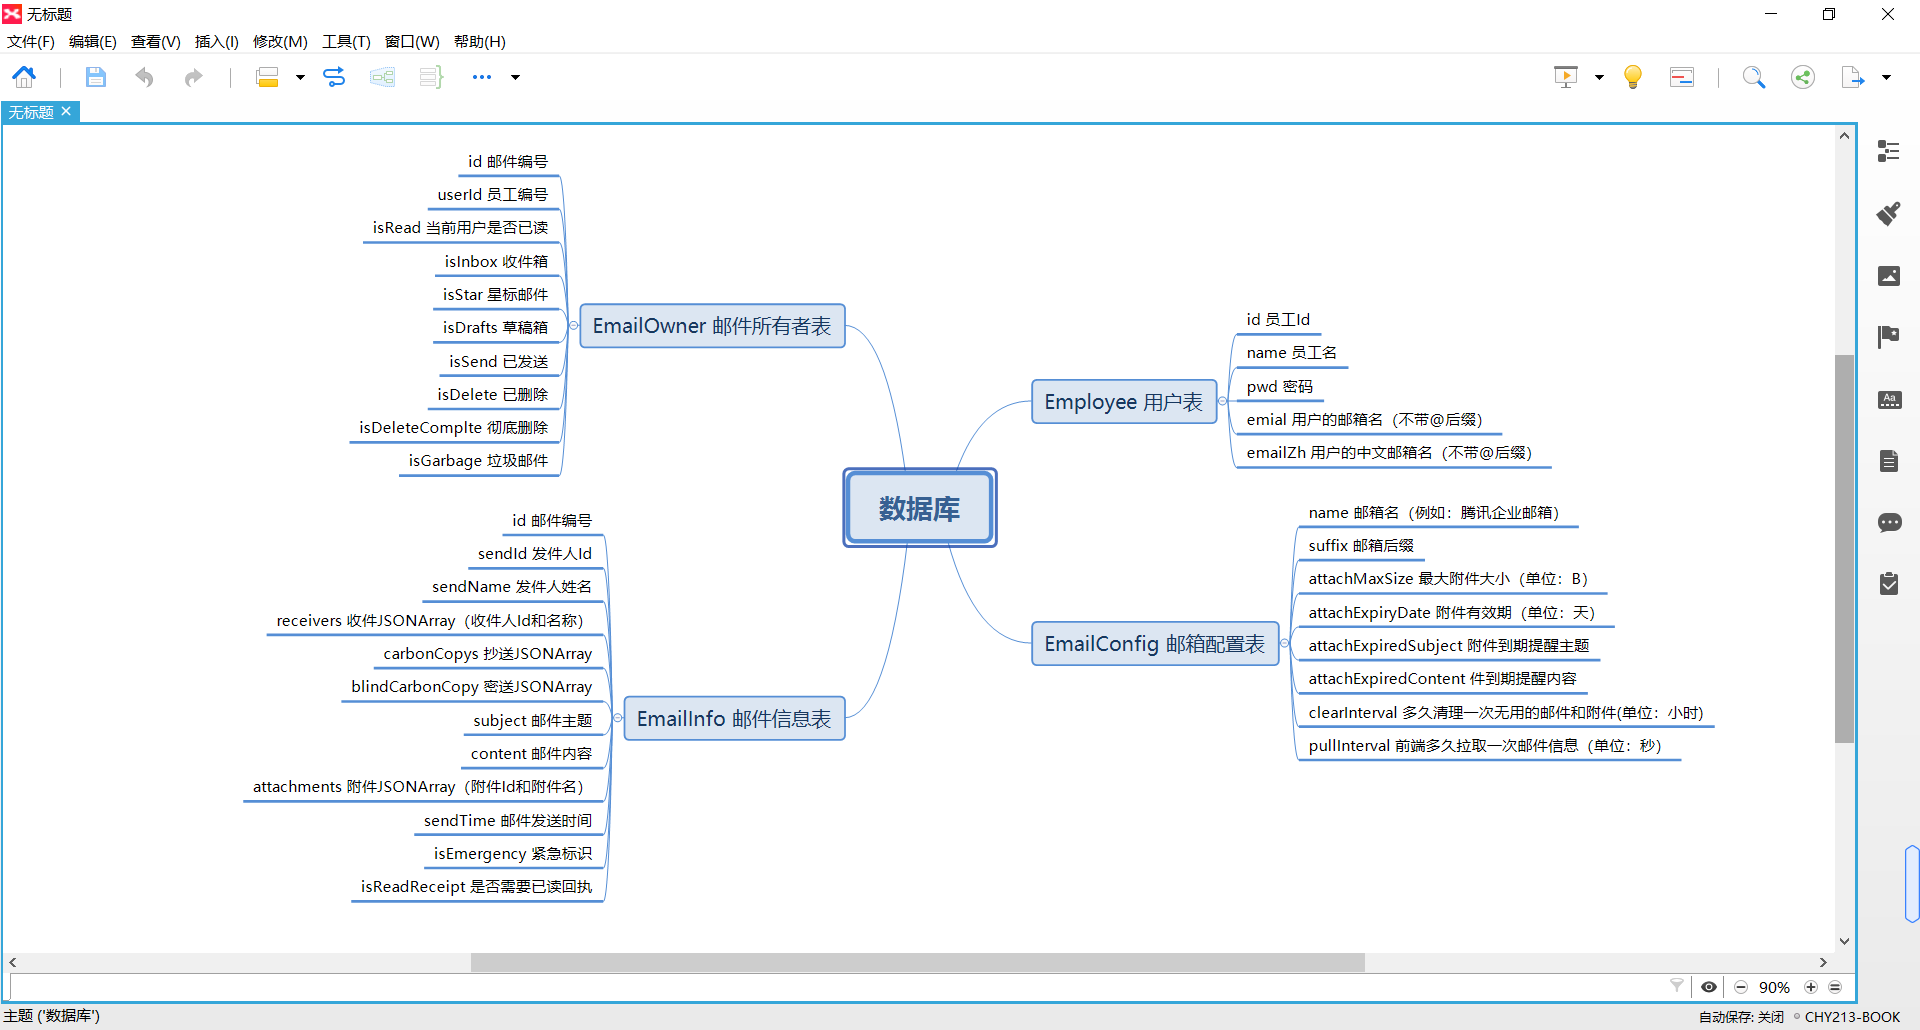
ibatis Demo
一、单独使用ibatis
ibatis全部只有一个几百k的jar:ibatis-sqlmap-2.3.4.726.jar
还需要数据库驱动,这里用MySQL:mysql-connector-java-5.1.46.jar
以下代码基于两个思路:
1、把平时直接写在dao层的sql抽离,写在配置文件中
2、把pojo对象的属性值拼接到sql,执行,把结果封装到pojo对象
pojo实体类:
public class Student {private int id;private String name;private int age;public int getId() {return id;}public void setId(int id) {this.id = id;}public String getName() {return name;}public void setName(String name) {this.name = name;}public int getAge() {return age;}public void setAge(int age) {this.age = age;}@Overridepublic String toString() {return "Student [id=" + id + ", name=" + name + ", age=" + age + "]";}
}实体类的sqlMap配置文件Student.xml:
<?xml version="1.0" encoding="UTF-8" ?>
<!DOCTYPE sqlMap PUBLIC "-//ibatis.apache.org//DTD SQL Map 2.0//EN""http://ibatis.apache.org/dtd/sql-map-2.dtd"><sqlMap><!-- 通过typeAlias使得我们在下面使用Student实体类的时候不需要写包名 --><typeAlias alias="Student" type="com.lwr.ibatis.bean.Student" /><!-- 这样以后改了sql,就不需要去改java代码了 --><!-- id表示select里的sql语句,resultClass表示返回结果的类型 --><select id="selectAllStudent" resultClass="Student">select * fromstudent</select><!-- parameterClass表示参数的内容 --><!-- #表示这是一个外部调用的需要传进的参数,可以理解为占位符 --><select id="selectStudentById" parameterClass="int" resultClass="Student">select * from student where id=#id#</select><!-- 注意这里的resultClass类型,使用Student类型取决于queryForList还是queryForObject --><select id="selectStudentByName" parameterClass="String"resultClass="Student">select name,age,id from student where name like'%$name$%'</select><insert id="addStudent" parameterClass="Student">insert intostudent(name,age) values(#name#,#age#);<selectKey resultClass="int" keyProperty="id">SELECT LAST_INSERT_ID() AS VALUE<!-- 这里需要说明一下不同的数据库主键的生成,对各自的数据库有不同的方式: --><!-- mysql:SELECT LAST_INSERT_ID() AS VALUE --><!-- mssql:select @@IDENTITY as value --><!-- oracle:SELECT STOCKIDSEQUENCE.NEXTVAL AS VALUE FROM DUAL --><!-- 还有一点需要注意的是不同的数据库生产商生成主键的方式不一样,有些是预先生成 (pre-generate)主键的,如Oracle和PostgreSQL。 有些是事后生成(post-generate)主键的,如MySQL和SQL Server 所以如果是Oracle数据库,则需要将selectKey写在insert之前 --></selectKey></insert><delete id="deleteStudentById" parameterClass="int"><!-- #id#里的id可以随意取,但是上面的insert则会有影响,因为上面的name会从Student里的属性里去查找 --><!-- 我们也可以这样理解,如果有#占位符,则ibatis会调用parameterClass里的属性去赋值 -->delete from student where id=#id#</delete><update id="updateStudent" parameterClass="Student">update student setname=#name#,age=#age# where id=#id#</update></sqlMap>ibatis配置文件sqlMapConfig.xml:
<?xml version="1.0" encoding="UTF-8"?>
<!DOCTYPE sqlMapConfig PUBLIC "-//ibatis.apache.org//DTD SQL Map Config 2.0//EN""http://ibatis.apache.org/dtd/sql-map-config-2.dtd"><sqlMapConfig><!-- 引用JDBC属性的配置文件,SqlMap.properties自己写 --><properties resource="SqlMap.properties" /><!-- 使用JDBC的事务管理 --><transactionManager type="JDBC"><!-- 数据源 --><dataSource type="SIMPLE"><property name="JDBC.Driver" value="${driver}" /><property name="JDBC.ConnectionURL" value="${url}" /><property name="JDBC.Username" value="${username}" /><property name="JDBC.Password" value="${password}" /></dataSource></transactionManager><!-- 这里可以写多个实体的映射文件 --><sqlMap resource="com/lwr/ibatis/sqlmap/Student.xml" /></sqlMapConfig>
dao实现类,通过ibatis执行sql:
public class StudentDaoImpl {private static SqlMapClient sqlMapClient = null;// 读取配置文件SqlMapConfig.xml,解读Student.xmlstatic {try {Reader reader = Resources.getResourceAsReader("SqlMapConfig.xml");sqlMapClient = SqlMapClientBuilder.buildSqlMapClient(reader);reader.close();} catch (IOException e) {e.printStackTrace();}}public List<Student> selectAllStudent() {List<Student> students = null;try {/** selectAllStudent是Student.xml配置中的id*/students = sqlMapClient.queryForList("selectAllStudent");} catch (SQLException e) {e.printStackTrace();}return students;}public Student selectStudentById(int id) {Student student = null;try {/** Student.xml中parameterClass="int",也就是需要一个int参数* Student.xml中resultClass="Student",也就是查询结果封装到Student类*/student = (Student) sqlMapClient.queryForObject("selectStudentById", id);} catch (SQLException e) {e.printStackTrace();}return student;}public boolean updateStudent(Student student) {boolean flag = false;Object object = false;try {/** student对象作为参数,会对应Student.xml中配置的参数,通过getter取值*/object = sqlMapClient.update("updateStudent", student);System.out.println("更新学生信息的返回值:" + object + ",返回影响的行数");} catch (SQLException e) {e.printStackTrace();}if (object != null) {flag = true;}return flag;}
}
二、spring整合ibatis
由于spring-orm-4版本已经不再集成ibatis,改为使用mybatis-spring的独立orm映射包。
所以,demo项目使用spring3整合ibatis。
概要:整合之后的不同之处在于,ibatis的bean生成和事务管理交由spring容器处理。ibatis的配置文件中的数据源给到spring来注入。
项目结构:

maven导入的包:

web.xml:略
springmvc-servlet.xml:略
jdbc.properties:略.
applicationContext.xml:
<?xml version="1.0" encoding="UTF-8" ?>
<beans xmlns="http://www.springframework.org/schema/beans"xmlns:xsi="http://www.w3.org/2001/XMLSchema-instance"xmlns:context="http://www.springframework.org/schema/context"xmlns:p="http://www.springframework.org/schema/p"xmlns:aop="http://www.springframework.org/schema/aop"xmlns:tx="http://www.springframework.org/schema/tx"xsi:schemaLocation="http://www.springframework.org/schema/beans http://www.springframework.org/schema/beans/spring-beans-4.3.xsdhttp://www.springframework.org/schema/context http://www.springframework.org/schema/context/spring-context-4.3.xsd http://www.springframework.org/schema/aop http://www.springframework.org/schema/aop/spring-aop-4.3.xsd http://www.springframework.org/schema/tx http://www.springframework.org/schema/tx/spring-tx-4.3.xsd"><!-- 启用注解 --><context:annotation-config /><!-- 注解扫描包路径 --><context:component-scan base-package="com.lwr.ibatis"><context:exclude-filter type="annotation" expression="org.springframework.stereotype.Controller" /></context:component-scan><!-- 加载配置文件 --><context:property-placeholder location="classpath:jdbc.properties" /><!-- 数据源 dataSource --><bean id="dataSource" class="org.springframework.jdbc.datasource.DriverManagerDataSource"><property name="driverClassName" value="${jdbc.driver}"/><property name="url" value="${jdbc.url}" /><property name="username" value="${jdbc.username}"/><property name="password" value="${jdbc.password}"/></bean><!-- spring事务管理器 --><bean id="transactionManager" class="org.springframework.jdbc.datasource.DataSourceTransactionManager"><property name="dataSource" ref="dataSource"/></bean><!-- 在公共类或公共方法上加入@Transactional即可实现事务 --><tx:annotation-driven transaction-manager="transactionManager" /><!-- 由SqlMapClientFactoryBean工厂生成SqlMapClient对象 --><bean id="sqlMapClient"class="org.springframework.orm.ibatis.SqlMapClientFactoryBean"><property name="dataSource" ref="dataSource" /><property name="configLocation" value="classpath:SqlMapConfig.xml" /></bean><bean id="jdbcTemplate" class="org.springframework.jdbc.core.JdbcTemplate"><property name="dataSource" ref="dataSource"/></bean></beans>SqlMapConfig.xml:
<?xml version="1.0" encoding="UTF-8"?>
<!DOCTYPE sqlMapConfig PUBLIC "-//ibatis.apache.org//DTD SQL Map Config 2.0//EN""http://ibatis.apache.org/dtd/sql-map-config-2.dtd"><sqlMapConfig><!-- 数据源已交由spring注入,写在applicationContext.xml中 --><!-- 这里可以写多个实体的映射文件 --><sqlMap resource="com/lwr/ibatis/sqlmap/User.xml" />
</sqlMapConfig>User.xml:
<?xml version="1.0" encoding="UTF-8" ?>
<!DOCTYPE sqlMap PUBLIC "-//ibatis.apache.org//DTD SQL Map 2.0//EN""http://ibatis.apache.org/dtd/sql-map-2.dtd"><sqlMap><!-- 通过typeAlias使得我们在下面使用User实体类的时候不需要写包名 --><typeAlias alias="User" type="com.lwr.ibatis.bean.User" /><!-- 这样以后改了sql,就不需要去改java代码了 --><!-- id表示select里的sql语句,resultClass表示返回结果的类型 --><select id="selectAllUser" resultClass="User">select * from user</select><!-- parameterClass表示参数的内容 --><!-- #表示这是一个外部调用的需要传进的参数,可以理解为占位符 --><select id="selectUserById" parameterClass="int" resultClass="User">select * from user where id=#id#</select><select id="selectUserByName" parameterClass="String"resultClass="User">select name,age,id from user where name like '%$name$%'</select><insert id="addUser" parameterClass="User">insert into user(name,age) values(#name#,#age#);<selectKey resultClass="int" keyProperty="id">SELECT LAST_INSERT_ID() AS VALUE<!-- 这里需要说明一下不同的数据库主键的生成,对各自的数据库有不同的方式: --><!-- mysql:SELECT LAST_INSERT_ID() AS VALUE --><!-- mssql:select @@IDENTITY as value --><!-- oracle:SELECT STOCKIDSEQUENCE.NEXTVAL AS VALUE FROM DUAL --><!-- 还有一点需要注意的是不同的数据库生产商生成主键的方式不一样,有些是预先生成 (pre-generate)主键的,如Oracle和PostgreSQL。 有些是事后生成(post-generate)主键的,如MySQL和SQL Server 所以如果是Oracle数据库,则需要将selectKey写在insert之前 --></selectKey></insert><delete id="deleteUserById" parameterClass="int"><!-- #id#里的id可以随意取,但是上面的insert则会有影响,因为上面的name会从User里的属性里去查找 --><!-- 我们也可以这样理解,如果有#占位符,则ibatis会调用parameterClass里的属性去赋值 -->delete from user where id=#id#</delete><update id="updateUser">update user set name=#name# where name=#name1# or name=#name2# </update></sqlMap>Dao实现类UserDaoImpl.java
package com.lwr.ibatis.dao.impl;import java.sql.SQLException;
import java.util.HashMap;
import java.util.List;
import java.util.Map;import org.springframework.beans.factory.annotation.Autowired;
import org.springframework.jdbc.core.JdbcTemplate;
import org.springframework.stereotype.Repository;
import org.springframework.transaction.annotation.Transactional;import com.ibatis.sqlmap.client.SqlMapClient;
import com.lwr.ibatis.bean.User;
import com.lwr.ibatis.dao.UserDao;@Transactional
@Repository("userDao")
public class UserDaoImpl implements UserDao {@Autowiredprivate SqlMapClient sqlMapClient;//@Autowired//private JdbcTemplate jdbcTemplate;public List<User> selectAllStudent() {List<User> list = null;try {list = sqlMapClient.queryForList("selectAllUser");} catch (SQLException e) {e.printStackTrace();}return list;}@Overridepublic String addUser(String name, int age) {try {User user = new User();user.setName(name);user.setAge(age);Object result = sqlMapClient.insert("addUser", user);return result.toString();} catch (SQLException e) {// TODO Auto-generated catch blocke.printStackTrace();}return null;}@Overridepublic String updateUser(String param1, String param2, String param3) {try {Map<String,String> map = new HashMap<String,String>();map.put("name", param1);map.put("name1", param2);map.put("name2", param3);Object result = sqlMapClient.update("updateUser", map);return result.toString();} catch (SQLException e) {e.printStackTrace();}return null;}@Overridepublic List<User> selecAllUser() {try {List list = sqlMapClient.queryForList("selectAllUser");return list;} catch (SQLException e) {e.printStackTrace();}return null;}
}
解读:
从上面代码可见:
1、spring整合ibatis,sqlMapClient对象由spring的bean工厂生成。
2、spring的事务管理器transactionManager配置了sqlMapClient的数据源dataSource,sqlMapClient对象的CUID操作的事务由spring管理。
3、sql语句、参数、返回结果配置在User.xml中,每个id都是一个statement。
ibatis 思想
ibatis是个“半自动化”的关系映射ORM框架。
它把写在dao层的sql语句全部放到一个sqlMap配置文件中,并给每条sql配置一个id,在执行sqlMapClient对象的增删查改时通过id找到对应sql。
其实每个id和sql会被解析成一个MappedStatement对象,Dao层的sqlMapClient方法是通过id查找对应MappedStatement对象来执行的。
在sqlMap配置文件中,parameterClass和resultClass是配置sql中的参数类型和查询结果类型。参数类型对应有个ParameterMap存储、查询结果类型对应有个ResultMap存储。
每次执行sql,拿到当前id的MappedStatement对象,拿到对应参数ParameterMap,拿到结果类型映射ResultMap;
通过MappedStatement的内容,执行connection的prepareStatement()方法;
然后通过PrepareStatement对象的参数设置方法(setString,setInt…),把ParameterMap内容按顺序设置;
执行完毕后,把执行结果resultSet按ResultMap内容封装到pojo对象(如果返回pojo)中并返回。