vs2017
rapidxml-1.13
1 RapidXml使用
1.1 创建xml
#include <iostream>
#include "rapidxml/rapidxml.hpp"
#include "rapidxml/rapidxml_utils.hpp"
#include "rapidxml/rapidxml_print.hpp"using namespace rapidxml;void crateXml()
{xml_document<> doc;xml_node<>* rot = doc.allocate_node(rapidxml::node_pi, doc.allocate_string("xml version='1.0' encoding='utf-8'"));doc.append_node(rot);xml_node<>* node = doc.allocate_node(node_element, "config", "information");xml_node<>* color = doc.allocate_node(node_element, "color", NULL);doc.append_node(node);node->append_node(color);color->append_node(doc.allocate_node(node_element, "red", "0.1"));color->append_node(doc.allocate_node(node_element, "green", "0.1"));color->append_node(doc.allocate_node(node_element, "blue", "0.1"));color->append_node(doc.allocate_node(node_element, "alpha", "1.0"));xml_node<>* size = doc.allocate_node(node_element, "size", NULL);size->append_node(doc.allocate_node(node_element, "x", "640"));size->append_node(doc.allocate_node(node_element, "y", "480"));node->append_node(size);xml_node<>* mode = doc.allocate_node(rapidxml::node_element, "mode", "screen mode");mode->append_attribute(doc.allocate_attribute("fullscreen", "false"));node->append_node(mode);std::string text;rapidxml::print(std::back_inserter(text), doc, 0);std::cout << text << std::endl;std::ofstream out("config.xml");out << doc;
}int main()
{crateXml();system("PAUSE");return EXIT_SUCCESS;
}
输出文件config.xml:
<?xml version='1.0' encoding='utf-8' ?>
<config><color><red>0.1</red><green>0.1</green><blue>0.1</blue><alpha>1.0</alpha></color><size><x>640</x><y>480</y></size><mode fullscreen="false">screen mode</mode>
</config>
1.2 创建xml2
void createXml2()
{xml_document<> doc; //是解析器char a[] = "<top>"//假设单独传, 就不能加上xml的头部信息,//否则会报错"<name>tangqiang</name>""<age>22</age>""</top>";char* p = a;doc.parse<0>(p);xml_node<>* node = doc.first_node();//去顶级结点std::cout << (node->name()) << std::endl;node = node->first_node();while (node) {std::cout << node->name() << ":" << node->value() << std::endl;//name() value()返回的字符串不会去掉首尾的空白字符node = node->next_sibling();}std::ofstream out("test.xml");//ofstream 默认时,假设文件存在则会覆盖原来的内容,不存在则会新建out << doc;//doc 这样输出时在目标文件里不会有xml 头信息---<?xml version='1.0' encoding='utf-8' >out.close();}
输出文件test.xml:
<top><name>tangqiang</name><age>22</age>
</top>
1.3 读取xml
void readXml()
{file<> fdoc("config.xml");std::cout << fdoc.data() << std::endl;xml_document<> doc;doc.parse<0>(fdoc.data());std::cout << doc.name() << std::endl;//! 获取根节点xml_node<>* root = doc.first_node();std::cout << root->name() << std::endl;//! 获取根节点第一个节点xml_node<>* node1 = root->first_node();std::cout << node1->name() << std::endl;xml_node<>* node11 = node1->first_node();std::cout << node11->name() << std::endl;std::cout << node11->value() << std::endl;//! 加入之后再次保存//须要说明的是rapidxml明显有一个bug//那就是append_node(doc.allocate_node(node_element,"h","0"));的时候并不考虑该对象是否存在!xml_node<>* size = root->first_node("size");size->append_node(doc.allocate_node(node_element, "w", "0"));size->append_node(doc.allocate_node(node_element, "h", "0"));std::string text;rapidxml::print(std::back_inserter(text), doc, 0);std::cout << text << std::endl;std::ofstream out("config.xml");out << doc;}
输出文件config.xml:
<config><color><red>0.1</red><green>0.1</green><blue>0.1</blue><alpha>1.0</alpha></color><size><x>640</x><y>480</y><w>0</w><h>0</h></size><mode fullscreen="false">screen mode</mode>
</config>
1.4 删除节点
void removeNode()
{file<> fdoc("config.xml");xml_document<> doc;doc.parse<0>(fdoc.data());std::string text;rapidxml::print(std::back_inserter(text), doc, 0);std::cout << text << std::endl;xml_node<>* root = doc.first_node();xml_node<>* sec = root->first_node();root->remove_node(sec); //移除根节点下的sec结点(包含该结点下全部结点)text = "删除一个节点\r\n";rapidxml::print(std::back_inserter(text), doc, 0);std::cout << text << std::endl;root->remove_all_nodes(); //移除根节点下全部结点text = "删除全部节点\r\n";rapidxml::print(std::back_inserter(text), doc, 0);std::cout << text << std::endl;std::ofstream out("test.xml");out << doc;}
输出文件test.xml:
<config><color><red>0.1</red><green>0.1</green><blue>0.1</blue><alpha>1.0</alpha></color><size><x>640</x><y>480</y><w>0</w><h>0</h></size><mode fullscreen="false">screen mode</mode>
</config>删除一个节点<config><size><x>640</x><y>480</y><w>0</w><h>0</h></size><mode fullscreen="false">screen mode</mode>
</config>删除全部节点<config/>
2 问题记录
2.1 错误 C3861 “print_children”: 找不到标识符
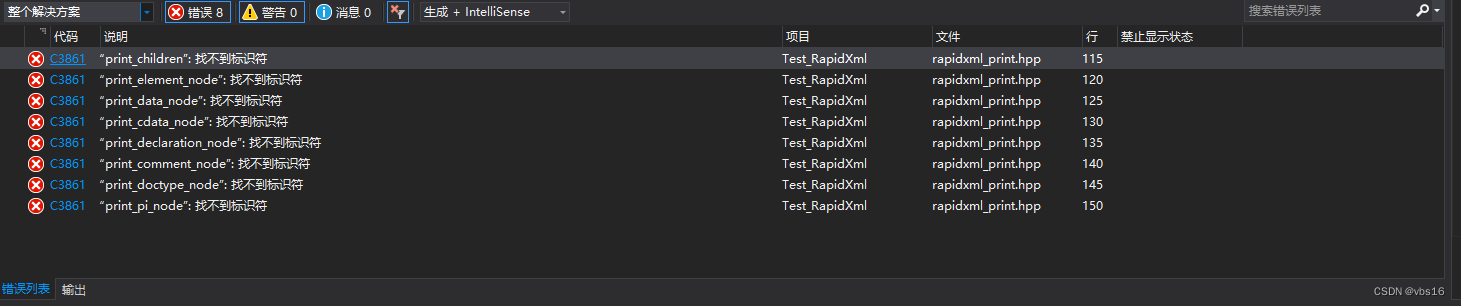
解决方法:
在print_node函数处,rapidxml_print.hpp 104行,前置声明调用到的函数
template<class OutIt, class Ch>
inline OutIt print_children(OutIt out, const xml_node<Ch>* node, int flags, int indent);template<class OutIt, class Ch>
inline OutIt print_element_node(OutIt out, const xml_node<Ch>* node, int flags, int indent);template<class OutIt, class Ch>
inline OutIt print_data_node(OutIt out, const xml_node<Ch>* node, int flags, int indent);template<class OutIt, class Ch>
inline OutIt print_cdata_node(OutIt out, const xml_node<Ch>* node, int flags, int indent);template<class OutIt, class Ch>
inline OutIt print_declaration_node(OutIt out, const xml_node<Ch>* node, int flags, int indent);template<class OutIt, class Ch>
inline OutIt print_comment_node(OutIt out, const xml_node<Ch>* node, int flags, int indent);template<class OutIt, class Ch>
inline OutIt print_doctype_node(OutIt out, const xml_node<Ch>* node, int flags, int indent);template<class OutIt, class Ch>
inline OutIt print_pi_node(OutIt out, const xml_node<Ch>* node, int flags, int indent);
原文连接: https://www.cnblogs.com/rainbow70626/p/10386131.html