【Android 网络编程】
HTTP
HTTP简介
HTTP是一个属于应用层的面向对象的协议,由于其简捷、快速的方式,适用于分布式超媒体信息系统。它于1990年提出,经过几年的使用与发展,得到不断地完善和扩展。
HTTP协议的主要特点
- 支持C/S(客户/服务器)模式。
- 简单快速:客户向服务器请求服务时,只需传送请求方法和路径。
请求方法常用的有GET、HEAD、POST,每种方法规定了客户与服务器联系的类型不同。
由于HTTP协议简单,使得HTTP服务器的程序规模小,因而通信速度很快。 - 灵活:HTTP允许传输任意类型的数据对象。正在传输的类型由Content-Type加以标记。
- 无连接:无连接的含义是限制每次连接只处理一个请求。
服务器处理完客户的请求,并收到客户的应答后,即断开连接。
采用这种方式可以节省传输时间。 - 无状态:HTTP协议是无状态协议,无状态是指协议对于事务处理没有记忆能力。
缺少状态意味着如果后续处理需要前面的信息,则它必须重传,这样可能导致每次连接传送的数据量增大。
另一方面,在服务器不需要先前信息时它的应答就较快。
HTTP URL 的格式
http://host[":"port][abs_path]http表示要通过HTTP协议来定位网络资源;
host表示合法的Internet主机域名或者IP地址;
port指定一个端口号,为空则使用默认端口80;
abs_path指定请求资源的URI(Web上任意的可用资源)。
HTTP有两种报文分别是请求报文和响应报文,让我们先来看看请求报文。
HTTP的请求报文
先来看看请求报文的一般格式:
通常来说一个HTTP请求报文由请求行、请求报头、空行、**请求数据**4个部分组成。
① 请求行
请求行由请求方法、URL字段、HTTP协议的版本组成,格式如下:
Method Request-URI HTTP-Version CRLFMethod表示请求方法;
Request-URI是一个统一资源标识符;
HTTP-Version表示请求的HTTP协议版本;
CRLF表示回车和换行(除了作为结尾的CRLF外,不允许出现单独的CR或LF字符)。
HTTP请求方法
HTTP请求方法有8种,分别是GET、POST、DELETE、PUT、HEAD、TRACE、CONNECT 、OPTIONS。
其中PUT、DELETE、POST、GET分别对应着增删改查,对于移动开发最常用的就是POST和GET了。
- GET:请求获取Request-URI所标识的资源
- POST:在Request-URI所标识的资源后附加新的数据
- HEAD:请求获取由Request-URI所标识的资源的响应消息报头
- PUT: 请求服务器存储一个资源,并用Request-URI作为其标识
- DELETE :请求服务器删除Request-URI所标识的资源
- TRACE : 请求服务器回送收到的请求信息,主要用于测试或诊断
- CONNECT: HTTP/1.1协议中预留给能够将连接改为管道方式的代理服务器。
- OPTIONS :请求查询服务器的性能,或者查询与资源相关的选项和需求
例如我去访问我的CSDN博客地址请求行是:
GET http://blog.csdn.net/itachi85 HTTP/1.1② 请求报头
在请求行之后会有0个或者多个请求报头,每个请求报头都包含一个名字和一个值,它们之间用“:”分割。
关于请求报头,会在后面的消息报头一节做统一的解释。
③ 空行
请求头部会以一个空行,发送回车符和换行符,通知服务器以下不会有请求头。
④ 请求数据
请求数据不在GET方法中使用,而是在POST方法中使用。
POST方法适用于需要客户填写表单的场合,与请求数据相关的最常用的请求头是Content-Type和Content-Length。
HTTP的响应报文
先来看看响应报文的一般格式:
HTTP的响应报文由状态行、消息报头、空行、响应正文组成。响应报头后面会讲到,响应正文是服务器返回的资源的内容,先来看看状态行。
① 状态行
状态行格式如下:
HTTP-Version Status-Code Reason-Phrase CRLFHTTP-Version表示服务器HTTP协议的版本;
Status-Code表示服务器发回的响应状态代码;
Reason-Phrase表示状态代码的文本描述。
状态代码
状态代码有三位数字组成,第一个数字定义了响应的类别,且有五种可能取值:
- 100~199:指示信息,表示请求已接收,继续处理
- 200~299:请求成功,表示请求已被成功接收、理解、接受
- 300~399:重定向,要完成请求必须进行更进一步的操作
- 400~499:客户端错误,请求有语法错误或请求无法实现
- 500~599:服务器端错误,服务器未能实现合法的请求
常见的状态码如下:
- 200 OK:客户端请求成功
- 400 Bad Request:客户端请求有语法错误,不能被服务器所理解
- 401 Unauthorized:请求未经授权,这个状态代码必须和WWW-Authenticate报头域一起使用
- 403 Forbidden:服务器收到请求,但是拒绝提供服务
- 500 Internal Server Error:服务器发生不可预期的错误
- 503 Server Unavailable:服务器当前不能处理客户端的请求,一段时间后可能恢复正常
例如访问我的CSDN博客地址响应的状态行是:
HTTP/1.1 200 OK② 消息报头
③ 空行
④ 响应正文
HTTP的消息报头
消息报头分为通用报头、请求报头、响应报头、实体报头等。
消息头由键值对组成,每行一对,关键字和值用英文冒号“:”分隔。
通用报头
既可以出现在请求报头,也可以出现在响应报头中
- Date:表示消息产生的日期和时间
- Connection:允许发送指定连接的选项
例如指定连接是连续的,或者指定“close”选项,通知服务器,在响应完成后,关闭连接 - Cache-Control:用于指定缓存指令,缓存指令是单向的(响应中出现的缓存指令在请求中未必会出现),且是独立的(一个消息的缓存指令不会影响另一个消息处理的缓存机制)
请求报头
请求报头通知服务器关于客户端请求的信息,典型的请求头有:
- Host:请求的主机名,允许多个域名同处一个IP地址,即虚拟主机
- User-Agent:发送请求的浏览器类型、操作系统等信息
- Accept:客户端可识别的内容类型列表,用于指定客户端接收那些类型的信息
- Accept-Encoding:客户端可识别的数据编码
- Accept-Language:表示浏览器所支持的语言类型
- Connection:允许客户端和服务器指定与请求/响应连接有关的选项,例如这是为Keep-Alive则表示保持连接。
- Transfer-Encoding:告知接收端为了保证报文的可靠传输,对报文采用了什么编码方式。
响应报头
用于服务器传递自身信息的响应,常见的响应报头:
- Location:用于重定向接受者到一个新的位置,常用在更换域名的时候
- Server:包含可服务器用来处理请求的系统信息,与User-Agent请求报头是相对应的
实体报头
实体报头用来定义被传送资源的信息,既可以用于请求也可用于响应。
请求和响应消息都可以传送一个实体,常见的实体报头为:
- Content-Type:发送给接收者的实体正文的媒体类型
- Content-Lenght:实体正文的长度
- Content-Language:描述资源所用的自然语言,没有设置则该选项则认为实体内容将提供给所有的语言阅读
- Content-Encoding:实体报头被用作媒体类型的修饰符,它的值指示了已经被应用到实体正文的附加内容的编码,因而要获得Content-Type报头域中所引用的媒体类型,必须采用相应的解码机制。
- Last-Modified:实体报头用于指示资源的最后修改日期和时间
- Expires:实体报头给出响应过期的日期和时间
HTTP应用举例
要想查看网页或者手机请求网络的请求报文和响应报文有很多种方法,这里推荐采用Fiddler,在Android利用Fiddler进行网络数据抓包这篇文章中详尽介绍了如何使用Fiddler,在这里就不赘述了。
打开Fiddler,然后用浏览器访问我的CSDN博客网站:

点击红色画笔的区域就可以看到请求报文和响应报文了
请求报文:
GET http://blog.csdn.net/itachi85 HTTP/1.1                                //请求行
Host: blog.csdn.net                                                       //请求报头
Connection: keep-alive
Cache-Control: max-age=0
Accept: text/html,application/xhtml+xml,application/xml;q=0.9,image/webp,*/*;q=0.8
Upgrade-Insecure-Requests: 1
User-Agent: Mozilla/5.0 (Windows NT 6.1; WOW64) AppleWebKit/537.36 (KHTML, like Gecko) Chrome/47.0.2526.80 Safari/537.36 QQBrowser/9.3.6872.400
Accept-Encoding: gzip, deflate, sdch
Accept-Language: zh-CN,zh;q=0.8
Cookie: bdshare_firstime=1443768140949; uuid_tt_dd=5028529250430960147_20151002;
...省略
很容易看出访问的是我的博客地址http://blog.csdn.net/itachi85,请求的方法是GET,因为是GET方法所以并没有请求数据。
响应报文:
HTTP/1.1 200 OK                                                         //状态行
Server: openresty                                                       //响应报头
Date: Sun, 27 Mar 2016 08:26:54 GMT
Content-Type: text/html; charset=utf-8
Transfer-Encoding: chunked
Connection: keep-alive
Keep-Alive: timeout=20
Vary: Accept-Encoding
Cache-Control: private
X-Powered-By: PHP 5.4.28
Content-Encoding: gzip//不能省略的空格
28b5                                    }ysI   1ߡFsgl n- ]{^_ { 'z!     C ,  m# 0 !l   `  4x  ly .ݪ*  ڴzAt_Xl *  9'O  ɬ  '  ק   3  ^1a
...省略
响应报文没什么可说的,接下来我们配置好手机网络代理,访问一个应用的界面
请求报文:
POST http://patientapi.shoujikanbing.com/api/common/getVersion HTTP/1.1       //请求行
Content-Length: 226                                                          //请求报头
Content-Type: application/x-www-form-urlencoded
Host: patientapi.shoujikanbing.com
Connection: Keep-Alive
User-Agent: Mozilla/5.0 (Linux; U; Android 4.4.4; zh-cn; MI NOTE LTE Build/KTU84P) AppleWebKit/533.1 (KHTML, like Gecko) Version/4.0 Mobile Safari/533.1
Accept-Encoding: gzip//不能省略的空格,下面是请求数据
clientversion=2_2.0.0&time=1459069342&appId=android&channel=hjwang&sessionId=0d1cee1f31926ffa8894c64804efa855101d56eb21caf5db5dcb9a4955b7fbc9&token=b191944d680145b5ed97f2f4ccf03058&deviceId=869436020220717&type=2&version=2.0.0
从请求报文的请求行来看,请求的方法是POST,请求地址为http://patientapi.shoujikanbing.com/api/common/getVersion,很显然是获取版本信息的接口。
响应报文:
HTTP/1.1 200 OK                                                              //状态行
Server: nginx                                                               //响应报头
Date: Sun, 27 Mar 2016 09:02:20 GMT
Content-Type: text/html;charset=utf-8
Transfer-Encoding: chunked
Connection: keep-alive
Vary: Accept-Encoding
Set-Cookie: sessionId=0d1cee1f31926ffa8894c64804efa855101d56eb21caf5db5dcb9a4955b7fbc9; expires=Mon, 28-Mar-2016 09:02:20 GMT; Max-Age=86400; path=/; domain=.shoujikanbing.com
Set-Cookie: PHPSESSID=0d1cee1f31926ffa8894c64804efa855101d56eb21caf5db5dcb9a4955b7fbc9; path=/; domain=.shoujikanbing.com
Expires: Thu, 19 Nov 1981 08:52:00 GMT
Cache-Control: no-store, no-cache, must-revalidate, post-check=0, pre-check=0
Pragma: no-cache
Content-Encoding: gzip//不能省略的空格
17f                                                //实体报文编码格式为gzip所以显示在这里的响应数据是乱码mP N @     "E ?    n m   1
w ( HL (1^ P nK  E ѷ93'3gNLH  7P  $c \  T 4a6   L:+ 1dY%$g   h H   +...省略
响应报文的实体采用的编码格式为为gzip,所以在Fiddler软件中显示的是乱码。
TCP三次握手
通常我们进行HTTP连接网络的时候我们会进行TCP的三次握手,然后传输数据,然后再释放连接。
TCP三次握手的过程为:
第一次握手:建立连接。客户端发送连接请求报文段,将SYN位置为1,Sequence Number为x;然后,客户端进入SYN_SEND状态,等待服务器的确认;
第二次握手:服务器收到客户端的SYN报文段,需要对这个SYN报文段进行确认,设置Acknowledgment Number为x+1(Sequence Number+1);同时,自己自己还要发送SYN请求信息,将SYN位置为1,Sequence Number为y;服务器端将上述所有信息放到一个报文段(即SYN+ACK报文段)中,一并发送给客户端,此时服务器进入SYN_RECV状态;
第三次握手:客户端收到服务器的SYN+ACK报文段。然后将Acknowledgment Number设置为y+1,向服务器发送ACK报文段,这个报文段发送完毕以后,客户端和服务器端都进入ESTABLISHED状态,完成TCP三次握手。
TCP四次分手
当客户端和服务器通过三次握手建立了TCP连接以后,当数据传送完毕,断开连接就需要进行TCP四次分手:
第一次分手:主机1(可以使客户端,也可以是服务器端),设置Sequence Number和Acknowledgment
Number,向主机2发送一个FIN报文段;此时,主机1进入FIN_WAIT_1状态;这表示主机1没有数据要发送给主机2了;第二次分手:主机2收到了主机1发送的FIN报文段,向主机1回一个ACK报文段,Acknowledgment Number为Sequence
第三次分手:主机2向主机1发送FIN报文段,请求关闭连接,同时主机2进入LAST_ACK状态;
第四次分手:主机1收到主机2发送的FIN报文段,向主机2发送ACK报文段,然后主机1进入TIME_WAIT状态;主机2收到主机1的ACK报文段以后,就关闭连接;此时,主机1等待2MSL后依然没有收到回复,则证明Server端已正常关闭,那好,主机1也可以关闭连接了。
来看下面的图加强下理解:
keepalive connections
当然大量的连接每次连接关闭都要三次握手四次分手的很显然会造成性能低下,因此http有一种叫做keepalive connections的机制,它可以在传输数据后仍然保持连接,当客户端需要再次获取数据时,直接使用刚刚空闲下来的连接而不需要再次握手。
HttpClient与HttpURLConnection
Apache的HttpClient和Java的HttpURLConnection,这两种都是我们平常请求网络会用到的。无论我们是自己封装的网络请求类还是第三方的网络请求框架都离不开这两个类库。
HttpClient
Android SDK中包含了HttpClient,在Android6.0版本直接删除了HttpClient类库,如果仍想使用则解决方法是:
- 如果使用的是eclipse则在libs中加入org.apache.http.legacy.jar
这个jar包在:sdk\platforms\android-23\optional目录中(需要下载android
6.0的SDK) - 如果使用的是android studio则 在相应的module下的build.gradle中加入:
android {useLibrary 'org.apache.http.legacy'} HttpClient的GET请求
首先我们来用DefaultHttpClient类来实例化一个HttpClient,并配置好默认的请求参数:
 //创建HttpClient
private HttpClient createHttpClient() {HttpParams mDefaultHttpParams = new BasicHttpParams();//设置连接超时HttpConnectionParams.setConnectionTimeout(mDefaultHttpParams, 15000);//设置请求超时HttpConnectionParams.setSoTimeout(mDefaultHttpParams, 15000);HttpConnectionParams.setTcpNoDelay(mDefaultHttpParams, true);HttpProtocolParams.setVersion(mDefaultHttpParams, HttpVersion.HTTP_1_1);HttpProtocolParams.setContentCharset(mDefaultHttpParams, HTTP.UTF_8);//持续握手HttpProtocolParams.setUseExpectContinue(mDefaultHttpParams, true);HttpClient mHttpClient = new DefaultHttpClient(mDefaultHttpParams);return mHttpClient;
}接下来创建HttpGet和HttpClient,请求网络并得到HttpResponse,并对HttpResponse进行处理:
private void useHttpClientGet(String url) {HttpGet mHttpGet = new HttpGet(url);//创建HttpGetmHttpGet.addHeader("Connection", "Keep-Alive");try {HttpClient mHttpClient = createHttpClient();//创建HttpClientHttpResponse mHttpResponse = mHttpClient.execute(mHttpGet);//请求网络并得到HttpResponse//处理HttpResponseHttpEntity mHttpEntity = mHttpResponse.getEntity();int code = mHttpResponse.getStatusLine().getStatusCode();if (null != mHttpEntity) {InputStream mInputStream = mHttpEntity.getContent();String respose = converStreamToString(mInputStream);Log.i("wangshu", "请求状态码:" + code + "\n请求结果:\n" + respose);mInputStream.close();}} catch (IOException e) {e.printStackTrace();}}converStreamToString方法将请求结果转换成String类型:
private String converStreamToString(InputStream is) throws IOException {BufferedReader reader = new BufferedReader(new InputStreamReader(is));StringBuffer sb = new StringBuffer();String line = null;while ((line = reader.readLine()) != null) {sb.append(line + "\n");}String respose = sb.toString();return respose;}最后我们开启线程访问百度:
new Thread(new Runnable() {@Overridepublic void run() {useHttpClientGet("http://www.baidu.com");}}).start();请求的返回结果,请求状态码为200,结果就是个html页,这里只截取了部分html代码:
GET请求的参数暴露在URL中,这有些不大妥当,而且URL的长度也有限制:长度在2048字符之内,在HTTP 1.1后URL长度才没有限制。一般情况下POST可以替代GET,接下来我们来看看HttpClient的POST请求。
HttpClient的POST请求
post请求和get类似就是需要配置要传递的参数:
private void useHttpClientPost(String url) {HttpPost mHttpPost = new HttpPost(url);mHttpPost.addHeader("Connection", "Keep-Alive");try {HttpClient mHttpClient = createHttpClient();List<NameValuePair> postParams = new ArrayList<>();//要传递的参数postParams.add(new BasicNameValuePair("username", "moon"));postParams.add(new BasicNameValuePair("password", "123"));mHttpPost.setEntity(new UrlEncodedFormEntity(postParams));HttpResponse mHttpResponse = mHttpClient.execute(mHttpPost);HttpEntity mHttpEntity = mHttpResponse.getEntity();int code = mHttpResponse.getStatusLine().getStatusCode();if (null != mHttpEntity) {InputStream mInputStream = mHttpEntity.getContent();String respose = converStreamToString(mInputStream);Log.i("wangshu", "请求状态码:" + code + "\n请求结果:\n" + respose);mInputStream.close();}} catch (IOException e) {e.printStackTrace();}
}
HttpURLConnection
Android 2.2版本之前,HttpURLConnection一直存在着一些令人厌烦的bug。比如说对一个可读的InputStream调用close()方法时,就有可能会导致连接池失效了。那么我们通常的解决办法就是直接禁用掉连接池的功能:
private void disableConnectionReuseIfNecessary() {// 这是一个2.2版本之前的bugif (Integer.parseInt(Build.VERSION.SDK) < Build.VERSION_CODES.FROYO) {System.setProperty("http.keepAlive", "false");}
}
所以在Android 2.2版本以及之前的版本使用HttpClient是较好的选择,而在Android 2.3版本及以后,HttpURLConnection则是最佳的选择,它的API简单,体积较小,因而非常适用于Android项目。
压缩和缓存机制可以有效地减少网络访问的流量,在提升速度和省电方面也起到了较大的作用。
另外在Android 6.0版本中,HttpClient库被移除了,HttpURLConnection则是以后我们唯一的选择。
HttpURLConnection的POST请求
因为会了HttpURLConnection的POST请求那GET请求也就会了,所以我这里只举出POST的例子
首先我们创建一个UrlConnManager类,然后里面提供getHttpURLConnection()方法用于配置默认的参数并返回HttpURLConnection:
public static HttpURLConnection getHttpURLConnection(String url){HttpURLConnection mHttpURLConnection=null;try {URL mUrl=new URL(url);mHttpURLConnection=(HttpURLConnection)mUrl.openConnection();//设置链接超时时间mHttpURLConnection.setConnectTimeout(15000);//设置读取超时时间mHttpURLConnection.setReadTimeout(15000);//设置请求参数mHttpURLConnection.setRequestMethod("POST");//添加HeadermHttpURLConnection.setRequestProperty("Connection","Keep-Alive");//接收输入流mHttpURLConnection.setDoInput(true);//传递参数时需要开启mHttpURLConnection.setDoOutput(true);} catch (IOException e) {e.printStackTrace();}return mHttpURLConnection ;}因为我们要发送POST请求,所以在UrlConnManager类中再写一个postParams()方法用来组织一下请求参数并将请求参数写入到输出流中:
public static void postParams(OutputStream output,List<NameValuePair>paramsList) throws IOException{StringBuilder mStringBuilder=new StringBuilder();for (NameValuePair pair:paramsList){if(!TextUtils.isEmpty(mStringBuilder)){mStringBuilder.append("&");}mStringBuilder.append(URLEncoder.encode(pair.getName(),"UTF-8"));mStringBuilder.append("=");mStringBuilder.append(URLEncoder.encode(pair.getValue(),"UTF-8"));}BufferedWriter writer=new BufferedWriter(new OutputStreamWriter(output,"UTF-8"));writer.write(mStringBuilder.toString());writer.flush();writer.close();}接下来我们添加请求参数,调用postParams()方法将请求的参数组织好传给HttpURLConnection的输出流,请求连接并处理返回的结果:
private void useHttpUrlConnectionPost(String url) {InputStream mInputStream = null;HttpURLConnection mHttpURLConnection = UrlConnManager.getHttpURLConnection(url);try {List<NameValuePair> postParams = new ArrayList<>();//要传递的参数postParams.add(new BasicNameValuePair("username", "moon"));postParams.add(new BasicNameValuePair("password", "123"));//HttpURLConnection.getOutputStream输出流 请求UrlConnManager.postParams(mHttpURLConnection.getOutputStream(), postParams);//HttpURLConnection.connect 连接mHttpURLConnection.connect();HttpURLConnection.getInputStream输入流 响应mInputStream = mHttpURLConnection.getInputStream();int code = mHttpURLConnection.getResponseCode();String respose = converStreamToString(mInputStream);Log.i("wangshu", "请求状态码:" + code + "\n请求结果:\n" + respose);mInputStream.close();} catch (IOException e) {e.printStackTrace();}}最后开启线程请求网络:
private void useHttpUrlConnectionGetThread() {new Thread(new Runnable() {@Overridepublic void run() {useHttpUrlConnectionPost("http://www.baidu.com");}}).start();}这里我们仍旧请求百度,看看会发生什么?
mInputStream = mHttpURLConnection.getInputStream() 这句代码报错了,找不到文件。打开Fiddler来分析一下,不了解Fiddler和HTTP协议原理的请查看Android网络编程(一)HTTP协议原理这篇文章。
我们的请求报文:
看来请求报文没有问题,再来看看响应报文:
报504错误,读取响应的数据报错,对于我们这次请求服务端不能返回完整的响应,返回的数据为0 bytes,所以mHttpURLConnection.getInputStream() 也读不到服务端响应的输入流。当然这次错误是正常的,百度没理由处理我们的这次POST请求。
github源码下载
Volley
Volley简介
在2013年Google I/O大会上推出了一个新的网络通信框架Volley。
Volley既可以访问网络取得数据,也可以加载图片,并且在性能方面也进行了大幅度的调整。
它的设计目标就是非常适合去进行数据量不大,但通信频繁的网络操作,
而对于大数据量的网络操作,比如说下载文件等,Volley的表现就会非常糟糕。
在使用Volley前请下载Volley库并放在libs目录下并add到工程中。 下载Volley请点击这
Volley网络请求队列
Volley请求网络都是基于请求队列的,开发者只要把请求放在请求队列中就可以了,请求队列会依次进行请求,一般情况下,一个应用程序如果网络请求没有特别频繁则完全可以只有一个请求队列(对应Application),如果非常多或其他情况,则可以是一个Activity对应一个网络请求队列,这就要看具体情况了,首先创建队列Volley.newRequestQueue(context):
RequestQueue mQueue = Volley.newRequestQueue(getApplicationContext());StringRequest的用法
StringRequest返回的数据是String类型的,我们查看下StringRequest的源码:
public class StringRequest extends Request<String> {private final Listener<String> mListener;public StringRequest(int method, String url, Listener<String> listener, ErrorListener errorListener) {super(method, url, errorListener);this.mListener = listener;}public StringRequest(String url, Listener<String> listener, ErrorListener errorListener) {this(0, url, listener, errorListener);}
...
}
有两个构造函数,其中第一个比第二个多了一个请求的方法,如果采用第二个则默认是GET请求。好了,我们试着用GET方法来请求百度:
//创建请求队列
RequestQueue mQueue = Volley.newRequestQueue(getApplicationContext());
//StringRequest
StringRequest mStringRequest = new StringRequest(Request.Method.GET, "http://www.baidu.com",new Response.Listener<String>() {@Overridepublic void onResponse(String response) {Log.i("wangshu", response);}}, new Response.ErrorListener() {@Overridepublic void onErrorResponse(VolleyError error) {Log.e("wangshu", error.getMessage(), error);}
});
//将请求添加在请求队列中
mQueue.add(mStringRequest);
当然别忘了添加网络访问权限:
<uses-permission android:name="android.permission.INTERNET"/>请求结果不用说是百度界面的html文件:
JsonRequest的用法
和StringRequest类似,我们直接上代码:
RequestQueue mQueue = Volley.newRequestQueue(getApplicationContext());
//JsonRequest
JsonObjectRequest mJsonObjectRequest = new JsonObjectRequest(Request.Method.POST,"http://api.1-blog.com/biz/bizserver/article/list.do",new Response.Listener<JSONObject>() {@Overridepublic void onResponse(JSONObject response) {Log.d("wangshu", response.toString());}}, new Response.ErrorListener() {@Overridepublic void onErrorResponse(VolleyError error) {Log.e("wangshu", error.getMessage(), error);}
}
);
mQueue.add(mJsonObjectRequest);
运行程序返回的是一堆新闻的Json数据:
为了解析这些Json数据,我们用Gson来解析Json数据。
点击这里下载Gson将jar包放在libs目录下并add进工程中。
我们开始写article类用于存储数据:
public class Article {private String desc;private String status;private List<detail> detail = new ArrayList<detail>();public List<Article.detail> getDetail() {return detail;}public void setDetail(List<Article.detail> detail) {this.detail = detail;}public String getDesc() {return desc;}public void setDesc(String desc) {this.desc = desc;}public String getStatus() {return status;}public void setStatus(String status) {this.status = status;}public class detail {private String title;private String article_url;private String my_abstract;private String article_type;public String getTitle() {return title;}public void setTitle(String title) {this.title = title;}public String getArticle_url() {return article_url;}public void setArticle_url(String article_url) {this.article_url = article_url;}public String getMy_abstract() {return my_abstract;}public void setMy_abstract(String my_abstract) {this.my_abstract = my_abstract;}public String getArticle_type() {return article_type;}public void setArticle_type(String article_type) {this.article_type = article_type;}}
}
最后我们改写JsonRequest的请求回调:
RequestQueue mQueue = Volley.newRequestQueue(getApplicationContext());
JsonObjectRequest mJsonObjectRequest = new JsonObjectRequest(Request.Method.POST,"http://api.1-blog.com/biz/bizserver/article/list.do",new Response.Listener<JSONObject>() {@Overridepublic void onResponse(JSONObject response) {//new Gson().fromJson 把json转成beanArticle mArticle=new Gson().fromJson(response.toString(), Article.class);List<Article.detail>mList=mArticle.getDetail();String title=mList.get(0).getTitle();Log.d("wangshu", title);}}, new Response.ErrorListener() {@Overridepublic void onErrorResponse(VolleyError error) {Log.e("wangshu", error.getMessage(), error);}}
);
mQueue.add(mJsonObjectRequest);
来看看打印结果:
使用ImageRequest加载图片
ImageRequest已经是过时的方法了,和前面两种的用法类似:
RequestQueue mQueue = Volley.newRequestQueue(getApplicationContext());
//ImageRequest
ImageRequest imageRequest = new ImageRequest("https://img-my.csdn.net/uploads/201603/26/1458988468_5804.jpg",new Response.Listener<Bitmap>() {@Overridepublic void onResponse(Bitmap response) {iv_image.setImageBitmap(response);}}, 0, 0, Bitmap.Config.RGB_565, new Response.ErrorListener() {@Overridepublic void onErrorResponse(VolleyError error) {iv_image.setImageResource(R.drawable.ico_default);}
});
mQueue.add(imageRequest);查看ImageRequest的源码发现它可以设置你想要的图片的最大宽度和高度,在加载图片时如果图片超过期望的最大宽度和高度则会进行压缩:
 public ImageRequest(String url, Listener<Bitmap> listener, int maxWidth, int maxHeight, ScaleType scaleType, Config decodeConfig, ErrorListener errorListener) {super(0, url, errorListener);this.setRetryPolicy(new DefaultRetryPolicy(1000, 2, 2.0F));this.mListener = listener;this.mDecodeConfig = decodeConfig;this.mMaxWidth = maxWidth;this.mMaxHeight = maxHeight;this.mScaleType = scaleType;}
//压缩图片
private Response<Bitmap> doParse(NetworkResponse response) {byte[] data = response.data;Options decodeOptions = new Options();Bitmap bitmap = null;if(this.mMaxWidth == 0 && this.mMaxHeight == 0) {decodeOptions.inPreferredConfig = this.mDecodeConfig;bitmap = BitmapFactory.decodeByteArray(data, 0, data.length, decodeOptions);} else {decodeOptions.inJustDecodeBounds = true;BitmapFactory.decodeByteArray(data, 0, data.length, decodeOptions);int actualWidth = decodeOptions.outWidth;int actualHeight = decodeOptions.outHeight;int desiredWidth = getResizedDimension(this.mMaxWidth, this.mMaxHeight, actualWidth, actualHeight, this.mScaleType);int desiredHeight = getResizedDimension(this.mMaxHeight, this.mMaxWidth, actualHeight, actualWidth, this.mScaleType);decodeOptions.inJustDecodeBounds = false;decodeOptions.inSampleSize = findBestSampleSize(actualWidth, actualHeight, desiredWidth, desiredHeight);Bitmap tempBitmap = BitmapFactory.decodeByteArray(data, 0, data.length, decodeOptions);if(tempBitmap == null || tempBitmap.getWidth() <= desiredWidth && tempBitmap.getHeight() <= desiredHeight) {bitmap = tempBitmap;} else {bitmap = Bitmap.createScaledBitmap(tempBitmap, desiredWidth, desiredHeight, true);tempBitmap.recycle();}}return bitmap == null?Response.error(new ParseError(response)):Response.success(bitmap, HttpHeaderParser.parseCacheHeaders(response));
}
private static int getResizedDimension(int maxPrimary, int maxSecondary, int actualPrimary, int actualSecondary, ScaleType scaleType) {if(maxPrimary == 0 && maxSecondary == 0) {return actualPrimary;} else if(scaleType == ScaleType.FIT_XY) {return maxPrimary == 0?actualPrimary:maxPrimary;} else {double ratio;if(maxPrimary == 0) {ratio = (double)maxSecondary / (double)actualSecondary;return (int)((double)actualPrimary * ratio);} else if(maxSecondary == 0) {return maxPrimary;} else {ratio = (double)actualSecondary / (double)actualPrimary;int resized = maxPrimary;if(scaleType == ScaleType.CENTER_CROP) {if((double)maxPrimary * ratio < (double)maxSecondary) {resized = (int)((double)maxSecondary / ratio);}return resized;} else {if((double)maxPrimary * ratio > (double)maxSecondary) {resized = (int)((double)maxSecondary / ratio);}return resized;}}}
}
static int findBestSampleSize(int actualWidth, int actualHeight, int desiredWidth, int desiredHeight) {double wr = (double)actualWidth / (double)desiredWidth;double hr = (double)actualHeight / (double)desiredHeight;double ratio = Math.min(wr, hr);float n;for(n = 1.0F; (double)(n * 2.0F) <= ratio; n *= 2.0F) {;}return (int)n;
}
使用ImageLoader加载图片
ImageLoader的内部使用ImageRequest来实现,它的构造器可以传入一个ImageCache缓存形参,实现了图片缓存的功能,同时还可以过滤重复链接,避免重复发送请求。
RequestQueue mQueue = Volley.newRequestQueue(getApplicationContext());
//ImageLoader
ImageLoader imageLoader = new ImageLoader(mQueue, new BitmapCache());
ImageLoader.ImageListener listener = ImageLoader.getImageListener(iv_image,R.drawable.ico_default, R.drawable.ico_default);
imageLoader.get("https://img-my.csdn.net/uploads/201603/26/1458988468_5804.jpg", listener);与ImageRequest实现效果不同的是,ImageLoader加载图片会先显示默认的图片,等待图片加载完成才会显示在ImageView上。
当然ImageLoader也提供了设置最大宽度和高度的方法:
public ImageLoader.ImageContainer get(String requestUrl, ImageLoader.ImageListener imageListener, int maxWidth, int maxHeight) {return this.get(requestUrl, imageListener, maxWidth, maxHeight, ScaleType.CENTER_INSIDE);
}
使用NetworkImageView加载图片
NetworkImageView是一个自定义控件,继承自ImageView,封装了请求网络加载图片的功能。
先在布局中引用:
<com.android.volley.toolbox.NetworkImageView
        android:id="@+id/nv_image"android:layout_width="200dp"android:layout_height="200dp"android:layout_centerHorizontal="true"android:layout_below="@id/iv_image"android:layout_marginTop="20dp"></com.android.volley.toolbox.NetworkImageView>
代码中调用,和ImageLoader用法类似:
iv_image = (ImageView) this.findViewById(R.id.iv_image);
RequestQueue mQueue = Volley.newRequestQueue(getApplicationContext());
ImageLoader imageLoader = new ImageLoader(mQueue, new BitmapCache());
nv_image.setDefaultImageResId(R.drawable.ico_default);
nv_image.setErrorImageResId(R.drawable.ico_default);
nv_image.setImageUrl("https://img-my.csdn.net/uploads/201603/26/1458988468_5804.jpg", imageLoader);
NetworkImageView并没有提供设置最大宽度和高度的方法,根据我们设置控件的宽和高结合网络图片的宽和高内部会自动去实现压缩,如果我们不想要压缩可以设置NetworkImageView控件的宽和高都为wrap_content。
github源码下载
Volley源码解析
Volley结构图

从上图可以看到Volley分为三个线程,分别是主线程、缓存调度线程、和网络调度线程。
首先请求会加入缓存队列,如果发现可以找到相应的缓存结果就直接读取缓存并解析,然后回调给主线程;
如果在缓存中没有找到结果,则将这条请求加入到网络队列中,然后发送HTTP请求,解析响应并写入缓存,并回调给主线程。
从RequestQueue入手
我们都知道使用Volley之前首先要创建RequestQueue:
RequestQueue mQueue = Volley.newRequestQueue(getApplicationContext());这也是volley运作的入口,看看newRequestQueue:
 public static RequestQueue newRequestQueue(Context context) {return newRequestQueue(context, (HttpStack)null);}
public static RequestQueue newRequestQueue(Context context, HttpStack stack) {return newRequestQueue(context, stack, -1);}
连续调用了两个重载函数,最终调用的是:
public static RequestQueue newRequestQueue(Context context, HttpStack stack, int maxDiskCacheBytes) {File cacheDir = new File(context.getCacheDir(), "volley");String userAgent = "volley/0";try {String network = context.getPackageName();PackageInfo queue = context.getPackageManager().getPackageInfo(network, 0);userAgent = network + "/" + queue.versionCode;} catch (NameNotFoundException var7) {;}if(stack == null) {if(VERSION.SDK_INT >= 9) {stack = new HurlStack();} else {stack = new HttpClientStack(AndroidHttpClient.newInstance(userAgent));}}BasicNetwork network1 = new BasicNetwork((HttpStack)stack);RequestQueue queue1;if(maxDiskCacheBytes <= -1) {queue1 = new RequestQueue(new DiskBasedCache(cacheDir), network1);} else {queue1 = new RequestQueue(new DiskBasedCache(cacheDir, maxDiskCacheBytes), network1);}queue1.start();return queue1;}可以看到如果android版本大于等于2.3则调用基于HttpURLConnection的HurlStack,否则就调用基于HttpClient的HttpClientStack。
并创建了RequestQueue,调用了start()方法:
public void start() {this.stop();this.mCacheDispatcher = new CacheDispatcher(this.mCacheQueue, this.mNetworkQueue, this.mCache, this.mDelivery);this.mCacheDispatcher.start();for(int i = 0; i < this.mDispatchers.length; ++i) {NetworkDispatcher networkDispatcher = new NetworkDispatcher(this.mNetworkQueue, this.mNetwork, this.mCache, this.mDelivery);this.mDispatchers[i] = networkDispatcher;networkDispatcher.start();}}CacheDispatcher是缓存调度线程,并调用了start()方法,
在循环中调用了NetworkDispatcher的start()方法,NetworkDispatcher是网络调度线程,默认情况下mDispatchers.length为4,默认开启了4个网络调度线程,也就是说有5个线程在后台运行并等待请求的到来。
接下来我们创建各种的Request,并调用RequestQueue的add()方法:
public Request add(Request request) {request.setRequestQueue(this);Set var2 = this.mCurrentRequests;synchronized(this.mCurrentRequests) {this.mCurrentRequests.add(request);}request.setSequence(this.getSequenceNumber());request.addMarker("add-to-queue");//如果不能缓存,则将请求添加到网络请求队列中if(!request.shouldCache()) {this.mNetworkQueue.add(request);return request;} else {Map var8 = this.mWaitingRequests;synchronized(this.mWaitingRequests) {String cacheKey = request.getCacheKey();//之前是否有执行相同的请求且还没有返回结果的,如果有的话将此请求加入mWaitingRequests队列,不再重复请求if(this.mWaitingRequests.containsKey(cacheKey)) {Object stagedRequests = (Queue)this.mWaitingRequests.get(cacheKey);if(stagedRequests == null) {stagedRequests = new LinkedList();}((Queue)stagedRequests).add(request);this.mWaitingRequests.put(cacheKey, stagedRequests);if(VolleyLog.DEBUG) {VolleyLog.v("Request for cacheKey=%s is in flight, putting on hold.", new Object[]{cacheKey});}} else {//没有的话就将请求加入缓存队列mCacheQueue,同时加入mWaitingRequests中用来做下次同样请求来时的重复判断依据this.mWaitingRequests.put(cacheKey, (Object)null);this.mCacheQueue.add(request);}return request;}}}通过判断request.shouldCache(),来判断是否可以缓存,默认是可以缓存的,
如果不能缓存,则将请求添加到网络请求队列中,
如果能缓存,就判断之前是否有执行相同的请求且还没有返回结果的,
如果有的话将此请求加入mWaitingRequests队列,不再重复请求;
没有的话就将请求加入缓存队列mCacheQueue,同时加入mWaitingRequests中用来做下次同样请求来时的重复判断依据。
从上面可以看出RequestQueue的add()方法并没有做什么请求网络或者对缓存进行操作。
当将请求添加到网络请求队列或者缓存队列时,这时在后台的网络调度线程和缓存调度线程轮询各自的请求队列发现有请求任务则开始执行,我们先看看缓存调度线程。
CacheDispatcher缓存调度线程
CacheDispatcher的run()方法:
public void run() {if(DEBUG) {VolleyLog.v("start new dispatcher", new Object[0]);}//线程优先级设置为最高级别Process.setThreadPriority(10);this.mCache.initialize();while(true) {while(true) {while(true) {while(true) {try {//获取缓存队列中的一个请求final Request e = (Request)this.mCacheQueue.take();e.addMarker("cache-queue-take");//如果请求取消了则将请求停止掉if(e.isCanceled()) {e.finish("cache-discard-canceled");} else {//查看是否有缓存的响应Entry entry = this.mCache.get(e.getCacheKey());//如果缓存响应为空,则将请求加入网络请求队列if(entry == null) {e.addMarker("cache-miss");this.mNetworkQueue.put(e);//判断缓存响应是否过期 } else if(!entry.isExpired()) {e.addMarker("cache-hit");//对数据进行解析并回调给主线程Response response = e.parseNetworkResponse(new NetworkResponse(entry.data, entry.responseHeaders));e.addMarker("cache-hit-parsed");if(!entry.refreshNeeded()) {this.mDelivery.postResponse(e, response);} else {e.addMarker("cache-hit-refresh-needed");e.setCacheEntry(entry);response.intermediate = true;this.mDelivery.postResponse(e, response, new Runnable() {public void run() {try {CacheDispatcher.this.mNetworkQueue.put(e);} catch (InterruptedException var2) {;}}});}} else {e.addMarker("cache-hit-expired");e.setCacheEntry(entry);this.mNetworkQueue.put(e);}}} catch (InterruptedException var4) {if(this.mQuit) {return;}}}}}}
}
static {DEBUG = VolleyLog.DEBUG;
}
看到四个while循环有些晕吧,让我们挑重点的说:
首先从缓存队列取出请求,判断请求是否被取消了,
如果没有,则判断该请求是否有缓存的响应,
如果有并且没有过期则对缓存响应进行解析并回调给主线程,
否则,将请求加入网络请求队列。
接下来看看网络调度线程。
NetworkDispatcher网络调度线程
NetworkDispatcher的run()方法:
public void run() {Process.setThreadPriority(10);while(true) {long startTimeMs;Request request;while(true) {startTimeMs = SystemClock.elapsedRealtime();try {//从队列中取出请求request = (Request)this.mQueue.take();break;} catch (InterruptedException var6) {if(this.mQuit) {return;}}}try {request.addMarker("network-queue-take");if(request.isCanceled()) {request.finish("network-discard-cancelled");} else {this.addTrafficStatsTag(request);//请求网络NetworkResponse e = this.mNetwork.performRequest(request);request.addMarker("network-http-complete");if(e.notModified && request.hasHadResponseDelivered()) {request.finish("not-modified");} else {Response volleyError1 = request.parseNetworkResponse(e);request.addMarker("network-parse-complete");if(request.shouldCache() && volleyError1.cacheEntry != null) {//将响应结果存入缓存this.mCache.put(request.getCacheKey(), volleyError1.cacheEntry);request.addMarker("network-cache-written");}request.markDelivered();this.mDelivery.postResponse(request, volleyError1);}}} catch (VolleyError var7) {var7.setNetworkTimeMs(SystemClock.elapsedRealtime() - startTimeMs);this.parseAndDeliverNetworkError(request, var7);} catch (Exception var8) {VolleyLog.e(var8, "Unhandled exception %s", new Object[]{var8.toString()});VolleyError volleyError = new VolleyError(var8);volleyError.setNetworkTimeMs(SystemClock.elapsedRealtime() - startTimeMs);this.mDelivery.postError(request, volleyError);}}}网络调度线程也是从队列中取出请求并且判断是否被取消了,
如果没取消,就去请求网络得到响应并回调给主线程。
请求网络时调用this.mNetwork.performRequest(request),这个mNetwork是一个接口,实现它的类是BasicNetwork,我们来看看BasicNetwork的performRequest()方法:
  public NetworkResponse performRequest(Request<?> request) throws VolleyError {long requestStart = SystemClock.elapsedRealtime();while(true) {HttpResponse httpResponse = null;Object responseContents = null;Map responseHeaders = Collections.emptyMap();try {HashMap e = new HashMap();this.addCacheHeaders(e, request.getCacheEntry());//调用HttpStack的performRequest()方法请求网络httpResponse = this.mHttpStack.performRequest(request, e);StatusLine statusCode1 = httpResponse.getStatusLine();int networkResponse1 = statusCode1.getStatusCode();responseHeaders = convertHeaders(httpResponse.getAllHeaders());//根据不同的响应状态码来返回不同的NetworkResponseif(networkResponse1 == 304) {Entry requestLifetime2 = request.getCacheEntry();if(requestLifetime2 == null) {return new NetworkResponse(304, (byte[])null, responseHeaders, true, SystemClock.elapsedRealtime() - requestStart);}requestLifetime2.responseHeaders.putAll(responseHeaders);return new NetworkResponse(304, requestLifetime2.data, requestLifetime2.responseHeaders, true, SystemClock.elapsedRealtime() - requestStart);}
...
从上面可以看到在12行调用的是HttpStack的performRequest()方法请求网络,接下来根据不同的响应状态码来返回不同的NetworkResponse。
另外HttpStack也是一个接口,实现它的两个类我们在前面已经提到了就是HurlStack和HttpClientStack。
让我们再回到NetworkDispatcher,请求网络后,会将响应结果存在缓存中,如果响应结果成功则调用this.mDelivery.postResponse(request, volleyError1)来回调给主线程。
来看看Delivery的postResponse()方法:
public void postResponse(Request<?> request, Response<?> response, Runnable runnable) {request.markDelivered();request.addMarker("post-response");this.mResponsePoster.execute(new ExecutorDelivery.ResponseDeliveryRunnable(request, response, runnable));}来看看ResponseDeliveryRunnable里面做了什么:
private class ResponseDeliveryRunnable implements Runnable {private final Request mRequest;private final Response mResponse;private final Runnable mRunnable;public ResponseDeliveryRunnable(Request request, Response response, Runnable runnable) {this.mRequest = request;this.mResponse = response;this.mRunnable = runnable;}public void run() {if(this.mRequest.isCanceled()) {this.mRequest.finish("canceled-at-delivery");} else {if(this.mResponse.isSuccess()) {//deliverResponsethis.mRequest.deliverResponse(this.mResponse.result);} else {this.mRequest.deliverError(this.mResponse.error);}if(this.mResponse.intermediate) {this.mRequest.addMarker("intermediate-response");} else {this.mRequest.finish("done");}if(this.mRunnable != null) {this.mRunnable.run();}}}}
第17行调用了this.mRequest.deliverResponse(this.mResponse.result)。deliverResponse就是实现Request抽象类必须要实现的方法,我们来看看StringRequest的源码:
public class StringRequest extends Request {private final Listener mListener;public StringRequest(int method, String url, Listener listener, ErrorListener errorListener) {super(method, url, errorListener);this.mListener = listener;}public StringRequest(String url, Listener listener, ErrorListener errorListener) {this(0, url, listener, errorListener);}protected void deliverResponse(String response) {//最终将response回调给了Response.Listener的onResponse()方法this.mListener.onResponse(response);}...
}
在deliverResponse方法中调用了this.mListener.onResponse(response),最终将response回调给了Response.Listener的onResponse()方法。
我们用StringRequest请求网络的写法是这样的:
RequestQueue mQueue = Volley.newRequestQueue(getApplicationContext());
StringRequest mStringRequest = new StringRequest(Request.Method.GET, "http://www.baidu.com",new Response.Listener() {@Overridepublic void onResponse(String response) {Log.i("wangshu", response);}}, new Response.ErrorListener() {@Overridepublic void onErrorResponse(VolleyError error) {Log.e("wangshu", error.getMessage(), error);}
});
//将请求添加在请求队列中
mQueue.add(mStringRequest);
OkHttp
OkHttp2.x
我们接下来看看目前比较火的网络框架OkHttp, 它处理了很多网络疑难杂症:会从很多常用的连接问题中自动恢复。
如果您的服务器配置了多个IP地址,当第一个IP连接失败的时候,OkHttp会自动尝试下一个IP,此外OkHttp还处理了代理服务器问题和SSL握手失败问题。
使用前准备
eclipse引入jar包地址:
okhttp-2.7.5.jar
okio-1.7.0.jar
Android Studio 配置gradle:
compile 'com.squareup.okhttp:okhttp:2.7.5'compile 'com.squareup.okio:okio:1.7.0'异步GET请求
基本的步骤很简单:
- ① 创建OkHttpClient
OkHttpClient mOkHttpClient = new OkHttpClient();- ② 创建Request
final Request request = new Request.Builder().url("http://www.baidu.com").build();- ③ 创建Call
Call call = mOkHttpClient.newCall(request);- ④ 调用Call的enqueue()
call.enqueue(new Callback() {@Overridepublic void onFailure(Request request, IOException e) {}@Overridepublic void onResponse(final Response response) throws IOException {}});但是每次这么写肯定是很麻烦,肯定是要进行封装的。需要注意的是onResponse回调并不是在UI线程。
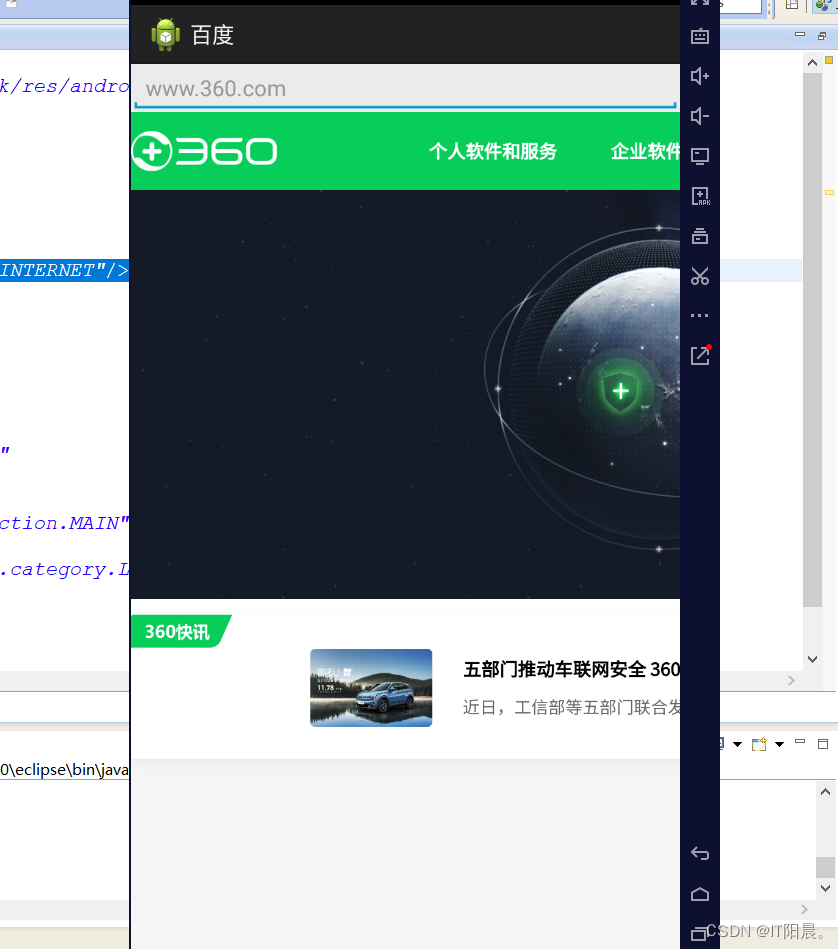
最简单的get请求,老规矩请求百度:
private void getAsynHttp() {//① 创建okHttpClient对象OkHttpClient mOkHttpClient = new OkHttpClient();//② 创建Requestfinal Request request = new Request.Builder().url("http://www.baidu.com").build();//③ 创建CallCall call = mOkHttpClient.newCall(request);//④ 调用Call的enqueue 进行异步请求call.enqueue(new Callback() {@Overridepublic void onFailure(Request request, IOException e) {}@Overridepublic void onResponse(final Response response) throws IOException {//onResponse回调并不是在UIString str = response.body().string();Log.i("wangshu", str);runOnUiThread(new Runnable() {@Overridepublic void run() {Toast.makeText(getApplication(), "请求成功", Toast.LENGTH_SHORT).show();}});}});
}
运行程序log打印出来的是百度首页的html文件。
同步GET请求
同步Get请求和异步调用区别就是调用了call的execute()方法。
private String getSyncHttp() throws IOException{//① 创建okHttpClient对象OkHttpClient mOkHttpClient = new OkHttpClient();//② 创建Requestfinal Request request = new Request.Builder().url("http://www.baidu.com").build();//③ 创建CallCall call = mOkHttpClient.newCall(request);//④ 调用Call的execute 进行同步请求Response mResponse=call.execute();if (mResponse.isSuccessful()) {return mResponse.body().string();} else {throw new IOException("Unexpected code " + mResponse);}}异步POST请求
post与get不同的就是要创建RequestBody = new FormEncodingBuilder().add(“size”, “10”).build(); 并传进Request中,同样onResponse回调不是在UI线程。
private void postAsynHttp() {OkHttpClient mOkHttpClient = new OkHttpClient();//创建RequestBodyRequestBody formBody = new FormEncodingBuilder().add("size", "10").build();    Request request = new Request.Builder().url("http://api.1-blog.com/biz/bizserver/article/list.do").post(formBody)//RequestBody传进Request中.build();Call call = mOkHttpClient.newCall(request);call.enqueue(new Callback() {@Overridepublic void onFailure(Request request, IOException e) {}@Overridepublic void onResponse(Response response) throws IOException {String str = response.body().string();Log.i("wangshu", str);runOnUiThread(new Runnable() {@Overridepublic void run() {Toast.makeText(getApplicationContext(), "请求成功", Toast.LENGTH_SHORT).show();}});}});
}
请求缓存设置
首先我们设置缓存路径和大小并设置给OkHttpClient: mOkHttpClient.setCache
mOkHttpClient = new OkHttpClient();File sdcache = getExternalCacheDir();int cacheSize = 10 * 1024 * 1024;mOkHttpClient.setCache(new Cache(sdcache.getAbsoluteFile(), cacheSize));接下来异步GET请求baidu:
private void getAsynHttp() {//创建请求Requestfinal Request request = new Request.Builder().url("http://www.baidu.com").build();Call call = mOkHttpClient.newCall(request);call.enqueue(new Callback() {@Overridepublic void onFailure(Request request, IOException e) {}@Overridepublic void onResponse(final Response response) throws IOException {if (null != response.cacheResponse()) {String str = response.cacheResponse().toString();Log.i("wangshu", "cache---" + str);} else {response.body().string();String str=response.networkResponse().toString();Log.i("wangshu", "network---" + str);}runOnUiThread(new Runnable() {@Overridepublic void run() {Toast.makeText(getApplicationContext(), "请求成功", Toast.LENGTH_SHORT).show();}});}});}第一次请求会请求网络得到数据,第二次以及后面的请求则会从缓存中取出数据:
当然也有种情况是有的请求每次都需要最新的数据,则在创建Request,来设置cacheControl为CacheControl.FORCE_NETWORK,用来表示请求会一直请求网络得到数据:
final Request request = new Request.Builder().url("http://www.baidu.com").cacheControl(CacheControl.FORCE_NETWORK).build();运行程序结果为:
设置超时时间
另外我们也需要设置超时的时间用来处理各种网络超时的情况,超时的原因可能是网络问题也可能是服务器响应慢等问题,OkHttp当然不会忽略这一点,它支持连接、读取和写入超时的时间设置:mOkHttpClient.setConnectTimeout/.setWriteTimeout/.setReadTimeout
mOkHttpClient = new OkHttpClient();mOkHttpClient.setConnectTimeout(15, TimeUnit.SECONDS);mOkHttpClient.setWriteTimeout(20, TimeUnit.SECONDS);mOkHttpClient.setReadTimeout(20, TimeUnit.SECONDS);取消请求
使用call.cancel()可以立即停止掉一个正在执行的call。
如果一个线程正在写请求或者读响应,将会引发IOException。
当用户离开一个应用时或者跳到其他界面时,使用Call.cancel()可以节约网络资源,另外不管同步还是异步的call都可以取消。
也可以通过tags来同时取消多个请求。当你构建一请求时,使用RequestBuilder.tag(tag)来分配一个标签。之后你就可以用OkHttpClient.cancel(tag)来取消所有带有这个tag的call。
为了模拟这个场景我们首先创建一个定时的线程池:
private ScheduledExecutorService executor = Executors.newScheduledThreadPool(1);接下来的代码为:
private void cancel(){final Request request = new Request.Builder().url("http://www.baidu.com").cacheControl(CacheControl.FORCE_NETWORK).build();Call call=null;call = mOkHttpClient.newCall(request);final Call finalCall = call;//100毫秒后取消callexecutor.schedule(new Runnable() {@Override public void run() {finalCall.cancel();}}, 100, TimeUnit.MILLISECONDS);call.enqueue(new Callback() {@Overridepublic void onFailure(Request request, IOException e) {}@Overridepublic void onResponse(final Response response) {if (null != response.cacheResponse()) {String str = response.cacheResponse().toString();Log.i("wangshu", "cache---" + str);} else {try {response.body().string();} catch (IOException e) {Log.i("wangshu", "IOException");e.printStackTrace();}String str = response.networkResponse().toString();Log.i("wangshu", "network---" + str);}}});Log.i("wangshu", "是否取消成功"+call.isCanceled());}100毫秒后调用call.cancel(),为了能让请求耗时,我们设置每次请求都要请求网络,运行程序并且不断的快速点击发送请求按钮:
很明显每次cancel()都失败了,仍旧成功的访问了网络,在cancel()时已经有读写操作了所以会报IOException。每隔100毫秒来调用call.cancel()显然时间间隔太长,我们设置为1毫秒并不断的快速的点击发送请求按钮:
没有请求网络的log,几乎每次都取消成功了。
封装
如果每次请求网络都需要写重复的代码绝对是令人头疼的,网上也有很多对OkHttp封装的优秀开源项目,功能也非常强大,封装的意义就在于更加方便的使用,具有拓展性,但是对OkHttp封装最需要解决的是以下的两点:
- 避免重复代码调用
- 将请求结果回调改为UI线程
根据以上两点,我们也简单封装一下,在此只是举个例子,如果想要使用OkHttp封装的开源库,推荐使用OkHttpFinal。
首先呢我们写一个抽象类用于请求回调:
public abstract class ResultCallback<T> {public abstract void onError(Request request, Exception e);public abstract void onResponse(Response response);
}接下来封装OkHttp,并实现了异步GET请求:
public class OkHttpEngine {private static OkHttpEngine mInstance;private OkHttpClient mOkHttpClient;private Handler mHandler;public static OkHttpEngine getInstance() {if (mInstance == null) {synchronized (OkHttpEngine.class) {if (mInstance == null) {mInstance = new OkHttpEngine();}}}return mInstance;}private OkHttpEngine() {mOkHttpClient = new OkHttpClient();mOkHttpClient.setConnectTimeout(15, TimeUnit.SECONDS);mOkHttpClient.setWriteTimeout(20, TimeUnit.SECONDS);mOkHttpClient.setReadTimeout(20, TimeUnit.SECONDS);mHandler = new Handler();}public OkHttpEngine setCache(Context mContext) {File sdcache = mContext.getExternalCacheDir();int cacheSize = 10 * 1024 * 1024;mOkHttpClient.setCache(new Cache(sdcache.getAbsoluteFile(), cacheSize));return mInstance;}/* 异步get请求* @param url* @param callback     */public void getAsynHttp(String url, ResultCallback callback) {final Request request = new Request.Builder().url(url).build();Call call = mOkHttpClient.newCall(request);dealResult(call, callback);}private void dealResult(Call call, final ResultCallback callback) {call.enqueue(new Callback() {@Overridepublic void onFailure(Request request, IOException e) {sendFailedCallback(request, e, callback);}@Overridepublic void onResponse(final Response response) throws IOException {sendSuccessCallback(response, callback);}private void sendSuccessCallback(final Response object, final ResultCallback callback) {mHandler.post(new Runnable() {@Overridepublic void run() {if (callback != null) {callback.onResponse(object);}}});}private void sendFailedCallback(final Request request, final Exception e, final ResultCallback callback) {mHandler.post(new Runnable() {@Overridepublic void run() {if (callback != null)callback.onError(request, e);}});}});}
}
原理很简单就是,写一个双重检查模式的单例,不了解双重检查模式的请查看设计模式之单例模式的七种写法这篇文章。在开始创建的时候配置好OkHttpClient,在请求网络的时候用Handler将请求的结果回调给UI线程。
最后调用这个OkHttpEngine的getAsynHttp()方法:
OkHttpEngine.getInstance().getAsynHttp("http://www.baidu.com", new ResultCallback() {@Overridepublic void onError(Request request, Exception e) {}@Overridepublic void onResponse(Response response) {String str = response.networkResponse().toString();Log.i("wangshu", str);Toast.makeText(getApplicationContext(), "请求成功", Toast.LENGTH_SHORT).show();}});使用起来简单多了,而且请求结果回调是在UI线程的。
github源码下载
OkHttp3
使用前准备
Android Studio 配置gradle:
compile 'com.squareup.okhttp3:okhttp:3.2.0'compile 'com.squareup.okio:okio:1.7.0'添加网络权限:
<uses-permission android:name="android.permission.INTERNET"/>异步GET请求
与2.x版本并没有什么不同,比较郁闷的是回调仍然不在UI线程。
惯例,请求百度:
private void getAsynHttp() {mOkHttpClient=new OkHttpClient();Request.Builder requestBuilder = new Request.Builder().url("http://www.baidu.com");    requestBuilder.method("GET",null);//可以省略,默认是GET请求Request request = requestBuilder.build();Call mcall= mOkHttpClient.newCall(request);mcall.enqueue(new Callback() {@Overridepublic void onFailure(Call call, IOException e) {}@Overridepublic void onResponse(Call call, Response response) throws IOException {if (null != response.cacheResponse()) {String str = response.cacheResponse().toString();Log.i("wangshu", "cache---" + str);} else {response.body().string();String str = response.networkResponse().toString();Log.i("wangshu", "network---" + str);}runOnUiThread(new Runnable() {@Overridepublic void run() {Toast.makeText(getApplicationContext(), "请求成功", Toast.LENGTH_SHORT).show();}});}});
}
异步POST请求
OkHttp3异步POST请求和OkHttp2.x有一些差别就是没有FormEncodingBuilder这个类,替代它的是功能更加强大的FormBody:
private void postAsynHttp() {mOkHttpClient=new OkHttpClient();RequestBody formBody = new FormBody.Builder().add("size", "10").build();Request request = new Request.Builder().url("http://api.1-blog.com/biz/bizserver/article/list.do").post(formBody).build();Call call = mOkHttpClient.newCall(request);call.enqueue(new Callback() {@Overridepublic void onFailure(Call call, IOException e) {}@Overridepublic void onResponse(Call call, Response response) throws IOException {String str = response.body().string();Log.i("wangshu", str);runOnUiThread(new Runnable() {@Overridepublic void run() {Toast.makeText(getApplicationContext(), "请求成功", Toast.LENGTH_SHORT).show();}});}});
}
异步上传文件
上传文件本身也是一个POST请求,上一篇没有讲,这里我们补上。首先定义上传文件类型:
public static final MediaType MEDIA_TYPE_MARKDOWN= MediaType.parse("text/x-markdown; charset=utf-8");将sdcard根目录的wangshu.txt文件上传到服务器上:
private void postAsynFile() {mOkHttpClient=new OkHttpClient();File file = new File("/sdcard/wangshu.txt");Request request = new Request.Builder().url("https://api.github.com/markdown/raw").post(RequestBody.create(MEDIA_TYPE_MARKDOWN, file))//上传文件RequestBody.create.build();mOkHttpClient.newCall(request).enqueue(new Callback() {@Overridepublic void onFailure(Call call, IOException e) {}@Overridepublic void onResponse(Call call, Response response) throws IOException {Log.i("wangshu",response.body().string());}});
}
当然如果想要改为同步的上传文件只要调用 mOkHttpClient.newCall(request).execute()就可以了。
在wangshu.txt文件中有一行字“Android网络编程(六)OkHttp3用法全解析”我们运行程序点击发送文件按钮,最终请求网络返回的结果就是我们txt文件中的内容 :
当然不要忘了添加如下权限:
<uses-permission android:name="android.permission.READ_EXTERNAL_STORAGE"/><uses-permission android:name="android.permission.WRITE_EXTERNAL_STORAGE"/>异步下载文件
下载文件同样在上一篇没有讲到,实现起来比较简单,在这里下载一张图片,我们得到Response后将流写进我们指定的图片文件中就可以了。
private void downAsynFile() {mOkHttpClient = new OkHttpClient();String url = "https://img-my.csdn.net/uploads/201603/26/1458988468_5804.jpg";Request request = new Request.Builder().url(url).build();mOkHttpClient.newCall(request).enqueue(new Callback() {@Overridepublic void onFailure(Call call, IOException e) {}@Overridepublic void onResponse(Call call, Response response) {//得到Response后将流写进我们指定的图片文件InputStream inputStream = response.body().byteStream();FileOutputStream fileOutputStream = null;try {fileOutputStream = new FileOutputStream(new File("/sdcard/wangshu.jpg"));byte[] buffer = new byte[2048];int len = 0;while ((len = inputStream.read(buffer)) != -1) {fileOutputStream.write(buffer, 0, len);}fileOutputStream.flush();} catch (IOException e) {Log.i("wangshu", "IOException");e.printStackTrace();}Log.d("wangshu", "文件下载成功");}});
}
异步上传Multipart文件
关键类MultipartBody
这种场景很常用,我们有时会上传文件同时还需要传其他类型的字段,OkHttp3实现起来很简单,需要注意的是没有服务器接收我这个Multipart文件,所以这里只是举个例子,具体的应用还要结合实际工作中对应的服务器。
首先定义上传文件类型:
private static final MediaType MEDIA_TYPE_PNG = MediaType.parse("image/png");private void sendMultipart(){mOkHttpClient = new OkHttpClient();//关键类MultipartBodyRequestBody requestBody = new MultipartBody.Builder().setType(MultipartBody.FORM).addFormDataPart("title", "wangshu").addFormDataPart("image", "wangshu.jpg",RequestBody.create(MEDIA_TYPE_PNG, new File("/sdcard/wangshu.jpg"))).build();Request request = new Request.Builder().header("Authorization", "Client-ID " + "...").url("https://api.imgur.com/3/image").post(requestBody).build();mOkHttpClient.newCall(request).enqueue(new Callback() {@Overridepublic void onFailure(Call call, IOException e) {}@Overridepublic void onResponse(Call call, Response response) throws IOException {Log.i("wangshu", response.body().string());}});
}设置超时时间和缓存
和OkHttp2.x有区别的是不能通过OkHttpClient直接设置超时时间和缓存了,而是通过OkHttpClient.Builder来设置,通过builder配置好OkHttpClient后用builder.build()来返回OkHttpClient,所以我们通常不会调用new OkHttpClient()来得到OkHttpClient,而是通过builder.build():
File sdcache = getExternalCacheDir();int cacheSize = 10 * 1024 * 1024;OkHttpClient.Builder builder = new OkHttpClient.Builder().connectTimeout(15, TimeUnit.SECONDS).writeTimeout(20, TimeUnit.SECONDS).readTimeout(20, TimeUnit.SECONDS).cache(new Cache(sdcache.getAbsoluteFile(), cacheSize));OkHttpClient mOkHttpClient=builder.build(); 取消请求和封装
取消请求仍旧可以调用call.cancel(),这个没有变化,不明白的可以查看上一篇文章Android网络编程(五)OkHttp2.x用法全解析,这里就不赘述了,封装上一篇也讲过仍旧推荐OkHttpFinal,它目前是基于OkHttp3来进行封装的。
github源码下载
OkHttp源码解析==RTRT
从请求处理开始分析
当我们要请求网络的时候我们需要用OkHttpClient.newCall(request)进行execute或者enqueue操作,当我们调用newCall时:
@Override public Call newCall(Request request) {return new RealCall(this, request);}实际返回的是一个RealCall类,我们调用enqueue异步请求网络实际上是调用了RealCall的enqueue方法:
void enqueue(Callback responseCallback, boolean forWebSocket) {synchronized (this) {if (executed) throw new IllegalStateException("Already Executed");executed = true;}client.dispatcher().enqueue(new AsyncCall(responseCallback, forWebSocket));}可以看到最终的请求是dispatcher来完成的。
Dispatcher任务调度
主要的变量
Dispatcher主要用于控制并发的请求,它主要维护了以下变量:
/* 最大并发请求数*/private int maxRequests = 64;/* 每个主机最大请求数*/private int maxRequestsPerHost = 5;/* 消费者线程池 */private ExecutorService executorService;/* 将要运行的异步请求队列 */private final Deque<AsyncCall> readyAsyncCalls = new ArrayDeque<>();/* 正在运行的异步请求队列 */private final Deque<AsyncCall> runningAsyncCalls = new ArrayDeque<>();/* 正在运行的同步请求队列 */private final Deque<RealCall> runningSyncCalls = new ArrayDeque<>();构造函数
public Dispatcher(ExecutorService executorService) {this.executorService = executorService;}public Dispatcher() {}public synchronized ExecutorService executorService() {if (executorService == null) {executorService = new ThreadPoolExecutor(0, Integer.MAX_VALUE, 60, TimeUnit.SECONDS,new SynchronousQueue<Runnable>(), Util.threadFactory("OkHttp Dispatcher", false));}return executorService;}Dispatcher有两个构造函数,可以使用自己设定线程池,如果没有设定线程池则会在请求网络前自己创建线程池,这个线程池类似于CachedThreadPool比较适合执行大量的耗时比较少的任务。不了解线程池的同学可以查看Android多线程(一)线程池这篇文章。其中用到了SynchronousQueue,不了解它的同学可以查看Java并发编程(六)阻塞队列这篇文章。
异步请求
synchronized void enqueue(AsyncCall call) {if (runningAsyncCalls.size() < maxRequests && runningCallsForHost(call) < maxRequestsPerHost) {runningAsyncCalls.add(call);executorService().execute(call);} else {readyAsyncCalls.add(call);}}当正在运行的异步请求队列中的数量小于64并且正在运行的请求主机数小于5时则把请求加载到runningAsyncCalls中并在线程池中执行,否则就再入到readyAsyncCalls中进行缓存等待。
AsyncCall
线程池中传进来的参数就是AsyncCall它是RealCall的内部类,内部也实现了execute方法:
@Override
protected void execute() {boolean signalledCallback = false;try {Response response = getResponseWithInterceptorChain(forWebSocket);if (canceled) {signalledCallback = true;responseCallback.onFailure(RealCall.this, new IOException("Canceled"));} else {signalledCallback = true;responseCallback.onResponse(RealCall.this, response);}} catch (IOException e) {if (signalledCallback) {// Do not signal the callback twice!logger.log(Level.INFO, "Callback failure for " + toLoggableString(), e);} else {responseCallback.onFailure(RealCall.this, e);}} finally {client.dispatcher().finished(this);}
}
首先我们来看看最后一行, 无论这个请求的结果如何都会执行client.dispatcher().finished(this);
synchronized void finished(AsyncCall call) {if (!runningAsyncCalls.remove(call)) throw new AssertionError("AsyncCall wasn't running!");promoteCalls();}finished方法将此次请求从runningAsyncCalls移除后还执行了promoteCalls方法:
private void promoteCalls() {if (runningAsyncCalls.size() >= maxRequests) return; // Already running max capacity.if (readyAsyncCalls.isEmpty()) return; // No ready calls to promote.for (Iterator<AsyncCall> i = readyAsyncCalls.iterator(); i.hasNext(); ) {AsyncCall call = i.next();if (runningCallsForHost(call) < maxRequestsPerHost) {i.remove();runningAsyncCalls.add(call);executorService().execute(call);}if (runningAsyncCalls.size() >= maxRequests) return; // Reached max capacity.}}可以看到最关键的点就是会从readyAsyncCalls取出下一个请求,并加入runningAsyncCalls中并交由线程池处理。好了让我们再回到上面的AsyncCall的execute方法,我们会发getResponseWithInterceptorChain方法返回了Response,很明显这是在请求网络。
Interceptor拦截器
private Response getResponseWithInterceptorChain(boolean forWebSocket) throws IOException {Interceptor.Chain chain = new ApplicationInterceptorChain(0, originalRequest, forWebSocket);return chain.proceed(originalRequest);}getResponseWithInterceptorChain方法,创建了ApplicationInterceptorChain,它是一个拦截器链,这个类也是RealCall的内部类,接下来执行了它的proceed方法:
@Override
public Response proceed(Request request) throws IOException {// If there's another interceptor in the chain, call that.if (index < client.interceptors().size()) {Interceptor.Chain chain = new ApplicationInterceptorChain(index + 1, request, forWebSocket);//从拦截器列表取出拦截器Interceptor interceptor = client.interceptors().get(index);Response interceptedResponse = interceptor.intercept(chain);if (interceptedResponse == null) {throw new NullPointerException("application interceptor " + interceptor+ " returned null");}return interceptedResponse;}// No more interceptors. Do HTTP.return getResponse(request, forWebSocket);
}
proceed方法每次从拦截器列表中取出拦截器,当存在多个拦截器时都会在第七行阻塞,并等待下一个拦截器的调用返回。下面分别以 拦截器链中有1个、2个拦截器的场景加以模拟:
拦截器主要用来观察,修改以及可能短路的请求输出和响应的回来。通常情况下拦截器用来添加,移除或者转换请求或者响应的头部信息。比如将域名替换为ip地址,将请求头中添加host属性,也可以添加我们应用中的一些公共参数,比如设备id、版本号等等。 不了解拦截器的可以查看Okhttp-wiki 之 Interceptors 拦截器这篇文章。
回到代码上来,我们看最后一行 return getResponse(request, forWebSocket),如果没有更多的拦截器的话,就会执行网络请求,来看看getResponse方法做了些什么(RealCall.java):
Response getResponse(Request request, boolean forWebSocket) throws IOException {...省略// Create the initial HTTP engine. Retries and redirects need new engine for each attempt.engine = new HttpEngine(client, request, false, false, forWebSocket, null, null, null);int followUpCount = 0;while (true) {if (canceled) {engine.releaseStreamAllocation();throw new IOException("Canceled");}boolean releaseConnection = true;try {engine.sendRequest();engine.readResponse();releaseConnection = false;} catch (RequestException e) {// The attempt to interpret the request failed. Give up.throw e.getCause();} catch (RouteException e) {// The attempt to connect via a route failed. The request will not have been sent....省略 }}getResponse方法比较长我省略了一些代码,可以看到创建了HttpEngine类并且调用HttpEngine的sendRequest方法和readResponse方法。
缓存策略
我们先来看看sendRequest方法:
public void sendRequest() throws RequestException, RouteException, IOException {if (cacheStrategy != null) return; // Already sent.if (httpStream != null) throw new IllegalStateException();//请求头部添加Request request = networkRequest(userRequest);//获取client中的Cache,同时Cache在初始化的时候会去读取缓存目录中关于曾经请求过的所有信息。InternalCache responseCache = Internal.instance.internalCache(client);//cacheCandidate为上次与服务器交互缓存的ResponseResponse cacheCandidate = responseCache != null? responseCache.get(request): null;long now = System.currentTimeMillis();//创建CacheStrategy.Factory对象,进行缓存配置cacheStrategy = new CacheStrategy.Factory(now, request, cacheCandidate).get();//网络请求networkRequest = cacheStrategy.networkRequest;//缓存的响应cacheResponse = cacheStrategy.cacheResponse;if (responseCache != null) {//记录当前请求是网络发起还是缓存发起responseCache.trackResponse(cacheStrategy);}if (cacheCandidate != null && cacheResponse == null) {closeQuietly(cacheCandidate.body()); // The cache candidate wasn't applicable. Close it.}//不进行网络请求并且缓存不存在或者过期则返回504错误if (networkRequest == null && cacheResponse == null) {userResponse = new Response.Builder().request(userRequest).priorResponse(stripBody(priorResponse)).protocol(Protocol.HTTP_1_1).code(504).message("Unsatisfiable Request (only-if-cached)").body(EMPTY_BODY).build();return;}// 不进行网络请求,而且缓存可以使用,直接返回缓存if (networkRequest == null) {userResponse = cacheResponse.newBuilder().request(userRequest).priorResponse(stripBody(priorResponse)).cacheResponse(stripBody(cacheResponse)).build();userResponse = unzip(userResponse);return;}//需要访问网络时boolean success = false;try {httpStream = connect();httpStream.setHttpEngine(this);if (writeRequestHeadersEagerly()) {long contentLength = OkHeaders.contentLength(request);if (bufferRequestBody) {if (contentLength > Integer.MAX_VALUE) {throw new IllegalStateException("Use setFixedLengthStreamingMode() or "+ "setChunkedStreamingMode() for requests larger than 2 GiB.");}if (contentLength != -1) {// Buffer a request body of a known length.httpStream.writeRequestHeaders(networkRequest);requestBodyOut = new RetryableSink((int) contentLength);} else {// Buffer a request body of an unknown length. Don't write request headers until the// entire body is ready; otherwise we can't set the Content-Length header correctly.requestBodyOut = new RetryableSink();}} else {httpStream.writeRequestHeaders(networkRequest);requestBodyOut = httpStream.createRequestBody(networkRequest, contentLength);}}success = true;} finally {// If we're crashing on I/O or otherwise, don't leak the cache body.if (!success && cacheCandidate != null) {closeQuietly(cacheCandidate.body());}}}上面的代码显然是在发送请求,但是最主要的是做了缓存的策略。cacheCandidate是上次与服务器交互缓存的Response,这里的缓存都是基于Map,key是请求中url的md5,value是在文件中查询到的缓存,页面置换基于LRU算法,我们现在只需要知道它是一个可以读取缓存Header的Response即可。根据cacheStrategy的处理得到了networkRequest和cacheResponse这两个值,根据这两个值的数据是否为null来进行进一步的处理,当networkRequest和cacheResponse都为null的情况也就是不进行网络请求并且缓存不存在或者过期,这时候则返回504错误;当networkRequest 为null时也就是不进行网络请求,而且缓存可以使用时则直接返回缓存;其他的情况则请求网络。
接下来我们查看readResponse方法:
public void readResponse() throws IOException {...省略else{//读取网络响应networkResponse = readNetworkResponse();}//将响应头部存入Cookie中receiveHeaders(networkResponse.headers());// If we have a cache response too, then we're doing a conditional get.if (cacheResponse != null) {//检查缓存是否可用,如果可用。那么就用当前缓存的Response,关闭网络连接,释放连接。if (validate(cacheResponse, networkResponse)) {userResponse = cacheResponse.newBuilder().request(userRequest).priorResponse(stripBody(priorResponse)).headers(combine(cacheResponse.headers(), networkResponse.headers())).cacheResponse(stripBody(cacheResponse)).networkResponse(stripBody(networkResponse)).build();networkResponse.body().close();releaseStreamAllocation();// Update the cache after combining headers but before stripping the// Content-Encoding header (as performed by initContentStream()).InternalCache responseCache = Internal.instance.internalCache(client);responseCache.trackConditionalCacheHit();// 更新缓存responseCache.update(cacheResponse, stripBody(userResponse));userResponse = unzip(userResponse);return;} else {closeQuietly(cacheResponse.body());}}userResponse = networkResponse.newBuilder().request(userRequest).priorResponse(stripBody(priorResponse)).cacheResponse(stripBody(cacheResponse)).networkResponse(stripBody(networkResponse)).build();if (hasBody(userResponse)) {maybeCache();userResponse = unzip(cacheWritingResponse(storeRequest, userResponse));}}这个方法发起刷新请求头部和请求体,解析HTTP响应头部。如果有缓存并且可用则用缓存的数据并更新缓存,否则就用网络请求返回的数据。
我们再来看看validate(cacheResponse, networkResponse)方法是如何判断缓存是否可用的:
private static boolean validate(Response cached, Response network) {//如果服务器返回304则缓存有效if (network.code() == HTTP_NOT_MODIFIED) {return true;}//通过缓存和网络请求响应中的Last-Modified来计算是否是最新数据,如果是则缓存有效Date lastModified = cached.headers().getDate("Last-Modified");if (lastModified != null) {Date networkLastModified = network.headers().getDate("Last-Modified");if (networkLastModified != null&& networkLastModified.getTime() < lastModified.getTime()) {return true;}}return false;}如缓存果过期或者强制放弃缓存,在此情况下,缓存策略全部交给服务器判断,客户端只用发送条件get请求即可,如果缓存是有效的,则返回304 Not Modifiled,否则直接返回body。条件get请求有两种方式一种是Last-Modified-Date,一种是 ETag。这里采用了Last-Modified-Date,通过缓存和网络请求响应中的Last-Modified来计算是否是最新数据,如果是则缓存有效。
失败重连
最后我们再回到RealCall的getResponse方法:
Response getResponse(Request request, boolean forWebSocket) throws IOException {...省略boolean releaseConnection = true;try {engine.sendRequest();engine.readResponse();releaseConnection = false;} catch (RequestException e) {// The attempt to interpret the request failed. Give up.throw e.getCause();} catch (RouteException e) {// The attempt to connect via a route failed. The request will not have been sent.HttpEngine retryEngine = engine.recover(e.getLastConnectException(), null);if (retryEngine != null) {releaseConnection = false;engine = retryEngine;continue;}// Give up; recovery is not possible.throw e.getLastConnectException();} catch (IOException e) {// An attempt to communicate with a server failed. The request may have been sent.HttpEngine retryEngine = engine.recover(e, null);if (retryEngine != null) {releaseConnection = false;engine = retryEngine;continue;}// Give up; recovery is not possible.throw e;} finally {// We're throwing an unchecked exception. Release any resources.if (releaseConnection) {StreamAllocation streamAllocation = engine.close();streamAllocation.release();}}...省略engine = new HttpEngine(client, request, false, false, forWebSocket, streamAllocation, null,response);}}查看代码第11行和21行当发生IOException或者RouteException时会执行HttpEngine的recover方法:
public HttpEngine recover(IOException e, Sink requestBodyOut) {if (!streamAllocation.recover(e, requestBodyOut)) {return null;}if (!client.retryOnConnectionFailure()) {return null;}StreamAllocation streamAllocation = close();// For failure recovery, use the same route selector with a new connection.return new HttpEngine(client, userRequest, bufferRequestBody, callerWritesRequestBody,forWebSocket, streamAllocation, (RetryableSink) requestBodyOut, priorResponse);}最后一行可以看到就是重新创建了HttpEngine并返回,用来完成重连。
到这里OkHttp请求网络的流程基本上讲完了,下面是关于OKHttp的请求流程图:
参考资料:
http://www.jianshu.com/p/aad5aacd79bf
http://www.jianshu.com/p/64e256c1dbbf
http://www.cnblogs.com/LuLei1990/p/5534791.html
http://frodoking.github.io/2015/03/12/android-okhttp/
OkHttp连接池(ConnectionPool)分析
keepalive connections
当然大量的连接每次连接关闭都要三次握手四次分手的很显然会造成性能低下,因此http有一种叫做keepalive connections的机制,它可以在传输数据后仍然保持连接,当客户端需要再次获取数据时,直接使用刚刚空闲下来的连接而不需要再次握手。
Okhttp支持5个并发KeepAlive,默认链路生命为5分钟(链路空闲后,保持存活的时间)。
引用计数
在okhttp中,在高层代码的调用中,使用了类似于引用计数的方式跟踪Socket流的调用,这里的计数对象是StreamAllocation,它被反复执行aquire与release操作,这两个函数其实是在改变RealConnection中的List<Reference<StreamAllocation>> 的大小。(StreamAllocation.java)
public void acquire(RealConnection connection) {connection.allocations.add(new WeakReference<>(this));} private void release(RealConnection connection) {for (int i = 0, size = connection.allocations.size(); i < size; i++) {Reference<StreamAllocation> reference = connection.allocations.get(i);if (reference.get() == this) {connection.allocations.remove(i);return;}}throw new IllegalStateException();}RealConnection是socket物理连接的包装,它里面维护了List<Reference<StreamAllocation>>的引用。List中StreamAllocation的数量也就是socket被引用的计数,如果计数为0的话,说明此连接没有被使用就是空闲的,需要通过下文的算法实现回收;如果计数不为0,则表示上层代码仍然引用,就不需要关闭连接。
主要变量
连接池的类位于okhttp3.ConnectionPool:
private static final Executor executor = new ThreadPoolExecutor(0 /* corePoolSize */,Integer.MAX_VALUE /* maximumPoolSize */, 60L /* keepAliveTime */, TimeUnit.SECONDS,new SynchronousQueue<Runnable>(), Util.threadFactory("OkHttp ConnectionPool", true));/** The maximum number of idle connections for each address. *///空闲的socket最大连接数private final int maxIdleConnections;//socket的keepAlive时间private final long keepAliveDurationNs;// 双向队列private final Deque<RealConnection> connections = new ArrayDeque<>();final RouteDatabase routeDatabase = new RouteDatabase();boolean cleanupRunning;
主要的变量有必要说明一下:
- executor线程池,类似于CachedThreadPool,需要注意的是这种线程池的工作队列采用了没有容量的SynchronousQueue,不了解它的请查看Java并发编程(六)阻塞队列这篇文章。
Deque<RealConnection>,双向队列,双端队列同时具有队列和栈性质,经常在缓存中被使用,里面维护了RealConnection也就是socket物理连接的包装。- RouteDatabase,它用来记录连接失败的Route的黑名单,当连接失败的时候就会把失败的线路加进去。
构造函数
public ConnectionPool() {//默认空闲的socket最大连接数为5个,socket的keepAlive时间为5秒this(5, 5, TimeUnit.MINUTES);}public ConnectionPool(int maxIdleConnections, long keepAliveDuration, TimeUnit timeUnit) {this.maxIdleConnections = maxIdleConnections;this.keepAliveDurationNs = timeUnit.toNanos(keepAliveDuration);// Put a floor on the keep alive duration, otherwise cleanup will spin loop.if (keepAliveDuration <= 0) {throw new IllegalArgumentException("keepAliveDuration <= 0: " + keepAliveDuration);}}通过构造函数可以看出ConnectionPool默认的空闲的socket最大连接数为5个,socket的keepAlive时间为5秒。
实例化
ConnectionPool实例化是在OkHttpClient实例化时进行的:
public OkHttpClient() {this(new Builder());}在OkHttpClient的构造函数中调用了new Builder():
public Builder() {dispatcher = new Dispatcher();...省略connectionPool = new ConnectionPool();...省略}
缓存操作
ConnectionPool提供对Deque<RealConnection>进行操作的方法分别为put、get、connectionBecameIdle和evictAll几个操作。分别对应放入连接、获取连接、移除连接和移除所有连接操作,这里我们举例put和get操作。
put操作
void put(RealConnection connection) {assert (Thread.holdsLock(this));if (!cleanupRunning) {cleanupRunning = true;executor.execute(cleanupRunnable);}connections.add(connection);}在添加到Deque<RealConnection>之前首先要清理空闲的线程,这个后面会讲到。
get操作
RealConnection get(Address address, StreamAllocation streamAllocation) {assert (Thread.holdsLock(this));for (RealConnection connection : connections) {if (connection.allocations.size() < connection.allocationLimit&& address.equals(connection.route().address)&& !connection.noNewStreams) {streamAllocation.acquire(connection);return connection;}}return null;}遍历connections缓存列表,当某个连接计数的次数小于限制的大小并且request的地址和缓存列表中此连接的地址完全匹配。则直接复用缓存列表中的connection作为request的连接。
自动回收连接
okhttp是根据StreamAllocation引用计数是否为0来实现自动回收连接的。我们在put操作前首先要调用executor.execute(cleanupRunnable)来清理闲置的线程。我们来看看cleanupRunnable到底做了什么:
private final Runnable cleanupRunnable = new Runnable() {@Override public void run() {while (true) {long waitNanos = cleanup(System.nanoTime());if (waitNanos == -1) return;if (waitNanos > 0) {long waitMillis = waitNanos / 1000000L;waitNanos -= (waitMillis * 1000000L);synchronized (ConnectionPool.this) {try {ConnectionPool.this.wait(waitMillis, (int) waitNanos);} catch (InterruptedException ignored) {}}}}}};
线程不断的调用cleanup来进行清理,并返回下次需要清理的间隔时间,然后调用wait进行等待以释放锁与时间片,当等待时间到了后,再次进行清理,并返回下次要清理的间隔时间,如此循环下去,接下来看看cleanup方法:
long cleanup(long now) {int inUseConnectionCount = 0;int idleConnectionCount = 0;RealConnection longestIdleConnection = null;long longestIdleDurationNs = Long.MIN_VALUE;// Find either a connection to evict, or the time that the next eviction is due.synchronized (this) {//遍历连接for (Iterator<RealConnection> i = connections.iterator(); i.hasNext(); ) {RealConnection connection = i.next();//查询此连接的StreamAllocation的引用数量,如果大于0则inUseConnectionCount数量加1,否则idleConnectionCount加1if (pruneAndGetAllocationCount(connection, now) > 0) {inUseConnectionCount++;continue;}idleConnectionCount++;long idleDurationNs = now - connection.idleAtNanos;if (idleDurationNs > longestIdleDurationNs) {longestIdleDurationNs = idleDurationNs;longestIdleConnection = connection;}}//如果空闲连接keepAlive时间超过5分钟,或者空闲连接数超过5个,则从Deque中移除此连接if (longestIdleDurationNs >= this.keepAliveDurationNs|| idleConnectionCount > this.maxIdleConnections) {// We've found a connection to evict. Remove it from the list, then close it below (outside// of the synchronized block).connections.remove(longestIdleConnection);//如果空闲连接大于0,则返回此连接即将到期的时间} else if (idleConnectionCount > 0) {// A connection will be ready to evict soon.return keepAliveDurationNs - longestIdleDurationNs;//如果没有空闲连接,并且活跃连接大于0则返回5分钟} else if (inUseConnectionCount > 0) {// All connections are in use. It'll be at least the keep alive duration 'til we run again.return keepAliveDurationNs;} else {//如果没有任何连接则跳出循环cleanupRunning = false;return -1;}}closeQuietly(longestIdleConnection.socket());// Cleanup again immediately.return 0;}cleanup所做的简单总结就是根据连接中的引用计数来计算空闲连接数和活跃连接数,然后标记出空闲的连接,如果空闲连接keepAlive时间超过5分钟,或者空闲连接数超过5个,则从Deque中移除此连接。接下来根据空闲连接或者活跃连接来返回下次需要清理的时间数:如果空闲连接大于0则返回此连接即将到期的时间,如果都是活跃连接并且大于0则返回默认的keepAlive时间5分钟,如果没有任何连接则跳出循环并返回-1。在上述代码中的第13行,通过pruneAndGetAllocationCount方法来判断连接是否闲置的,如果pruneAndGetAllocationCount方法返回值大于0则是空闲连接,否则就是活跃连接,让我们来看看pruneAndGetAllocationCount方法:
private int pruneAndGetAllocationCount(RealConnection connection, long now) {List<Reference<StreamAllocation>> references = connection.allocations;//遍历弱引用列表for (int i = 0; i < references.size(); ) {Reference<StreamAllocation> reference = references.get(i);//若StreamAllocation被使用则接着循环if (reference.get() != null) {i++;continue;}// We've discovered a leaked allocation. This is an application bug.Internal.logger.warning("A connection to " + connection.route().address().url()+ " was leaked. Did you forget to close a response body?");//若StreamAllocation未被使用则移除引用references.remove(i);connection.noNewStreams = true;// If this was the last allocation, the connection is eligible for immediate eviction.//如果列表为空则说明此连接没有被引用了,则返回0,表示此连接是空闲连接if (references.isEmpty()) {connection.idleAtNanos = now - keepAliveDurationNs;return 0;}}//否则返回非0的数,表示此连接是活跃连接return references.size();}pruneAndGetAllocationCount方法首先遍历传进来的RealConnection的StreamAllocation列表,如果StreamAllocation被使用则接着遍历下一个StreamAllocation,如果StreamAllocation未被使用则从列表中移除。如果列表为空则说明此连接没有引用了,则返回0,表示此连接是空闲连接,否则就返回非0的数表示此连接是活跃连接。
总结
可以看出连接池复用的核心就是用Deque<RealConnection>来存储连接,通过put、get、connectionBecameIdle和evictAll几个操作来对Deque进行操作,另外通过判断连接中的计数对象StreamAllocation来进行自动回收连接。
参考资料
okhttp3源码
简析TCP的三次握手与四次分手
TCP三次握手过程
短连接、长连接与keep-alive
OkHttp3源码分析[复用连接池]
okhttp连接池复用机制
Retrofit
Retrofit是Square公司开发的一款针对Android网络请求的框架,Retrofit2**底层基于OkHttp**实现的,而OkHttp现在已经得到Google官方认可。
Retrofit基本使用
使用前准备
老生长谈,先配置build.gradle:
dependencies {...compile 'com.squareup.retrofit2:retrofit:2.1.0'compile 'com.squareup.retrofit2:converter-gson:2.1.0'compile 'com.squareup.retrofit2:converter-scalars:2.1.0'//ConverterFactory的String依赖包
}
当然别忘了在manifest加入访问网络的权限:
<uses-permission android:name="android.permission.INTERNET"></uses-permission>这次我们访问的网站产生了变化,我们用淘宝IP地址库,里面有访问接口的说明:

1. 请求接口(GET):
/service/getIpInfo.php?ip=[ip地址字串]
2. 响应信息:
(json格式的)国家 、省(自治区或直辖市)、市(县)、运营商
3. 返回数据格式:
{"code": 0,"data": {"ip": "210.75.225.254","country": "\u4e2d\u56fd","area": "\u534e\u5317","region": "\u5317\u4eac\u5e02","city": "\u5317\u4eac\u5e02","county": "","isp": "\u7535\u4fe1","country_id": "86","area_id": "100000","region_id": "110000","city_id": "110000","county_id": "-1","isp_id": "100017"}
}
其中code的值的含义为,0:成功,1:失败。
用Retrofit异步访问网络
① 编写实体类
我们可以用JSON字符串转换成Java实体类(POJO)这个网站将Json转为实体类,经过修改的实体类如下:
IpModel.java:
public class IpModel {private int code;private IpData data;public void setCode(int code) {this.code = code;}public int getCode() {return this.code;}public void setData(IpData data) {this.data = data;}public IpData getData() {return this.data;}
}
IpData.java:
public class IpData {private String country;private String country_id;private String area;private String area_id;private String region;private String region_id;private String city;private String city_id;private String county;private String county_id;private String isp;private String isp_id;private String ip;public void setCountry(String country) {this.country = country;}public String getCountry() {return this.country;}public void setCountry_id(String country_id) {this.country_id = country_id;}...}
② 编写请求网络接口类
上文已知,请求接口(GET方式)为:/service/getIpInfo.php?ip=[ip地址字串]
public interface IpService{@GET("/service/getIpInfo.php")Call<IpModel> getIpMsg(@Query("ip")String ip);
}Retrofit提供的请求方式注解有@GET和@POST等,分别代表GET请求和POST请求,我们在这里访问的界面是“getIpInfo.php”。
参数注解有@PATH和@Query等,@Query就是我们的请求的键值对的设置,在这里@Query**(“ip”)代表键,**String ip则代表值。
③ 创建Retrofit
String url = "http://ip.taobao.com";
Retrofit retrofit = new Retrofit.Builder().baseUrl(url)//增加返回值为String的支持.addConverterFactory(ScalarsConverterFactory.create()).addConverterFactory(GsonConverterFactory.create()).build();这里的baseUrl加上之前@GET(“/service/getIpInfo.php”)定义的参数形成完整的请求地址http://ip.taobao.com/service/getIpInfo.php;
addConverterFactory用于指定返回的参数数据类型,这里我们支持String和Gson类型。
④ 用Retrofit创建接口文件
IpService ipService = retrofit.create(IpService.class);
Call<IpModel>call=ipService.getIpMsg(ip);
用retrofit创建我们之前定义的IpService接口对象,并调用该接口定义的getIpMsg方法得到Call对象。
⑤ 用Call请求网络并处理回调
call.enqueue(new Callback<IpModel>() {@Overridepublic void onResponse(Call<IpModel> call, Response<IpModel> response) {String country= response.body().getData().getCountry();Log.i("wangshu","country"+country);Toast.makeText(getApplicationContext(),country,Toast.LENGTH_SHORT).show();}@Overridepublic void onFailure(Call<IpModel> call, Throwable t) {}
});这里是异步请求网络,回调的Callback是运行在主线程的。得到返回的Response后将返回数据的country字段用Toast显示出来。
如果想同步请求网络请使用 call.execute()。
如果想中断网络请求则可以使用 call.cancel()。
完整的代码如下:
public class MainActivity extends AppCompatActivity {private Button bt_request;@Overrideprotected void onCreate(Bundle savedInstanceState) {super.onCreate(savedInstanceState);setContentView(R.layout.activity_main);bt_request = (Button) findViewById(R.id.bt_request);bt_request.setOnClickListener(new View.OnClickListener() {@Overridepublic void onClick(View v) {getIpInformation("59.108.54.37");}});}private void getIpInformation(String ip) {String url = "http://ip.taobao.com/service/";Retrofit retrofit = new Retrofit.Builder().baseUrl(url)//增加返回值为String的支持.addConverterFactory(ScalarsConverterFactory.create()).addConverterFactory(GsonConverterFactory.create()).build();IpService ipService = retrofit.create(IpService.class);Call<IpModel>call=ipService.getIpMsg(ip);call.enqueue(new Callback<IpModel>() {@Overridepublic void onResponse(Call<IpModel> call, Response<IpModel> response) {String country= response.body().getData().getCountry();Log.i("wangshu","country"+country);Toast.makeText(getApplicationContext(),country,Toast.LENGTH_SHORT).show();}@Overridepublic void onFailure(Call<IpModel> call, Throwable t) {}});}
请求参数
上文讲了Retrofit访问网络的基本方法,接下来我们来了解下Retrofit常用的请求参数。
请求方法
请求方法除了上文讲到的@GET,还有@POST、@PUT、@DELETE、@HEAD、@OPTIONS、@PATCH、@HTTP。
其中@HTTP用来替换以上7个,其他的分别对应着不同的请求方法。
@Query
前面的例子就用了Query用来查询参数。
public interface IpService{@GET("getIpInfo.php")Call<IpModel> getIpMsg(@Query("ip")String ip);
}
@QueryMap
如果Query**参数比较多,那么可以通过@QueryMap方式将所有的参数集成在一个Map统一传递**。
public interface BlueService {@GET("book/search")Call<BookSearchResponse> getSearchBooks(@QueryMap Map<String, String> options);
}
@Path
@Path用来替换路径。
public interface ApiStores {@GET("adat/sk/{cityId}.html")Call<ResponseBody> getWeather(@Path("cityId") String cityId);
}
@Body
@Body与@POST注解一起使用,提供查询主体内容,其中ApiInfo是一个bean类。
public interface ApiStores {@POST("client/shipper/getCarType")Call<ResponseBody> getCarType(@Body ApiInfo apiInfo);}@Headers
interface SomeService {@GET("some/endpoint")@Headers("Accept-Encoding: application/json")Call<ResponseBody> getCarType();
}
@Headers用来添加头部信息,上面用的是固定头部,也可以采用动态头部:
interface SomeService {@GET("some/endpoint")Call<SomeResponse> someEndpoint(@Header("Location") String location);
}
@Multipart
@Multipart用来上传文件
public interface FileUploadService {  @Multipart@POST("upload")Call<ResponseBody> upload(@Part("description") RequestBody description,@Part MultipartBody.Part file);
}
github源码下载
参考资料
Retrofit 2.0文件上传
RxJava 与 Retrofit 结合的最佳实践
Retrofit2使用初探
android 介绍Retrofit的简单使用
Retrofit框架使用笔记
Retrofit 解析 JSON 数据
用 Retrofit 2 简化 HTTP 请求
Android Retrofit 2.0使用
Retrofit注解
GET请求访问网络
动态配置URL地址:@Path
Retrofit提供了很多的请求参数注解,使得请求网路时更加便捷。在这里我们仍旧访问淘宝IP地址库。
其中,@Path用来动态的配置URL地址。请求网络接口代码如下所示。
public interface IpServiceForPath {@GET("{path}/getIpInfo.php?ip=59.108.54.37")Call<IpModel> getIpMsg(@Path("path") String path);
}
在GET注解中包含了{path},它对应着@Path注解中的”path”,而用来替换{path}的正是需要传入的”String path”的值。
接下来请求网络的代码如下所示。
String url = "http://ip.taobao.com/";
Retrofit retrofit = new Retrofit.Builder().baseUrl(url).addConverterFactory(GsonConverterFactory.create()).build();
IpServiceForPath ipService = retrofit.create(IpServiceForPath.class);
Call<IpModel>call=ipService.getIpMsg("service");//1
call.enqueue(new Callback<IpModel>() {@Overridepublic void onResponse(Call<IpModel> call, Response<IpModel> response) {String country= response.body().getData().getCountry();Toast.makeText(getApplicationContext(),country,Toast.LENGTH_SHORT).show();}@Overridepublic void onFailure(Call<IpModel> call, Throwable t) {}
});
在注释1处,传入”service”来替换 @GET注解中的{path}的值。
动态指定查询条件:@Query与@QueryMap
在上一篇中我们用@Query来动态的替换ip地址为了能更方便的得到该ip所对应的地理信息:
public interface IpServiceForQuery{@GET("getIpInfo.php")Call<IpModel> getIpMsg(@Query("ip")String ip);
}
但是在网络请求中一般为了更精确的查找到我们所需要的数据,需要传入很多的查询参数,如果用@Query会比较麻烦,这时我们可以采用@QueryMap,将所有的参数集成在一个Map统一传递:
public interface IpServiceForQueryMap {@GET("getIpInfo.php")Call<IpModel> getIpMsg(@QueryMap Map<String, String> options);
}
POST请求访问网络
传输数据类型为键值对:@Field
传输数据类型为键值对,这是我们最常用的POST请求数据类型,淘宝ip库支持数据类型为键值对的POST请求:
public interface IpServiceForPost {@FormUrlEncoded@POST("getIpInfo.php")Call<IpModel> getIpMsg(@Field("ip") String first);
}首先用到@FormUrlEncoded注解来标明这是一个表单请求,
然后在getIpMsg方法中使用@Field注解来标示所对应的String类型数据的键,从而组成一组键值对进行传递。
接下来请求网络的代码如下所示。
String url = "http://ip.taobao.com/service/";
Retrofit retrofit = new Retrofit.Builder().baseUrl(url).addConverterFactory(GsonConverterFactory.create()).build();
IpServiceForPost ipService = retrofit.create(IpServiceForPost.class);
Call<IpModel>call=ipService.getIpMsg("59.108.54.37");
call.enqueue(new Callback<IpModel>() {@Overridepublic void onResponse(Call<IpModel> call, Response<IpModel> response) {String country= response.body().getData().getCountry();Toast.makeText(getApplicationContext(),country,Toast.LENGTH_SHORT).show();}@Overridepublic void onFailure(Call<IpModel> call, Throwable t) {}
});
传输数据类型Json字符串:@Body
我们也可以用POST方式将Json字符串作为请求体发送到服务器,请求网络接口代码为:
public interface IpServiceForPostBody {@POST("getIpInfo.php")Call<IpModel> getIpMsg(@Body Ip ip);
}用@Body这个注解标识参数对象即可,retrofit会将Ip对象转换为字符串。
public class Ip {private String ip;public Ip(String ip) {this.ip = ip;}
}
请求网络的代码基本上都是一致的:
String url = "http://ip.taobao.com/service/";
Retrofit retrofit = new Retrofit.Builder().baseUrl(url).addConverterFactory(GsonConverterFactory.create()).build();
IpServiceForPostBody ipService = retrofit.create(IpServiceForPostBody.class);
Call<IpModel>call=ipService.getIpMsg(new Ip(ip));
call.enqueue(new Callback<IpModel>() {@Overridepublic void onResponse(Call<IpModel> call, Response<IpModel> response) {String country= response.body().getData().getCountry();Log.i("wangshu","country"+country);Toast.makeText(getApplicationContext(),country,Toast.LENGTH_SHORT).show();}@Overridepublic void onFailure(Call<IpModel> call, Throwable t) {}
});
运行程序用Fiddler抓包,如下图所示。
可以看到请求数据是一个Json字符串,因为淘宝ip库并不支持此类型所以不会返回我们需要的地理信息数据。
单个文件上传:@Part
public interface UploadFileForPart {@Multipart@POST("user/photo")Call<User> updateUser(@Part MultipartBody.Part photo, @Part("description") RequestBody description);
}
@Multipart注解表示允许多个@Part,updateUser方法第一个参数是准备上传的图片文件,使用了MultipartBody.Part类型,另一个参数是RequestBody类型,它用来传递简单的键值对。请求网络代码如下所示。
...
File file = new File(Environment.getExternalStorageDirectory(), "wangshu.png");
RequestBody photoRequestBody = RequestBody.create(MediaType.parse("image/png"), file);
MultipartBody.Part photo = MultipartBody.Part.createFormData("photos", "wangshu.png", photoRequestBody);
UploadFileForPart uploadFile = retrofit.create(UploadFileForPart.class);
Call<User> call = uploadFile.updateUser(photo, RequestBody.create(null, "wangshu"));
...
多个文件上传:@PartMap
@Multipart
@POST("user/photo")
Call<User> updateUser(@PartMap Map<String, RequestBody> photos, @Part("description") RequestBody description);
和单文件上传是类似的,只是使用Map封装了上传的文件,并用@PartMap注解来标示起来。其他的都一样,这里就不赘述了。
消息报头Header
Http请求中,为了防止攻击或是过滤掉不安全的访问或是添加特殊加密的访问等等,用来减轻服务器的压力和保证请求的安全,通常都会在消息报头中携带一些特殊的消息头处理。
Retrofit也提供了@Header来添加消息报头。
添加消息报头有两种方式,一种是静态的,另一种是动态的,
先来看静态方式,如下所示
interface SomeService {@GET("some/endpoint")@Headers("Accept-Encoding: application/json")Call<ResponseBody> getCarType();
}
使用@Headers注解添加消息报头,如果想要添加多个消息报头,则可以使用{}包含起来:
interface SomeService {@GET("some/endpoint")@Headers({"Accept-Encoding: application/json","User-Agent: MoonRetrofit"})Call<ResponseBody> getCarType();
}动态方式添加消息报头如下所示。
interface SomeService {@GET("some/endpoint")Call<ResponseBody> getCarType(@Header("Location") String location);
}
使用@Header注解,可以通过调用getCarType方法来动态的添加消息报头。
github源码下载
Retrofit源码解析==RTRT
前言
最近博客的产出确实很少,因为博主我正在写一本Android进阶书籍,两头很难兼顾,但是每个月也得至少发一篇博客。上一篇我们介绍了Retrofit的使用方法,这一篇我们照例来学习Retrofit的源码。
1.Retrofit的创建过程**
当我们使用Retrofit请求网络时,首先要写请求接口:
public interface IpService {@GET("getIpInfo.php?ip=59.108.54.37")Call<IpModel> getIpMsg();接着我们通过调用如下代码来创建Retrofit:
Retrofit retrofit = new Retrofit.Builder().baseUrl(url).addConverterFactory(GsonConverterFactory.create()).build();
Retrofit 是通过建造者模式构建出来的,接下来查看Builder方法做了什么:
public Builder() {this(Platform.get());}很简短,查看Platform的get方法,如下所示。
private static final Platform PLATFORM = findPlatform();static Platform get() {return PLATFORM;}private static Platform findPlatform() {try {Class.forName("android.os.Build");if (Build.VERSION.SDK_INT != 0) {return new Android();}} catch (ClassNotFoundException ignored) {}try {Class.forName("java.util.Optional");return new Java8();} catch (ClassNotFoundException ignored) {}try {Class.forName("org.robovm.apple.foundation.NSObject");return new IOS();} catch (ClassNotFoundException ignored) {}return new Platform();}Platform的get方法最终调用的是findPlatform方法,根据不同的运行平台来提供不同的线程池。接下来查看build方法,代码如下所示。
public Retrofit build() {if (baseUrl == null) {//1throw new IllegalStateException("Base URL required.");}okhttp3.Call.Factory callFactory = this.callFactory;//2if (callFactory == null) {callFactory = new OkHttpClient();//3}Executor callbackExecutor = this.callbackExecutor;if (callbackExecutor == null) {callbackExecutor = platform.defaultCallbackExecutor();//4}List<CallAdapter.Factory> adapterFactories = new ArrayList<>(this.adapterFactories);//5adapterFactories.add(platform.defaultCallAdapterFactory(callbackExecutor));List<Converter.Factory> converterFactories = new ArrayList<>(this.converterFactories);//6return new Retrofit(callFactory, baseUrl, converterFactories, adapterFactories,callbackExecutor, validateEagerly);}从注释1处可以看出baseUrl 是必须指定的。注释2处callFactory默认为this.callFactory,this.callFactory就是我们在构建Retrofit时调用callFactory方法所传进来的,如下所示。
public Builder callFactory(okhttp3.Call.Factory factory) {this.callFactory = checkNotNull(factory, "factory == null");return this;}因此,如果需要对OkHttpClient进行设置,则可以构建OkHttpClient对象,然后调用callFactory方法将设置好的OkHttpClient传进去。注释3处,如果没有设置callFactory则直接创建OkHttpClient。注释4的callbackExecutor用来将回调传递到UI线程。注释5的adapterFactories主要用于存储对Call进行转化的对象,后面在Call的创建过程会再次提到它。注释6处的converterFactories主要用于存储转化数据对象,后面也会提及到。此前在例子中调用的addConverterFactory(GsonConverterFactory.create()),就是设置返回的数据支持转换为Gson对象。最终会返回配置好的Retrofit类。
2.Call的创建过程**
紧接着我们创建Retrofit实例并调用如下代码来生成接口的动态代理对象:
IpService ipService = retrofit.create(IpService.class);接下来看Retrofit的create方法做了什么,代码如下所示。
public <T> T create(final Class<T> service) {Utils.validateServiceInterface(service);if (validateEagerly) {eagerlyValidateMethods(service);}return (T) Proxy.newProxyInstance(service.getClassLoader(), new Class<?>[] { service },new InvocationHandler() {private final Platform platform = Platform.get();@Override public Object invoke(Object proxy, Method method, Object... args)throws Throwable {// If the method is a method from Object then defer to normal invocation.if (method.getDeclaringClass() == Object.class) {return method.invoke(this, args);}if (platform.isDefaultMethod(method)) {return platform.invokeDefaultMethod(method, service, proxy, args);}ServiceMethod serviceMethod = loadServiceMethod(method);//1OkHttpCall okHttpCall = new OkHttpCall<>(serviceMethod, args);return serviceMethod.callAdapter.adapt(okHttpCall);}});}可以看到create方法返回了一个Proxy.newProxyInstance动态代理对象,当我们调用IpService的getIpMsg方法最终会调用InvocationHandler的invoke 方法,它有3个参数,第一个是代理对象,第二个是调用的方法,第三个是方法的参数。注释1处的loadServiceMethod(method)中的method就是我们定义的getIpMsg方法。接下来查看loadServiceMethod方法里做了什么:
private final Map<Method, ServiceMethod> serviceMethodCache = new LinkedHashMap<>();ServiceMethod loadServiceMethod(Method method) {ServiceMethod result;synchronized (serviceMethodCache) {result = serviceMethodCache.get(method);if (result == null) {result = new ServiceMethod.Builder(this, method).build();serviceMethodCache.put(method, result);}}return result;}首先会从serviceMethodCache查询传入的方法是否有缓存,如果有就用缓存的ServiceMethod,如果没有就创建一个,并加入serviceMethodCache缓存起来。接下来看ServiceMethod是如何构建的,代码如下所示。
public ServiceMethod build() {callAdapter = createCallAdapter();//1responseType = callAdapter.responseType();//2if (responseType == Response.class || responseType == okhttp3.Response.class) {throw methodError("'"+ Utils.getRawType(responseType).getName()+ "' is not a valid response body type. Did you mean ResponseBody?");}responseConverter = createResponseConverter();//3for (Annotation annotation : methodAnnotations) {parseMethodAnnotation(annotation);//4}...int parameterCount = parameterAnnotationsArray.length;parameterHandlers = new ParameterHandler<?>[parameterCount];for (int p = 0; p < parameterCount; p++) {Type parameterType = parameterTypes[p];if (Utils.hasUnresolvableType(parameterType)) {throw parameterError(p, "Parameter type must not include a type variable or wildcard: %s",parameterType);}Annotation[] parameterAnnotations = parameterAnnotationsArray[p];//5if (parameterAnnotations == null) {throw parameterError(p, "No Retrofit annotation found.");}parameterHandlers[p] = parseParameter(p, parameterType, parameterAnnotations);}...return new ServiceMethod<>(this);}注释1处调用了createCallAdapter方法,它最终会得到我们在构建Retrofit调用build方法时adapterFactories添加的对象的get方法,Retrofit的build方法部分代码:
List<CallAdapter.Factory> adapterFactories = new ArrayList<>(this.adapterFactories);adapterFactories.add(platform.defaultCallAdapterFactory(callbackExecutor));adapterFactories列表默认会添加defaultCallAdapterFactory,defaultCallAdapterFactory指的是ExecutorCallAdapterFactory,ExecutorCallAdapterFactory的get方法如下所示。
public CallAdapter<Call<?>> get(Type returnType, Annotation[] annotations, Retrofit retrofit) {if (getRawType(returnType) != Call.class) {return null;}final Type responseType = Utils.getCallResponseType(returnType);return new CallAdapter<Call<?>>() {@Override public Type responseType() {return responseType;}@Override public <R> Call<R> adapt(Call<R> call) {return new ExecutorCallbackCall<>(callbackExecutor, call);}};}get方法会得到CallAdapter对象,它的responseType方法会返回数据的真实类型,比如 Call<IpModel>,它就会返回IpModel。adapt方法会创建ExecutorCallbackCall,它会将call的回调转发至UI线程。
接着回到ServiceMethod的 build方法,注释2处调用CallAdapter的responseType得到的是返回数据的真实类型。
注释3处调用createResponseConverter方法来遍历converterFactories列表中存储的Converter.Factory,并返回一个合适的Converter用来转换对象。此前我们在构建Retrofit 调用了addConverterFactory(GsonConverterFactory.create())将GsonConverterFactory(Converter.Factory的子类)添加到converterFactories列表中,表示返回的数据支持转换为Json对象。
注释4处遍历parseMethodAnnotation方法来对请求方式(比如GET、POST)和请求地址进行解析。注释5处对方法中的参数注解进行解析(比如@Query、@Part)。最后创建ServiceMethod类并返回。
接下来回过头来查看Retrofit的create方法,在调用了loadServiceMethod方法后会创建OkHttpCall,OkHttpCall的构造函数只是进行了赋值操作。紧接着调用serviceMethod.callAdapter.adapt(okHttpCall),callAdapter的adapt方法前面讲过,它会创建ExecutorCallbackCall,ExecutorCallbackCall的部分代码如下所示。
ExecutorCallbackCall(Executor callbackExecutor, Call<T> delegate) {this.callbackExecutor = callbackExecutor;this.delegate = delegate;}@Override public void enqueue(final Callback<T> callback) {if (callback == null) throw new NullPointerException("callback == null");delegate.enqueue(new Callback<T>() {//1@Override public void onResponse(Call<T> call, final Response<T> response) {callbackExecutor.execute(new Runnable() {@Override public void run() {if (delegate.isCanceled()) {callback.onFailure(ExecutorCallbackCall.this, new IOException("Canceled"));} else {callback.onResponse(ExecutorCallbackCall.this, response);}}});}@Override public void onFailure(Call<T> call, final Throwable t) {callbackExecutor.execute(new Runnable() {@Override public void run() {callback.onFailure(ExecutorCallbackCall.this, t);}});}});}可以看出ExecutorCallbackCall是对Call的封装,它主要添加了通过callbackExecutor将请求回调到UI线程。
当我们得到Call对象后会调用它的enqueue方法,其实调用的是ExecutorCallbackCall的enqueue方法,而从注释1处可以看出ExecutorCallbackCall的enqueue方法最终调用的是delegate的enqueue方法。delegate从Retrofit的create方法的代码中我们知道它其实就是OkHttpCall。
3.Call的enqueue方法**
接下来我们就来查看OkHttpCall的enqueue方法,代码如下所示。
public void enqueue(final Callback<T> callback) {if (callback == null) throw new NullPointerException("callback == null");okhttp3.Call call;...call.enqueue(new okhttp3.Callback() {//1@Override public void onResponse(okhttp3.Call call, okhttp3.Response rawResponse)throws IOException {Response<T> response;try {response = parseResponse(rawResponse);//2} catch (Throwable e) {callFailure(e);return;}callSuccess(response);}...}注释1处调用了okhttp3.Call的enqueue方法。注释2处调用parseResponse方法:
Response<T> parseResponse(okhttp3.Response rawResponse) throws IOException {ResponseBody rawBody = rawResponse.body();...int code = rawResponse.code();if (code < 200 || code >= 300) {try {ResponseBody bufferedBody = Utils.buffer(rawBody);return Response.error(bufferedBody, rawResponse);} finally {rawBody.close();}}if (code == 204 || code == 205) {return Response.success(null, rawResponse);}ExceptionCatchingRequestBody catchingBody = new ExceptionCatchingRequestBody(rawBody);try {T body = serviceMethod.toResponse(catchingBody);//2return Response.success(body, rawResponse);} catch (RuntimeException e) {catchingBody.throwIfCaught();throw e;}}根据返回的不同的状态码code值来做不同的操作,如果顺利则会调用注释2处的代码,接下来看toResponse方法里做了什么:
T toResponse(ResponseBody body) throws IOException {return responseConverter.convert(body);}这个responseConverter就是此前讲过在ServiceMethod的build方法调用createResponseConverter方法返回的Converter,在此前的例子中我们传入的是GsonConverterFactory,因此可以查看GsonConverterFactory的代码,如下所示。
public final class GsonConverterFactory extends Converter.Factory {
...@Overridepublic Converter<ResponseBody, ?> responseBodyConverter(Type type, Annotation[] annotations,Retrofit retrofit) {TypeAdapter<?> adapter = gson.getAdapter(TypeToken.get(type));return new GsonResponseBodyConverter<>(gson, adapter);}
...
}
在GsonConverterFactory 中有一个方法responseBodyConverter,它最终会创建GsonResponseBodyConverter:
final class GsonResponseBodyConverter<T> implements Converter<ResponseBody, T> {private final Gson gson;private final TypeAdapter<T> adapter;GsonResponseBodyConverter(Gson gson, TypeAdapter<T> adapter) {this.gson = gson;this.adapter = adapter;}@Override public T convert(ResponseBody value) throws IOException {JsonReader jsonReader = gson.newJsonReader(value.charStream());try {return adapter.read(jsonReader);} finally {value.close();}}
}在GsonResponseBodyConverter的convert方法里会将回调的数据转换为Json格式。因此我们也知道了此前调用responseConverter.convert是为了转换为特定的数据格式。
Call的enqueue方法主要做的就是用OKHttp来请求网络并将返回的Response进行数据转换并回调给UI线程。
至此,Retrofit的源码就讲到这里。
网络请求库对比
前言
为什么要用网络请求开源库?
网络请求开源库是一个将 网络请求的相关功能封装好的类库
没有网络请求框架之前
App想与服务器进行网络请求交互是一件很痛苦的事:因为Android的主线程不能进行网络请求,需另开1个线程请求、考虑到线程池,缓存等一堆问题使用网络请求库后
实现网络请求的需求同时不需要考虑:- 异步请求
- 线程池
- 缓存
- blabla
同时还: - 降低开发难度
- 缩短开发周期
- 使用方便
Android实现网络请求的主流方法(SDK自带)
HttpClient vs HttpURLConnection

网络请求库 与 Android网络请求方法的关系
网络请求库的本质 = 封装了 网络请求 + 异步 + 数据处理功能的库
其中,网络请求功能则是采用
Android网络请求的原生方法(HttpClient或HttpURLConnection)具体如下图

主流的网络请求库 简介
如今Android中主流的网络请求框架有:
Android-Async-HttpVolleyOkHttpRetrofit
下面是简单介绍:

Github地址
- Android-Async-Http
- Volley
- OkHttp
- Retrofit
网络请求库- 对比

引用:
★★★Android网络编程(一)HTTP协议原理
★★★Android网络编程(二)HttpClient与HttpURLConnection
★★★Android网络编程(三)Volley用法全解析
★★★Android网络编程(四)从源码解析volley
★★★Android网络编程(五)OkHttp2.x用法全解析
★★★Android网络编程(六)OkHttp3用法全解析
★★★Android网络编程(七)源码解析OkHttp前篇-请求网络
★★★Android网络编程(八)源码解析OkHttp后篇-复用连接池
★★★Android网络编程(九)Retrofit2前篇-基本使用
★★★Android网络编程(十)Retrofit2后篇-注解
★★★Android网络编程(十一)源码解析Retrofit
★★★Android:主流网络请求开源库的对比(Android-Async-Http、Volley、OkHttp、Retrofit)