Name: Deep Residual Learning for Image Recognition
Author: 何恺明团队
Publiced: 2015.12_CVPR
文章目录
- 前言
- 1. 残差网络待解决的问题
- 2. ResNet模型亮点
- ResNet模型结构
- 1. 残差学习
- 2. Residual模块
- 3. ResNet模型
- ResNet-layers模型完整代码
- 1. BasicBlock
- 2. BottleNeck
- 3. ResNet
- 4. 搭建ResNet-34、ResNet-50模型
- 5. 网络结构可视化
- 6. 查看Pytorch官方源码
- 7. split_dataset.py
- 8. train.py
- 【附录:ResNet_layer模型代码】
前言
1. 残差网络待解决的问题
- 网络退化

随着网络深度的增加,网络能获取的信息量随之增加,而且提取的特征更加丰富。但是在残差结构提出之前,根据实验表明,随着网络层不断的加深,模型的准确率起初会不断的提高,达到最大饱和值,然后随着网络深度的继续增加,模型准确率不但不会继续增加,反而会出现大幅度降低现象,即模型训练过程和测试过程的error比浅层模型更高。这是由于之前的网络模型随着网络层不断加深会造成梯度爆炸和梯度消失的问题。
2. ResNet模型亮点
- 提出Residual模块
- 使用Batch Normalization加速训练(丢弃dropout)
- 残差网络:易于收敛、很好的解决了退化问题、模型可以很深,准确率大大提高
ResNet模型结构
1. 残差学习
- 残差结构1

- 残差结构2

残差网络是一种非常有效的缓解梯度消失问题网络,极大的提高了可以有效训练的网络的深度。
残差结构1: 原论文将输入X(即input)经过一系列处理之后得到残差F(X),若是在shortcut分支上不经过downsample处理(即不经过conv1x1卷积+BN处理),则在最终得到的残差映射函数为F(X) + X,此种结构一般用在conv_x组块中的非第一层之后的层,即用在不需要改变前后输入输出维度的层。
残差结构2: 残差结构2提到的类似这种需要在shortcut分支上进行downsample处理的结构,一般用在每个conv_x组块的第一层中,即上一层的输出out_channel不符合此层所需要的in_channel,此时需要用conv1x1卷积进行升维操作,此时得到的残差映射函数为F(X) + G(X),G(X)为shortcut分支上对输入X进行处理后得到的恒等映射。
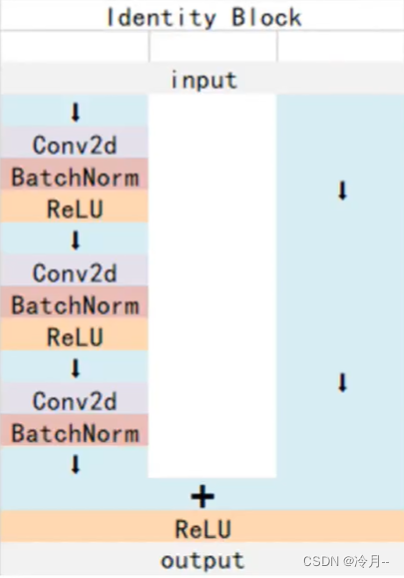
2. Residual模块
- 原论文Residual结构

- Residual详细结构

Residual结构分为两种,BasicBlock和BottleNeck。 BasicBlock应用与ResNet-18、ResNet-34模型,BottleNeck应用与ResNet-50、ResNet-101、ResNet-152模型。
两种结构中,应用downsample的shortcut分支,即在上文提到的在每个conv_x组块中的第一层,此时上一层的输入out_channel 不等于此层所需要的in_channel,因此通过downsample进行维度调整。
虚线shortcut分支,即在conv_x组块中经过第一层的downsample调整后in_channel = out_channel,此组块conv_x中的后续层不再需要调整channel_size,因此可以直接恒等映射X(即input)。
- BN层注意事项

【注】: 此处引用b站大up【霹雳吧啦Wz】的笔记,通过公式更直观的说明,添加BN层则不需要再设置bias。
由上边一系列推导公式可以看出,添加BN层后,bias会在计算中被抵消掉(即公式中的b),因此在代码中设置bias=False。
3. ResNet模型
-
ResNet-18、Res-50模型结构

-
原论文ResNet-layer模型

ResNet-layer中所有模型的大致结构都基本相似,不同layer的模型区别在于选择使用BasicBlock还是BottleNeck,其次就是在每个Conv_x组块中使用Residual的个数。
上图中ResNet-18和ResNet-50的模型中通道数的变化、图像尺寸的变化、是否使用downsample均已标出,可与原论文中给出的具体ResNet_layer模型进行相互对照学习。其它layer模型与这两个模型基本一致。
ResNet-layers模型完整代码

【注】: 此模型代码与Pytorch官方源码结构逻辑基本一致。具体细节问题,代码中注释已给出解释和说明。
1. BasicBlock
import torch
import torch.nn as nnclass BasicBlock(nn.Module):"""搭建BasicBlock模块"""expansion = 1def __init__(self, in_channel, out_channel, stride=1, downsample=None):super(BasicBlock, self).__init__()# 使用BN层是不需要使用bias的,bias最后会抵消掉self.conv1 = nn.Conv2d(in_channel, out_channel, kernel_size=3, padding=1, stride=stride, bias=False)self.bn1 = nn.BatchNorm2d(out_channel)    # BN层, BN层放在conv层和relu层中间使用self.conv2 = nn.Conv2d(out_channel, out_channel, kernel_size=3, padding=1, bias=False)self.bn2 = nn.BatchNorm2d(out_channel)self.downsample = downsampleself.relu = nn.ReLU(inplace=True)# 前向传播def forward(self, X):identity = XY = self.relu(self.bn1(self.conv1(X)))Y = self.bn2(self.conv2(Y))if self.downsample is not None:    # 保证原始输入X的size与主分支卷积后的输出size叠加时维度相同identity = self.downsample(X)return self.relu(Y + identity)
2. BottleNeck
class BottleNeck(nn.Module):"""搭建BottleNeck模块"""# BottleNeck模块最终输出out_channel是Residual模块输入in_channel的size的4倍(Residual模块输入为64),shortcut分支in_channel# 为Residual的输入64,因此需要在shortcut分支上将Residual模块的in_channel扩张4倍,使之与原始输入图片X的size一致expansion = 4def __init__(self, in_channel, out_channel, stride=1, downsample=None):super(BottleNeck, self).__init__()# 默认原始输入为256,经过7x7层和3x3层之后BottleNeck的输入降至64self.conv1 = nn.Conv2d(in_channel, out_channel, kernel_size=1, bias=False)self.bn1 = nn.BatchNorm2d(out_channel) # BN层, BN层放在conv层和relu层中间使用self.conv2 = nn.Conv2d(out_channel, out_channel, kernel_size=3, stride=stride, padding=1, bias=False)self.bn2 = nn.BatchNorm2d(out_channel)self.conv3 = nn.Conv2d(out_channel, out_channel * self.expansion, kernel_size=1, bias=False)self.bn3 = nn.BatchNorm2d(out_channel * self.expansion) # Residual中第三层out_channel扩张到in_channel的4倍self.downsample = downsampleself.relu = nn.ReLU(inplace=True)# 前向传播def forward(self, X):identity = XY = self.relu(self.bn1(self.conv1(X)))Y = self.relu(self.bn2(self.conv2(Y)))Y = self.bn3(self.conv3(Y))if self.downsample is not None: # 保证原始输入X的size与主分支卷积后的输出size叠加时维度相同identity = self.downsample(X)return self.relu(Y + identity)
3. ResNet
class ResNet(nn.Module):"""搭建ResNet-layer通用框架"""# num_classes是训练集的分类个数,include_top是在ResNet的基础上搭建更加复杂的网络时用到,此处用不到def __init__(self, residual, num_residuals, num_classes=1000, include_top=True):super(ResNet, self).__init__()self.out_channel = 64 # 输出通道数(即卷积核个数),会生成与设定的输出通道数相同的卷积核个数self.include_top = include_topself.conv1 = nn.Conv2d(3, self.out_channel, kernel_size=7, stride=2, padding=3,bias=False) # 3表示输入特征图像的RGB通道数为3,即图片数据的输入通道为3self.bn1 = nn.BatchNorm2d(self.out_channel)self.relu = nn.ReLU(inplace=True)self.maxpool = nn.MaxPool2d(kernel_size=3, stride=2, padding=1)self.conv2 = self.residual_block(residual, 64, num_residuals[0])self.conv3 = self.residual_block(residual, 128, num_residuals[1], stride=2)self.conv4 = self.residual_block(residual, 256, num_residuals[2], stride=2)self.conv5 = self.residual_block(residual, 512, num_residuals[3], stride=2)if self.include_top:self.avgpool = nn.AdaptiveAvgPool2d((1, 1)) # output_size = (1, 1)self.fc = nn.Linear(512 * residual.expansion, num_classes)# 对conv层进行初始化操作for m in self.modules():if isinstance(m, nn.Conv2d):nn.init.kaiming_normal_(m.weight, mode='fan_out', nonlinearity='relu')elif isinstance(m, (nn.BatchNorm2d, nn.GroupNorm)):nn.init.constant_(m.weight, 1)nn.init.constant_(m.bias, 0)def residual_block(self, residual, channel, num_residuals, stride=1):downsample = None# 用在每个conv_x组块的第一层的shortcut分支上,此时上个conv_x输出out_channel与本conv_x所要求的输入in_channel通道数不同,# 所以用downsample调整进行升维,使输出out_channel调整到本conv_x后续处理所要求的维度。# 同时stride=2进行下采样减小尺寸size,(注:conv2时没有进行下采样,conv3-5进行下采样,size=56、28、14、7)。if stride != 1 or self.out_channel != channel * residual.expansion:downsample = nn.Sequential(nn.Conv2d(self.out_channel, channel * residual.expansion, kernel_size=1, stride=stride, bias=False),nn.BatchNorm2d(channel * residual.expansion))block = [] # block列表保存某个conv_x组块里for循环生成的所有层# 添加每一个conv_x组块里的第一层,第一层决定此组块是否需要下采样(后续层不需要)block.append(residual(self.out_channel, channel, downsample=downsample, stride=stride))self.out_channel = channel * residual.expansion # 输出通道out_channel扩张for _ in range(1, num_residuals):block.append(residual(self.out_channel, channel))# 非关键字参数的特征是一个星号*加上参数名,比如*number,定义后,number可以接收任意数量的参数,并将它们储存在一个tuple中return nn.Sequential(*block)# 前向传播def forward(self, X):Y = self.relu(self.bn1(self.conv1(X)))Y = self.maxpool(Y)Y = self.conv5(self.conv4(self.conv3(self.conv2(Y))))if self.include_top:Y = self.avgpool(Y)Y = torch.flatten(Y, 1)Y = self.fc(Y)return Y
4. 搭建ResNet-34、ResNet-50模型
# 构建ResNet-34模型
def resnet34(num_classes=1000, include_top=True):return ResNet(BasicBlock, [3, 4, 6, 3], num_classes=num_classes, include_top=include_top)# 构建ResNet-50模型
def resnet50(num_classes=1000, include_top=True):return ResNet(BottleNeck, [3, 4, 6, 3], num_classes=num_classes, include_top=include_top)# 模型网络结构可视化
net = resnet34()
5. 网络结构可视化
# 1. 使用torchsummary中的summary查看模型的输入输出形状、顺序结构,网络参数量,网络模型大小等信息
from torchsummary import summarydevice = torch.device("cuda" if torch.cuda.is_available() else "cpu")
model = net.to(device)
summary(model, (3, 224, 224))    # 3是RGB通道数,即表示输入224 * 224的3通道的数据# 2. 使用torchviz中的make_dot生成模型的网络结构,pdf图包括计算路径、网络各层的权重、偏移量
from torchviz import make_dotX = torch.rand(size=(1, 3, 224, 224))    # 3是RGB通道数,即表示输入224 * 224的3通道的数据
Y = net(X)
vise = make_dot(Y, params=dict(net.named_parameters()))
vise.view()
6. 查看Pytorch官方源码
# Pytorch官方ResNet模型
# 导入resnet包,(ctrl + 左键)点击resnet34,即可查看resnet-layer模型源码
from torchvision.models import resnet34
7. split_dataset.py
文件: split_dataset.py
功能: 数据集划分脚本。将原始数据集 flower_photos 划分为 train 和 test 两个数据集,并更改图片size=224x224。
数据集下载地址: http://download.tensorflow.org/example_images/flower_photos.tgz
数据集保存路径: 根目录 \ data_set \ flower_photos
"""
# 数据集划分脚本
#
"""import os
import glob
import random
from PIL import Imageif __name__ == '__main__':split_rate = 0.1    # 训练集和验证集划分比率resize_image = 224    # 图片缩放后统一大小file_path = '.\\data_set\\flower_photos'    # 获取原始数据集路径# 找到文件中所有文件夹的目录,即类文件夹名dirs = glob.glob(os.path.join(file_path, '*'))dirs = [d for d in dirs if os.path.isdir(d)]print("Totally {} classes: {}".format(len(dirs), dirs))    # 打印花类文件夹名称for path in dirs:# 对每个类别进行单独处理path = path.split('\\')[-1]  # -1表示以分隔符/保留后面的一段字符# 在根目录中创建两个文件夹,train/testos.makedirs("data_set\\train\\{}".format(path), exist_ok=True)os.makedirs("data_set\\test\\{}".format(path), exist_ok=True)# 读取原始数据集中path类中对应类型的图片,并添加到files中files = glob.glob(os.path.join(file_path, path, '*jpg'))files += glob.glob(os.path.join(file_path, path, '*jpeg'))files += glob.glob(os.path.join(file_path, path, '*png'))random.shuffle(files)    # 打乱图片顺序split_boundary = int(len(files) * split_rate)  # 训练集和测试集的划分边界for i, file in enumerate(files):img = Image.open(file).convert('RGB')# 更改原始图片尺寸old_size = img.size  # (wight, height)ratio = float(resize_image) / max(old_size)  # 通过最长的size计算原始图片缩放比率# 把原始图片最长的size缩放到resize_pic,短的边等比率缩放,等比例缩放不会改变图片的原始长宽比new_size = tuple([int(x * ratio) for x in old_size])im = img.resize(new_size, Image.ANTIALIAS)  # 更改原始图片的尺寸,并设置图片高质量,保存成新图片imnew_im = Image.new("RGB", (resize_image, resize_image))  # 创建一个resize_pic尺寸的黑色背景# 把新图片im贴到黑色背景上,并通过'地板除//'设置居中放置new_im.paste(im, ((resize_image - new_size[0]) // 2, (resize_image - new_size[1]) // 2))# 先划分0.1_rate的测试集,剩下的再划分为0.9_ate的训练集,同时直接更改图片后缀为.jpgassert new_im.mode == "RGB"if i < split_boundary:new_im.save(os.path.join("data_set\\test\\{}".format(path),file.split('\\')[-1].split('.')[0] + '.jpg'))else:new_im.save(os.path.join("data_set\\train\\{}".format(path),file.split('\\')[-1].split('.')[0] + '.jpg'))# 统计划分好的训练集和测试集中.jpg图片的数量train_files = glob.glob(os.path.join('data_set', 'train', '*', '*.jpg'))test_files = glob.glob(os.path.join('data_set', 'test', '*', '*.jpg'))print("Totally {} files for train".format(len(train_files)))print("Totally {} files for test".format(len(test_files)))
8. train.py
文件: train.py
功能: 训练模型 和 验证训练好的模型精度。
ResNet-34 预训练权重文件下载地址: https://download.pytorch.org/models/resnet34-b627a593.pth
【注】:其它ResNet-layer预训练权重下载地址:
model_urls = {'resnet18': 'https://download.pytorch.org/models/resnet18-f37072fd.pth','resnet34': 'https://download.pytorch.org/models/resnet34-b627a593.pth','resnet50': 'https://download.pytorch.org/models/resnet50-0676ba61.pth','resnet101': 'https://download.pytorch.org/models/resnet101-63fe2227.pth','resnet152': 'https://download.pytorch.org/models/resnet152-394f9c45.pth','resnext50_32x4d': 'https://download.pytorch.org/models/resnext50_32x4d-7cdf4587.pth','resnext101_32x8d': 'https://download.pytorch.org/models/resnext101_32x8d-8ba56ff5.pth','wide_resnet50_2': 'https://download.pytorch.org/models/wide_resnet50_2-95faca4d.pth','wide_resnet101_2': 'https://download.pytorch.org/models/wide_resnet101_2-32ee1156.pth',
}
"""
# 训练脚本
#
"""import os
import sys
import json
import timeimport torch
import torch.nn as nn
import torch.optim as optim
import torch.utils.data as Data
from torchvision import transforms, datasets
from tqdm import tqdmfrom model import resnet34def train_model():device = torch.device("cuda:0" if torch.cuda.is_available() else "cpu")print("Using {} device.".format(device))# 数据预处理。transforms提供一系列数据预处理方法data_transform = {"train": transforms.Compose([transforms.RandomResizedCrop(224),    # 随机裁剪transforms.RandomHorizontalFlip(),    # 水平方向随机反转transforms.ToTensor(),transforms.Normalize([0.485, 0.456, 0.406], [0.229, 0.224, 0.225])]),    # 标准化"val": transforms.Compose([transforms.Resize(256),    # 图像缩放transforms.CenterCrop(224),    # 中心裁剪transforms.ToTensor(),transforms.Normalize([0.485, 0.456, 0.406], [0.229, 0.224, 0.225])])}# 获取数据集根目录(即当前代码文件夹路径)data_root = os.path.abspath(os.path.join(os.getcwd(), ".\\"))# 获取flower图片数据集路径image_path = os.path.join(data_root, "data_set")assert os.path.exists(image_path), "{} path does not exist.".format(image_path)# ImageFolder是一个通用的数据加载器,它要求我们以root/class/xxx.png格式来组织数据集的训练、验证或者测试图片。train_dataset = datasets.ImageFolder(root=os.path.join(image_path, "train"), transform=data_transform["train"])train_num = len(train_dataset)val_dataset = datasets.ImageFolder(root=os.path.join(image_path, "test"), transform=data_transform["val"])val_num = len(val_dataset)# {'daisy':0, 'dandelion':1, 'roses':2, 'sunflower':3, 'tulips':4}flower_list = train_dataset.class_to_idxclass_dict = dict((val, key) for key, val in flower_list.items())    # 将字典中键值对翻转。此处翻转为 {'0':daisy,...}# 将class_dict编码成json格式文件json_str = json.dumps(class_dict, indent=4)with open('class_indices.json', 'w') as json_file:json_file.write(json_str)batch_size = 4    # 设置批大小。batch_size太大会报错OSError: [WinError 1455] 页面文件太小,无法完成操作。num_workers = min([os.cpu_count(), batch_size if batch_size > 1 else 0, 8])  # number of workersprint("Using batch_size={} dataloader workers every process.".format(num_workers))# 加载训练集和测试集train_loader = Data.DataLoader(train_dataset, batch_size=batch_size,num_workers=num_workers, shuffle=True)val_loader = Data.DataLoader(val_dataset, batch_size=batch_size,num_workers=num_workers, shuffle=True)print("Using {} train_images for training, {} test_images for validation.".format(train_num, val_num))print()# 加载预训练权重# download url: https://download.pytorch.org/models/resnet34-b627a593.pthnet = resnet34()model_weight_path = ".\\resnet34_pre.pth"    # 预训练权重assert os.path.exists(model_weight_path), "file {} does not exist.".format(model_weight_path)# torch.load_state_dict()函数就是用于将预训练的参数权重加载到新的模型之中net.load_state_dict(torch.load(model_weight_path, map_location='cpu'), strict=False)# 改变in_channel符合fc层的要求,调整output为数据集类别5in_channel = net.fc.in_featuresnet.fc = nn.Linear(in_channel, 5)net.to(device)# 损失函数loss_function = nn.CrossEntropyLoss()# 优化器params = [p for p in net.parameters() if p.requires_grad]optimizer = optim.Adam(params, lr=0.0001)epochs = 10    # 训练迭代次数best_acc = 0.0save_path = '.\\resNet34.pth'    # 当前模型训练好后的权重参数文件保存路径batch_num = len(train_loader)    # 一个batch中数据的数量total_time = 0    # 统计训练过程总时间for epoch in range(epochs):# 开始迭代训练和测试start_time = time.perf_counter()  # 计算训练一个epoch的时间# trainnet.train()train_loss = 0.0train_bar = tqdm(train_loader, file=sys.stdout)    # tqdm是Python进度条库,可以在Python长循环中添加一个进度条提示信息。for step, data in enumerate(train_bar):train_images, train_labels = datatrain_images = train_images.to(device)train_labels = train_labels.to(device)optimizer.zero_grad()    # 梯度置零。清空之前的梯度信息outputs = net(train_images)    # 前向传播loss = loss_function(outputs, train_labels)    # 计算损失loss.backward()    # 反向传播optimizer.step()    # 参数更新train_loss += loss.item()    # 将计算的loss累加到train_loss中# desc:str类型,作为进度条说明,在进度条右边train_bar.desc = "train epoch[{}/{}] loss:{:.3f}.".format(epoch+1, epochs, loss)# validatenet.eval()val_acc = 0.0val_bar = tqdm(val_loader, file=sys.stdout)with torch.no_grad():for val_data in val_bar:val_images, val_labels = val_dataval_images = val_images.to(device)val_labels = val_labels.to(device)val_y = net(val_images)    # 前向传播predict_y = torch.max(val_y, dim=1)[1]    # 在维度为1上找到预测Y的最大值,第0个维度是batch# 计算测试集精度。predict_y与val_labels进行比较(true=1, False=0)的一个batch求和,所有batch的累加精度值val_acc += torch.eq(predict_y, val_labels).sum().item()val_bar.desc = "valid epoch[{}/{}].".format(epoch+1, epochs)# 打印epoch数据结果val_accurate = val_acc / val_numprint("[epoch {:.0f}] train_loss: {:.3f}  val_accuracy: {:.3f}".format(epoch+1, train_loss/batch_num, val_accurate))epoch_time = time.perf_counter() - start_time    # 计算训练一个epoch的时间print("epoch_time: {}".format(epoch_time))total_time += epoch_time    # 统计训练过程总时间print()# 调整测试集最优精度if val_accurate > best_acc:best_acc = val_accurate# model.state_dict()保存学习到的参数torch.save(net.state_dict(), save_path)    # 保存当前最高的准确度# 将训练过程总时间转换为h:m:s格式打印m, s = divmod(total_time, 60)h, m = divmod(m, 60)print("Total_time: {:.0f}:{:.0f}:{:.0f}".format(h, m, s))print('Finished Training!')if __name__ == '__main__':train_model()
【附录:ResNet_layer模型代码】
文件: model.py
"""
# 搭建resnet-layer模型
#
"""
import torch
import torch.nn as nnclass BasicBlock(nn.Module):"""搭建BasicBlock模块"""expansion = 1def __init__(self, in_channel, out_channel, stride=1, downsample=None):super(BasicBlock, self).__init__()# 使用BN层是不需要使用bias的,bias最后会抵消掉self.conv1 = nn.Conv2d(in_channel, out_channel, kernel_size=3, padding=1, stride=stride, bias=False)self.bn1 = nn.BatchNorm2d(out_channel)    # BN层, BN层放在conv层和relu层中间使用self.conv2 = nn.Conv2d(out_channel, out_channel, kernel_size=3, padding=1, bias=False)self.bn2 = nn.BatchNorm2d(out_channel)self.downsample = downsampleself.relu = nn.ReLU(inplace=True)# 前向传播def forward(self, X):identity = XY = self.relu(self.bn1(self.conv1(X)))Y = self.bn2(self.conv2(Y))if self.downsample is not None:    # 保证原始输入X的size与主分支卷积后的输出size叠加时维度相同identity = self.downsample(X)return self.relu(Y + identity)class BottleNeck(nn.Module):"""搭建BottleNeck模块"""# BottleNeck模块最终输出out_channel是Residual模块输入in_channel的size的4倍(Residual模块输入为64),shortcut分支in_channel# 为Residual的输入64,因此需要在shortcut分支上将Residual模块的in_channel扩张4倍,使之与原始输入图片X的size一致expansion = 4def __init__(self, in_channel, out_channel, stride=1, downsample=None):super(BottleNeck, self).__init__()# 默认原始输入为224,经过7x7层和3x3层之后BottleNeck的输入降至64self.conv1 = nn.Conv2d(in_channel, out_channel, kernel_size=1, bias=False)self.bn1 = nn.BatchNorm2d(out_channel)    # BN层, BN层放在conv层和relu层中间使用self.conv2 = nn.Conv2d(out_channel, out_channel, kernel_size=3, stride=stride, padding=1, bias=False)self.bn2 = nn.BatchNorm2d(out_channel)self.conv3 = nn.Conv2d(out_channel, out_channel * self.expansion, kernel_size=1, bias=False)self.bn3 = nn.BatchNorm2d(out_channel * self.expansion)  # Residual中第三层out_channel扩张到in_channel的4倍self.downsample = downsampleself.relu = nn.ReLU(inplace=True)# 前向传播def forward(self, X):identity = XY = self.relu(self.bn1(self.conv1(X)))Y = self.relu(self.bn2(self.conv2(Y)))Y = self.bn3(self.conv3(Y))if self.downsample is not None:    # 保证原始输入X的size与主分支卷积后的输出size叠加时维度相同identity = self.downsample(X)return self.relu(Y + identity)class ResNet(nn.Module):"""搭建ResNet-layer通用框架"""# num_classes是训练集的分类个数,include_top是在ResNet的基础上搭建更加复杂的网络时用到,此处用不到def __init__(self, residual, num_residuals, num_classes=1000, include_top=True):super(ResNet, self).__init__()self.out_channel = 64    # 输出通道数(即卷积核个数),会生成与设定的输出通道数相同的卷积核个数self.include_top = include_topself.conv1 = nn.Conv2d(3, self.out_channel, kernel_size=7, stride=2, padding=3,bias=False)    # 3表示输入特征图像的RGB通道数为3,即图片数据的输入通道为3self.bn1 = nn.BatchNorm2d(self.out_channel)self.relu = nn.ReLU(inplace=True)self.maxpool = nn.MaxPool2d(kernel_size=3, stride=2, padding=1)self.conv2 = self.residual_block(residual, 64, num_residuals[0])self.conv3 = self.residual_block(residual, 128, num_residuals[1], stride=2)self.conv4 = self.residual_block(residual, 256, num_residuals[2], stride=2)self.conv5 = self.residual_block(residual, 512, num_residuals[3], stride=2)if self.include_top:self.avgpool = nn.AdaptiveAvgPool2d((1, 1))    # output_size = (1, 1)self.fc = nn.Linear(512 * residual.expansion, num_classes)# 对conv层进行初始化操作for m in self.modules():if isinstance(m, nn.Conv2d):nn.init.kaiming_normal_(m.weight, mode='fan_out', nonlinearity='relu')elif isinstance(m, (nn.BatchNorm2d, nn.GroupNorm)):nn.init.constant_(m.weight, 1)nn.init.constant_(m.bias, 0)def residual_block(self, residual, channel, num_residuals, stride=1):downsample = None# 用在每个conv_x组块的第一层的shortcut分支上,此时上个conv_x输出out_channel与本conv_x所要求的输入in_channel通道数不同,# 所以用downsample调整进行升维,使输出out_channel调整到本conv_x后续处理所要求的维度。# 同时stride=2进行下采样减小尺寸size,(注:conv2时没有进行下采样,conv3-5进行下采样,size=56、28、14、7)。if stride != 1 or self.out_channel != channel * residual.expansion:downsample = nn.Sequential(nn.Conv2d(self.out_channel, channel * residual.expansion, kernel_size=1, stride=stride, bias=False),nn.BatchNorm2d(channel * residual.expansion))block = []    # block列表保存某个conv_x组块里for循环生成的所有层# 添加每一个conv_x组块里的第一层,第一层决定此组块是否需要下采样(后续层不需要)block.append(residual(self.out_channel, channel, downsample=downsample, stride=stride))self.out_channel = channel * residual.expansion    # 输出通道out_channel扩张for _ in range(1, num_residuals):block.append(residual(self.out_channel, channel))# 非关键字参数的特征是一个星号*加上参数名,比如*number,定义后,number可以接收任意数量的参数,并将它们储存在一个tuple中return nn.Sequential(*block)# 前向传播def forward(self, X):Y = self.relu(self.bn1(self.conv1(X)))Y = self.maxpool(Y)Y = self.conv5(self.conv4(self.conv3(self.conv2(Y))))if self.include_top:Y = self.avgpool(Y)Y = torch.flatten(Y, 1)Y = self.fc(Y)return Y# 构建ResNet-34模型
def resnet34(num_classes=1000, include_top=True):return ResNet(BasicBlock, [3, 4, 6, 3], num_classes=num_classes, include_top=include_top)# 构建ResNet-50模型
def resnet50(num_classes=1000, include_top=True):return ResNet(BottleNeck, [3, 4, 6, 3], num_classes=num_classes, include_top=include_top)# 模型网络结构可视化
net = resnet34()"""
# 1. 使用torchsummary中的summary查看模型的输入输出形状、顺序结构,网络参数量,网络模型大小等信息
from torchsummary import summarydevice = torch.device("cuda" if torch.cuda.is_available() else "cpu")
model = net.to(device)
summary(model, (3, 224, 224))    # 3是RGB通道数,即表示输入224 * 224的3通道的数据
""""""
# 2. 使用torchviz中的make_dot生成模型的网络结构,pdf图包括计算路径、网络各层的权重、偏移量
from torchviz import make_dotX = torch.rand(size=(1, 3, 224, 224))    # 3是RGB通道数,即表示输入224 * 224的3通道的数据
Y = net(X)
vise = make_dot(Y, params=dict(net.named_parameters()))
vise.view()
""""""
# Pytorch官方ResNet模型
from torchvision.models import resnet34
"""
【注】:由于本人水平有限,如有错误,敬请指正!!!


![[NCTF2019]SQLi 1regexp注入](https://img-blog.csdnimg.cn/4c262ff483944f478d13a83053002daf.png)
![buuctf-[NCTF2019]Keyboard](https://img-blog.csdnimg.cn/0d2cd646c0514b2198e62508d8e3c204.jpg)

![[NCTF2019]Fake XML cookbook](https://img-blog.csdnimg.cn/98fc6bd960dd496585955723c35c48fb.png)
![[NCTF2019]True XML cookbook](https://img-blog.csdnimg.cn/20210804132458265.png?x-oss-process=image/watermark,type_ZmFuZ3poZW5naGVpdGk,shadow_10,text_aHR0cHM6Ly9ibG9nLmNzZG4ubmV0L3FxXzUyOTA3ODM4,size_16,color_FFFFFF,t_70)
![[NCTF2019]Sore](https://img-blog.csdnimg.cn/33348eac02774c0a82a5420314156de5.png)
![[NCTF 2018]Easy_Audit](https://img-blog.csdnimg.cn/2771ba9438c645f998e2ce26895cc89c.png)
![[NCTF 2018]签到题](https://img-blog.csdnimg.cn/img_convert/1d07b8d57d692fce62ab23139c24d11d.png)

![[NCTF2019]SQLi](https://img-blog.csdnimg.cn/773dbc3972184457a1249911fb29ef26.png?x-oss-process=image/watermark,type_d3F5LXplbmhlaQ,shadow_50,text_Q1NETiBA6ICBeW91bmflj6_niLE=,size_20,color_FFFFFF,t_70,g_se,x_16)