ResNet
下图为包含有18层(17个卷积层和1个全连接层)、34层(33个卷积层和1个全连接层)、50层(49个卷积层和1个全连接层)、101层(100个卷积层和1个全连接层)、152层(151个卷积层和1个全连接层)的resnet结构

下图是论文中给出的两种残差结构。左边的残差结构是针对层数较少网络,例如ResNet18层和ResNet34层网络。右边是针对网络层数较多的网络,例如ResNet101,ResNet152等。右侧的残差结构能够减少网络参数与运算量。同样输入、输出一个channel为256的特征矩阵,如果使用左侧的残差结构需要大约1170648个参数,但如果使用右侧的残差结构只需要69632个参数。明显搭建深层网络时,使用右侧的残差结构更合适。

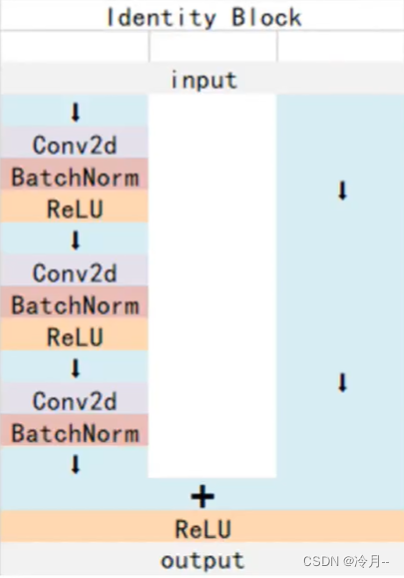
实线对应的残差结构输出的shape和输出的shape是一样的,可以直接相加
虚线对应的残差结构是输入的shape和输出的shape不一样的


下图为以34层结构为例的详细结构图,虚线部分对应上图中虚线残差结构,实线部分对应上图中实线残差结构

ResNet50

ResNeXt
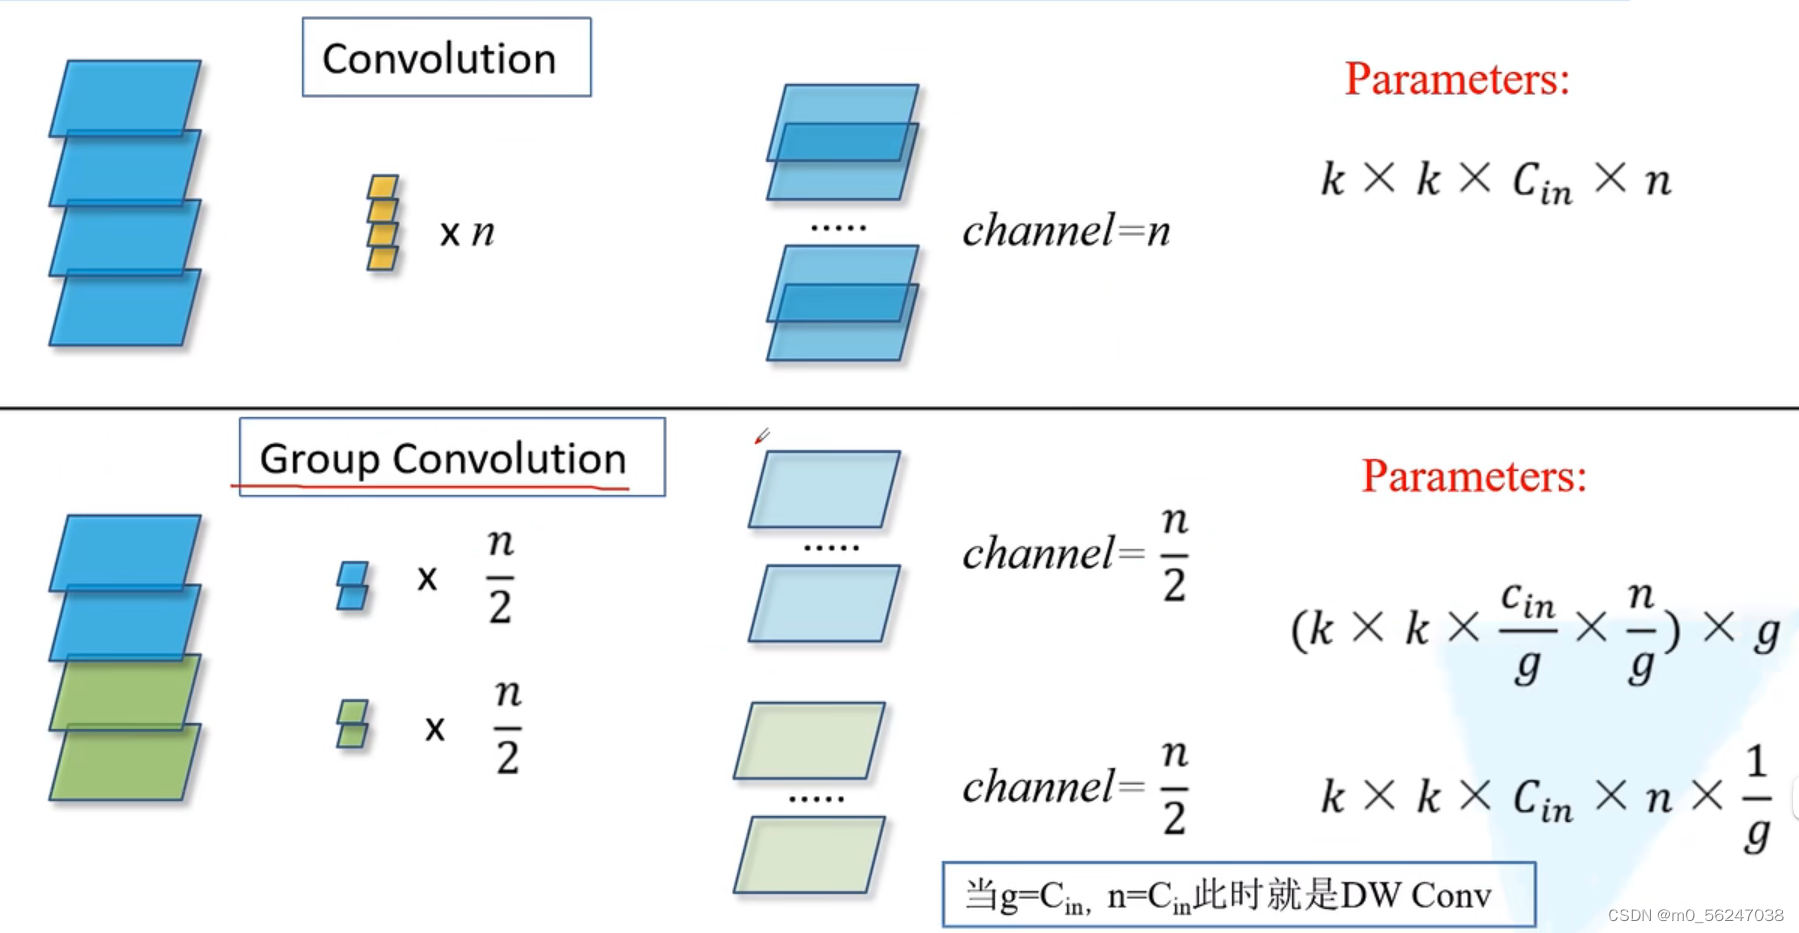
首先来看一下组卷积,即把输入特征矩阵分为g组,对每一组分别进行卷积操作,然后再把每一组的结果进行concat拼接。使用组卷积会减少模型参数量
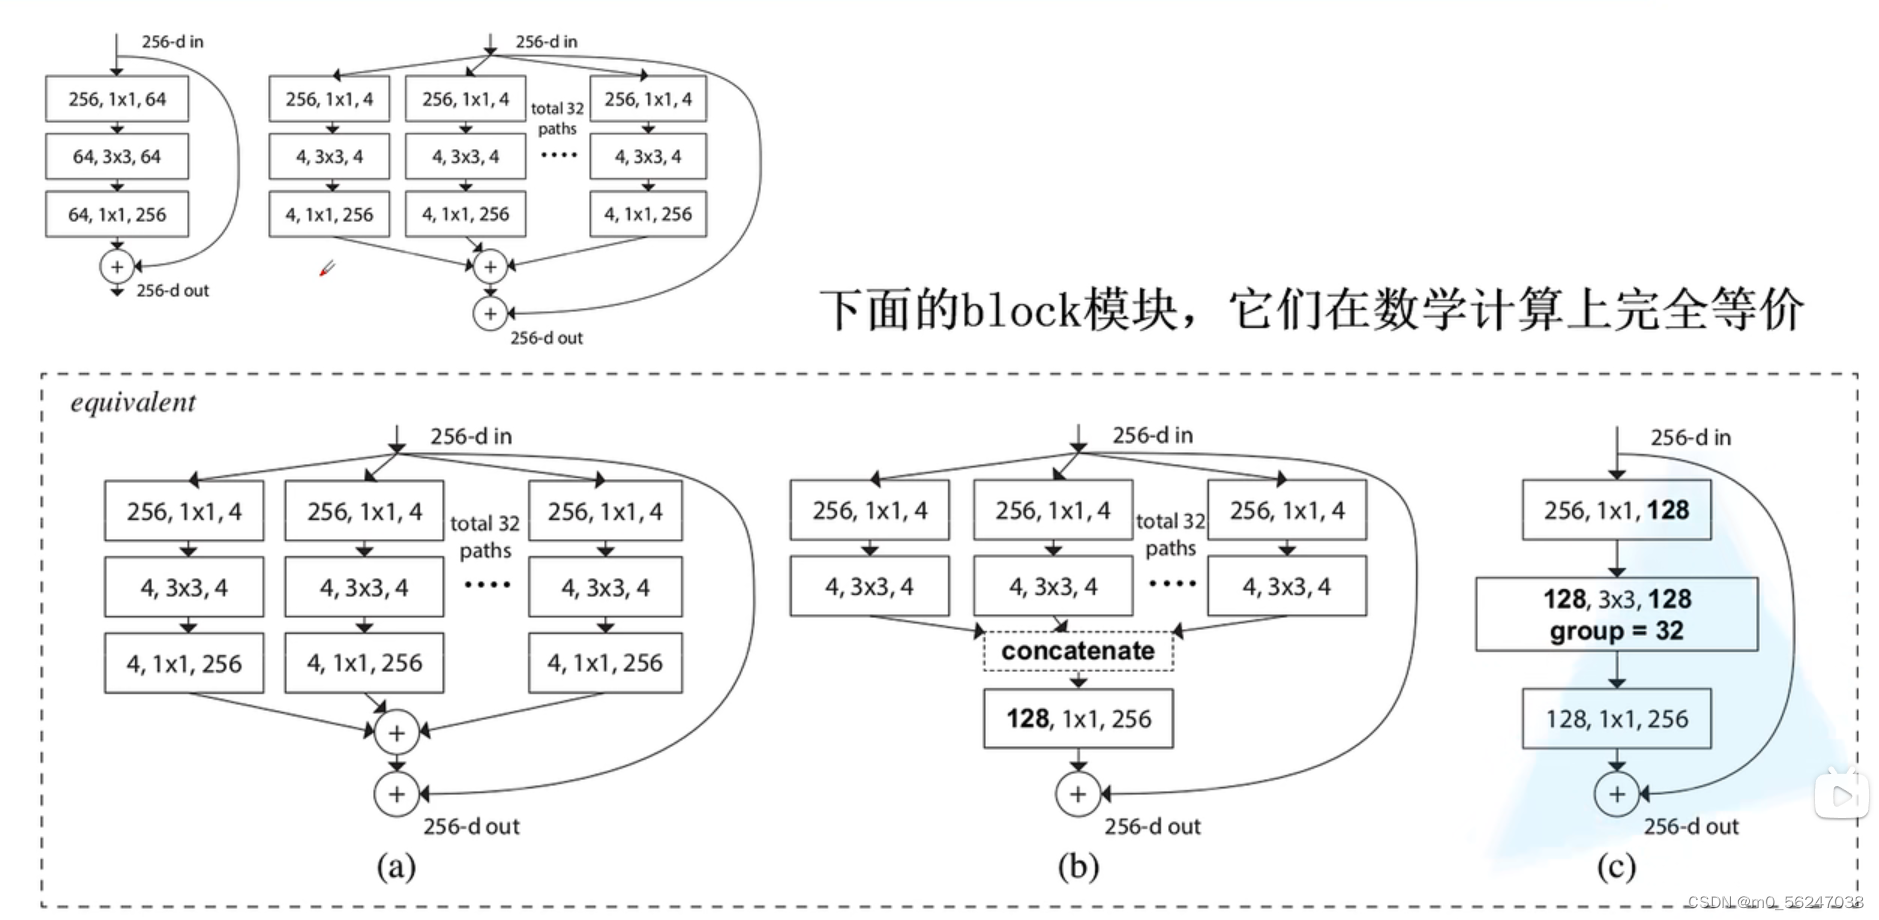
ResNeXt是把ResNet中高层(50层、101层...)的残差结构替换为了右边的结构
对于ResNeXt的block,第二层用的是group conv

model.py
import torch.nn as nn
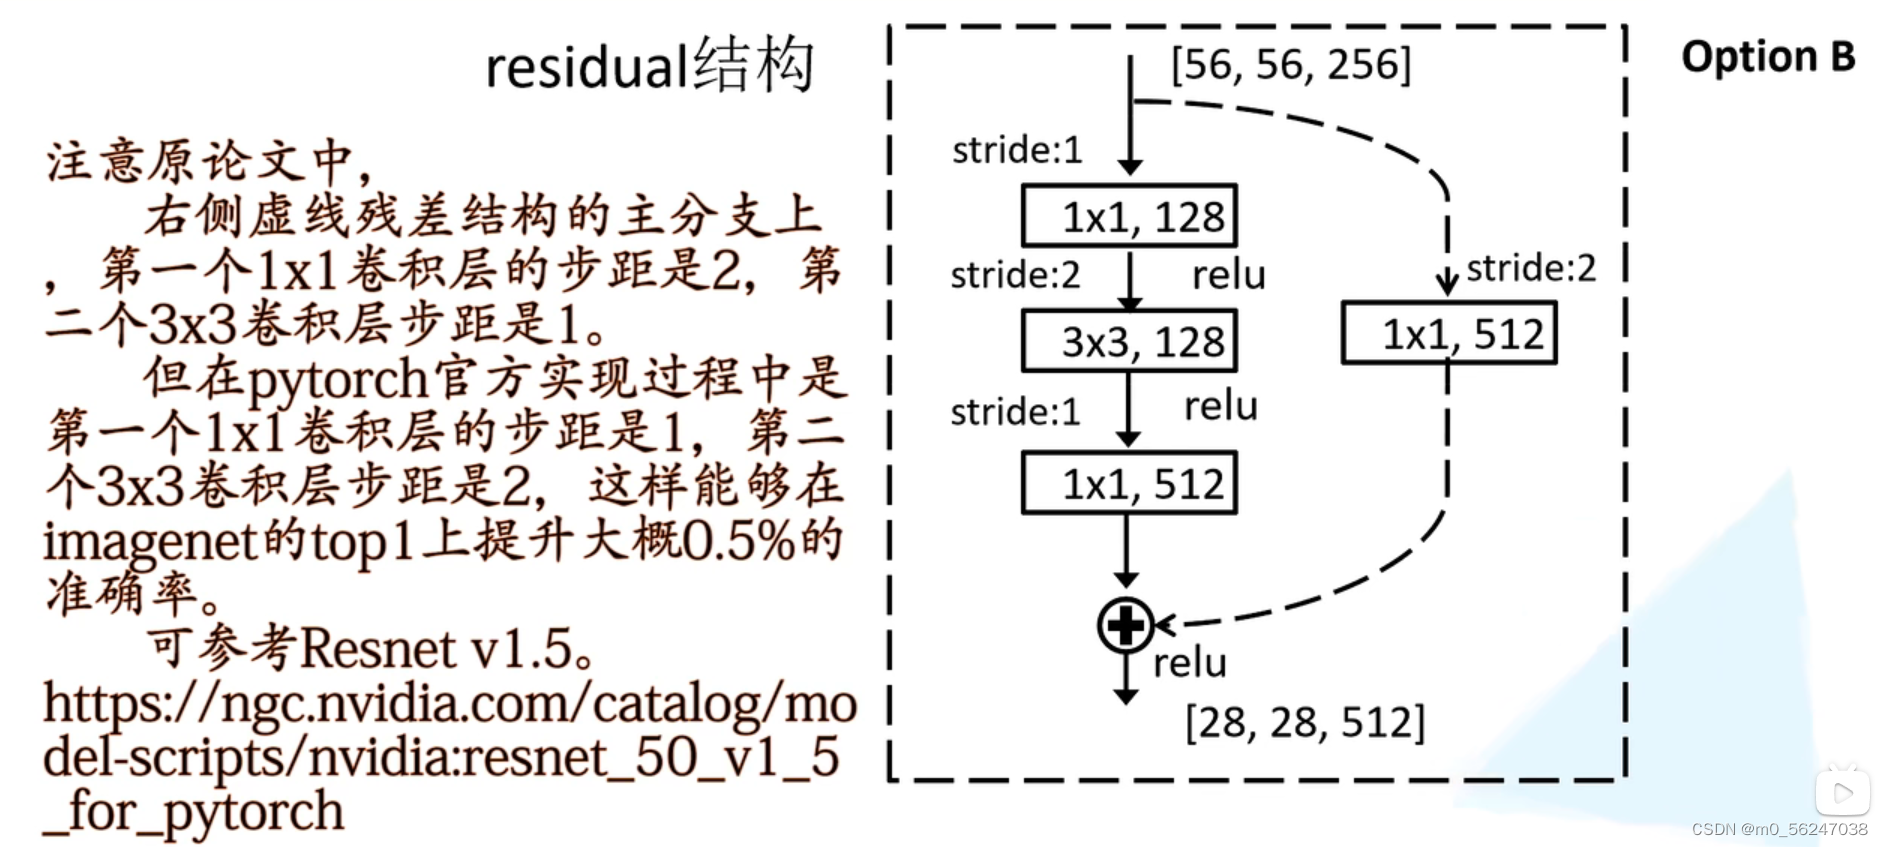
import torchclass BasicBlock(nn.Module): # 含有两层3*3conv的残差结构expansion = 1def __init__(self, in_channel, out_channel, stride=1, downsample=None, **kwargs):super(BasicBlock, self).__init__()self.conv1 = nn.Conv2d(in_channels=in_channel, out_channels=out_channel,kernel_size=3, stride=stride, padding=1, bias=False)self.bn1 = nn.BatchNorm2d(out_channel)self.relu = nn.ReLU()self.conv2 = nn.Conv2d(in_channels=out_channel, out_channels=out_channel,kernel_size=3, stride=1, padding=1, bias=False)self.bn2 = nn.BatchNorm2d(out_channel)self.downsample = downsampledef forward(self, x):identity = x # 捷径分支if self.downsample is not None: # downsample为None,对应的是实线残差结构identity = self.downsample(x)out = self.conv1(x)out = self.bn1(out)out = self.relu(out)out = self.conv2(out)out = self.bn2(out)out += identityout = self.relu(out)return outclass Bottleneck(nn.Module): # 含有两层1*1conv和一个3*3conv的残差结构"""注意:原论文中,在虚线残差结构的主分支上,第一个1x1卷积层的步距是2,第二个3x3卷积层步距是1。但在pytorch官方实现过程中是第一个1x1卷积层的步距是1,第二个3x3卷积层步距是2,这么做的好处是能够在top1上提升大概0.5%的准确率。可参考Resnet v1.5 https://ngc.nvidia.com/catalog/model-scripts/nvidia:resnet_50_v1_5_for_pytorch"""expansion = 4def __init__(self, in_channel, out_channel, stride=1, downsample=None,groups=1, width_per_group=64):super(Bottleneck, self).__init__()width = int(out_channel * (width_per_group / 64.)) * groupsself.conv1 = nn.Conv2d(in_channels=in_channel, out_channels=width,kernel_size=1, stride=1, bias=False) # squeeze channelsself.bn1 = nn.BatchNorm2d(width)# -----------------------------------------self.conv2 = nn.Conv2d(in_channels=width, out_channels=width, groups=groups,kernel_size=3, stride=stride, bias=False, padding=1)self.bn2 = nn.BatchNorm2d(width)# -----------------------------------------self.conv3 = nn.Conv2d(in_channels=width, out_channels=out_channel*self.expansion, # 卷积核的个数是前面的四倍kernel_size=1, stride=1, bias=False) # unsqueeze channelsself.bn3 = nn.BatchNorm2d(out_channel*self.expansion)self.relu = nn.ReLU(inplace=True)self.downsample = downsampledef forward(self, x):identity = xif self.downsample is not None:identity = self.downsample(x)out = self.conv1(x)out = self.bn1(out)out = self.relu(out)out = self.conv2(out)out = self.bn2(out)out = self.relu(out)out = self.conv3(out)out = self.bn3(out)out += identityout = self.relu(out)return outclass ResNet(nn.Module):def __init__(self,block,blocks_num, # [3, 4, 6, 3]num_classes=1000,include_top=True,groups=1,width_per_group=64):super(ResNet, self).__init__()self.include_top = include_topself.in_channel = 64 # 此处是通过3*3max pool之后的channelself.groups = groupsself.width_per_group = width_per_groupself.conv1 = nn.Conv2d(3, self.in_channel, kernel_size=7, stride=2,padding=3, bias=False)self.bn1 = nn.BatchNorm2d(self.in_channel)self.relu = nn.ReLU(inplace=True)self.maxpool = nn.MaxPool2d(kernel_size=3, stride=2, padding=1)self.layer1 = self._make_layer(block, 64, blocks_num[0]) # 对应表格中conv_2self.layer2 = self._make_layer(block, 128, blocks_num[1], stride=2) # 对应表格中conv_3self.layer3 = self._make_layer(block, 256, blocks_num[2], stride=2) # 对应表格中conv_4self.layer4 = self._make_layer(block, 512, blocks_num[3], stride=2) # 对应表格中conv_5if self.include_top:# output size = (1, 1) 自适应的平均池化下采样操作,无论输入特征矩阵高宽是多少,通过AdaptiveAvgPool2d之后得到的特征矩阵高宽都是1self.avgpool = nn.AdaptiveAvgPool2d((1, 1))self.fc = nn.Linear(512 * block.expansion, num_classes) # 全连接层for m in self.modules():if isinstance(m, nn.Conv2d):nn.init.kaiming_normal_(m.weight, mode='fan_out', nonlinearity='relu')def _make_layer(self, block, channel, block_num, stride=1): # channel对应conv_2 conv_3 conv_4 conv_5中第一层卷积的channeldownsample = Noneif stride != 1 or self.in_channel != channel * block.expansion: # 不成立就会生成下采样函数downsampledownsample = nn.Sequential(nn.Conv2d(self.in_channel, channel * block.expansion, kernel_size=1, stride=stride, bias=False),nn.BatchNorm2d(channel * block.expansion))layers = []layers.append(block(self.in_channel,channel,downsample=downsample,stride=stride,groups=self.groups,width_per_group=self.width_per_group))self.in_channel = channel * block.expansionfor _ in range(1, block_num):layers.append(block(self.in_channel,channel,groups=self.groups,width_per_group=self.width_per_group))return nn.Sequential(*layers)def forward(self, x):x = self.conv1(x)x = self.bn1(x)x = self.relu(x)x = self.maxpool(x)x = self.layer1(x)x = self.layer2(x)x = self.layer3(x)x = self.layer4(x)if self.include_top:x = self.avgpool(x)x = torch.flatten(x, 1)x = self.fc(x)return xdef resnet34(num_classes=1000, include_top=True):# https://download.pytorch.org/models/resnet34-333f7ec4.pthreturn ResNet(BasicBlock, [3, 4, 6, 3], num_classes=num_classes, include_top=include_top)def resnet50(num_classes=1000, include_top=True):# https://download.pytorch.org/models/resnet50-19c8e357.pthreturn ResNet(Bottleneck, [3, 4, 6, 3], num_classes=num_classes, include_top=include_top)def resnet101(num_classes=1000, include_top=True):# https://download.pytorch.org/models/resnet101-5d3b4d8f.pthreturn ResNet(Bottleneck, [3, 4, 23, 3], num_classes=num_classes, include_top=include_top)def resnext50_32x4d(num_classes=1000, include_top=True):# https://download.pytorch.org/models/resnext50_32x4d-7cdf4587.pthgroups = 32width_per_group = 4return ResNet(Bottleneck, [3, 4, 6, 3],num_classes=num_classes,include_top=include_top,groups=groups,width_per_group=width_per_group)def resnext101_32x8d(num_classes=1000, include_top=True):# https://download.pytorch.org/models/resnext101_32x8d-8ba56ff5.pthgroups = 32width_per_group = 8return ResNet(Bottleneck, [3, 4, 23, 3],num_classes=num_classes,include_top=include_top,groups=groups,width_per_group=width_per_group)train.py
import os
import sys
import json
import timeimport torch
import torch.nn as nn
import torch.optim as optim
from matplotlib import pyplot as plt
from torch.utils.data import DataLoader
from torchvision import transforms, datasets
from tqdm import tqdm
from torch.optim import lr_schedulerfrom torchvision.datasets import ImageFolder
from model import resnet34
# import torchvision.models.resnetimport os
os.environ['KMP_DUPLICATE_LIB_OK'] = 'TRUE'# 解决中文显示问题
plt.rcParams['font.sans-serif'] = ['SimHei']
plt.rcParams['axes.unicode_minus'] = FalseROOT_TRAIN = r'E:/cnn/All Classfication/AlexNet/data/train'
ROOT_TEST = r'E:/cnn/All Classfication/AlexNet/data/val'def main():device = torch.device("cuda:0" if torch.cuda.is_available() else "cpu")print("using {} device.".format(device))data_transform = {"train": transforms.Compose([transforms.RandomResizedCrop(224),transforms.RandomHorizontalFlip(),transforms.ToTensor(),transforms.Normalize([0.485, 0.456, 0.406], [0.229, 0.224, 0.225])]), # 这里的标准化参数是官网提供的,不做修改"val": transforms.Compose([transforms.Resize(256), # 将原图像长宽比固定,再将其最小边缩放到256transforms.CenterCrop(224), # 在使用中心裁剪到224 * 224大小transforms.ToTensor(),transforms.Normalize([0.485, 0.456, 0.406], [0.229, 0.224, 0.225])])}train_dataset = ImageFolder(ROOT_TRAIN, transform=data_transform["train"])  # 加载训练集train_num = len(train_dataset)  # 打印训练集有多少张图片animal_list = train_dataset.class_to_idx  # 获取类别名称以及对应的索引cla_dict = dict((val, key) for key, val in animal_list.items())  # 将上面的键值对位置对调一下json_str = json.dumps(cla_dict, indent=4)  # 把类别和对应的索引写入根目录下class_indices.json文件中with open('class_indices.json', 'w') as json_file:json_file.write(json_str)batch_size = 32train_loader = torch.utils.data.DataLoader(train_dataset,batch_size=batch_size, shuffle=True,num_workers=0)validate_dataset = ImageFolder(ROOT_TEST, transform=data_transform["val"])  # 载入测试集val_num = len(validate_dataset)  # 打印测试集有多少张图片validate_loader = torch.utils.data.DataLoader(validate_dataset,batch_size=16, shuffle=False,num_workers=0)print("using {} images for training, {} images for validation.".format(train_num, val_num))# 载入预训练模型参数net = resnet34() # 实例化resnet34(),但并未传入参数num_classes,也就是说实例化之后的全连接层是有1000个节点的# 载入预训练模型参数(如果不想使用迁移学习的方法就把下面五行注释掉,然后在resnet34()里传入参数num_classes即可,如果使用迁移学习的方法就不需要在resnet34()里传入参数num_classes)model_weight_path = "./resnet34-pre.pth" # 预训练权重assert os.path.exists(model_weight_path), "file {} does not exist.".format(model_weight_path)net.load_state_dict(torch.load(model_weight_path, map_location='cpu')) # 通过torch.load载入模型预训练权重 此时可以直接载入官方的预训练权重,因为节点个数是匹配的in_channel = net.fc.in_features # 获得全连接层的输入节点个数# 通过nn.Linear创建一个新的全连接层,输入节点个数是in_channel,输出节点个数是我们所需要的分类数net.fc = nn.Linear(in_channel, 2) # 重新赋值全连接层,这里的2指代的是类别数,训练时需要改一下net.to(device) # 将网络指认到GPU或CPU上# define loss functionloss_function = nn.CrossEntropyLoss()# construct an optimizerparams = [p for p in net.parameters() if p.requires_grad]optimizer = optim.Adam(params, lr=0.0001)epochs = 3best_acc = 0.0save_path = './resNet34.pth'train_steps = len(train_loader)t1 = time.perf_counter() # 开始计时for epoch in range(epochs):# trainnet.train()running_loss = 0.0train_bar = tqdm(train_loader, file=sys.stdout)for step, data in enumerate(train_bar):images, labels = dataoptimizer.zero_grad()logits = net(images.to(device))loss = loss_function(logits, labels.to(device))loss.backward()optimizer.step()# print statisticsrunning_loss += loss.item()train_bar.desc = "train epoch[{}/{}] loss:{:.3f}".format(epoch + 1,epochs,loss)# validatenet.eval()acc = 0.0  # accumulate accurate number / epochwith torch.no_grad():val_bar = tqdm(validate_loader, file=sys.stdout)for val_data in val_bar:val_images, val_labels = val_dataoutputs = net(val_images.to(device))# loss = loss_function(outputs, test_labels)predict_y = torch.max(outputs, dim=1)[1]acc += torch.eq(predict_y, val_labels.to(device)).sum().item()val_bar.desc = "valid epoch[{}/{}]".format(epoch + 1,epochs)val_accurate = acc / val_numprint('[epoch %d] train_loss: %.3f  val_accuracy: %.3f' %(epoch + 1, running_loss / train_steps, val_accurate))if val_accurate > best_acc:best_acc = val_accuratetorch.save(net.state_dict(), save_path)print((time.perf_counter() - t1) / 3600)  # 结束计时,计时单位为小时print('Finished Training')if __name__ == '__main__':main()
reference
ResNet网络结构详解与模型的搭建_太阳花的小绿豆的博客-CSDN博客_resnet网络结构


![[NCTF2019]SQLi 1regexp注入](https://img-blog.csdnimg.cn/4c262ff483944f478d13a83053002daf.png)
![buuctf-[NCTF2019]Keyboard](https://img-blog.csdnimg.cn/0d2cd646c0514b2198e62508d8e3c204.jpg)

![[NCTF2019]Fake XML cookbook](https://img-blog.csdnimg.cn/98fc6bd960dd496585955723c35c48fb.png)
![[NCTF2019]True XML cookbook](https://img-blog.csdnimg.cn/20210804132458265.png?x-oss-process=image/watermark,type_ZmFuZ3poZW5naGVpdGk,shadow_10,text_aHR0cHM6Ly9ibG9nLmNzZG4ubmV0L3FxXzUyOTA3ODM4,size_16,color_FFFFFF,t_70)
![[NCTF2019]Sore](https://img-blog.csdnimg.cn/33348eac02774c0a82a5420314156de5.png)
![[NCTF 2018]Easy_Audit](https://img-blog.csdnimg.cn/2771ba9438c645f998e2ce26895cc89c.png)
![[NCTF 2018]签到题](https://img-blog.csdnimg.cn/img_convert/1d07b8d57d692fce62ab23139c24d11d.png)

![[NCTF2019]SQLi](https://img-blog.csdnimg.cn/773dbc3972184457a1249911fb29ef26.png?x-oss-process=image/watermark,type_d3F5LXplbmhlaQ,shadow_50,text_Q1NETiBA6ICBeW91bmflj6_niLE=,size_20,color_FFFFFF,t_70,g_se,x_16)
![BUUCTF:[NCTF2019]phar matches everything](https://img-blog.csdnimg.cn/20200728174242861.png?x-oss-process=image/watermark,type_ZmFuZ3poZW5naGVpdGk,shadow_10,text_aHR0cHM6Ly9ibG9nLmNzZG4ubmV0L21vY2h1Nzc3Nzc3Nw==,size_16,color_FFFFFF,t_70)