Mybatis/Hibernate/JPA作为持久层使用广泛的框架,在实际的项目中有很多的追随者。这篇文章将会通过简单的实例让完全不知道Mybatis为何物的入门者迅速Catchup,对于有一些Java基础的入门者应该能够很快学会如何使用Mybatis进行CRUD(增查改删)操作。
Mybatis的前世今生
| 时间 | 详细 |
|---|---|
| 2002 | iBATIS一词来源于“internet”+“abatis”,是由Clinton Begin在2002年发起的开放源代码项目。是Apache旗下的项目 |
| 2010 | 由ASF(Apache Software Foundation) 迁到了Google Code,并改名为MyBatis |
| 2013 | 迁到Github(https://github.com/mybatis/mybatis-3)。目前最新版本为3.4.1 |
目标
通过阅读和练习,预定达到以下目标
| 项番 | 详细内容 |
|---|---|
| No.1 | Mybatis项目环境搭建 |
| No.2 | 使用Mybatis进行CRUD操作 |
预估练习时长:15分钟以内
事前准备
下载Mybatis
| 项目 | 详细信息 |
|---|---|
| 类型 | Mybatis的JAR文件 |
| 版本 | 3.4.1 |
| URL | https://github.com/mybatis/mybatis-3/releases |
下载JDBC驱动
| 项目 | 详细信息 |
|---|---|
| 类型 | MySQL的JDBC驱动 |
| 版本 | 5.1.40 |
| URL | http://dev.mysql.com/downloads/connector/j/ |
DB设定
DB使用MySQL5.7,详细安装以及创建DB和Table请参看同样是持久层框架的Hibernate的如下入门内容。
| 项番 | 内容 | URL |
|---|---|---|
| No.1 | 概要及准备 | http://blog.csdn.net/liumiaocn/article/details/53555787 |
| No.2 | JDBC方式访问数据库 | http://blog.csdn.net/liumiaocn/article/details/53559810 |
创建项目
创建项目,将上面下载的JAR文件加入到Dependencies中即可。
mybatis设定文件
在src根目录创建mybatis-config.xm设定文件,具体内容如下:
<?xml version="1.0" encoding="UTF-8"?>
<!DOCTYPE configurationPUBLIC "-//mybatis.org//DTD Config 3.0//EN""http://mybatis.org/dtd/mybatis-3-config.dtd">
<configuration><environments default="DEV"><environment id="DEV"><transactionManager type="JDBC"/><dataSource type="POOLED"><property name="driver" value="com.mysql.jdbc.Driver"/><property name="url" value="jdbc:mysql://localhost:3306/hbtestdb?useSSL=false"/><property name="username" value="hbtestuser01"/><property name="password" value="hbtestuser01"/></dataSource></environment></environments><mappers><mapper class="com.liumiao.entity.UserMapper"/></mappers>
</configuration>
mapper也可以使用resouce的方式,使用xml进行mapping,本文将使用注解方式。
创建User类和UserMapper接口
User类
package com.liumiao.entity;public class User {private int userid;private String username;private String country;public User() {}public User(int userid, String username, String country) {this.userid = userid;this.username = username;this.country = country;}public int getUserid() {return userid;}public void setUserid(int userid) {this.userid = userid;}public String getUsername() {return username;}public void setUsername(String username) {this.username = username;}public String getCountry() {return country;}public void setCountry(String country) {this.country = country;}@Overridepublic String toString(){return "User Information: "+userid+":"+username+":"+country;}
}
UserMapper接口
package com.liumiao.entity;import org.apache.ibatis.annotations.Delete;
import org.apache.ibatis.annotations.Insert;
import org.apache.ibatis.annotations.Select;
import org.apache.ibatis.annotations.Update;public interface UserMapper {@Insert("insert into hbtableuser (userid, username, country) values(#{userid},#{username}, #{country})")public int insertUser(User user);@Delete("delete from hbtableuser where userid = #{userid}")public  int deleteUser(int userid);@Delete("delete from hbtableuser")public int deleteAllUser();@Update("update hbtableuser set username=#{username}, country=#{country} where userid=#{userid}")public  int updateUser(User user);@Select("select userid, username, country from hbtableuser where userid=#{userid}")public User retrieveUserByUserid(int userid);
}
Demo演示代码
import com.liumiao.entity.UserMapper;
import org.apache.ibatis.session.SqlSession;
import org.apache.ibatis.io.Resources;
import org.apache.ibatis.session.SqlSessionFactory;
import org.apache.ibatis.session.SqlSessionFactoryBuilder;
import com.liumiao.entity.User;public class Main {public static void main(String[] args) {try {//Get SessionFactory & SessionSqlSessionFactory sqlSessionFactory = new SqlSessionFactoryBuilder().build(Resources.getResourceAsReader("mybatis-config.xml"));SqlSession sqlSession = sqlSessionFactory.openSession();System.out.println("Successfully got sqlSession from session factory.");//Get UserMapperUserMapper userMapper = sqlSession.getMapper(UserMapper.class);//CRUD: Delete All UsersuserMapper.deleteAllUser();sqlSession.commit();//CRUD: Create: Add user : 1001 liumiaocnSystem.out.println("CRUD: Create: add 1001 ");User user = new User(1001,"liumiaocn","China");System.out.println("Now Begin to add user 1001: "+ user);userMapper.insertUser(user);sqlSession.commit();System.out.println("CRUD: Create: add 1002 ");user = new User(1002,"Michael","PRC");System.out.println("Now Begin to add user 1002: "+ user);userMapper.insertUser(user);sqlSession.commit();System.out.println();//CRUD: Retrieve:  user : 1001System.out.println("CRUD: Retrieve:  1001 ");user = userMapper.retrieveUserByUserid(1001);sqlSession.commit();System.out.println("Retrieved user data: "+user);//CRUD: Retrieve:  user : 1002System.out.println("CRUD: Retrieve:  1002 ");user = userMapper.retrieveUserByUserid(1002);sqlSession.commit();System.out.println("Retrieved user data: "+user);System.out.println();//CRUD: Update:  user : 1001System.out.println("CRUD: Update:  1001 ");User tmpUser = new User(1001,"MichaelLiu","PRC");userMapper.updateUser(tmpUser);sqlSession.commit();System.out.println("Retrieved user data: "+user);//CRUD: Retrieve:  user : 1001System.out.println("CRUD: Retrieve:  1001 ");user = userMapper.retrieveUserByUserid(1001);sqlSession.commit();System.out.println("Retrieved user data after Update : "+user);System.out.println();//CRUD: DeleteSystem.out.println("CRUD: Delete:  1002 ");userMapper.deleteUser(1002);sqlSession.commit();sqlSession.close();}catch(Exception e){System.out.println("Exception happened...");e.printStackTrace();}}
}
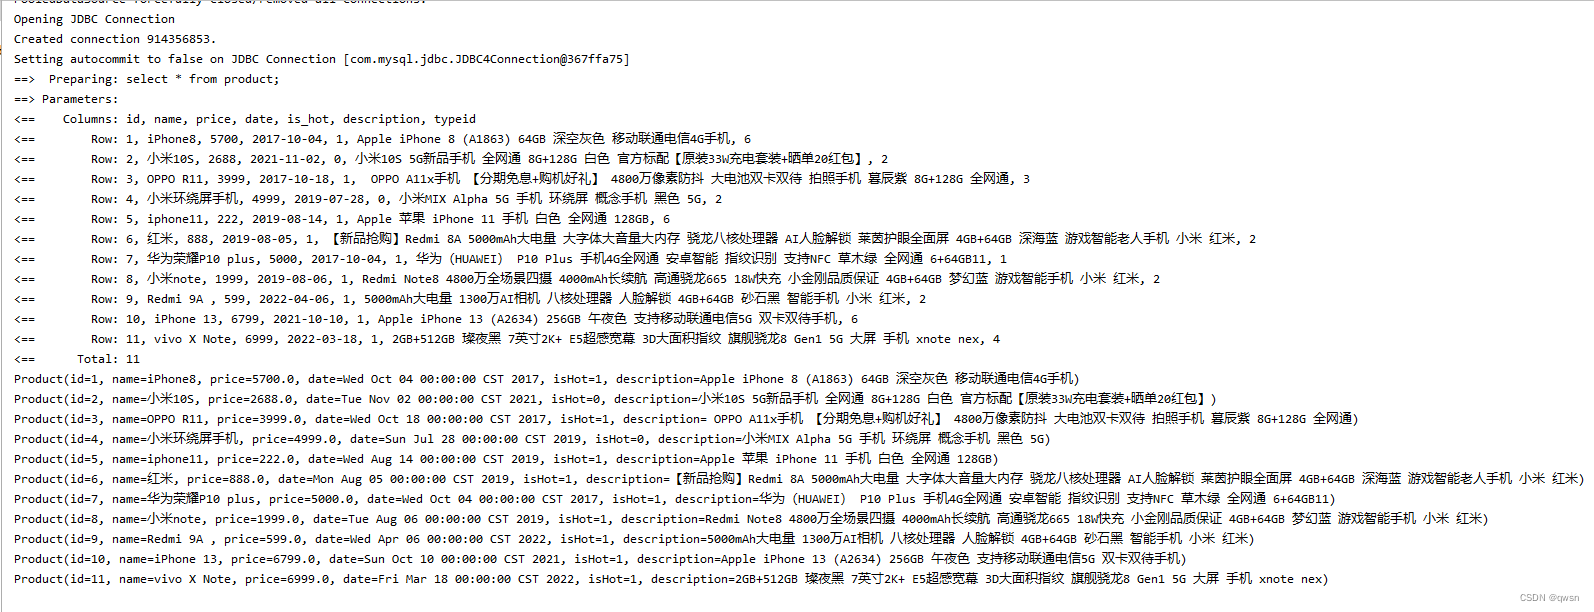
实施结果确认
Successfully got sqlSession from session factory.
CRUD: Create: add 1001
Now Begin to add user 1001: User Information: 1001:liumiaocn:China
CRUD: Create: add 1002
Now Begin to add user 1002: User Information: 1002:Michael:PRCCRUD: Retrieve:  1001
Retrieved user data: User Information: 1001:liumiaocn:China
CRUD: Retrieve:  1002
Retrieved user data: User Information: 1002:Michael:PRCCRUD: Update:  1001
Retrieved user data: User Information: 1002:Michael:PRC
CRUD: Retrieve:  1001
Retrieved user data after Update : User Information: 1001:MichaelLiu:PRCCRUD: Delete:  1002