One cut in grabcut(grabcut算法的非迭代实现?)
本文针对交互式图像分割中的图割算法,主要想翻译一篇英文文献。不足之处请大家指正。
这是博主近期看到的效果最好,实现最简单,运算时间最短的交互式图割算法,而且由于是发明图割算法实验室原班人马的文章和代码,所以非常值得研究。
摘要
该方法使用少量的辅助节点(这个辅助节点我没看出来代码在哪块提现的,还望高手指点)来实现高效率的分割,传统的基于梯度下降的方法的分割方法,如grabcut,可能会收敛到局部极值(在图像较大时),而实验结果表明,对于图像比较复杂的图像如果我们使用足够过的辅助节点也能得到较好的效果:一次分割时间大概一秒以内,在图割里面算很快的了。
论文的贡献如下:
1.提出了一整个简单的基于l1距离的appearance overlap(这个怎么翻译?),可以看成高级形式的一致性标号,提出了一种简单的图建立方法,避免将问题陷入np难,并且论文通过实验发现l1距离能够更好的分离颜色信息。
2.使用颜色索引(从代码中可以看出),作者使用一个grb三通道的像素值计算了一个索引,类似hash-code的东西,相同像素值的(grb)的hash-code算出来是一样的,可以作为一个相似的节点(也就是索引节点)。
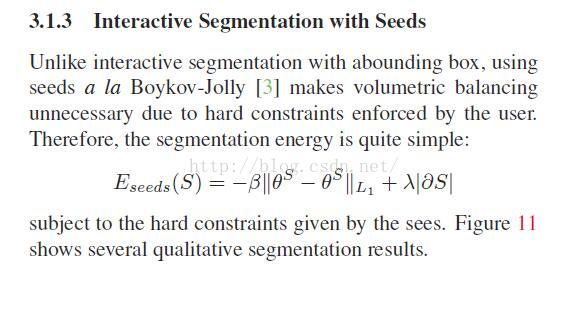
3.简化的能量函数

利用种子点分割时候简化为下面形式:
下面是我写了一些注释的代码:(对原来部分代码做了修改,没改算法,改的输入输出)
配置好OpenCV就直接能用,效果非常好,甚至可以直接集成到app里面去。
//
//@inproceedings{iccv2013onecut,
// title = {Grabcut in One Cut},
// author = {Tang, Meng and Gorelick, Lena and Veksler, Olga and Boykov, Yuri},
// booktitle={International Conference on Computer Vision},
// month = {December},
// year = {2013}}
//
//THIS SOFTWARE USES maxflow/min-cut CODE THAT WAS IMPLEMENTED BY VLADIMIR KOLMOGOROV,
//THAT CAN BE DOWNLOADED FROM http://vision.csd.uwo.ca/code/.
//PLEASE USE THE FOLLOWING CITATION:
//
//@ARTICLE{Boykov01anexperimental,
// author = {Yuri Boykov and Vladimir Kolmogorov},
// title = {An Experimental Comparison of Min-Cut/Max-Flow Algorithms for Energy Minimization in Vision},
// journal = {IEEE TRANSACTIONS ON PATTERN ANALYSIS AND MACHINE INTELLIGENCE},
// year = {2001},
// volume = {26},
// pages = {359--374}}
////
//##################################################################
//
// USAGE INSTRUCTIONS
//
// In the command line type:
//
// OneCut <imageFileName> [<beta> <numBinsPerChannel>]
//
// Default values: beta= 0.1, numBinsPerChannel=64
//
// Example: OneCut frida_small.jpg 0.1 64
// or OneCut frida_small.jpg
//
//
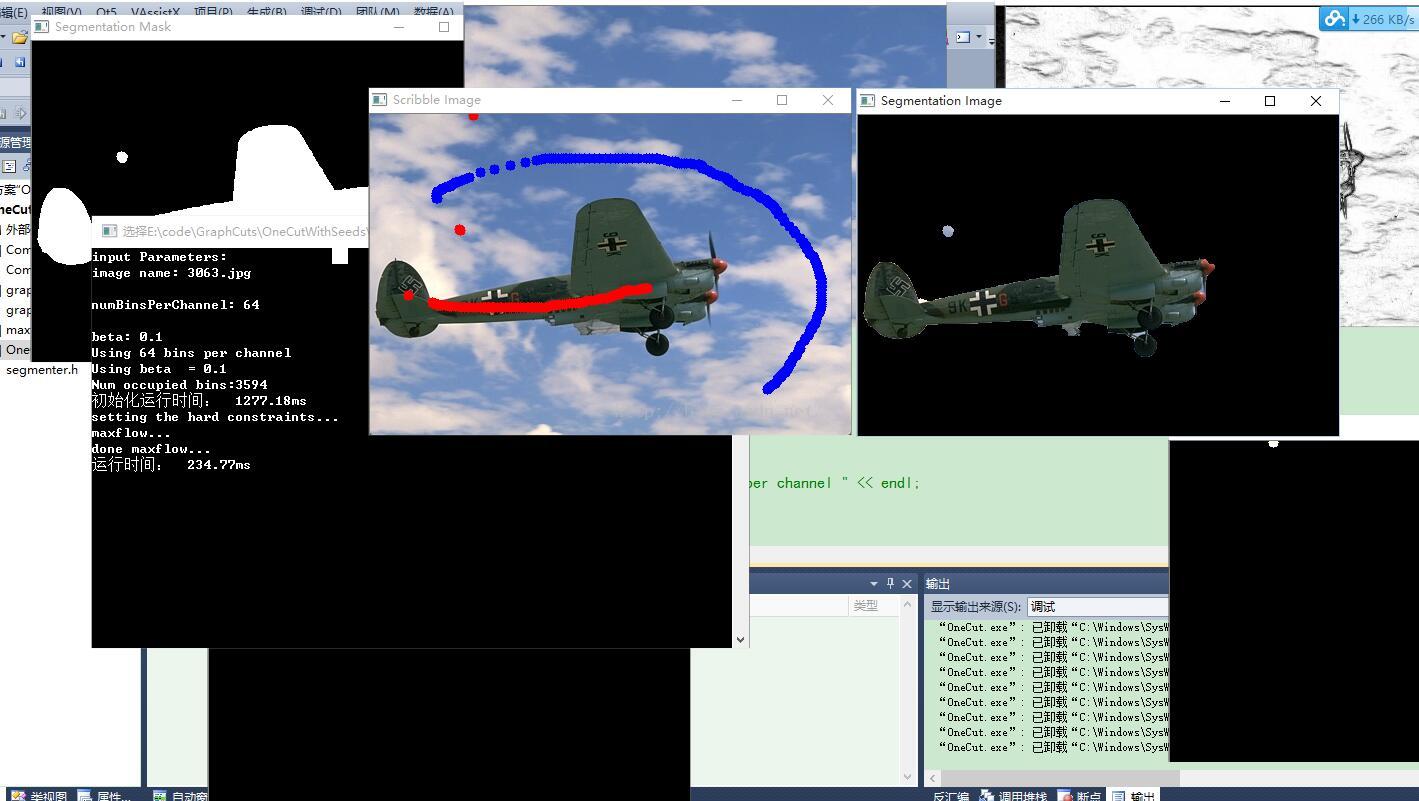
// Once the image is opened you can scribble with left and right
// mouse buttons on the object and the background in the
// "Scribble Image" window. Once the scribbles are given you can
// segment the image.You can keep repeatedly adding scribbles and
// segmenting until the result is satisfactory.
//
// Use the following Short Keys:
// 'q' - quit
// 's' - segment
// 'r' - reset (removes all strokes and clears all results)
// '+' - increase brush stroke radius
// '-' - decrease brush stroke radius
// 'right mouse button drug' - draw blue scribble
// 'left mouse button drug' - draw red scribble
//
//
#include <iostream> // for standard I/O
#include <string> // for strings
#include <iomanip> // for controlling float print precision
#include <sstream> // string to number conversion #include <opencv2/imgproc/imgproc.hpp> // Gaussian Blur
#include <opencv2/core/core.hpp> // Basic OpenCV structures (cv::Mat, Scalar)
#include <opencv2/highgui/highgui.hpp> // OpenCV window I/O#include "graph.h"
#include "ComputeTime.h"using namespace std;
using namespace cv;// images
Mat inputImg, showImg, binPerPixelImg, showEdgesImg, segMask, segShowImg;// mask
Mat fgScribbleMask, bgScribbleMask;// user clicked mouse buttons flags
bool rButtonDown = false;
bool lButtonDown = false;
int numUsedBins = 0;
float varianceSquared = 0;
int scribbleRadius = 5;//画笔半径// default arguments
float bha_slope = 0.1f;
int numBinsPerChannel = 64;const float INT32_CONST = 1000;
const float HARD_CONSTRAINT_CONST = 1000;#define NEIGHBORHOOD_8_TYPE 1;
#define NEIGHBORHOOD_25_TYPE 2;const int NEIGHBORHOOD = NEIGHBORHOOD_8_TYPE;//************************************
// F u n c t i o n d e c l a r a t i o n s // init all images/vars
int init(char * imgFileName);// clear everything before closing
void destroyAll();// mouse listener
static void onMouse( int event, int x, int y, int, void* );// set bin index for each image pixel, store it in binPerPixelImg
void getBinPerPixel(Mat & binPerPixelImg, Mat & inputImg, int numBinsPerChannel, int & numUsedBins);// compute the variance of image edges between neighbors
void getEdgeVariance(Mat & inputImg, Mat & showEdgesImg, float & varianceSquared);typedef Graph<int,int,int> GraphType;
GraphType *myGraph; //***********************************
// M a i n /*if( argc > 4 || argc < 2){cout <<" Usage: seedsAndOverlap ImageToSegment [numBinsPerChannel bha_slope]" << endl;return -1;}if (argc >= 3){// get the second argString numBinsStr(argv[2]);// convert to int numBinsPerChannel = atoi(numBinsStr.c_str());cout << "Using " << numBinsPerChannel << " bins per channel " << endl; if (argc >=4){//get third argumentString bhaSlopeStr(argv[3]);bha_slope = (float)atof(bhaSlopeStr.c_str());cout << "Using beta = " << bha_slope << endl;}elsecout << "Using default beta = " << bha_slope << endl; }else{cout << "Using default " << numBinsPerChannel << " bins per channel " << endl; cout << "Using default beta = " << bha_slope << endl; }*/int main(int argc, char *argv[])
{String image_name,numBinsStr,bhaSlopeStr;cout<<"input Parameters:"<<endl;cout<<"image name: ";cin>>image_name;cout<<endl<<"numBinsPerChannel: ";cin>>numBinsStr;cout<<endl<<"beta: ";cin>>bhaSlopeStr;// get img name parameterchar * imgFileName = (char *)image_name.c_str();// convert to int numBinsPerChannel = atoi(numBinsStr.c_str());cout << "Using " << numBinsPerChannel << " bins per channel " << endl; bha_slope = (float)atof(bhaSlopeStr.c_str());cout << "Using beta = " << bha_slope << endl;//cout << "Using default beta = " << bha_slope << endl; ComputeTime ct_init;//计算代码运行时间的类ct_init.Begin();if (init(imgFileName)==-1){cout << "Could not initialize" << endl ;return -1;}cout<<"初始化运行时间: "<<ct_init.End()<<"ms"<<endl;// Wait for a keystroke in the windowfor (;;){char key = waitKey(0); switch (key){case 'q':cout << "goodbye" << endl;destroyAll();return 0;case '-'://缩小画笔直径if (scribbleRadius > 2)scribbleRadius --;cout << "current radius is " << scribbleRadius << endl;break;case '+':if (scribbleRadius < 100)scribbleRadius ++;cout << "current radius is " << scribbleRadius << endl;break;case 's':{ComputeTime ct;//计算代码运行时间的类ct.Begin();cout << "setting the hard constraints..." << endl;for(int i=0; i<inputImg.rows; i++){for(int j=0; j<inputImg.cols; j++) {// this is the node id for the current pixelGraphType::node_id currNodeId = i * inputImg.cols + j;// add hard constraints based on scribblesif (fgScribbleMask.at<uchar>(i,j) == 255)myGraph->add_tweights(currNodeId,(int)ceil(INT32_CONST * HARD_CONSTRAINT_CONST + 0.5),0);else if (bgScribbleMask.at<uchar>(i,j) == 255)myGraph->add_tweights(currNodeId,0,(int)ceil(INT32_CONST * HARD_CONSTRAINT_CONST + 0.5));}}cout << "maxflow..." << endl;int flow = myGraph -> maxflow();cout << "done maxflow..." << endl;// this is where we store the resultssegMask = 0;inputImg.copyTo(segShowImg);//inputImg.copyTo(showImg);// empty scribble masks are ready to record additional scribbles for additional hard constraints// to be used next timefgScribbleMask = 0;bgScribbleMask = 0;// copy the segmentation results on to the result imagesfor (int i = 0; i<inputImg.rows * inputImg.cols; i++){// if it is foreground - color blueif (myGraph->what_segment((GraphType::node_id)i ) == GraphType::SOURCE){segMask.at<uchar>(i/inputImg.cols, i%inputImg.cols) = 255;//(uchar)segShowImg.at<Vec3b>(i/inputImg.cols, i%inputImg.cols)[2] = 200;}// if it is background - color redelse{segMask.at<uchar>(i/inputImg.cols, i%inputImg.cols) = 0;(uchar)segShowImg.at<Vec3b>(i/inputImg.cols, i%inputImg.cols)[0] = 0;(uchar)segShowImg.at<Vec3b>(i/inputImg.cols, i%inputImg.cols)[1] = 0;(uchar)segShowImg.at<Vec3b>(i/inputImg.cols, i%inputImg.cols)[2] = 0;}}imshow("Segmentation Mask", segMask);imshow("Segmentation Image", segShowImg);cout<<"运行时间: "<<ct.End()<<"ms"<<endl;imwrite("seg_result.bmp",segShowImg);waitKey(0);break;}case 'r':{cout << "resetting" << endl;destroyAll();if (init(imgFileName)==-1){cout << "could not initialize" << std::endl ;return -1;}break;}}}return 0;
}// mouse listener
static void onMouse( int event, int x, int y, int, void* )
{//cout << "On Mouse: (" << x << "," << y << ")" <<endl;if (event == CV_EVENT_LBUTTONDOWN){lButtonDown = true;}else if (event == CV_EVENT_RBUTTONDOWN){rButtonDown = true;}else if (event == CV_EVENT_LBUTTONUP){lButtonDown = false;}else if (event == CV_EVENT_RBUTTONUP){rButtonDown = false;}else if (event == CV_EVENT_MOUSEMOVE){if (rButtonDown){// scribble the backgroundcircle(bgScribbleMask,Point(x,y),scribbleRadius, 255,-1);circle(showImg,Point(x,y),scribbleRadius, CV_RGB(0,0,255),-1);}else if (lButtonDown){// scribble the foregroundcircle(fgScribbleMask,Point(x,y),scribbleRadius, 255,-1);circle(showImg,Point(x,y),scribbleRadius, CV_RGB(255,0,0),-1);//fgScribbleMask.at<char>(y,x)=(char)255;// set variables using mask//showImg.setTo(redColorElement,fgScribbleMask);//showImg.at<Vec3b>(y,x)[0] = 0;//showImg.at<Vec3b>(y,x)[1] = 0;//showImg.at<Vec3b>(y,x)[2] = 255;}}imshow("Scribble Image", showImg);imshow("fg mask", fgScribbleMask);imshow("bg mask", bgScribbleMask);
}// clear everything before closing
void destroyAll()
{// destroy all windowsdestroyWindow("Input Image");destroyWindow("Scribble Image");destroyWindow("Bin Per Pixel");destroyWindow("Edges");destroyWindow("bg mask");destroyWindow("fg mask");destroyWindow("Segmentation Mask");destroyWindow("Segmentation Image");// clear all datafgScribbleMask.release();bgScribbleMask.release();inputImg.release();showImg.release();showEdgesImg.release();binPerPixelImg.release();segMask.release();segShowImg.release();delete myGraph;}// init all images/vars
int init(char * imgFileName)
{// Read the fileinputImg = imread(imgFileName, CV_LOAD_IMAGE_COLOR); showImg = inputImg.clone();segShowImg = inputImg.clone();// Check for invalid inputif(!inputImg.data ) {cout << "Could not open or find the image: " << imgFileName << std::endl ;return -1;}// this is the mask to keep the user scribblesfgScribbleMask.create(2,inputImg.size,CV_8UC1);fgScribbleMask = 0;bgScribbleMask.create(2,inputImg.size,CV_8UC1);bgScribbleMask = 0;segMask.create(2,inputImg.size,CV_8UC1);segMask = 0;showEdgesImg.create(2, inputImg.size, CV_32FC1);showEdgesImg = 0;binPerPixelImg.create(2, inputImg.size,CV_32F);// get bin index for each image pixel, store it in binPerPixelImggetBinPerPixel(binPerPixelImg, inputImg, numBinsPerChannel, numUsedBins);// compute the variance of image edges between neighborsgetEdgeVariance(inputImg, showEdgesImg, varianceSquared);// Create a window for display.namedWindow( "Input Image", CV_WINDOW_AUTOSIZE );namedWindow( "Scribble Image", CV_WINDOW_AUTOSIZE);namedWindow("Bin Per Pixel", CV_WINDOW_AUTOSIZE );namedWindow("Edges", CV_WINDOW_AUTOSIZE );namedWindow("Segmentation Mask",CV_WINDOW_AUTOSIZE);namedWindow("Segmentation Image",CV_WINDOW_AUTOSIZE);namedWindow( "fg mask", CV_WINDOW_AUTOSIZE );namedWindow( "bg mask", CV_WINDOW_AUTOSIZE );//namedWindow("Input Image", CV_WINDOW_NORMAL | CV_WINDOW_KEEPRATIO | CV_GUI_EXPANDED);// Show our image inside it.imshow( "Input Image", inputImg ); imshow( "Scribble Image", showImg ); imshow("Segmentation Mask", segMask);imshow("Segmentation Image", segShowImg);imshow("fg mask", fgScribbleMask);imshow("bg mask", bgScribbleMask);moveWindow("Scribble Image", 1,1);moveWindow("Input Image", inputImg.cols + 50,1);moveWindow("Bin Per Pixel", 2*(inputImg.cols + 50),1);moveWindow("Edges", 2*(inputImg.cols + 55),1);// set the callback on mousesetMouseCallback("Scribble Image", onMouse, 0);myGraph = new GraphType(/*estimated # of nodes*/ inputImg.rows * inputImg.cols + numUsedBins, /*estimated # of edges=11 spatial neighbors and one link to auxiliary*/ 12 * inputImg.rows * inputImg.cols); GraphType::node_id currNodeId = myGraph -> add_node((int)inputImg.cols * inputImg.rows + numUsedBins); //#pragma omp parallel forfor(int i=0; i<inputImg.rows; i++){//#pragma omp parallel forfor(int j=0; j<inputImg.cols; j++) {// this is the node id for the current pixelGraphType::node_id currNodeId = i * inputImg.cols + j;// add hard constraints based on scribblesif (fgScribbleMask.at<uchar>(i,j) == 255)myGraph->add_tweights(currNodeId,(int)ceil(INT32_CONST * HARD_CONSTRAINT_CONST + 0.5),0);else if (bgScribbleMask.at<uchar>(i,j) == 255)myGraph->add_tweights(currNodeId,0,(int)ceil(INT32_CONST * HARD_CONSTRAINT_CONST + 0.5));// You can now access the pixel value with cv::Vec3bfloat b = (float)inputImg.at<Vec3b>(i,j)[0];float g = (float)inputImg.at<Vec3b>(i,j)[1];float r = (float)inputImg.at<Vec3b>(i,j)[2];// go over the neighborsfor (int si = -NEIGHBORHOOD; si <= NEIGHBORHOOD && si + i < inputImg.rows && si + i >= 0 ; si++){for (int sj = 0; sj <= NEIGHBORHOOD && sj + j < inputImg.cols; sj++){if ((si == 0 && sj == 0) ||(si == 1 && sj == 0) || (si == NEIGHBORHOOD && sj == 0))continue;// this is the node id for the neighborGraphType::node_id nNodeId = (i+si) * inputImg.cols + (j + sj);float nb = (float)inputImg.at<Vec3b>(i+si,j+sj)[0];float ng = (float)inputImg.at<Vec3b>(i+si,j+sj)[1];float nr = (float)inputImg.at<Vec3b>(i+si,j+sj)[2];// ||I_p - I_q||^2 / 2 * sigma^2float currEdgeStrength = exp(-((b-nb)*(b-nb) + (g-ng)*(g-ng) + (r-nr)*(r-nr))/(2*varianceSquared));float currDist = sqrt((float)si*(float)si + (float)sj*(float)sj);// this is the edge between the current two pixels (i,j) and (i+si, j+sj)currEdgeStrength = ((float)0.95 * currEdgeStrength + (float)0.05) /currDist;myGraph -> add_edge(currNodeId, nNodeId, /* capacities */ (int) ceil(INT32_CONST*currEdgeStrength + 0.5), (int)ceil(INT32_CONST*currEdgeStrength + 0.5));}}// add the adge to the auxiliary nodeint currBin = (int)binPerPixelImg.at<float>(i,j);myGraph -> add_edge(currNodeId, (GraphType::node_id)(currBin + inputImg.rows * inputImg.cols),/* capacities */ (int) ceil(INT32_CONST*bha_slope+ 0.5), (int)ceil(INT32_CONST*bha_slope + 0.5));}}return 0;
}// get bin index for each image pixel, store it in binPerPixelImg
void getBinPerPixel(Mat & binPerPixelImg, Mat & inputImg, int numBinsPerChannel, int & numUsedBins)
{// this vector is used to through away bins that were not used 计算x的y次幂。初值64*64*64空间中初值都是-1vector<int> occupiedBinNewIdx((int)pow((double)numBinsPerChannel,(double)3),-1);// go over the imageint newBinIdx = 0;//#pragma omp parallel forfor(int i=0; i<inputImg.rows; i++)for(int j=0; j<inputImg.cols; j++) {// You can now access the pixel value with cv::Vec3bfloat b = (float)inputImg.at<Vec3b>(i,j)[0];float g = (float)inputImg.at<Vec3b>(i,j)[1];float r = (float)inputImg.at<Vec3b>(i,j)[2];// this is the bin assuming all bins are presentint bin = (int)(floor(b/256.0 *(float)numBinsPerChannel) + (float)numBinsPerChannel * floor(g/256.0*(float)numBinsPerChannel) + (float)numBinsPerChannel * (float)numBinsPerChannel * floor(r/256.0*(float)numBinsPerChannel)); // if we haven't seen this bin yetif (occupiedBinNewIdx[bin]==-1){// mark it seen and assign it a new indexoccupiedBinNewIdx[bin] = newBinIdx;newBinIdx ++;}// if we saw this bin already, it has the new indexbinPerPixelImg.at<float>(i,j) = (float)occupiedBinNewIdx[bin];//cout << bin << endl;}double maxBin;minMaxLoc(binPerPixelImg,NULL,&maxBin);//图像中的最大值numUsedBins = (int) maxBin + 1;imshow("Bin Per Pixel", binPerPixelImg/maxBin);occupiedBinNewIdx.clear();cout << "Num occupied bins:" << numUsedBins<< endl;} // compute the variance(变化,方差) of image edges between neighbors
void getEdgeVariance(Mat & inputImg, Mat & showEdgesImg, float & varianceSquared)
{varianceSquared = 0;int counter = 0;#pragma omp parallel forfor(int i=0; i<inputImg.rows; i++){for(int j=0; j<inputImg.cols; j++) {// You can now access the pixel value with cv::Vec3bfloat b = (float)inputImg.at<Vec3b>(i,j)[0];float g = (float)inputImg.at<Vec3b>(i,j)[1];float r = (float)inputImg.at<Vec3b>(i,j)[2];for (int si = -NEIGHBORHOOD; si <= NEIGHBORHOOD && si + i < inputImg.rows && si + i >= 0 ; si++){for (int sj = 0; sj <= NEIGHBORHOOD && sj + j < inputImg.cols ; sj++){if ((si == 0 && sj == 0) ||(si == 1 && sj == 0) || (si == NEIGHBORHOOD && sj == 0))continue;float nb = (float)inputImg.at<Vec3b>(i+si,j+sj)[0];float ng = (float)inputImg.at<Vec3b>(i+si,j+sj)[1];float nr = (float)inputImg.at<Vec3b>(i+si,j+sj)[2];varianceSquared+= (b-nb)*(b-nb) + (g-ng)*(g-ng) + (r-nr)*(r-nr); counter ++;}}}}varianceSquared/=counter;// just for visualization//#pragma omp parallel forfor(int i=0; i<inputImg.rows; i++){for(int j=0; j<inputImg.cols; j++) {float edgeStrength = 0;// You can now access the pixel value with cv::Vec3bfloat b = (float)inputImg.at<Vec3b>(i,j)[0];float g = (float)inputImg.at<Vec3b>(i,j)[1];float r = (float)inputImg.at<Vec3b>(i,j)[2];for (int si = -NEIGHBORHOOD; si <= NEIGHBORHOOD && si + i < inputImg.rows && si + i >= 0; si++){for (int sj = 0; sj <= NEIGHBORHOOD && sj + j < inputImg.cols ; sj++){if ((si == 0 && sj == 0) ||(si == 1 && sj == 0) ||(si == NEIGHBORHOOD && sj == 0))continue;float nb = (float)inputImg.at<Vec3b>(i+si,j+sj)[0];float ng = (float)inputImg.at<Vec3b>(i+si,j+sj)[1];float nr = (float)inputImg.at<Vec3b>(i+si,j+sj)[2];// ||I_p - I_q||^2 / 2 * sigma^2float currEdgeStrength = exp(-((b-nb)*(b-nb) + (g-ng)*(g-ng) + (r-nr)*(r-nr))/(2*varianceSquared));float currDist = sqrt((float)si*(float)si + (float)sj * (float)sj);// this is the edge between the current two pixels (i,j) and (i+si, j+sj)edgeStrength = edgeStrength + ((float)0.95 * currEdgeStrength + (float)0.05) /currDist;}}// this is the avg edge strength for pixel (i,j) with its neighborsshowEdgesImg.at<float>(i,j) = edgeStrength;}}double maxEdge;Point maxPoint;minMaxLoc(showEdgesImg,NULL,&maxEdge, NULL, &maxPoint);//cout << showEdgesImg.at<float>(maxPoint) << endl;imshow("Edges", showEdgesImg/maxEdge);}/*
*******************************
Mat myMat(size(3, 3), CV_32FC2);myMat.ptr<float>(y)[2*x]; // first channel
myMat.ptr<float>(y)[2*x+1]; // second channel
*/
测量时间的类:
#pragma once
/*
//计算代码段运行时间的类
//
*/
#include <iostream>#ifndef ComputeTime_h
#define ComputeTime_hclass   ComputeTime
{
private:  int Initialized;  __int64 Frequency;  __int64 BeginTime;  public:  bool Avaliable();  double End();  bool Begin();  ComputeTime();  virtual   ~ComputeTime();    };  #endif#include "ComputeTime.h"
#include <iostream>
#include <Windows.h>ComputeTime::ComputeTime()
{  Initialized=QueryPerformanceFrequency((LARGE_INTEGER   *)&Frequency);
}  ComputeTime::~ComputeTime()
{  }  bool   ComputeTime::Begin()
{  if(!Initialized)  return 0;return   QueryPerformanceCounter((LARGE_INTEGER   *)&BeginTime);  }double   ComputeTime::End()
{  if(!Initialized)  return 0;__int64   endtime;  QueryPerformanceCounter((LARGE_INTEGER   *)&endtime);  __int64   elapsed = endtime-BeginTime;  return   ((double)elapsed/(double)Frequency)*1000.0;  //单位毫秒}  bool   ComputeTime::Avaliable()
{  return Initialized;
}
项目主页:
http://vision.csd.uwo.ca/code/
Code:http://vision.csd.uwo.ca/wiki/vision/upload/7/77/OneCutWithSeeds_v1.03.zip
Paper:http://www.csd.uwo.ca/~ygorelic/iccv13_one_cut.pdf
OpenCV代码实现grabcut::
http://www.morethantechnical.com/2010/05/05/bust-out-your-own-graphcut-based-image-segmentation-with-opencv-w-code/
我调试好的工程代码下载链接:点击打开链接