理论:
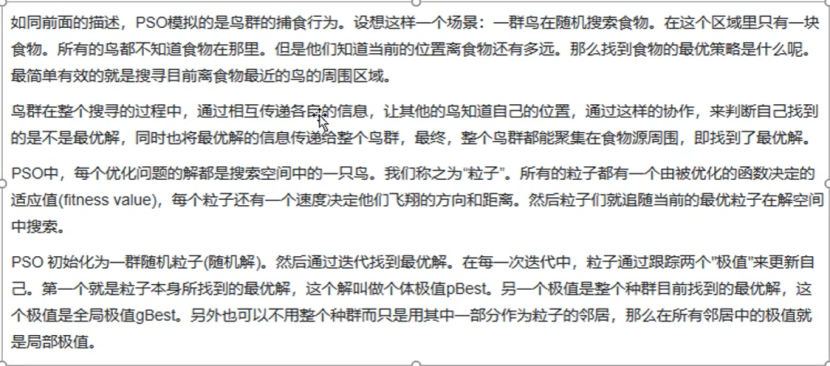
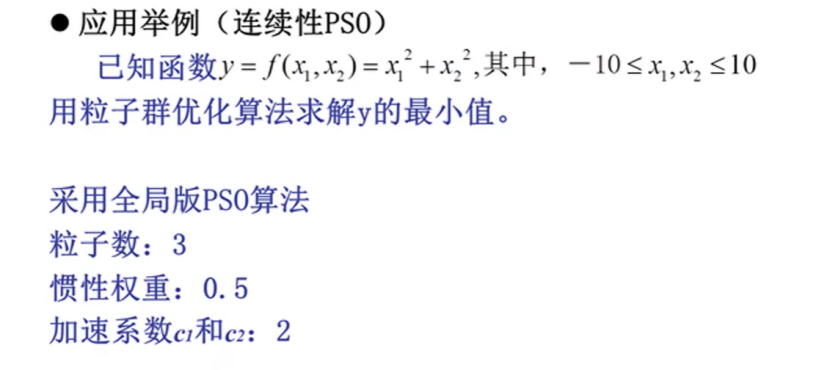
粒子群优化算法(PSO)是一种智能优化算法,也是一种元启发式算法,最初是由Eberhart和Kennedy提出的,其模拟了鸟群捕食行为,通过一定的搜索策略,使得多个粒子在多维搜索空间中寻找最优解。
在云计算调度中,PSO算法可以用于优化虚拟机的调度策略。云计算环境中存在着多种类型的虚拟机资源,每种资源都有其特定的限制和使用成本模型。考虑到虚拟机的计算能力和使用成本等因素,云计算系统需要合理地分配虚拟机资源,以最大化资源利用率和系统效益。
使用PSO算法可以有效地优化虚拟机的调度策略。PSO算法可以在优化目标函数中设置多个参数以权衡资源利用率和系统效益。例如,在优化目标函数中,可以添加CPU利用率和内存利用率等参数,并在优化过程中动态调整各参数的权重以实现最优解的搜索。
PSO算法在云计算调度中的主要作用是优化资源的分配和虚拟机调度策略,从而提高云计算系统的资源利用率和系统效益。
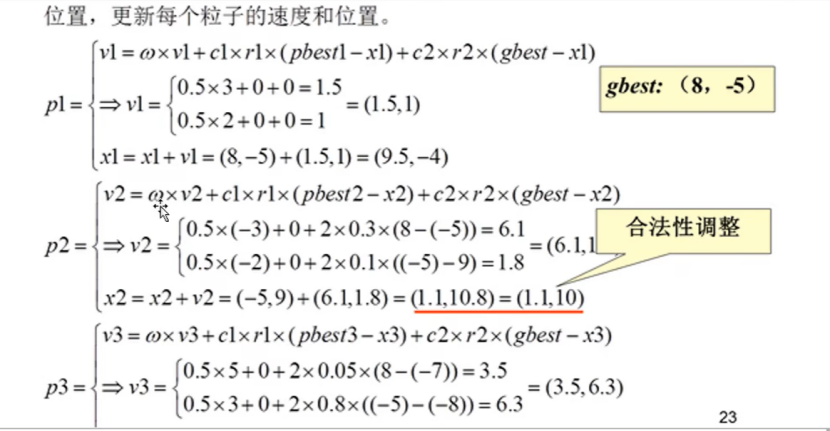
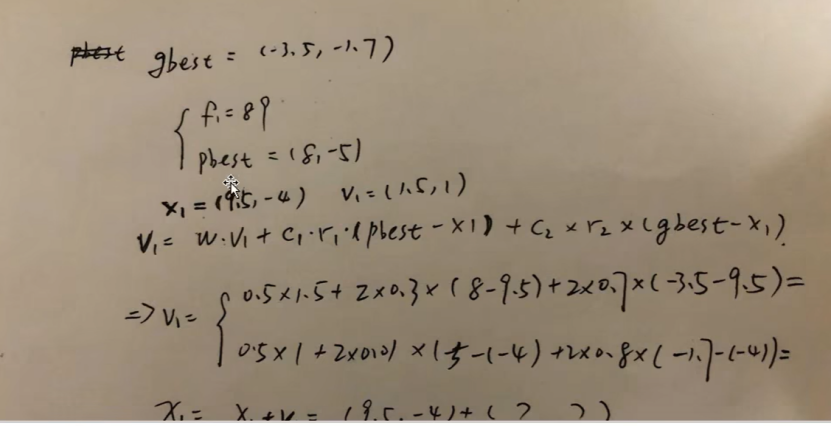
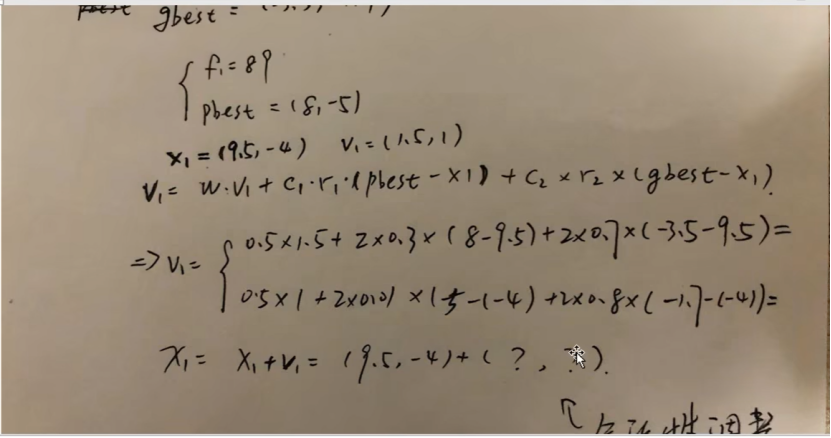
速度向量、位置向量决定了下一次它迭代的位置
本身的最优解和种群的最优解决定下一代

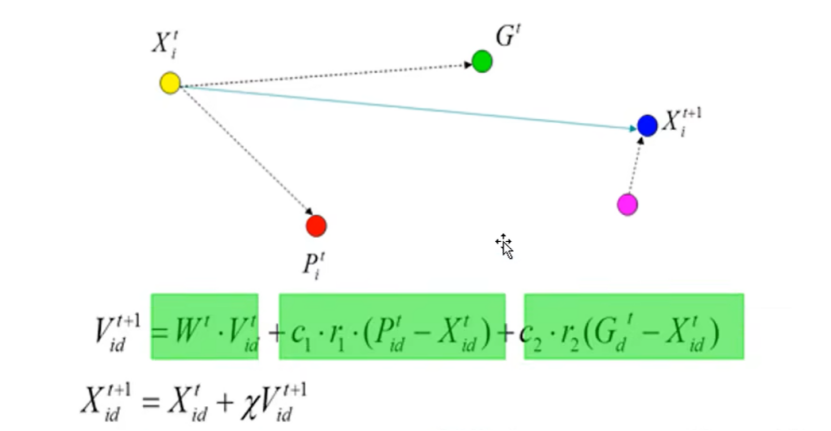
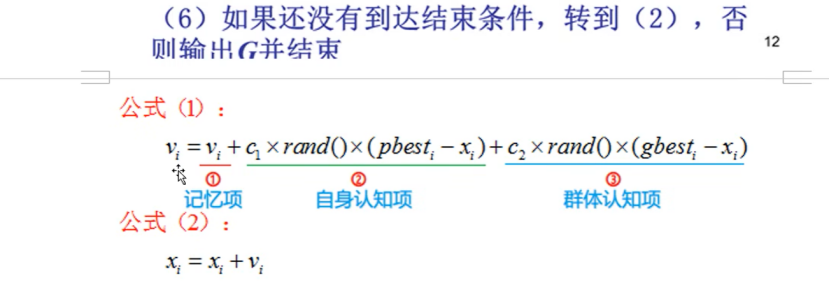
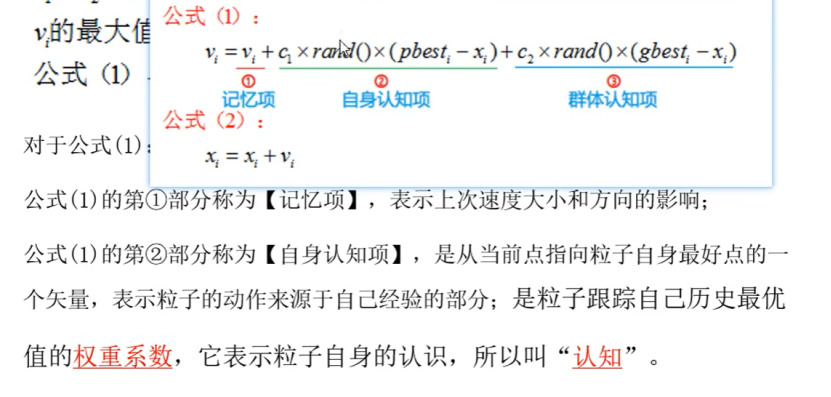
粒子就是通过自己的经验和同伴中最好的经验来决定下一步的运动

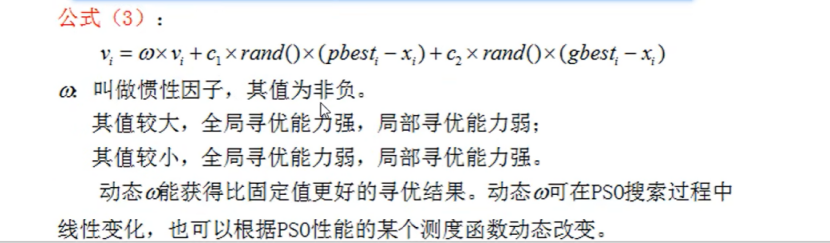

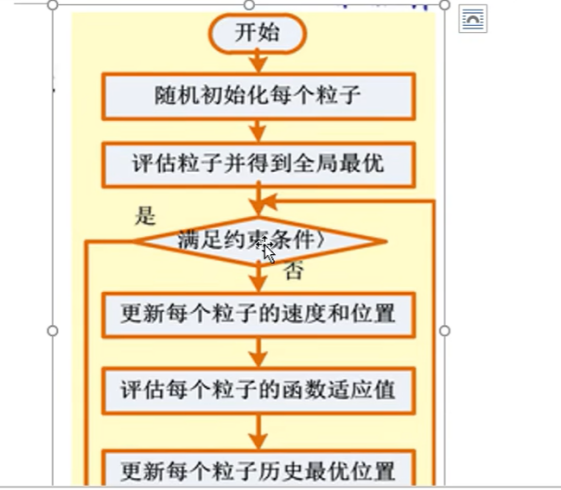
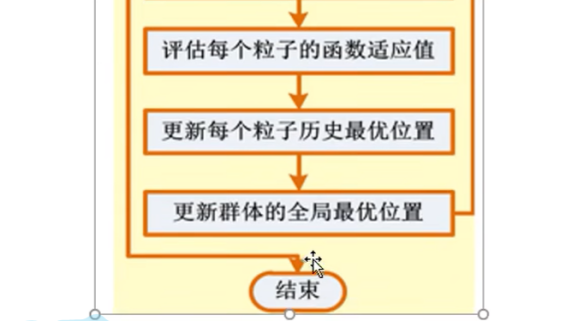

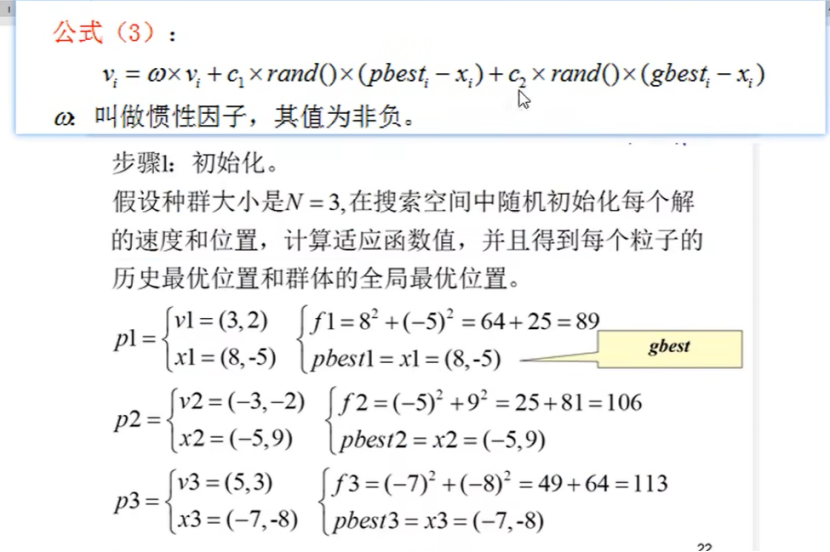
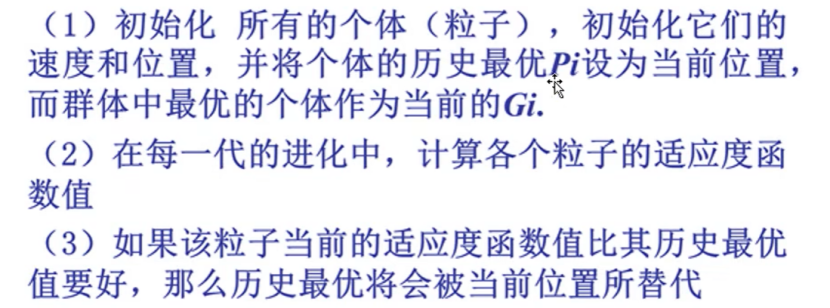
这些都是初始化,速度随便给,位置要符合约束条件,计算出每个个体的最优值,再通过比较个体之间最优值推出全局最优


本部分的视频链接
代码:
PSOSchedulingTest
/*** 演示了如何使用粒子群算法调度工作流。*/
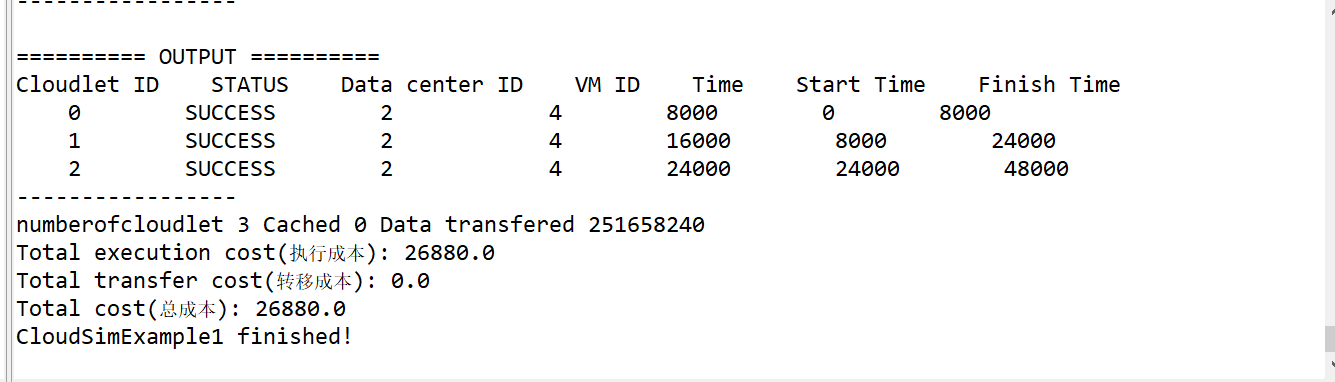
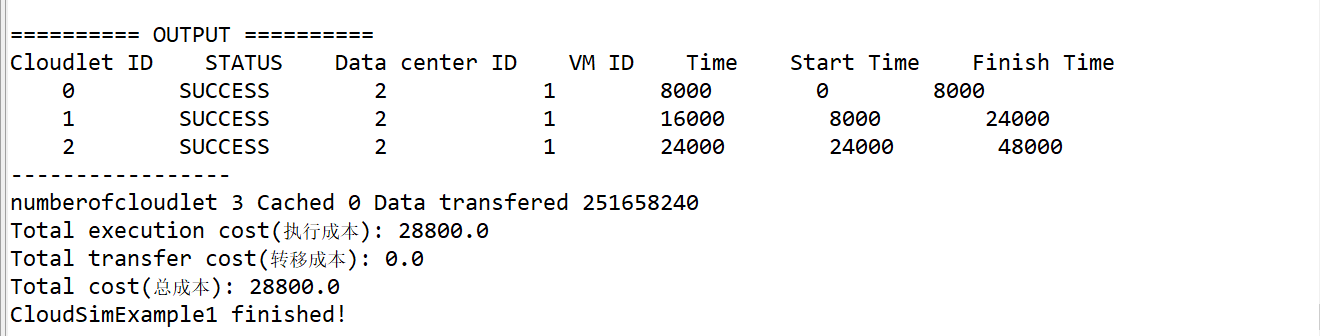
public class PSOSchedulingTest {/*** Creates main() to run this example*/public static void main(String[] args) {Log.printLine("Starting PSO scheduing...");try {// 第一步: 初始化CloudSim包。它应该叫做在创建任何实体之前。int num_user = 1; // 云用户的数量Calendar calendar = Calendar.getInstance();boolean trace_flag = false; // 平均跟踪事件// 初始化CloudSim库CloudSim.init(num_user, calendar, trace_flag);// 第二步: 创建数据中心。数据中心是CloudSim中的资源提供者。我们需要列出其中一个以运行CloudSim模拟NetworkDatacenter datacenter0 = createDatacenter("Datacenter_0");// 第三步: 创建代理NetDatacenterBroker broker = createBroker();broker.setLinkDC(datacenter0);// 第四步: 开始仿真CloudSim.startSimulation();/** // 最后一步: 模拟结束后打印结果* List<Cloudlet> newList = broker.getCloudletReceivedList();*/CloudSim.stopSimulation();List<Cloudlet> newList = broker.getCloudletReceivedList();System.out.println("-----------------");printCloudletList(newList); //打印内容:“========== OUTPUT ==========”那部分System.out.println("-----------------");System.out.println("numberofcloudlet " + newList.size() + " Cached "+ NetDatacenterBroker.cachedcloudlet + " Data transfered "+ NetworkConstants.totaldatatransfer);/*numberofcloudlet 是云任务的数量。NetDatacenterBroker.cachedcloudlet 在运行过程中会根据需要进行更新和重新排序,以保持其准确性和可靠性。用于缓存云任务(cloudlet),以减少数据中心代理(Datacenter Broker)与数据中心(Datacenter)之间的数据交换。通过缓存云任务,数据中心代理可以更快地检索当前可用的云任务和数据中心,从而更快地调度任务并减少不必要的通信。这个缓存机制可以显著提高系统的效率,并降低通信成本。在运行过程中会根据需要进行更新和重新排序,以保持其准确性和可靠性。NetworkConstants.totaldatatransfer 是一个常量,用于表示网络传输的总数据量。它的值是1TB(1 terabyte)。这个常量在模拟过程 中用于限制虚拟机和数据中心之间的网络流量。在 CloudSim 中,虚拟机和数据中心之间的数据传输是通过网络连接模拟的。通过设置这个常量可以控制系统中的总数据传输量,以便更准确地反映真实环境中的网络性能。需要注意的是,这个常量是一个固定的值,不可以被修改。*/// 打印每个用户到每个数据中心的消耗的成本//datacenter0.printDebts();System.out.println("Total execution cost:(执行成本) " + NetDatacenterBroker.totalExeCost);System.out.println("Total transfer cost:(转移成本) " + NetDatacenterBroker.totalTransferCost);NetDatacenterBroker.totalCost = NetDatacenterBroker.totalExeCost + NetDatacenterBroker.totalTransferCost;System.out.println("Total cost:(总成本) " + NetDatacenterBroker.totalCost);Log.printLine("CloudSimExample1 finished!");} catch (Exception e) {e.printStackTrace();Log.printLine("Unwanted errors happen");}}private static NetworkDatacenter createDatacenter(String name) { // 创建数据中心// 以下是创建PowerDatacenter所需的步骤:// 1: 我们需要创建一个列表来存储我们的机器List<NetworkHost> hostList = new ArrayList<NetworkHost>();// 2:一台机器包含一个或多个PEs(Processing Element,通常是指一台计算机中的 CPU) 或 CPUs/Cores // 在本例中,它将只有一个核心(一个CPU)List<Pe> peList = new ArrayList<Pe>();int mips = 1000;// 虚拟机的处理速度// 3. 创建pe并将其添加到列表中。peList.add(new Pe(0, new PeProvisionerSimple(mips))); // 需要储存设置id和MIPS// 4. 使用主机id和pe列表创建Host,并将它们添加到列表中命令行int ram = 2048; // host memory (MB) 主机内存(临时存储) 内存long storage = 1000000; // host storage 主机存储设备(永久存储) 硬盘int bw = 10000; // 带宽int hostNumber = 4;// 主机数量/*在 CloudSim 中,hostNumber 是一个标识符,用于表示主机的编号。在一个模拟系统中,可能会有多台主机同时运行。为了对它们进行区分,每台主机都有一个唯一的编号,即 hostNumber。在 CloudSim 中,可以通过以下方式获取主机的 hostNumber:int hostNumber = host.getId();这个方法返回主机的唯一标识符,即 hostNumber。需要注意的是,hostNumber 不是任意的整数,而是在系统中被分配的唯一编号。因此,不能手动设置 hostNumber。*/for (int index = 0; index < hostNumber; index++) { // 添加4台机器。这里的hostNumber设置为4hostList.add(new NetworkHost(index, new RamProvisionerSimple(ram),new BwProvisionerSimple(bw), storage, peList,new VmSchedulerTimeShared(peList))); // This is our machine}System.out.println();System.out.println("----------------------");// Initialising...第二行后就来到这里// 这是我们的机器/*创建一个DatacenterCharacteristics对象,该对象存储数据中心的属性:architecture(架构)、OS(操作系统)、list of Machines(机器列表)、allocation policy(分配策略:时间或空间共享、时区及其价格(G$/Pe时间单位))*/String arch = "x86"; // system architectureString os = "Linux"; // operating systemString vmm = "Xen";double time_zone = 10.0; // time zone this resource located 该资源所在的时区double cost = 3.0; // the cost of using processing in this resource 在此资源中使用处理的成本double costPerMem = 0.05; // the cost of using memory in this resource 在此资源中使用内存的成本double costPerStorage = 0.001; // the cost of using storage in this resource 在这里使用存储的成本资源double costPerBw = 0.0; // the cost of using bw in this resource 在该资源中使用bw的成本LinkedList<Storage> storageList = new LinkedList<Storage>(); DatacenterCharacteristics characteristics = new DatacenterCharacteristics(arch, os, vmm, hostList, time_zone, cost, costPerMem,costPerStorage, costPerBw);// 6. 最后,我们需要创建一个NetworkDatacenter对象。NetworkDatacenter datacenter = null;try {datacenter = new NetworkDatacenter(name, characteristics,new NetworkVmAllocationPolicy(hostList), storageList, 0);} catch (Exception e) {e.printStackTrace();}//创建内部数据中心网络CreateNetwork(4, datacenter);// 4表示的是主机的数量return datacenter;}// 我们强烈建议用户开发自己的代理策略,根据模拟场景的特定规则提交vm和cloudlet/*** Creates the broker. 创建代理* * @return the datacenter broker*/private static NetDatacenterBroker createBroker() {NetDatacenterBroker broker = null;try {broker = new NetDatacenterBroker("Broker");} catch (Exception e) {e.printStackTrace();return null;}return broker;}/*** Prints the Cloudlet objects 打印云任务对象* * @param list* list of Cloudlets*/private static void printCloudletList(List<Cloudlet> list) {int size = list.size();Cloudlet cloudlet;String indent = " ";Log.printLine();Log.printLine("========== OUTPUT ==========");Log.printLine("Cloudlet ID" + indent + "STATUS" + indent+ "Data center ID" + indent + "VM ID" + indent + "Time"+ indent + "Start Time" + indent + "Finish Time");for (int i = 0; i < size; i++) {cloudlet = list.get(i);Log.print(indent + cloudlet.getCloudletId() + indent + indent);if (cloudlet.getCloudletStatus() == Cloudlet.SUCCESS) {Log.print("SUCCESS");DecimalFormat dft = new DecimalFormat("###.##");Log.printLine(indent + indent + cloudlet.getResourceId()+ indent + indent + indent + cloudlet.getVmId()+ indent + indent+ dft.format(cloudlet.getActualCPUTime()) + indent+ indent + dft.format(cloudlet.getExecStartTime())+ indent + indent+ dft.format(cloudlet.getFinishTime()));}/*在 Java 编程中,DecimalFormat 是一个可以格式化数字的类。它可以将数字格式化为指定格式的字符串,并支持指定小数位数、千位分隔等。在这里,代码 DecimalFormat dft = new DecimalFormat("###.##") 表示创建了一个 DecimalFormat 对象 dft,它的格式规则是输出数字的整数部分位数至少为 1 位,小数部分位数至少为 0 位,最多保留 2 位小数。其中,# 表示如果该位有数字则输出该数字,否则不输出,而 0 表示该位不管有无数字都要输出。例如,对于数字 1234.5678,使用DecimalFormat.format() 方法,格式化结果为 "1234.57"。因为规定了最多保留 2 位小数,因此5678 被四舍五入为 57。*/}}static void CreateNetwork(int numhost, NetworkDatacenter dc) {// Edge SwitchEdgeSwitch edgeswitch[] = new EdgeSwitch[1];// EdgeSwitch 这个类允许模拟数据中心网络的边缘交换机。它与其他交换机交互以交换数据包。for (int i = 0; i < 1; i++) {edgeswitch[i] = new EdgeSwitch("Edge" + i,NetworkConstants.EDGE_LEVEL, dc);//要向该数组中添加EdgeSwitch对象,可以使用下面的方式:edgeswitch[0] = new EdgeSwitch();// edgeswitch[i].uplinkswitches.add(null);dc.Switchlist.put(edgeswitch[i].getId(), edgeswitch[i]);// aggswitch[(int)// (i/Constants.AggSwitchPort)].downlinkswitches.add(edgeswitch[i]);}double bandwidths[] = {80, 90, 100, 70};// 4台虚拟机的带宽int i = 0;for (Host hs : dc.getHostList()) {NetworkHost hs1 = (NetworkHost) hs;hs1.bandwidth = bandwidths[i++] * 1024 * 1024;int switchnum = (int) (hs.getId() / NetworkConstants.EdgeSwitchPort);edgeswitch[switchnum].hostlist.put(hs.getId(), hs1);dc.HostToSwitchid.put(hs.getId(), edgeswitch[switchnum].getId());hs1.sw = edgeswitch[switchnum];List<NetworkHost> hslist = hs1.sw.fintimelistHost.get(0D);if (hslist == null) {hslist = new ArrayList<NetworkHost>();hs1.sw.fintimelistHost.put(0D, hslist);}hslist.add(hs1);}}
}Particle
import java.util.Random;/*** Represents a particle from the Particle Swarm Optimization algorithm.* 表示粒子群优化算法中的粒子。*/
class Particle {private Vector position;        // Current position.目前位置private Vector velocity;private Vector bestPosition;    // Personal best solution.个体最优解private double bestEval;        // Personal best value.个体最优值// The evaluation function to use./*** 构造一个随机起始位置的粒子。* @param beginRange    the minimum xyz values of the position (inclusive)	位置的最小xyz值(包含)	[a,b)* @param endRange      the maximum xyz values of the position (exclusive)	位置的最大xyz值(不包含)*/Particle (int a,int b,int c,int d,int e) {position = new Vector(a,b,c,d,e); // 位置velocity = new Vector(); // 速度bestPosition = velocity.clone(); // 最佳位置bestEval = eval();	// 最佳值}/*** The evaluation of the current position.对当前位置的评估。* @return      the evaluation*/private double eval () {	// 评估函数 这里在云上的评估函数是关于成本的// executioncost cost 执行成本double cost=vmlist[0].executioncost[a] + vmlist[1].executioncost[b] + vmlist[2].executioncost[c]+vmlist[3].executioncost[d]+vmlist[4].executioncost[e];//communication cost  通信成本  4台VMcost=cost+(cloudletList[individual[1]].comcost[individual[0]])*vmlist[1].datasize[0]+(cloudletList[individual[2]].comcost[individual[1]])*vmlist[2].datasize[0]+(cloudletList[individual[3]].comcost[individual[2]])*vmlist[3].datasize[0]+(cloudletList[individual[4]].comcost[individual[3]])*vmlist[4].datasize[0];// Calculate fitness 计算适应度值  这里的适应度值是cost,cost是执行成本和通信成本的总和double fitness = (double) cost;// Store fitnessreturn fitness;}/*** Generate a random number between a certain range.	生成一定范围内的随机数。* @param beginRange    the minimum value (inclusive)	最小值(包括在内)	[a,b)* @param endRange      the maximum value (exclusive)	最大值(不包含)* @return              the randomly generated value	随机生成的值*//*** Update the personal best if the current evaluation is better.	如果当前评估函数较好,则更新个人最优。*/void updatePersonalBest () {double eval = eval();if (eval < bestEval) {	// 目标是让eval值即cost最小化,越小的eval才能成为bestEval bestPosition = position.clone();bestEval = eval;}}/*** Get a copy of the position of the particle.	得到粒子位置的副本。* @return  the x position*/Vector getPosition () {return position.clone();}/*** Get a copy of the velocity of the particle.  获取速度* @return  the velocity*/Vector getVelocity () {return velocity.clone();}/*** Get a copy of the personal best solution.	获取位置* @return  the best position*/Vector getBestPosition() {return bestPosition.clone();}/*** Get the value of the personal best solution.	获得个体最优解的值。* @return  the evaluation*/double getBestEval () {return bestEval;}/*** Update the position of a particle by adding its velocity to its position.通过将粒子的速度与位置相加来更新粒子的位置。*/void updatePosition () {this.position.add(velocity);}/*** Set the velocity of the particle.	设置粒子的速度。* @param velocity  the new velocity*/void setVelocity (Vector velocity) {this.velocity = velocity.clone();}}
Swarm
import java.util.Random;/*** Represents a swarm of particles from the Particle Swarm Optimization algorithm.* 表示来自粒子群优化算法的粒子群。*/
public class Swarm {private int numOfParticles, epochs;private double inertia, cognitiveComponent, socialComponent;private Vector bestPosition;private double bestEval;// The function to search.public static final double DEFAULT_INERTIA = 0.729844;public static final double DEFAULT_COGNITIVE = 1.496180; // Cognitive component.认知成分public static final double DEFAULT_SOCIAL = 1.496180; // Social component.社会成分/**当粒子被创建时,它们被赋予一个随机的位置。随机位置是从指定范围中选择的。如果起始范围为0,结束范围为10,则值将介于0(包含)和10(不包含)之间。*//*** Construct the Swarm with default values.	用默认值构造种群。* @param particles     the number of particles to create	要创建的粒子数* @param epochs        the number of generations	迭代次数*/public Swarm (int particles, int epochs) {	// epochs:迭代次数this( particles, epochs, DEFAULT_INERTIA, DEFAULT_COGNITIVE, DEFAULT_SOCIAL);}/*** Construct the Swarm with custom values.	用自定义值构建种群。* @param particles     the number of particles to create	要创建的粒子数* @param epochs        the number of generations	迭代的次数* @param inertia       the particles resistance to change* @param cognitive     the cognitive component or introversion of the particle	 粒子的认知成分或内向性* @param social        the social component or extroversion of the particle	粒子的社会性成分或外向性*/public Swarm (int particles, int epochs, double inertia, double cognitive, double social) {this.numOfParticles = particles;this.epochs = epochs;this.inertia = inertia;this.cognitiveComponent = cognitive;this.socialComponent = social;bestPosition = new Vector(0, 0, 0, 0, 0);bestEval = Double.POSITIVE_INFINITY;  // 正无穷}/*** Execute the algorithm.	执行算法*/public void run (int[][] individuals) {		// 传入的参数是二维数组Particle[] particle=new Particle[numOfParticles];for(int i=0;i<individuals.length;i++){int a=individuals[i][0];int b=individuals[i][1];int c=individuals[i][2];int d=individuals[i][3];int e=individuals[i][4];particle[i]=new Particle (a,b,c,d,e);	// 传进去5个值}double oldEval = bestEval;System.out.println("--------------------------EXECUTING-------------------------");System.out.println("Global Best Evaluation (Epoch " + 0 + "):\t"  + bestEval);for (int i = 0; i < epochs; i++) {if (bestEval < oldEval) {System.out.println("Global Best Evaluation (Epoch " + (i + 1) + "):\t" + bestEval);oldEval = bestEval;}for (int j=0;j<numOfParticles;j++) {particle[j].updatePersonalBest();updateGlobalBest(particle[j]);}for (int j=0;j<numOfParticles;j++) {updateVelocity(particle[j]);particle[j].updatePosition();}}System.out.println("---------------------------RESULT---------------------------");System.out.println("x = " + bestPosition.getA());System.out.println("Final Best Evaluation: " + bestEval);System.out.println("---------------------------COMPLETE-------------------------");}/*** Create a set of particles, each with random starting positions.	创建一组粒子,每个粒子都有随机的起始位置。* @return  an array of particles*//*** Update the global best solution if a the specified particle has a better solution如果指定粒子有,则更新全局最优解更好的解决方案* @param particle  the particle to analyze*/private void updateGlobalBest (Particle particle) {if (particle.getBestEval() < bestEval) {bestPosition = particle.getBestPosition();bestEval = particle.getBestEval();}}/*** Update the velocity of a particle using the velocity update formula* 使用速度更新公式更新粒子的速度* @param particle  the particle to update*/private void updateVelocity (Particle particle) {Vector oldVelocity = particle.getVelocity();Vector pBest = particle.getBestPosition();Vector gBest = bestPosition.clone();Vector pos = particle.getPosition();Random random = new Random();double r1 = random.nextDouble();double r2 = random.nextDouble();// The first product of the formula.Vector newVelocity = oldVelocity.clone();newVelocity.mul(inertia);// The second product of the formula.pBest.sub(pos);pBest.mul(cognitiveComponent);pBest.mul(r1);newVelocity.add(pBest);// The third product of the formula.gBest.sub(pos);gBest.mul(socialComponent);gBest.mul(r2);newVelocity.add(gBest);particle.setVelocity(newVelocity);}}
PSO
public class PSO {private double[][] vmData; private double[][] vmTransferCost;  // 虚拟机之间数据转移的成本private Datacenter datacenter;private double[][] workFlowDataTrans;private double[] workFlowTaskExecution;public PSO(double[][] td, double[] et, Datacenter dc){workFlowDataTrans = td;workFlowTaskExecution = et;datacenter = dc;setVmData();}public ArrayList<Integer> runPSO(){// Create a swarm (using 'MyParticle' as sample particle and 'MyFitnessFunction' as fitness function)// 创建一个群(使用'MyParticle'作为样本粒子,'MyFitnessFunction'作为适应度函数)Swarm swarm = new Swarm(Swarm.DEFAULT_NUMBER_OF_PARTICLES, new MyParticle(workFlowTaskExecution.length), new MyFitnessFunction(workFlowDataTrans, workFlowTaskExecution, vmData, vmTransferCost));// System.out.println("workFlowTaskExecution.length: " + workFlowTaskExecution.length);// Use neighborhoodNeighborhood neigh = new Neighborhood1D(Swarm.DEFAULT_NUMBER_OF_PARTICLES / 5, true);swarm.setNeighborhood(neigh);swarm.setNeighborhoodIncrement(0.9);// Tune swarm's update parameters (if needed)swarm.setInertia(0.95);swarm.setParticleIncrement(0.8);swarm.setGlobalIncrement(0.8);// Set position (and velocity) constraints. I.e.: where to look for solutionsswarm.setInertia(0.95);	// 惯性swarm.setMaxPosition(vmData.length - 1);  //changeswarm.setMinPosition(0);swarm.setMaxMinVelocity(0.1);int numberOfIterations = 20;	//10boolean showGraphics = false;if (showGraphics) {int displayEvery = numberOfIterations / 100 + 1;SwarmShow2D ss2d = new SwarmShow2D(swarm, numberOfIterations, displayEvery, true);ss2d.run();} else {// Optimize (and time it)for (int i = 0; i < numberOfIterations; i++){System.out.println("evolve ");swarm.evolve();}//System.out.println(swarm.getBestFitness());}// transfer double to int double[] bestPosition = swarm.getBestPosition();ArrayList<Integer> intBestPosition = new ArrayList<Integer>();System.out.println("BestFitness:"+swarm.getBestFitness()+"bestPosition:");for(int i = 0; i < bestPosition.length; i++ ){intBestPosition.add((int)bestPosition[i]);System.out.println(" "+(int)bestPosition[i]);}System.out.println("okokokokoko");return intBestPosition;}/*** Get VM information(MIPS, execution cost, bandwidth cost) into an array* 获取虚拟机信息(MIPS、执行成本、带宽成本)到数组中*/private void setVmData(){List<NetworkVm> vmList = datacenter.getVmList();int sizeOfVm = vmList.size();// System.out.println("sizeOfVm: " + sizeOfVm); // 8Iterator<NetworkVm> it = vmList.iterator();int count = 0;vmData = new double[sizeOfVm][2];// 8行2列vmTransferCost = new double[sizeOfVm][sizeOfVm]; // 8行8列while(it.hasNext()){//System.out.println("运行的次数" + q);NetworkVm tmp = it.next();vmData[count][0] = tmp.getMips();// 虚拟机处理速度vmData[count][1] = tmp.getExecutionCost();	// 执行的成本// System.out.println(vmData[count][]);ArrayList<Double> vmBandwidthCost = new ArrayList<Double>();vmBandwidthCost = tmp.getBandwidthCost();// 带宽 转移成本System.out.println("VMBandwidthCost:" +vmBandwidthCost.size() );// 8for (int i = 0; i < vmBandwidthCost.size(); i++){vmTransferCost[count][i] = vmBandwidthCost.get(i);}//System.out.println("vmData: " + vmData);/*System.out.println("vmData: " + vmData);System.out.println("vmTransferCost: " + vmTransferCost[count]);
*/	    	count++;//q++;}}}
Eclipse代码调试过程:
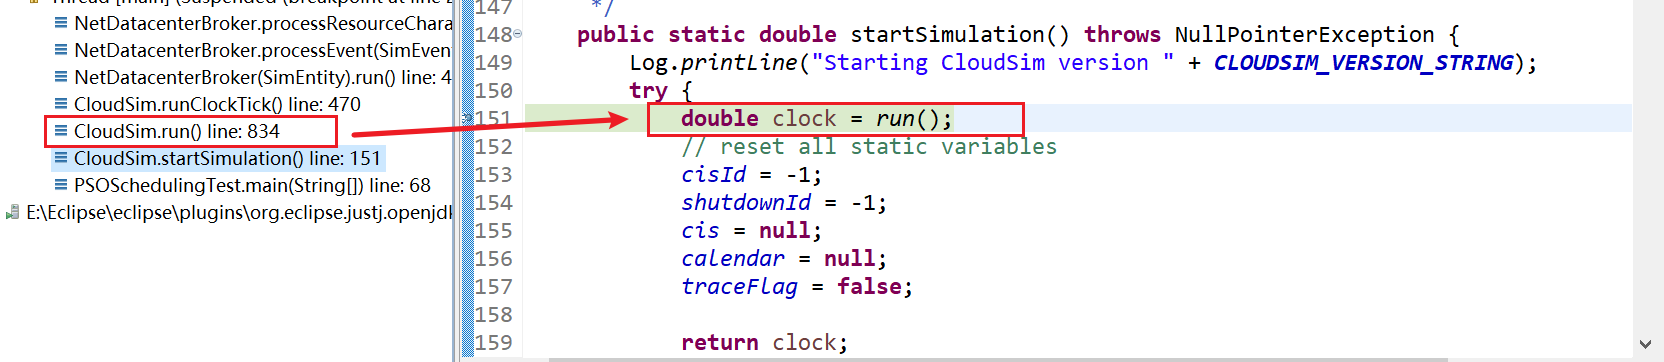
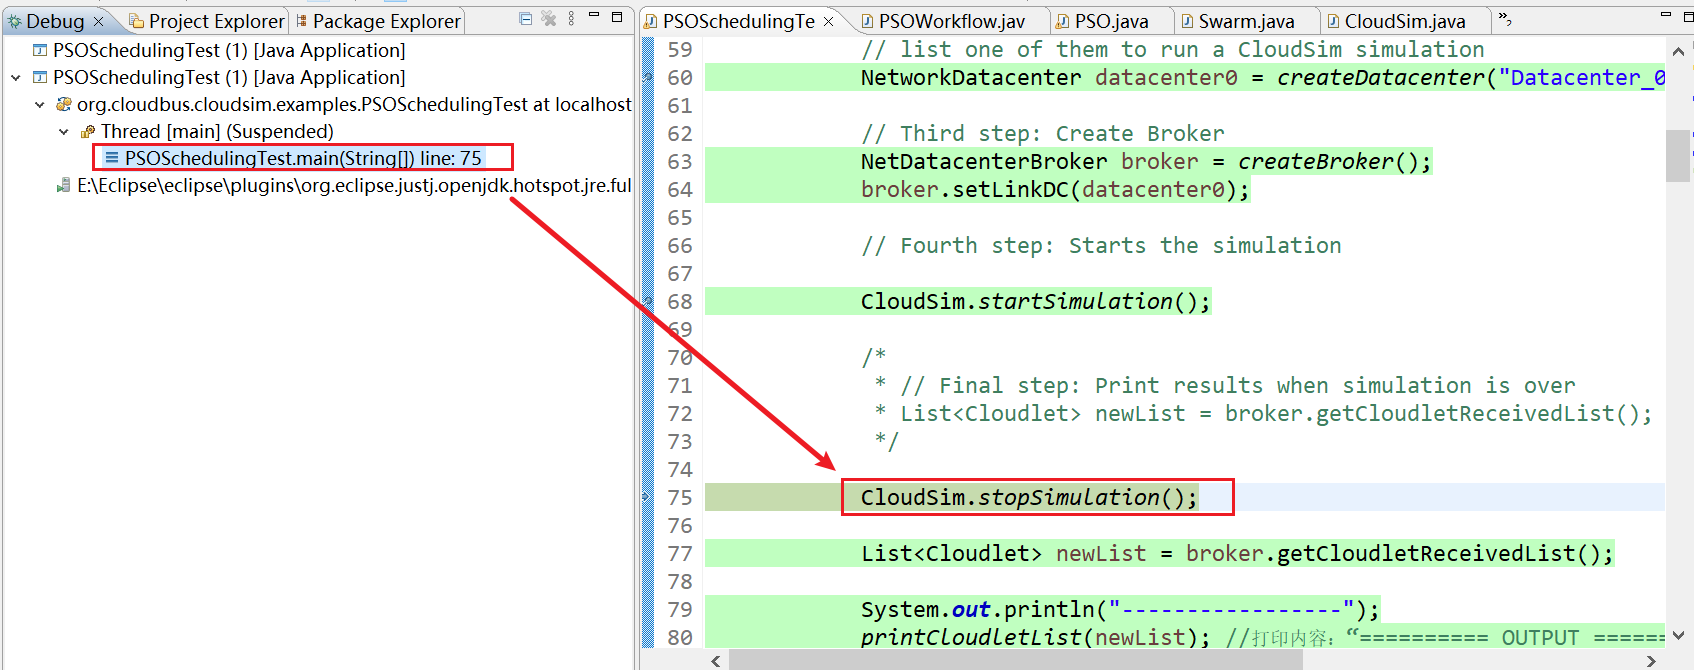
1、PSOSchedulingTest.main(String[]) line: 68

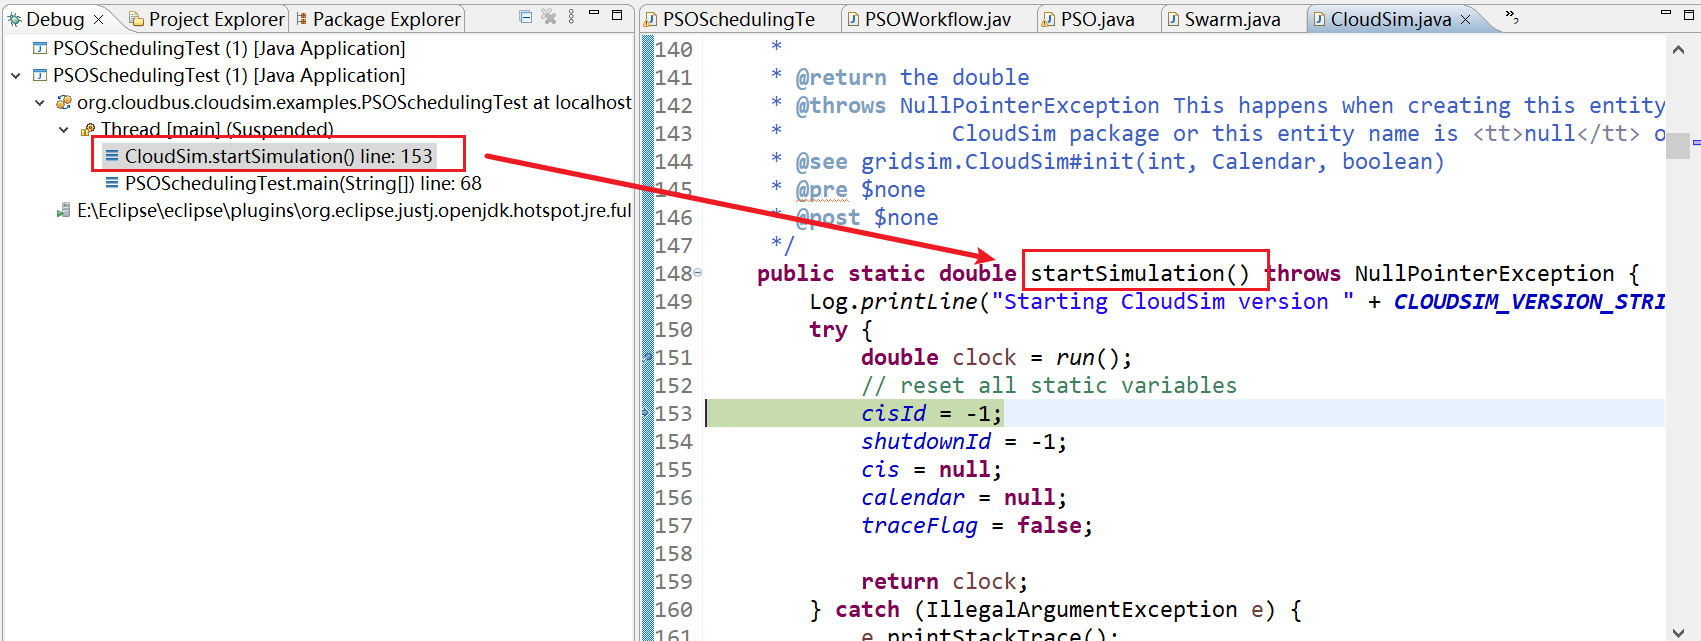
2、CloudSim.startSimulation() line: 151

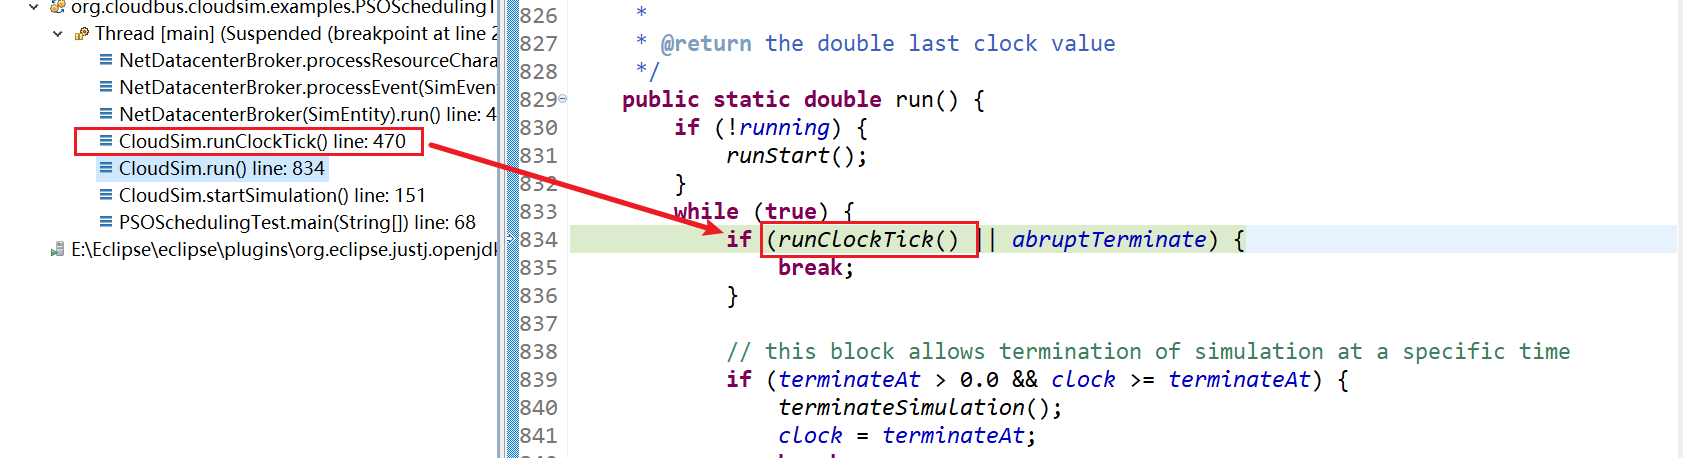
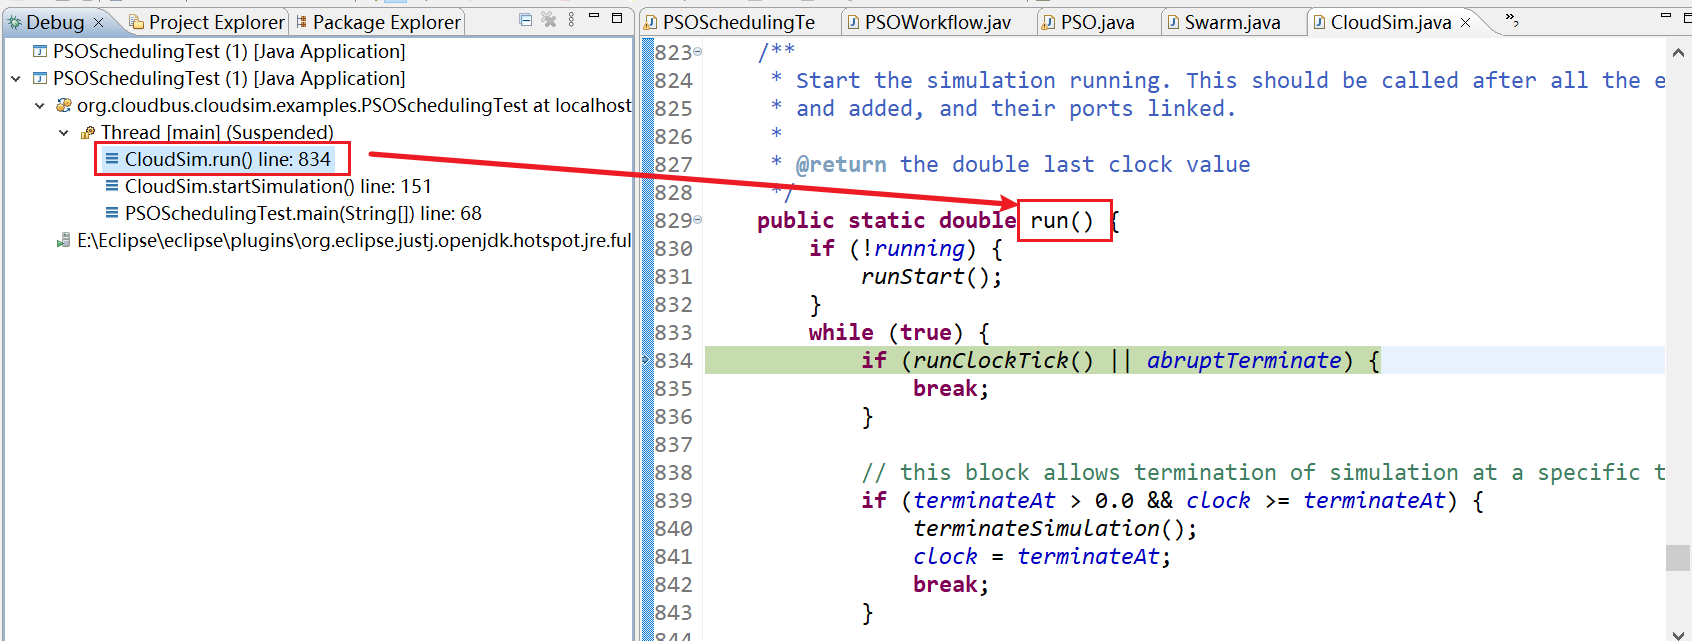
3、CloudSim.run() line: 834
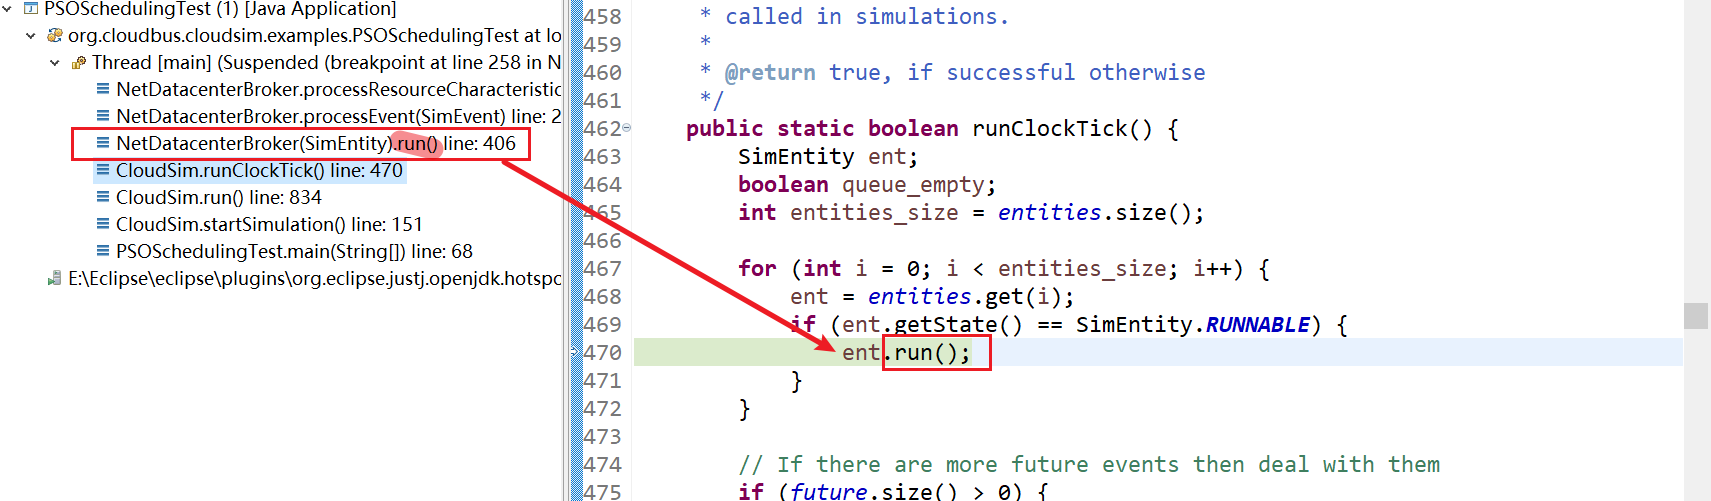
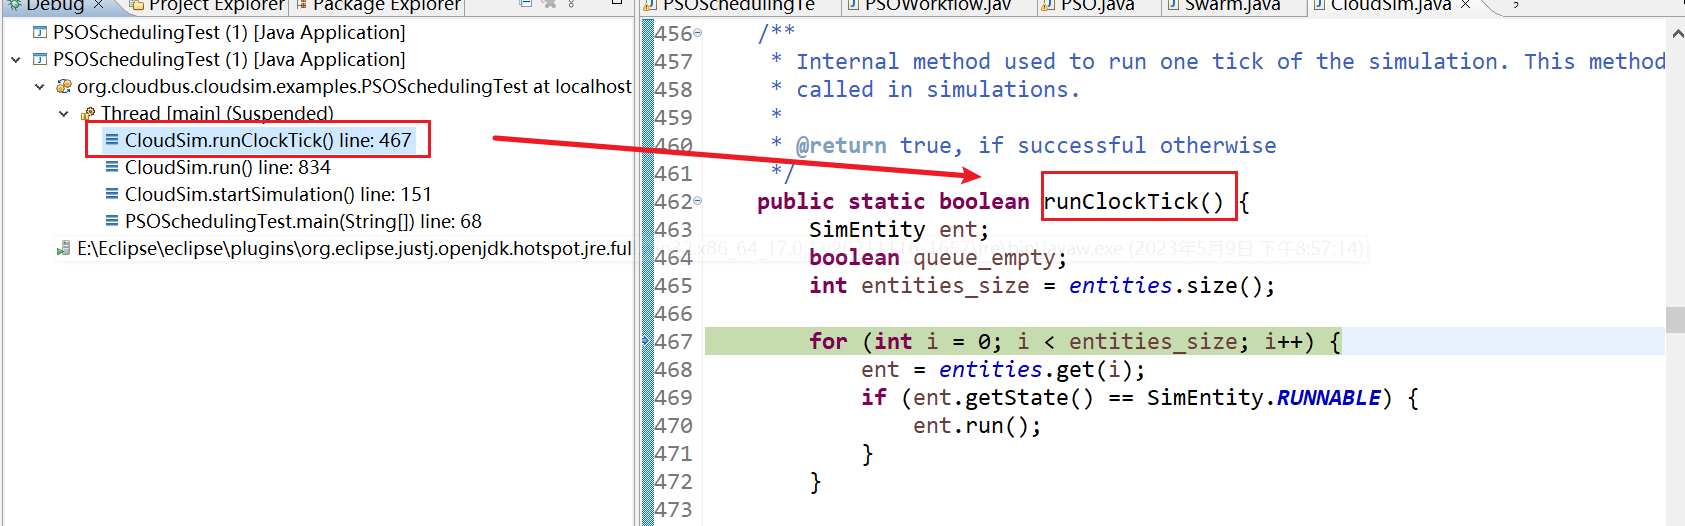
4、CloudSim.runClockTick() line: 470
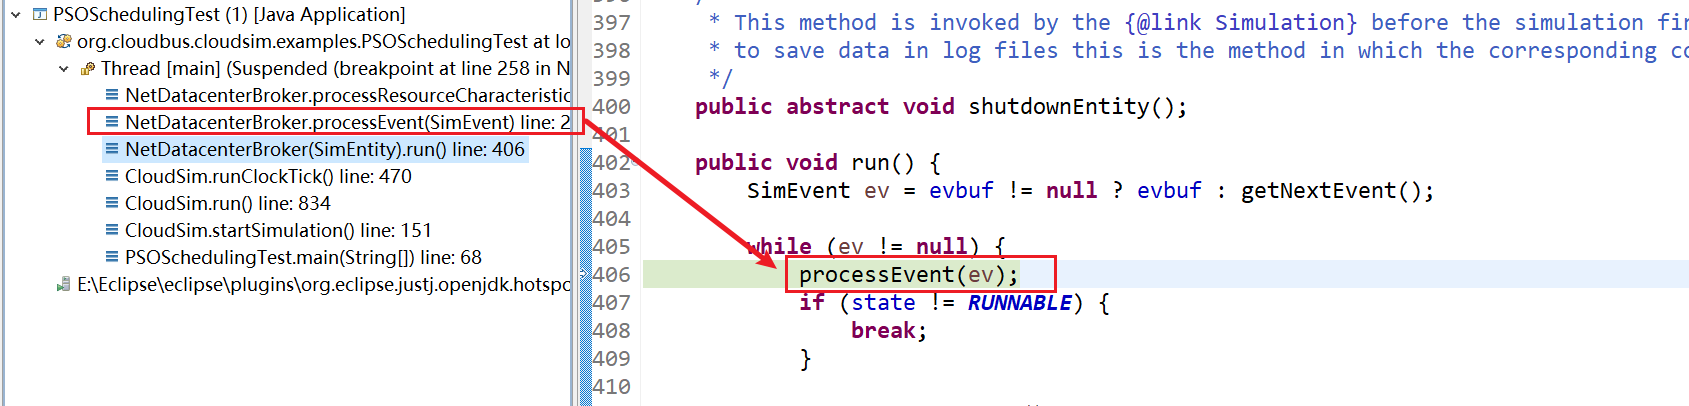
5、NetDatacenterBroker(SimEntity).run() line: 406
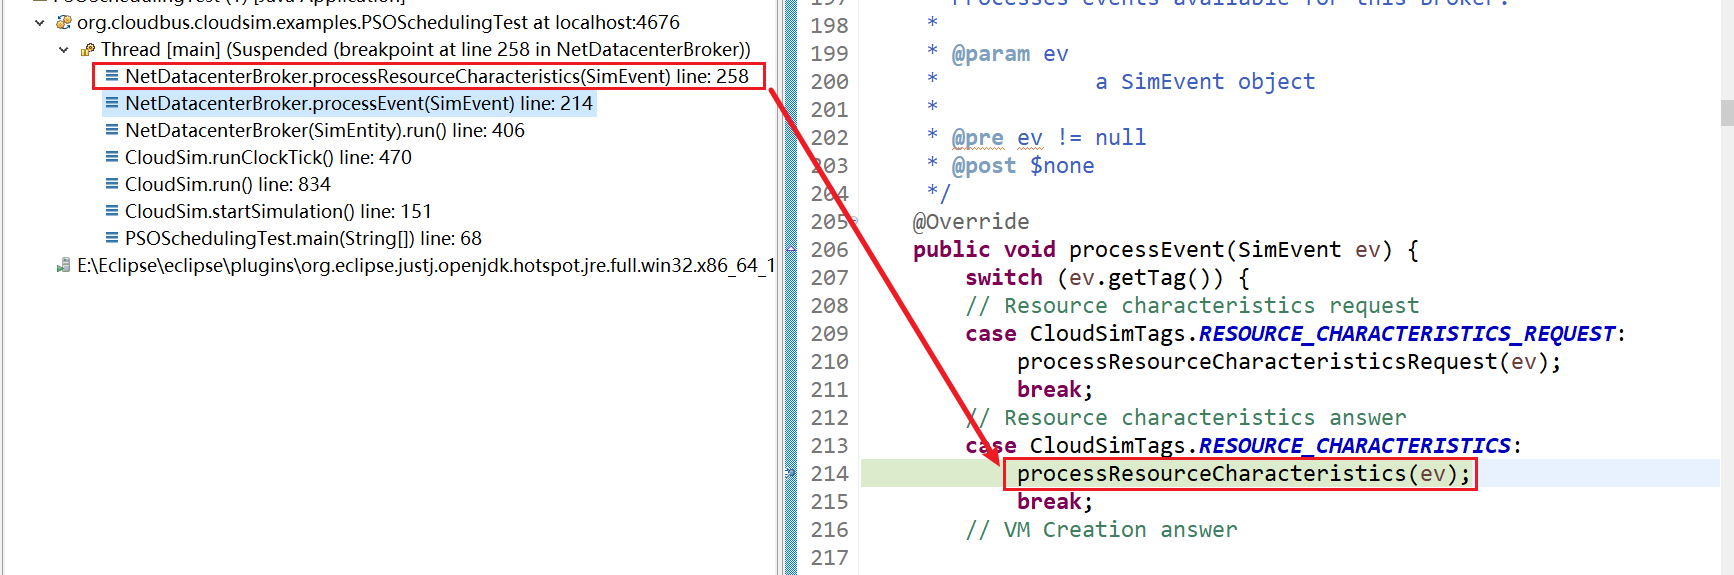
6、NetDatacenterBroker.processEvent(SimEvent) line: 214
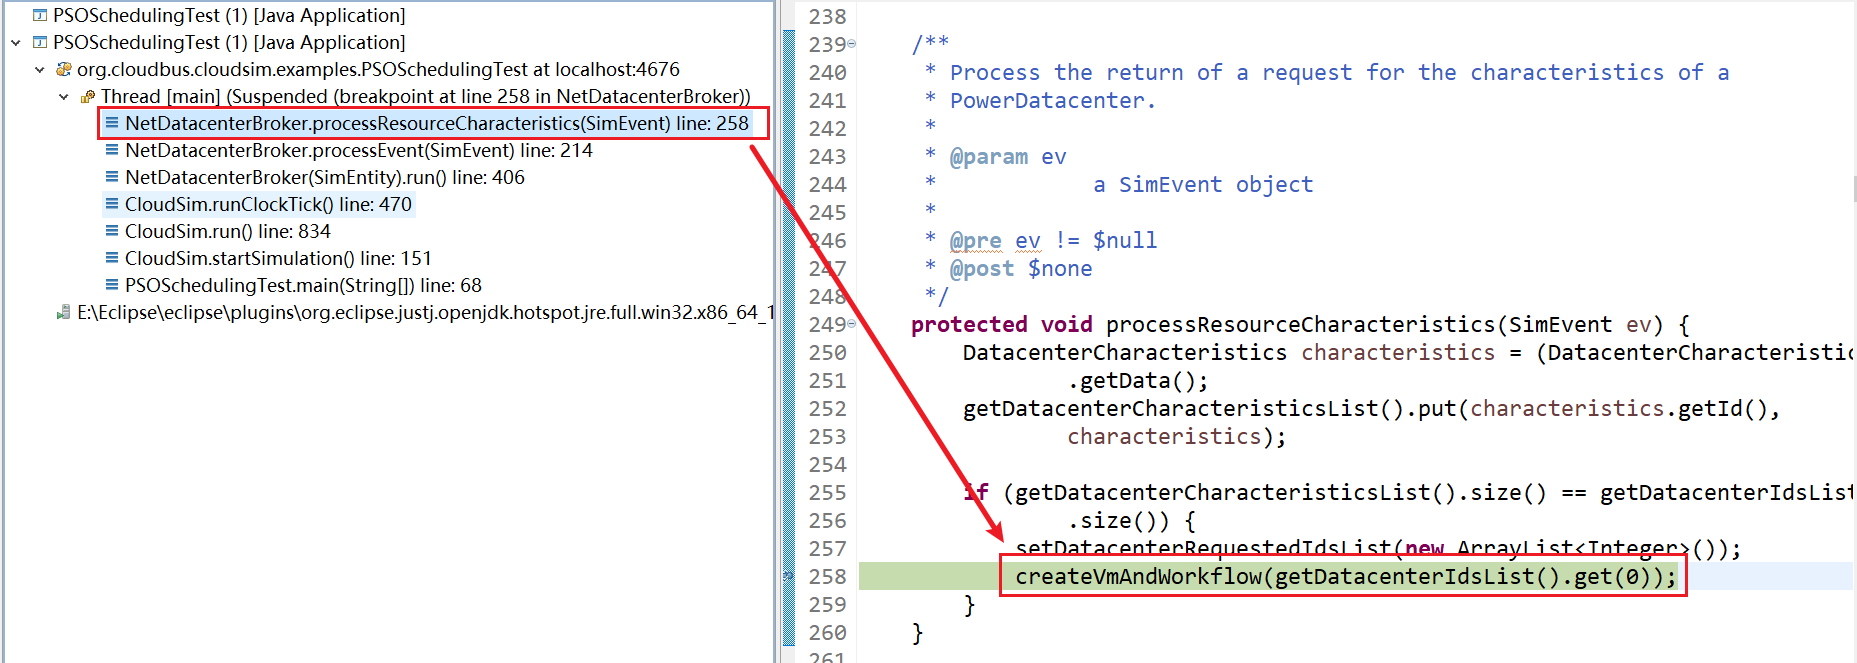
7、NetDatacenterBroker.processResourceCharacteristics(SimEvent) line: 258
8、NetDatacenterBroker.createVmAndWorkflow(int) line: 609
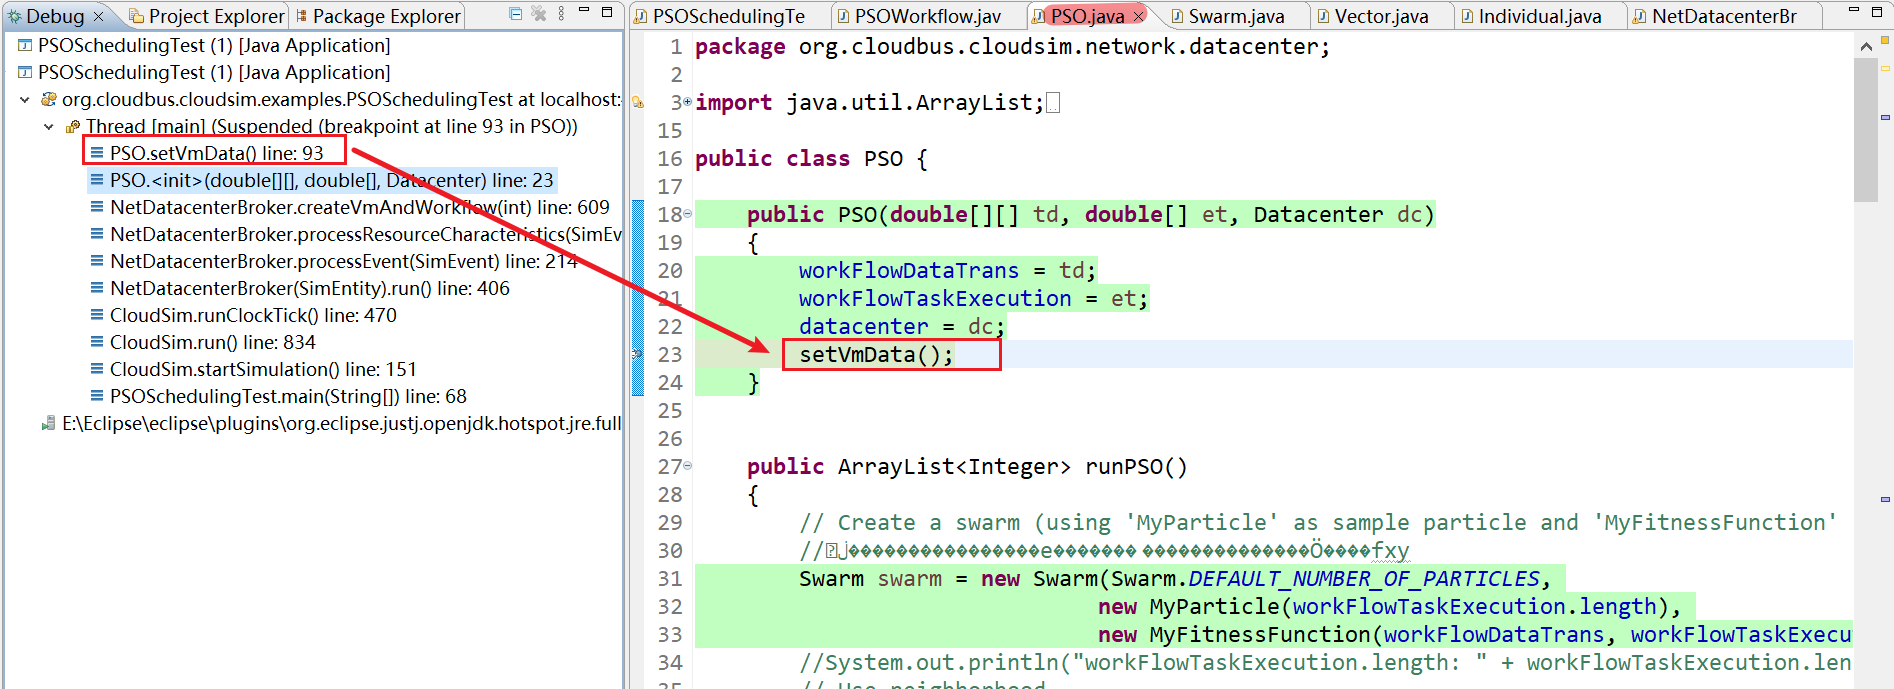
9、PSO.(double[][], double[], Datacenter) line: 23

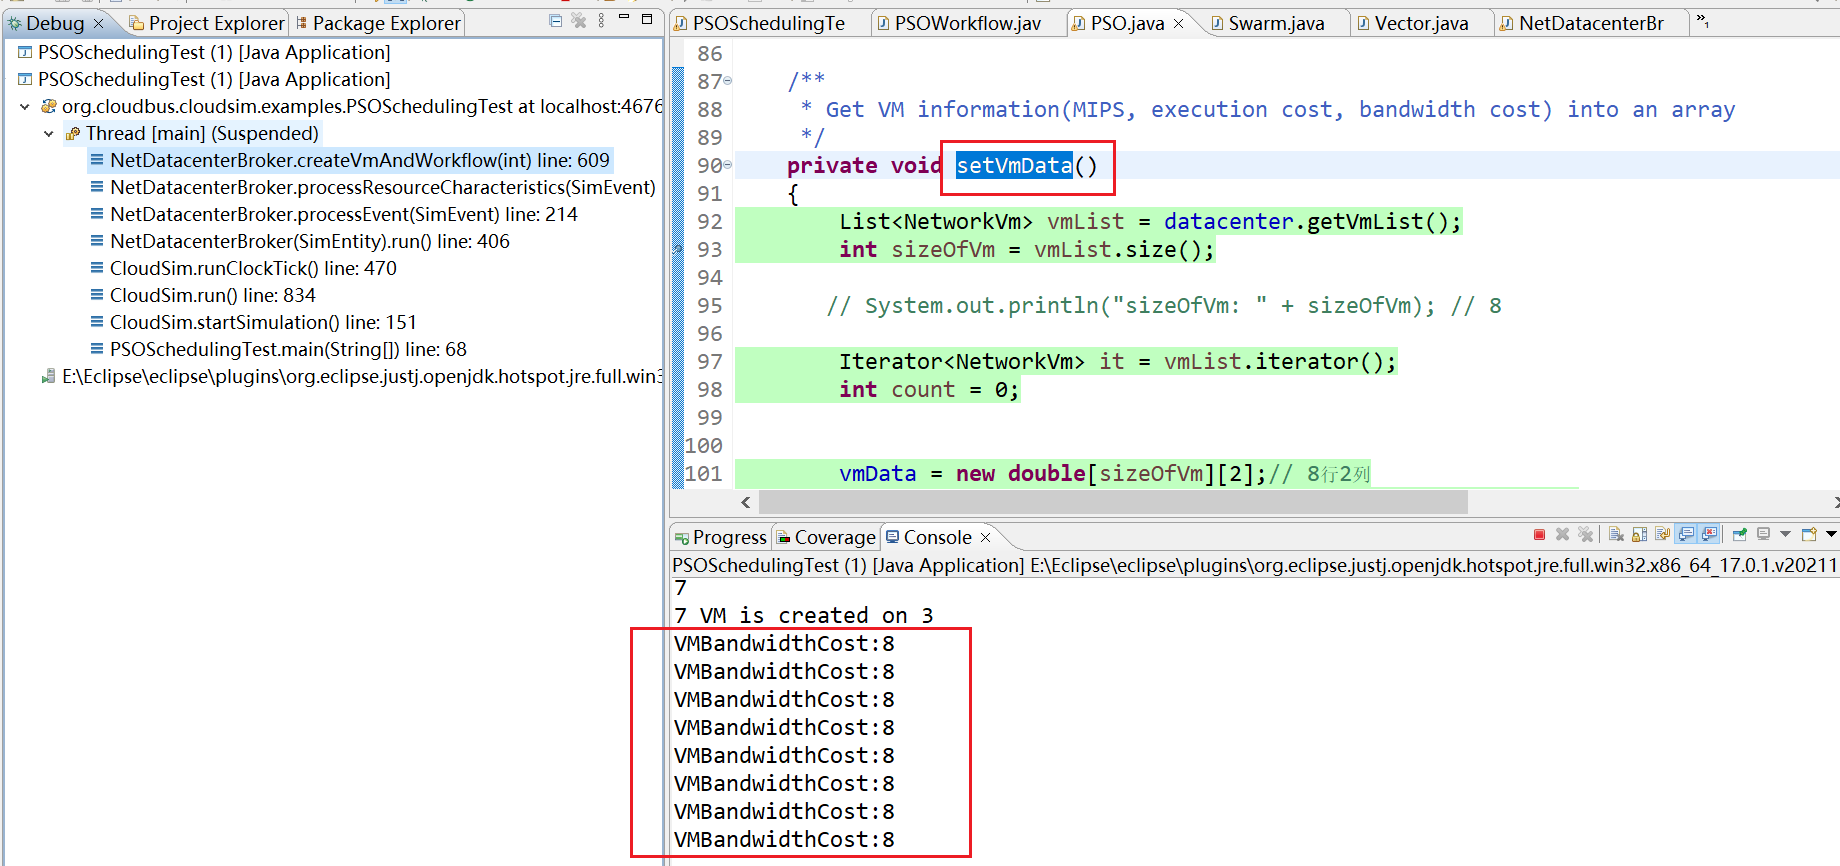
10、PSO.setVmData() line: 93
11、走到setVmData()函数,不断运行这个。一共运行8次,由于矩阵是8*8 显示结果为:8个 VMBandwidthCost:8
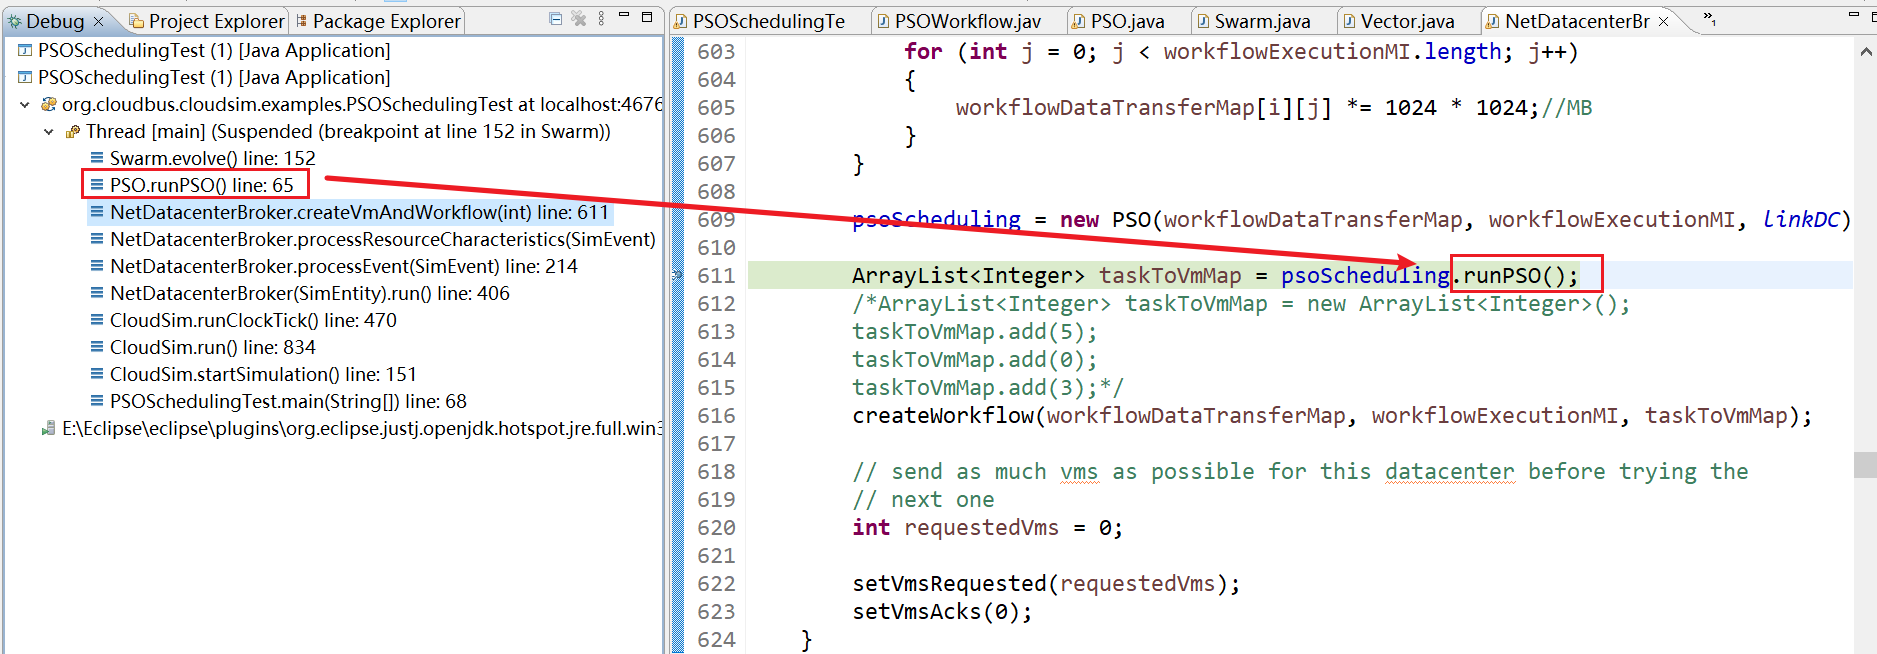
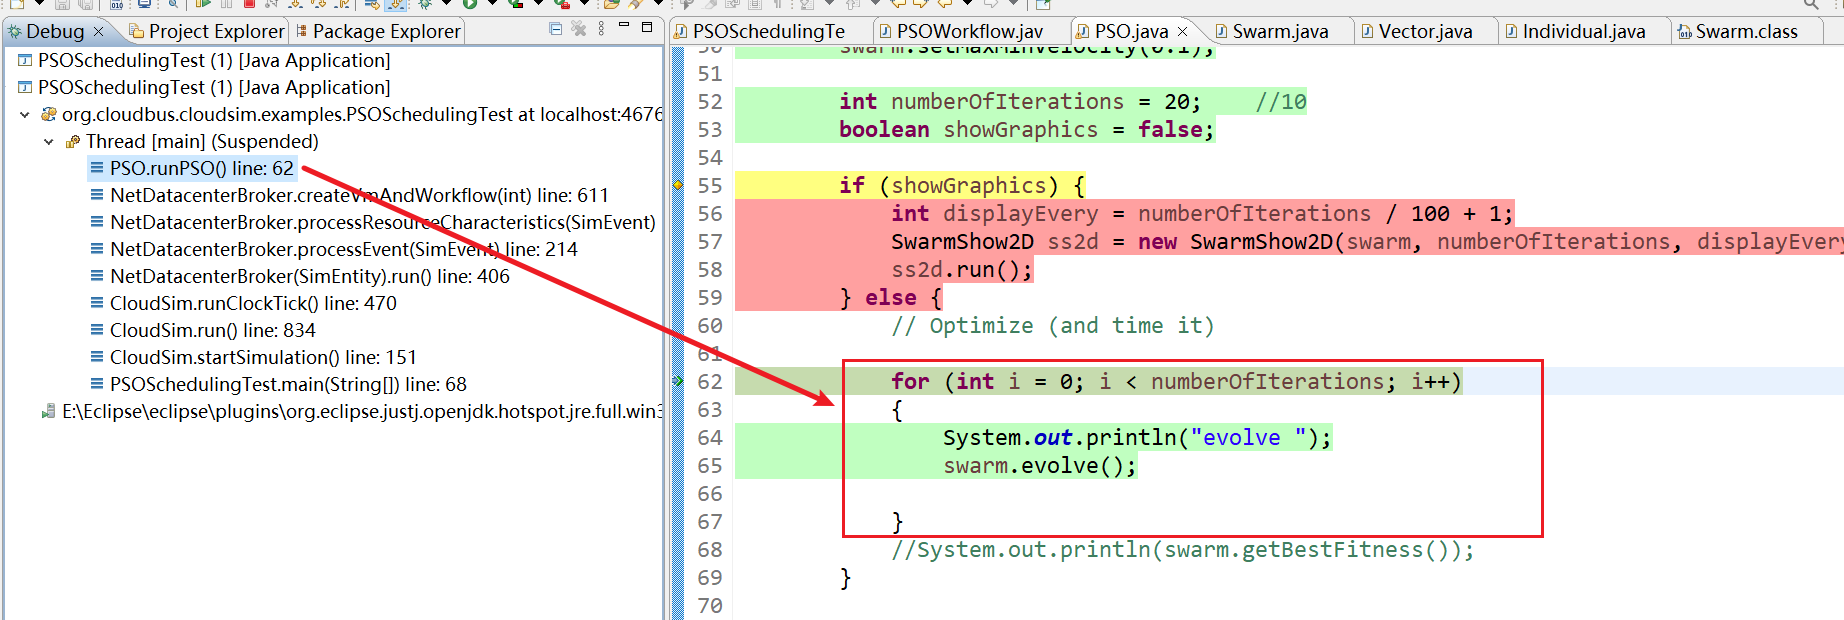
12、NetDatacenterBroker.createVmAndWorkflow(int) line: 611
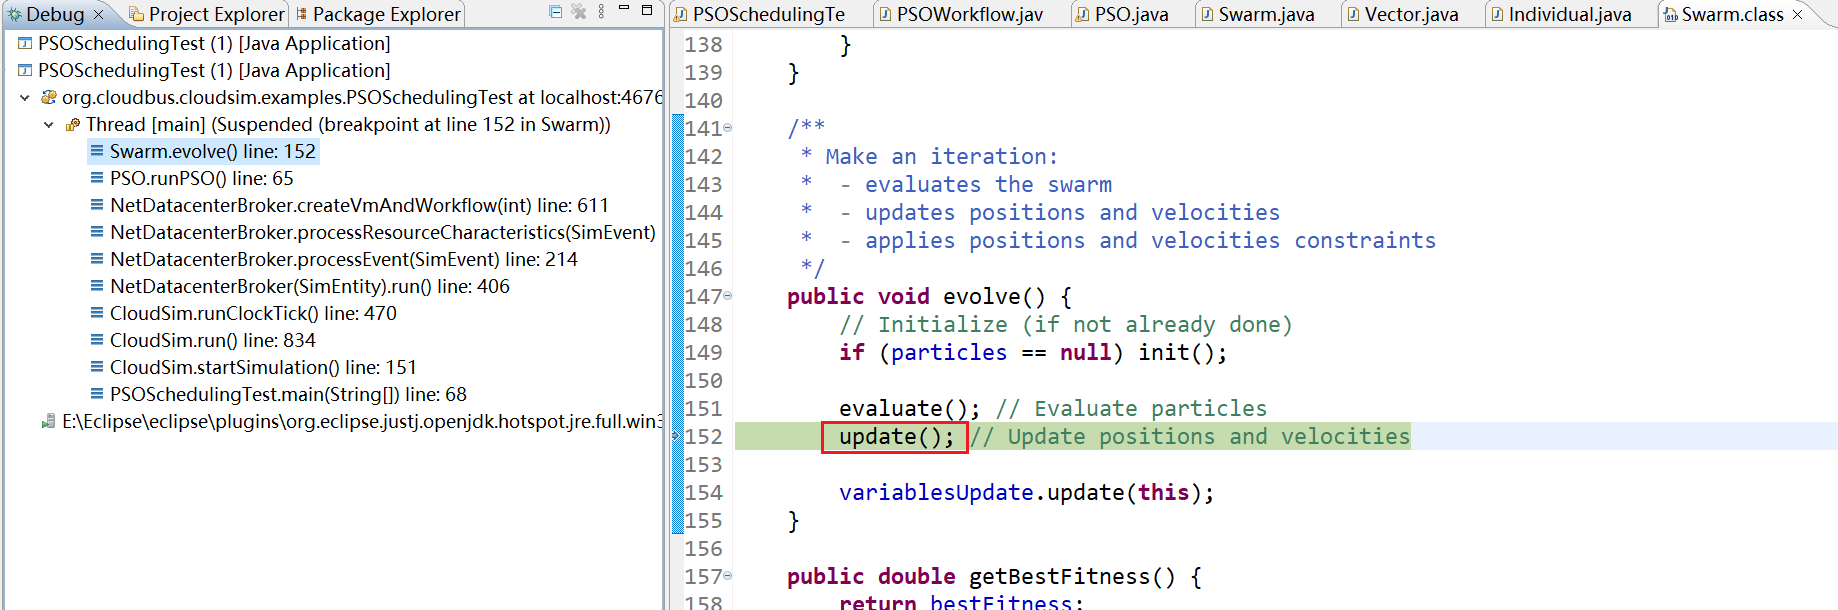
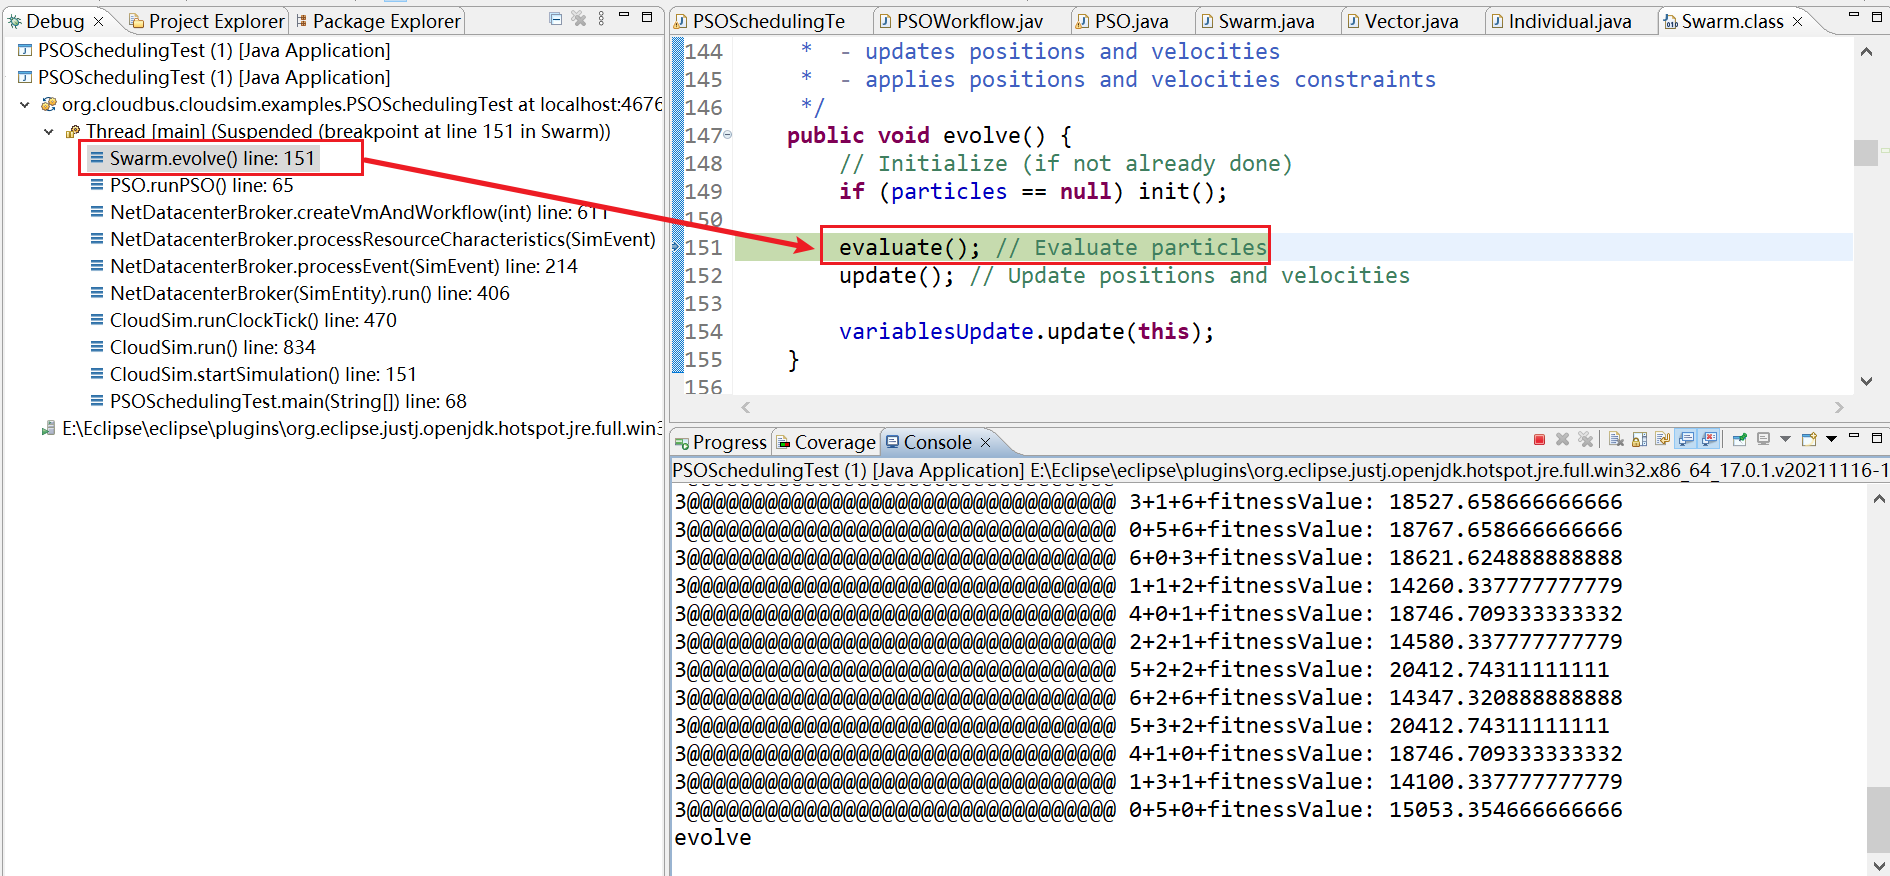
13、Swarm.evolve() line: 152
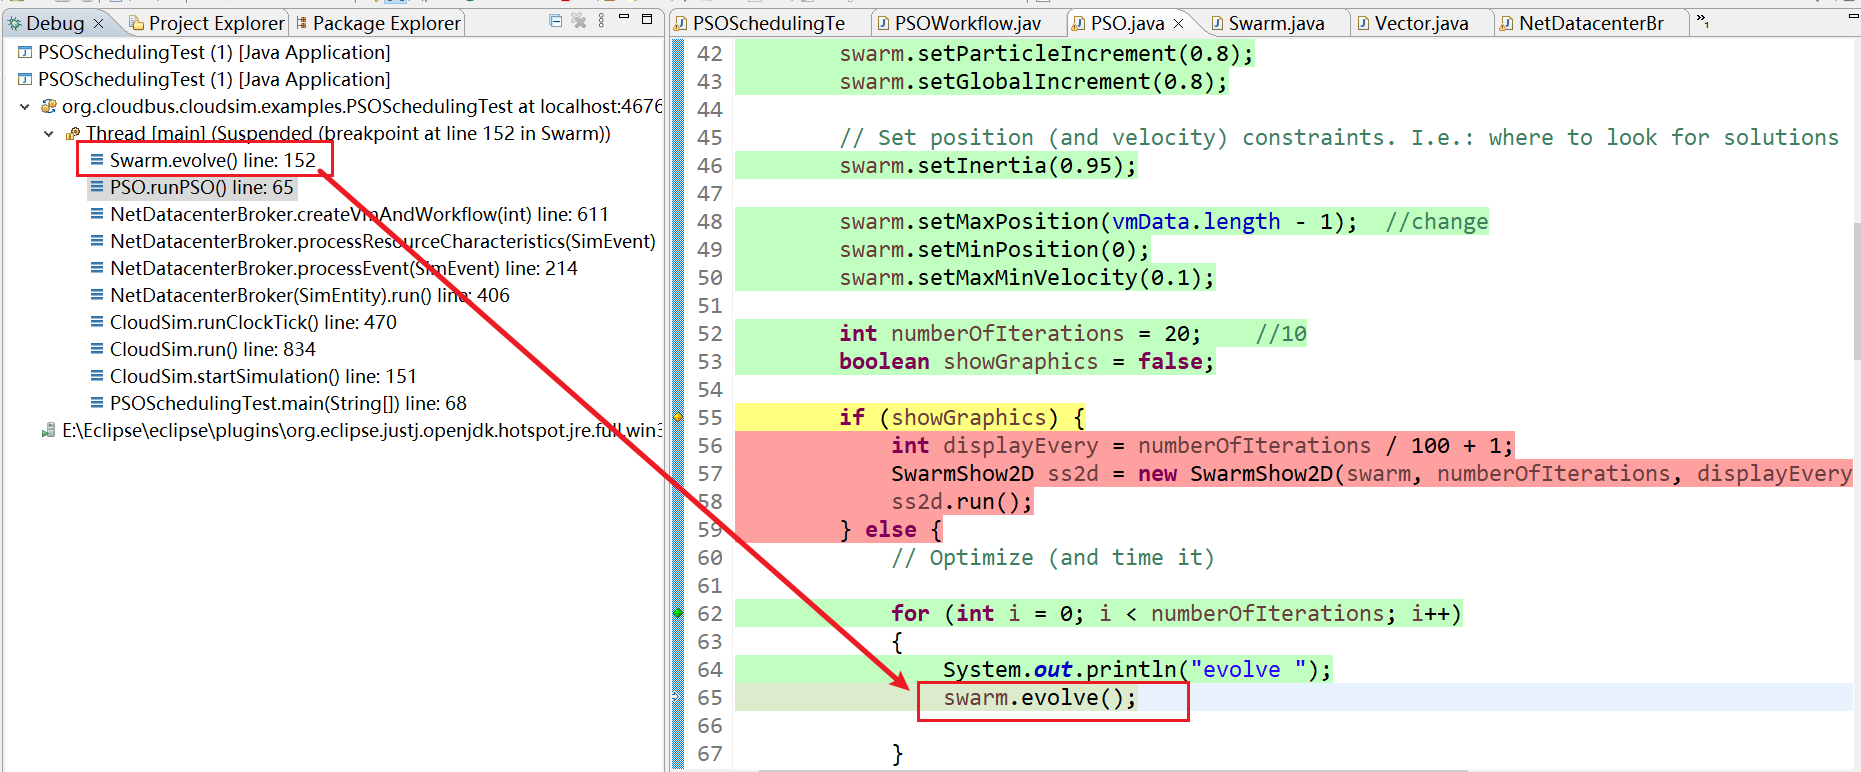
14、Swarm.evolve() line:152
15、不断进行迭代
16、然后evolve函数中不断执行evaluate() 和 update()函数。不断迭代20代

17、NetDatacenterBroker.createVmAndWorkflow(int) line: 622

18、NetDatacenterBroker.processEvent(SimEvent) line: 215

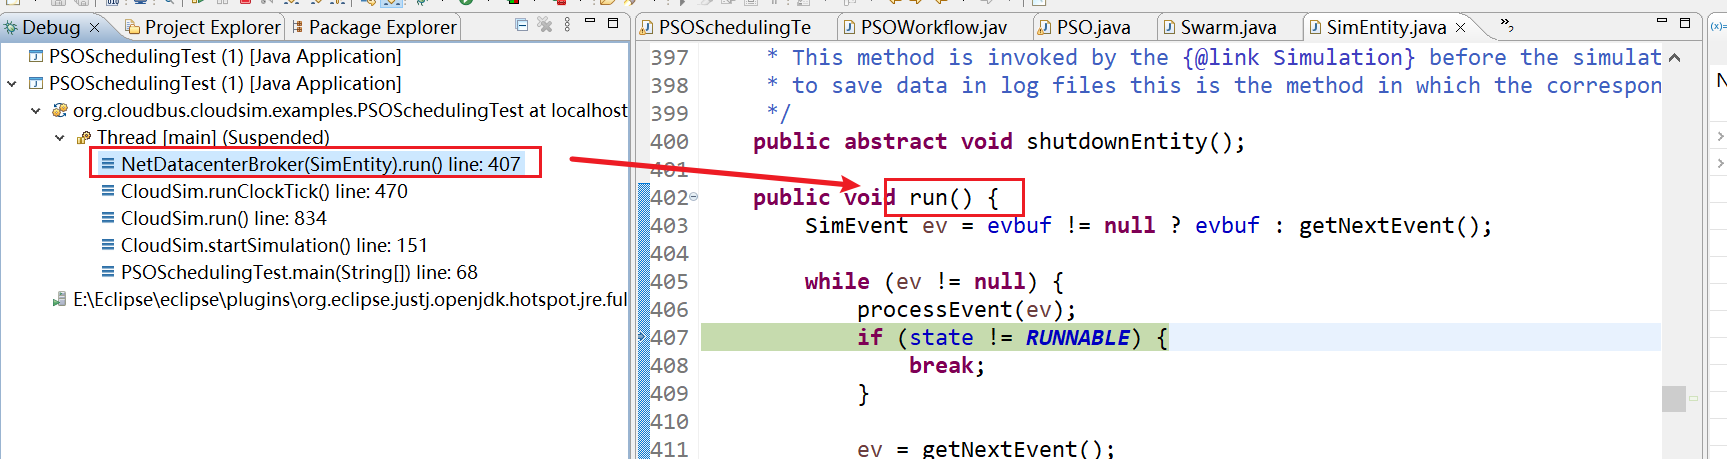
19、NetDatacenterBroker(SimEntity).run() line: 407
20、CloudSim.runClockTick() line: 467
21、CloudSim.run() line: 834
22、CloudSim.startSimulation() line: 153
23、PSOSchedulingTest.main(String[]) line: 75
24、最终输出结果