一些菜鸡学习心得,如果有错的话希望大佬能帮忙指出,感激不尽!!
(底层组织结构是大佬帮忙写的,感谢大佬带入门)
- 项目组织
\prj
\prjname
\simulation
\results
package.ned
omnet.ini
network.ned
…
\src
package.ned
host.ned
host.cc
host.h
…
其中ned主要负责简单模块、复杂模块、网络等的组件与拓扑的描述。h文件来声明,c文件来定义模块的行为。
如简单的tictoc项目:
- tictoc.ned
simple Txc1
{
gates:
input in;
output out;
}
- tictoc.h
class Txc1 : public cSimpleModule
{
protected:
// The following redefined virtual function holds the algorithm.
virtual void initialize() override;
virtual void handleMessage(cMessage *msg) override;
};
- tictoc.cc
Define_Module(Txc1);
void Txc1::initialize()
{
// Initialize is called at the beginning of the simulation.
// To bootstrap the tic-toc-tic-toc process, one of the modules needs
// to send the first message. Let this be `tic'.
// Am I Tic or Toc?
if (strcmp("tic", getName()) == 0) {
// create and send first message on gate "out". "tictocMsg" is an
// arbitrary string which will be the name of the message object.
cMessage *msg = new cMessage("tictocMsg");
send(msg, "out");
}
}
void Txc1::handleMessage(cMessage *msg)
{
// The handleMessage() method is called whenever a message arrives
// at the module. Here, we just send it to the other module, through
// gate `out'. Because both `tic' and `toc' does the same, the message
// will bounce between the two.
send(msg, "out"); // send out the message
}
而ini文件则是进行网络的配置,如:
[Tictoc1]
network = Tictoc1
以上是最简单的网络配置,后续还可以通过在ned中定义一些参数然后在ini中修改它来配置需要的网络。
复杂的网络则会在src文件夹中定义简单模块与复杂模块,然后在simulation文件夹中定义网络的ned及ini文件。
- 新建项目
File->new->OMNET++ Project

填写项目名称:
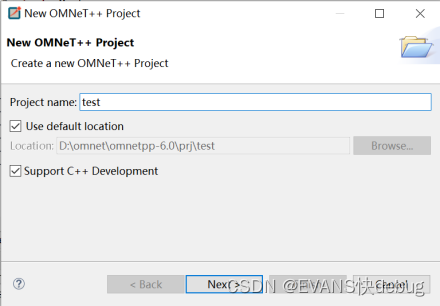
->NEXT->选择空项目/带src和simulation文件夹的项目。网络上的简易教程多为空项目,但带俩文件夹的项目后续会更适合复杂network的组织。
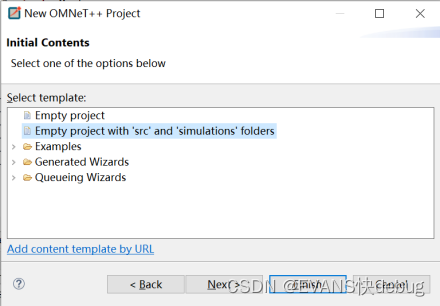
一般情况下,simulation文件夹放网络模块文件及ini配置,src文件夹放组织网络的简单及复杂模块(如node、host等)
三、简单模块与复杂模块的介绍及拼装网络
这部分以简易自组织网络为例介绍简单模块与复杂模块的ned部分。
简单的maclayer.ned:
package tdma_mac_demo;
//此处定义文件位置,处于tdma_mac_demo/src/maclayer.ned
//若需要在tdma_mac_demo/文件夹下但/src以外的地方(如simulation)引用它
//则需要import tdma_mac_demo/maclayer.ned
simple MacLayer
{
parameters:
@display("i=block/routing");
int numSlots = default(10);
double slotDuration @unit(s) = default(500ms);
string slotAllocate = default("");
gates:
input upperIn;
output upperOut;
input phyIn;
output phyOut;
}
简单来说,简单模块都是这个样子:
package ……;
simple ……
{
parameters:
……
gates:
input ……;
output ……;
}
而用简单模块的复杂模块则长这个样子:
package ……;
simple Node
{
parameters:
……
gates:
input ……;
output ……;
}
submodules:
trafficGen: TrafficGen {
……
}
macLayer: MacLayer {
……
}
phyLayer: PhyLayer {
……
}
connections:
trafficGen.lowerOut --> macLayer.upperIn;
……
}
再把复杂模块node拼装成一个网络network:
package tdma_mac_demo.simulations;
import tdma_mac_demo.DemoNode;
network DemoNetwork
{
parameters:
@display("bgb=500,500");
int nodenum = default(5);
types:
channel Channel extends ned.DatarateChannel
{
datarate = 100Mbps;
delay = default(100ms);
}
submodules:
node[nodenum]: DemoNode;
connections:
for i=0..sizeof(node[0].radioIn) , for j = 0..sizeof(node[0].radioIn){
node[i].radioOut++ --> Channel --> node[j].radioIn++ if i!=j ;}
}
很显然,parameters指参数,default()为默认,默认后就可以在ini快乐的更改它了~
gates指门(用来连接);submodule为子模块;connections指连接,用-->或者<--来表示。Channel为信道,可以直接继承(extends)omnet库中的信道类型,直接在types中定义一些参数的值。
注:
在parameters中可以用@class属性明确指定C++类,若未指定则默认当前文件夹的下的同名文件。
在ned中定义的参数,可以直接赋值,也可以设为默认后在ini文件中配置它。而在ini文件中赋值并不能覆盖ned中的赋值。参数还有一些属性,如@mutable、@unit、@derectIn等。
更具体可以参照《OMNET++与网络仿真 赵永利 张杰 著》及其他教程。
四、简单模块行为描述
首先举一个例子,下述是Txc1.h文件。和普通的C++类一样的声明,但继承简单模块cSimpleModule,initialize()、handleMessage()也是必须的——须在.cc文件中进行初始化及处理信息的描述。
class Txc1 : public cSimpleModule
{
protected:
// The following redefined virtual function holds the algorithm.
virtual void initialize() override;
virtual void handleMessage(cMessage *msg) override;
};
然后看Txc1.cc文件:
Define_Module(Txc1);
void Txc1::initialize()
{
// Initialize is called at the beginning of the simulation.
// To bootstrap the tic-toc-tic-toc process, one of the modules needs
// to send the first message. Let this be `tic'.
// Am I Tic or Toc?
if (strcmp("tic", getName()) == 0) {
// create and send first message on gate "out". "tictocMsg" is an
// arbitrary string which will be the name of the message object.
cMessage *msg = new cMessage("tictocMsg");
send(msg, "out");
}
}
void Txc1::handleMessage(cMessage *msg)
{
// The handleMessage() method is called whenever a message arrives
// at the module. Here, we just send it to the other module, through
// gate `out'. Because both `tic' and `toc' does the same, the message
// will bounce between the two.
send(msg, "out"); // send out the message
}
在仿真时会自动运行上述两个函数,也可以加入其他函数的声明及定义,但需要要initialize()和handleMessage()来call它们。
initialize()和handleMessage()都如其名,进行初始化和处理消息,初始化函数则是在仿真进行的开始对模块进行初始化,可以将ned中的参数导入,初始化变量等。处理消息函数则是在消息来到时自行调用该函数对msg进行处理,这个msg包括外来消息及自消息。
这个自消息则是一个新概念,比如modula A可以自己给自己发消息,用scheduleAfter ( delaytime, msg),在delaytime后发送msg给自己,就像定闹钟,到时间了告诉自己该起床、开会等等。
写不动了……


