第一步在pro文件加入:
QT    +=serialport代码如下:QT       += core gui
QT    +=serialportgreaterThan(QT_MAJOR_VERSION, 4): QT += widgetsCONFIG += c++11# The following define makes your compiler emit warnings if you use
# any Qt feature that has been marked deprecated (the exact warnings
# depend on your compiler). Please consult the documentation of the
# deprecated API in order to know how to port your code away from it.
DEFINES += QT_DEPRECATED_WARNINGS# You can also make your code fail to compile if it uses deprecated APIs.
# In order to do so, uncomment the following line.
# You can also select to disable deprecated APIs only up to a certain version of Qt.
#DEFINES += QT_DISABLE_DEPRECATED_BEFORE=0x060000    # disables all the APIs deprecated before Qt 6.0.0SOURCES += \main.cpp \mainwindow.cppHEADERS += \mainwindow.hFORMS += \mainwindow.ui# Default rules for deployment.
qnx: target.path = /tmp/$${TARGET}/bin
else: unix:!android: target.path = /opt/$${TARGET}/bin
!isEmpty(target.path): INSTALLS += target
第二步需要加入的头文件:
#include<QtSerialPort/QtSerialPort>第三步获取当前电脑可用串口名字:
QSerialPortInfo::availablePorts();//将返回一个含有电脑当前的可用串口名字QList<QSerialPortInfo>容器第四步定义一个串口对象并且设置串口名字,数据,校验,停止等等:
第一步: QSerialPort *serial=new QSerialPort(this);//定义创建一个串口
第二步:serial->setPortName(ui->comboBox->currentText());//设置串口名字里面参数为字符串
第三步:serial->setBaudRate(ui->comboBox->currentText().toInt());//设置波特率面参数为数字
第四步: serial->setDataBits(QSerialPort::Data5);//设置数据位这个参数是qt定义的枚举类型
第五步:serial->setParity(QSerialPort::EvenParity);//设置校验位,参数也是个qt自定义的枚举类型
第六步:serial->setStopBits(QSerialPort::OneStop);//设置停止位,参数也是个qt自定义的枚举类型
第七步:serial->setFlowControl(QSerialPort::NoFlowControl);//设置流控,参数也是个qt自定义的枚举类型
第八步:serial->open(QIODevice::ReadWrite);//以读写的方式打开串口成功与失败都会有返回值
第八步: serial->close();//关闭串口
第五步设置串口有消息来需要响应的槽函数并且显示消息:
第一步定义一个串口有消息来要处理的槽函数:
private slots:
void serialPort_readyRead();//当串口有消息来的时候促发的槽函数
第二步设置信号和槽:
connect(serial,&QSerialPort::readyRead,this,&MainWindow::serialPort_readyRead);
第三步定义槽函数:
void MainWindow::serialPort_readyRead()//当串口有消息来的时候促发的槽函数
{qDebug()<<"Reveive data";
}
第四步接收信息:
QString Receivetext=serial->readAll();//这个的格式位QString接收到的信息
可以把接收到的信息转化为两总格式:
第一种://ASCIIReceivetext=Receivetext.toLatin1();
第二种://十六进制Receivetext=Receivetext.toLatin1().toHex();
第六步发送消息:
发送消息方法:QByteArray bytearray;serial->write(bytearray);//参数类型为QByteArray下面就是我学习写的一个串口助手源码:
头文件#include "mainwindow.h":#ifndef MAINWINDOW_H
#define MAINWINDOW_H
#pragma execution_character_set("utf-8")
#include <QMainWindow>
#include<QtSerialPort/QtSerialPort>
#include<QTimer>
#include<QMessageBox>QT_BEGIN_NAMESPACE
namespace Ui { class MainWindow; }
QT_END_NAMESPACEclass MainWindow : public QMainWindow
{Q_OBJECTpublic:MainWindow(QWidget *parent = nullptr);~MainWindow();
private slots:void TimcrEvent();//定义一个槽函数专门处理定时器槽函数(自定义)void serialPort_readyRead();//当串口有消息来的时候促发的槽函数(自定义)void on_pushButton_clicked();//打开串口转到槽void on_checkBox_clicked();//接收格式ASSCII点击后转到槽void on_checkBox_2_clicked();//十六进制点击后转到槽void on_checkBox_3_clicked();//暂停转到槽void on_pushButton_2_clicked();//串口通信发送信息void on_pushButton_3_clicked();//清空接收区转到void on_pushButton_4_clicked();//清空发送区转到槽private:Ui::MainWindow *ui;QTimer   *timcr;//定义一个定时器QStringList  portStringList;//定义一个容器用来验证是否有串口需要添加QSerialPort *serial;//定义一个串口QString Receivetext;//获取串口发来的信息long  Receive_Byte;//统计收到的字节QString Sendtext;//要发送的信息long Send_Byte;//统计发送了多少字节};
#endif // MAINWINDOW_H源文件#include "mainwindow.h":#include "mainwindow.h"
#include "ui_mainwindow.h"MainWindow::MainWindow(QWidget *parent): QMainWindow(parent), ui(new Ui::MainWindow)
{ui->setupUi(this);resize(800,600);setWindowTitle("串口调试助手");timcr=new QTimer(this);//new 一个定时器timcr->start(500);//设置500时间发送一个信号connect(timcr,&QTimer::timeout,this, &MainWindow::TimcrEvent);serial=new QSerialPort(this);//创建一个串口ui->comboBox_2->setCurrentIndex(5);ui->comboBox_3->setCurrentIndex(3);ui->comboBox_4->setCurrentIndex(2);ui->comboBox_5->setCurrentIndex(0);Receive_Byte=0;Send_Byte=0;connect(serial,&QSerialPort::readyRead,this,&MainWindow::serialPort_readyRead);ui->checkBox->setCheckState(Qt::Checked);
}MainWindow::~MainWindow()
{delete ui;
}void MainWindow::TimcrEvent()//检测当前电脑的槽函数
{QStringList  newPortStringList; //定义一个string容器newPortStringList.clear();foreach(const QSerialPortInfo &info,QSerialPortInfo::availablePorts())//foreach是qt定义的一个按照顺序遍历容器的循环{newPortStringList +=info.portName();//info就是遍历的成员,它的portName()方法是转化为QString类型}if(newPortStringList.size()!=portStringList.size())//判断是否有新的串口或者取出串口{portStringList=newPortStringList;ui->comboBox->clear();ui->comboBox->addItems( portStringList);}
}void MainWindow::serialPort_readyRead()//当串口有消息来的时候促发的槽函数
{QString last_text;int length;int i;if(ui->checkBox_3->checkState()!=Qt::Checked){last_text=ui->textEdit->toPlainText();Receivetext=serial->readAll();Receive_Byte+=Receivetext.length();ui->label_9->setText(QString::number(Receive_Byte));if(ui->checkBox_2->checkState()==Qt::Checked)//十六进制{Receivetext=Receivetext.toLatin1().toHex();length=Receivetext.length();for(i=0;i<=length/2;i++){Receivetext.insert(2+3*i,' ');}}else//ASCII{Receivetext=Receivetext.toLatin1();}last_text=last_text.append(Receivetext);ui->textEdit->setText(last_text );}}void MainWindow::on_pushButton_clicked()//打开串口
{if(ui->pushButton->text()==QString("打开串口")){serial->setPortName(ui->comboBox->currentText());//设置串口名字serial->setBaudRate(ui->comboBox_2->currentText().toInt());//设置波特率switch (ui->comboBox_3->currentText().toInt())//设置数据位{case 5:serial->setDataBits(QSerialPort::Data5);break;case 6:serial->setDataBits(QSerialPort::Data6);break;case 7:serial->setDataBits(QSerialPort::Data7);break;case 8:serial->setDataBits(QSerialPort::Data8);break;default:serial->setDataBits(QSerialPort::UnknownDataBits);}switch (ui->comboBox_4->currentIndex())//设置校验位{case 0: break;//偶校验case 1:serial->setParity(QSerialPort::OddParity);break;//奇校验case 2:serial->setParity(QSerialPort::NoParity);break;//无校验default:serial->setParity (QSerialPort::UnknownParity);break;}switch (ui->comboBox_5->currentIndex())//停止位{case 0:serial->setStopBits(QSerialPort::OneStop);break;//1case 1:serial->setStopBits(QSerialPort::OneStop);break;//1.2case 2:serial->setStopBits(QSerialPort::OneStop);break;//2default:serial->setStopBits(QSerialPort::UnknownStopBits);}serial->setFlowControl(QSerialPort::NoFlowControl);//设置流控if(!serial->open(QIODevice::ReadWrite)){QMessageBox::information(this,"错误提示","无法打开串口",QMessageBox::Ok);return;}ui->comboBox->setEnabled(false);ui->comboBox_2->setEnabled(false);ui->comboBox_3->setEnabled(false);ui->comboBox_4->setEnabled(false);ui->comboBox_5->setEnabled(false);ui->pushButton->setText("关闭串口");}else{serial->close();ui->comboBox->setEnabled(true);ui->comboBox_2->setEnabled(true);ui->comboBox_3->setEnabled(true);ui->comboBox_4->setEnabled(true);ui->comboBox_5->setEnabled(true);ui->pushButton->setText("打开串口");}
}void MainWindow::on_checkBox_clicked()//接收格式ASSCII点击后转到槽
{ui->checkBox->setCheckState(Qt::Checked);ui->checkBox_2->setCheckState(Qt::Unchecked);ui->checkBox_3->setCheckState(Qt::Unchecked);}void MainWindow::on_checkBox_2_clicked()//十六进制点击后转到槽
{ui->checkBox->setCheckState(Qt::Unchecked);ui->checkBox_2->setCheckState(Qt::Checked);ui->checkBox_3->setCheckState(Qt::Unchecked);
}void MainWindow::on_checkBox_3_clicked()//暂停转到槽
{ui->checkBox->setCheckState(Qt::Unchecked);ui->checkBox_2->setCheckState(Qt::Unchecked);ui->checkBox_3->setCheckState(Qt::Checked);
}void MainWindow::on_pushButton_2_clicked()//串口通信发送信息
{QByteArray bytearray;Sendtext=ui->textEdit_2->toPlainText();bytearray=Sendtext.toLatin1();serial->write(bytearray);Receive_Byte+=Sendtext.length();ui->label_11->setText(QString::number(Receive_Byte));
}void MainWindow::on_pushButton_3_clicked()//清空接收区
{ui->textEdit->clear();
}void MainWindow::on_pushButton_4_clicked()//清空发送区
{ui->textEdit_2->clear();
}
ui布局: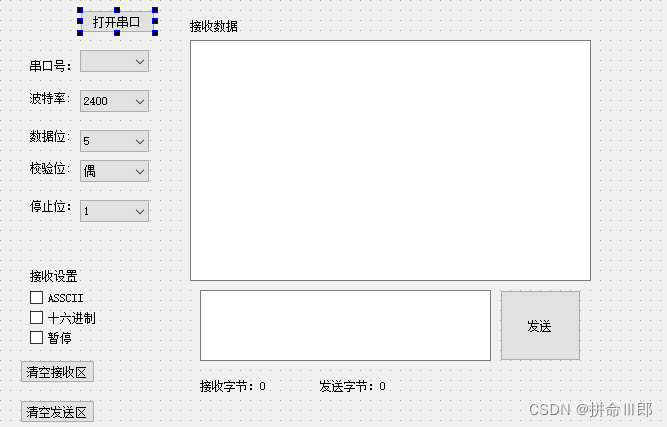


![[QT入门篇]编程基础知识](https://img-blog.csdnimg.cn/05a5c34684234258966211c823bd2bae.png)