日期:2008年10月
介绍
在文章中我会介绍3D撞击测试的原理和一些基本的实现步骤,当然也会写一些我在实现上的心得。所有的例子我都是在Visual C++ Express 2008里编译,还需要下载最新版本的OpenGL类库。我想提一下,这并不是一个新的课题,文章的主要目的是使你了解物理碰撞中的数学理论和分析方式,至于编程语言我认为你并不一定使用C++,可以完全可以使用C#或者是你其他喜欢的语言(只要你清楚实现步骤)。源文件一般都附带在文章中,以便于学习讨论,你完全可以下载使用我写的类,但是请务必注明出处。
碰撞测试
当做研究或者学习时,通常在理想的环境进行。碰撞牵扯到两个或者多个物体,物体大小不一,规则形状不同。在这里我从最简单最基本的写起,拿一个球体和一个平面的撞击举例(这也是我能想到最简单的最容易让读者看懂的例子)。顺便说一下,这里我所说的球体都是想象出来的(有着半径R,体积为4/3乘PI乘R平方),现实世界中不存在真正的球体,电脑里也不存在真正的球体。
现实中你在空地上抛出一个小球,那么小球会落到地面上并且反弹一下,或者当你对着墙壁抛出一个小球,那么小球也会弹回。那么小球撞击地面,墙面的过程就是要讨论的碰撞。发挥你的想象,把墙壁想象成一个3D空间的平面。从逻辑角度来说,小球向墙壁方向移动时,当小球碰到墙壁的时候,那么就知道小球撞倒墙壁了。那么怎么让程序知道小球撞击到墙壁了呢?
建议
如果你在空间中想象一个小球碰撞平面有困难的话,那么你可以尝试把小球想象成一个点,这个点就是小球的球心。
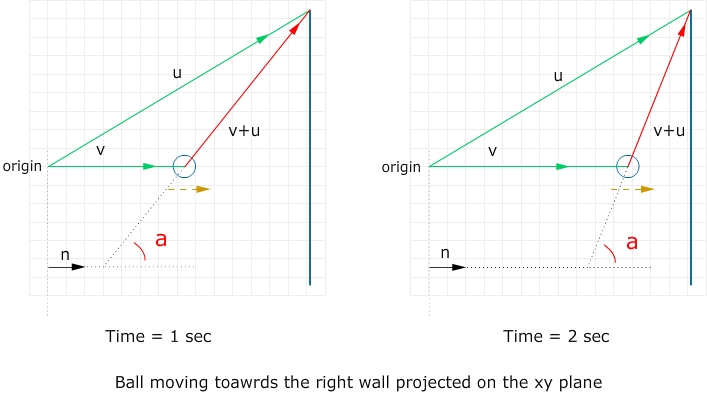
Hum!想象一个场景,一个沿着直线向右匀速运动的小球去撞击一堵墙。可能你会觉得用3D空间想象可能有点难度,我把整个场景投影在xy坐标系。图中的蓝线代表墙,origin就原点,黄色箭头代表小球的运动方向,v代表当前小球的位置用向量v(x,y,z)代表,u(x,y,z)代表墙角的位置,n代表墙的法线(我把它画在左边是为了让你能够清晰看到角度a)。用v+u便得到从小球当前位置到墙角的向量,那么它与法线n的夹角a便是我们所要关心的!当然这里的a指的是两个三维向量之间的夹角。设当时间为1sec时夹角为a0,时间为2sec时夹角为a1,从图中可以看出a0<a1!(因为小球向墙的方向移动)再想象一下,当小球移动到墙上的时候夹角就是90度。如果小球继续向右移动的话,那么夹角会继续增大。
关于向量点乘积(Dot product)计算的公式:
两个向量的乘积等于两个向量的大小相乘再乘以它们夹角的余弦。当一个角度在0到90度范围内,那么这个夹角的余弦值为正数,当这个角度在90到180的范围内,它的余弦值为负数。有没有看出什么呢?也就是说当小球向右运动还未碰到墙时,a的值为正值,如果小球中心在墙上,a的值为cos(PI/2) = 0,当小球越过墙的话,a的值为负值。根据点乘积公式v0•v1=|v0||v1|cos(a),可以推断v0•v1与cos(a)成正比并且符号相同。也就是说v+u向量和墙的法线n的点乘积为正时,小球还未碰到墙面,为负时小球已经越过墙面,乘积为0时,小球在墙面上。(我这里说的墙面的法线是垂直于墙面的向量)Great!
再加深一下印象,下面是目前所述内容的伪代码:
VECTOR3D position_after
VECTOR3D velocity
VECTOR3D uv_before = VectorAddition(position_current, wall_corner)
SCALAR before = VectorDotProduct(uv_before, normal_wall);
VECTOR3D position_after = VectorAddition(current_position, velocity)
VECTOR3D uv_after = VectorAddition(position_after, wall_corner)
SCALAR after = DotProduct(uv_after, normal_wall);
IF before > 0 AND after < 0 THEN COLLIDE
IF before < 0 AND after > 0 THEN COLLIDE
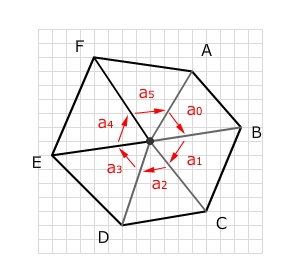
不足为奇,上面我所说的方法只是其中一种方法实现检测碰撞,这里再简单说一另外一个方法:当小球球心在平面上时,那么设球心与多边行任意两个夹角分别为a0,a1...an,那么a0+a1+...an的值就应该为360,运用这种角度检测的方法也可以得到想要得结果。当然还有很多其他的测定碰撞方式,我就不再一一叙述。
我写了一个例子说明我们是运用第一个算法检测碰撞的。你可以在文章尾找到例子源文件的下载链接。你所要做的就是使用Visual C++新建立一个空的项目,然后把vector.h和main.cpp添加到项目里,然后编译。这个例子演示了一个小球在两个四边形中间来回运动,当撞击到其中一个平面后便会相反的方向移动。你可以点击托拽鼠标来转动物体,按下键盘的A键来确定是否在小球撞击到四边形后变化小球运动方向。
程序步骤
下面我详细讲解一部分代码:
1. 首先你需要写一个Vector3D类,代表三维空间的向量(当然不需要非常复杂)。关于这个类我就打算在这篇文章详细的解释了。
#define __VECTOR3D__
#include " math.h "
///
// vector class
class Vector3D
{
public :
float x;
float y;
float z;
///
// constructor
Vector3D() { x = 0.0f ; y = 0.0f ; z = 0.0f ; }
Vector3D( const Vector3D & v) { x = v.x; y = v.y; z = v.z; } // copy constructor
Vector3D( float x, float y, float z) { this -> x = x; this -> y = y; this -> z = z; }
///
// operator overloading
Vector3D & operator = (Vector3D v) { x = v.x; y = v.y; z = v.z; return * this ; }
Vector3D operator + (Vector3D v) const { return Vector3D(x + v.x, y + v.y, z + v.z); }
Vector3D operator - (Vector3D v) const { return Vector3D(x - v.x, y - v.y, z - v.z); }
Vector3D operator * ( float scalar) const { return Vector3D(x * scalar, y * scalar, z * scalar); }
Vector3D operator / ( float scalar) const { return Vector3D(x / scalar, y / scalar, z / scalar); }
Vector3D operator - () { return Vector3D( - x, - y, - z); }
bool operator == ( const Vector3D & v) const { return x == v.x && y == v.y && z == v.z; }
bool operator != ( const Vector3D & v) const { return x != v.x || y != v.y || z != v.z; }
Vector3D & operator += (Vector3D v) { x += v.x; y += v.y; z += v.z; return * this ; }
Vector3D & operator -= (Vector3D v) { x -= v.x; y -= v.y; z -= v.z; return * this ; }
Vector3D & operator *= (Vector3D v) { x *= v.x; y *= v.y; z *= v.y; return * this ; }
Vector3D & operator /= (Vector3D v) { x /= v.x; y /= v.y; z /= v.y; return * this ; }
inline float dot (Vector3D & v) { return x * v.x + y * v.y + z * v.z; }
///
// vector functions
void zero(){ x = y = z = 0.0f ; }
float mag() { return sqrt(x * x + y * y + z * z); }
float operator * ( const Vector3D & v) const { return x * v.x + y * v.y + z * v.z; }
void normalize()
{
float mag = this -> mag();
if (mag == 0 )
return ;
x /= mag;
y /= mag;
z /= mag;
}
Vector3D normal()
{
float mag = this -> mag();
if (mag == 0 )
return Vector3D( 0 , 0 , 0 );
return Vector3D(x / mag, y / mag, z / mag);
}
};
#endif
2. 在例子里,我使用了OpenGL的绘图引擎。程序一开始一些设置和初始化全局变量的代码(通常不会做太大的变化)。
#include < windows.h >
#include < stdio.h >
#include < stdlib.h >
#include < gl / glut.h >
#include " vector.h "
using namespace std;
#define APP_WIDTH 640 // specify the width of the app window
#define APP_HEIGHT 480 // specify the height
#define APP_INIT_X 200 // specify the initial x
#define APP_INIT_Y 200 // specify the initial y
// an rgb struct
typedef struct tagRGB { float r, g, b; } RGB;
// a quad struct
typedef struct tagQuad { Vector3D vertices[ 4 ]; Vector3D normal; RGB color; } QUAD;
float _rotationy = 90.0f ; // rotate objects around y axis
float SPHERE_RADIUS = 0.4f ; // radius of our ball
bool _pre_check = false ; // not let the ball pass through the plane
Vector3D _sphere_pos = Vector3D( 0.0f , 0.0f , 0.0f ); // position of our ball 1
Vector3D _velocity = Vector3D( 0.0f , 0.0f , 0.02f ); // moving velocity of our ball
GLUquadricObj * _quadric = gluNewQuadric(); // used to create a sphere
QUAD _quads[ 2 ];
bool _drag = false ; // click on the screen and start drag
int _dragx; // current mouse x
int _dragy; // current mouse y
3. 下面设置鼠标和键盘响应的事件。
void handleKeyEvent(unsigned char key, int x, int y)
{
switch (key)
{
case ' a ' :
_pre_check = ! _pre_check;
printf( " Toggle check.\n " );
break ;
default :
break ;
}
}
// handle the mouse press and release event
void mouseEvent( int button, int state, int x, int y)
{
if (button == 0 ) // mouse left
{
if (state == 0 ) // pressed
{
_drag = true ;
_dragx = x;
}
if (state == 1 ) // released
{
_drag = false ;
}
}
}
// handle the mouse move event
void motionEvent( int x, int y)
{
if (_drag)
{
_rotationy += x - _dragx;
_dragx = x;
}
}
4. 初始化OpenGL绘制设置,包括氛围和灯光等。另外还要写一个函数处理当你缩放窗口的响应事件。
{
glEnable(GL_DEPTH_TEST);
glEnable(GL_NORMALIZE);
glEnable(GL_LIGHTING);
glEnable(GL_LIGHT0);
glEnable(GL_LIGHT1);
glEnable(GL_DEPTH_TEST);
glEnable(GL_COLOR_MATERIAL);
GLfloat ambientColor[] = { 1.0f , 1.0f , 1.0f , 0.1f }; // setup ambient light
glLightModelfv(GL_LIGHT_MODEL_AMBIENT, ambientColor);
GLfloat lightColor0[] = { 1.0f , 1.0f , 1.0f , 1.0f }; // setup a light
GLfloat lightPos0[] = { 2.0f , 20.0f , 20.0f , 1.0f };
glLightfv(GL_LIGHT0, GL_DIFFUSE, lightColor0);
glLightfv(GL_LIGHT0, GL_POSITION, lightPos0);
return true ;
}
// this is called when you resize the app
void handleResize( int width, int height)
{
glViewport( 0 , 0 , width, height);
glMatrixMode(GL_PROJECTION);
glLoadIdentity();
gluPerspective( 45.0f , ( double )width / ( double )height, 1.0 , 200.0 );
}
5. 下面是布置场景的函数display(),函数完成功能是简单的绘制两个四边形一个在前面,另外一个在后面,中间绘制一个小球。然后我让整个场景围绕y轴旋转90度,有一个更好的观看角度。
void display()
{
glClear(GL_COLOR_BUFFER_BIT | GL_DEPTH_BUFFER_BIT);
glMatrixMode(GL_MODELVIEW);
glLoadIdentity();
glTranslatef( 0.0f , 0.0f , - 20.0f ); // move objects further
glRotatef(_rotationy, 0.0f , 1.0f , 0.0f ); // rotate obejcts around y axis
glPushMatrix();
glBegin(GL_QUADS); // draw left and right plane
for ( int i = 0 ; i < 2 ; i ++ )
{
glColor3fv(( const float * ) & _quads[i].color);
for ( int v = 0 ; v < 4 ; v ++ )
{
glVertex3f(_quads[i].vertices[v].x, _quads[i].vertices[v].y, _quads[i].vertices[v].z);
}
}
glEnd();
glPopMatrix();
glColor3f( 0.2f , 0.4f , 0.9f ); // color of our ball
glPushMatrix();
// move the ball to the position specified at the beginning
glTranslatef(_sphere_pos.x, _sphere_pos.y, _sphere_pos.z);
gluSphere(_quadric, SPHERE_RADIUS, 50 , 50 ); // draw the ball
glPopMatrix();
glutSwapBuffers();
}
6. 下面是小球运动的循环函数,这里的算法即是前面所讨论到的。
{
glClear(GL_COLOR_BUFFER_BIT | GL_DEPTH_BUFFER_BIT);
glMatrixMode(GL_MODELVIEW);
glLoadIdentity();
bool collision = false ;
// calculate the position where the ball should be
Vector3D post_pos = _sphere_pos + _velocity;
for ( int i = 0 ; i < 2 ; i ++ )
{
// slope between the normal of the plane and the ball position
// to the right plane, if the ball center is on the plane,
// then the slope should be acos(0) which is pi/2 radian, if it is not yet reach the plane
// then the sploe should be acos(angle) where angle is greater than pi/2 radian
// this means the the slope is less than 0, vice versa
float d_before = (_sphere_pos + _quads[i].vertices[ 0 ]).dot(_quads[i].normal);
float d_after = (post_pos + _quads[i].vertices[ 0 ]).dot(_quads[i].normal);
if (_pre_check)
{
if (abs(d_after) < SPHERE_RADIUS)
{
printf( " The sphere is close to the %s plane\n " , i == 0 ? " left " : " right " );
collision = true ;
}
}
else
{
// if there is a sign change
if ((d_before > 0 && d_after < 0 ) || (d_before < 0 && d_after > 0 ))
{
printf( " The sphere passed the %s plane\n " , i == 0 ? " left " : " right " );
collision = true ;
}
}
}
if ( ! collision)
_sphere_pos = post_pos; // if not collide with the plane
else
_velocity = - _velocity; // move opposite way
glutPostRedisplay();
}
7. 写好接口main函数,那么整个程序就完成了。
{
glutInit( & argc, argv);
glutInitDisplayMode(GLUT_DOUBLE | GLUT_RGB | GLUT_DEPTH);
glutInitWindowSize(APP_WIDTH, APP_HEIGHT);
glutInitWindowPosition(APP_INIT_X, APP_INIT_Y);
glutCreateWindow( " Collision Detection " );
// here we create specify two planes, one is on the left and another one is on the right
_quads[ 0 ].color.r = 0.9f ;
_quads[ 0 ].color.g = 0.2f ;
_quads[ 0 ].color.b = 0.2f ;
_quads[ 0 ].vertices[ 0 ] = Vector3D( - 2.0f , - 2.0f , - 7.0f );
_quads[ 0 ].vertices[ 1 ] = Vector3D( 2.0f , - 2.0f , - 7.0f );
_quads[ 0 ].vertices[ 2 ] = Vector3D( 2.0f , 2.0f , - 7.0f );
_quads[ 0 ].vertices[ 3 ] = Vector3D( - 2.0f , 2.0f , - 7.0f );
_quads[ 0 ].normal = Vector3D( 0.0f , 0.0f , 1.0f ); // the normal is diagonal to the plane
_quads[ 1 ].color.r = 0.2f ;
_quads[ 1 ].color.g = 0.9f ;
_quads[ 1 ].color.b = 0.2f ;
_quads[ 1 ].vertices[ 0 ] = Vector3D( - 2.0f , - 2.0f , 7.0f );
_quads[ 1 ].vertices[ 1 ] = Vector3D( 2.0f , - 2.0f , 7.0f );
_quads[ 1 ].vertices[ 2 ] = Vector3D( 2.0f , 2.0f , 7.0f );
_quads[ 1 ].vertices[ 3 ] = Vector3D( - 2.0f , 2.0f , 7.0f );
_quads[ 1 ].normal = Vector3D( 0.0f , 0.0f , 1.0f ); // the normal is diagonal to the plane
gluQuadricNormals(_quadric, GLU_SMOOTH);
init();
glutDisplayFunc(display);
glutIdleFunc(move);
printf( " Program started...\n " );
glutKeyboardFunc(handleKeyEvent);
glutMouseFunc(mouseEvent);
glutMotionFunc(motionEvent);
glutReshapeFunc(handleResize);
glutMainLoop();
}
我希望在看完这篇文章后你有所收益,举一反三,so,加油!
非常抱歉,文中暂时不提供源文件下载,如果你需要源文件,请来信或者留言给我。笔者利用工作之余写这些文章,付出了很多汗水,希望读者和转载者能够尊重作者的劳动。
| | 作者:Yang Zhou 出处:http://yangzhou1030.cnblogs.com 本文版权归作者和博客园共有,转载未经作者同意必须保留此段声明。请在文章页面明显位置给出原文连接,作者保留追究法律责任的权利。 |