1. JAX-WS发布WebService
创建web工程
创建simple包,和server、client两个子包。正常情况下server和client应该是两个项目,这里我们只是演示效果,所以简化写到一个项目中:
1.1 创建服务类Server
package simple.server;import javax.jws.WebService;
import javax.xml.ws.Endpoint;//这里要加上WebService注解
@WebService
public class SimpleServer {//要发布出去的方法public String sayHello() {return "hello world";}//要发布出去的方法public String speak(@WebParam(name = "word") String word) {return word + ":webservice";}//使用main方法发布出去public static void main(String[] args) {//第一个参数是地址,localhost是本机,//9001是端口,端口可以是任意一个未占用的端口//SimpleService是自己起的服务名,任意//第二个参数是要发布的这个类的对象Endpoint.publish("http://localhost:9001/SimpleService", new SimpleServer());System.out.println("Publish Success~");//看到这个输出代表发布成功了}
}
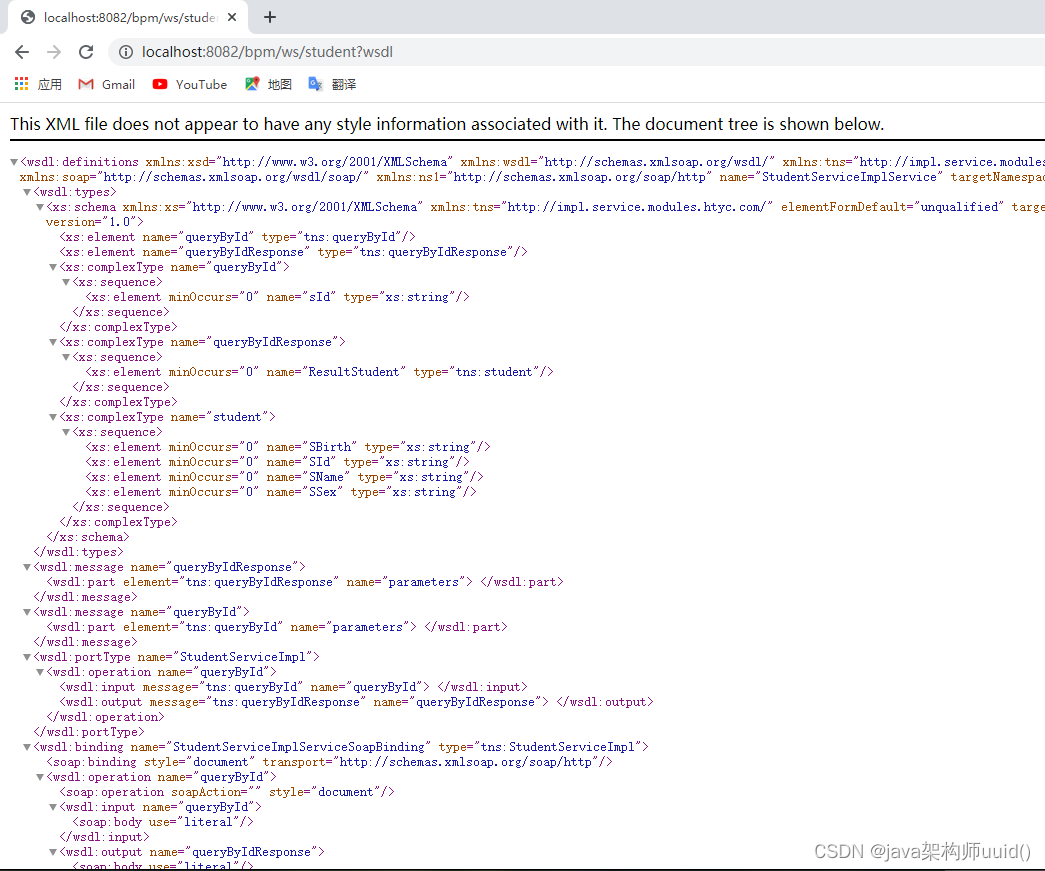
运行main方法后在浏览器中输入
http://localhost:9001/SimpleService?wsdl
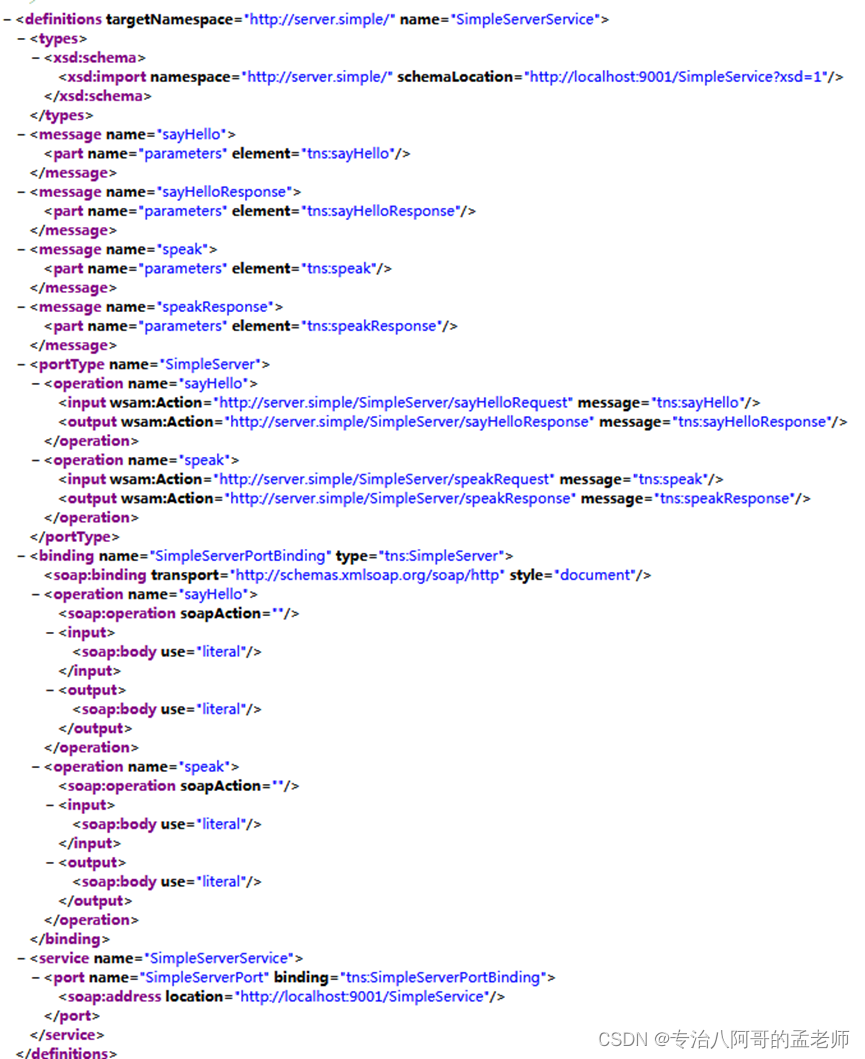
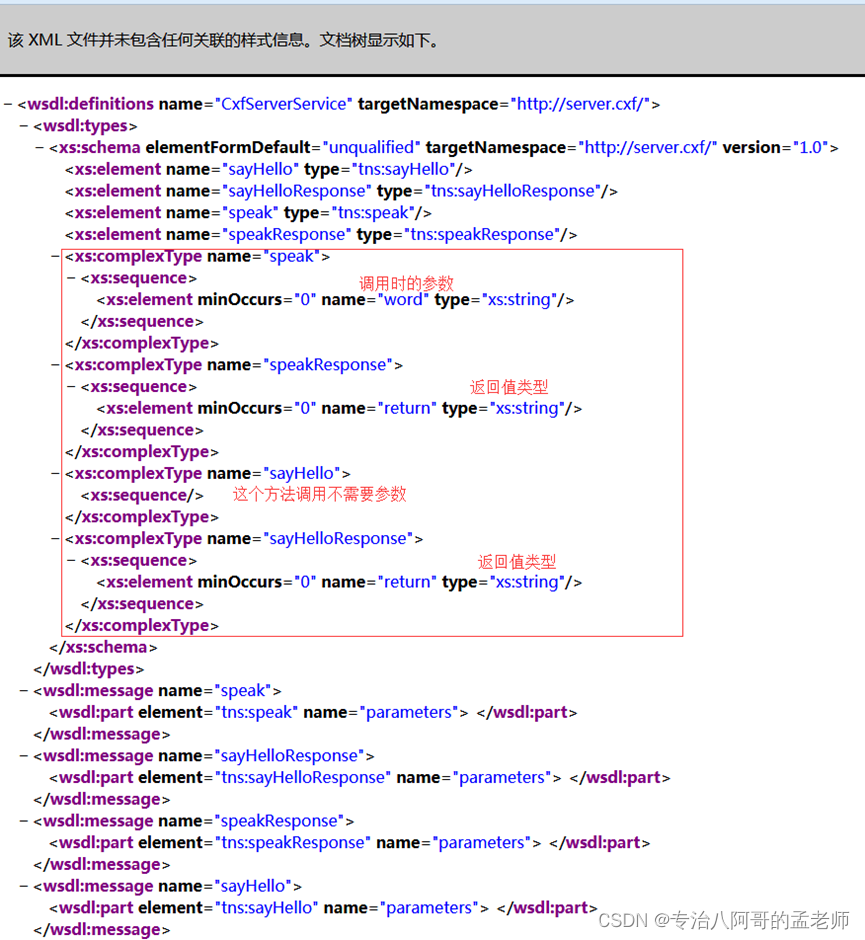
可以看到服务信息:
Wsdl文档从下往上读
Types - 数据类型定义的容器,它使用某种类型系统(一般地使用XML
Schema中的类型系统)。(入参和出参的数据类型)
Message -通信消息的数据结构的抽象类型化定义。使用Types所定义的类型来定义整个消息的数据结构(入参和出参)。
Operation - 对服务中所支持的操作的抽象描述,一般单个Operation描述了一个访问入口的请求/响应消息对(方法)。
PortType -对于某个访问入口点类型所支持的操作的抽象集合,这些操作可以由一个或多个服务访问点来支持(服务类)。
Binding - 特定服务访问点与具体服务类的绑定(不看内容,看关系)。 Port - 定义为webservice单个服务访问点。
Service-相关服务访问点的集合。
访问上面的schemaLocation="http://localhost:9001/SimpleService?xsd=1"网址,可以看到具体方法的描述信息
如果要使用web方式发布这个webservice,只需要写一个servlet,并在tomcat启动时就加载这个servlet,在servlet的int方法中发布webservice。
如:

package simple.server;import javax.servlet.ServletConfig;
import javax.servlet.ServletException;
import javax.servlet.http.HttpServlet;
import javax.xml.ws.Endpoint;public class PublishServlet extends HttpServlet{@Overridepublic void init(ServletConfig servletConfig) throws ServletException {super.init(servletConfig);//发布webserviceEndpoint.publish("http://localhost:9001/SimpleService", new SimpleServer());System.out.println("Publish Success~");//看到这个输出代表发布成功了}
}
web.xml中配置:
<servlet><servlet-name>PublishServlet</servlet-name><servlet-class>simple.server.PublishServlet</servlet-class><load-on-startup>1</load-on-startup><!--启动就加载-->
</servlet>
<servlet-mapping><servlet-name>PublishServlet</servlet-name><url-pattern>/servlet/publish</url-pattern>
</servlet-mapping>
需要servlet的jar包
<!--servlet依赖jar包-->
<dependency><groupId>javax.servlet</groupId><artifactId>servlet-api</artifactId><version>2.5</version>
</dependency>
1.2 创建客户端
使用jdk自带命令调用WebService
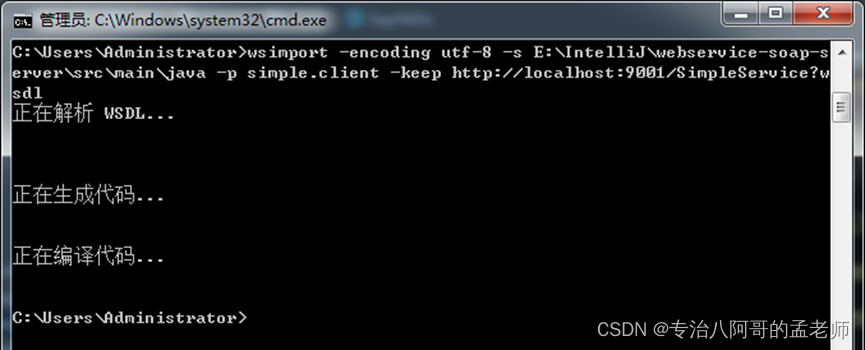
请求webservice会在本地生成类
wsimport 是请求webservice
-encoding utf-8 指定生成的java文件编码格式为utf-8
-s 后面是文件存放的工程路径
-p 是生成的java文件存放的包名
-keep 后面接的是1.1中发布出去的服务地址
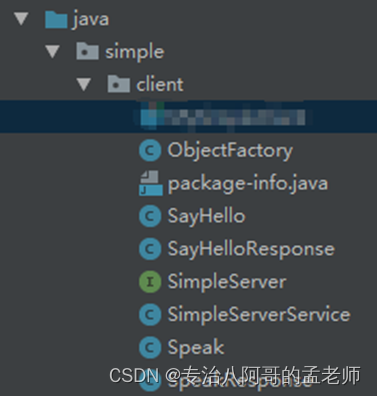
运行成功后,工程中会多出几个类:
创建测试客户端类MySimpleClient
package simple.client;import org.junit.Test;import java.io.InputStream;
import java.io.OutputStream;
import java.net.HttpURLConnection;
import java.net.URL;public class MySimpleClient {@Testpublic void testJdkMethod() {//<service name="SimpleServerService">//   <port name="SimpleServerPort" binding="tns:SimpleServerPortBinding">//     <soap:address location="http://localhost:9001/SimpleService"/>//   </port>// </service>//这个是xml文件中的service-name// <service name="SimpleServerService">SimpleServerService simpleServerService = new SimpleServerService();//这个是<port name="SimpleServerPort"SimpleServer simpleServer = simpleServerService.getSimpleServerPort();System.out.println(simpleServer.sayHello());}
}
通过jdk生成的SimpleServer,可以调用相应的方法,实际上返回响应的是服务器,但执行的时候就像调用自己写的类一样。可以清楚的看到方法和参数。
另一种调用的方式,直接使用java方法,不生成类:
新建一个other包,存放如下代码:
package simple.other;import javax.jws.WebMethod;
import javax.jws.WebParam;
import javax.jws.WebService;
import javax.xml.bind.annotation.XmlSeeAlso;
import javax.xml.ws.RequestWrapper;
import javax.xml.ws.ResponseWrapper;//对应xml文件
//<definitions targetNamespace="http://server.simple/" name="SimpleServerService">
@WebService(name = "SimpleServerService", targetNamespace = "http://server.simple/")
@XmlSeeAlso({})
public interface MySimpleClient {@WebMethod@RequestWrapper(localName = "sayHello")@ResponseWrapper(localName = "sayHelloResponse")public String sayHello();@WebMethod@RequestWrapper(localName = "speak")@ResponseWrapper(localName = "speakResponse")public String speak(@WebParam(name = "word")String word);
}
测试代码:
package simple.other;import javax.xml.namespace.QName;
import javax.xml.ws.Service;
import java.net.URL;public class OtherTest {public static void main(String[] args) throws Exception {URL wsdlUrl = new URL("http://localhost:9001/SimpleService?wsdl");// targetNamespace="http://server.simple/" name="SimpleServerService"Service s = Service.create(wsdlUrl,new QName("http://server.simple/","SimpleServerService"));MySimpleClient client = s.getPort(new QName("http://server.simple/","SimpleServerPort"), MySimpleClient.class);System.out.println(client.sayHello());System.out.println(client.speak("123"));}
}
2. cxf发布WebService
JAX-WS是一种规范,CXF是他的实现。CXF可以不必关心服务端的实现方式。
为了简化代码,我们把服务端和客户端写在一个工程里,正常应该写在两个工程
2.1 发布服务
新建web工程,导入jar包:
<dependencies><dependency><groupId>org.apache.cxf</groupId><artifactId>cxf-rt-transports-http-jetty</artifactId><version>3.2.0</version></dependency><dependency><groupId>org.apache.cxf.karaf</groupId><artifactId>apache-cxf</artifactId><version>3.2.0</version></dependency><!--日志文件--><dependency><groupId>org.slf4j</groupId><artifactId>slf4j-log4j12</artifactId><version>1.6.1</version></dependency>
</dependencies>
CXF发布服务需要一个接口和一个实现类:
package server;import javax.jws.WebParam;
import javax.jws.WebService;@WebService(name = "CXF", targetNamespace = "http://server.cxf/")
public interface CxfServer {String sayHello();String speak(@WebParam(name = "word") String world);
}
实现类:
package server;public class CxfServerImpl implements CxfServer {@Overridepublic String sayHello() {return "Hello CXF";}@Overridepublic String speak(String word) {return word + "CXF";}
}
发布服务:
package server;import org.apache.cxf.jaxws.JaxWsServerFactoryBean;public class CXFServerTest {public static void main(String[] args) {// 创建JaxWsServerFactoryBean对象JaxWsServerFactoryBean serverFactoryBean = new JaxWsServerFactoryBean();// 设置服务端地址serverFactoryBean.setAddress("http://127.0.0.1:9999/cxf");// 设置服务接口serverFactoryBean.setServiceClass(CxfServer.class);// 设置实现类对象serverFactoryBean.setServiceBean(new CxfServerImpl());// 发布服务serverFactoryBean.create();System.out.println("发布成功");}
}
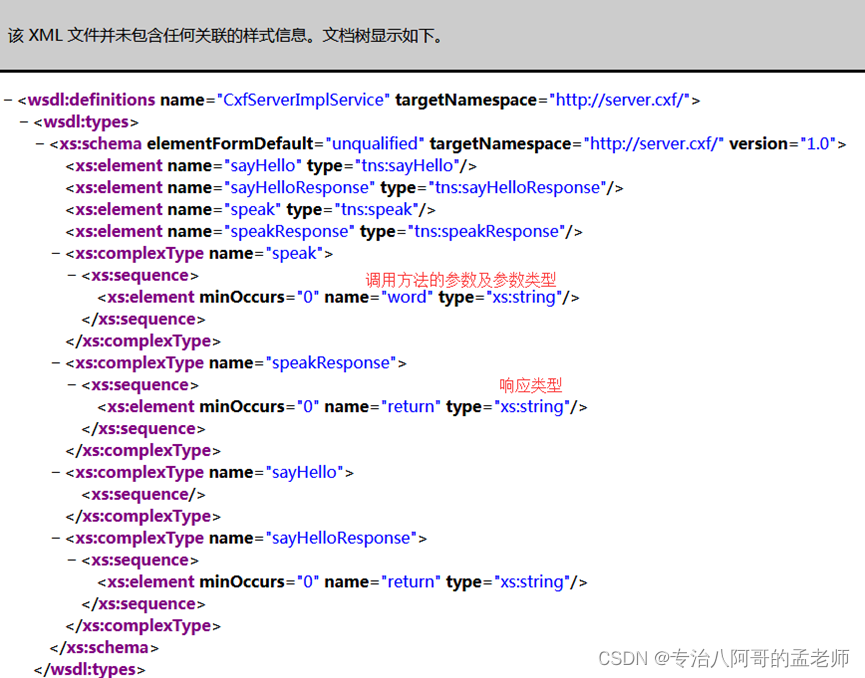
浏览器中访问:http://127.0.0.1:9999/cxf?wsdl
2.2 调用服务
package client;import org.apache.cxf.endpoint.Client;
import org.apache.cxf.jaxws.endpoint.dynamic.JaxWsDynamicClientFactory;public class CxfClientTest {public static void main(String[] args) throws Exception {JaxWsDynamicClientFactory clientFactory = JaxWsDynamicClientFactory.newInstance();Client client = clientFactory.createClient("http://127.0.0.1:9999/cxf?wsdl");//直接调用方法,不用关心服务端是怎么实现的Object[] result = client.invoke("sayHello");System.out.println(result[0]);Object[] result2 = client.invoke("speak", "123");System.out.println(result2[0]);}
}
2.3 Spring与CXF集成
引入spring的jar
<dependency><groupId>org.springframework</groupId><artifactId>spring-web</artifactId><version>4.3.11.RELEASE</version>
</dependency>
<dependency><groupId>org.springframework</groupId><artifactId>spring-webmvc</artifactId><version>4.3.11.RELEASE</version>
</dependency>
spring-cxf.xml配置
<?xml version="1.0" encoding="UTF-8"?>
<beans xmlns="http://www.springframework.org/schema/beans" xmlns:xsi="http://www.w3.org/2001/XMLSchema-instance"xmlns:jaxws="http://cxf.apache.org/jaxws"xsi:schemaLocation="http://cxf.apache.org/jaxws http://cxf.apache.org/schemas/jaxws.xsd
http://www.springframework.org/schema/beans http://www.springframework.org/schema/beans/spring-beans.xsd"><!--发布服务implementor是接口实现类,address在访问的时候加载路径里--><jaxws:endpoint id="cxfDemo" implementor="server.CxfServerImpl" address="/cxf"/>
</beans>
web.xml中配置
<?xml version="1.0" encoding="UTF-8"?>
<web-app xmlns="http://java.sun.com/xml/ns/javaee"xmlns:xsi="http://www.w3.org/2001/XMLSchema-instance"xsi:schemaLocation="http://java.sun.com/xml/ns/javaeehttp://java.sun.com/xml/ns/javaee/web-app_3_0.xsd"version="3.0"><display-name>Archetype Created Web Application</display-name><servlet><servlet-name>CXFServlet</servlet-name><servlet-class>org.apache.cxf.transport.servlet.CXFServlet</servlet-class></servlet><servlet-mapping><servlet-name>CXFServlet</servlet-name><url-pattern>/services/*</url-pattern></servlet-mapping><context-param><param-name>contextConfigLocation</param-name><param-value>classpath:spring-cxf.xml</param-value></context-param><listener><listener-class>org.springframework.web.context.ContextLoaderListener</listener-class></listener>
</web-app>
使用spring发布的时候,在接口实现类上加上注解,保证发布出去的targetNamespace一致:
@WebService(name = "CXF", targetNamespace = "http://server.cxf/")
public class CxfServerImpl implements CxfServer {
浏览器中访问:http://127.0.0.1:8080/services/cxf?wsdl
测试方法与2.2中相同,更换访问地址即可。