本篇内容过多,时间紧迫的朋友可以通过目录快速筛选自己想要看的内容,本人接触webservice也没多久,也处于学习阶段,如果有错误请指正,如果已经是大神请略过这篇文章,这篇文章不涉及webservice的底层原理,属于入门级文章,就当是笔记吧!本章主要介绍利用jdk的jws和框架技术cxf在服务端发布webservice,客户端如何接收将在下一小节介绍,因为本章内容过多,我已经尽量精简了语言,如果一次性写完整个webservice结构,可能文章的内容就过于庞杂了,不利于大家消化。
目录
一、什么是WebService
二、使用原生JDK实现WebService
1.创建接口
2.创建impl类
3.发布服务
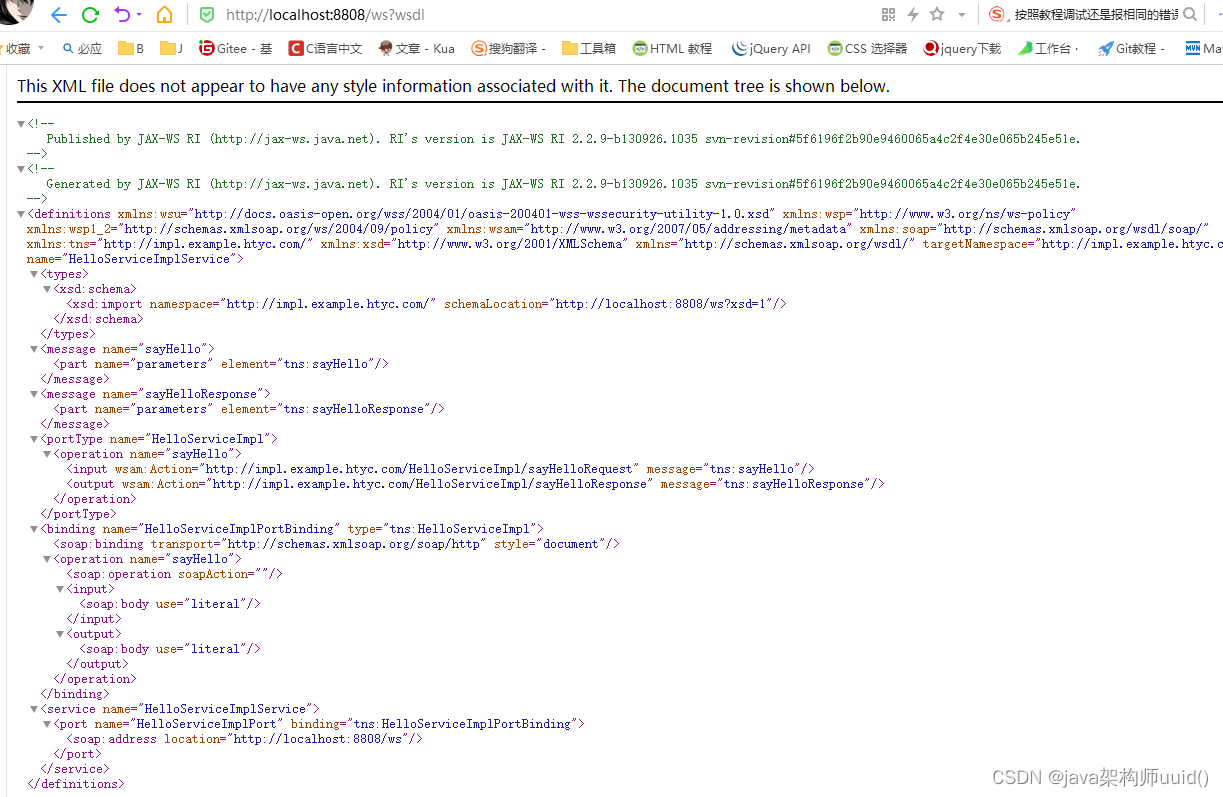
4.查看服务 http://localhost:8808/ws?wsdl
5.接口测试
5.1 创建soap工程
5.2 输入服务发布的url地址
5.3 输入参数,返回结果
三、Springboot整合CXF初级篇
1.pom.xml文件
2.yml文件(application.yml)
3.数据源配置
4.日志系统配置(可选)
5.在service层添加@WebService注解
6.使用CXF发布WebService
7.项目结构截图
8.启动项目访问wsdl文档
9.使用SoapUI测试
四、Springboot整合CXF进阶篇
1.实现方式
2.ApplicationRunner 和 CommandLineRunner简单使用
3.结果截图
4.利用自定义注解动态发布
4.1 自定义注解
4.2 在业务接口的实现类上标注动态发布WS的自定义注解
4.3 定义自动发布WS的配置类
4.4 注释或删除CxfConfig类测试注解是否生效
一、什么是WebService
其实WebService就是RPC的实现方式之一,是通过SOAP协议在Web上提供的软件服务,使用WSDL文件进行说明,并通过UDDI进行注册。
RPC 是一种技术思想而非一种规范或协议,常见 RPC 技术和框架有: 应用级的服务框架: 阿里的 Dubbo/Dubbox、Google gRPC、Spring Boot/ Spring Cloud 。 远程通信协议: RMI、Socket、SOAP (HTTP XML)、REST (HTTP JSON)。 通信框架: MINA 和 Netty。
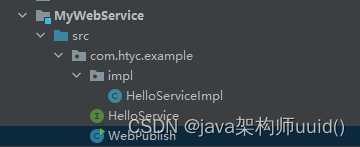
二、使用原生JDK实现WebService
项目结构:
1.创建接口
代码(接口):
package com.htyc.example;/*** @author: tyy* @date: 2022/09/19* description: 接口*/
public interface HelloService {String sayHello(String name);}
2.创建impl类
1.在类上添加@WebService注解,代表发布一个WebService服务。
2.在方法上添加WebMethod,注意!!!@WebService注解将会对该类中所有的非静态方法全部对外公布,private、prodected、final方法默认不公布。
3.在方法上添加@WebResult(name="xxx"),代表设置wsdl文档该返回参数所在节点名称。
4.在方法的参数中添加@WebParam(name = "xxx"),代表设置wsdl文档该发送参数所在节点名称。
踩坑记录:@WebService标注的类,默认会发布里面Public的方法,如果有些方法你不想发布那么一定要在该方法的上面添加@WebMethod(exclude=true),否则后面整合CXF的时候会报错,无法实例化Bean。
代码如下(impl层):
package com.htyc.example.impl;import com.htyc.example.HelloService;import javax.jws.WebMethod;
import javax.jws.WebParam;
import javax.jws.WebResult;
import javax.jws.WebService;/*** @author: tyy* @date: 2022/09/19* description: hello服务*/
@WebService
public class HelloServiceImpl implements HelloService {@Override@WebMethod@WebResult(name = "resultName")public String sayHello(@WebParam(name = "name") String name) {return "hello"+name;}
}
3.发布服务
代码如下(Test):
package com.htyc.example;import com.htyc.example.impl.HelloServiceImpl;import javax.xml.ws.Endpoint;public class WebPublish {public static void main(String[] args) {String address = "http://localhost:8808/ws";Endpoint.publish(address,new HelloServiceImpl());System.out.println("服务已发布");}
}
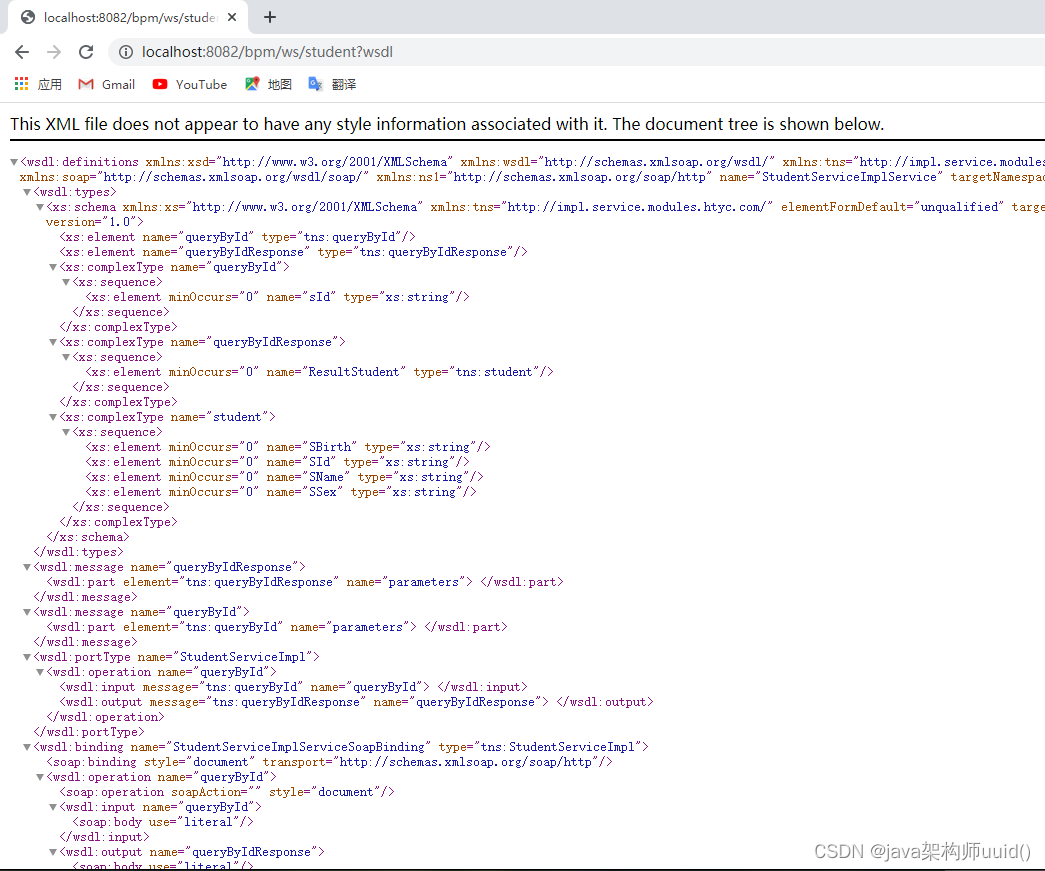
4.查看服务 http://localhost:8808/ws?wsdl
5.接口测试
工具:SoapUI 5.7.0
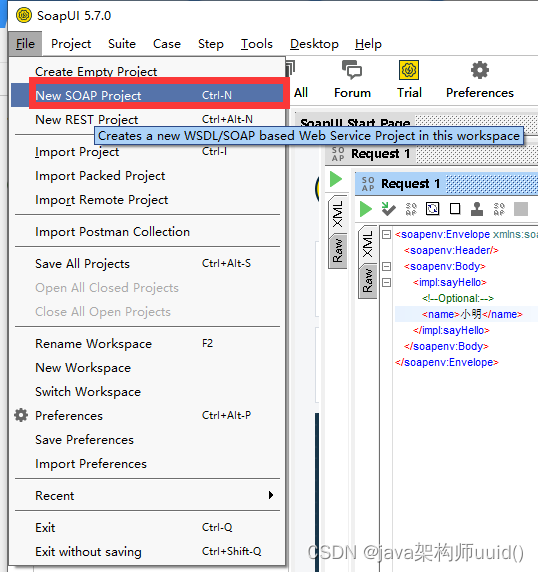
5.1 创建soap工程
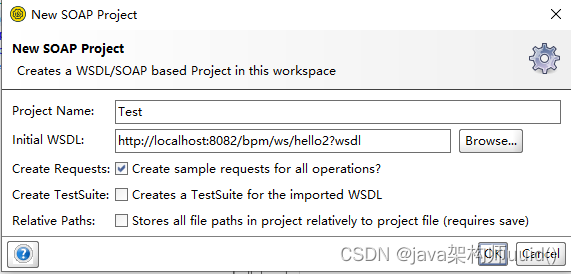
5.2 输入服务发布的url地址
命名工程项目,输入服务发布的url地址,点击ok开始测试
5.3 输入参数,返回结果
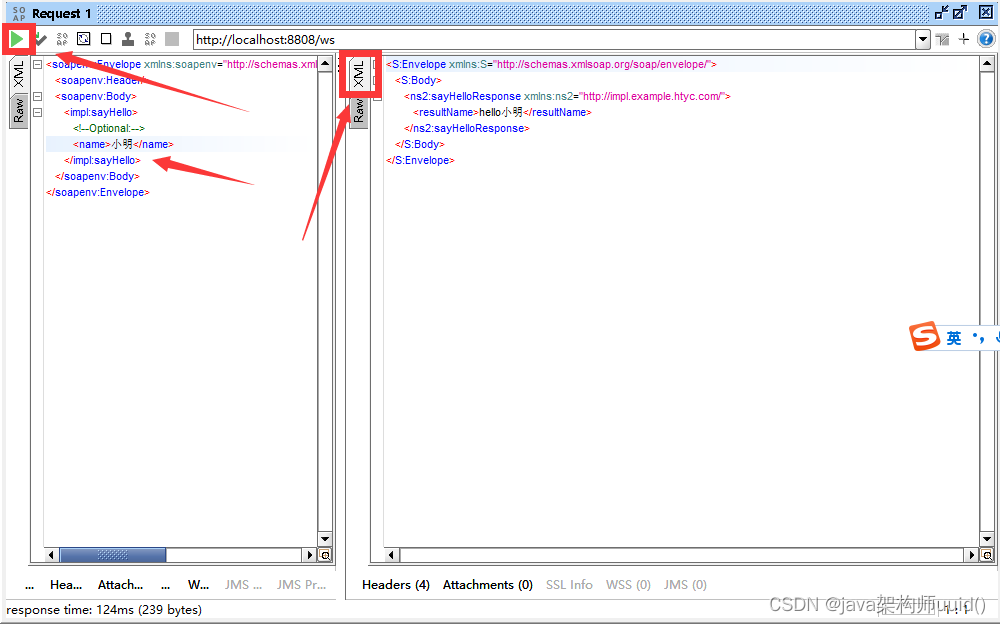
在name一行输入参数,再点击三角形开始按钮,点击右边分栏中的XML面板,查看返回值
三、Springboot整合CXF初级篇
技术栈:springboot、springmvc、mysql、sqlServer、druid、logback、mybaties
工具:idea插件easycode(因为方便演示使用easycode生成整个dao、entity、controller、service层)
1.pom.xml文件
根据实际项目需要进行删减
<dependencies><dependency><groupId>org.springframework.boot</groupId><artifactId>spring-boot-starter-web</artifactId></dependency><dependency><groupId>org.projectlombok</groupId><artifactId>lombok</artifactId><optional>true</optional></dependency><dependency><groupId>org.springframework.boot</groupId><artifactId>spring-boot-starter-test</artifactId><scope>test</scope></dependency><!--引入 mybatis-spring-boot-starter 的依赖--><dependency><groupId>org.mybatis.spring.boot</groupId><artifactId>mybatis-spring-boot-starter</artifactId><version>2.2.0</version></dependency><dependency><groupId>org.springframework.data</groupId><artifactId>spring-data-commons</artifactId><version>2.3.1.RELEASE</version></dependency><!-- 连接sqlserver依赖包 --><dependency><groupId>com.microsoft.sqlserver</groupId><artifactId>sqljdbc4</artifactId><version>4.0</version></dependency><!-- 连接mysql依赖包 --><dependency><groupId>mysql</groupId><artifactId>mysql-connector-java</artifactId><version>8.0.28</version></dependency><!--用druid作为数据源--><dependency><groupId>com.alibaba</groupId><artifactId>druid-spring-boot-starter</artifactId><version>1.2.6</version></dependency><dependency><groupId>com.microsoft.sqlserver</groupId><artifactId>mssql-jdbc</artifactId><scope>runtime</scope></dependency><!-- springBoot devtools的热部署 修改代码之后需要重新编译一下即可 --><dependency><groupId>org.springframework.boot</groupId><artifactId>spring-boot-devtools</artifactId><optional>true</optional></dependency><!-- SpringBoot集成Logback --><dependency><groupId>org.springframework.boot</groupId><artifactId>spring-boot-starter-logging</artifactId></dependency><!--WebService CXF依赖 begin--><dependency><groupId>org.apache.cxf</groupId><artifactId>cxf-spring-boot-starter-jaxws</artifactId><version>3.5.0</version></dependency><dependency><groupId>org.apache.cxf</groupId><artifactId>cxf-rt-frontend-jaxws</artifactId><version>3.5.0</version></dependency><dependency><groupId>org.apache.cxf</groupId><artifactId>cxf-rt-transports-http</artifactId><version>3.5.0</version></dependency><dependency><groupId>org.apache.cxf</groupId><artifactId>cxf-rt-transports-http-jetty</artifactId><version>3.2.4</version></dependency><!--WebService CXF依赖 end--></dependencies>2.yml文件(application.yml)
注意此处的server.port是默认发布的端口号,最后两行必须配置,否则默认发布在/service下
# Tomcat
server:tomcat:uri-encoding: UTF-8port: 8082servlet:context-path: /bpm
spring:# 环境 dev|test|prodprofiles:active: devjackson:time-zone: GMT+8date-format: yyyy-MM-dd HH:mm:ssservlet:multipart:max-file-size: 100MBmax-request-size: 100MBenabled: truemvc:format:date: yyyy-MM-dd # 日期格式date-time: yyyy-MM-dd HH:mm:ss # 日期时间格式time: HH:mm:ss # 时间格式throw-exception-if-no-handler-found: truepathmatch:matching-strategy: ANT_PATH_MATCHER
#mybaties
mybatis:#匹配sql语句的映射文件的位置,classpat代表在resources下mapper-locations: classpath*:/mapper/**/*.xml#以下两个配置可以省略,然后在mapper映射文件中配置也是可以的。#使用type-aliases-package中指定entity扫描包类让mybatis自定扫描到自定义的entitytype-aliases-package: com.htyc.modules.*.entityconfiguration:# 开启驼峰uName自动映射到u_namemap-underscore-to-camel-case: true
#cxf
cxf:path: /ws
3.数据源配置
#数据源配置
spring:datasource:#driver-class-name: com.microsoft.sqlserver.jdbc.SQLServerDriverdriver-class-name: com.mysql.cj.jdbc.Driver#url: jdbc:sqlserver://192.168.10.7:1433;DatabaseName=BPMurl: jdbc:mysql://localhost:3306/mydb?useUnicode=true&characterEncoding=UTF-8&serverTimezone=Asia/Shanghaiusername: rootpassword: roottype: com.alibaba.druid.pool.DruidDataSourcedruid:initialSize: 5minIdle: 5maxActive: 10maxWait: 60000     #获取连接时最大等待时间,单位毫秒timeBetweenEvictionRunsMillis: 1800000     #配置间隔多久才进行一次检测,检测需要关闭的空闲连接,单位是毫秒filters: stat,wall,slf4j    #通过别名的方式配置扩展插件,常用的插件有:监控统计用的filter:stat,日志用的filter: slf4j,防御sql注入的filter:wallconnectionProperties: druid.stat.mergeSql=true;druid.stat.slowSqlMillis=90;druid.stat.logSlowSql=true   # 通过connectProperties属性来打开mergeSql功能;慢SQL记录validationQuery: select 'x'   #用来检测连接是否有效的sql,要求是一个查询语句testWhileIdle: true       #建议配置为true,不影响性能,并且保证安全性。如果空闲时间大于timeBetweenEvictionRunsMillis,执行validationQuery检测连接是否有效。testOnBorrow: false       #申请连接时执行validationQuery检测连接是否有效,做了这个配置会降低性能testOnReturn: false       #归还连接时执行validationQuery检测连接是否有效,做了这个配置会降低性能poolPreparedStatements: false #是否缓存preparedStatement,也就是PSCache。PSCache对支持游标的数据库性能提升巨大,比如说oracle。在mysql下建议关闭
4.日志系统配置(可选)
<?xml version="1.0" encoding="UTF-8"?>
<configuration><include resource="org/springframework/boot/logging/logback/base.xml" /><logger name="org.springframework.web" level="INFO"/><logger name="org.springboot.sample" level="TRACE" /><!-- 开发、测试环境 --><springProfile name="dev,test"><logger name="org.springframework.web" level="INFO"/><logger name="org.springboot.sample" level="INFO" /><logger name="com.htyc.modules" level="DEBUG" /></springProfile><!-- 生产环境 --><springProfile name="prod"><logger name="org.springframework.web" level="ERROR"/><logger name="org.springboot.sample" level="ERROR" /><logger name="com.htyc.modules" level="ERROR" /></springProfile></configuration>
5.在service层添加@WebService注解
注意!!!不需要发布的方法用@WebMethod(exclude = true)进行标注,否则会报错,此处我们只发布一个根据id查询student对象的方法,其他都不发布。
package com.htyc.modules.service.impl;import com.htyc.modules.entity.Student;
import com.htyc.modules.dao.StudentDao;
import com.htyc.modules.service.StudentService;
import org.springframework.stereotype.Service;
import org.springframework.data.domain.Page;
import org.springframework.data.domain.PageImpl;
import org.springframework.data.domain.PageRequest;import javax.annotation.Resource;
import javax.jws.WebMethod;
import javax.jws.WebParam;
import javax.jws.WebResult;
import javax.jws.WebService;/*** (Student)表服务实现类** @author makejava* @since 2022-09-19 16:09:18*/
@Service("studentService")
@WebService
public class StudentServiceImpl implements StudentService {@Resourceprivate StudentDao studentDao;/*** 通过ID查询单条数据** @param sId 主键* @return 实例对象*/@Override@WebMethod@WebResult(name = "ResultStudent")public Student queryById(@WebParam(name = "sId") String sId) {return this.studentDao.queryById(sId);}/*** 分页查询** @param student 筛选条件* @param pageRequest      分页对象* @return 查询结果*/@Override@WebMethod(exclude = true)public Page<Student> queryByPage(Student student, PageRequest pageRequest) {long total = this.studentDao.count(student);return new PageImpl<>(this.studentDao.queryAllByLimit(student, pageRequest), pageRequest, total);}/*** 新增数据** @param student 实例对象* @return 实例对象*/@Override@WebMethod(exclude = true)public Student insert(Student student) {this.studentDao.insert(student);return student;}/*** 修改数据** @param student 实例对象* @return 实例对象*/@Override@WebMethod(exclude = true)public Student update(Student student) {this.studentDao.update(student);return this.queryById(student.getSId());}/*** 通过主键删除数据** @param sId 主键* @return 是否成功*/@Override@WebMethod(exclude = true)public boolean deleteById(String sId) {return this.studentDao.deleteById(sId) > 0;}
}
6.使用CXF发布WebService
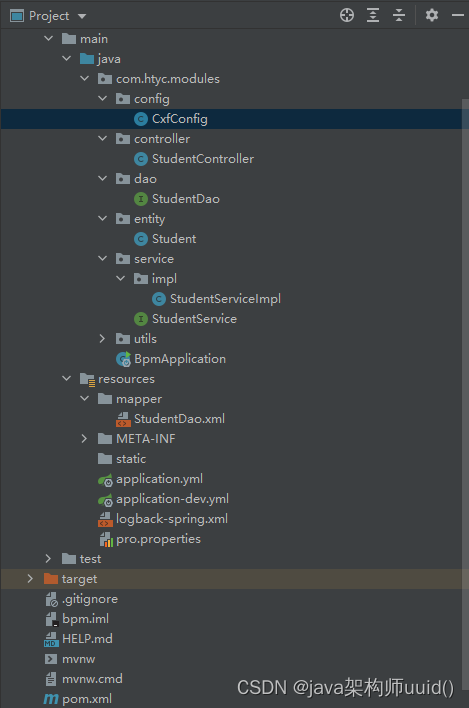
创建config文件夹,在里面创建CxfConfig类。 endpoint.publish("/student");代表将服务发布到项目目录的student路径下,此处我的项目是bpm(yml文件中context-path: /bpm指定了项目路径),那么访问此处的方法应该是/bpm/ws,类上添加@Configuration代表这是一个配置类,会被spring容器管理
package com.htyc.modules.config;import com.htyc.modules.service.impl.StudentServiceImpl;
import org.apache.cxf.Bus;
import org.apache.cxf.jaxws.EndpointImpl;
import org.springframework.beans.factory.annotation.Autowired;
import org.springframework.context.annotation.Bean;
import org.springframework.context.annotation.Configuration;import javax.xml.ws.Endpoint;/*** @author: tyy* @date: 2022/09/14* description: cxf服务发布配置*/
@Configuration
public class CxfConfig {@Autowiredprivate Bus bus;//使用注解自动注入studentService对象@Autowiredprivate StudentServiceImpl studentService;@Beanpublic Endpoint helloServer(){//我们发布的方法是在StudentServiceImpl类上所以需要的参数应该是该类引用的对象Endpoint endpoint  = new EndpointImpl(bus,studentService);endpoint.publish("/student");return endpoint;}}
7.项目结构截图
8.启动项目访问wsdl文档

9.使用SoapUI测试

四、Springboot整合CXF进阶篇
虽然上面已经基本实现了WebService服务端的核心功能了,但是如果发布的方法一旦增多,就会出现大量的重复代码块,造成cxf配置的冗余的问题,所以我们需要进一步改进。
1.实现方式
2.ApplicationRunner 和 CommandLineRunner简单使用
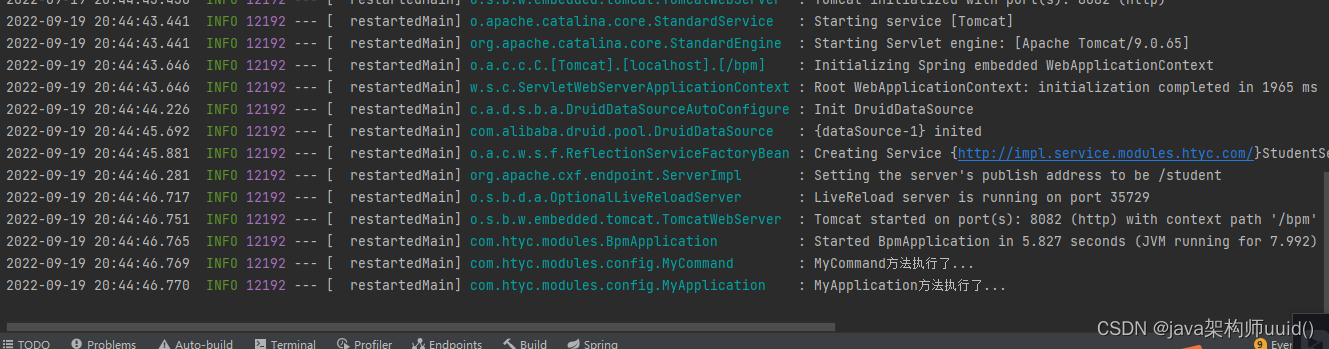
创建两个类分别实现CommandLineRunner接口,和ApplicationRunner接口,然后添加@Component注解,默认情况下先执行实现了ApplicationRunner类的run方法然后执行实现了CommandLineRunner接口的类的run方法,但是通过在CommandLineRunner实现类上添加@Order(1)注解可以改变执行顺序,数字越小,优先级越高。
package com.htyc.modules.config;import lombok.extern.slf4j.Slf4j;
import org.springframework.boot.CommandLineRunner;
import org.springframework.core.annotation.Order;
import org.springframework.stereotype.Component;@Slf4j
@Order(1)
@Component
public class MyCommand implements CommandLineRunner {@Overridepublic void run(String... args) throws Exception {log.info("MyCommand方法执行了...");}
}
package com.htyc.modules.config;import lombok.extern.slf4j.Slf4j;
import org.springframework.boot.ApplicationArguments;
import org.springframework.boot.ApplicationRunner;
import org.springframework.stereotype.Component;@Slf4j
@Component
public class MyApplication implements ApplicationRunner {@Overridepublic void run(ApplicationArguments args) throws Exception {log.info("MyApplication方法执行了...");}
}
3.结果截图
4.利用自定义注解动态发布
目的:通过注解的形式直接将发布的路径放在注解中,这样就不需要利用CxfConfig类进行统一发布。
4.1 自定义注解
package com.htyc.modules.annotation;import java.lang.annotation.ElementType;
import java.lang.annotation.Retention;
import java.lang.annotation.RetentionPolicy;
import java.lang.annotation.Target;@Target(ElementType.TYPE)
@Retention(RetentionPolicy.RUNTIME)
public @interface AutoPublishWS {//发布ws的pathString publishPath();
}
4.2 在业务接口的实现类上标注动态发布WS的自定义注解
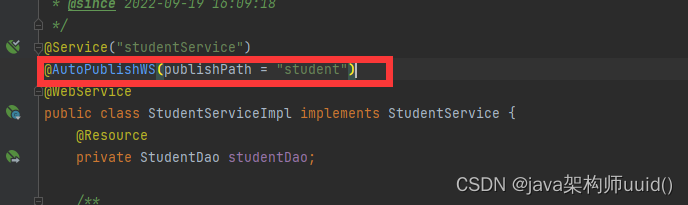
4.3 定义自动发布WS的配置类
package com.htyc.modules.config;import com.htyc.modules.annotation.AutoPublishWS;
import lombok.extern.slf4j.Slf4j;
import org.apache.cxf.Bus;
import org.apache.cxf.jaxws.EndpointImpl;
import org.springframework.beans.factory.annotation.Autowired;
import org.springframework.boot.ApplicationArguments;
import org.springframework.boot.ApplicationRunner;
import org.springframework.stereotype.Component;
import org.springframework.web.context.WebApplicationContext;import javax.xml.ws.Endpoint;@Slf4j
@Component
public class AutoPublishWSEndpoint implements ApplicationRunner {@Autowiredprivate Bus bus;@Autowiredprivate WebApplicationContext webApplicationContext;@Overridepublic void run(ApplicationArguments args) throws Exception {log.info("Webservice发布...");Endpoint endpoint;String[] beanNames = webApplicationContext.getBeanNamesForAnnotation(AutoPublishWS.class);String publishPath;for(String beanName : beanNames){publishPath = webApplicationContext.getType(beanName).getAnnotation(AutoPublishWS.class).publishPath();endpoint = new EndpointImpl(bus,webApplicationContext.getBean(beanName));endpoint.publish(publishPath);log.info("Webservice发布结束...");}}
}
4.4 注释或删除CxfConfig类测试注解是否生效