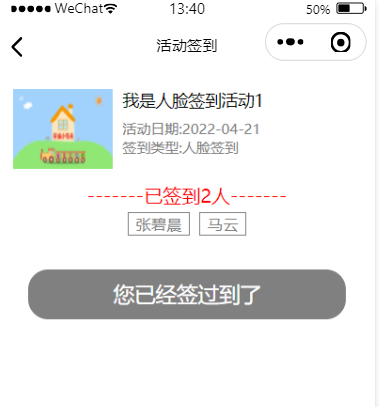
一,人脸签到效果图
我们做人脸识别签到,其实就是要拿识别的人脸和数据库里的人脸对比,相识度大于一定的值,就可以判定成功。

如我们识别的结果是98.295%,所以这里就可以认定为签到成功
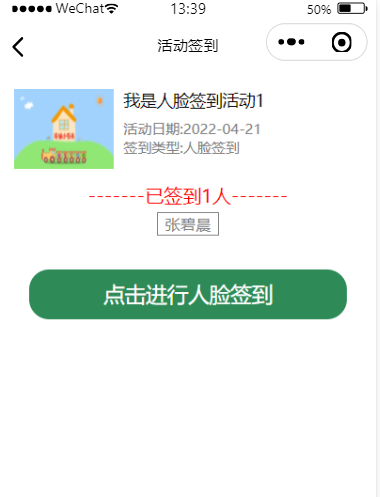
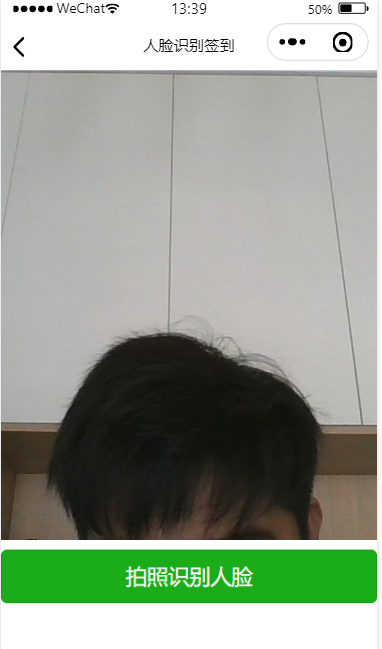
1-1,效果图
1-1-1,还未签到
1-1-2,签到
1-1-3,签到成功
二,准备工作
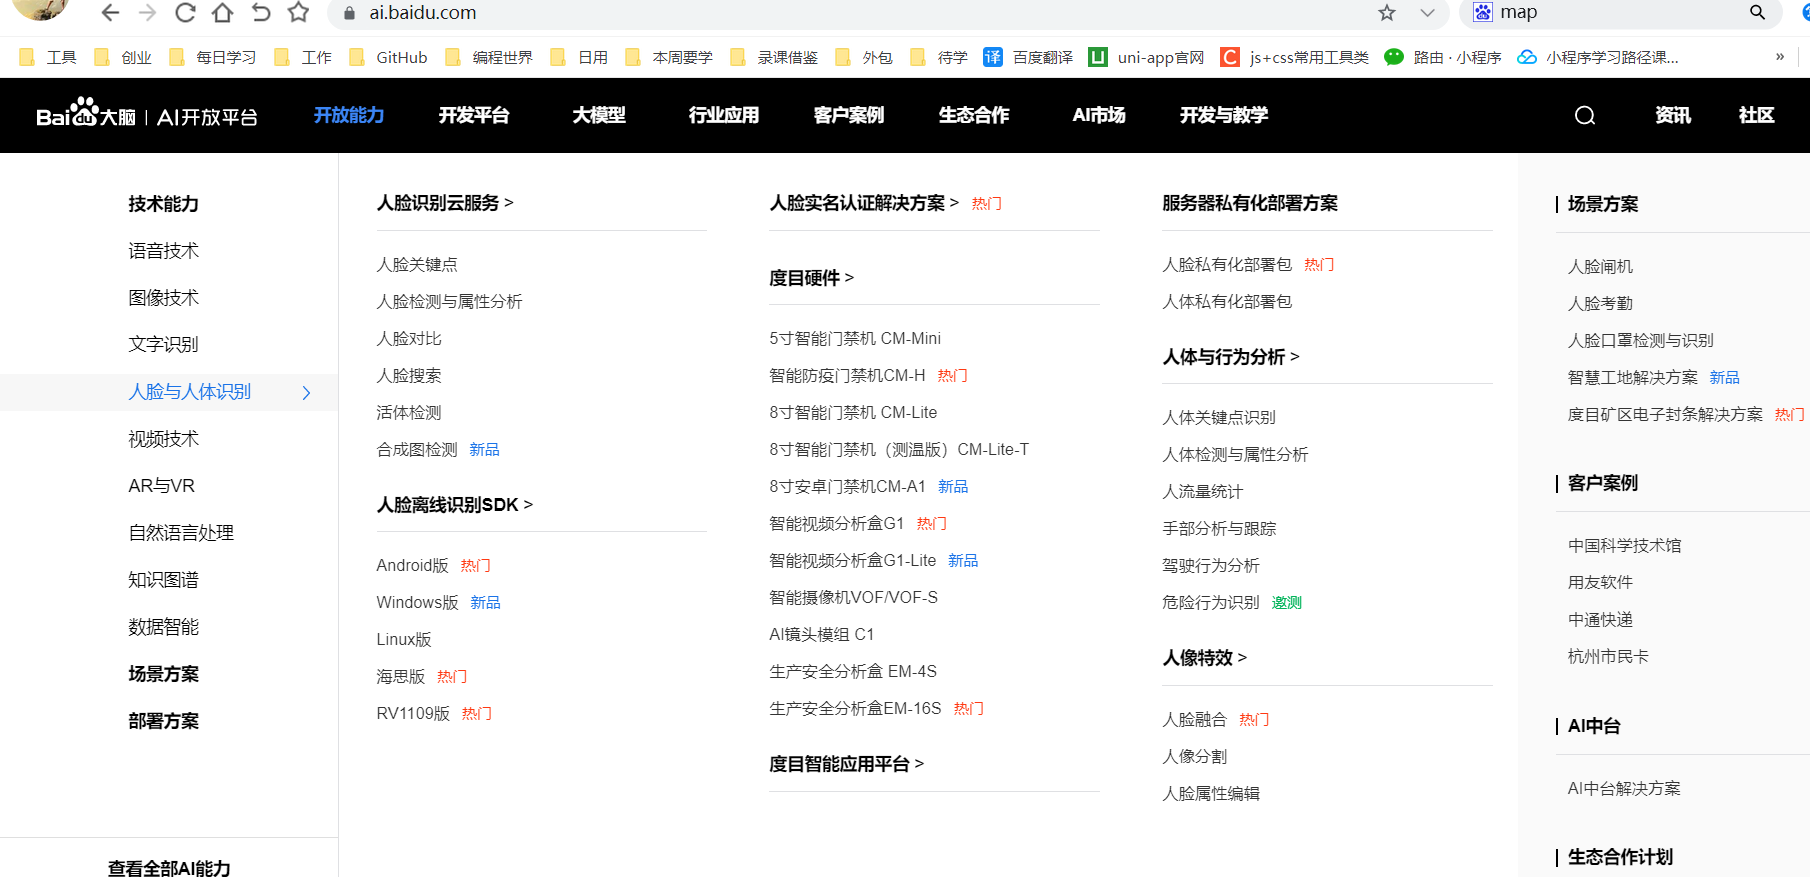
2-1,注册百度开发者账号
我们这里使用了百度的图片识别技术,所以在使用之前我们要现在注册百度开发者账号,官方地址:https://ai.baidu.com
注册地址:https://login.bce.baidu.com
至于如何注册,这里不需要我再教了吧,大家自行注册就行了。
我们主要用到的是人脸识别技术
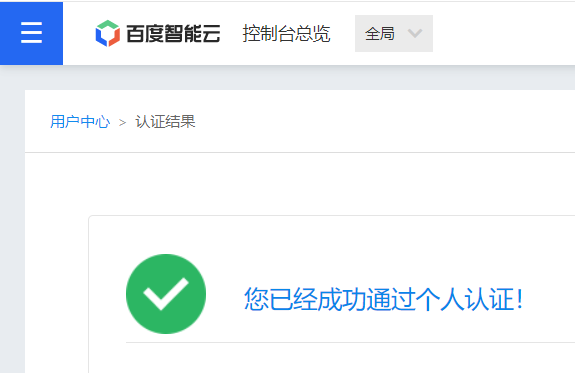
2-2,注册完记得要实名下
现在使用百度图片识别,必须要实名认证下。

根据自己的情况选择认证方式
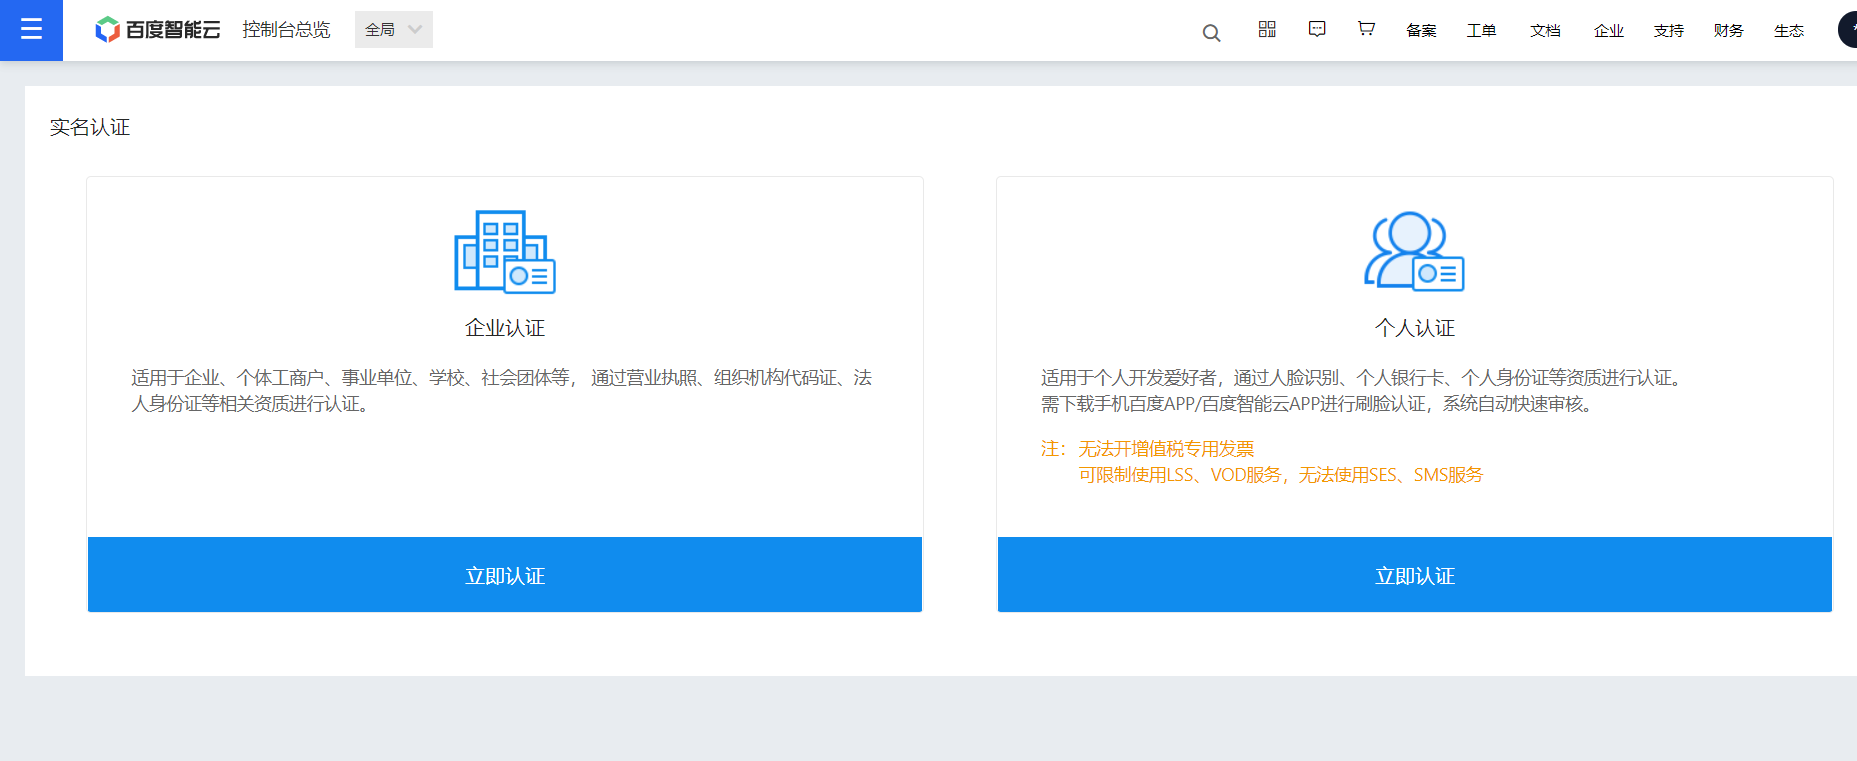
学习的话,只需要个人认证即可。
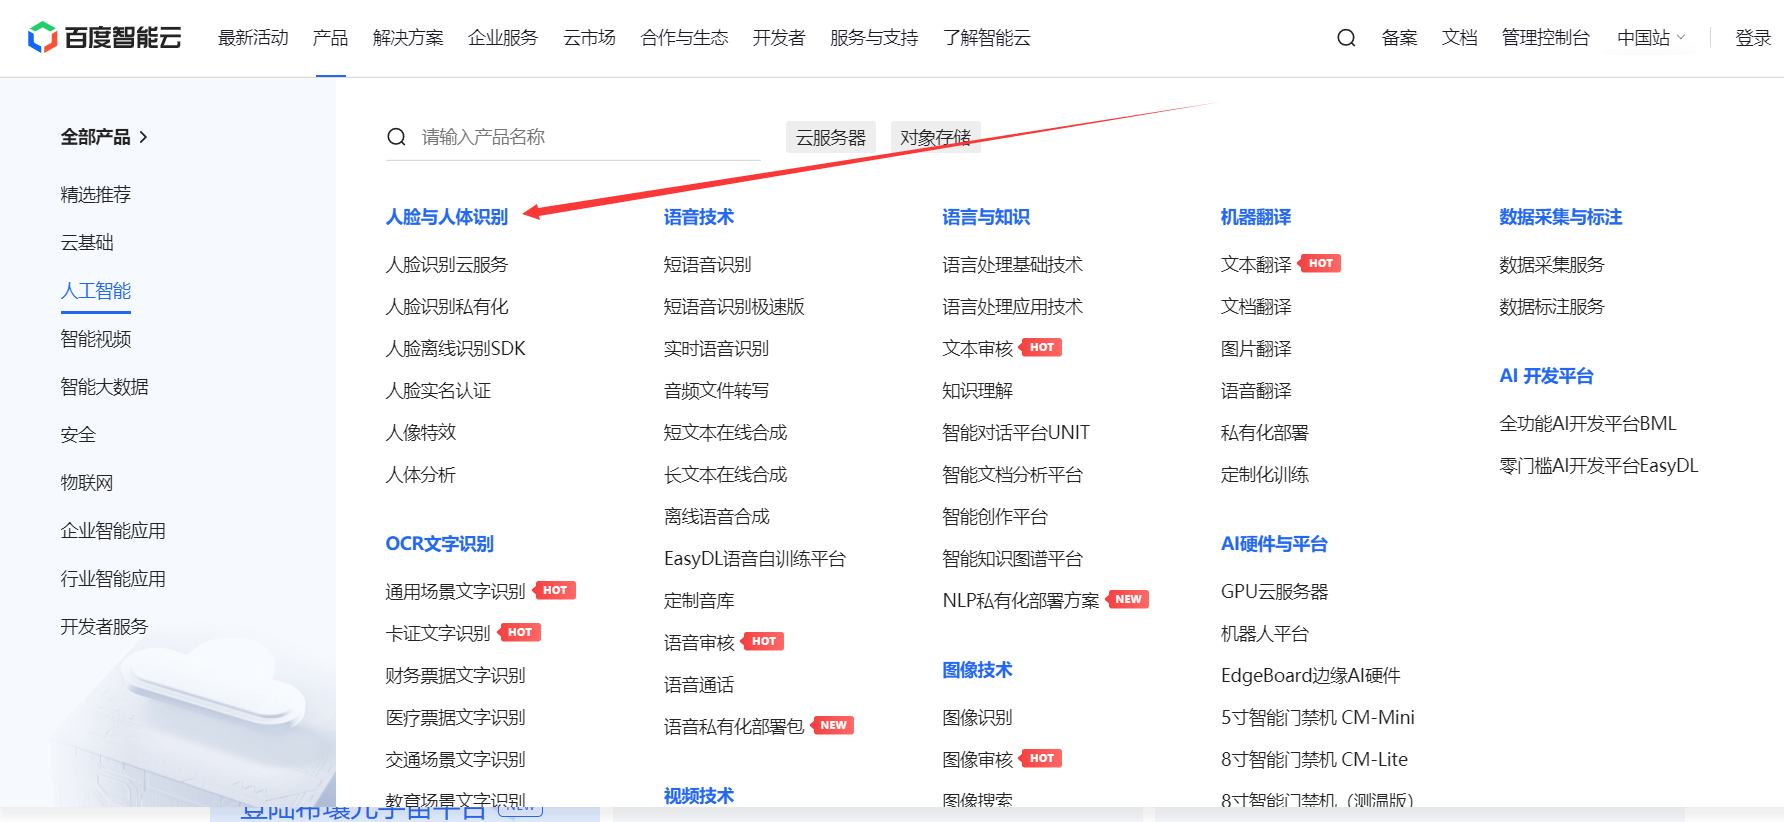
2-3,创建人脸识别应用
我们这里主要使用的是百度的人脸对比功能,就是事先把要识别人的照片存到百度数据库,然后打卡时,让对应的人拍好照,和数据库里存的人脸图片进行对比,相似度达到一定数值,比如90%相似度,就可以认为识别成功,进行签到即可。
估计百度是在为后期收费做准备,但是目前还有免费资源可以领取。既然可以白piao就先领取免费的。即便后期收费了,咱们学习使用估计也用不了太多,几毛钱的估计就够咱们学习用的了。
人脸识别官方文档:https://cloud.baidu.com/product/face
点击免费领取资源
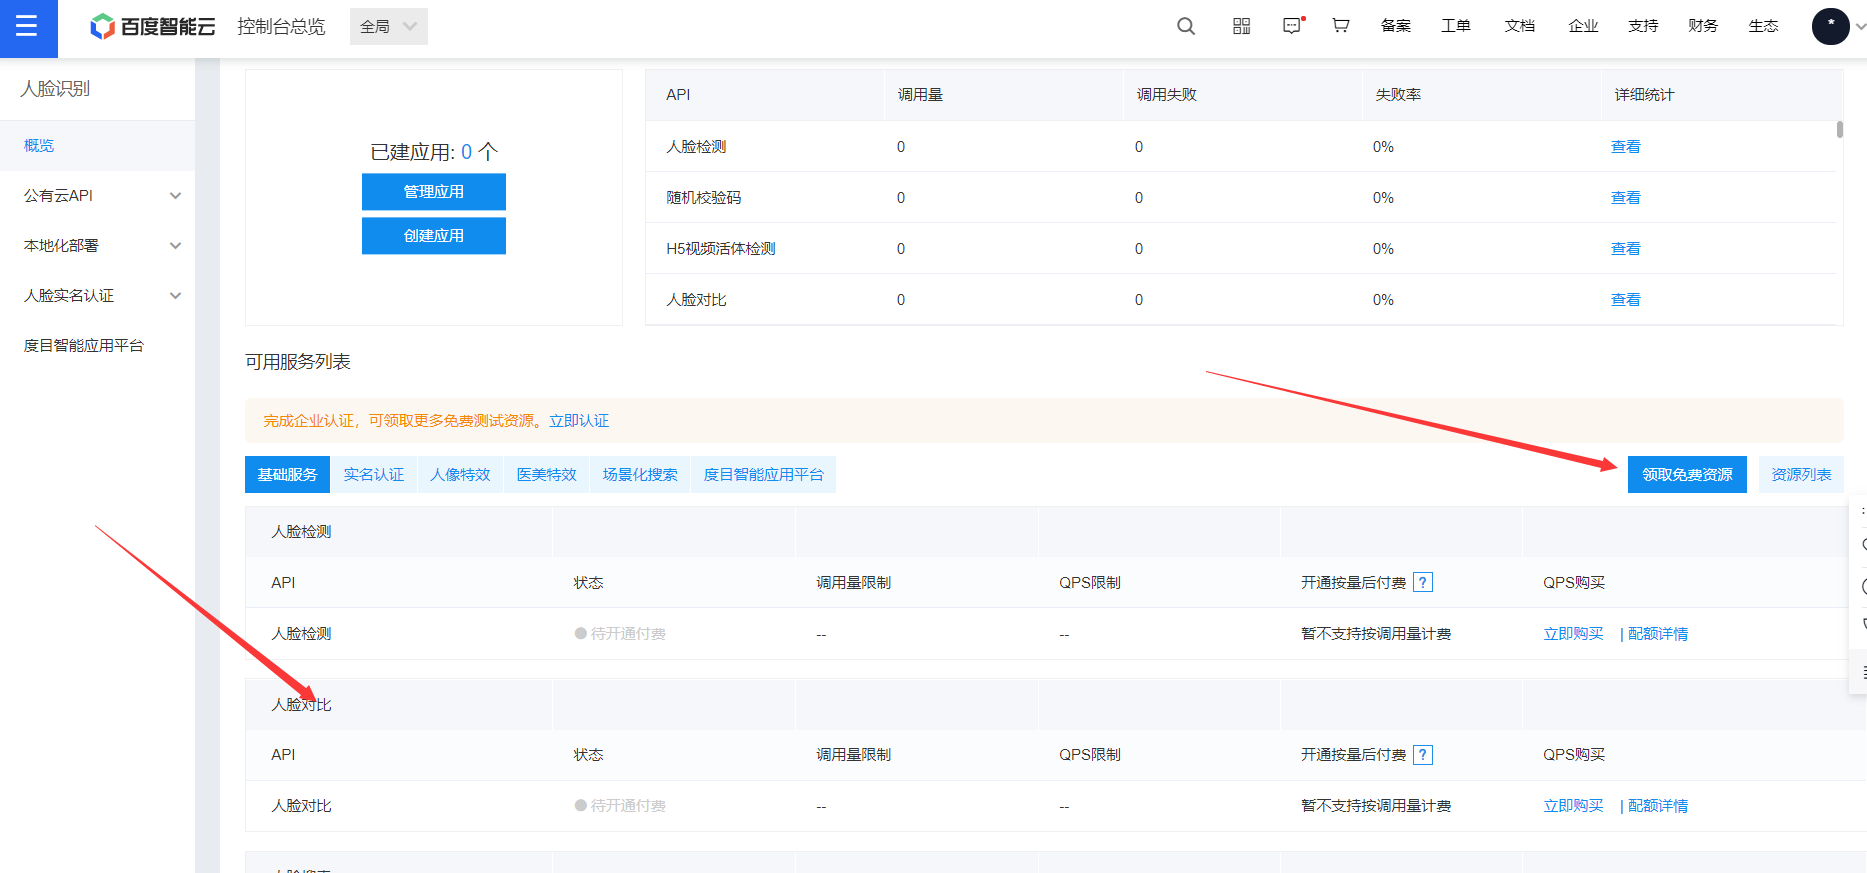
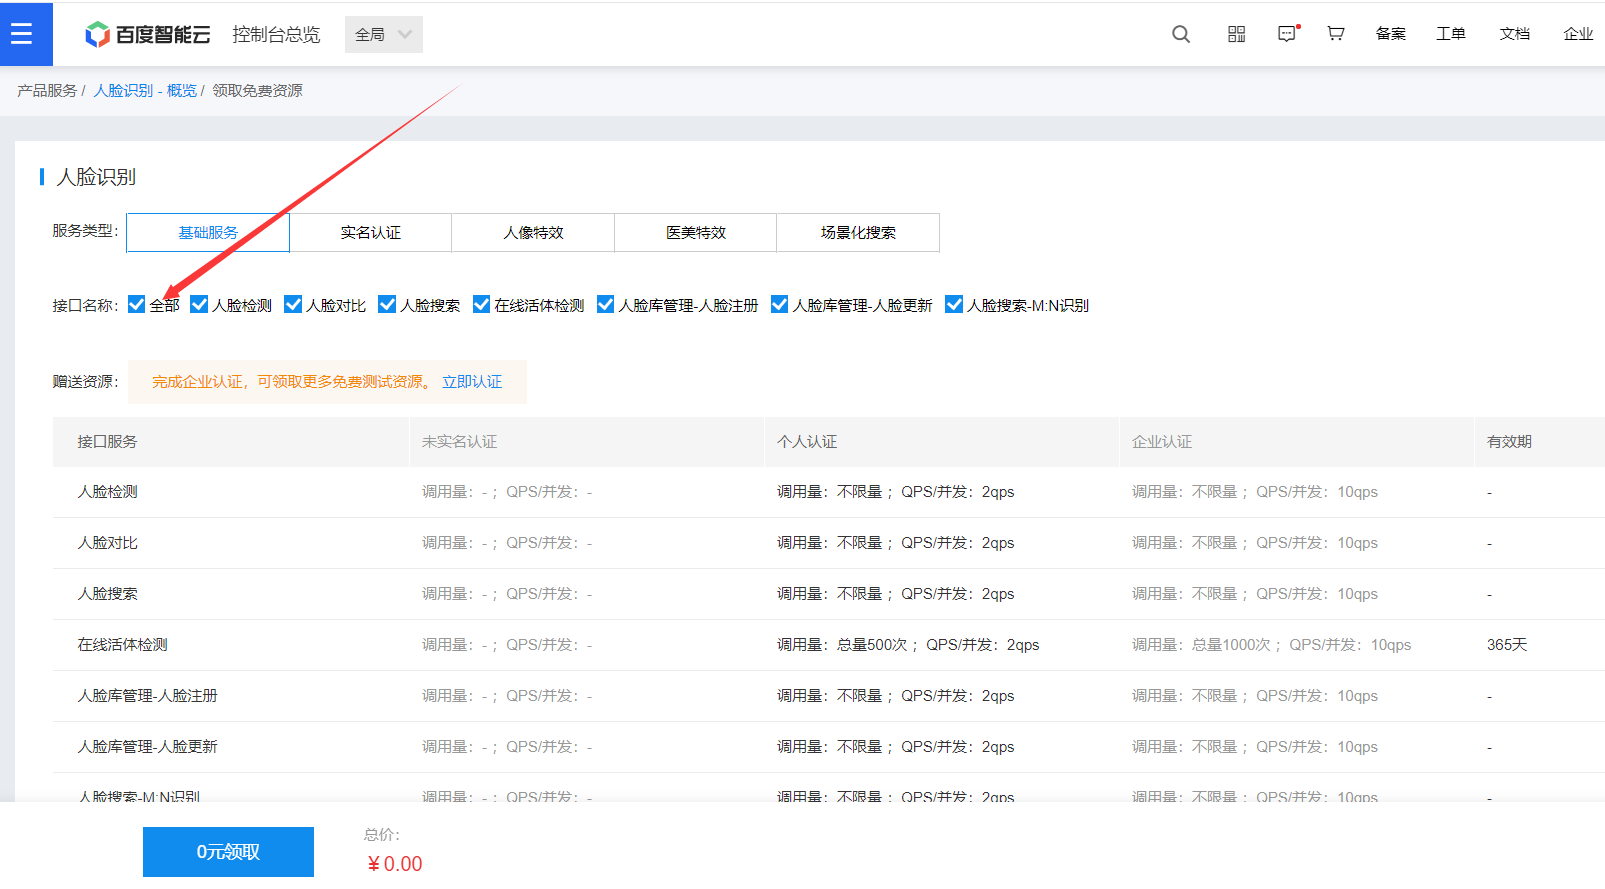
既然免费,当然全部领取了啊。
领取完,耐心等待生效即可。如果你在学习的时候,不能在免费领取了,那就花几毛钱付费下也行的,基本上几毛钱就够咱们学习使用了。

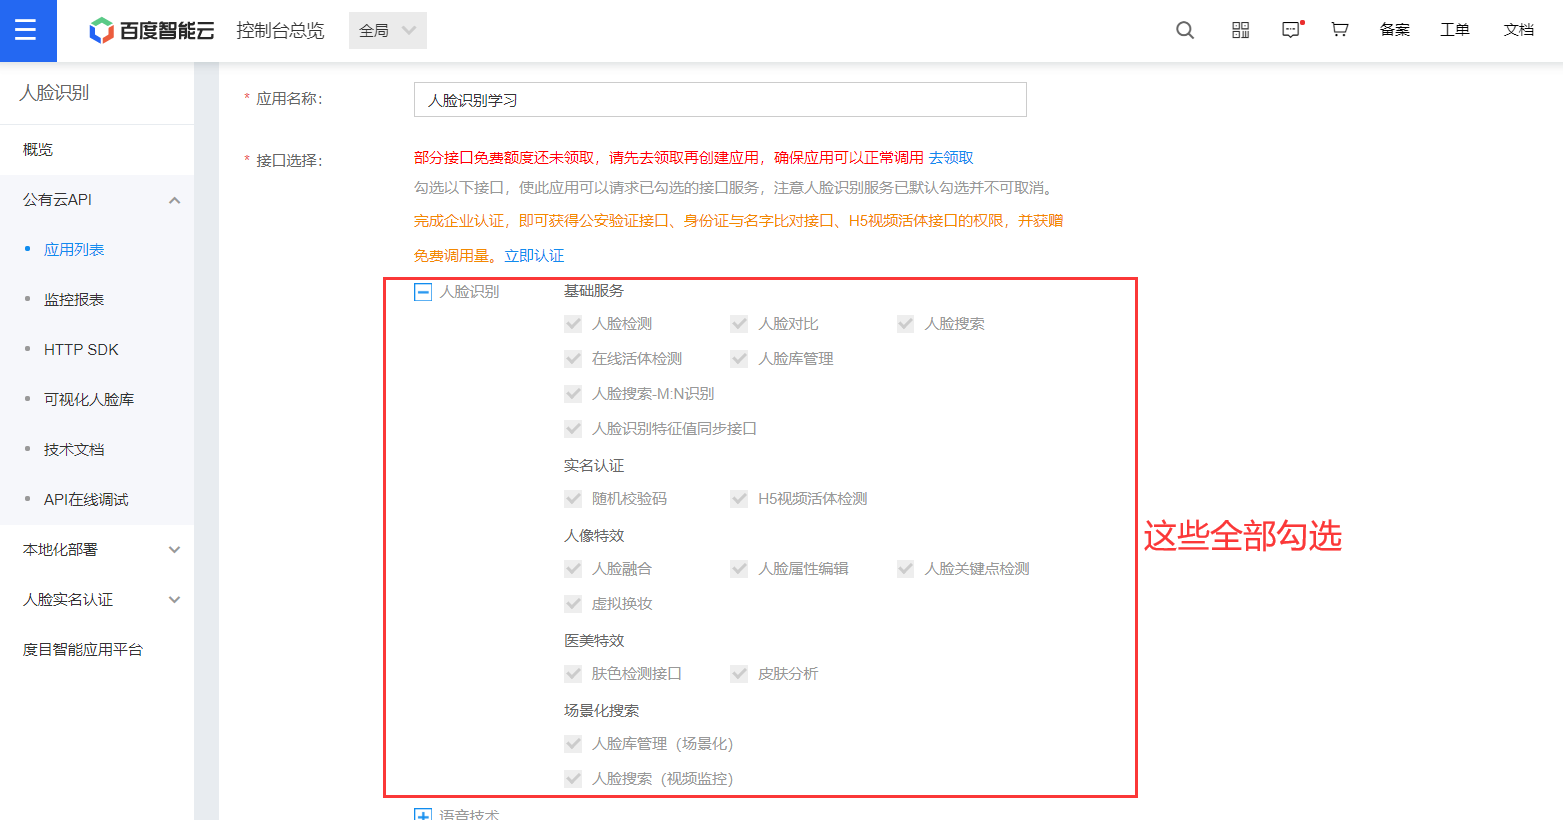
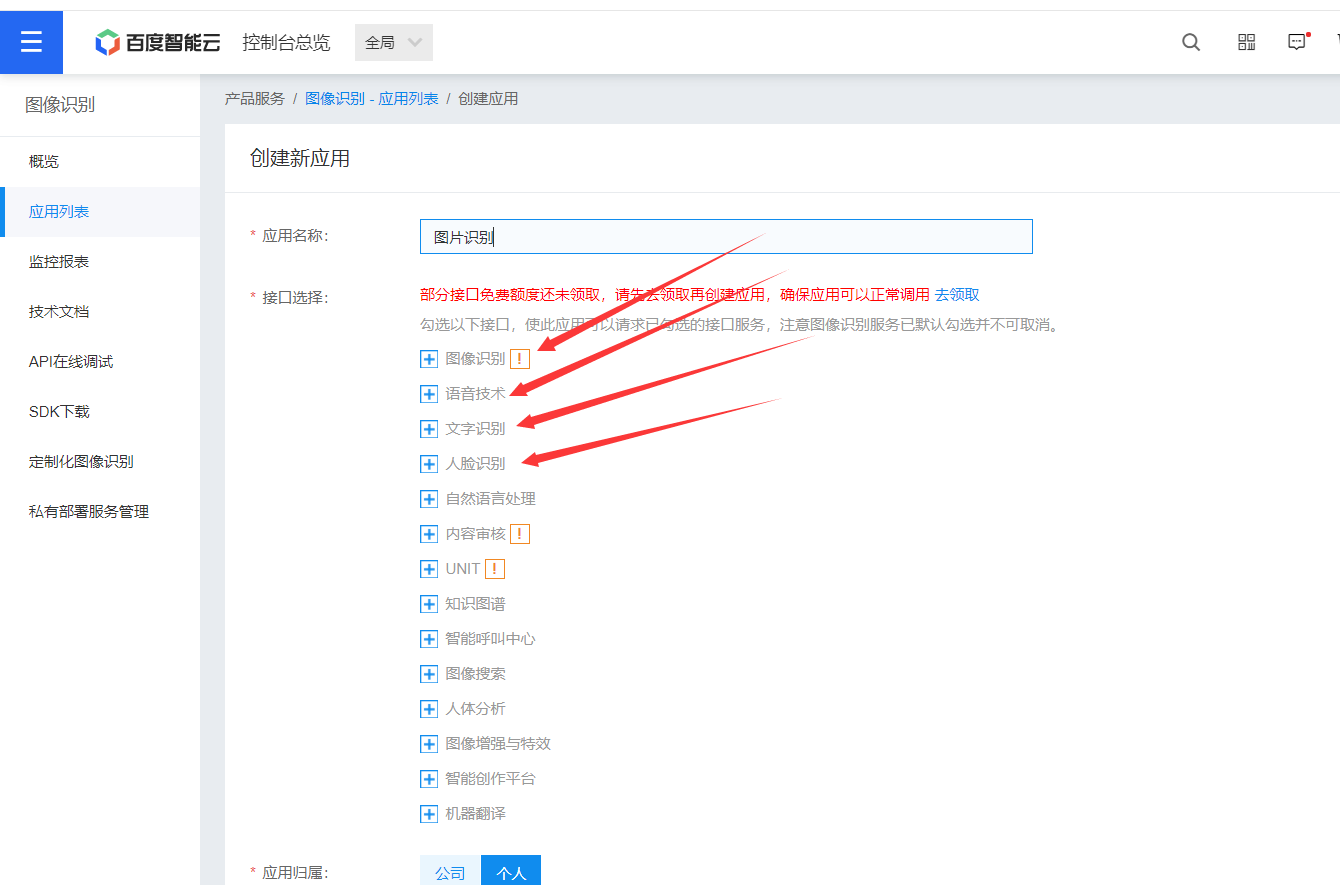
上面该领的都领完以后,我们就来创建应用吧。
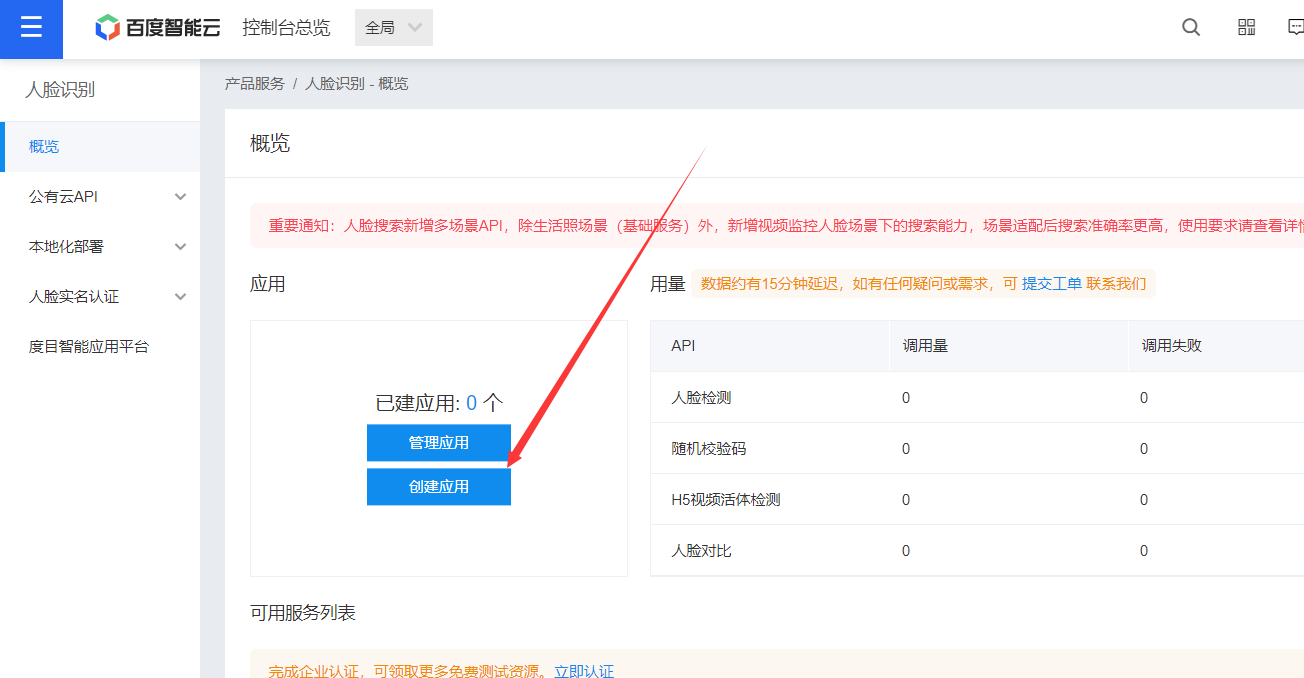
默认人脸识别相关的都已经勾选了
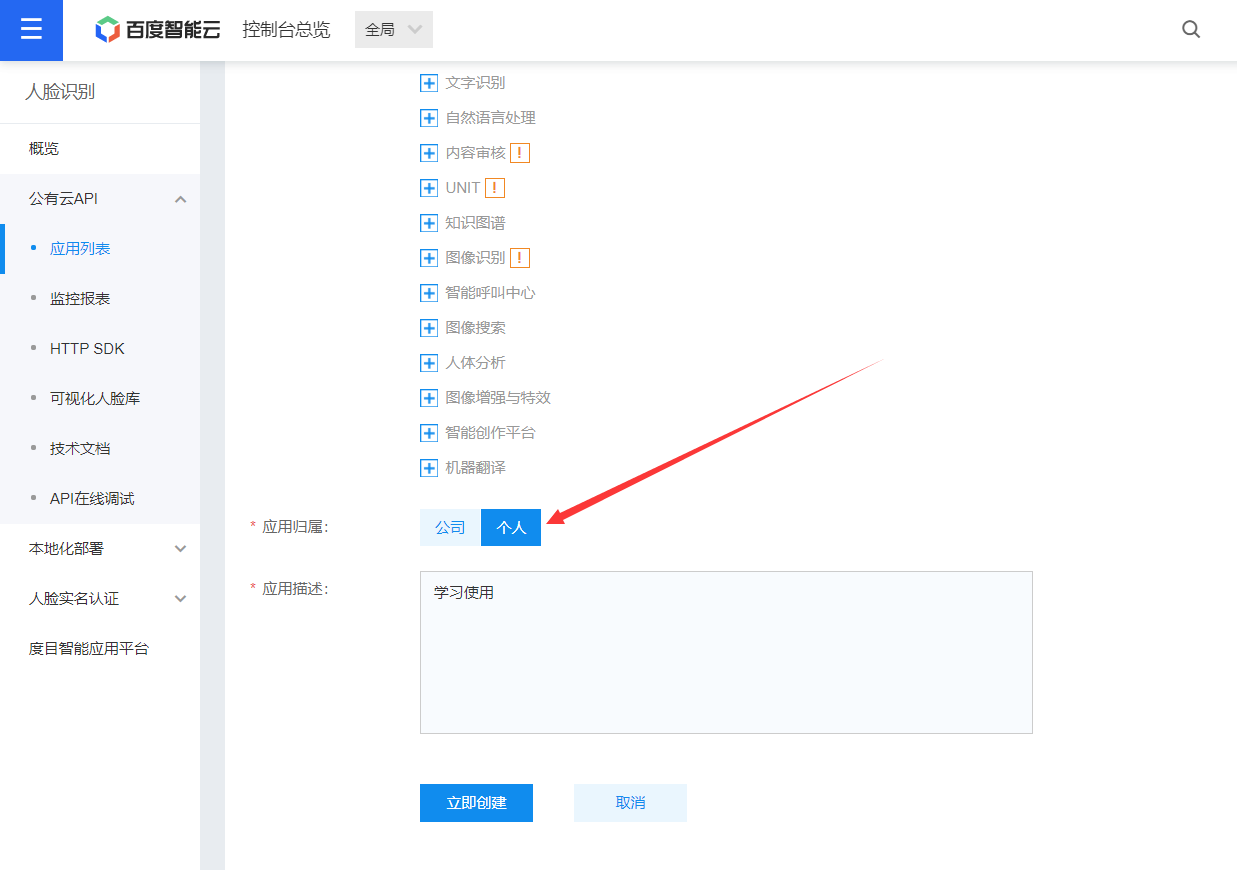
选个人即可。
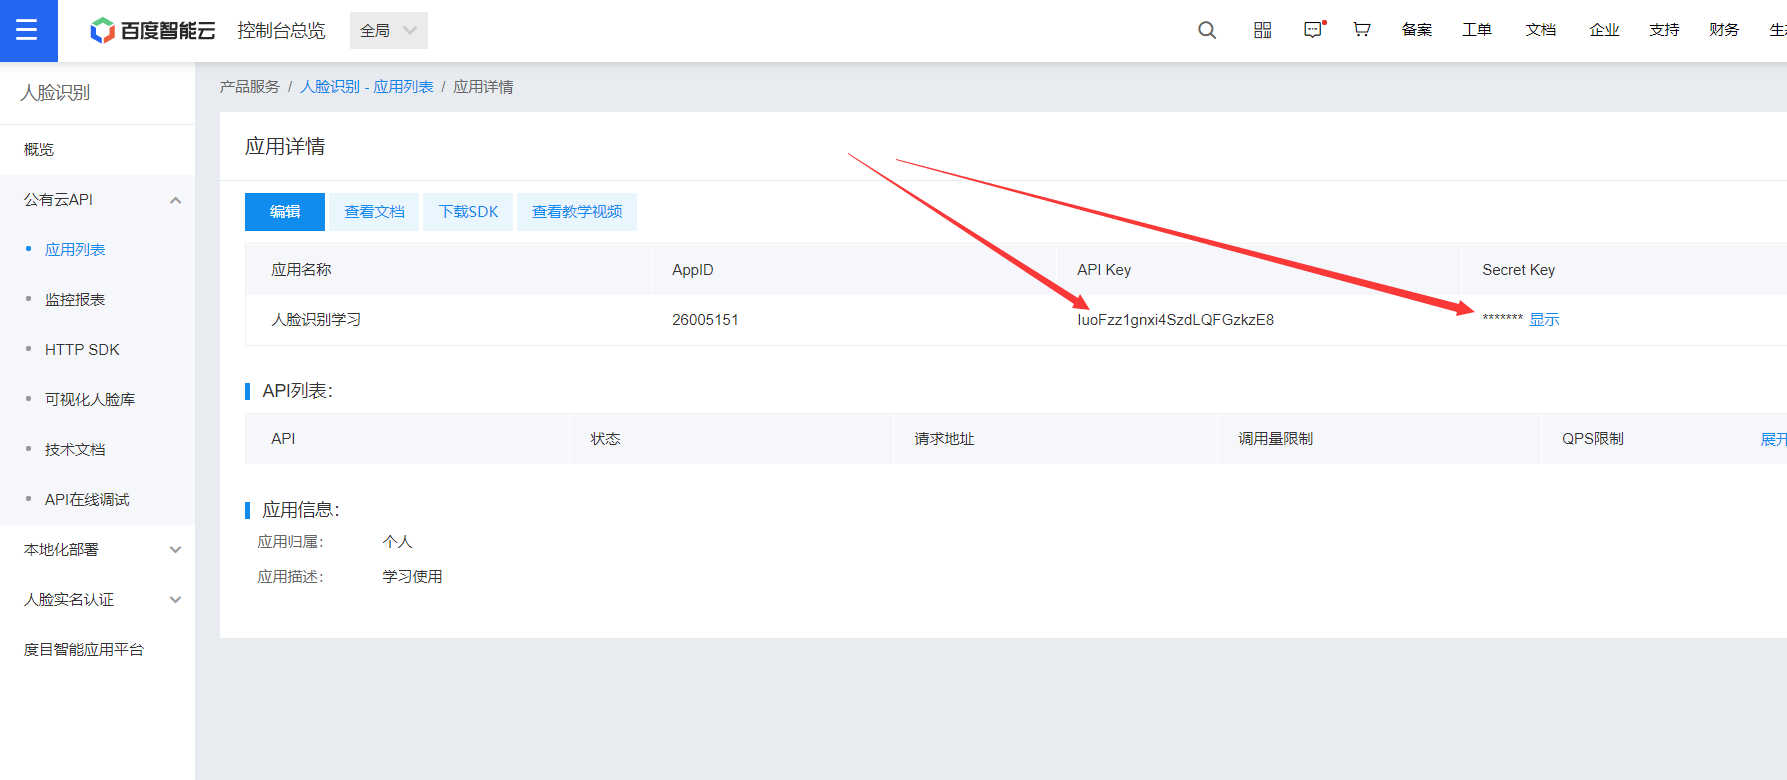
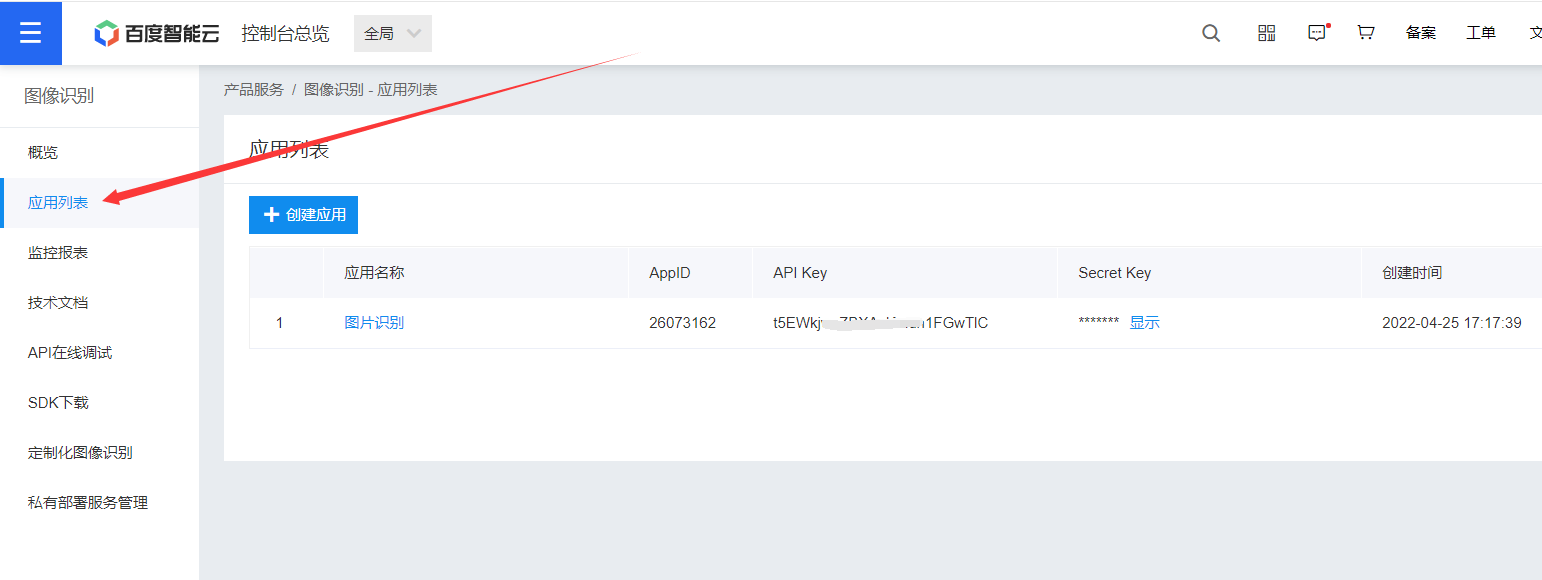
创建好以后,下面两个东西我们后面会用到,知道在哪里即可。
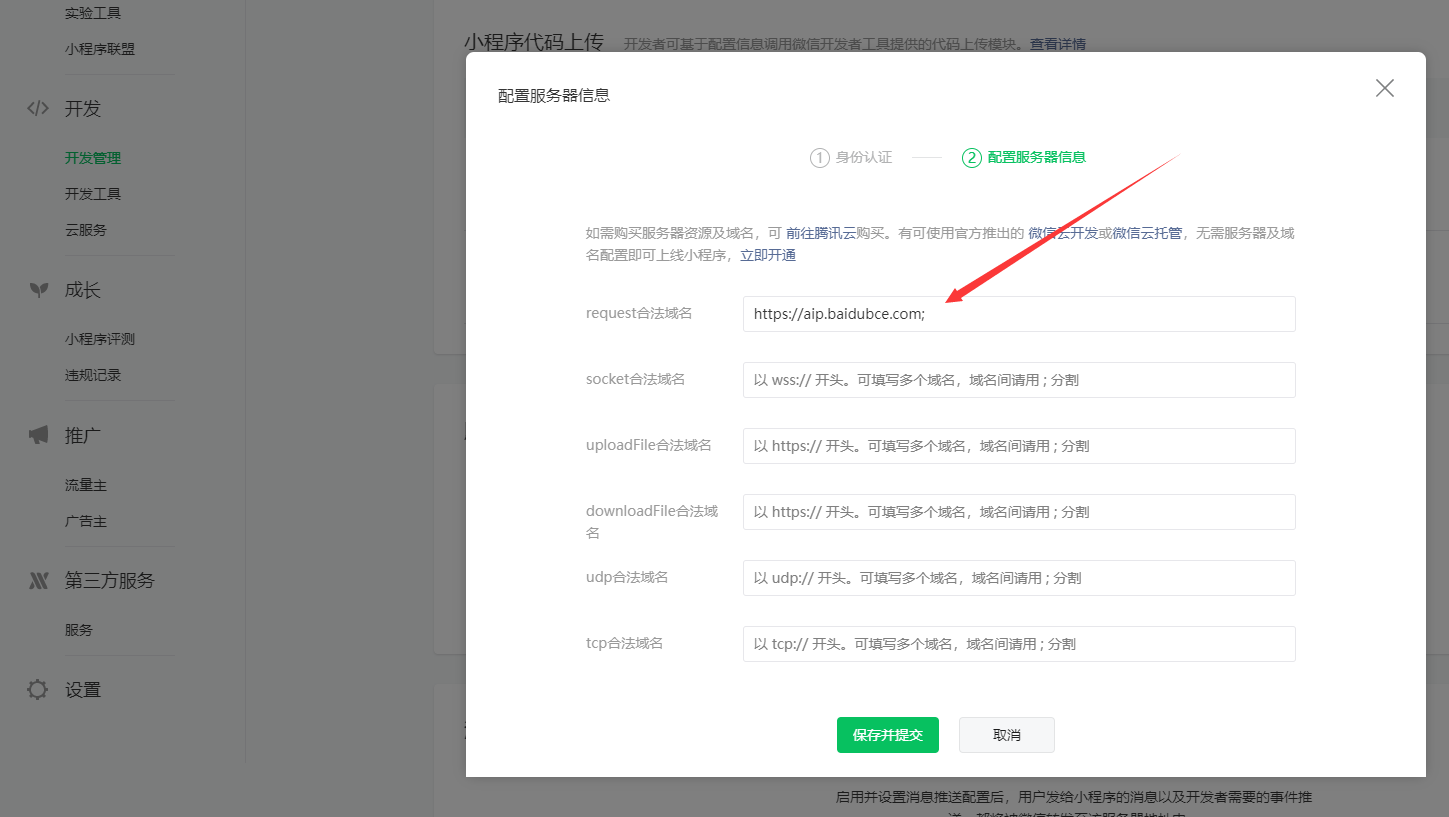
2-4,添加百度域名到小程序
我们这里要调用百度的人脸识别接口,所以需要配置域名到小程序,如果不配置的话,就会报如下错误。

所以需要到小程序后台,把这个https://aip.baidubce.com 添加到如下位置。


点击上面的服务设置,然后做如下设置。
一般设置到10分钟左右生效。
三,接入人脸识别
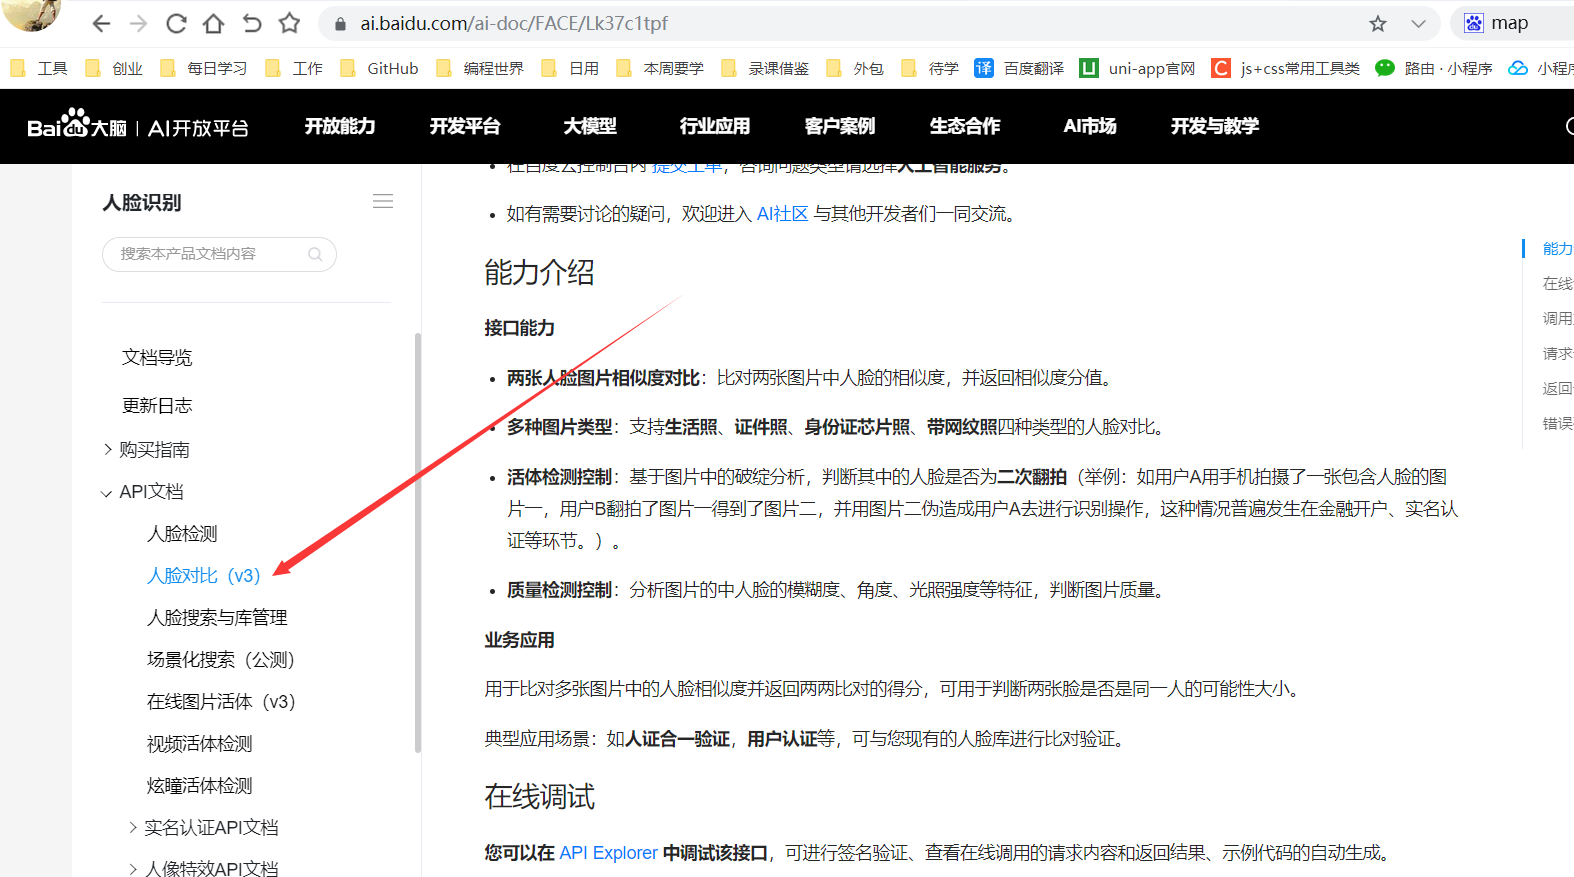
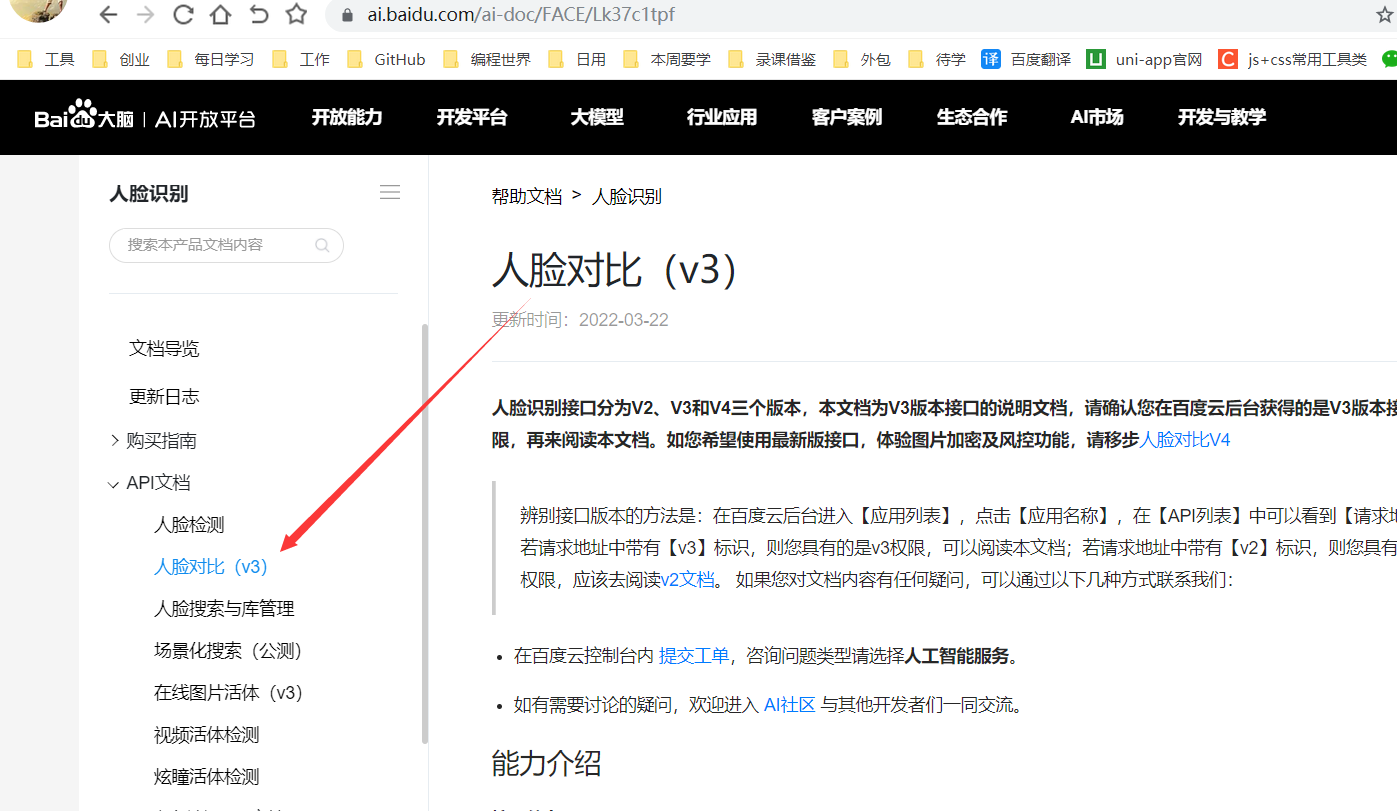
3-1,官方文档
我们在自己的小程序里接入人脸识别,就必须去看百度官方的技术文档。
文档地址:https://ai.baidu.com/ai-doc/FACE/Lk37c1tpf
我们这里主要就看这个人脸对比文档。
官方文档里并没有给出小程序里如何调用的代码。
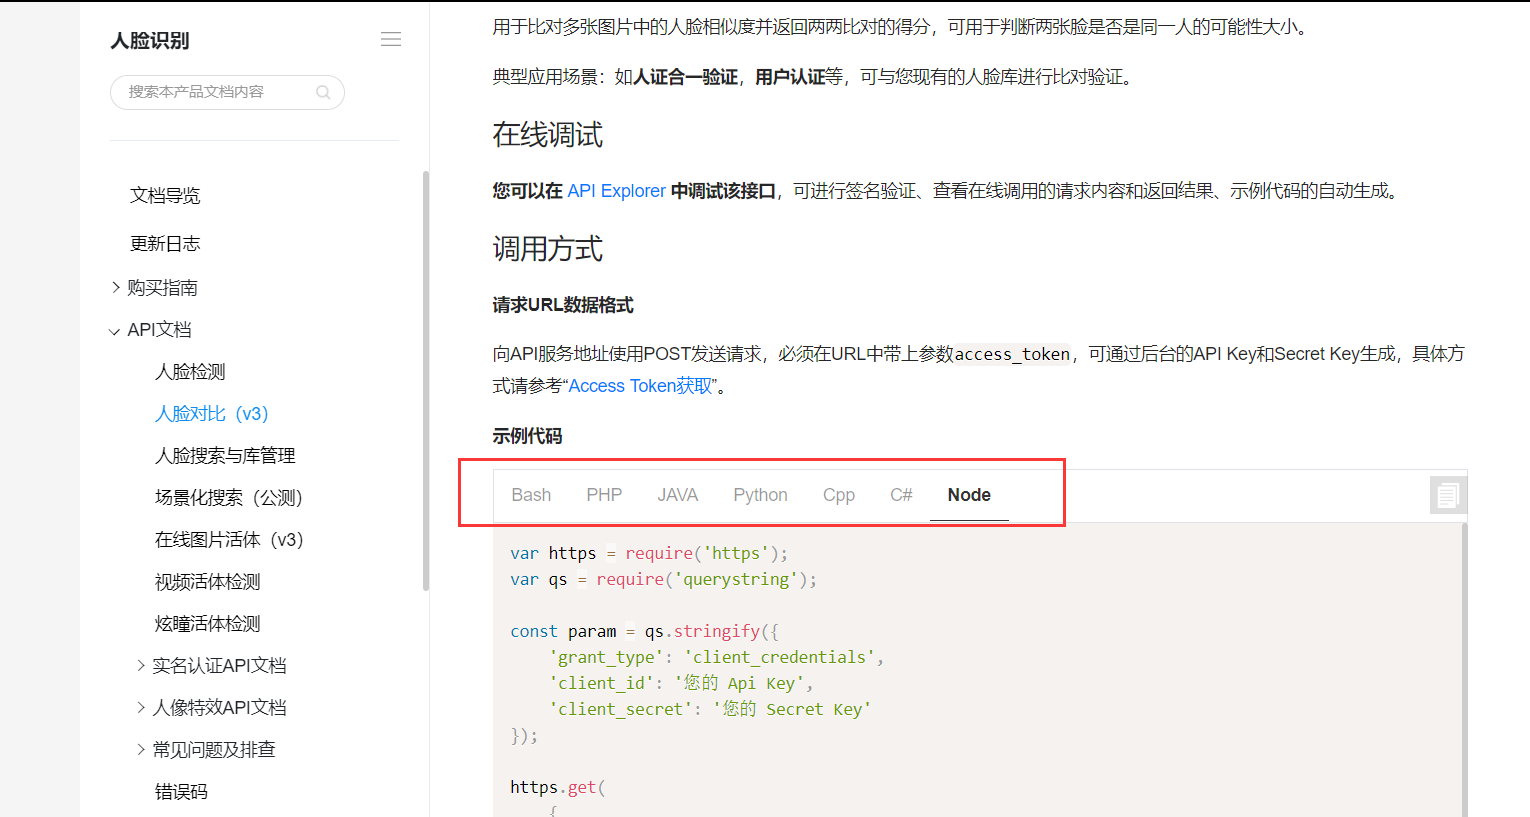
所以接下来的学习要跟紧石头哥的脚步,石头哥手把手的带大家实现小程序端的调用。
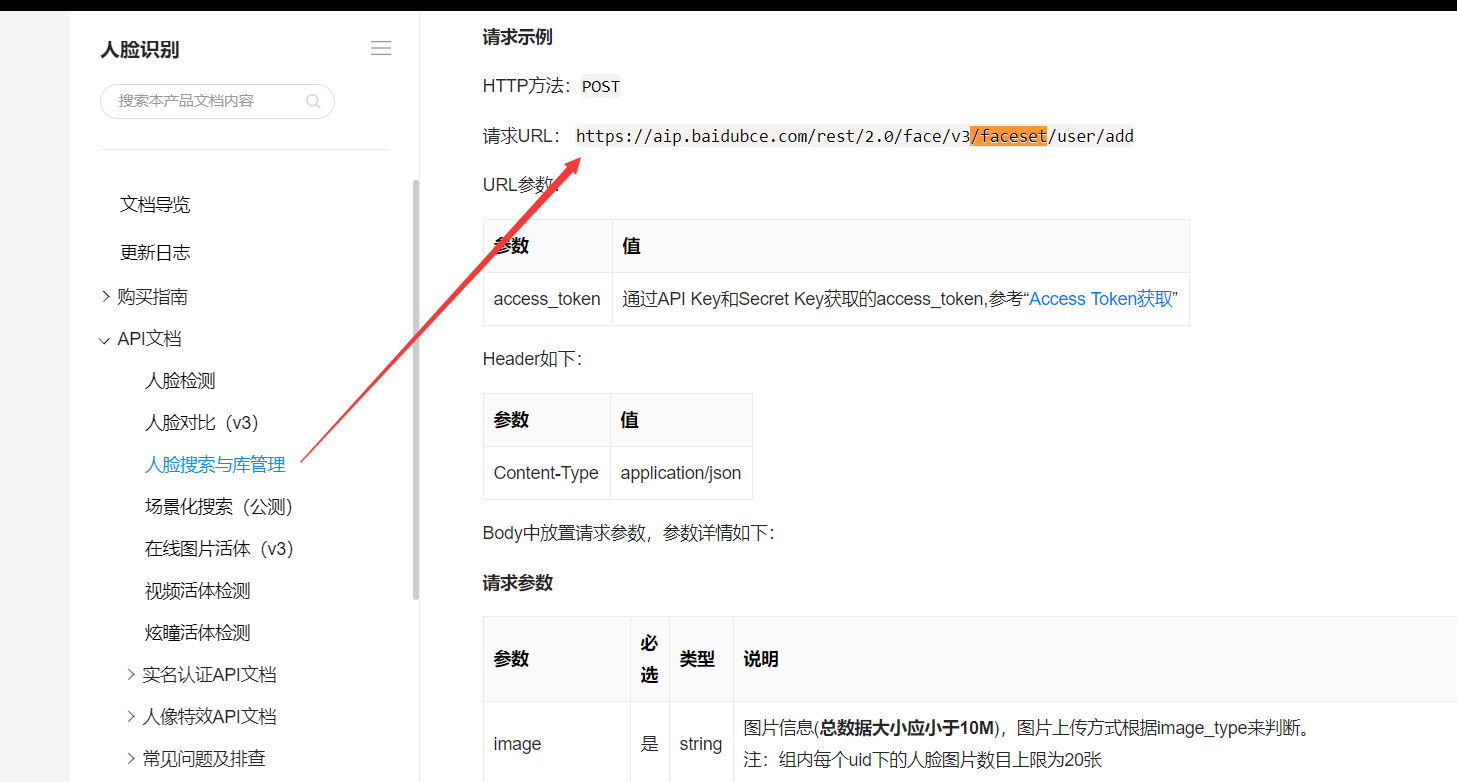
3-2,人脸注册
我们要想实现人脸识别,就需要一开始先在百度的可视化人脸库里注册人脸,要调用的接口如下。
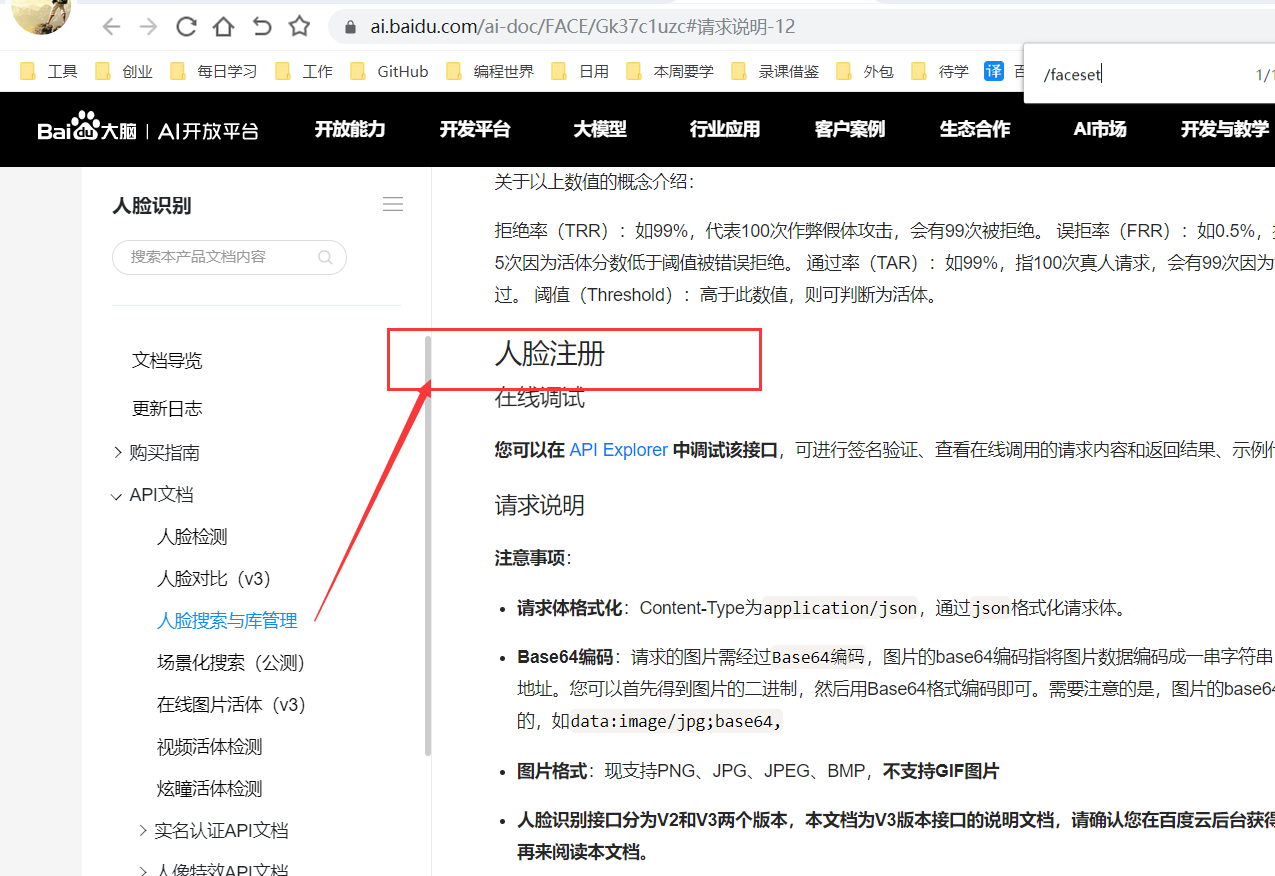
在调用这个之前,我们需要先去获取对应的acess_token,所以接下来我们要做的第一步就是获取acess_token
3-2-1,获取acess_token
我们后面做的所有操作,基本上都要获取这个。
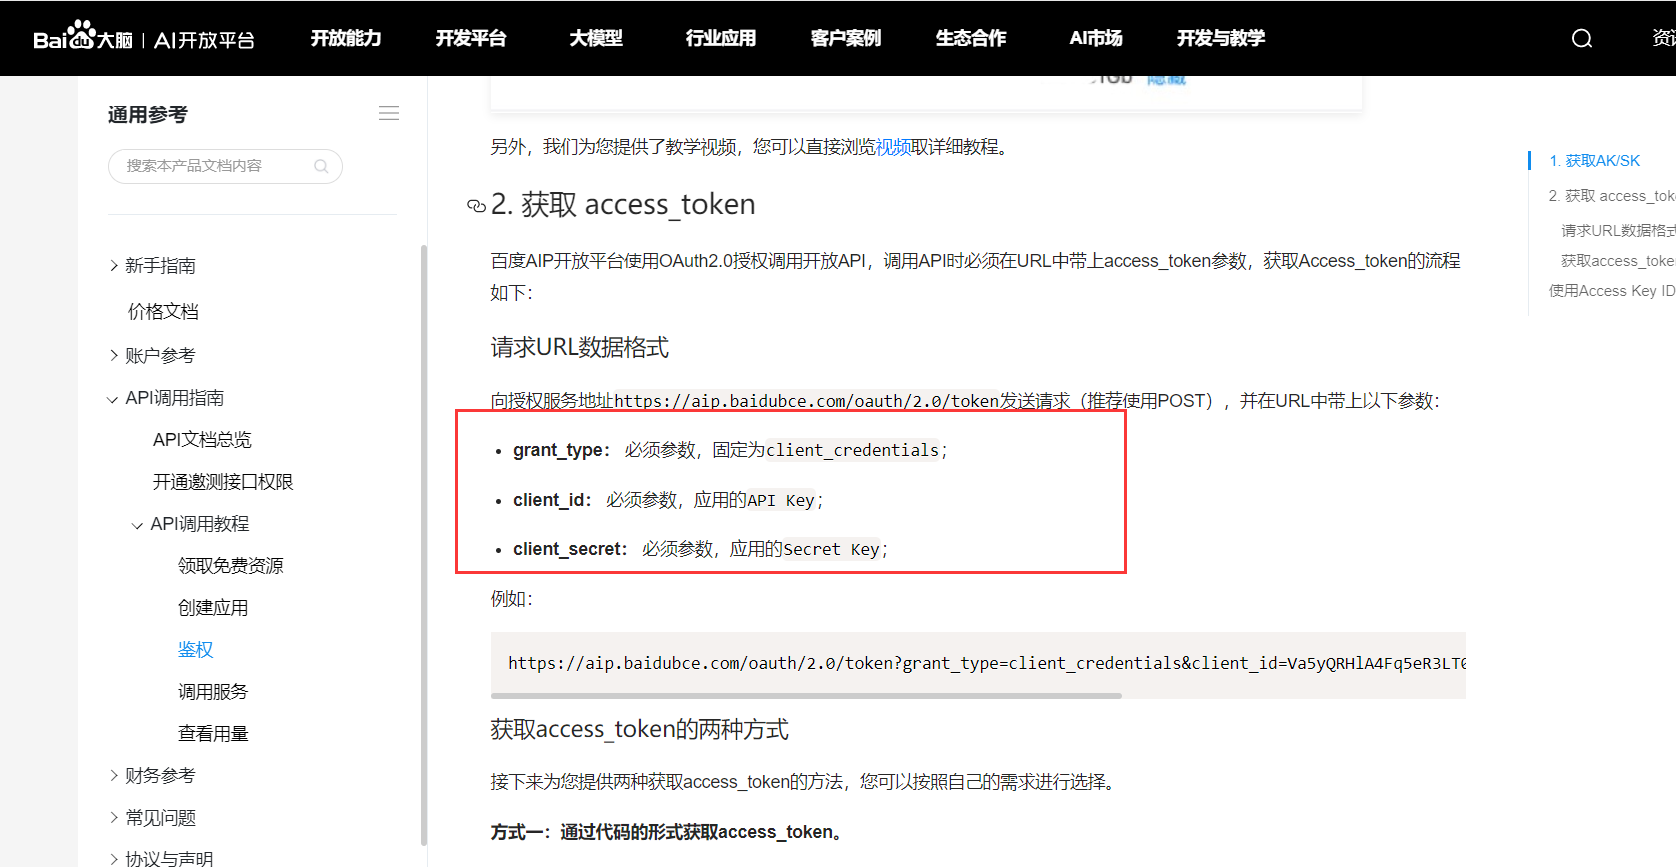
所以我把源码贴出来给到大家,client_id和client_secret记得换成你自己的。
wx.request({url: 'https://aip.baidubce.com/oauth/2.0/token',data: {grant_type: 'client_credentials',client_id:, //应用的API Keyclient_secret: //应用的Secret Key},header: {'Content-Type': 'application/json' // 默认值},success: res => {this.setData({token: res.data.access_token //获取到token})console.log('获取到的token', this.data.token)}})
3-2-2,拍人脸照
第二步和第三步要同时进行,所以我把代码放到下面第三步
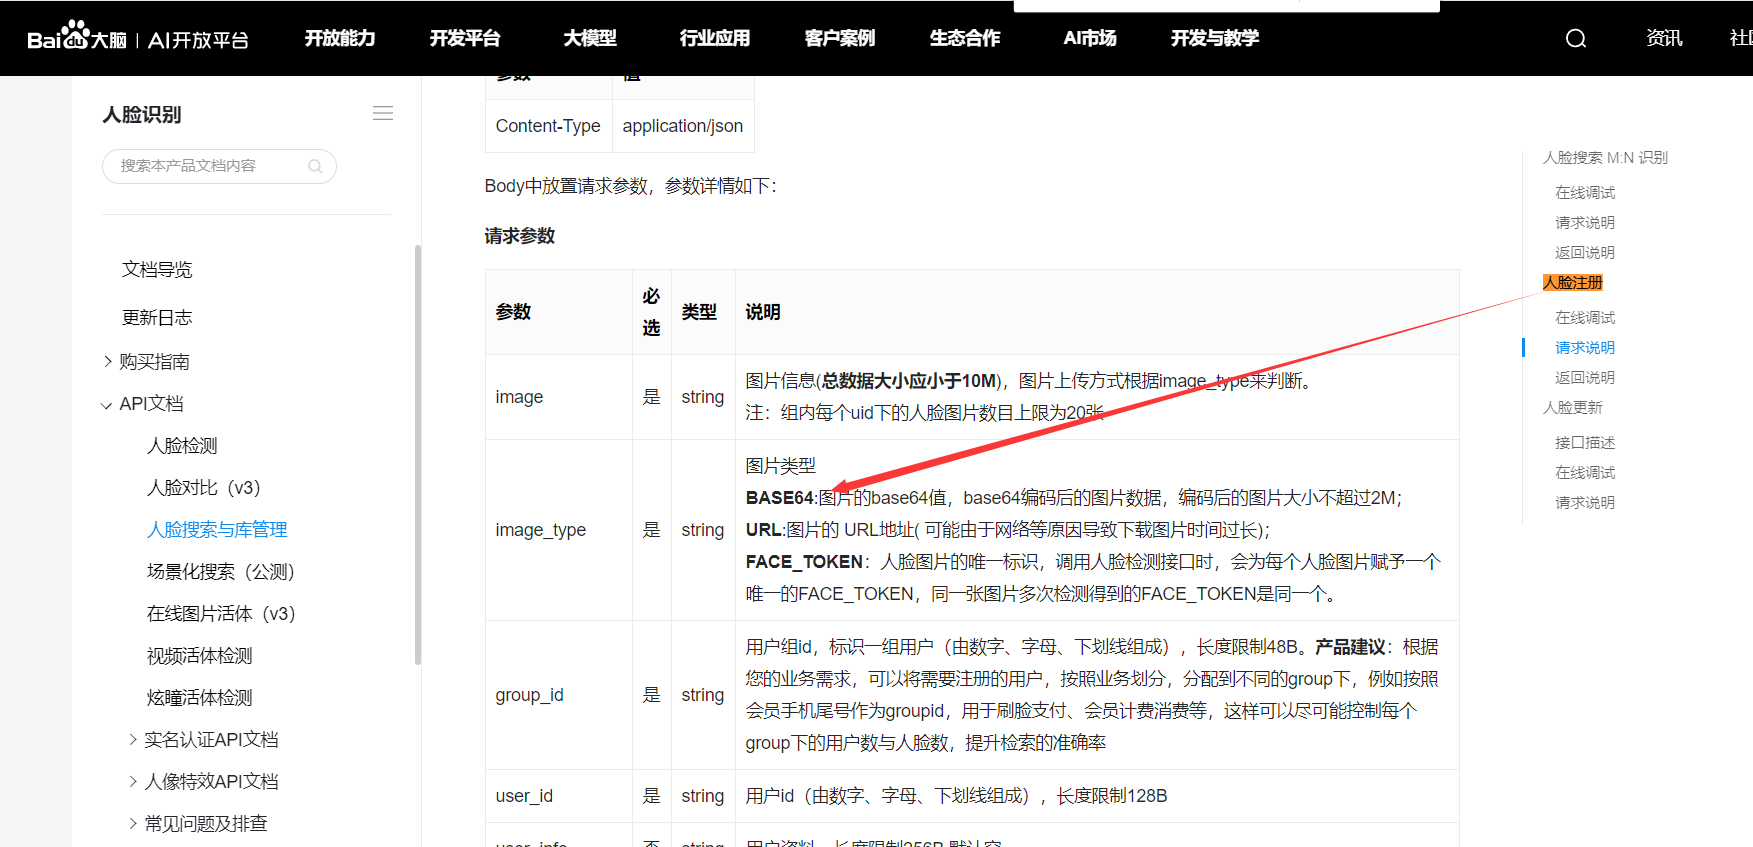
3-2-3,注册人脸到百度人脸库
我们在拍照以后,获取到图片,并通过 wx.getFileSystemManager().readFile()方法把图片转换为base64,因为百度需要这样格式的数据
对应的代码如下:
var that = this;//拍照const ctx = wx.createCameraContext()ctx.takePhoto({quality: 'high',success: (res) => {that.setData({src: res.tempImagePath //获取图片})//图片base64编码wx.getFileSystemManager().readFile({filePath: that.data.src, //选择图片返回的相对路径encoding: 'base64', //编码格式success: res => { //成功的回调that.setData({base64: res.data})//第三步:上传人脸进行注册wx.request({url: 'https://aip.baidubce.com/rest/2.0/face/v3/faceset/user/add?access_token=' + that.data.token,method: 'POST',data: {image: that.data.base64,image_type: 'BASE64',group_id: 'users', //自己建的用户组iduser_id: app.globalData.userInfo.phone, //学号user_info: app.globalData.userInfo.name //存储学生姓名},header: {'Content-Type': 'application/json' // 默认值},success(res) {that.setData({msg: res.data.error_msg})console.log("人脸注册返回结果", res)//做成功判断if (that.data.msg == 'SUCCESS') { //微信js字符串使用单引号wx.showToast({title: '注册成功',icon: 'success',duration: 2000})// that.registerFace()}}}),//失败尝试wx.showToast({title: '请重试',icon: 'loading',duration: 500})}})} //拍照成功结束}) //调用相机结束
这几个参数,要记得换成自己的
group_id: 'users', //自己建的用户组iduser_id: app.globalData.userInfo.phone, //学号或者用户电话能唯一标识用户的user_info: app.globalData.userInfo.name //存储用户姓名
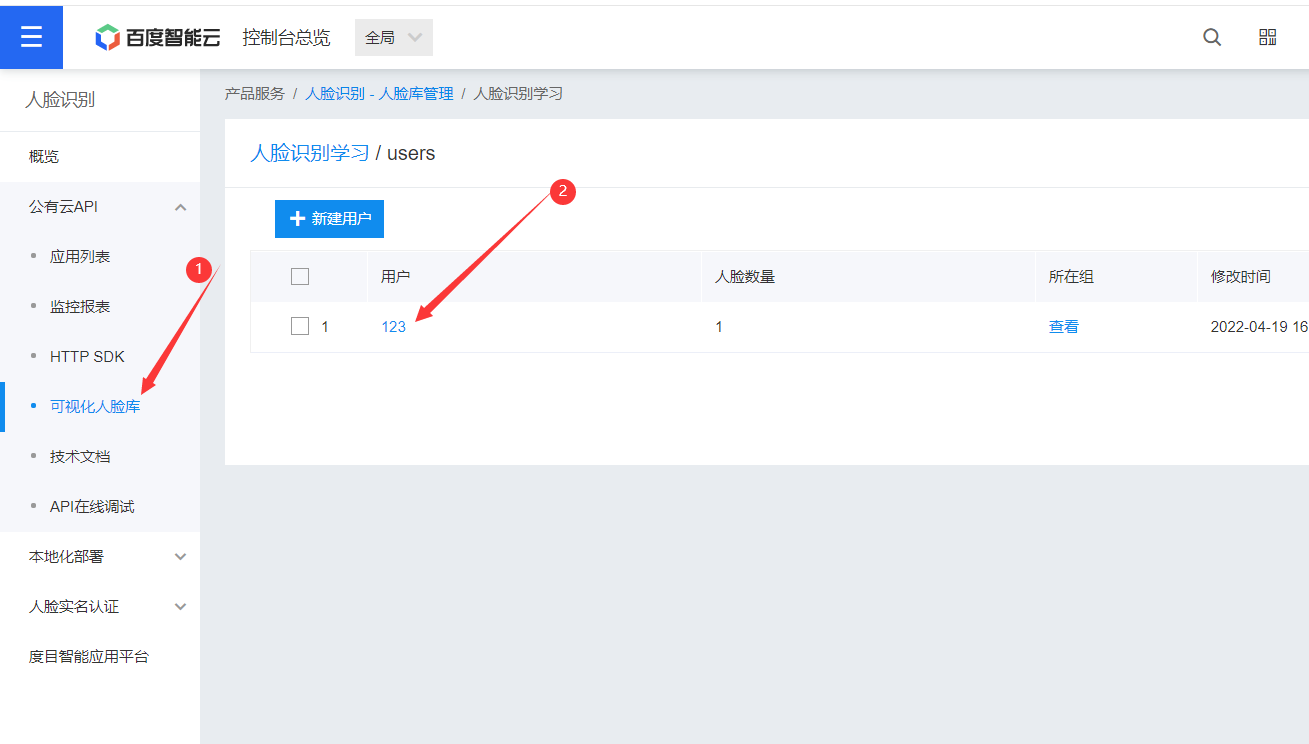
我们注册完以后,可以在百度人脸库里看到这条数据,可以看到我们创建的users表。
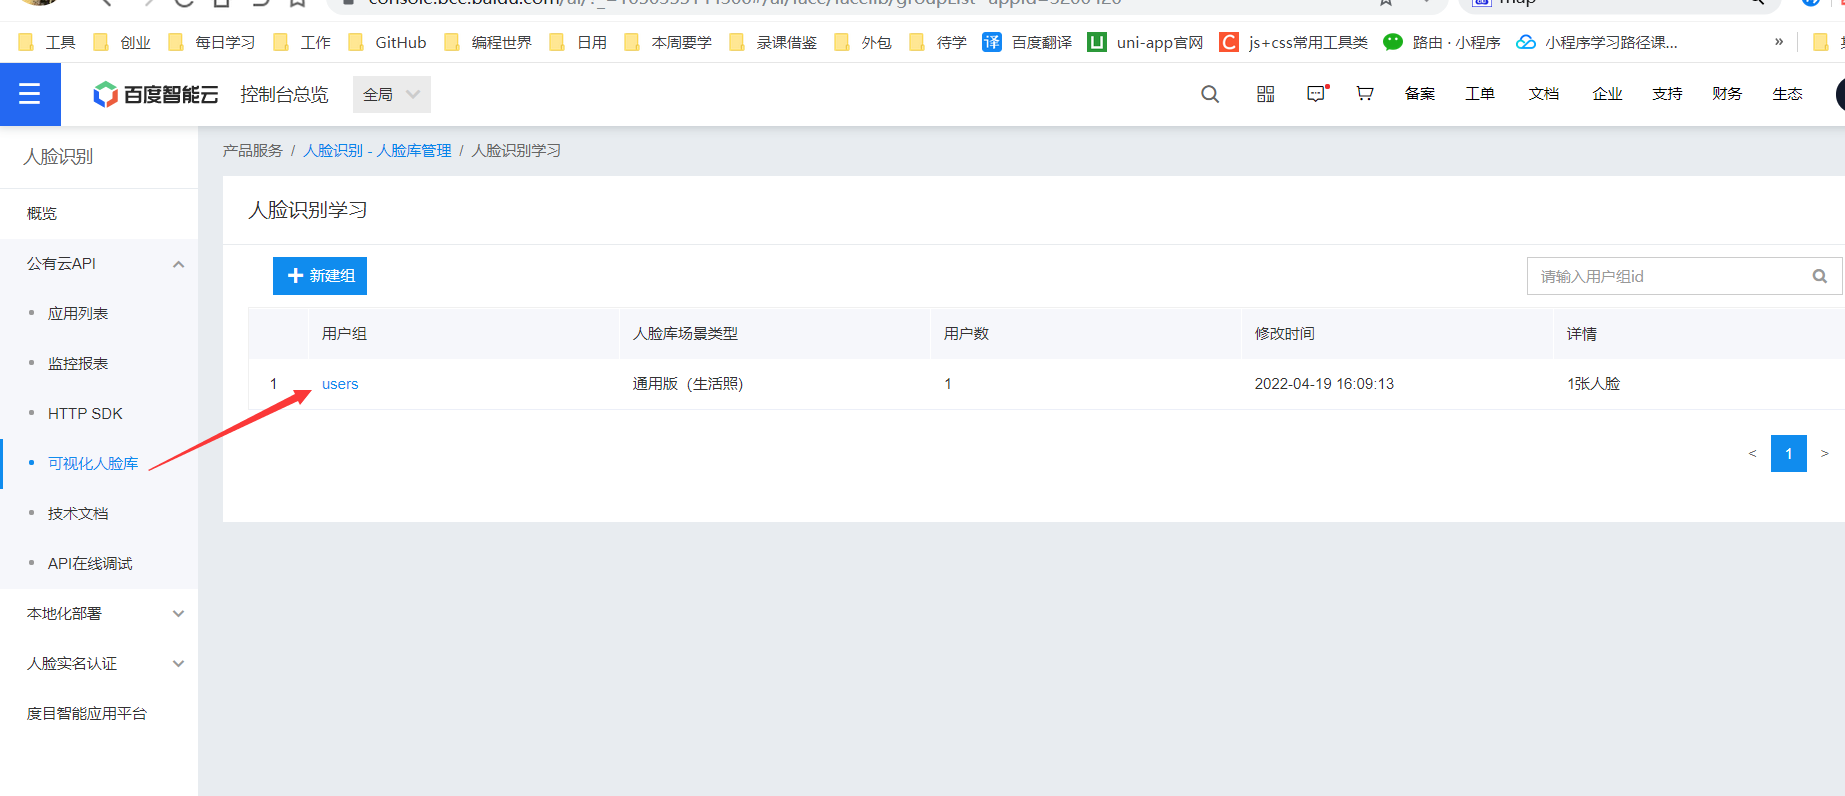
3-3,查看人脸库
我们进入百度的控制台,找到如下的类目
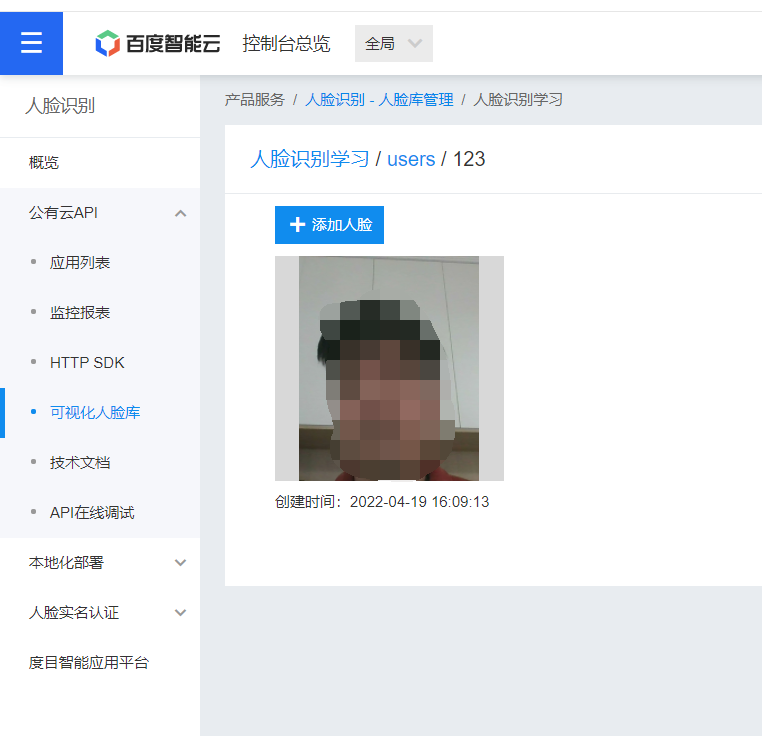
然后点开用户123,就可以看到他注册的人脸照片。
四,人脸比对
我们上面注册好人脸以后,接下来就可以使用人脸打卡功能了。
使用之前还是第一步,获取acess_token
4-1,获取acess_token
// acess_token获取getTokenInfo() {var that = thiswx.request({url: 'https://aip.baidubce.com/oauth/2.0/token',data: {grant_type: 'client_credentials',client_id: app.globalData.client_id, //应用的API Keyclient_secret: app.globalData.client_secret //Secret Key},header: {'Content-Type': 'application/json' // 默认值},success(res) {that.setData({token: res.data.access_token //获取到token})console.log(that.data.token)}})},
4-2,人脸比对
核心代码如下:
//拍照并编码takePhoto() {let that=thisconst ctx = wx.createCameraContext()ctx.takePhoto({quality: 'high',success: (res) => {//图片base64编码wx.getFileSystemManager().readFile({filePath: res.tempImagePath, //选择图片返回的相对路径encoding: 'base64', //编码格式success: res => { //成功的回调that.signInFace(res.data)}})}})},//上传人脸进行 比对signInFace(base64) {var that = thisif (base64 != "") {wx.request({url: 'https://aip.baidubce.com/rest/2.0/face/v3/search?access_token=' + that.data.token,method: 'POST',data: {image: base64,image_type: 'BASE64',group_id_list: 'users' //自己建的用户组id},header: {'Content-Type': 'application/json' // 默认值},success(res) {console.log("人脸对比返回结果", res)if (res.data.error_msg == "match user is not found") {wx.showModal({title: '签到失败',content: '请先注册人脸才可以人脸使用',})}if (res.data.error_msg == "SUCCESS") {that.setData({msg: res.data.result.user_list[0].score,})// console.log(res)if (that.data.msg > 80) { //相似度大于80console.log('人脸识别成功')} else {wx.showToast({title: '人脸识别失败',})}} else {wx.showToast({title: '人脸识别失败',})}}});}if (base64 == "") {wx.showToast({title: '请重试',icon: 'loading',duration: 500})}},
我们执行代码以后,会返回一个相识度,我这里规定相识度80%以上即为同一个人。

看日志可以知道我们的相识度是98.295%,所以这里就可以认定为签到成功
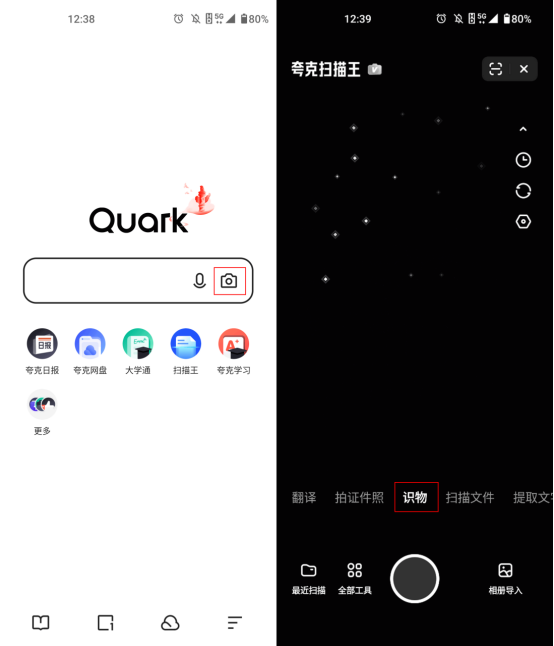
五,图片识别
我们图片识别其实和上面的人脸识别操作步骤差不多的,依然也是先开通图片识别功能。
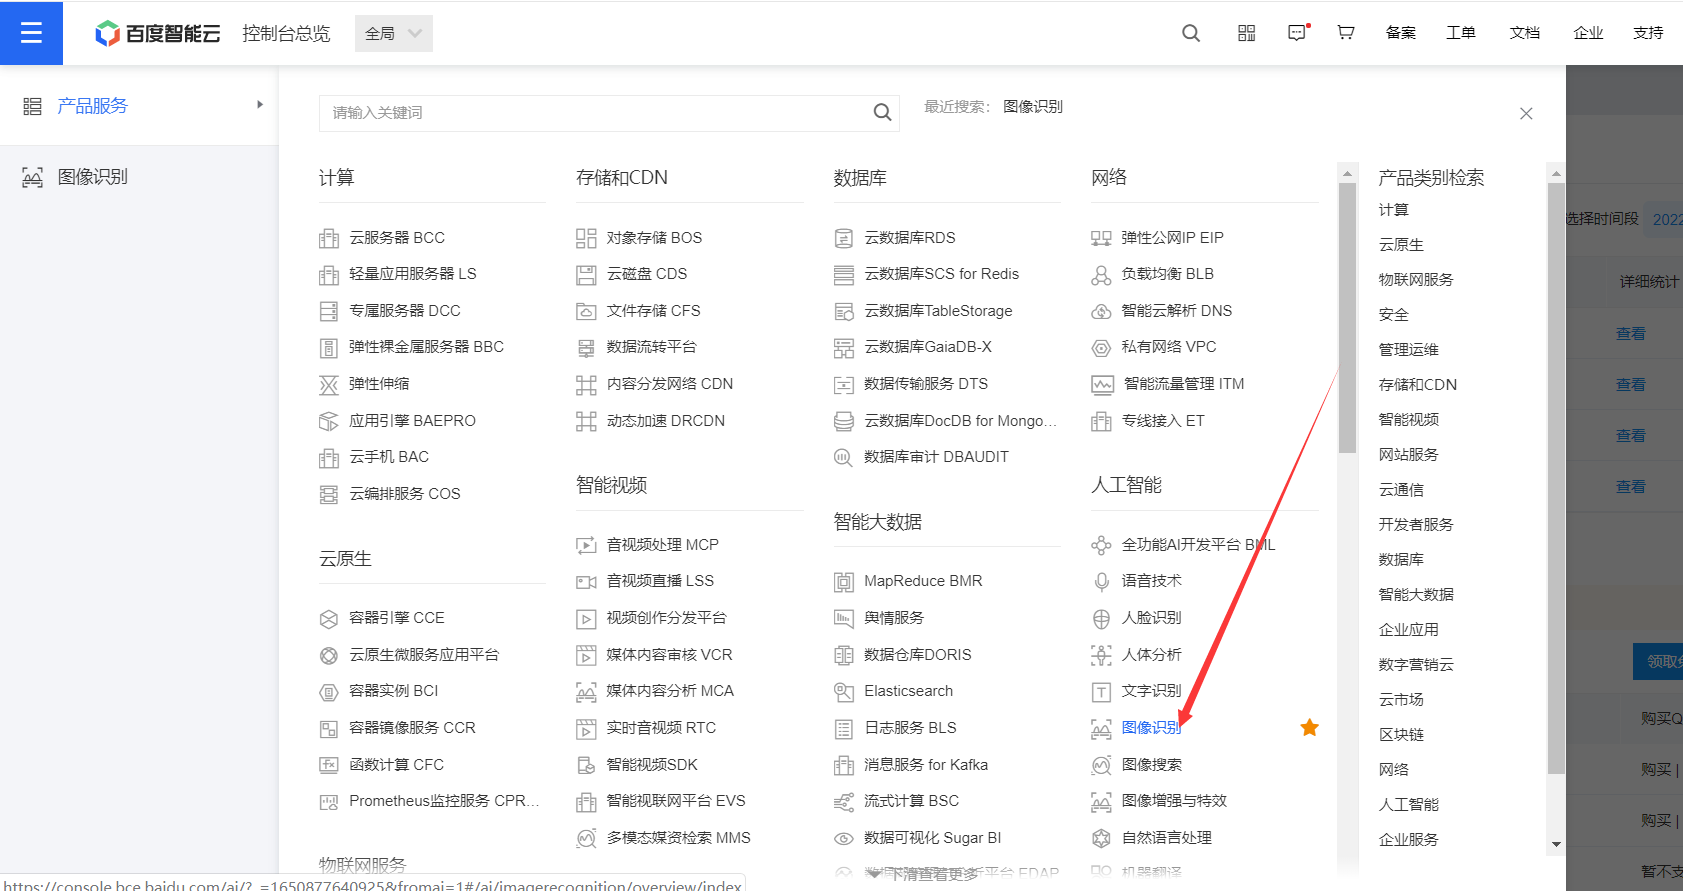
通过上图或者这个地址进入图片识别页面:https://cloud.baidu.com/doc/IMAGERECOGNITION/index.html

5-1,创建图片识别应用
和人脸应用一样,也要创建一个应用 。
点击完创建应用后,把图像识别全部勾选。
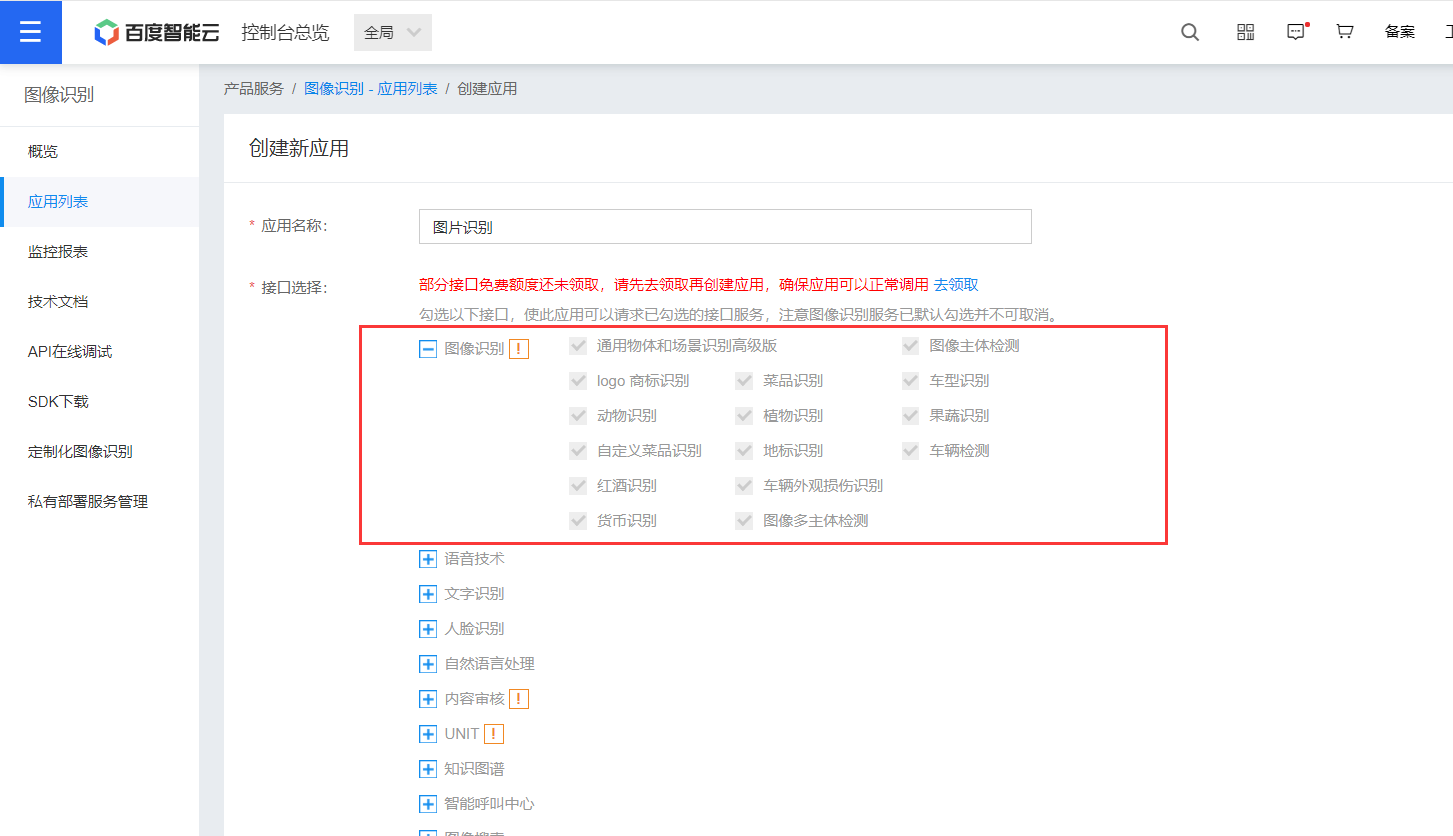
当然了,如果你一开始考虑清楚都用那些功能以后,可以把你想要的功能都勾选了,这样以后就不用重复的创建应用了。
这样我们就创建好应用了
5-2,领取免费资源
同样的我们要使用图片识别功能,也是要去领取免费资源的,要不然我们连免费使用的额度都没有,当然啦,如果百度后面改规则了,我们就只能付费购买这些资源了。
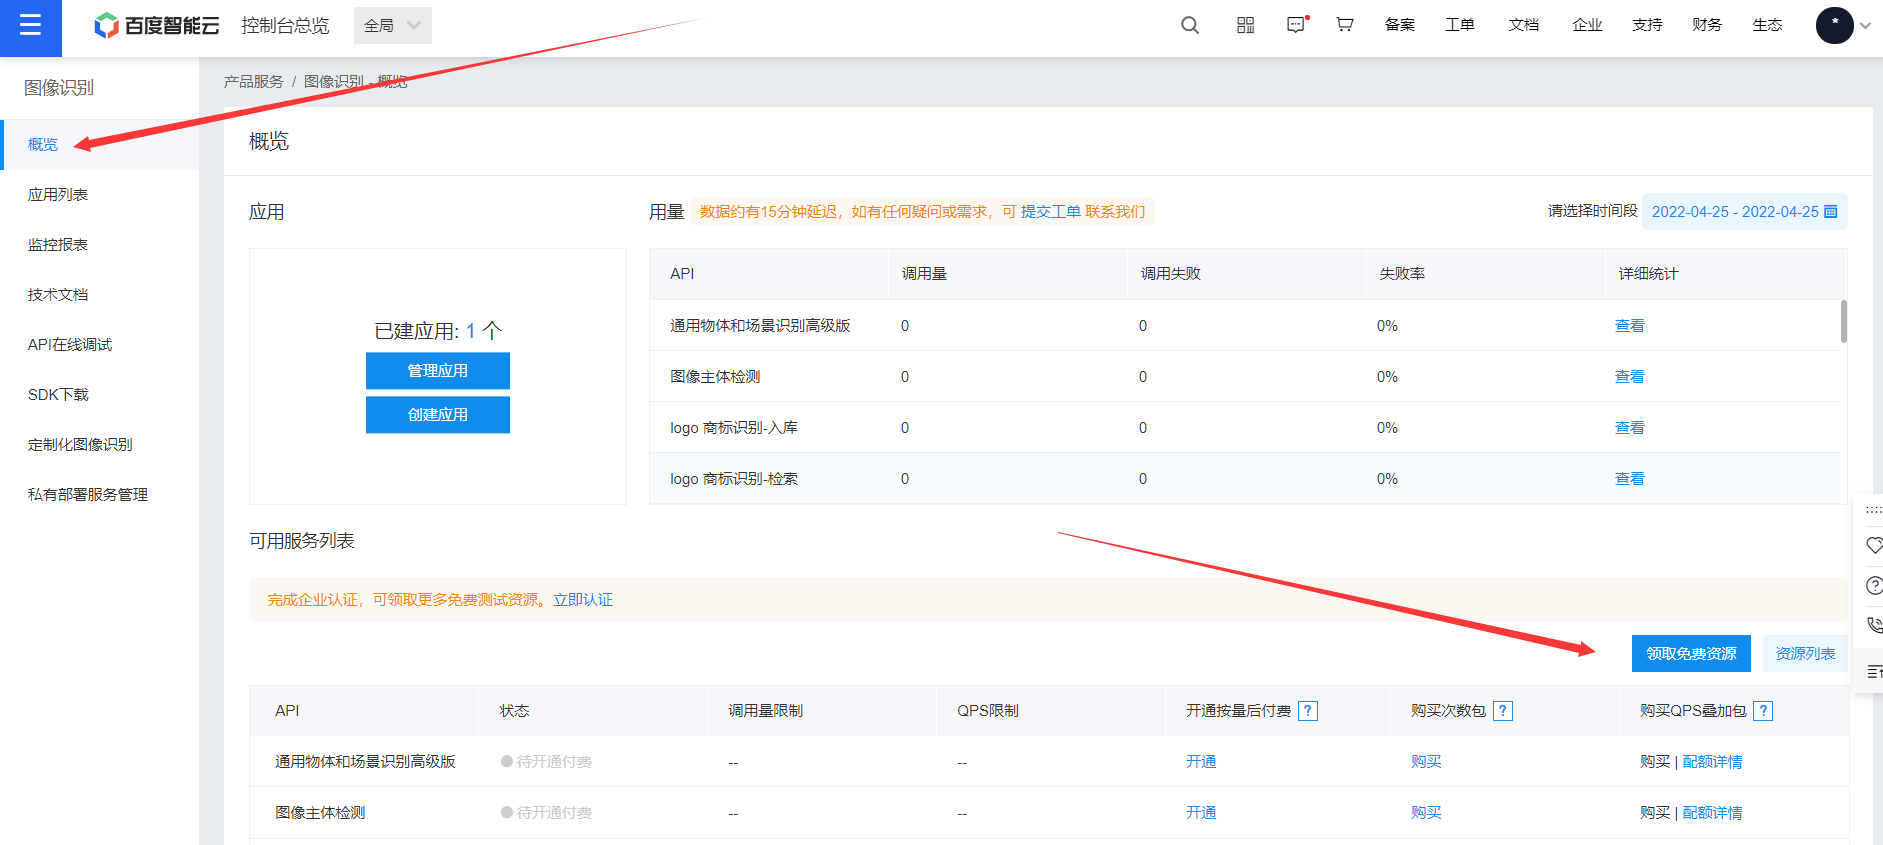
所以先把能领的都领取下。
5-3,获取acess_token
使用之前还是要先获取acess_token
// acess_token获取getTokenInfo() {var that = thiswx.request({url: 'https://aip.baidubce.com/oauth/2.0/token',data: {grant_type: 'client_credentials',client_id: app.globalData.client_id, //应用的API Keyclient_secret: app.globalData.client_secret //Secret Key},header: {'Content-Type': 'application/json' // 默认值},success(res) {that.setData({token: res.data.access_token //获取到token})console.log(that.data.token)}})},
5-4,图片识别核心文档
我们首先去看下官方文档 https://cloud.baidu.com/product/imagerecognition/general
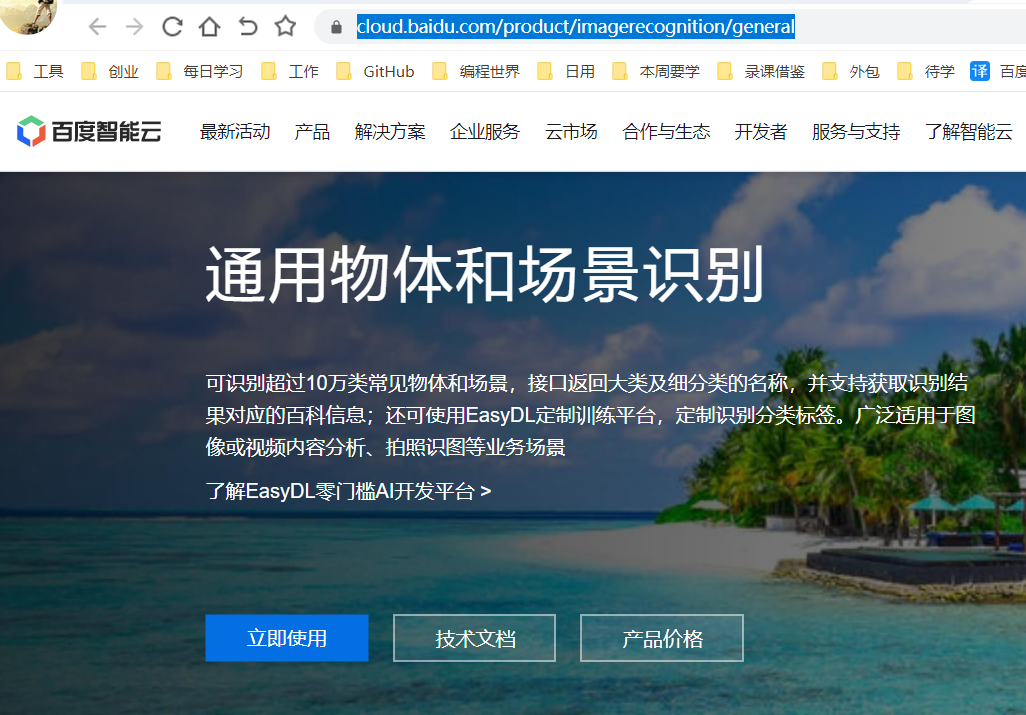
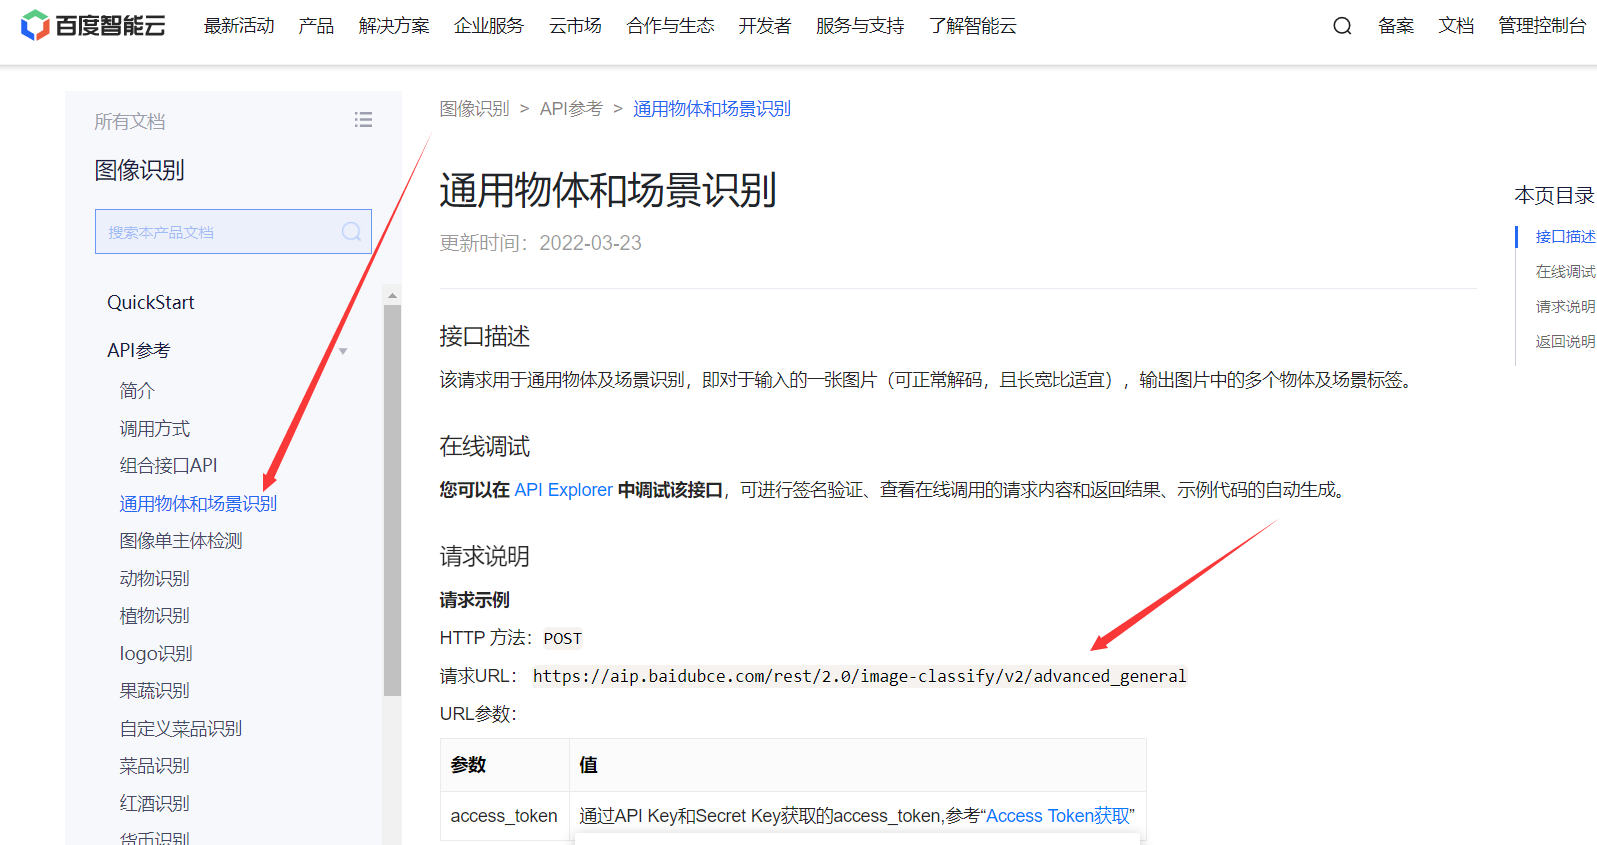
我们这里使用通用物体和场景识别,这样可以识别很多东西
5-5,图片识别
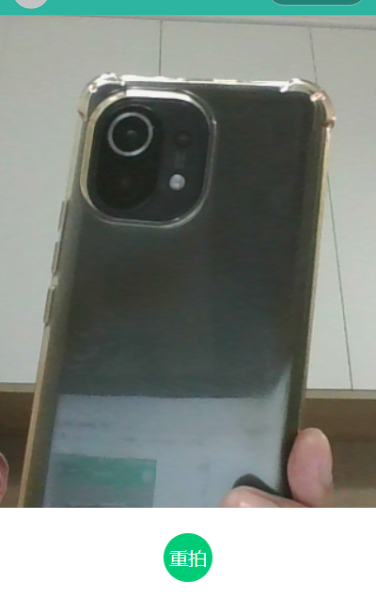
我们做图片识别依然是先拍照,然后上传到百度进行图片识别
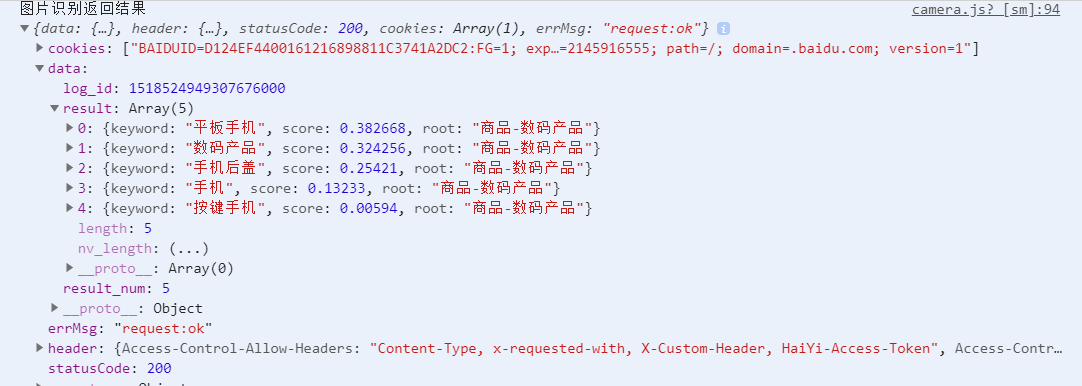
我先看下识别结果的格式如下:
我这里把代码全部贴出来给到大家
5-5-1,wxml代码
<view style="width: 100%; height:calc(100vh - 200rpx);"><camera style="width: 100%; height:100%;" wx:if="{{isCamera}}" device-position="back" flash="off" binderror="error"></camera><image style="width: 100%; height:100%;" wx:else mode="widthFix" src="{{src}}"></image>
</view><view class='photo-view'><view class='takePhoto' bindtap="takePhoto">{{btnTxt}}</view>
</view><!-- 识别结果弹窗 -->
<view class="mask" hidden="{{!isShow}}" bindtap="hideModal"></view>
<view class="mask_content" hidden="{{!isShow}}"><view class="mask_title">识别结果如下</view><block wx:for="{{results}}" wx:key="index"><view class="mask_item">{{item.keyword}}(点击查看)</view></block>
</view>
5-5-2,wxss代码
.photo-view {width: 100%;height: 200rpx;display: flex;flex-direction: column;justify-content: center;align-items: center;
}.takePhoto {width: 100rpx;height: 100rpx;border-radius: 100rpx;background-color: #00cc77;color: white;display: flex;flex-direction: column;justify-content: center;align-items: center;
}/* 识别出的结果 */
.mask {position: fixed;left: 0;right: 0;top: 0;bottom: 0;opacity: 0.5;background: black;/* 设置组件的层级 */z-index: 100;
}.mask_content {position: fixed;left: 80rpx;top: 200rpx;right: 80rpx;height: 600rpx;background: white;z-index: 200;overflow: auto;
}.mask_title {text-align: center;font-size: 50rpx;color: red;margin-bottom: 20rpx;
}.mask_item {text-align: center;padding: 15rpx;border-bottom: 1px solid gainsboro;
}
5-5-3,js代码
const app = getApp()
Page({data: {accessToken: "",isShow: false,results: [{keyword: "人物特写",score: 0.813571,root: "人物-人物特写"},{keyword: "男孩",score: 0.630612,root: "人物活动-人物特写"},{keyword: "女孩",score: 0.353866,root: "人物-人物特写"}],src: "",isCamera: true,btnTxt: "拍照"},onLoad() {this.ctx = wx.createCameraContext()var time = wx.getStorageSync("time")var curTime = new Date().getTime()var timeInt = parseInt(time)var timeNum = parseInt((curTime - timeInt) / (1000 * 60 * 60 * 24))console.log("=======" + timeNum)var accessToken = wx.getStorageSync("access_token")console.log("====accessToken===" + accessToken + "a")// accessToken超过30天过期if (timeNum > 28 || (accessToken == "" ||accessToken == null || accessToken == undefined)) {this.accessTokenFunc()} else {this.setData({accessToken: wx.getStorageSync("access_token")})}},// 第一步,拍照takePhoto() {var that = thisif (this.data.isCamera == false) {this.setData({isCamera: true,btnTxt: "拍照"})return}this.ctx.takePhoto({quality: 'high',success: (res) => {this.setData({src: res.tempImagePath,isCamera: false,btnTxt: "重拍"})wx.showLoading({title: '正在加载中',})wx.getFileSystemManager().readFile({filePath: res.tempImagePath,encoding: "base64",success: res => {that.shibie(res.data)},fail: res => {wx.hideLoading()wx.showToast({title: '拍照失败,未获取相机权限或其他原因',icon: "none"})}})}})},//第二步:上传图片进行识别shibie(image) {var that = thisif (image == "") {wx.showToast({title: '请重试',icon: 'loading',duration: 500})return}if (image != "") {wx.request({url: 'https://aip.baidubce.com/rest/2.0/image-classify/v2/advanced_general',method: 'POST',data: {access_token: that.data.accessToken,image: image,},header: {'Content-Type': 'application/x-www-form-urlencoded' // 默认值},success(res) {wx.hideLoading()console.log("图片识别返回结果", res)// 如果access_token过期,就重新请求access_tokenlet code = res.data.err_codeif (code == 111 || code == 100 || code == 110) {wx.clearStorageSync("access_token")wx.clearStorageSync("time")that.accessTokenFunc()return}// 返回的识别结果let results = res.data.resultif (results != undefined && results != null) {that.setData({isShow: true,results: results})console.log("识别到的结果", results)} else {wx.clearStorageSync("access_token")wx.showToast({icon: 'error',title: '识别失败,请重试',})}}});}},// 获取百度的AccessTokenaccessTokenFunc() {wx.request({url: 'https://aip.baidubce.com/oauth/2.0/token',data: {grant_type: 'client_credentials',client_id: app.globalData.client_id, //应用的API Keyclient_secret: app.globalData.client_secret //应用的Secret Key},header: {'Content-Type': 'application/json' // 默认值},success: res => {this.setData({accessToken: res.data.access_token //获取到token})console.log('获取到的token', this.data.accessToken)wx.setStorageSync("access_token", this.data.accessToken)wx.setStorageSync("time", new Date().getTime())},fail: res => {wx.clearStorageSync("access_token")wx.showToast({icon: 'error',title: '调用失败,请重新尝试',})}})},// 选择识别的结果radioChange: function (e) {console.log(e)console.log(e.detail)console.log(e.detail.value)wx.navigateTo({url: '/pages/result/list?keyword=' + e.detail.value,})},// 隐藏弹窗hideModal: function () {this.setData({isShow: false,})},})
效果图如下:
识别出来的结果如下:
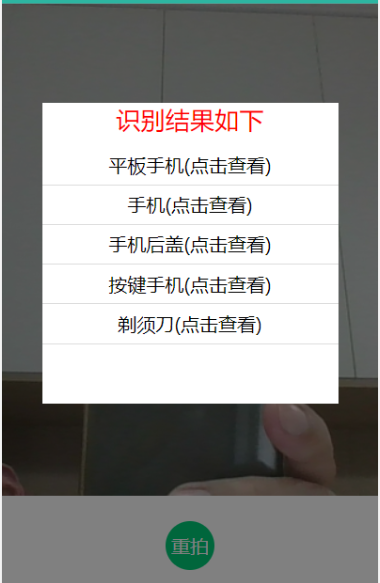
到这里我们图片识别的功能也做好了。欢迎关注编程小石头,后面会出更多更好的内容。
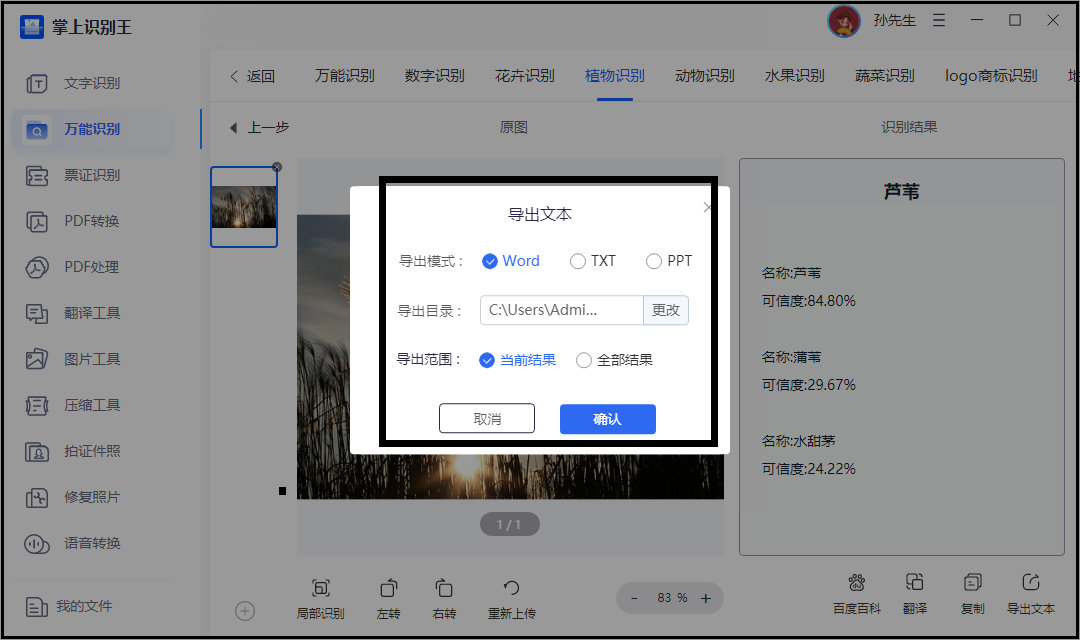
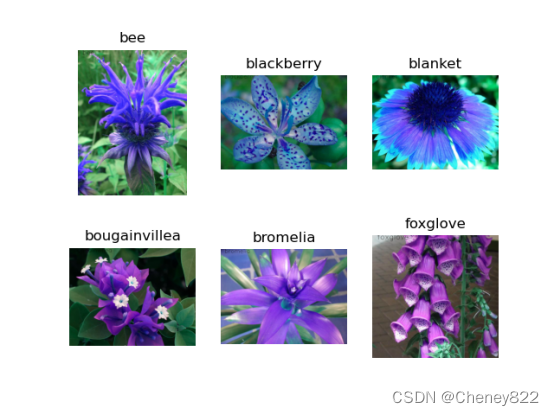
六,植物花卉识别
我们上面既然用了图片识别,其实还可以深入的做下植物和花卉识别。
我们这里用的是百度的植物识别api
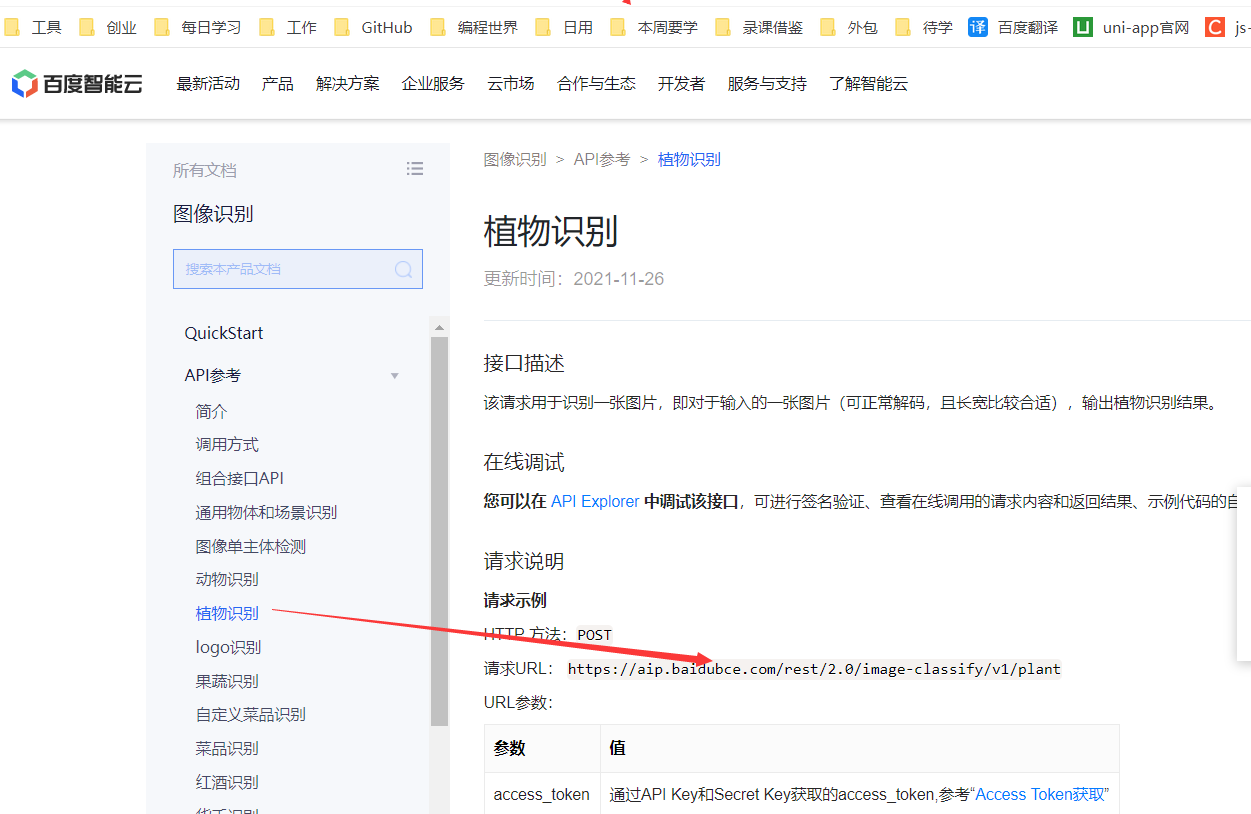
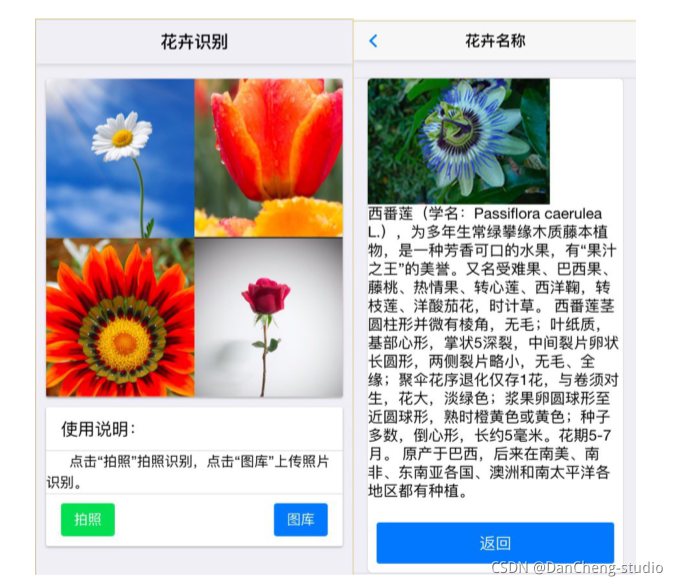
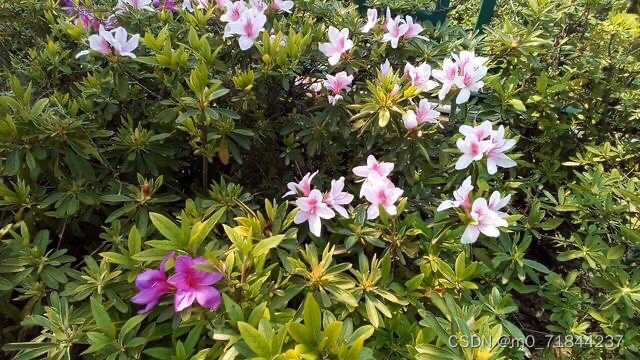
6-1,拍照识别
先看效果图
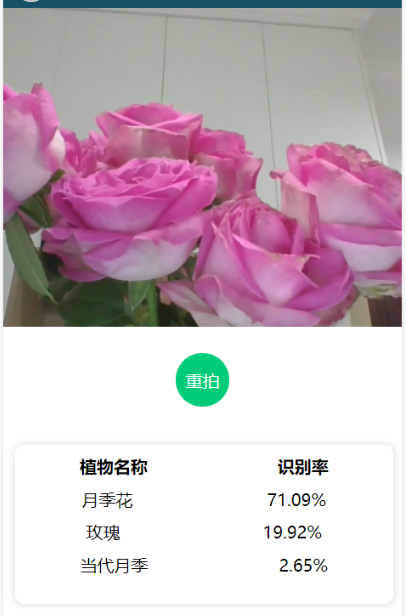
可以看出,我们拍照后,就可以识别出来是什么花。
核心代码贴出来给到大家
wxml
<view style="width: 100%; height:600rpx"><camera style="width: 100%; height:100%;" wx:if="{{isCamera}}" device-position="back" flash="off" binderror="error"></camera><image style="width: 100%; height:100%;" wx:else mode="widthFix" src="{{src}}"></image>
</view><view class='photo-view'><view class='takePhoto' bindtap="takePhoto">{{btnTxt}}</view>
</view>
<!-- 识别结果 -->
<view class="bottom" wx:if="{{result.length != 0}}"><view class="title"><text>植物名称</text><text>识别率</text></view><view class="info" wx:for="{{result}}" wx:key="index"><text>{{item.name}}</text><text>{{item.score}}</text></view>
</view>
wxss
.photo-view {width: 100%;height: 200rpx;display: flex;flex-direction: column;justify-content: center;align-items: center;
}.takePhoto {width: 100rpx;height: 100rpx;border-radius: 100rpx;background-color: #00cc77;color: white;display: flex;flex-direction: column;justify-content: center;align-items: center;
}/* 识别结果区域 */.bottom {margin: 20rpx;width: 95%;height: 300rpx;border: 1rpx solid #efefef;border-radius: 20rpx;box-shadow: 1rpx 1rpx 15rpx #ddd;
}.title {display: flex;justify-content: space-around;margin-top: 20rpx;
}.title text {font-weight: 700;font-size: 32rpx;
}.info {display: flex;justify-content: space-around;margin-top: 20rpx;
}
js
const app = getApp()
Page({data: {accessToken: "",result: [],src: "",isCamera: true,btnTxt: "拍照"},onLoad() {this.ctx = wx.createCameraContext()// 获取accessTokenvar time = wx.getStorageSync("time")var curTime = new Date().getTime()var timeInt = parseInt(time)var timeNum = parseInt((curTime - timeInt) / (1000 * 60 * 60 * 24))console.log("=======" + timeNum)var accessToken = wx.getStorageSync("access_token")console.log("====accessToken===" + accessToken + "a")// accessToken超过30天过期if (timeNum > 28 || (accessToken == "" ||accessToken == null || accessToken == undefined)) {this.accessTokenFunc()} else {this.setData({accessToken: wx.getStorageSync("access_token")})}},// 第一步,拍照takePhoto() {var that = thisif (this.data.isCamera == false) {this.setData({isCamera: true,btnTxt: "拍照"})return}this.ctx.takePhoto({quality: 'high',success: (res) => {this.setData({src: res.tempImagePath,isCamera: false,btnTxt: "重拍"})wx.showLoading({title: '正在加载中',})wx.getFileSystemManager().readFile({filePath: res.tempImagePath,encoding: "base64",success: res => {that.getResult(res.data)},fail: res => {wx.hideLoading()wx.showToast({title: '拍照失败,未获取相机权限或其他原因',icon: "none"})}})}})},//获取识别结果getResult(base64Img) {let that = thiswx.request({// url: 'https://aip.baidubce.com/rest/2.0/image-classify/v1/plant?access_token=' + token,url: 'https://aip.baidubce.com/rest/2.0/image-classify/v1/plant',method: 'POST',data: {access_token: that.data.accessToken,image: base64Img},header: {'Content-Type': 'application/x-www-form-urlencoded'},success: (res) => {console.log(res);this.setData({result: that.resultFilter(res.data.result)})},complete: () => {wx.hideLoading()}})},//result结果过滤resultFilter(arr) {arr.forEach((item) => {item.score = (item.score.toFixed(4) * 100).toFixed(2) + '%'})return arr},// 获取百度的AccessTokenaccessTokenFunc() {wx.request({url: 'https://aip.baidubce.com/oauth/2.0/token',data: {grant_type: 'client_credentials',client_id: app.globalData.client_id, //应用的API Keyclient_secret: app.globalData.client_secret //应用的Secret Key},header: {'Content-Type': 'application/json' // 默认值},success: res => {this.setData({accessToken: res.data.access_token //获取到token})console.log('获取到的token', this.data.accessToken)wx.setStorageSync("access_token", this.data.accessToken)wx.setStorageSync("time", new Date().getTime())},fail: res => {wx.clearStorageSync("access_token")wx.showToast({icon: 'error',title: '调用失败,请重新尝试',})}})},
})
6-2,相册选择识别
效果图
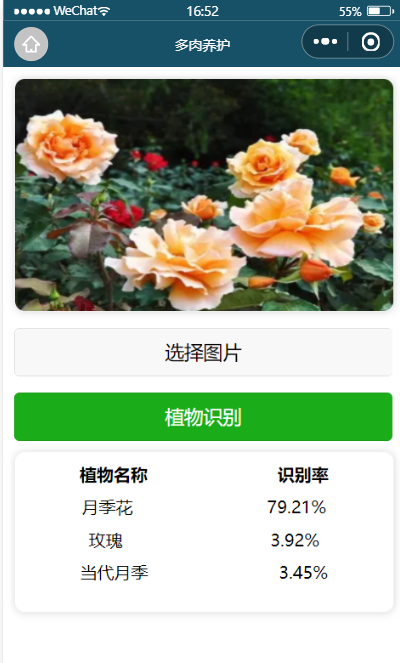
核心代码贴出来给到大家
wxml
<!-- 图片展示 -->
<view class="top-img"><image src="{{image}}"></image>
</view>
<!-- 选择图片及植物识别 -->
<view class="center"><text class="selece-img" wx:if="{{isShow}}">请选择图片!</text><button bindtap="imgSelect">选择图片</button><button type="primary" bindtap="plant">植物识别</button>
</view><!-- 识别结果 -->
<view class="bottom" wx:if="{{result.length != 0}}"><view class="title"><text>植物名称</text><text>识别率</text></view><view class="info" wx:for="{{result}}" wx:key="index"><text>{{item.name}}</text><text>{{item.score}}</text></view>
</view>
wxss
.top-img{margin: 20rpx;width: 95%;height: 440rpx;border:1rpx solid #efefef;border-radius: 20rpx;box-shadow: 1rpx 1rpx 15rpx #ddd;overflow: hidden;}.top-img image{width: 100%;height: 100%;}.center{margin: 20rpx;width: 95%;}.selece-img{font-size: 26rpx ;color:red;}.center button{margin-top: 30rpx;}.bottom{margin: 20rpx;width: 95%;height: 300rpx;border:1rpx solid #efefef;border-radius: 20rpx;box-shadow: 1rpx 1rpx 15rpx #ddd;}.title{display: flex;justify-content: space-around;margin-top: 20rpx;}.title text {font-weight: 700;font-size: 32rpx;}.info{display: flex;justify-content: space-around;margin-top: 20rpx;}
js
const app = getApp()
var that = ''Page({data: {accessToken: "",isShow: false,image: '/images/banner.png',base64Img: '',token: '',result: []},onShow() {// 获取accessTokenvar time = wx.getStorageSync("time")var curTime = new Date().getTime()var timeInt = parseInt(time)var timeNum = parseInt((curTime - timeInt) / (1000 * 60 * 60 * 24))console.log("=======" + timeNum)var accessToken = wx.getStorageSync("access_token")console.log("====accessToken===" + accessToken + "a")// accessToken超过30天过期if (timeNum > 28 || (accessToken == "" ||accessToken == null || accessToken == undefined)) {this.accessTokenFunc()} else {this.setData({accessToken: wx.getStorageSync("access_token")})}},//选择图片按钮imgSelect() {this.setData({isShow: false})wx.chooseImage({count: 1,sizeType: ['original', 'compressed'],sourceType: ['album', 'camera'],success: (res) => {const tempFilePaths = res.tempFilePaths[0]this.getB64ByUrl(tempFilePaths)this.setData({image: tempFilePaths})}})},//图片转为base64getB64ByUrl(url) {wx.getFileSystemManager().readFile({filePath: url,encoding: 'base64',success: (res) => {this.setData({base64Img: res.data})}})},// 获取百度的AccessTokenaccessTokenFunc() {wx.request({url: 'https://aip.baidubce.com/oauth/2.0/token',data: {grant_type: 'client_credentials',client_id: app.globalData.client_id, //应用的API Keyclient_secret: app.globalData.client_secret //应用的Secret Key},header: {'Content-Type': 'application/json' // 默认值},success: res => {this.setData({accessToken: res.data.access_token //获取到token})console.log('获取到的token', this.data.accessToken)wx.setStorageSync("access_token", this.data.accessToken)wx.setStorageSync("time", new Date().getTime())},fail: res => {wx.clearStorageSync("access_token")wx.showToast({icon: 'error',title: '调用失败,请重新尝试',})}})},//植物识别plant() {if (!this.data.base64Img) {this.setData({isShow: true})return}this.getResult()},//获取识别结果getResult() {let that = thiswx.request({// url: 'https://aip.baidubce.com/rest/2.0/image-classify/v1/plant?access_token=' + token,url: 'https://aip.baidubce.com/rest/2.0/image-classify/v1/plant',method: 'POST',data: {access_token: that.data.accessToken,image: this.data.base64Img},header: {'Content-Type': 'application/x-www-form-urlencoded'},success: (res) => {console.log(res);this.setData({result: that.resultFilter(res.data.result)})},complete: () => {wx.hideLoading()}})},//result结果过滤resultFilter(arr) {arr.forEach((item) => {item.score = (item.score.toFixed(4) * 100).toFixed(2) + '%'})return arr},
})