Unity协程那些事儿
- 1、什么是协程?
- 2、协程的使用
- 3、关于yield
- 4、关于IEnumerator/IEnumerable
- 5、从IEnumerator/IEnumerable到yield
- 6、Unity协程机制的实现原理
- 7、源码分析
- 8、总结
1、什么是协程?
用过Unity的应该都知道协程,今天就给大家来讲解下这个简洁又神奇的设计。一般的使用场景就是需要异步执行的时候,比如下载、加载、事件的延时触发等,函数的返回值是IEnumerator类型,开启一个协程只需要调用StartCoroutine即可,之后Unity会在每一次GameLoop的时候调用协程。
官方对协程给出的定义:
A coroutine is a function that is executed partially and, presuming suitable conditions are met, will be resumed at some point in the future until its work is done.
即协程是一个分部执行,遇到条件(yield return 语句)会挂起,直到条件满足才会被唤醒继续执行后面的代码。
稍微形象的解释一下,想象一下,在进行主任务的过程中我们需要一个对资源消耗极大的操作时候,如果在一帧中实现这样的操作,游戏就会变得十分卡顿,这个时候,我们就可以通过协程,在一定帧内完成该工作的处理,同时不影响主任务的进行。
2、协程的使用

首先通过一个迭代器定义一个返回值为IEnumerator的方法,然后再程序中通过StartCoroutine来开启一个协程即可。
在正式开始代码之前,需要了解StartCoroutine的两种重载方式:
StartCoroutine(string methodName):这种是没有参数的情况,直接通过方法名(字符串形式)来开启协程。
StartCoroutine(IEnumerator routine):通过方法形式调用。
StartCoroutine(string methodName,object values):带参数的通过方法名进行调用。
协程开启的方式主要是上面的三种形式,如果你还是不理解,可以查看下面代码:
//通过迭代器定义一个方法
IEnumerator Demo(int i)
{//代码块yield return null; //代码块
}//在程序种调用协程
public void Test()
{//第一种与第二种调用方式,通过方法名与参数调用StartCoroutine("Demo", 1);//第三种调用方式, 通过调用方法直接调用StartCoroutine(Demo(1));
}
在一个协程开始后,同样会对应一个结束协程的方法StopCoroutine与StopAllCoroutines两种方式,但是需要注意的是,两者的使用需要遵循一定的规则,在介绍规则之前,同样介绍一下关于StopCoroutine重载:
StopCoroutine(string methodName):通过方法名(字符串)来进行。
StopCoroutine(IEnumerator routine):通过方法形式来调用。
StopCoroutine(Coroutine routine):通过指定的协程来关闭。
刚刚我们说到他们的使用是有一定的规则的,规则就是前两种结束协程方法的使用上,如果我们是使用StartCoroutine(string methodName)来开启一个协程的,那么结束协程就只能使用StopCoroutine(string methodName)和StopCoroutine(Coroutine routine)来结束协程,需要有一个对应的关系。
为了给大家更直观的感受,直接看一个Demo。
private void Start()
{StartCoroutine(TestEnumerator());
}private IEnumerator TestEnumerator()
{UnityEngine.Debug.Log("wait for 1s");yield return new WaitForSeconds(1f);UnityEngine.Debug.Log("wait for 2s");yield return new WaitForSeconds(2f);UnityEngine.Debug.Log("wait for 3s");yield return new WaitForSeconds(3f);
}
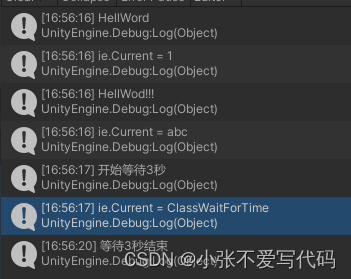
上面的执行结果是:
wait for 1s
等待了一秒
wait for 2s
等待了两秒
wait for 3s
等待了三秒
3、关于yield
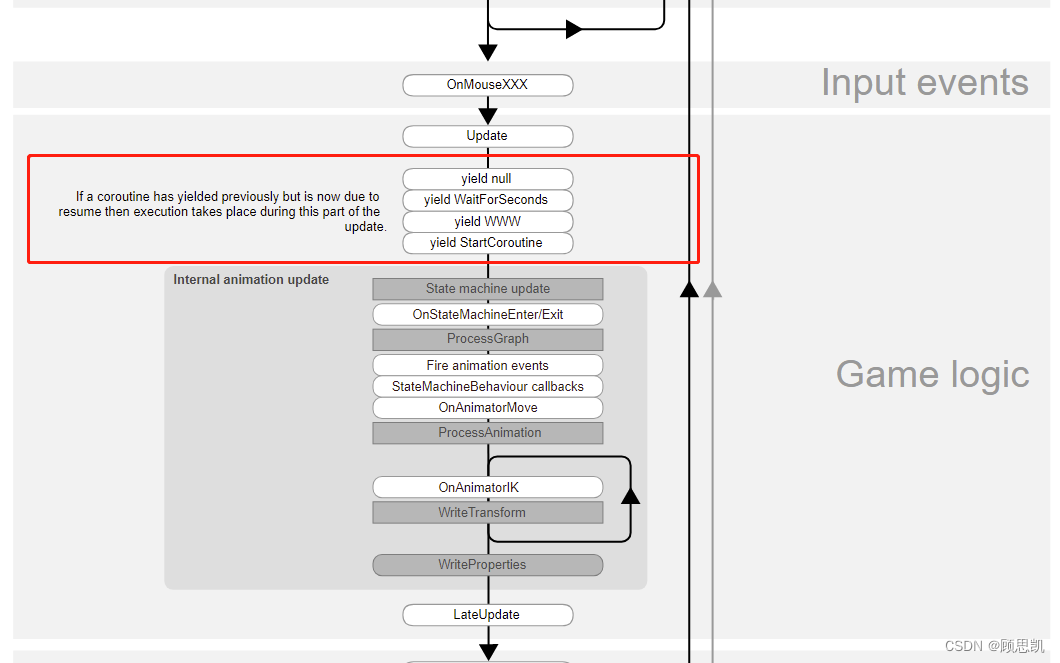
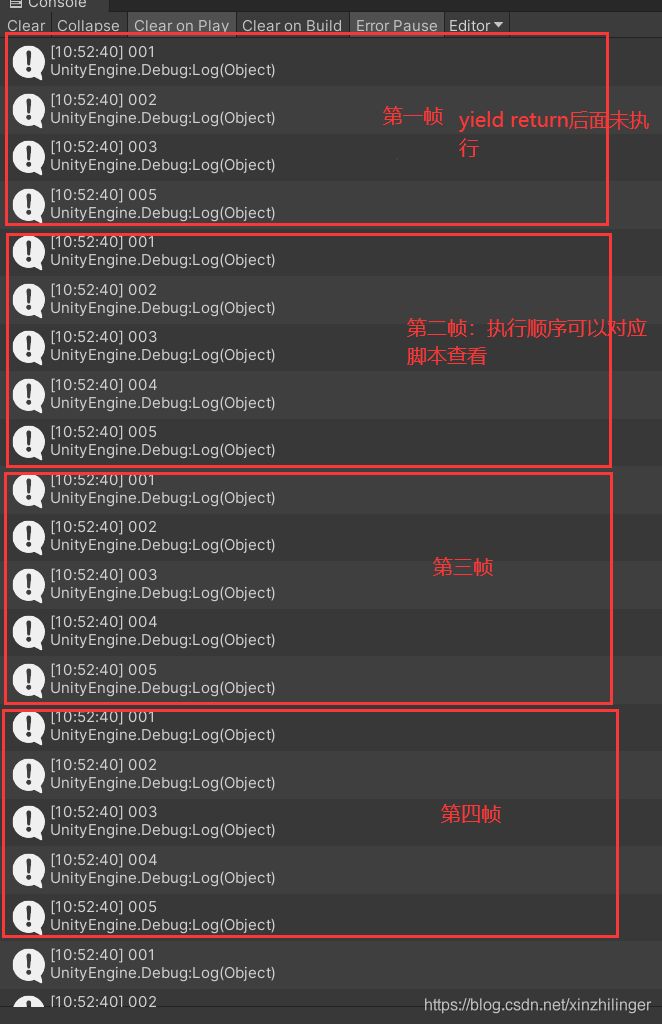
通过这张图可以看出大部分yield位置Update与LateUpdate之间。所以我们可以知道协程的执行时间在每一帧的Update后面,LateUpdate之前。可以自行写下代码,就可清晰知道它们的执行顺序。
再来解释一下位于Update与LateUpdate之间这些yield的含义:
yield return null; 暂停协程等待下一帧继续执行。yield return 0或其他数字; 暂停协程等待下一帧继续执行。yield return new WairForSeconds(时间); 等待规定时间后继续执行。yield return StartCoroutine("协程方法名");开启一个协程(嵌套协程)。
看了上面的Demo细心的各位有没有这样的疑惑。
return前面怎么有个yield关键字。TestEnumerator函数的返回值是IEnumerator类型但是返回的对象并不是该类型。
为了解释这些问题我们先来看下函数的返回值IEnumerator类型的定义:
public interface IEnumerator
{   object Current { get; } bool MoveNext(); void Reset();
}
其实,C#为了简化我们创建枚举器的步骤,你想想看你需要先实现IEnumerator 接口,并且实现 Current、MoveNext、Reset 步骤。C#从2.0开始提供了有yield组成的迭代器块,编译器会自动根据迭代器块创建了枚举器。
用Reflector反编译看看:
[CompilerGenerated]
private sealed class <TestEnumerator>d__1 : IEnumerator<object>, IEnumerator, IDisposable // 继承 IEnumerator
{private int <>1__state;private object <>2__current;public Test <>4__this;[DebuggerHidden]public <TestEnumerator>d__1(int <>1__state){this.<>1__state = <>1__state;}private bool MoveNext(){switch (this.<>1__state){case 0:this.<>1__state = -1;UnityEngine.Debug.Log("wait for 1s");this.<>2__current = new WaitForSeconds(1f); // 重点关注 这个赋值;this.<>1__state = 1;return true;case 1:this.<>1__state = -1;UnityEngine.Debug.Log("wait for 2s");this.<>2__current = new WaitForSeconds(2f);this.<>1__state = 2;return true;case 2:this.<>1__state = -1;UnityEngine.Debug.Log("wait for 3s");this.<>2__current = new WaitForSeconds(3f);this.<>1__state = 3;return true;case 3:this.<>1__state = -1;return false;}return false;}object IEnumerator.Current{[DebuggerHidden]get{return this.<>2__current;}}...
}
从中可以得出:
yield是个语法糖,编译过后的代码看不到yield。- 编译器在内部创建了一个枚举类
<TestEnumerator>d__1。 yield return被声明为枚举时的下一项,即Current属性,通过MoveNext方法来访问结果。
到这里,我想代码“停住”与恢复的神秘面纱终于被揭开了。总结下来就是,以能“停住”的地方为分界线,编译器会为不同分区的语句按照功能逻辑生成一个个对应的代码块。yield语句就是这条分界线,想要代码“停住”,就不执行后面语句对应的代码块,想要代码恢复,就接着执行后面语句对应的代码块。而调度上下文的保存,是通过将需要保存的变量都定义成成员变量来实现的。
4、关于IEnumerator/IEnumerable
首先需要了解协程不是线程,协程依旧是在主线程中进行
然后要知道协程是通过迭代器来实现功能的,通过关键字IEnumerator来定义一个迭代方法,注意使用的是IEnumerator,而不是IEnumerable:
两者之间的区别:
IEnumerator:是一个实现迭代器功能的接口。
IEnumerable:是在IEnumerator基础上的一个封装接口,有一个GetEnumerator()方法返回IEnumerator。
在迭代器中呢,最关键的是yield的使用,这是实现我们协程功能的主要途径,通过该关键方法,可以使得协程的运行暂停、记录下一次启动的时间与位置等等。
5、从IEnumerator/IEnumerable到yield
c#语言中,迭代器特性最常见的莫过于foreach了。foreach能够对一个实现了IEnumerable接口的对象dataSource进行遍历访问其中的元素。
foreach (var item in dataSource)
{Console.WriteLine(item.ToString());
}
foreach的遍历过程可以拆解为:
IEnumerator iterator = dataSource.GetEnumerator();
while (iterator.MoveNext())
{ Console.WriteLine(iterator.ToString());
}
从名字常来看,IEnumerator是枚举器的意思,IEnumerable是可枚举的意思。
了解了两个接口代表的含义后,接着看看源码:
IEnumerator:
public interface IEnumerator
{// Interfaces are not serializable// Advances the enumerator to the next element of the enumeration and// returns a boolean indicating whether an element is available. Upon// creation, an enumerator is conceptually positioned before the first// element of the enumeration, and the first call to MoveNext // brings the first element of the enumeration into view.// bool MoveNext();// Returns the current element of the enumeration. The returned value is// undefined before the first call to MoveNext and following a// call to MoveNext that returned false. Multiple calls to// GetCurrent with no intervening calls to MoveNext // will return the same object.// Object Current {get; }// Resets the enumerator to the beginning of the enumeration, starting over.// The preferred behavior for Reset is to return the exact same enumeration.// This means if you modify the underlying collection then call Reset, your// IEnumerator will be invalid, just as it would have been if you had called// MoveNext or Current.//void Reset();
}
IEnumerable:
public interface IEnumerable
{// Interfaces are not serializable// Returns an IEnumerator for this enumerable Object.  The enumerator provides// a simple way to access all the contents of a collection.[Pure][DispId(-4)]IEnumerator GetEnumerator();
}
发现IEnumerable只有一个GetEnumerator函数,返回值是IEnumerator类型,从注释我们可以得知IEnumerable代表继承此接口的类可以获取一个IEnumerator来实现枚举这个类中包含的集合中的元素的功能(比如List<T>,ArrayList,Dictionary等继承了IEnumeratble接口的类)。
6、Unity协程机制的实现原理
协程是一种比线程更轻量级的存在,协程可完全由用户程序控制调度。协程可以通过yield方式进行调度转移执行权,调度时要能够保存上下文,在调度回来的时候要能够恢复。这是不是和上面“停住”,然后又原位恢复的执行效果很像?没错,Unity实现协程的原理,就是通过yield return生成的IEnumerator再配合控制何时触发MoveNext来实现了执行权的调度。
具体而言,Unity每通过MonoBehaviour.StartCoroutine启动一个协程,就会获得一个IEnumerator(StartCoroutine的参数就是IEnumerator,参数是方法名的重载版本也会通过反射拿到该方法对应的IEnumerator)。并在它的游戏循环中,根据条件判断是否要执行MoveNext方法。而这个条件就是根据IEnumerator的Current属性获得的,即yield return返回的值。
在启动一个协程时,Unity会先调用得到的IEnumerator的MoveNext一次,以拿到IEnumerator的Current值。所以每启动一个协程,协程函数会立即执行到第一个yield return处然后“停住”。
对于不同的Current类型(一般是YieldInstruction的子类),Unity已做好了一些默认处理,比如:
-
如果
Current是null,就相当于什么也不做。在下一次游戏循环中,就会调用MoveNext。所以yield return null就起到了等待一帧的作用; -
如果
Current是WaitForSeconds类型,Unity会获取它的等待时间,每次游戏循环中都会判断时间是否到了,只有时间到了才会调用MoveNext。所以yield return WaitForSeconds就起到了等待指定时间的作用; -
如果
Current是UnityWebRequestAsyncOperation类型,它是AsyncOperation的子类,而AsyncOperation有isDone属性,表示操作是否完成,只有isDone为true时,Unity才会调用MoveNext。对于UnityWebRequestAsyncOperation而言,只有请求完成了,才会将isDone属性设置为true。
7、源码分析
Test.cs(Unity逻辑层):
private void Start()
{StartCoroutine(TestEnumerator());
}
在Unity的逻辑层进入StartCoroutine的定义你会看到如下代码:
namespace UnityEngine
{public class MonoBehaviour : Behaviour{// ...public Coroutine StartCoroutine(IEnumerator routine);public Coroutine StartCoroutine(string methodName);// ...}
}
发现这些代码已经被封装好编译成了.dll文件,如果想看到具体实现可以在git上获取源码(Unity官方公布了中间层的代码,但是还未公布底层C++的代码)。
MonoBehavior.bindings.cs(Unity中间层):
当你下载好中间层的源码后发现,最核心的实现StartCoroutineManaged2竟然是个被extern修饰的外部函数。
extern Coroutine StartCoroutineManaged(string methodName, object value);
extern Coroutine StartCoroutineManaged2(IEnumerator enumerator);public Coroutine StartCoroutine(string methodName)
{object value = null;return StartCoroutine(methodName, value);
}public Coroutine StartCoroutine(IEnumerator routine)
{if (routine == null)throw new NullReferenceException("routine is null");if (!IsObjectMonoBehaviour(this))throw new ArgumentException("Coroutines can only be stopped on a MonoBehaviour");return StartCoroutineManaged2(routine);
}
MonoBehavior.cpp(Unity底层):
通过各种途径的尝试终于获得了Unity的底层源码 (o)/,这里因为版权问题大家还是自行从网络渠道获取吧。
MonoBehaviour::StartCoroutineManaged2(ScriptingObjectPtr enumerator)
{Coroutine* coroutine = CreateCoroutine(enumerator, SCRIPTING_NULL);return 封装过的Coroutine对象;
}Coroutine* MonoBehaviour::CreateCoroutine(ScriptingObjectPtr userCoroutine, ScriptingMethodPtr method)
{获取moveNext;获取current;Coroutine* coroutine = new Coroutine ();初始化coroutine对象;    //这个时候就会把moveNext和current传递给coroutine对象m_ActiveCoroutines.push_back (*coroutine);m_ActiveCoroutines.back ().Run ();// ...return coroutine;
}
Coroutine.cpp(Unity底层):
void Coroutine::Run ()
{// - Call MoveNext (处理迭代器块的逻辑直到遇到yield return)// - Call Current (返回一个条件,何时可以执行下一个moveNext)//根据IEnumerator的特性,首先得调用下MoveNext,这样current就被赋值了bool keepLooping = InvokeMoveNext(&exception);    ProcessCoroutineCurrent();
}void Coroutine::ProcessCoroutineCurrent()
{//调用Current,并从中取出yield return的返回对象monoWaitScriptingInvocation invocation(m_Current);...ScriptingObjectPtr monoWait = invocation.Invoke(&exception);//yield return nullif (monoWait == SCRIPTING_NULL){...//wait的时间就是0,相当于等一帧CallDelayed (ContinueCoroutine, m_Behaviour, 0.0F, this, 0.0F, CleanupCoroutine, DelayedCallManager::kRunDynamicFrameRate | DelayedCallManager::kWaitForNextFrame);return;}HandleIEnumerableCurrentReturnValue(monoWait);
}void Coroutine::HandleIEnumerableCurrentReturnValue(ScriptingObjectPtr monoWait)
{ScriptingClassPtr waitClass = scripting_object_get_class (monoWait, GetScriptingTypeRegistry());const CommonScriptingClasses& classes = GetMonoManager ().GetCommonClasses ();//yield return new WaitForSeconds()if (scripting_class_is_subclass_of (waitClass, classes.waitForSeconds)){float wait;通过monoWait获取需要wait的时间;CallDelayed(ContinueCoroutine, m_Behaviour, wait, this, 0.0F, CleanupCoroutine, DelayedCallManager::kRunDynamicFrameRate | DelayedCallManager::kWaitForNextFrame);return;  }//yield reuturn new WaitForFixedUpdate()if (scripting_class_is_subclass_of (waitClass, classes.waitForFixedUpdate)){CallDelayed (ContinueCoroutine, m_Behaviour, 0.0F, this, 0.0F, CleanupCoroutine, DelayedCallManager::kRunFixedFrameRate);return;  }//yield return new WaitForEndOfFrame()if (scripting_class_is_subclass_of (waitClass, classes.waitForEndOfFrame)){CallDelayed (ContinueCoroutine, m_Behaviour, 0.0F, this, 0.0F, CleanupCoroutine, DelayedCallManager::kEndOfFrame);return;  }//yield return 另一个协程if (scripting_class_is_subclass_of (waitClass, classes.coroutine)){Coroutine* waitForCoroutine;...if(waitForCoroutine->m_DoneRunning){ContinueCoroutine(m_Behavoir, this);return;}...return;  }//yield return wwwif (scripting_class_is_subclass_of (waitClass, classes.www)){WWW* wwwPtr;if(wwwPtr != NULL){//WWW类型比较特殊它本身做了类似的处理,它提供了一个方法CallWhenDone,当它完成的时候直接回调Coroutine。wwwPtr->CallWhenDone(ContinueCoroutine, m_Behaviour, this, CleanupCoroutine);}return;  }
}void Coroutine::ContinueCoroutine (Object* o, void* userData)
{Coroutine* coroutine = (Coroutine*)userData;if((Object*)coroutine->m_Behaviour != o){...reutrn;}coroutine->Run();
}
CallDelayed.cpp(Unity底层):
//这个枚举型就是下面用到的mode
enum  {kRunFixedFrameRate = 1 << 0,kRunDynamicFrameRate = 1 << 1,kRunStartupFrame = 1 << 2,kWaitForNextFrame = 1 << 3,kAfterLoadingCompleted = 1 << 4,kEndOfFrame = 1 << 5
};void CallDelayed (DelayedCall *func, PPtr<Object> o, float time, void* userData, float repeatRate, CleanupUserData* cleanup, int mode)
{DelayedCallManager::Callback callback;callback.time = time + GetCurTime ();callback.userData = userData;callback.call = func;callback.cleanup = cleanup;callback.object = o;callback.mode = mode;...//将callback保存在DelayedCallManager的Callback List中GetDelayedCallManager ().m_CallObjects.insert (callback);
}void DelayedCallManager::Update (int modeMask)
{float time = GetCurTime();Container::iterator i = m_CallObjects.begin ();while (i !=  m_CallObjects.end () && i->time <= time){m_NextIterator = i;	m_NextIterator++;Callback &cb = const_cast<Callback&> (*i);// - 确保modeMask匹配// - 不执行那些在DelayedCallManager::Update中被添加进来的delayed callsif((cb.mode & modeMask) && cb.timeStamp != m_TimeStamp && cb.frame <= frame){void* userData = cb.userData;DelayedCall* callback = cb.call;if (!cb.repeat){从callback列表中移除即将被执行的callback;callback (o, userData);    //执行callback清除userData;}else{//增加时间后并重新插入callback列表中cb.time += cb.repeatRate;...m_CallObjects.insert (cb);从callback列表中移除即将被执行的callback;callback (o, userData);    //执行callback}}i = m_NextIterator;}
}
详细的流程分析:
- C#层调用
StartCoroutine方法,将IEnumerator对象(或者是用于创建IEnumerator对象的方法名字符串)传入C++层。 - 通过
mono的反射功能,找到IEnuerator上的moveNext、current两个方法,然后创建出一个对应的Coroutine对象,把两个方法传递给这个Coroutine对象。 - 创建好之后这个
Coroutine对象会保存在MonoBehaviour一个成员变量List中,这样使得MonoBehaviour具备StopCoroutine功能,StopCoroutine能够找到对应Coroutine并停止。 - 调用这个
Coroutine对象的Run方法。 - 在
Coroutine.Run中,然后调用一次MoveNext。如果MoveNext返回false,表示Coroutine执行结束,进入清理流程;如果返回true,表示Coroutine执行到了一句yield return处,这时就需要调用invocation(m_Current).Invoke取出yield return返回的对象monoWait,再根据monoWait的具体类型(null、WaitForSeconds、WaitForFixedUpdate等),将Coroutine对象保存到DelayedCallManager的callback列表m_CallObjects中。 - 至此,
Coroutine在当前帧的执行即结束。 - 之后游戏运行过程中,游戏主循环的
PlayerLoop方法会在每帧的不同时间点以不同的modeMask调用DelayedCallManager.Update方法,Update方法中会遍历callback列表中的Coroutine对象,如果某个Coroutine对象的monoWait的执行条件满足,则将其从callback列表中取出,执行这个Coroutine对象的Run方法,回到之前的执行流程中。
至此,Coroutine的整体流程已经分析完毕,实现原理已经很明朗了。
8、总结
1、协程只是看起来像多线程一样,其实还是在主线程上执行。
2、协程只是个伪异步,内部的死循环依旧会导致应用卡死。
3、yield是C#的语法糖,和Unity没有关系。
4、避免使用字符串的版本开启一个协程,字符串的版本在运行时要用mono的反射做更多参数检查、函数查询工作,带来性能损失。
Unity的协程是和MonoBehavior进行了绑定的,只能通过MonoBehavior.StartCoroutine开启协程,而在开发中,有些不是继承MonoBehavior的类就无法使用协程了,在这种情况下我们可以自己封装一套协程。在搞清楚Unity协程的实现原理后,想必实现自己的协程也不是难事了,感兴趣的同学赶快行动起来吧。
[参考]
https://www.cnblogs.com/iwiniwin/p/14878498.html
https://sunweizhe.cn/2020/05/08/深入剖析Unity协程的实现原理