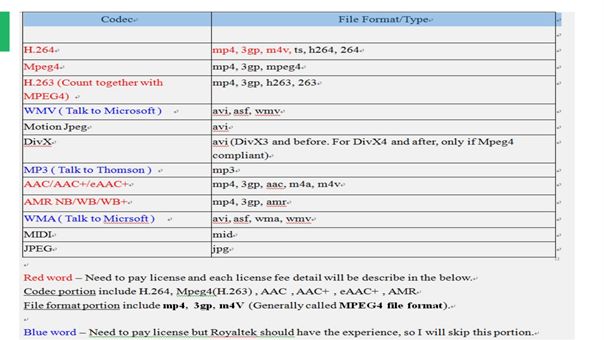
1.简介
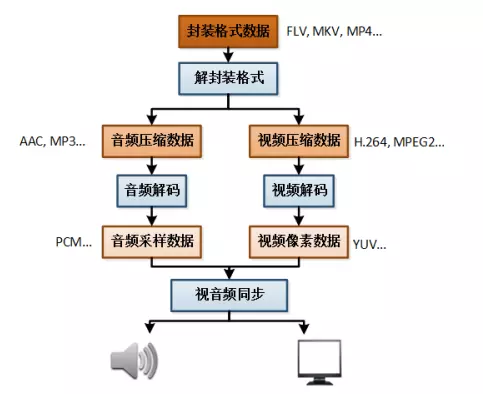
解码音频数据,如下图所示,把MP3或者AAC数据解码成原始的数据pcm。
2.流程
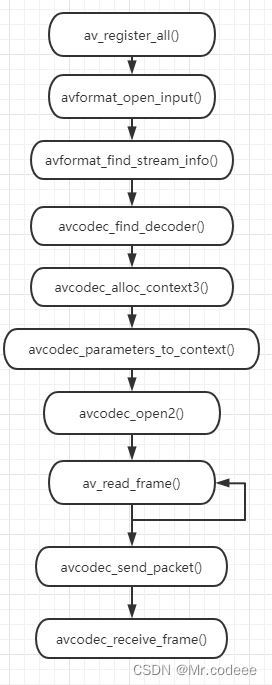
2.1在使用FFmpeg API之前,需要先注册API,然后才能使用API。当然,新版本的库不需要再调用下面的方法。
av_register_all()2.2 构建输入AVFormatContext声明输入的封装结构体,通过输入文件或者流地址作为封装结构的句柄。
AVFormatContext* ifmt_ctx = NULL;const char* inputUrl = "test.mp4";///打开输入的流int ret = avformat_open_input(&ifmt_ctx, inputUrl, NULL, NULL);if (ret != 0){printf("Couldn't open input stream.\n");return -1;}
2.3查找音频流信息,通过下面的接口与AVFormatContext中建立输入文件对应的流信息。
//查找;if (avformat_find_stream_info(inputFmtCtx, NULL) < 0){printf("Couldn't find stream information.\n");return -1;}2.4查找解码器
先找到音频流索引,找到音频流,根据音频流的codec_id找到解码器。
//找到音频流索引int audio_index = av_find_best_stream(ifmt_ctx, AVMEDIA_TYPE_AUDIO, -1, -1, NULL, 0);AVStream* st = ifmt_ctx->streams[audio_index];AVCodec* codec = nullptr;//找到解码器codec = avcodec_find_decoder(st->codecpar->codec_id);if (!codec){fprintf(stderr, "Codec not found\n");exit(1);}2.5申请AVCodecContenxt
//申请AVCodecContextAVCodecContext* codec_ctx = nullptr;codec_ctx = avcodec_alloc_context3(codec);if (!codec_ctx){exit(1);}2.6同步AVCodecParameters
avcodec_parameters_to_context(codec_ctx, ifmt_ctx->streams[audio_index]->codecpar);2.7打开解码器
//打开解码器if ((ret = avcodec_open2(codec_ctx, codec, NULL) < 0)){return -1;}2.8然后通过while循环,不停的读取数据,解码。
av_read_frame(ifmt_ctx, pkt)avcodec_send_packet(codec_ctx, pkt);avcodec_receive_frame(codec_ctx, frame);3.源码
演示输入一个flv文件,保存解码后的pcm数据。
#include "pch.h"
#include <iostream>extern "C"
{
#include "libavformat/avformat.h"
#include "libavutil/dict.h"
#include "libavutil/opt.h"
#include "libavutil/timestamp.h"
#include "libswscale/swscale.h"
#include "libswresample/swresample.h"
#include "libavutil/imgutils.h"
};int main()
{//av_register_all();avformat_network_init();AVFormatContext* ifmt_ctx = NULL;const char* inputUrl = "out.flv";///打开输入的流int ret = avformat_open_input(&ifmt_ctx, inputUrl, NULL, NULL);if (ret != 0){printf("Couldn't open input stream.\n");return -1;}//查找流信息if (avformat_find_stream_info(ifmt_ctx, NULL) < 0){printf("Couldn't find stream information.\n");return -1;}//找到音频流索引int audio_index =  av_find_best_stream(ifmt_ctx, AVMEDIA_TYPE_AUDIO, -1, -1, NULL, 0);AVStream* st = ifmt_ctx->streams[audio_index];AVCodec* codec = nullptr;//找到解码器codec = avcodec_find_decoder(st->codecpar->codec_id);if (!codec){fprintf(stderr, "Codec not found\n");exit(1);}//申请AVCodecContextAVCodecContext* codec_ctx = nullptr;codec_ctx = avcodec_alloc_context3(codec);if (!codec_ctx){exit(1);}avcodec_parameters_to_context(codec_ctx, ifmt_ctx->streams[audio_index]->codecpar);//打开解码器if ((ret = avcodec_open2(codec_ctx, codec, NULL) < 0)){return -1;}AVPacket* pkt = av_packet_alloc();//av_init_packet(pkt);AVFrame *frame = av_frame_alloc();char fileName[20] = "test.pcm";FILE* f;f = fopen(fileName, "wb");while (av_read_frame(ifmt_ctx, pkt) >= 0){if (pkt->stream_index == audio_index){int ret = avcodec_send_packet(codec_ctx, pkt);if (ret >= 0){ret = avcodec_receive_frame(codec_ctx, frame);if (ret == AVERROR(EAGAIN) || ret == AVERROR_EOF){break;}else if (ret < 0){break;}int data_size = av_get_bytes_per_sample(codec_ctx->sample_fmt);if (data_size < 0) {continue;}for (int i = 0; i < frame->nb_samples; i++){for (int ch = 0; ch < codec_ctx->channels; ch++){fwrite(frame->data[ch] + data_size * i, 1, data_size, f);}}}}}fclose(f);avcodec_close(codec_ctx);avcodec_free_context(&codec_ctx);avformat_close_input(&ifmt_ctx);av_frame_free(&frame);av_packet_free(&pkt);return 0;
}
4.pcm数据工具,用于播放pcm文件
pcm工具pcm工具pcm工具-C++文档类资源-CSDN下载
5.查看解码前的音频数据
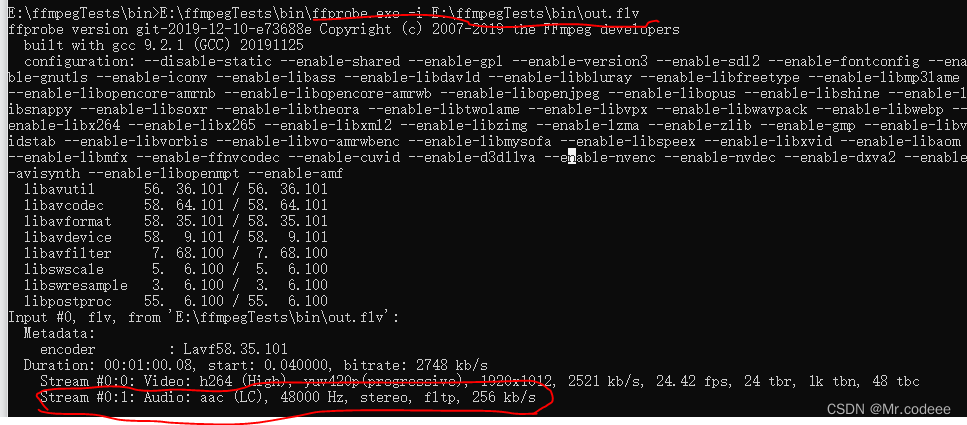
可以看见解码前 :采样率是48000HZ,双声道,fltp格式。
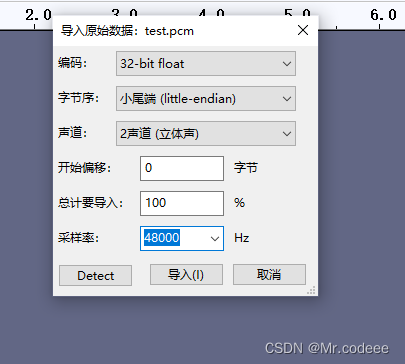
使用pcm工具播放 保存好的pcm文件。

选择导入原始数据,设置参数跟上面一样,点击播放就行了,如果数据正确,跟解码前听到的音频是一致的。
6.一些命令使用
6.1从视频文件中分离出MP3文件
ffmpeg -i out.flv -acodec libmp3lame output.mp3
6.2查看文件信息
ffprobe.exe -i out.flv