快速使用DL4J
- 一、新建Maven项目
- 二、配置依赖
- 三、测试
一、新建Maven项目
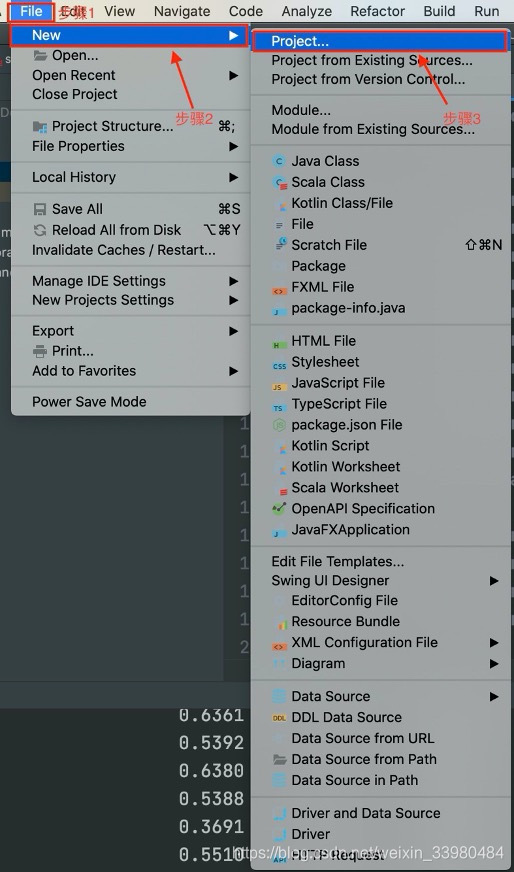
1、打开IDEA后,步骤为:“File -> New -> Project”
2、选择Maven,然后选择已安装好的的JDK。另外,关于Add Archetype在下面。

Archetype我们可以理解为项目模型或者项目的骨架,能够通过它生成某一种项目的通用文件布局,此处我们选择较为常用的maven-archetype-quickStart。当然,也可以选择其他的,或者不选都是可以的。

3、进行Maven项目的重命名。

4、选择Maven的坐标,这里,我们选择本地的maven,选择maven的配置文件路径及本地maven仓库路径,选择完成后,点击“Finish”完成创建。

至此,Maven项目基本创建完毕,接下来,是最简单也是最重要的一步。
二、配置依赖
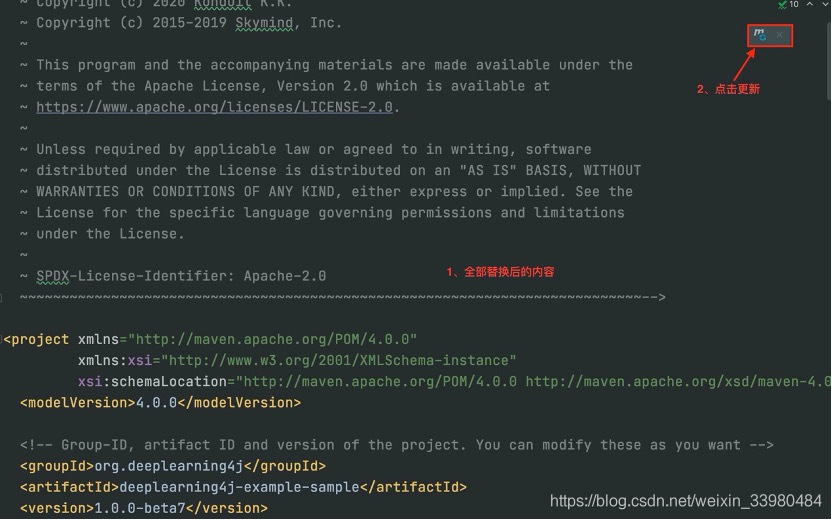
修改“pom.xml”文件,添加DL4J依赖。直接用以下内容全部替换原Maven项目中的“pom.xml”文件中的内容,点击更新即可。也可从此处进行复制替换:link
<?xml version="1.0" encoding="UTF-8"?>
<!--~~~~~~~~~~~~~~~~~~~~~~~~~~~~~~~~~~~~~~~~~~~~~~~~~~~~~~~~~~~~~~~~~~~~~~~~~~~~~ Copyright (c) 2020 Konduit K.K.~ Copyright (c) 2015-2019 Skymind, Inc.~~ This program and the accompanying materials are made available under the~ terms of the Apache License, Version 2.0 which is available at~ https://www.apache.org/licenses/LICENSE-2.0.~~ Unless required by applicable law or agreed to in writing, software~ distributed under the License is distributed on an "AS IS" BASIS, WITHOUT~ WARRANTIES OR CONDITIONS OF ANY KIND, either express or implied. See the~ License for the specific language governing permissions and limitations~ under the License.~~ SPDX-License-Identifier: Apache-2.0~~~~~~~~~~~~~~~~~~~~~~~~~~~~~~~~~~~~~~~~~~~~~~~~~~~~~~~~~~~~~~~~~~~~~~~~~~~--><project xmlns="http://maven.apache.org/POM/4.0.0"xmlns:xsi="http://www.w3.org/2001/XMLSchema-instance"xsi:schemaLocation="http://maven.apache.org/POM/4.0.0 http://maven.apache.org/xsd/maven-4.0.0.xsd"><modelVersion>4.0.0</modelVersion><!-- Group-ID, artifact ID and version of the project. You can modify these as you want --><groupId>org.deeplearning4j</groupId><artifactId>deeplearning4j-example-sample</artifactId><version>1.0.0-beta7</version><!-- Properties Section. Change ND4J versions here, if required --><properties><dl4j-master.version>1.0.0-beta7</dl4j-master.version><logback.version>1.2.3</logback.version><java.version>1.8</java.version><maven-shade-plugin.version>2.4.3</maven-shade-plugin.version><project.build.sourceEncoding>UTF-8</project.build.sourceEncoding></properties><dependencies><!-- deeplearning4j-core: contains main functionality and neural networks --><dependency><groupId>org.deeplearning4j</groupId><artifactId>deeplearning4j-core</artifactId><version>${dl4j-master.version}</version></dependency><!--ND4J backend: every project needs one of these. The backend defines the hardware on which network trainingwill occur. "nd4j-native-platform" is for CPUs only (for running on all operating systems).--><dependency><groupId>org.nd4j</groupId><artifactId>nd4j-native</artifactId><version>${dl4j-master.version}</version></dependency><!-- CUDA: to use GPU for training (CUDA) instead of CPU, uncomment this, and remove nd4j-native-platform --><!-- Requires CUDA to be installed to use. Change the version (8.0, 9.0, 9.1) to change the CUDA version --><!--<dependency><groupId>org.nd4j</groupId><artifactId>nd4j-cuda-9.2-platform</artifactId><version>${dl4j-master.version}</version></dependency>--><!-- Optional, but recommended: if you use CUDA, also use CuDNN. To use this, CuDNN must also be installed --><!-- See: https://deeplearning4j.konduit.ai/config/backends/config-cudnn#using-deeplearning-4-j-with-cudnn --><!--<dependency><groupId>org.deeplearning4j</groupId><artifactId>deeplearning4j-cuda-9.2</artifactId><version>${dl4j-master.version}</version></dependency>--><dependency><groupId>ch.qos.logback</groupId><artifactId>logback-classic</artifactId><version>${logback.version}</version></dependency></dependencies><build><plugins><!-- Maven compiler plugin: compile for Java 8 --><plugin><groupId>org.apache.maven.plugins</groupId><artifactId>maven-compiler-plugin</artifactId><version>3.5.1</version><configuration><source>${java.version}</source><target>${java.version}</target></configuration></plugin><!--Maven shade plugin configuration: this is required so that if you build a single JAR file (an "uber-jar")it will contain all the required native libraries, and the backends will work correctly.Used for example when running the following commantsmvn packagecd targetjava -cp deeplearning4j-examples-1.0.0-beta-bin.jar org.deeplearning4j.LenetMnistExample--><plugin><groupId>org.apache.maven.plugins</groupId><artifactId>maven-shade-plugin</artifactId><version>${maven-shade-plugin.version}</version><configuration><shadedArtifactAttached>true</shadedArtifactAttached><shadedClassifierName>bin</shadedClassifierName><createDependencyReducedPom>true</createDependencyReducedPom><filters><filter><artifact>*:*</artifact><excludes><exclude>org/datanucleus/**</exclude><exclude>META-INF/*.SF</exclude><exclude>META-INF/*.DSA</exclude><exclude>META-INF/*.RSA</exclude></excludes></filter></filters></configuration><executions><execution><phase>package</phase><goals><goal>shade</goal></goals><configuration><transformers><transformer implementation="org.apache.maven.plugins.shade.resource.AppendingTransformer"><resource>reference.conf</resource></transformer><transformer implementation="org.apache.maven.plugins.shade.resource.ServicesResourceTransformer"/><transformer implementation="org.apache.maven.plugins.shade.resource.ManifestResourceTransformer"></transformer></transformers></configuration></execution></executions></plugin></plugins></build></project>
替换后内容如下图所示,并且点击右上角的更新按钮,进行更新。最后,等待1分钟左右即可。
三、测试
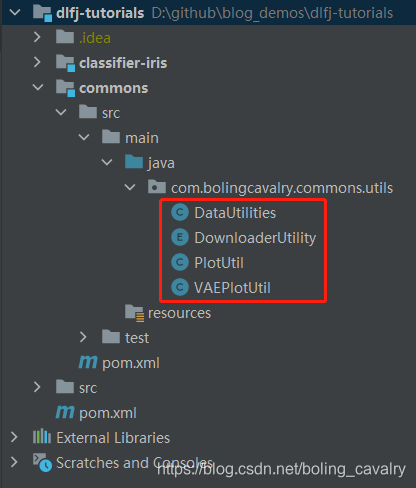
这里我们使用官方提供的MINIST案例进行测试,注意修改包名与类名(如果不是按照本教程设置的名称的话,需要根据自己所写的实际名称进行修改),另外项目结构如下。还有,我们需要删除“test”文件夹下“AppTest.java”文件中的内容,否则运行时会出错,因为,依赖有变化。

代码如下:
```java
/* ****************************************************************************** Copyright (c) 2020 Konduit K.K.* Copyright (c) 2015-2019 Skymind, Inc.** This program and the accompanying materials are made available under the* terms of the Apache License, Version 2.0 which is available at* https://www.apache.org/licenses/LICENSE-2.0.** Unless required by applicable law or agreed to in writing, software* distributed under the License is distributed on an "AS IS" BASIS, WITHOUT* WARRANTIES OR CONDITIONS OF ANY KIND, either express or implied. See the* License for the specific language governing permissions and limitations* under the License.** SPDX-License-Identifier: Apache-2.0******************************************************************************/
package org.example;import org.apache.commons.io.FilenameUtils;
import org.deeplearning4j.datasets.iterator.impl.MnistDataSetIterator;
import org.deeplearning4j.nn.conf.MultiLayerConfiguration;
import org.deeplearning4j.nn.conf.NeuralNetConfiguration;
import org.deeplearning4j.nn.conf.inputs.InputType;
import org.deeplearning4j.nn.conf.layers.*;
import org.deeplearning4j.nn.multilayer.MultiLayerNetwork;
import org.deeplearning4j.nn.weights.WeightInit;
import org.deeplearning4j.optimize.api.InvocationType;
import org.deeplearning4j.optimize.listeners.EvaluativeListener;
import org.deeplearning4j.optimize.listeners.ScoreIterationListener;
import org.nd4j.linalg.activations.Activation;
import org.nd4j.linalg.dataset.api.iterator.DataSetIterator;
import org.nd4j.linalg.learning.config.Adam;
import org.nd4j.linalg.lossfunctions.LossFunctions;
import org.slf4j.Logger;
import org.slf4j.LoggerFactory;import java.io.File;/*** Created by agibsonccc on 9/16/15.*/
public class App {private static final Logger log = LoggerFactory.getLogger(String.class);public static void main(String[] args) throws Exception {int nChannels = 1; // Number of input channelsint outputNum = 10; // The number of possible outcomesint batchSize = 64; // Test batch sizeint nEpochs = 1; // Number of training epochsint seed = 123; ///*Create an iterator using the batch size for one iteration*/log.info("Load data....");DataSetIterator mnistTrain = new MnistDataSetIterator(batchSize,true,12345);DataSetIterator mnistTest = new MnistDataSetIterator(batchSize,false,12345);/*Construct the neural network*/log.info("Build model....");MultiLayerConfiguration conf = new NeuralNetConfiguration.Builder().seed(seed).l2(0.0005).weightInit(WeightInit.XAVIER).updater(new Adam(1e-3)).list().layer(new ConvolutionLayer.Builder(5, 5)//nIn and nOut specify depth. nIn here is the nChannels and nOut is the number of filters to be applied.nIn(nChannels).stride(1,1).nOut(20).activation(Activation.IDENTITY).build()).layer(new SubsamplingLayer.Builder(PoolingType.MAX).kernelSize(2,2).stride(2,2).build()).layer(new ConvolutionLayer.Builder(5, 5)//Note that nIn need not be specified in later layers.stride(1,1).nOut(50).activation(Activation.IDENTITY).build()).layer(new SubsamplingLayer.Builder(PoolingType.MAX).kernelSize(2,2).stride(2,2).build()).layer(new DenseLayer.Builder().activation(Activation.RELU).nOut(500).build()).layer(new OutputLayer.Builder(LossFunctions.LossFunction.NEGATIVELOGLIKELIHOOD).nOut(outputNum).activation(Activation.SOFTMAX).build()).setInputType(InputType.convolutionalFlat(28,28,1)) //See note below.build();/*Regarding the .setInputType(InputType.convolutionalFlat(28,28,1)) line: This does a few things.(a) It adds preprocessors, which handle things like the transition between the convolutional/subsampling layersand the dense layer(b) Does some additional configuration validation(c) Where necessary, sets the nIn (number of input neurons, or input depth in the case of CNNs) values for eachlayer based on the size of the previous layer (but it won't override values manually set by the user)InputTypes can be used with other layer types too (RNNs, MLPs etc) not just CNNs.For normal images (when using ImageRecordReader) use InputType.convolutional(height,width,depth).MNIST record reader is a special case, that outputs 28x28 pixel grayscale (nChannels=1) images, in a "flattened"row vector format (i.e., 1x784 vectors), hence the "convolutionalFlat" input type used here.*/MultiLayerNetwork model = new MultiLayerNetwork(conf);model.init();log.info("Train model...");model.setListeners(new ScoreIterationListener(10), new EvaluativeListener(mnistTest, 1, InvocationType.EPOCH_END)); //Print score every 10 iterations and evaluate on test set every epochmodel.fit(mnistTrain, nEpochs);String path = FilenameUtils.concat(System.getProperty("java.io.tmpdir"), "lenetmnist.zip");log.info("Saving model to tmp folder: "+path);model.save(new File(path), true);log.info("****************Example finished********************"); }
}
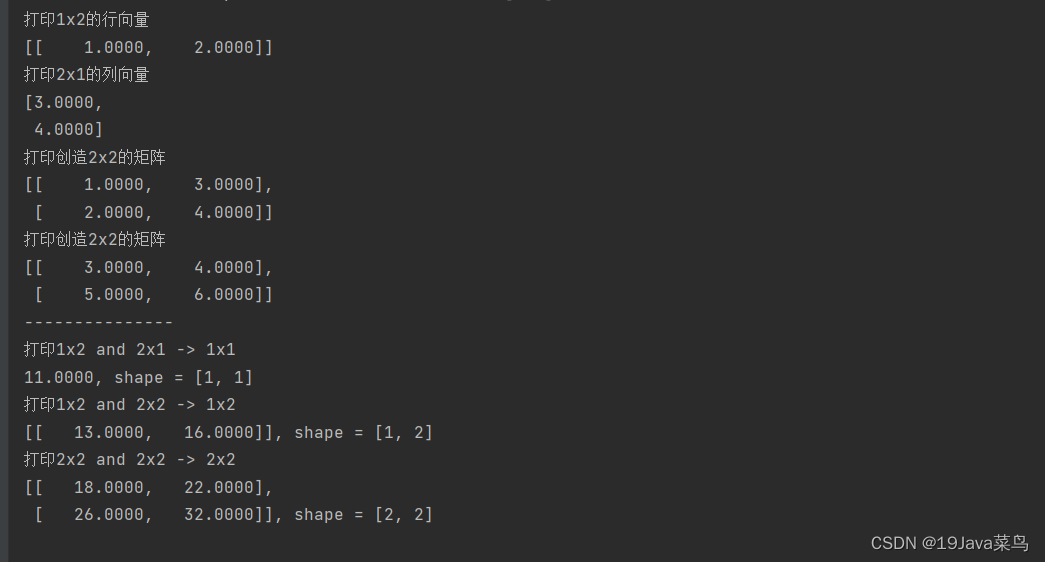
部分代码截图:

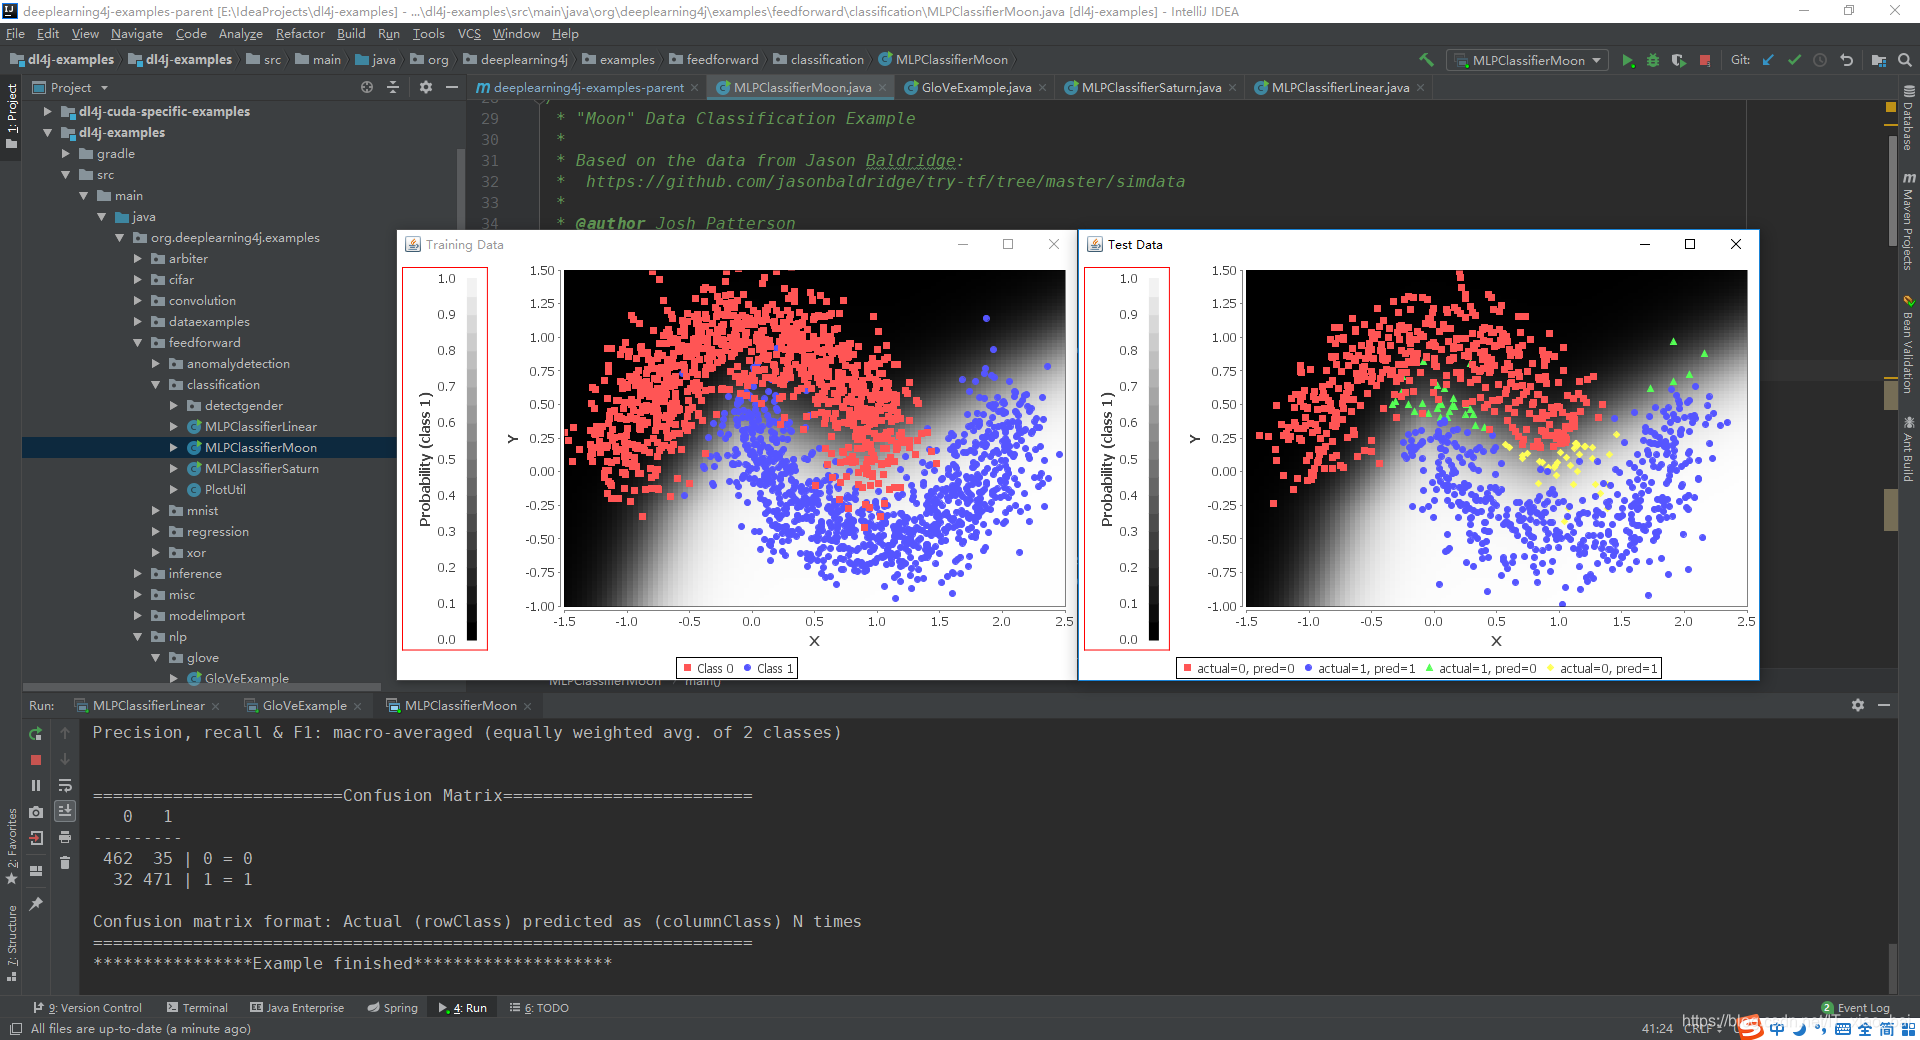
最终,运行程序,输出结果如下,则说明我们创建成功啦,恭喜,恭喜。

![[Deeplearning4j应用教程00]_DL4J技术介绍](https://img-blog.csdnimg.cn/2020122114355010.png?x-oss-process=image/watermark,type_ZmFuZ3poZW5naGVpdGk,shadow_10,text_aHR0cHM6Ly9ibG9nLmNzZG4ubmV0L3dlaXhpbl8zMzk4MDQ4NA==,size_16,color_FFFFFF,t_70)
![[Deeplearning4j应用教程04]_基于DL4J的神经网络实现](https://img-blog.csdnimg.cn/20210111154905659.jpg?x-oss-process=image/watermark,type_ZmFuZ3poZW5naGVpdGk,shadow_10,text_aHR0cHM6Ly9ibG9nLmNzZG4ubmV0L3dlaXhpbl8zMzk4MDQ4NA==,size_16,color_FFFFFF,t_70)


![[Deeplearning4j应用教程02]_DL4J环境搭建教程-Windows版](https://img-blog.csdnimg.cn/20210105162407912.jpeg?x-oss-process=image/watermark,type_ZmFuZ3poZW5naGVpdGk,shadow_10,text_aHR0cHM6Ly9ibG9nLmNzZG4ubmV0L3dlaXhpbl8zMzk4MDQ4NA==,size_16,color_FFFFFF,t_70)