背景:我们需要降低YOLOv2-tiny的参数量和存储量,以便硬件实现。
目的:更改YOLO结构,去掉后面的两层卷积层,降低参数量和运算量。
相关文章:
YOLOv3:Darknet代码解析(一)安装Darknet
YOLOv3:Darknet代码解析(二)代码初步
YOLOv3:Darknet代码解析(三)卷积操作
YOLOv3:Darknet代码解析(四)结构更改与训练
YOLOv3:Darknet代码解析(五)权重与特征存储
YOLOv3:Darknet代码解析(六)简化的程序与卷积拆分
目录
一、更改后的结构
二、训练VOC数据集与COCO数据集
2.1 训练VOC数据集
2.1.1 获得Pascal VOC Data
2.1.2 Generate Labels for VOC
2.1.3 Modify Cfg for Pascal Data
2.1.4 Download Pretrained Convolutional Weights
2.1.5 Train The Model
2.2 Training YOLO on COCO
2.2.1 Get The COCO Data
2.2.2 Modify cfg for COCO
2.2.3 Train The Model
三、在我们的数据集上训练
3.1 用到的一些linux指令
3.1.1 pwd 显示路径
3.1.2 cp复制指令
3.1.3 vi指令,显示文档
3.1.4 重复上条指令
3.2 数据集与cfg
3.3 训练
3.3.1数据集准备
3.3.2 训练
3.3.3 测试
一、更改后的结构
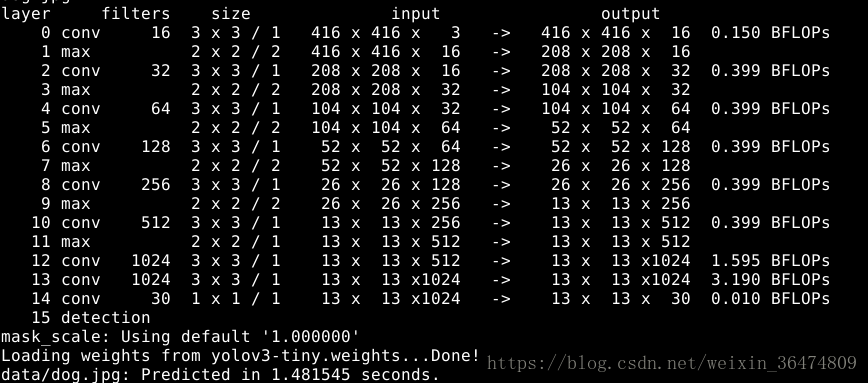
鉴于Yolov2结构相对简单,只有conv和pool。所以直接去掉后面两层卷积,并把最后一层的filter的个数减少为30个。相应的head-hw-v2.cfg文件如下。
[net]
# Testing
#batch=1
#subdivisions=1
# Training
batch=64
subdivisions=8
width=416
height=416
channels=3
momentum=0.9
decay=0.0005
angle=0
saturation = 1.5
exposure = 1.5
hue=.1learning_rate=0.001
max_batches = 40200
policy=steps
steps=-1,100,20000,30000
scales=.1,10,.1,.1[convolutional]
batch_normalize=1
filters=16
size=3
stride=1
pad=1
activation=leaky[maxpool]
size=2
stride=2[convolutional]
batch_normalize=1
filters=32
size=3
stride=1
pad=1
activation=leaky[maxpool]
size=2
stride=2[convolutional]
batch_normalize=1
filters=64
size=3
stride=1
pad=1
activation=leaky[maxpool]
size=2
stride=2[convolutional]
batch_normalize=1
filters=128
size=3
stride=1
pad=1
activation=leaky[maxpool]
size=2
stride=2[convolutional]
batch_normalize=1
filters=256
size=3
stride=1
pad=1
activation=leaky[maxpool]
size=2
stride=2[convolutional]
batch_normalize=1
filters=512
size=3
stride=1
pad=1
activation=leaky[maxpool]
size=2
stride=1[convolutional]
batch_normalize=1
filters=1024
size=3
stride=1
pad=1
activation=leaky###########[convolutional]
batch_normalize=1
size=3
stride=1
pad=1
filters=1024
activation=leaky[convolutional]
size=1
stride=1
pad=1
filters=30
activation=linear[region]
anchors = 1.08,1.19,  3.42,4.41,  6.63,11.38,  9.42,5.11,  16.62,10.52
bias_match=1
classes=1
coords=4
num=5
softmax=1
jitter=.2
rescore=1object_scale=5
noobject_scale=1
class_scale=1
coord_scale=1absolute=1
thresh = .6
random=1
更改结构时注意尽量用mousepad,其他编辑工具容易编辑不当,运行时容易报错。
二、训练VOC数据集与COCO数据集
2.1 训练VOC数据集
2.1.1 获得Pascal VOC Data
训练YOLO需要2007到2012年的VOC data。 You can find links to the data here. To get all the data, make a directory to store it all and from that directory run:
wget https://pjreddie.com/media/files/VOCtrainval_11-May-2012.tar
wget https://pjreddie.com/media/files/VOCtrainval_06-Nov-2007.tar
wget https://pjreddie.com/media/files/VOCtest_06-Nov-2007.tar
tar xf VOCtrainval_11-May-2012.tar
tar xf VOCtrainval_06-Nov-2007.tar
tar xf VOCtest_06-Nov-2007.tar
There will now be a VOCdevkit/ subdirectory with all the VOC training data in it.
2.1.2 Generate Labels for VOC
Now we need to generate the label files that Darknet uses. Darknet wants a .txt file for each image with a line for each ground truth object in the image that looks like:
<object-class> <x> <y> <width> <height>
Where x, y, width, and height are relative to the image's width and height. To generate these file we will run the voc_label.py script in Darknet's scripts/ directory. Let's just download it again because we are lazy.
wget https://pjreddie.com/media/files/voc_label.py
python voc_label.py
After a few minutes, this script will generate all of the requisite files. Mostly it generates a lot of label files in VOCdevkit/VOC2007/labels/ and VOCdevkit/VOC2012/labels/. In your directory you should see:
ls
2007_test.txt   VOCdevkit
2007_train.txt  voc_label.py
2007_val.txt    VOCtest_06-Nov-2007.tar
2012_train.txt  VOCtrainval_06-Nov-2007.tar
2012_val.txt    VOCtrainval_11-May-2012.tar
The text files like 2007_train.txt list the image files for that year and image set. Darknet needs one text file with all of the images you want to train on. In this example, let's train with everything except the 2007 test set so that we can test our model. Run:
cat 2007_train.txt 2007_val.txt 2012_*.txt > train.txt
Now we have all the 2007 trainval and the 2012 trainval set in one big list. That's all we have to do for data setup!
2.1.3 Modify Cfg for Pascal Data
Now go to your Darknet directory. We have to change the cfg/voc.data config file to point to your data:
1 classes= 202 train = <path-to-voc>/train.txt3 valid = <path-to-voc>2007_test.txt4 names = data/voc.names5 backup = backup
You should replace <path-to-voc> with the directory where you put the VOC data.
2.1.4 Download Pretrained Convolutional Weights
For training we use convolutional weights that are pre-trained on Imagenet. We use weights from the darknet53 model. You can just download the weights for the convolutional layers here (76 MB).
wget https://pjreddie.com/media/files/darknet53.conv.74
2.1.5 Train The Model
Now we can train! Run the command:
./darknet detector train cfg/voc.data cfg/yolov3-voc.cfg darknet53.conv.74
2.2 Training YOLO on COCO
You can train YOLO from scratch if you want to play with different training regimes, hyper-parameters, or datasets. Here's how to get it working on the COCO dataset.
2.2.1 Get The COCO Data
To train YOLO you will need all of the COCO data and labels. The script scripts/get_coco_dataset.sh will do this for you. Figure out where you want to put the COCO data and download it, for example:
cp scripts/get_coco_dataset.sh data
cd data
bash get_coco_dataset.sh
Now you should have all the data and the labels generated for Darknet.
2.2.2 Modify cfg for COCO
Now go to your Darknet directory. We have to change the cfg/coco.data config file to point to your data:
1 classes= 802 train = <path-to-coco>/trainvalno5k.txt3 valid = <path-to-coco>/5k.txt4 names = data/coco.names5 backup = backup
You should replace <path-to-coco> with the directory where you put the COCO data.
You should also modify your model cfg for training instead of testing. cfg/yolo.cfg should look like this:
[net]
# Testing
# batch=1
# subdivisions=1
# Training
batch=64
subdivisions=8
....
2.2.3 Train The Model
Now we can train! Run the command:
./darknet detector train cfg/coco.data cfg/yolov3.cfg darknet53.conv.74
If you want to use multiple gpus run:
./darknet detector train cfg/coco.data cfg/yolov3.cfg darknet53.conv.74 -gpus 0,1,2,3
If you want to stop and restart training from a checkpoint:
./darknet detector train cfg/coco.data cfg/yolov3.cfg backup/yolov3.backup -gpus 0,1,2,3
三、在我们的数据集上训练
3.1 用到的一些linux指令
3.1.1 pwd 显示路径
3.1.2 cp复制指令
http://man.linuxde.net/cp
cp -r /home/gpu/datasets/lzw/Data/head_data/ /home/gpu/datasets/xxr/darknet/data/cp -r 整个文件夹复制
以上命令把相应文件整个文件夹拷到我的文件夹中
3.1.3 vi指令,显示文档
http://man.linuxde.net/vi
例如,vi cfg/head.data
esc退出编辑模式进入命令模式,ZZ为存盘并推出,:q为退出
3.1.4 重复上条指令
ctrl+p
3.2 数据集与cfg
./darknet detector train cfg/voc.data cfg/yolov3-voc.cfg darknet53.conv.74
参照voc数据集我们创建cfg/head.data

分类数为1,其中文件夹中train为相应的路径,valid暂时用不到,head.names文件中改为head,训练好的权重存于backup文件夹中。运用3.1.2整个文件夹复制到相应路径。
3.3 训练
3.3.1数据集准备

运用Python的批量写入程序,将准备好的数据集写入train.txt,
"""
Created on Wed Dec 13, 15:14:53 2017
批量写入 train.txt
@auther xingxiangrui
"""
import os
#root = os.getcwd()
#picpath= '\\0\\1_f\\'
#filename=os.listdir(root+picpath)
#for file in filename:
#    if 'jpg' in file:
#        print(file)
openfile=open('train.txt','w')for root,dirs,files in os.walk(os.getcwd())for item in files:if 'jpg' in item:openfile.write(os.path.join(root,item)+'\n')if '.mat' in item or '.m' in itemos.remove(os.path.join(root,item))
openfile.close()
3.3.2 训练
./darknet detector train cfg/head.data cfg/yolov2-tinyhw.cfg输入相应的参量,即可训练。
3.3.3 测试
./darknet detect cfg/head-hw-v2.cfg headweights/obj_9000.weights data/dog.jpg
相关文章:
YOLOv3:Darknet代码解析(一)安装Darknet
YOLOv3:Darknet代码解析(二)代码初步
YOLOv3:Darknet代码解析(三)卷积操作
YOLOv3:Darknet代码解析(四)结构更改与训练
YOLOv3:Darknet代码解析(五)权重与特征存储
YOLOv3:Darknet代码解析(六)简化的程序与卷积拆分