1.实战部分
1.1 具体操作
其实和之前的deepsort没差
- 到github上下载Yolov5_StrongSORT_OSNet
- 下载
对应的yolov5去替代原文件中yolov5 - 下载yolov5权重(可以自动下载)和ReID权重(可能要科学上网)放到weight里面
ReID权重有点神秘,给的是需要科学上网才能下载的,下载之后发现是pth,好像是会格式不对应
默认的osnet_x0_25_msmt17.pt也给到你们:
链接:https://pan.baidu.com/s/1RlB1oeiOQ7Le3XFd_QhmAg?pwd=nlsh 提取码:nlsh
或者是到csdn这里去下载把
一些没法自动下载的疯狂报错

2. 代码详解
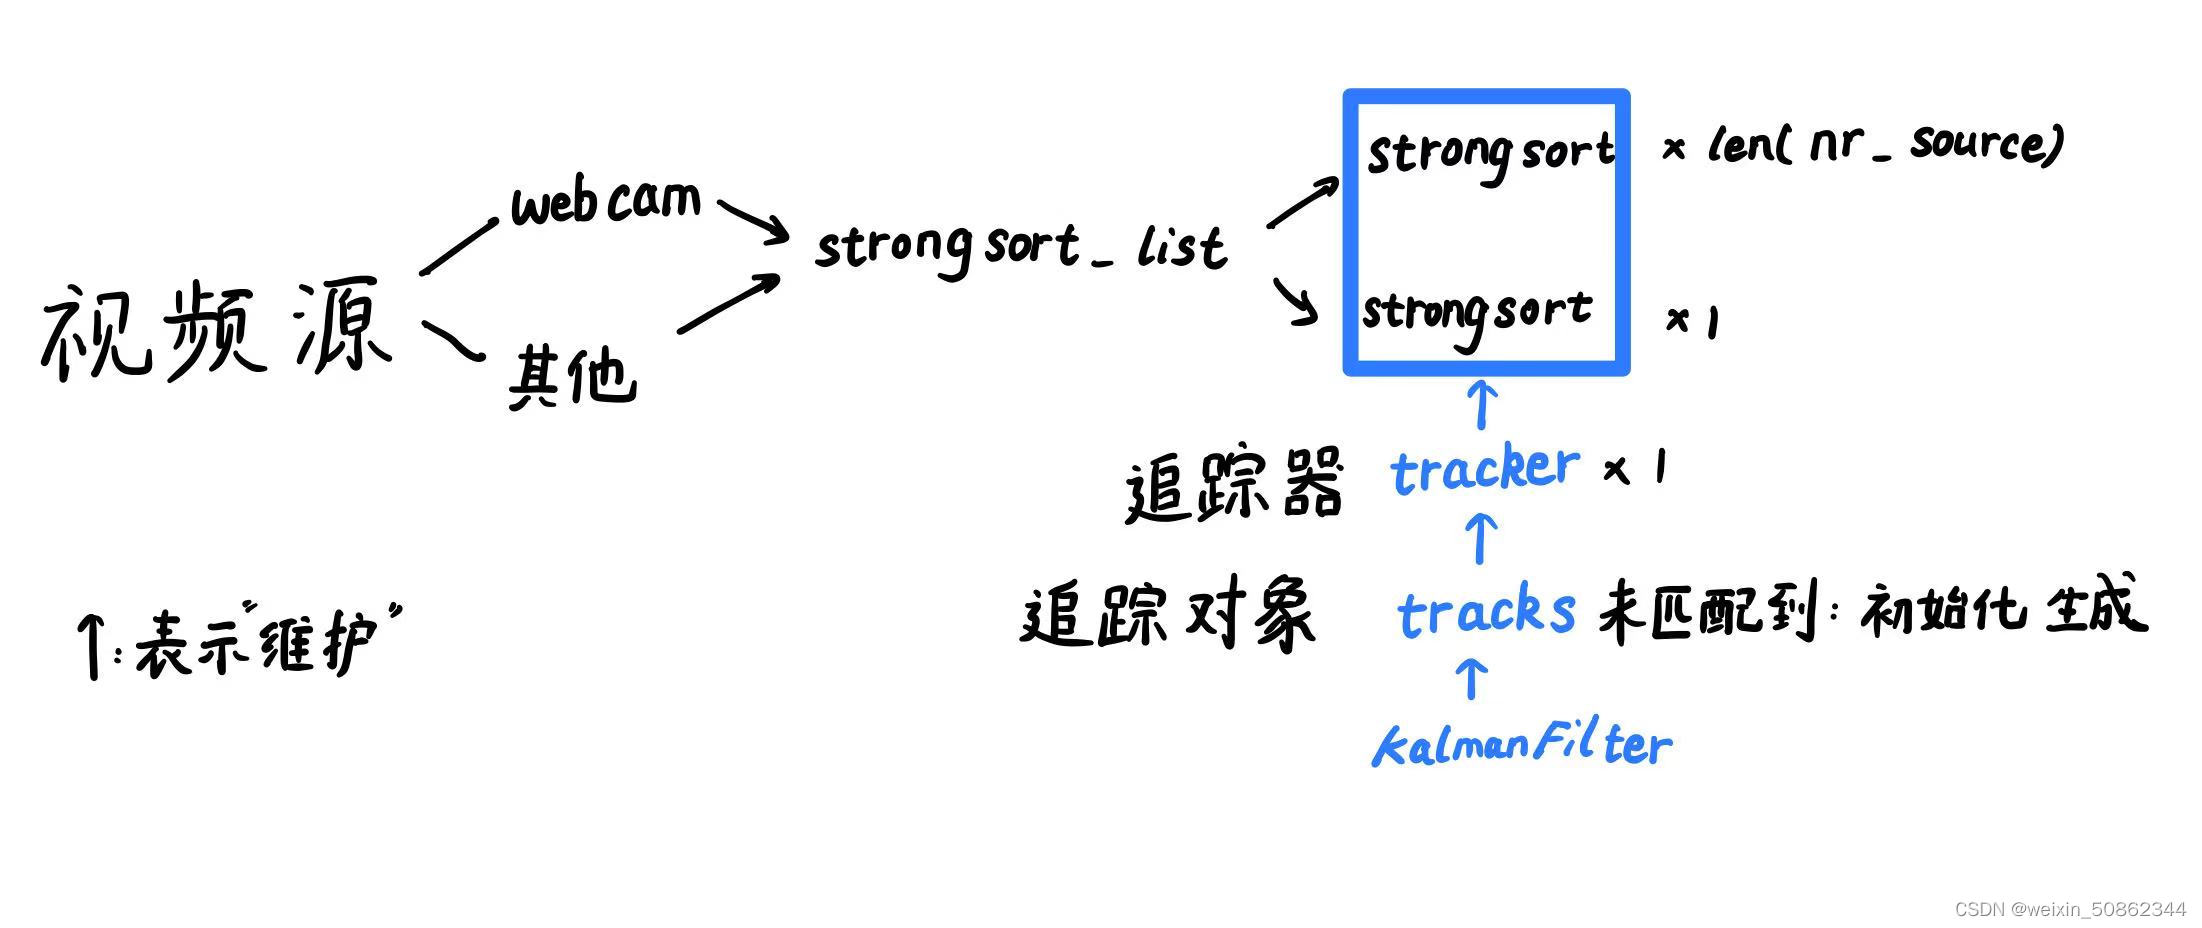
在代码详解之前我认为了解整个代码的类和函数之间关系是非常非常重要的!!!
- 各个主要类之间的关系
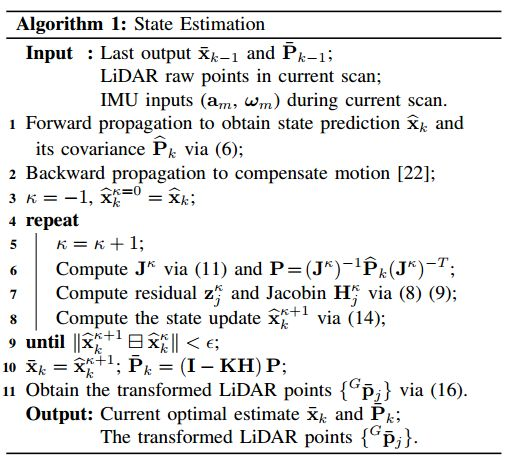
2.1 KalmanFilter类

先从比较底层的KalmanFilter类搞起
(1)建议是先移步去学习【卡尔曼预测在视觉跟踪中的运用】(但是请注意有一个地方应该是讲错了,我在评论中已经给她指出了!)
(2)调用时机
-
- _ init_ 和 initiate
卡尔曼滤波器的启动 同时 初始化状态向量mean和协方差矩阵covariance
- _ init_ 和 initiate
class Tracker:def __init__(self, metric, max_iou_distance=0.7, max_age=30, n_init=3):...self.kf = KalmanFilter()self.mean, self.covariance = self.kf.initiate(detection)
初始化只有1个时机:
①在self.tracker.update(detections, classes, confidences)对于 没有匹配到的检测目标
for detection_idx in unmatched_detections:#直接初始化:外观特征(样子&距离) 和iou 已经能匹配上的基本上都捞回来了,不能匹配的一般都是新的self._initiate_track(detections[detection_idx], classes[detection_idx].item(), confidences[detection_idx].item())
- 2.predict
调用关系:
(1)StrongSORT类中的update函数调用self.tracker.predict()
class Tracker:def predict(self):for track in self.tracks:track.predict(self.kf)
(2)tracker.predict()调用track.predict(self.kf)
class Track:def predict(self, kf):self.mean, self.covariance = self.kf.predict(self.mean, self.covariance)#使用卡尔曼滤波返回预测状态的平均向量和协方差矩阵self.age += 1self.time_since_update += 1
- update
(1)在StrongSORT中update函数中调用了tracker.update
self.tracker.update(detections, classes, confidences)
(2)在tracker.update调用track.update来 更新跟踪帧和检测帧
for track_idx, detection_idx in matches:self.tracks[track_idx].update(#执行卡尔曼滤波测量更新mean和协方差 并更新特征缓存detections[detection_idx], classes[detection_idx], confidences[detection_idx])#类别信息
(3)track.update中调用kf.update来更新mean(状态向量)和协方差矩阵
self.mean, self.covariance = self.kf.update(self.mean, self.covariance, detection.to_xyah(), detection.confidence)- 4.project
在KalmanFilter.update中被调用
2.2. StrongSORT类
接下来我们从上往下看

StrongSORT类中函数包括以上几个,打蓝色框看名字估计估计可以猜出来,四个bbox格式转换函数 和 一个增加追踪器年龄函数,这部分就不讲了。主要看_ init _ ,update 和 _get_features
2.2.1 StrongSORT类的 _ init _
def __init__(self,model_weights,device,fp16,max_dist=0.2,#匹配阈值。距离较大的样本被视为无效匹配。max_iou_distance=0.7,max_age=70, n_init=3,nn_budget=100,mc_lambda=0.995,ema_alpha=0.9):#加载ReID模型self.model = ReIDDetectMultiBackend(weights=model_weights, device=device, fp16=fp16)#weights='osnet_x0_25_msmt17.pt'self.max_dist = max_distmetric = NearestNeighborDistanceMetric( "cosine", self.max_dist, nn_budget)# 默认使用 余弦距离"cosine"(也可以使用“euclidean”欧几里得距离)度量相似程度#self.max_dist:最大阈值距离,超过该距离说明不匹配#nn_budget:每个类中固定样本的最大数量#初始化trackerself.tracker = Tracker(metric, max_iou_distance=max_iou_distance, max_age=max_age, n_init=n_init)#metric:对应上面的NearestNeighborDistanceMetric#max_iou_distance:使用iou匹配的阈值(后面用的是1-iou,即iou损失,越大说明离得越远)。#n_init:track仍处于初始化阶段的帧数,超过该帧 track会转变成confirmed状态
2.1.1.1 NearestNeighborDistanceMetric
对于每个目标,返回的最近邻距离度量。到目前为止观察到的任何样本的最近距离。
def __init__(self, metric, matching_threshold, budget=None):- metric : #只有 “euclidean” 和 "cosine"两种方法
- matching_threshold: 匹配阈值。距离较大的样本被视为无效匹配。
- budget : 如果不是“None”,请将每个类的样本数不超过此数字。达到该数值时删除最旧的样本。
2.2.2 StrongSORT类的_get_features
def _get_features(self, bbox_xywh, ori_img):im_crops = []#遍历所有的bbox截取原图中bboxfor box in bbox_xywh:x1, y1, x2, y2 = self._xywh_to_xyxy(box)im = ori_img[y1:y2, x1:x2]im_crops.append(im)if im_crops:features = self.model(im_crops)#放进ReID模型(预处理之后放入对应的模型)else:#没定义im_crops的话返回空features = np.array([])return features- 为什么要引入ReID?
这是因为检测算法有时会出现漏检的情况.
在跟踪算法中一旦跟踪丢了目标就很难再继续跟踪下去了。
如果遇到漏检的情况,将失去身份ID。所以仅仅使用detection进行跟踪结果也并不理想。
【参考文档】DeepSORT(工作流程)
在_get_features中被调用
features = self._get_features(bbox_xywh, ori_img)#取出原图像对应区域放入ReID模型
2.2.2.1ReID模型部分
(1)模型构建
self.model = build_model(#检查模型仓库中是否存在该模型,如果存在调用该模型model_name,num_classes=1,pretrained=not (w and check_isfile(w)),use_gpu=device)#模型全部存放在strong_sort/deep/reid/torchreid/models/*
build_model函数会检查模型仓库是否存在该模型,如果存在初始化该模型
(2)预处理
def _preprocess(self, im_batch):images = []for element in im_batch:#先将该图片转化为pil格式image = self.to_pil(element)#进行以下操作:(1)剪裁为(256, 128) (2)转换为张量(3)归一化image = self.preprocess(image)images.append(image)images = torch.stack(images, dim=0)#将图片张量在第0维堆叠起来images = images.to(self.device)return images
(3)forward
_get_features中的features = self.model(im_crops)实际上就是调用了forward函数
def forward(self, im_batch):# preprocess batchim_batch = self._preprocess(im_batch)# 半精度 batch to halfif self.fp16 and im_batch.dtype != torch.float16:im_batch = im_batch.half()# batch processingfeatures = []if self.pt:features = self.model(im_batch).......#将numpy转为tensorif isinstance(features, (list, tuple)):return self.from_numpy(features[0]) if len(features) == 1 else [self.from_numpy(x) for x in features]else:return self.from_numpy(features)2.2.3 StrongSORT类的update
def update(self, bbox_xywh, confidences, classes, ori_img):self.height, self.width = ori_img.shape[:2]#原图像的长宽高#-------step1 生成检测目标---------------------------generate detectionsfeatures = self._get_features(bbox_xywh, ori_img)#返回空feature,或取出原图像对应区域放入ReID模型bbox_tlwh = self._xywh_to_tlwh(bbox_xywh)#获得左上角和长宽detections = [Detection(bbox_tlwh[i], conf, features[i]) for i, conf in enumerate(confidences)]#import类 bbox的左上宽高,置信度,使用ReID得到的feature#-------step2 运行非极大抑制(好像没用上)------------ run on non-maximum supressionboxes = np.array([d.tlwh for d in detections])scores = np.array([d.confidence for d in detections])#------step3 更新追踪器tracker----------- update tracker#------step3.1 先进行预测获得状态向量mean和协方差矩阵covariance-------------self.tracker.predict()#对tracker对象维护的Track列表,每一个Track对象调用卡尔曼滤波对状态进行初始化和预测# ------step3.2 运行匹配级联,更新追踪-------------self.tracker.update(detections, classes, confidences)#------step4 输出bbox标识-------------------------output bbox identitiesoutputs = []for track in self.tracker.tracks:#排除掉没有被确认 而且 已经超过一帧没有更新的if not track.is_confirmed() or track.time_since_update > 1:continuebox = track.to_tlwh()x1, y1, x2, y2 = self._tlwh_to_xyxy(box)track_id = track.track_idclass_id = track.class_idconf = track.confoutputs.append(np.array([x1, y1, x2, y2, track_id, class_id, conf]))if len(outputs) > 0:outputs = np.stack(outputs, axis=0)return outputs
- 非极大抑制:区别于之前deepsort,StrongSORT没有运行。
- 更新追踪器tracker的流程是:(1)先预测 (2)再更新
2.3 Tracker类

Tracker类在我的理解中相当于一个追踪器,用来管理所有track追踪对象
2.3.1 Tracker类predict,increment_ages,camera_update
共同点:都是遍历所有track,调用track的函数
(1)predict
对每一个追踪对象进行预测
def predict(self):for track in self.tracks:track.predict(self.kf)Tracker维护了一个Track列表,Track对象调用卡尔曼滤波获得状态向量和协方差矩阵
(2)increment_ages
def increment_ages(self):for track in self.tracks:track.increment_age()track.mark_missed()#标记丢失
(3)camera_update
2.3.2 Tracker类的update
    def update(self, detections, classes, confidences):
#----------step1. 运行匹配级联 获得匹配到的--------------------------- Run matching cascade.matches, unmatched_tracks, unmatched_detections = \self._match(detections)#通过外观特征和iou匹配#----------step2.更新跟踪对象-------------------Update track set.for track_idx, detection_idx in matches:#----------step2.1 执行卡尔曼滤波测量更新mean和协方差 并更新特征缓存----self.tracks[track_idx].update(detections[detection_idx], classes[detection_idx], confidences[detection_idx])#类别信息#----------step2.2 没有匹配上的的追踪对象track标记------                                for track_idx in unmatched_tracks:self.tracks[track_idx].mark_missed()#可能会删除#------step2.3遍历未匹配上的检测对象detection初始化----------------for detection_idx in unmatched_detections:#直接初始化:外观特征(样子&距离) 和iou 已经能匹配上的基本上都捞回来了,不能匹配的一般都是新的self._initiate_track(detections[detection_idx], classes[detection_idx].item(), confidences[detection_idx].item())#------step2.4更新追踪器tracker维护的track列表-----self.tracks = [t for t in self.tracks if not t.is_deleted()]#----------step3  更新特征的距离度量。-------------------Update distance metric.active_targets = [t.track_id for t in self.tracks if t.is_confirmed()]features, targets = [], []for track in self.tracks:if not track.is_confirmed():continuefeatures += track.featurestargets += [track.track_id for _ in track.features]self.metric.partial_fit(np.asarray(features), np.asarray(targets), active_targets)#更新                              #获得更新后的{active_targets:feature}
在本函数中调用了本类的_match 和 _initiate_track,这里只讲_initiate_track。_match 比较重要放到后面
2.3.2.1 _initiate_track
对于没有匹配上的检测对象,tracker会调用_initiate_track新建一个追踪对象track,并放入维护列表中
def _initiate_track(self, detection, class_id, conf):#tracker维护列表中新增追踪对象Trackself.tracks.append(Track(detection.to_xyah(), self._next_id, class_id, conf, self.n_init, self.max_age, self.ema_alpha,detection.feature))#id自增self._next_id += 1
2.3.3 _match 级联匹配
这个部分是我认为比较难理解的。
先不要看这个函数内部创建的gated_metric,我们跟着步骤先理解大致作用。
- step1. 将跟踪集拆分为确认跟踪集和未确认跟踪集
- step2. 使用外观特征(特征的相似程度,距离)gated_metric关联 已确认跟踪集
- step3.将仍未关联上的跟踪和未确认跟踪 使用IOU 关联起来
    def _match(self, detections):'''其先调用 nnmatching.py-->distance函数计算出当前帧的所有检测目标detections与历史所有confrimed targets之间的外观相似度(基于两者之间的128维度特征,利用余弦距离计算的),得出相似度矩阵cost_matrix'''#综合了两点信息A:外观信息(128维度特征)B:运动信息(基于卡尔曼滤波预测的track的位置)对track与detection为同一个人的可能性进行判断,所以称为级联匹配def gated_metric(tracks, dets, track_indices, detection_indices):features = np.array([dets[i].feature for i in detection_indices])#检测到的目标targets = np.array([tracks[i].track_id for i in track_indices])#追踪的目标# 描述的是特征的相似程度cost_matrix = self.metric.distance(features, targets)# 创建了一个len(targets)*len(features)的二维矩阵用来描述距离#根据128特征,用余弦距离计算计算出当前帧的所有检测目标detections与历史所有confrimed targets之间的外观相似度# gate_cost_matrix:基于卡尔曼滤波得到的状态分布,使cost矩阵中的不可行项(距离)无效cost_matrix = linear_assignment.gate_cost_matrix(cost_matrix, tracks, dets, track_indices, detection_indices)# 这里将上面根据128特征,用余弦距离算的特征矩阵,再用卡尔曼滤波更新一下,用的是马氏距离return cost_matrix#------step1. 将跟踪集拆分为确认跟踪集和未确认跟踪集----------------------Split track set into confirmed and unconfirmed tracks.confirmed_tracks = [i for i, t in enumerate(self.tracks) if t.is_confirmed()]unconfirmed_tracks = [i for i, t in enumerate(self.tracks) if not t.is_confirmed()]#------step2. 使用外观特征(特征的相似程度,距离)gated_metric关联 已确认跟踪集---------------------- Associate confirmed tracks using appearance features.matches_a, unmatched_tracks_a, unmatched_detections = \linear_assignment.matching_cascade(gated_metric, self.metric.matching_threshold, self.max_age,self.tracks, detections, confirmed_tracks)# gated_metric:len(targets)*len(features)的二维矩阵cost_matrix# ------step3.将仍未关联上的跟踪和未确认跟踪 使用IOU 关联起来----------------------- Associate remaining tracks together with unconfirmed tracks using IOU.iou_track_candidates = unconfirmed_tracks + [k for k in unmatched_tracks_a ifself.tracks[k].time_since_update == 1]unmatched_tracks_a = [k for k in unmatched_tracks_a ifself.tracks[k].time_since_update != 1]matches_b, unmatched_tracks_b, unmatched_detections = \linear_assignment.min_cost_matching(iou_matching.iou_cost, self.max_iou_distance, self.tracks,#importdetections, iou_track_candidates, unmatched_detections)
#更新匹配和未匹配(时间超过一帧&没匹配上)matches = matches_a + matches_bunmatched_tracks = list(set(unmatched_tracks_a + unmatched_tracks_b))return matches, unmatched_tracks, unmatched_detections
2.3.3.1 linear_assignment.min_cost_matching
第一次调用是在linear_assignment.matching_cascade
第二次是在step3中将将仍未关联上的跟踪和未确认跟踪 使用IOU 关联起来
def min_cost_matching(distance_metric, max_distance, tracks, detections, track_indices=None,detection_indices=None):if track_indices is None:#索引为空,从输入中生成track_indices = np.arange(len(tracks))if detection_indices is None:#索引为空,从输入中生成detection_indices = np.arange(len(detections))if len(detection_indices) == 0 or len(track_indices) == 0:return [], track_indices, detection_indices # Nothing to match.#--------step1:先使用传入的distance_metric函数创建cost_matrix-------------------cost_matrix = distance_metric(tracks, detections, track_indices, detection_indices)#返回len(targets)*len(features)的二维矩阵cost_matrixcost_matrix[cost_matrix > max_distance] = max_distance + 1e-5#大于max_distance的全部等于max_distance + 1e-5#--------step2:使用匈牙利算法-----------------------------row_indices, col_indices = linear_sum_assignment(cost_matrix)#追踪对象 #检测对象 #返回的是每一行的索引 #用来描述距离matches, unmatched_tracks, unmatched_detections = [], [], []#----------step3:更新匹配对象和未匹配------------------------------------------------------#-----step3.1 遍历所有检测对象,没有匹配到(col_indices中不存在)放入unmatched_detectionsfor col, detection_idx in enumerate(detection_indices):if col not in col_indices:unmatched_detections.append(detection_idx)#-----step3.2遍历所有追踪对象,没有匹配到(row_indices中不存在)放入unmatched_tracksfor row, track_idx in enumerate(track_indices):if row not in row_indices:unmatched_tracks.append(track_idx)#-----step3.3 遍历所有匹配到的对象 超过最大距离重新置为未匹配------for row, col in zip(row_indices, col_indices):track_idx = track_indices[row]detection_idx = detection_indices[col]# 超过最大距离置为未匹配if cost_matrix[row, col] > max_distance:unmatched_tracks.append(track_idx)unmatched_detections.append(detection_idx)else:matches.append((track_idx, detection_idx))return matches, unmatched_tracks, unmatched_detections
其实只要你了解匈牙利算法,就会发现还是那两个步骤
(1)构建cost矩阵
(2)计算匈牙利算法
如果不清楚的话可以参考【目标跟踪初探(DeepSORT)】
这里只不过是增加了一步:
(3)只不过是将分配结果更新
2.3.3.2 linear_assignment.matching_cascade
 #------step2. 使用外观特征(特征的相似程度,距离)gated_metric关联 已确认跟踪集---------------------- Associate confirmed tracks using appearance features.matches_a, unmatched_tracks_a, unmatched_detections = \linear_assignment.matching_cascade(gated_metric, self.metric.matching_threshold, self.max_age,self.tracks, detections, confirmed_tracks)# gated_metric:自定义函数 ,返回len(targets)*len(features)的二维矩阵cost_matrix
#self.metric.matching_threshold:其实是对应了StrongSORT类中NearestNeighborDistanceMetric创建时传入的self.max_dist参数
#self.max_age:tracker初始化创建的,表示 最大跟踪丢失次数调用了linear_assignment.matching_cascade来实现级联匹配
def matching_cascade(distance_metric, max_distance, cascade_depth, tracks, detections,track_indices=None, detection_indices=None):
(1)参数
- distance_metric
distance_metric给出了tracks和detections以及N个track索引 和 M个detections索引的列表。该指标应该return NxM维度成本矩阵,其中元素(i,j)是给定track索引中第i条track与给定detections索引中的j检测的损失。
说明有点难理解,给一个简单的损失矩阵便于你们理解。distance_metric不过就是横坐标代表track索引,纵坐标代表detections索引,此时的值代表损失。
cost_matrix = np.array([[15.0, 40.0, 45.0],[20.0, 60., 35.],[20., 40.,25.]
])
- max_distance:最大(余弦/欧几里得)距离阈值,大于该值的cost将不被理会
这里的距离要区别于实际上的距离 - cascade_depth:级联深度应为最大track年龄。
- tracks:在当前时间中的预测跟踪列表(因此要先使用卡尔曼滤波进行预测,再更新)
- detections:在当前时间中的检测跟踪列表
- track_indices:将
cost_matrix中的行映射到tracks中的轨迹的轨迹索引列表(就是cost_matrix 的track索引) - detection_indices:将
cost_matrix中的行映射到detections中的检测目标的检测目标索引列表(就是detections索引)
(2) gated_metric函数
gated_metric用于传入linear_assignment.matching_cascade
def gated_metric(tracks, dets, track_indices, detection_indices):features = np.array([dets[i].feature for i in detection_indices])#检测到的目标targets = np.array([tracks[i].track_id for i in track_indices])#追踪的目标# 描述的是特征的相似程度cost_matrix = self.metric.distance(features, targets)# 创建了一个len(targets)*len(features)的二维矩阵用来描述距离#根据128特征,用余弦距离计算计算出当前帧的所有检测目标detections与历史所有confrimed targets之间的外观相似度# gate_cost_matrix:基于卡尔曼滤波得到的状态分布,使cost矩阵中的不可行项(距离)无效cost_matrix = linear_assignment.gate_cost_matrix(cost_matrix, tracks, dets, track_indices, detection_indices)# 这里将上面根据128特征,用余弦距离算的特征矩阵,再用卡尔曼滤波更新一下,用的是马氏距离return cost_matrix
//TODO:这个部分后面补上
(3)完整函数
def matching_cascade(distance_metric, max_distance, cascade_depth, tracks, detections,track_indices=None, detection_indices=None):
#----step1 如果检测索引或者跟踪索引为None,使用对应列表创建----------if track_indices is None:track_indices = list(range(len(tracks)))if detection_indices is None:detection_indices = list(range(len(detections)))#----step2 使用min_cost_matching构建匈牙利算法-------unmatched_detections = detection_indicesmatches = []track_indices_l = [k for k in track_indices# if tracks[k].time_since_update == 1 + level]matches_l, _, unmatched_detections = \min_cost_matching(distance_metric, max_distance, tracks, detections,track_indices_l, unmatched_detections)#----step3 更新--------------------matches += matches_lunmatched_tracks = list(set(track_indices) - set(k for k, _ in matches))#没有直接使用min_cost_matching的第二个返回值return matches, unmatched_tracks, unmatched_detections
这里调用了min_cost_matching构建了匈牙利算法
2.4 Track类
终于到track类了

2.4.1 状态转移图

2.4.2.1上图中关键变量的更新时机
- hits:
初始值为1,在track的update函数中自增 - times_since_update:
①每执行一次predict:+1
②每执行一次update:置0
2.4.2.2 执行mark_missed的时机
①tracker类中的increment_ages
def increment_ages(self):for track in self.tracks:track.increment_age()track.mark_missed()
②tracker类中的update函数
对没有匹配上的track跟踪对象进行mark_missed
for track_idx in unmatched_tracks:self.tracks[track_idx].mark_missed()#可能会删除2.4.2 使用卡尔曼滤波器 预测和更新
建议这部分结合上面的卡尔曼滤波一起服用
def predict(self, kf):self.mean, self.covariance = self.kf.predict(self.mean, self.covariance)#使用卡尔曼滤波返回预测状态的平均状态向量和协方差矩阵self.age += 1self.time_since_update += 1
def update(self, detection, class_id, conf):self.conf = confself.class_id = class_id.int()self.mean, self.covariance = self.kf.update(self.mean, self.covariance, detection.to_xyah(), detection.confidence)feature = detection.feature / np.linalg.norm(detection.feature)#求范数#使用历史平滑smooth_feat = self.ema_alpha * self.features[-1] + (1 - self.ema_alpha) * featuresmooth_feat /= np.linalg.norm(smooth_feat)self.features = [smooth_feat]self.hits += 1self.time_since_update = 0 #观测更新>=预设值if self.state == TrackState.Tentative and self.hits >= self._n_init:self.state = TrackState.Confirmed
这两个部分都没有特别难以理解的的地方