引言
最近python语言大火,除了在科学计算领域python有用武之地之外,在游戏、后台等方面,python也大放异彩,本篇博文将按照正规的项目开发流程,手把手教大家写个python小游戏,项目来自《Python编程从入门到实践》(本文将原项目中的部分错误进行修改完善,PS:强烈推荐这本书,真的很赞),来感受下其中的有趣之处。本次开发的游戏叫做alien invasion。
安装pygame并创建能左右移动的飞船
安装pygame
本人电脑是windows 10、python3.6,pygame下载地址:传送门
请自行下载对应python版本的pygame
运行以下命令
$ pip install wheel
$ pip install pygame‑1.9.3‑cp36‑cp36m‑win_amd64.whl
创建Pygame窗口及响应用户输入
新建一个文件夹alien_invasion,并在文件夹中新建alien_invasion.py文件,输入如下代码。
import sys
import pygame
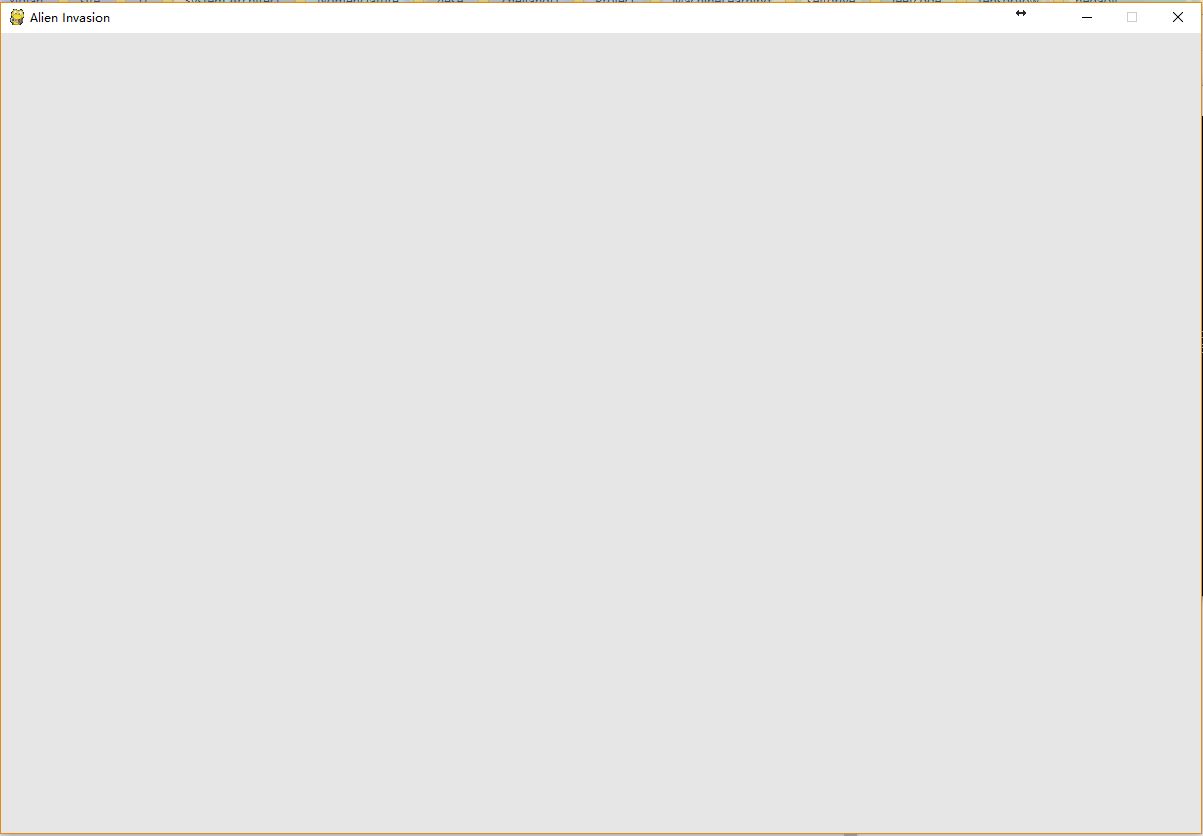
def run_game():#initialize game and create a dispaly objectpygame.init()screen = pygame.display.set_mode((1200,800))pygame.display.set_caption("Alien Invasion")# set backgroud colorbg_color = (230,230,230)# game loopwhile True:# supervise keyboard and mouse itemfor event in pygame.event.get():if event.type == pygame.QUIT:sys.exit()# fill colorscreen.fill(bg_color)# visualiaze the windowpygame.display.flip()
run_game()
运行上述代码,我们可以得到一个灰色界面的窗口:
$ python alien_invasion.py
创建设置类
为了在写游戏的过程中能便捷地创建一些新功能,下面额外编写一个settings模块,其中包含一个Settings类,用于将所有设置存储在一个地方。这样在以后项目增大时修改游戏的外观就更加容易。
我们首先将alien_invasion.py中的显示屏大小及显示屏颜色进行修改。
首先在alien_invasion文件夹下新建python文件settings.py,并向其中添加如下代码:
class Settings(object):"""docstring for Settings"""def __init__(self):# initialize setting of game# screen settingself.screen_width = 1200self.screen_height = 800self.bg_color = (230,230,230)
然后再alien_invasion.py中导入Settings类,并使用相关设置,修改如下:
import sys
import pygame
from settings import Settings
def run_game():#initialize game and create a dispaly objectpygame.init()ai_settings = Settings()screen = pygame.display.set_mode((ai_settings.screen_width,ai_settings.screen_height))pygame.display.set_caption("Alien Invasion")# set backgroud colorbg_color = (230,230,230)# game loopwhile True:# supervise keyboard and mouse itemfor event in pygame.event.get():if event.type == pygame.QUIT:sys.exit()# fill colorscreen.fill(ai_settings.bg_color)# visualiaze the windowpygame.display.flip()
run_game()
添加飞船图像
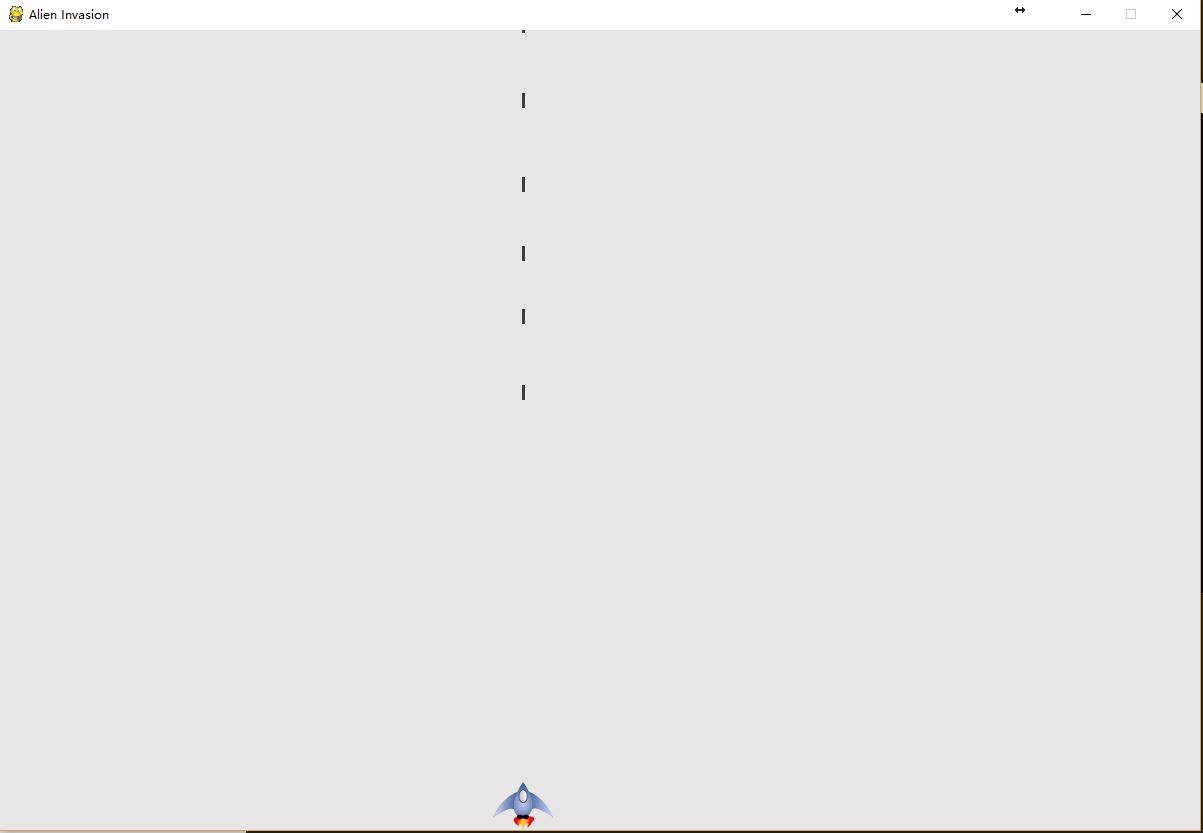
接下来,我们需要将飞船加入游戏中。为了在屏幕上绘制玩家的飞船,我们将加载一幅图像,再使用Pygame()方法blit()绘制它。
在游戏中几乎可以使用各种类型的图像文件,但是使用位图(.bmp)文件最为简单,这是因为Pygame默认加载位图。虽然其他类型的图像也能加载,但是需要安装额外的库。我们推荐去免费的图片素材网站上去找图像:传送门。我们在主项目文件夹(alien_invasion)中新建一个文件夹叫images,将如下bmp图片放入其中。

接下来,我们创建飞船类ship.py:
import pygame
class Ship():def __init__(self,screen):#initialize spaceship and its locationself.screen = screen# load bmp image and get rectangleself.image = pygame.image.load('image/ship.bmp')self.rect = self.image.get_rect()self.screen_rect = screen.get_rect()#put spaceship on the bottom of windowself.rect.centerx = self.screen_rect.centerxself.rect.bottom = self.screen_rect.bottomdef blitme(self):#buld the spaceship at the specific locationself.screen.blit(self.image,self.rect)
最后我们在屏幕上绘制飞船,即在alien_invasion.py文件中调用blitme方法:
import sys
import pygame
from settings import Settings
from ship import Settings
def run_game():#initialize game and create a dispaly objectpygame.init()ai_settings = Settings()screen = pygame.display.set_mode((ai_settings.screen_width,ai_settings.screen_height))ship = Ship(screen)pygame.display.set_caption("Alien Invasion")# set backgroud colorbg_color = (230,230,230)# game loopwhile True:# supervise keyboard and mouse itemfor event in pygame.event.get():if event.type == pygame.QUIT:sys.exit()# fill colorscreen.fill(ai_settings.bg_color)ship.blitme()# visualiaze the windowpygame.display.flip()
run_game()
重构:模块game_functions
在大型项目中,经常需要在添加新代码前重构既有代码。重构的目的是为了简化代码的结构,使其更加容易扩展。我们将实现一个game_functions模块,它将存储大量让游戏Alien invasion运行的函数。通过创建模块game_functions,可避免alien_invasion.py太长,使其逻辑更容易理解。
函数check_events()
首先我们将管理事件的代码移到一个名为check_events()的函数中,目的是为了隔离事件循环
import sys
import pygamedef check_events():#respond to  keyboard and mouse itemfor event in pygame.event.get():if event.type == pygame.QUIT:sys.exit()
然后我们修改alien_invasion.py代码,导入game_functions模块,并将事件循环替换成对函数check_events()的调用:
import sys
import pygame
from settings import Settings
from ship import Ship
import game_functions as gf
def run_game():#initialize game and create a dispaly objectpygame.init()ai_settings = Settings()screen = pygame.display.set_mode((ai_settings.screen_width,ai_settings.screen_height))ship = Ship(screen)pygame.display.set_caption("Alien Invasion")# set backgroud colorbg_color = (230,230,230)# game loopwhile True:# supervise keyboard and mouse itemgf.check_events()# fill colorscreen.fill(ai_settings.bg_color)ship.blitme()# visualiaze the windowpygame.display.flip()
run_game()
函数update_screen()
将更新屏幕的代码移到一个名为update_screen()函数中,并将这个函数放在模块game_functions中:
def update_screen(ai_settings,screen,ship):# fill colorscreen.fill(ai_settings.bg_color)ship.blitme()# visualiaze the windowpygame.display.flip()
其中alien_invasion修改如下:
import sys
import pygame
from settings import Settings
from ship import Ship
import game_functions as gf
def run_game():#initialize game and create a dispaly objectpygame.init()ai_settings = Settings()screen = pygame.display.set_mode((ai_settings.screen_width,ai_settings.screen_height))ship = Ship(screen)pygame.display.set_caption("Alien Invasion")# set backgroud colorbg_color = (230,230,230)# game loopwhile True:# supervise keyboard and mouse itemgf.check_events()gf.update_screen(ai_settings,screen,ship)
run_game()
从上面一套流程走下来,我们发现:在实际的开发过程中,我们一开始将代码编写得尽可能的简单,并在项目越来越复杂时进行重构。接下来我们开始处理游戏的动态方面。
驾驶飞船
这里我们要实现的就是使玩家通过左右箭头键来控制飞船的左移与右移。
响应按键
因为在pygame中,每次按键都被注册为KEYDOWN事件,在check_events()中,我们通过event.type检测到KEYDOWN事件后还需进一步判断是哪个按键。代码如下:
def check_events(ship):#respond to keyboard and mouse itemfor event in pygame.event.get():if event.type == pygame.QUIT:sys.exit()elif event.type == pygame.KEYDOWN:if event.key == pygame.K_RIGHT:#move rightship.rect.centerx +=1
允许不断移动
玩家按住右箭头不动时,我们希望飞船能不断地移动,知道玩家松开为止。这里我们通过KETUO事件来判断。因此我们设置一个标志位moving_right来实现持续移动。原理如下:
飞船不动时,标志moving_right将为false。玩家按下右箭头时,我们将这个标志设置为True;玩家松开时,我们将标志重新设置成False。
这个移动属性是飞船属性的一种,我们用ship类来控制,因此我们给这个类增加一个属性名称叫,moving_right以及一个update()方法来检测标志moving_right的状态。
ship
self.moving_right = Falsedef update(self):if self.moving_right:self.rect.centerx +=1
game_functions
elif event.type == pygame.KEYDOWN:if event.key == pygame.K_RIGHT:#move rightship.moving_right = Trueelif event.type == pygame.KEYUP:if event.key = pygame.K_RIGHT:ship.moving_right = False
最后在alien_invasion中调用update()方法
while True:# supervise keyboard and mouse itemgf.check_events(ship)ship.update()
左右移动
前面我们实现了向右移动,接下来实现向左移动,逻辑类似,代码就不贴了。
调整飞船的速度
当前,每次执行while循环时,飞船最多移动一个像素,我们可以在Settings中添加ship_speed_factor,用于控制飞船的速度。我们将根据这个属性决定飞船每次循环时最多移动多少距离。
Settings:
class Settings(object):"""docstring for Settings"""def __init__(self):# initialize setting of game# screen settingself.screen_width = 1200self.screen_height = 800self.bg_color = (230,230,230)self.ship_speed_factor = 1.5
Ship:
class Ship():def __init__(self,ai_settings,screen):#initialize spaceship and its locationself.screen = screenself.ai_settings = ai_settings
限制飞船的活动范围
如果玩家按住箭头的时间过长,飞船就会消失,那么如何使飞船抵达屏幕边缘时停止移动?这里我们只需要修改Ship类中的update方法,增加一个逻辑判断。
重构
这里我们主要讲check_events()函数进行重构,将其中部分代码分成两部分,一部分处理KEYDOWN事件,一部分处理KEYUP事件。
game_functions:
def check_keydown_events(event,ship):if event.key == pygame.K_RIGHT:#move rightship.moving_right = Trueelif event.key == pygame.K_LEFT:#move rightship.moving_left = True
def check_keyup_events(event,ship):if event.key == pygame.K_RIGHT:ship.moving_right = Falseelif event.key == pygame.K_LEFT:#move rightship.moving_left = False
def check_events(ship):#respond to  keyboard and mouse itemfor event in pygame.event.get():if event.type == pygame.QUIT:sys.exit()elif event.type == pygame.KEYDOWN:check_keydown_events(event,ship)elif event.type == pygame.KEYUP:check_keyup_events(event,ship)
射击
接下来添加射击功能,使玩家按空格键时发射子弹,子弹将在屏幕中向上穿行,抵达屏幕后消失。
添加子弹设置
在Settings类中增加一些子弹的属性,这里我们创建一个宽3像素,高15像素的深灰色子弹。子弹的速度比飞船稍低。
创建Bullet类
import pygame
from pygame.sprite import Spriteclass Bullet(Sprite):"""A class to manage bullets fired from the ship."""def __init__(self, ai_settings, screen, ship):"""Create a bullet object, at the ship's current position."""super().__init__()self.screen = screen# Create bullet rect at (0, 0), then set correct position.self.rect = pygame.Rect(0, 0, ai_settings.bullet_width,ai_settings.bullet_height)self.rect.centerx = ship.rect.centerxself.rect.top = ship.rect.top# Store a decimal value for the bullet's position.self.y = float(self.rect.y)self.color = ai_settings.bullet_colorself.speed_factor = ai_settings.bullet_speed_factordef update(self):"""Move the bullet up the screen."""# Update the decimal position of the bullet.self.y -= self.speed_factor# Update the rect position.self.rect.y = self.ydef draw_bullet(self):"""Draw the bullet to the screen."""pygame.draw.rect(self.screen, self.color, self.rect)
将子弹存储到group中
前面定义了Bullet类和必要的设置后,就可以编写代码了,在玩家每次按空格键时都会发射一发子弹。首先,我们在alien_invasion中创建一个group,用于存储所有的有效子弹。
def run_game():#initialize game and create a dispaly objectpygame.init()ai_settings = Settings()screen = pygame.display.set_mode((ai_settings.screen_width,ai_settings.screen_height))ship = Ship(ai_settings,screen)bullets = Group()pygame.display.set_caption("Alien Invasion")# set backgroud colorbg_color = (230,230,230)# game loopwhile True:# supervise keyboard and mouse itemgf.check_events(ai_settings, screen, ship,bullets)ship.update()bullets.update()gf.update_screen(ai_settings, screen, ship,bullets)
开火
这里我们修改check_keydown_events()函数,来监听玩家按下空格键的事件。这里还需要修改update_screen()函数,确保屏幕每次更新时,都能重绘每一个子弹。
我们来看下效果:
删除消失的子弹
在alien_invasion中删除消失的子弹。
import sys
import pygame
from settings import Settings
from ship import Ship
import game_functions as gf
from pygame.sprite import Group
def run_game():#initialize game and create a dispaly objectpygame.init()ai_settings = Settings()screen = pygame.display.set_mode((ai_settings.screen_width,ai_settings.screen_height))ship = Ship(ai_settings,screen)bullets = Group()pygame.display.set_caption("Alien Invasion")# set backgroud colorbg_color = (230,230,230)# game loopwhile True:# supervise keyboard and mouse itemgf.check_events(ai_settings, screen, ship,bullets)ship.update()bullets.update()for bullet in bullets.copy():if bullet.rect.bottom <=0:bullets.remove(bullet)gf.update_screen(ai_settings, screen,ship,bullets)
run_game()
限制子弹数量
为了鼓励玩家有目标的射击,我们规定屏幕上只能同时存在3颗子弹,我们只需要在每次创建子弹前检查未消失的子弹数目是否小于3即可。
创建update_bullets()函数
为了使alien_invasion中代码更加简单,我们将检查子弹管理的代码,移到game_functions模块中:
def update_bullets(bullets):bullets.update()for bullet in bullets.copy():if bullet.rect.bottom<=0:bullets.remove(bullet)
创建fire_bullet()函数
这里我们将发射子弹的代码移到一个独立的函数中:
def fire_bullet(ai_settings,screen,ship,bullets):if len(bullets) < ai_settings.bullets_allowed:new_bullet = Bullet(ai_settings,screen,ship)bullets.add(new_bullet)
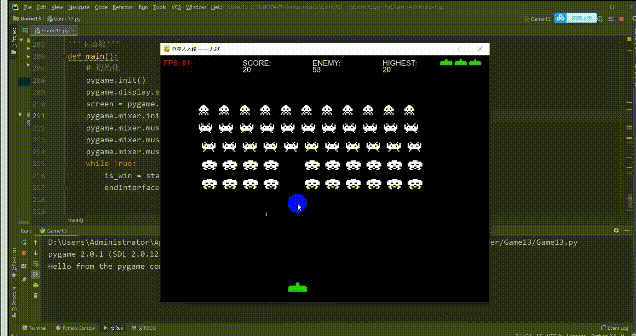
添加外星人,并检测碰撞
在我们完成新的任务之前,我们先给游戏添加一个结束游戏的快捷键Q:
创建第一个外星人
这里和创建飞船的方法一样
class Alien(Sprite):"""A class to represent a single alien in the fleet."""def __init__(self, ai_settings, screen):"""Initialize the alien, and set its starting position."""super().__init__()self.screen = screenself.ai_settings = ai_settings# Load the alien image, and set its rect attribute.self.image = pygame.image.load('images/alien.bmp')self.rect = self.image.get_rect()# Start each new alien near the top left of the screen.self.rect.x = self.rect.widthself.rect.y = self.rect.height# Store the alien's exact position.self.x = float(self.rect.x)def blitme(self):"""Draw the alien at its current location."""self.screen.blit(self.image, self.rect)
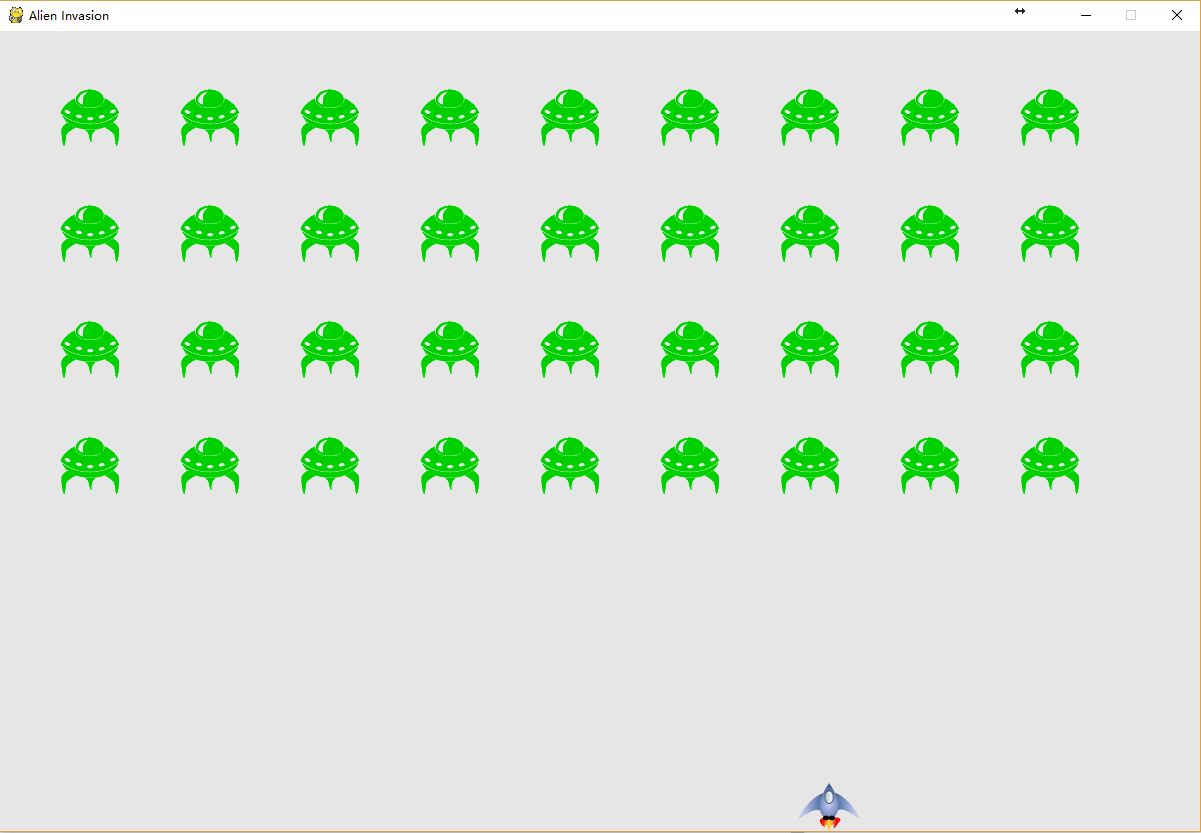
创建一群外星人
这里我们首先确定一行能容纳多少个外星人以及要绘制几行。这里改动代码较多,直接看效果:
移动外星人
前面我们创建的是静态的外星人,现在我们需要让外星人动起来。这里我们在Settings类中设置外星人移动的速度,然后通过Alien类中的update的方法来实现移动
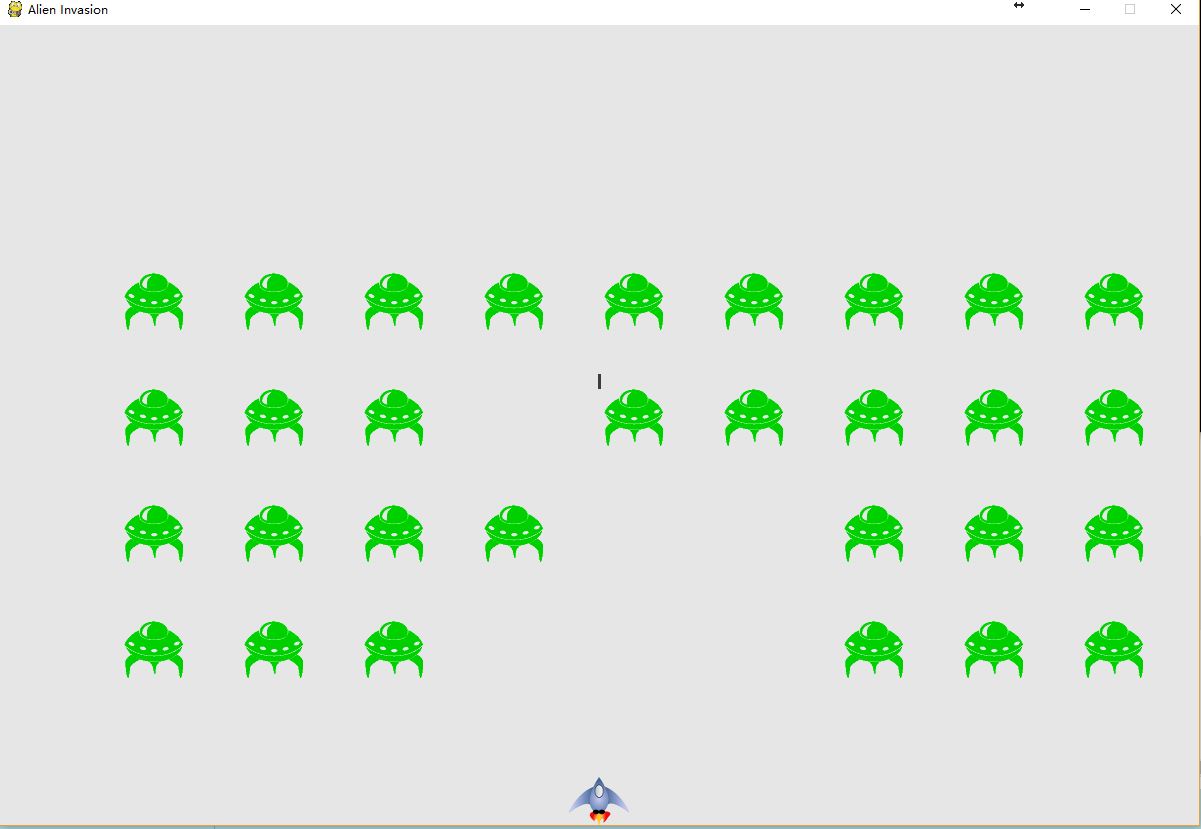
射杀外星人
要想射杀外星人,就必须先检测两个编组成员之间是否发生碰撞,在游戏中,碰撞就是游戏元素重叠在一起。这里我们使用sprite.groupcollide()来检测两个编组的成员之间的碰撞。
子弹击中外星人时,需要立马知道,并同时使被碰撞的外星人立即消失,因此我们需要在更新子弹的位置后立即检测碰撞。
结束游戏
这里我们还需要知道何时该结束游戏,有以下几种情况:
- 飞船全部被摧毁
- 外星人到达屏幕底部
实际效果:
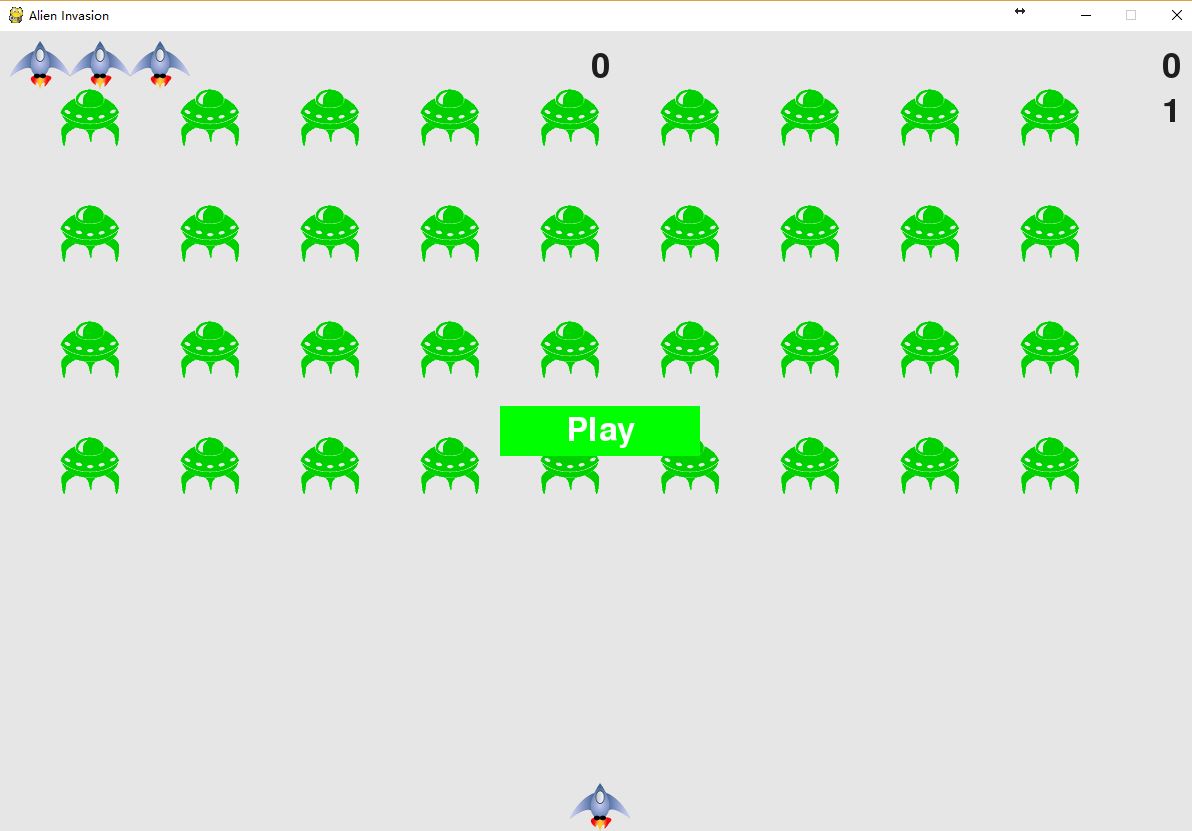
计分
最后我们将给游戏添加一个Play按钮,用于根据需要启动游戏以及在游戏结束后重启游戏。我们还将实现一个计分系统,能够在玩家等级提高时加快节奏。
添加Play按钮
这里可以先将游戏初始化为非活动状态,当我们点击了按钮,就开始游戏。由于Pygame中没有内置的创建按钮的方法。因此我们可以通过创建一个Button类来创建一个自带标签的实心矩形。我们通过检测鼠标发生点击后的坐标是否与我们绘制的按钮发生碰撞与否来判断是否发生了点击事件。
提高等级
为了使玩家将敌人消灭干净后能够提高游戏难度,增加趣味性,这里我们可以在Settings类中进行修改,增加静态初始值,和动态初始值。
记分、等级、剩余飞船
打包成exe可执行文件
上面游戏开发完了,那么你需要将其转成文exe的可执行文件。我们采用pyinstaller,安装步骤参考:传送门
项目代码
github地址:传送门