LayUI富文本域是一款轻量级的富文本编辑器,页面设计比较简约。之前写项目时因为用的是LayUI框架,所以富文本域当时就用的LayUI富文本编辑器,这里整理一下。
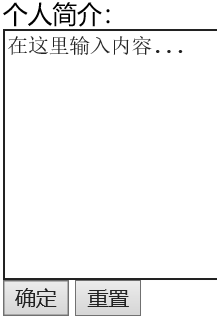
先来看一下效果图,页面效果图。

访问效果图:

首先需要引入LayUI的JS和CSS样式文件。
显示LayUI的富文本域页面只需要放一个textarea标签,可以设置富文本域的默认值。
<textarea id="lay_edit" lay-verify="content" name = "text" th:text="${model.text}"></textarea>之后用JS渲染页面。
<script>layui.use(['layedit', 'form'], function(){var form = layui.form;var layedit = layui.layedit;layedit.set({	//设置图片接口uploadImage: {url: 'layEdit/upload', //接口urltype: 'post'}});//创建一个编辑器,lay_edit为textarea标签的id值var index = layedit.build('lay_edit',{height: 350    //设置编辑器的高度});//提交时把值同步到文本域中form.verify({//content富文本域中的lay-verify值content: function(value) {return layedit.sync(index);}});});
</script>
上面代码主要有三部分。
设置图片上传的接口。
layedit.set({	//设置图片接口uploadImage: {url: 'layEdit/upload', //接口urltype: 'post'}
});
图片上传后台方法。
@RequestMapping(value="/upload")
@ResponseBody
public Object upload(MultipartFile file) {String filename = file.getOriginalFilename();String uuid = UUID.randomUUID().toString();boolean boole = fileService.saveFile(file, uuid);if (boole) {Map<String,Object> map = new HashMap<String,Object>();Map<String,Object> map2 = new HashMap<String,Object>();map.put("code", 0);	//0表示上传成功map.put("msg","上传成功"); //提示消息map2.put("src", "http://localhost/layEdit/download?uuid="+uuid);map2.put("title", filename);map.put("data", map2);return map;} else {return file.getOriginalFilename();}
}
返回的数据格式是LayUI固定的,LayUI前台接收返回的数据格式为:
{"code": 0,      //0表示成功,其他表示失败"msg": "",       //提示信息,//一般上传失败后返回"data":  {"src": "图片路径","title":  "图片名称"    //可选}
}
其中saveFile方法为图片上传方法,上传返回的地址是下载方法的地址,其代码如下。
// 图片存放位置
private final static String IMAGEPATH="e:\\layui\\image";//保存图片
@Transactional
public boolean saveFile(MultipartFile file, String uuid){try{File path = path(file.getContentType());String filename = file.getOriginalFilename();FileImg fileEntity = new FileImg();SimpleDateFormat sdf=new SimpleDateFormat("yyyy-MM-dd HH:mm:ss");Date date=new Date();fileEntity.setFileName(filename);fileEntity.setUuid(uuid);String storeaddress = path.getAbsolutePath();fileEntity.setStoreaddress(storeaddress);File saveFile = new File(path,uuid);try {fileRepository.save(fileEntity);file.transferTo(saveFile);return true;} catch (IllegalStateException | IOException e) {e.printStackTrace();return false;}}catch (Exception e){System.out.println("图片保存异常");return false;}
}//图片地址是否存在
private File path(String filename) {File pat=new File("e:\\layui");File path = new File(FileService.IMAGEPATH);if(!pat.isDirectory()) {pat.mkdir();}if(!path.isDirectory()) {path.mkdir();}return path;
}/*** 下载* @param uuid* @param request* @param response*/
public void download(String uuid, HttpServletRequest request, HttpServletResponse response) {FileImg fileentity = fileRepository.findByUuid(uuid);String filename = fileentity.getFileName();filename = getStr(request, filename);File file = new File(fileentity.getStoreaddress(), uuid);if(file.exists()) {FileInputStream fis;try {fis = new FileInputStream(file);response.setContentType("application/x-msdownload");response.addHeader("Content-Disposition", "attachment; filename=" + filename );ServletOutputStream out = response.getOutputStream();byte[] buf=new byte[2048];int n=0;while((n=fis.read(buf))!=-1){out.write(buf, 0, n);}fis.close();out.flush();out.close();} catch (FileNotFoundException e) {e.printStackTrace();} catch (IOException e) {e.printStackTrace();}}
}private String getStr(HttpServletRequest request, String fileName) {String downloadFileName = null;String agent = request.getHeader("USER-AGENT");try {if(agent != null && agent.toLowerCase().indexOf("firefox") > 0){//downloadFileName = "=?UTF-8?B?" + (new String(Base64Utils.encode(fileName.getBytes("UTF-8")))) + "?=";//设置字符集downloadFileName = "=?UTF-8?B?" + Base64Utils.encodeToString(fileName.getBytes("UTF-8")) + "?=";}else{downloadFileName =  java.net.URLEncoder.encode(fileName, "UTF-8");}} catch (UnsupportedEncodingException e) {e.printStackTrace();}return downloadFileName;
}
渲染textarea富文本域。
//创建一个编辑器,lay_edit为textarea标签的id值
var index = layedit.build('lay_edit',{height: 350
});
其他属性参数。
| 属性 | 类型 | 描述 |
|---|---|---|
| tool | Array | 重新定制编辑器工具栏,如: tool: ['link', 'unlink', 'face'] |
| hideTool | Array | 不显示编辑器工具栏,一般用于隐藏默认配置的工具bar |
| height | Number | 设定编辑器的初始高度 |
| uploadImage | Object | 设定图片上传接口,如:uploadImage: {url: '/upload/', type: 'post'} |
目前LayUI富文本域可选的Bar有(顺序可以自由排列):
tool: ['strong' //加粗,'italic' //斜体,'underline' //下划线,'del' //删除线,'|' //分割线,'left' //左对齐,'center' //居中对齐,'right' //右对齐,'link' //超链接,'unlink' //清除链接,'face' //表情,'image' //插入图片,'help' //帮助
]
同步富文本域中的数据。
//提交时把值同步到textarea文本域中
form.verify({//content富文本域中的lay-verify值content: function(value) {return layedit.sync(index);}
});
通过上面的JS渲染代码就可以得到一个完整的富文本域了,效果图如下(可以根据自己需求修改属性)。

页面全部代码。
<style type="text/css">#myForm{background: white;padding: 30px;}
</style>
<form id="myForm" method="post" class="layui-form white-bg radius"><div class="layui-form-item"><label class="layui-form-label">标题</label><div class="layui-input-block"><input type="text" class="layui-input" name="title" ></div></div><div class="layui-form-item"><label class="layui-form-label">发布人</label><div class="layui-input-block"><input type="text" class="layui-input" name="name" ></div></div><div class="layui-form-item"><label class="layui-form-label">内容</label><div class="layui-input-block"><textarea id="lay_edit" lay-verify="content" name = "text" ></textarea></div></div><div class="layui-form-item"><div class="layui-input-block"><button type="submit" lay-submit="" class="layui-btn layui-btn-radius layui-btn-normal" style="width: 150px" lay-filter="formSubmit" >保存</button></div></div>
</form><script>layui.use(['layedit', 'form'], function(){var form = layui.form;var layedit = layui.layedit;layedit.set({	//设置图片接口uploadImage: {url: 'layEdit/upload', //接口urltype: 'post'}});//创建一个编辑器var index = layedit.build('lay_edit',{height: 350});//提交时把值同步到文本域中form.verify({//content富文本域中的lay-verify值content: function(value) {return layedit.sync(index);}});form.on("submit(formSubmit)", function (data) {console.log(data.field);$.post("layEdit/save", data.field, function(result){layer.msg(result.msg,{offset:'rb'});});return false;  })});
</script>
关于富文本域的部分上面已经说的很清楚了,JS部分还包含了一个保存的方法。因为在富文本域渲染时设置了,提交时把值同步到textarea文本域中。所以这里就不用管了。
保存时,我们可以通过控制台输出看到表单序列化后的参数。

后台保存方法,新增和修改保存公用的一个方法,用ID作为区分,ID为null是新增,不为null为修改。
@Override
public Object save(LayEditForm form) throws InstantiationException, IllegalAccessException {try {LayEdit model = new LayEdit();SimpleDateFormat sdf=new SimpleDateFormat("yyyy-MM-dd HH:mm:ss");Integer id = form.getId();if(id!=null) {model=layEditService.findById(id);}else{form.setCreatdate(sdf.format(new Date()));}BeanUtils.copyProperties(form, model,"id");layEditService.save(model);return new AjaxResult("数据保存成功");} catch (Exception e) {return new AjaxResult(false,"数据保存失败");}
}
就写到这里了,如果还什么问题欢迎下方留言交流。