文章目录
- 1. RPC
- 2. 实现原理
- 3. 代码实现
- 3.1 客户端实现
- 3.2 服务端实现
- 3.3 测试
- 4. 小结
1. RPC
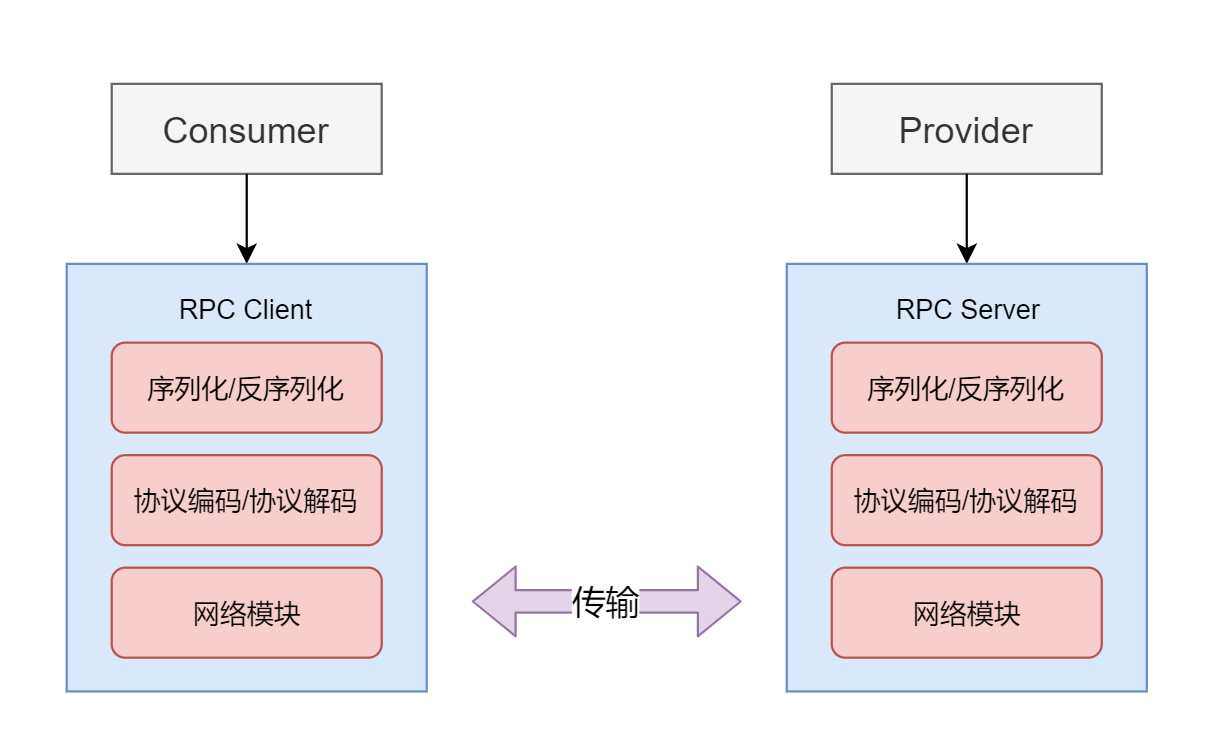
对于微服务开发者,对于 RPC(Remote Procedure Call Protocol 远程过程调用协议)并不会陌生吧, RESTful API、Dubbo、WebService等都是RPC的实现调用
在RabbitMQ中也提供了 RPC 功能,并且使用起来很简单,下面就来学习一下
2. 实现原理
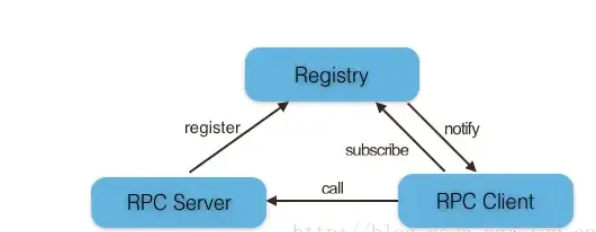
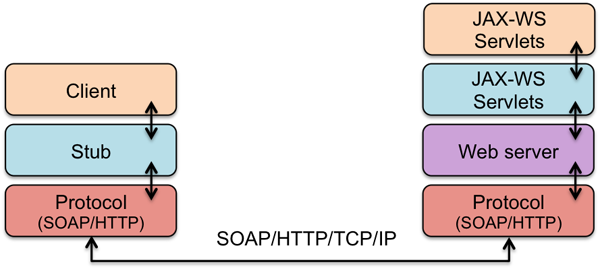
再来熟悉下原理图

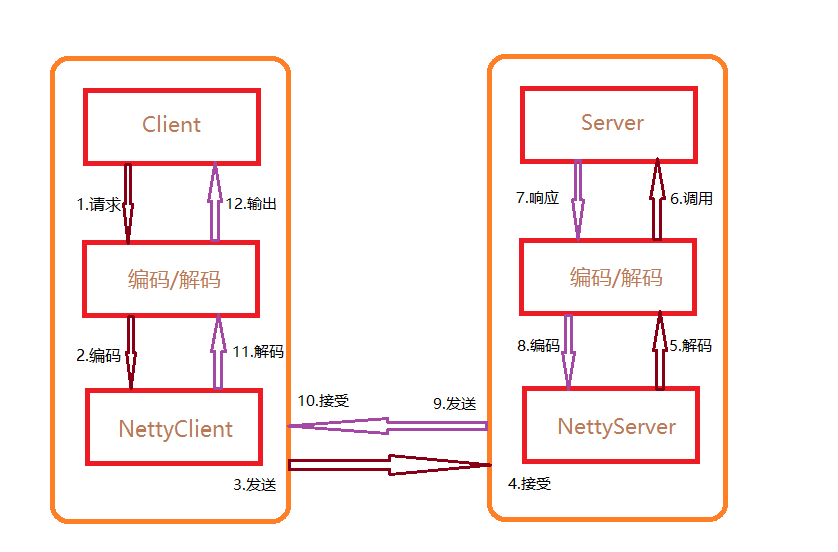
上图把RPC的过程描述的很清楚:
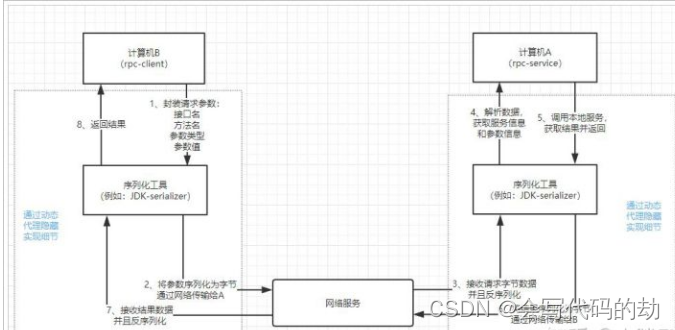
Client先发送一条消息,和普通的消息相比,消息多了两个关键内容:一个是correlation_id,表示这条消息的唯一id,一个是reply_to,表示回复队列的名字Server从消息发送队列获取消息并处理相应的业务逻辑,处理完成后,将处理结果发送到reply_to指定的回调队列中Client从回调队列中读取消息,就可知道执行结果
3. 代码实现
3.1 客户端实现
客户端配置文件:application.properties
server.port=8889
spring.rabbitmq.host=192.168.3.157
spring.rabbitmq.port=5672
spring.rabbitmq.username=guest
spring.rabbitmq.password=guest
spring.rabbitmq.virtual-host=/
# 开启消息确认
spring.rabbitmq.publisher-confirm-type=correlated
# 开启发送失败退回
spring.rabbitmq.publisher-returns=true
spring.rabbitmq.publisher-confirm-type=correlated这项配置作用是:通过 correlated来确认消息。
只有开启了这个配置,将来的消息中才会带 correlation_id,只有通过 correlation_id才能将发送的消息和返回值之间关联起来
客户端配置类:
package com.scorpios.rabbitmq.config;import org.springframework.amqp.core.Binding;
import org.springframework.amqp.core.BindingBuilder;
import org.springframework.amqp.core.Queue;
import org.springframework.amqp.core.TopicExchange;
import org.springframework.amqp.rabbit.connection.ConnectionFactory;
import org.springframework.amqp.rabbit.core.RabbitTemplate;
import org.springframework.amqp.rabbit.listener.SimpleMessageListenerContainer;
import org.springframework.context.annotation.Bean;
import org.springframework.context.annotation.Configuration;@Configuration
public class RPCRabbitMQConfig {// 交换机的名称public static final String SCORPIOS_RPC_EXCHANGE_NAME = "scorpios_rpc_exchange_name";// 发送队列名称public static final String SCORPIOS_RPC_MSG_QUEUE = "scorpios_rpc_msg_queue";// 返回队列名称public static final String SCORPIOS_RPC_REPLY_QUEUE = "scorpios_rpc_reply_queue";@BeanTopicExchange topicExchange(){return new TopicExchange(RPCRabbitMQConfig.SCORPIOS_RPC_EXCHANGE_NAME,true,false);}@BeanQueue queueOne() {return new Queue(RPCRabbitMQConfig.SCORPIOS_RPC_MSG_QUEUE,true,false,false);}@BeanQueue queueTwo() {return new Queue(RPCRabbitMQConfig.SCORPIOS_RPC_REPLY_QUEUE,true,false,false);}/*** 请求队列和交换器绑定*/@BeanBinding bindingMsg(){return BindingBuilder.bind(queueOne()).to(topicExchange()).with(RPCRabbitMQConfig.SCORPIOS_RPC_MSG_QUEUE);}/*** 返回队列和交换器绑定*/@BeanBinding bindingReply(){return BindingBuilder.bind(queueTwo()).to(topicExchange()).with(RPCRabbitMQConfig.SCORPIOS_RPC_REPLY_QUEUE);}/*** 自定义 RabbitTemplate发送和接收消息,因为要设置回调队列地址*/@BeanRabbitTemplate rabbitTemplate(ConnectionFactory connectionFactory){RabbitTemplate rabbitTemplate = new RabbitTemplate(connectionFactory);rabbitTemplate.setReplyAddress(RPCRabbitMQConfig.SCORPIOS_RPC_REPLY_QUEUE);rabbitTemplate.setReplyTimeout(5000);return rabbitTemplate;}/*** 给返回队列设置监听器*/@BeanSimpleMessageListenerContainer replyContainer(ConnectionFactory connectionFactory) {SimpleMessageListenerContainer container = new SimpleMessageListenerContainer();container.setConnectionFactory(connectionFactory);container.setQueueNames(RPCRabbitMQConfig.SCORPIOS_RPC_REPLY_QUEUE);container.setMessageListener(rabbitTemplate(connectionFactory));return container;}}
上面代码解释说明:
- 定义一个
TopicExchange交换机,一个MsgQueue队列,一个ReplyQueue,并与交换机进行绑定 - 自定义一个
RabbitTemplate用户发送消息,虽然在SpringBoot中,默认情况下系统自动提供RabbitTemplate,但是这里需要对该RabbitTemplate重新进行定制,因为要给RabbitTemplate添加返回队列,最后还需要给返回队列设置一个监听器
下面来编写消息发送代码:
@Slf4j
@RestController
public class RabbitMQController {@Autowiredprivate RabbitTemplate rabbitTemplate;@GetMapping("/send/message")public String send(String message) {// 创建消息对象Message newMessage = MessageBuilder.withBody(message.getBytes()).build();log.info("Client 发送的消息为:{}", newMessage);// 客户端给消息队列发送消息,并返回响应结果Message result = rabbitTemplate.sendAndReceive(RPCRabbitMQConfig.SCORPIOS_RPC_EXCHANGE_NAME, RPCRabbitMQConfig.SCORPIOS_RPC_MSG_QUEUE, newMessage);String response = "";if (result != null) {// 获取已发送的消息的 correlationIdString correlationId = newMessage.getMessageProperties().getCorrelationId();log.info("发送消息的correlationId为:{}", correlationId);// 获取响应头信息HashMap<String, Object> headers = (HashMap<String, Object>) result.getMessageProperties().getHeaders();// 获取 server 返回的消息 correlationIdString msgId = (String) headers.get("spring_returned_message_correlation");// 将已发送的消息的 correlationId与server返回的消息 correlationId进行对比,相同则取出响应结果if (msgId.equals(correlationId)) {response = new String(result.getBody());log.info("client 收到的响应结果为:{}", response);}}return response;}}
解释说明:
- 消息发送调用
sendAndReceive方法,该方法自带返回值,返回值就是服务端返回的消息 - 服务端返回的消息中,头信息中包含了
spring_returned_message_correlation字段,这就是消息发送时的correlation_id,通过消息发送时的correlation_id以及返回消息头中的spring_returned_message_correlation字段值,就可以将返回的消息内容和发送的消息绑定到一起,确认出这个返回的内容就是针对这个发送的消息的
注意:如果没有在 application.properties 中配置 correlated,发送的消息中就没有 correlation_id,这样就无法将返回的消息内容和发送的消息内容关联起来
3.2 服务端实现
服务端配置文件 application.properties与客户端中的配置文件一致
服务端配置类:
@Configuration
public class RPCServerRabbitMQConfig {// 交换机的名称public static final String SCORPIOS_RPC_EXCHANGE_NAME = "scorpios_rpc_exchange_name";// 发送队列名称public static final String SCORPIOS_RPC_MSG_QUEUE = "scorpios_rpc_msg_queue";// 返回队列名称public static final String SCORPIOS_RPC_REPLY_QUEUE = "scorpios_rpc_reply_queue";@BeanTopicExchange topicExchange(){return new TopicExchange(RPCServerRabbitMQConfig.SCORPIOS_RPC_EXCHANGE_NAME,true,false);}@BeanQueue queueOne() {return new Queue(RPCServerRabbitMQConfig.SCORPIOS_RPC_MSG_QUEUE,true,false,false);}@BeanQueue queueTwo() {return new Queue(RPCServerRabbitMQConfig.SCORPIOS_RPC_REPLY_QUEUE,true,false,false);}@BeanBinding bindingMsg(){return BindingBuilder.bind(queueOne()).to(topicExchange()).with(RPCServerRabbitMQConfig.SCORPIOS_RPC_MSG_QUEUE);}@BeanBinding bindingReply(){return BindingBuilder.bind(queueTwo()).to(topicExchange()).with(RPCServerRabbitMQConfig.SCORPIOS_RPC_REPLY_QUEUE);}}
最后我们再来看下消息的消费:
@Slf4j
@Component
public class RpcServerConsumer {@Autowiredprivate RabbitTemplate rabbitTemplate;// 此消费者消费msgQueue队列中的消息@RabbitListener(queues = RPCServerRabbitMQConfig.SCORPIOS_RPC_MSG_QUEUE)public void process(Message msg) {log.info("server 收到msgQueue队列中的消息为 : {}",msg.toString());Message response = MessageBuilder.withBody(("我是服务端Server,收到的消息为:"+new String(msg.getBody())).getBytes()).build();// 把收到的原消息的CorrelationId取出CorrelationData correlationData = new CorrelationData(msg.getMessageProperties().getCorrelationId());// 想replyQueue队列发送确认消息rabbitTemplate.sendAndReceive(RPCServerRabbitMQConfig.SCORPIOS_RPC_EXCHANGE_NAME, RPCServerRabbitMQConfig.SCORPIOS_RPC_REPLY_QUEUE, response, correlationData);}}
解释说明:
- 服务端首先收到消息并打印出来
- 服务端提取出原消息中的
correlation_id - 服务端调用
sendAndReceive方法,将消息发送给replyQueue队列,同时带上correlation_id参数
3.3 测试
启动Client与Server服务,并在浏览器中输入:http://localhost:8889/send/scorpios
Client服务日志:

Server服务日志:

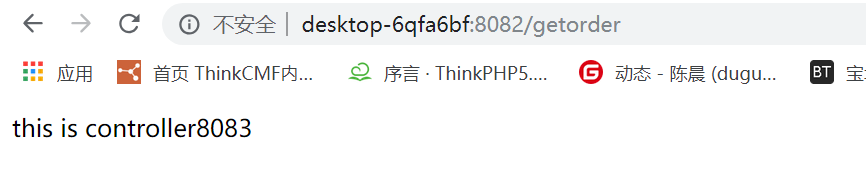
浏览器响应结果:

4. 小结
再来看一下这个原理图:

- 定义一个
Exchange交换机,两个队列:MsgQueue、ReplyQueue Client调用sendAndReceive方法向MsgQueue队列中发送消息,该方法自带返回值,返回值就是服务端返回的消息- 在
Server端消费MsgQueue队列消息后,往ReplayQueue中发送消息
代码地址:https://github.com/Hofanking/springboot-rabbitmq-example
springboot-rabbitmq-rpc-client
springboot-rabbitmq-rpc-server