最近进行led彩屏通讯开发,接触到CRC16算法计算校验码,先附上两篇网上可用的代码
/*** 计算CRC16校验码** @param bytes* @return*/public static String getCRC(byte[] bytes) {int CRC = 0x0000ffff;int POLYNOMIAL = 0x0000a001;int i, j;for (i = 0; i < bytes.length; i++) {CRC ^= ((int) bytes[i] & 0x000000ff);for (j = 0; j < 8; j++) {if ((CRC & 0x00000001) != 0) {CRC >>= 1;CRC ^= POLYNOMIAL;} else {CRC >>= 1;}}}return Integer.toHexString(CRC);}/*** 查表法计算CRC16校验** @param data 需要计算的字节数组*/public static String getCRC3(byte[] data) {byte[] crc16_h = {(byte) 0x00, (byte) 0xC1, (byte) 0x81, (byte) 0x40, (byte) 0x01, (byte) 0xC0, (byte) 0x80, (byte) 0x41, (byte) 0x01, (byte) 0xC0, (byte) 0x80, (byte) 0x41, (byte) 0x00, (byte) 0xC1, (byte) 0x81, (byte) 0x40,(byte) 0x01, (byte) 0xC0, (byte) 0x80, (byte) 0x41, (byte) 0x00, (byte) 0xC1, (byte) 0x81, (byte) 0x40, (byte) 0x00, (byte) 0xC1, (byte) 0x81, (byte) 0x40, (byte) 0x01, (byte) 0xC0, (byte) 0x80, (byte) 0x41,(byte) 0x01, (byte) 0xC0, (byte) 0x80, (byte) 0x41, (byte) 0x00, (byte) 0xC1, (byte) 0x81, (byte) 0x40, (byte) 0x00, (byte) 0xC1, (byte) 0x81, (byte) 0x40, (byte) 0x01, (byte) 0xC0, (byte) 0x80, (byte) 0x41,(byte) 0x00, (byte) 0xC1, (byte) 0x81, (byte) 0x40, (byte) 0x01, (byte) 0xC0, (byte) 0x80, (byte) 0x41, (byte) 0x01, (byte) 0xC0, (byte) 0x80, (byte) 0x41, (byte) 0x00, (byte) 0xC1, (byte) 0x81, (byte) 0x40,(byte) 0x01, (byte) 0xC0, (byte) 0x80, (byte) 0x41, (byte) 0x00, (byte) 0xC1, (byte) 0x81, (byte) 0x40, (byte) 0x00, (byte) 0xC1, (byte) 0x81, (byte) 0x40, (byte) 0x01, (byte) 0xC0, (byte) 0x80, (byte) 0x41,(byte) 0x00, (byte) 0xC1, (byte) 0x81, (byte) 0x40, (byte) 0x01, (byte) 0xC0, (byte) 0x80, (byte) 0x41, (byte) 0x01, (byte) 0xC0, (byte) 0x80, (byte) 0x41, (byte) 0x00, (byte) 0xC1, (byte) 0x81, (byte) 0x40,(byte) 0x00, (byte) 0xC1, (byte) 0x81, (byte) 0x40, (byte) 0x01, (byte) 0xC0, (byte) 0x80, (byte) 0x41, (byte) 0x01, (byte) 0xC0, (byte) 0x80, (byte) 0x41, (byte) 0x00, (byte) 0xC1, (byte) 0x81, (byte) 0x40,(byte) 0x01, (byte) 0xC0, (byte) 0x80, (byte) 0x41, (byte) 0x00, (byte) 0xC1, (byte) 0x81, (byte) 0x40, (byte) 0x00, (byte) 0xC1, (byte) 0x81, (byte) 0x40, (byte) 0x01, (byte) 0xC0, (byte) 0x80, (byte) 0x41,(byte) 0x01, (byte) 0xC0, (byte) 0x80, (byte) 0x41, (byte) 0x00, (byte) 0xC1, (byte) 0x81, (byte) 0x40, (byte) 0x00, (byte) 0xC1, (byte) 0x81, (byte) 0x40, (byte) 0x01, (byte) 0xC0, (byte) 0x80, (byte) 0x41,(byte) 0x00, (byte) 0xC1, (byte) 0x81, (byte) 0x40, (byte) 0x01, (byte) 0xC0, (byte) 0x80, (byte) 0x41, (byte) 0x01, (byte) 0xC0, (byte) 0x80, (byte) 0x41, (byte) 0x00, (byte) 0xC1, (byte) 0x81, (byte) 0x40,(byte) 0x00, (byte) 0xC1, (byte) 0x81, (byte) 0x40, (byte) 0x01, (byte) 0xC0, (byte) 0x80, (byte) 0x41, (byte) 0x01, (byte) 0xC0, (byte) 0x80, (byte) 0x41, (byte) 0x00, (byte) 0xC1, (byte) 0x81, (byte) 0x40,(byte) 0x01, (byte) 0xC0, (byte) 0x80, (byte) 0x41, (byte) 0x00, (byte) 0xC1, (byte) 0x81, (byte) 0x40, (byte) 0x00, (byte) 0xC1, (byte) 0x81, (byte) 0x40, (byte) 0x01, (byte) 0xC0, (byte) 0x80, (byte) 0x41,(byte) 0x00, (byte) 0xC1, (byte) 0x81, (byte) 0x40, (byte) 0x01, (byte) 0xC0, (byte) 0x80, (byte) 0x41, (byte) 0x01, (byte) 0xC0, (byte) 0x80, (byte) 0x41, (byte) 0x00, (byte) 0xC1, (byte) 0x81, (byte) 0x40,(byte) 0x01, (byte) 0xC0, (byte) 0x80, (byte) 0x41, (byte) 0x00, (byte) 0xC1, (byte) 0x81, (byte) 0x40, (byte) 0x00, (byte) 0xC1, (byte) 0x81, (byte) 0x40, (byte) 0x01, (byte) 0xC0, (byte) 0x80, (byte) 0x41,(byte) 0x01, (byte) 0xC0, (byte) 0x80, (byte) 0x41, (byte) 0x00, (byte) 0xC1, (byte) 0x81, (byte) 0x40, (byte) 0x00, (byte) 0xC1, (byte) 0x81, (byte) 0x40, (byte) 0x01, (byte) 0xC0, (byte) 0x80, (byte) 0x41,(byte) 0x00, (byte) 0xC1, (byte) 0x81, (byte) 0x40, (byte) 0x01, (byte) 0xC0, (byte) 0x80, (byte) 0x41, (byte) 0x01, (byte) 0xC0, (byte) 0x80, (byte) 0x41, (byte) 0x00, (byte) 0xC1, (byte) 0x81, (byte) 0x40};byte[] crc16_l = {(byte) 0x00, (byte) 0xC0, (byte) 0xC1, (byte) 0x01, (byte) 0xC3, (byte) 0x03, (byte) 0x02, (byte) 0xC2, (byte) 0xC6, (byte) 0x06, (byte) 0x07, (byte) 0xC7, (byte) 0x05, (byte) 0xC5, (byte) 0xC4, (byte) 0x04,(byte) 0xCC, (byte) 0x0C, (byte) 0x0D, (byte) 0xCD, (byte) 0x0F, (byte) 0xCF, (byte) 0xCE, (byte) 0x0E, (byte) 0x0A, (byte) 0xCA, (byte) 0xCB, (byte) 0x0B, (byte) 0xC9, (byte) 0x09, (byte) 0x08, (byte) 0xC8,(byte) 0xD8, (byte) 0x18, (byte) 0x19, (byte) 0xD9, (byte) 0x1B, (byte) 0xDB, (byte) 0xDA, (byte) 0x1A, (byte) 0x1E, (byte) 0xDE, (byte) 0xDF, (byte) 0x1F, (byte) 0xDD, (byte) 0x1D, (byte) 0x1C, (byte) 0xDC,(byte) 0x14, (byte) 0xD4, (byte) 0xD5, (byte) 0x15, (byte) 0xD7, (byte) 0x17, (byte) 0x16, (byte) 0xD6, (byte) 0xD2, (byte) 0x12, (byte) 0x13, (byte) 0xD3, (byte) 0x11, (byte) 0xD1, (byte) 0xD0, (byte) 0x10,(byte) 0xF0, (byte) 0x30, (byte) 0x31, (byte) 0xF1, (byte) 0x33, (byte) 0xF3, (byte) 0xF2, (byte) 0x32, (byte) 0x36, (byte) 0xF6, (byte) 0xF7, (byte) 0x37, (byte) 0xF5, (byte) 0x35, (byte) 0x34, (byte) 0xF4,(byte) 0x3C, (byte) 0xFC, (byte) 0xFD, (byte) 0x3D, (byte) 0xFF, (byte) 0x3F, (byte) 0x3E, (byte) 0xFE, (byte) 0xFA, (byte) 0x3A, (byte) 0x3B, (byte) 0xFB, (byte) 0x39, (byte) 0xF9, (byte) 0xF8, (byte) 0x38,(byte) 0x28, (byte) 0xE8, (byte) 0xE9, (byte) 0x29, (byte) 0xEB, (byte) 0x2B, (byte) 0x2A, (byte) 0xEA, (byte) 0xEE, (byte) 0x2E, (byte) 0x2F, (byte) 0xEF, (byte) 0x2D, (byte) 0xED, (byte) 0xEC, (byte) 0x2C,(byte) 0xE4, (byte) 0x24, (byte) 0x25, (byte) 0xE5, (byte) 0x27, (byte) 0xE7, (byte) 0xE6, (byte) 0x26, (byte) 0x22, (byte) 0xE2, (byte) 0xE3, (byte) 0x23, (byte) 0xE1, (byte) 0x21, (byte) 0x20, (byte) 0xE0,(byte) 0xA0, (byte) 0x60, (byte) 0x61, (byte) 0xA1, (byte) 0x63, (byte) 0xA3, (byte) 0xA2, (byte) 0x62, (byte) 0x66, (byte) 0xA6, (byte) 0xA7, (byte) 0x67, (byte) 0xA5, (byte) 0x65, (byte) 0x64, (byte) 0xA4,(byte) 0x6C, (byte) 0xAC, (byte) 0xAD, (byte) 0x6D, (byte) 0xAF, (byte) 0x6F, (byte) 0x6E, (byte) 0xAE, (byte) 0xAA, (byte) 0x6A, (byte) 0x6B, (byte) 0xAB, (byte) 0x69, (byte) 0xA9, (byte) 0xA8, (byte) 0x68,(byte) 0x78, (byte) 0xB8, (byte) 0xB9, (byte) 0x79, (byte) 0xBB, (byte) 0x7B, (byte) 0x7A, (byte) 0xBA, (byte) 0xBE, (byte) 0x7E, (byte) 0x7F, (byte) 0xBF, (byte) 0x7D, (byte) 0xBD, (byte) 0xBC, (byte) 0x7C,(byte) 0xB4, (byte) 0x74, (byte) 0x75, (byte) 0xB5, (byte) 0x77, (byte) 0xB7, (byte) 0xB6, (byte) 0x76, (byte) 0x72, (byte) 0xB2, (byte) 0xB3, (byte) 0x73, (byte) 0xB1, (byte) 0x71, (byte) 0x70, (byte) 0xB0,(byte) 0x50, (byte) 0x90, (byte) 0x91, (byte) 0x51, (byte) 0x93, (byte) 0x53, (byte) 0x52, (byte) 0x92, (byte) 0x96, (byte) 0x56, (byte) 0x57, (byte) 0x97, (byte) 0x55, (byte) 0x95, (byte) 0x94, (byte) 0x54,(byte) 0x9C, (byte) 0x5C, (byte) 0x5D, (byte) 0x9D, (byte) 0x5F, (byte) 0x9F, (byte) 0x9E, (byte) 0x5E, (byte) 0x5A, (byte) 0x9A, (byte) 0x9B, (byte) 0x5B, (byte) 0x99, (byte) 0x59, (byte) 0x58, (byte) 0x98,(byte) 0x88, (byte) 0x48, (byte) 0x49, (byte) 0x89, (byte) 0x4B, (byte) 0x8B, (byte) 0x8A, (byte) 0x4A, (byte) 0x4E, (byte) 0x8E, (byte) 0x8F, (byte) 0x4F, (byte) 0x8D, (byte) 0x4D, (byte) 0x4C, (byte) 0x8C,(byte) 0x44, (byte) 0x84, (byte) 0x85, (byte) 0x45, (byte) 0x87, (byte) 0x47, (byte) 0x46, (byte) 0x86, (byte) 0x82, (byte) 0x42, (byte) 0x43, (byte) 0x83, (byte) 0x41, (byte) 0x81, (byte) 0x80, (byte) 0x40};int crc = 0x0000ffff;int ucCRCHi = 0x00ff;int ucCRCLo = 0x00ff;int iIndex;for (int i = 0; i < data.length; ++i) {iIndex = (ucCRCLo ^ data[i]) & 0x00ff;ucCRCLo = ucCRCHi ^ crc16_h[iIndex];ucCRCHi = crc16_l[iIndex];}crc = ((ucCRCHi & 0x00ff) << 8) | (ucCRCLo & 0x00ff) & 0xffff;//高低位互换,输出符合相关工具对Modbus CRC16的运算crc = ( (crc & 0xFF00) >> 8) | ( (crc & 0x00FF ) << 8);return String.format("%04X", crc);}两个方法亲测可用后,我查了下算法原理,并且自己稍微修改了一下第一个方法显得更直观。附:可能有人和我一样当初对上面第一个方法为什么最后没有转换高低位感到奇怪,现在我的理解是看需求。
public static String getCRC2(byte[] bytes) {
//        ModBus 通信协议的 CRC ( 冗余循环校验码含2个字节, 即 16 位二进制数。
//        CRC 码由发送设备计算, 放置于所发送信息帧的尾部。
//        接收信息设备再重新计算所接收信息 (除 CRC 之外的部分)的 CRC,
//        比较计算得到的 CRC 是否与接收到CRC相符, 如果两者不相符, 则认为数据出错。
//
//        1) 预置 1 个 16 位的寄存器为十六进制FFFF(即全为 1) , 称此寄存器为 CRC寄存器。
//        2) 把第一个 8 位二进制数据 (通信信息帧的第一个字节) 与 16 位的 CRC寄存器的低 8 位相异或, 把结果放于 CRC寄存器。
//        3) 把 CRC 寄存器的内容右移一位( 朝低位)用 0 填补最高位, 并检查右移后的移出位。
//        4) 如果移出位为 0, 重复第 3 步 ( 再次右移一位); 如果移出位为 1, CRC 寄存器与多项式A001 ( 1010 0000 0000 0001) 进行异或。
//        5) 重复步骤 3 和步骤 4, 直到右移 8 次,这样整个8位数据全部进行了处理。
//        6) 重复步骤 2 到步骤 5, 进行通信信息帧下一个字节的处理。
//        7) 将该通信信息帧所有字节按上述步骤计算完成后,得到的16位CRC寄存器的高、低字节进行交换。
//        8) 最后得到的 CRC寄存器内容即为 CRC码。int CRC = 0x0000ffff;int POLYNOMIAL = 0x0000a001;int i, j;for (i = 0; i < bytes.length; i++) {CRC ^= (int) bytes[i];for (j = 0; j < 8; j++) {if ((CRC & 0x00000001) == 1) {CRC >>= 1;CRC ^= POLYNOMIAL;} else {CRC >>= 1;}}}//高低位转换,看情况使用(譬如本人这次对led彩屏的通讯开发就规定校验码高位在前低位在后,也就不需要转换高低位)//CRC = ( (CRC & 0x0000FF00) >> 8) | ( (CRC & 0x000000FF ) << 8);return Integer.toHexString(CRC);}
@Testpublic void testCRC16() throws Exception {//字符串转16进制byte数组String str16 = encode("aabb");byte[] bytes = str16.getBytes();System.out.println("str16:" + str16);System.out.println(getCRC(bytes));System.out.println(getCRC2(bytes));System.out.println(getCRC3(bytes));}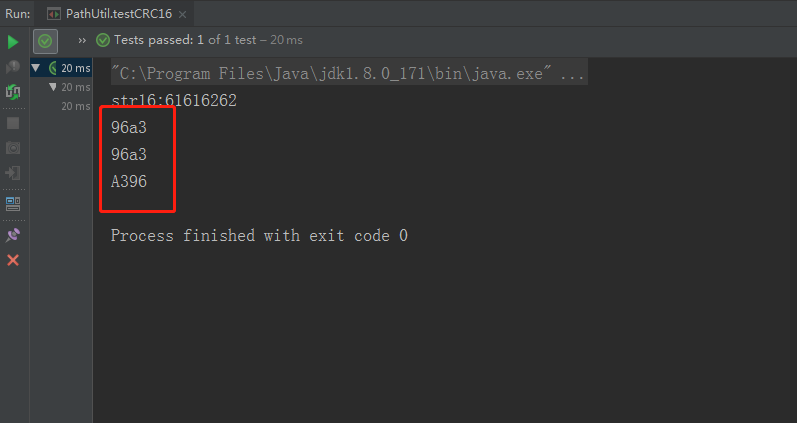
本文转载自: https://www.cnblogs.com/lujiannt/p/9246256.html


![[Linux]线程概念_线程控制(线程与进程的区别与联系 | 线程创建 | 线程等待 | 线程终止 | 线程分离 | LWP)](https://img-blog.csdnimg.cn/16d5aafb3844436e88a1785fefd5c34d.png)