欢迎支持笔者新作:《深入理解Kafka:核心设计与实践原理》和《RabbitMQ实战指南》,同时欢迎关注笔者的微信公众号:朱小厮的博客。

欢迎跳转到本文的原文链接:https://honeypps.com/java/jsch-quick-start/
JSch 是SSH2的一个纯Java实现。它允许你连接到一个sshd 服务器,使用端口转发,X11转发,文件传输等等。你可以将它的功能集成到你自己的 程序中。同时该项目也提供一个J2ME版本用来在手机上直连SSHD服务器。
官网:http://www.jcraft.com/jsch/中有很多例子http://www.jcraft.com/jsch/examples/,这里先采用(已做修改)其中2个来进行简单论述,希望对大家有所帮助。
本文采用的jsch版本是0.1.51. 下载地址:http://sourceforge.net/projects/jsch/files/jsch/0.1.54/jsch-0.1.54.zip/download。
本文采用的linux操作系统是CentOS6.5.
TIPS: 查看Linux操作系统(内核)版本可以使用:uname -a; uname -r; cat /etc/issue; cat /etc/redhat-release等命令。
第一个例子:采用Java模拟shell操作。
这里涉及到几个参数,会在下面的代码中有所体现:
- USER:所连接的Linux主机登录时的用户名
- PASSWORD:登录密码
- HOST:主机地址
- DEFAULT_SSH_PROT=端口号,默认为22
package com.test.jsch;/*** This program enables you to connect to sshd server and get the shell prompt.* You will be asked username, hostname and passwd.* If everything works fine, you will get the shell prompt. Output may* be ugly because of lacks of terminal-emulation, but you can issue commands.*/import com.jcraft.jsch.JSch;
import com.jcraft.jsch.Session;
import com.jcraft.jsch.UserInfo;
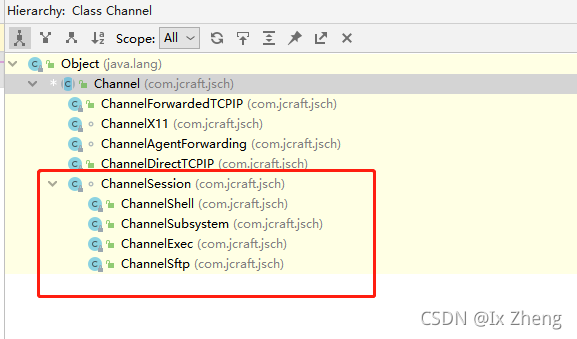
import com.jcraft.jsch.Channel;public class Shell{private static final String USER="root";private static final String PASSWORD="********";private static final String HOST="localhost";private static final int DEFAULT_SSH_PORT=22;public static void main(String[] arg){try{JSch jsch=new JSch();Session session = jsch.getSession(USER,HOST,DEFAULT_SSH_PORT);session.setPassword(PASSWORD);UserInfo userInfo = new UserInfo() {@Overridepublic String getPassphrase() {System.out.println("getPassphrase");return null;}@Overridepublic String getPassword() {System.out.println("getPassword");return null;}@Overridepublic boolean promptPassword(String s) {System.out.println("promptPassword:"+s);return false;}@Overridepublic boolean promptPassphrase(String s) {System.out.println("promptPassphrase:"+s);return false;}@Overridepublic boolean promptYesNo(String s) {System.out.println("promptYesNo:"+s);return true;//notice here!}@Overridepublic void showMessage(String s) {System.out.println("showMessage:"+s);}};session.setUserInfo(userInfo);// It must not be recommended, but if you want to skip host-key check,// invoke following,// session.setConfig("StrictHostKeyChecking", "no");//session.connect();session.connect(30000); // making a connection with timeout.Channel channel=session.openChannel("shell");// Enable agent-forwarding.//((ChannelShell)channel).setAgentForwarding(true);channel.setInputStream(System.in);/*// a hack for MS-DOS prompt on Windows.channel.setInputStream(new FilterInputStream(System.in){public int read(byte[] b, int off, int len)throws IOException{return in.read(b, off, (len>1024?1024:len));}});*/channel.setOutputStream(System.out);/*// Choose the pty-type "vt102".((ChannelShell)channel).setPtyType("vt102");*//*// Set environment variable "LANG" as "ja_JP.eucJP".((ChannelShell)channel).setEnv("LANG", "ja_JP.eucJP");*///channel.connect();channel.connect(3*1000);}catch(Exception e){System.out.println(e);}}
}
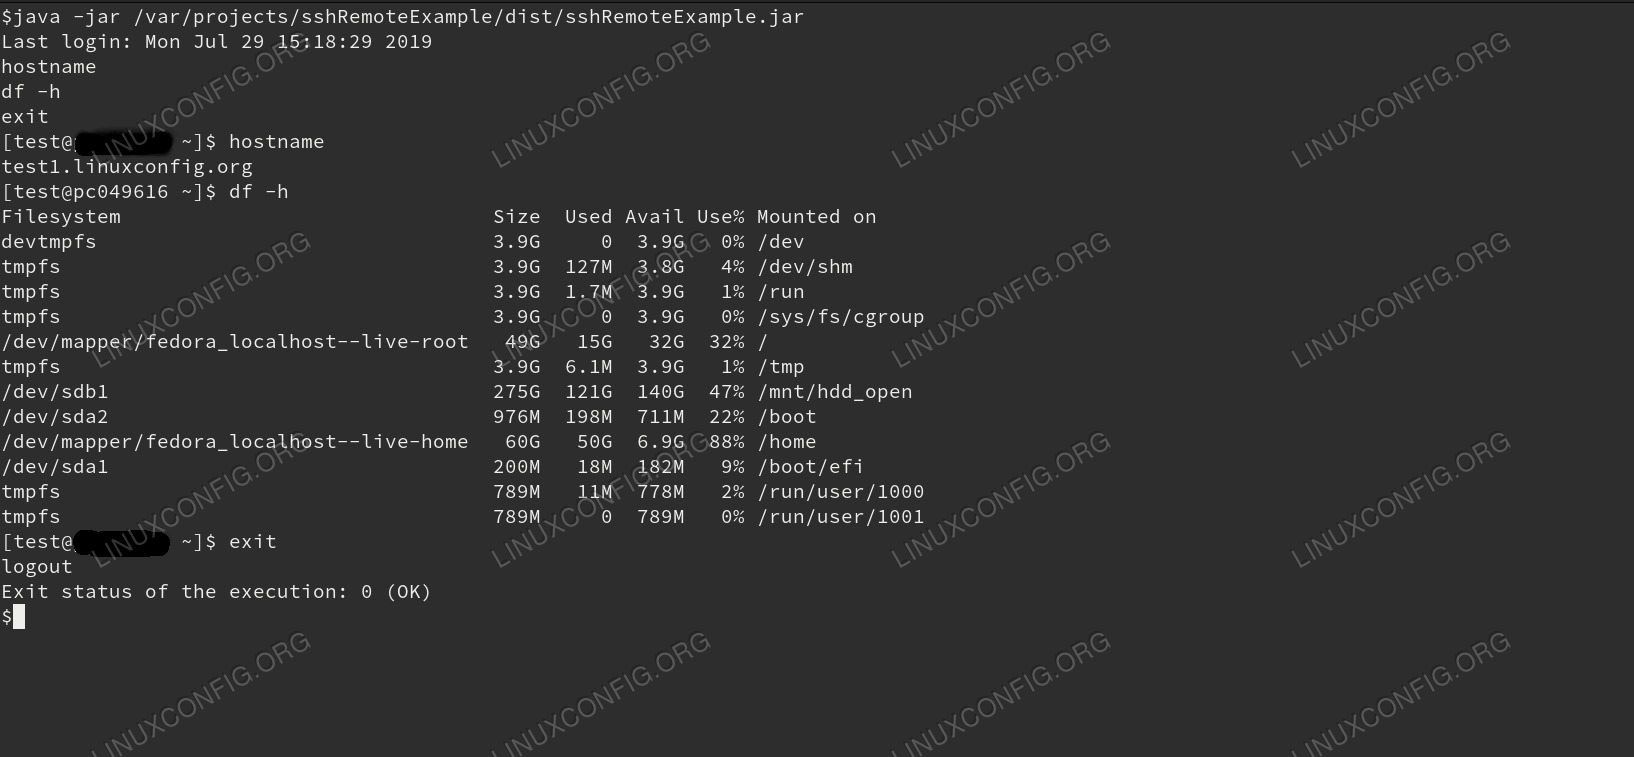
运行结果:
promptYesNo:
The authenticity of host 'xx.xx.xx.5' can't be established.
RSA key fingerprint is 59:0f:32:fc:7b:54:3d:90:c0:ef:5a:6b:fb:11:55:e1.
Are you sure you want to continue connecting?
trueLast login: Thu Sep 29 18:40:56 2016 from xx.xx.xx.240
[root@hidden ~]#
输入ls查看:
(省略一些....)
[root@hidden ~]# ls
ls
1.txt            install.log.syslog  vmware-tools-distrib  模板  文档  桌面
anaconda-ks.cfg  logs                workspace             视频  下载
install.log      util                公共的                图片  音乐
[root@hidden ~]#
这样就和在原linux系统中一样使用shell功能了。
如果需要跳过如下的检测:
The authenticity of host 'xx.xx.xx.5' can't be established.
RSA key fingerprint is 59:0f:32:fc:7b:54:3d:90:c0:ef:5a:6b:fb:11:55:e1.
Are you sure you want to continue connecting?
只需要在程序中加入相应的代码:
session.setConfig("StrictHostKeyChecking", "no");
运行结果:
Last login: Thu Sep 29 18:39:18 2016 from xx.xx.xx.240
[root@hidden ~]#
第二个例子:运行一条shell指令,这里就那“ls”做例子好了。
No more talk, show you the code:
package com.test.jsch;import com.jcraft.jsch.*;
import java.io.*;public class Exec{private static final String USER="root";private static final String PASSWORD="********";private static final String HOST="localhost";private static final int DEFAULT_SSH_PORT=22;public static void main(String[] arg){try{JSch jsch=new JSch();Session session = jsch.getSession(USER,HOST,DEFAULT_SSH_PORT);session.setPassword(PASSWORD);// username and password will be given via UserInfo interface.session.setUserInfo(new MyUserInfo());session.connect();String command="ls";Channel channel=session.openChannel("exec");((ChannelExec)channel).setCommand(command);// X Forwarding// channel.setXForwarding(true);//channel.setInputStream(System.in);channel.setInputStream(null);//channel.setOutputStream(System.out);//FileOutputStream fos=new FileOutputStream("/tmp/stderr");//((ChannelExec)channel).setErrStream(fos);((ChannelExec)channel).setErrStream(System.err);InputStream in=channel.getInputStream();channel.connect();byte[] tmp=new byte[1024];while(true){while(in.available()>0){int i=in.read(tmp, 0, 1024);if(i<0)break;System.out.print(new String(tmp, 0, i));}if(channel.isClosed()){if(in.available()>0) continue;System.out.println("exit-status: "+channel.getExitStatus());break;}try{Thread.sleep(1000);}catch(Exception ee){}}channel.disconnect();session.disconnect();}catch(Exception e){System.out.println(e);}}private static class MyUserInfo implements UserInfo{@Overridepublic String getPassphrase() {System.out.println("getPassphrase");return null;}@Overridepublic String getPassword() {System.out.println("getPassword");return null;}@Overridepublic boolean promptPassword(String s) {System.out.println("promptPassword:"+s);return false;}@Overridepublic boolean promptPassphrase(String s) {System.out.println("promptPassphrase:"+s);return false;}@Overridepublic boolean promptYesNo(String s) {System.out.println("promptYesNo:"+s);return true;//notice here!}@Overridepublic void showMessage(String s) {System.out.println("showMessage:"+s);}}
}
运行结果:
promptYesNo:The authenticity of host 'xx.xx.xx.5' can't be established.
RSA key fingerprint is 59:0f:32:fc:7b:54:3d:90:c0:ef:5a:6b:fb:11:55:e1.
Are you sure you want to continue connecting?
1.txt
anaconda-ks.cfg
install.log
install.log.syslog
logs
util
vmware-tools-distrib
workspace
公共的
模板
视频
图片
文档
下载
音乐
桌面
exit-status: 0
第二个例子相比于第一个例子来说将UserInfo采用static class的方式提取出来,这样更直观一点。
JSch是以多线程方式一下,所以代码在connect后如果不disconnect channel和session,以及相关stream, 程序会一直等待,直到关闭。
需要注意的一个问题,相关的Stream和Channel是一定要关闭的,那么应该在什么时候来关?执行connect后,JSch接受客户端结果需要一定的时间(以秒计),如果马上关闭session就会发现什么都没接受到或内容不全。
还有一点注意,使用shell时,看到执行后没有结果,解决办法是在命令行后加上"\n"字符,server端就认为是一条完整的命令了。
最后将第一个和第二个例子合并,并提取一些公用模块,以便更好的理解和使用:
package com.test.jsch;import com.jcraft.jsch.*;import java.io.*;
import java.util.concurrent.TimeUnit;import static java.lang.String.format;/*** Created by hidden on 2016/9/29.*/
public class SSHExecutor {private static long INTERVAL = 100L;private static int SESSION_TIMEOUT = 30000;private static int CHANNEL_TIMEOUT = 3000;private JSch jsch = null;private Session session = null;private SSHExecutor(SSHInfo sshInfo) throws JSchException {jsch =new JSch();session = jsch.getSession(sshInfo.getUser(),sshInfo.getHost(),sshInfo.getPort());session.setPassword(sshInfo.getPassword());session.setUserInfo(new MyUserInfo());session.connect(SESSION_TIMEOUT);}/** 在这里修改访问入口,当然可以把这个方法弄到SSHExecutor外面,这里是方便操作才这么做的* */public static SSHExecutor newInstance() throws JSchException {SSHInfo sshInfo = new SSHInfo("root","******","locahost",22);return new SSHExecutor(sshInfo);}/** 注意编码转换* */public long shell(String cmd, String outputFileName) throws JSchException, IOException, InterruptedException {long start = System.currentTimeMillis();Channel channel = session.openChannel("shell");PipedInputStream pipeIn = new PipedInputStream();PipedOutputStream pipeOut = new PipedOutputStream( pipeIn );FileOutputStream fileOut = new FileOutputStream( outputFileName, true);channel.setInputStream(pipeIn);channel.setOutputStream(fileOut);channel.connect(CHANNEL_TIMEOUT);pipeOut.write(cmd.getBytes());Thread.sleep( INTERVAL );pipeOut.close();pipeIn.close();fileOut.close();channel.disconnect();return System.currentTimeMillis() - start;}public int exec(String cmd) throws IOException, JSchException, InterruptedException {ChannelExec channelExec = (ChannelExec)session.openChannel( "exec" );channelExec.setCommand( cmd );channelExec.setInputStream( null );channelExec.setErrStream( System.err );InputStream in = channelExec.getInputStream();channelExec.connect();int res = -1;StringBuffer buf = new StringBuffer( 1024 );byte[] tmp = new byte[ 1024 ];while ( true ) {while ( in.available() > 0 ) {int i = in.read( tmp, 0, 1024 );if ( i < 0 ) break;buf.append( new String( tmp, 0, i ) );}if ( channelExec.isClosed() ) {res = channelExec.getExitStatus();System.out.println( format( "Exit-status: %d", res ) );break;}TimeUnit.MILLISECONDS.sleep(100);}System.out.println( buf.toString() );channelExec.disconnect();return res;}public Session getSession(){return session;}public void close(){getSession().disconnect();}/** SSH连接信息* */public static class SSHInfo{private String user;private String password;private String host;private int port;public SSHInfo(String user, String password, String host, int port) {this.user = user;this.password = password;this.host = host;this.port = port;}public String getUser() {return user;}public String getPassword() {return password;}public String getHost() {return host;}public int getPort() {return port;}}/** 自定义UserInfo* */private static class MyUserInfo implements UserInfo{@Override public String getPassphrase() { return null; }@Override public String getPassword() { return null; }@Override public boolean promptPassword(String s) { return false; }@Override public boolean promptPassphrase(String s) { return false; }@Overridepublic boolean promptYesNo(String s) {System.out.println(s);System.out.println("true");return true;}@Override public void showMessage(String s) { }}
}
测试代码:
SSHExecutor ssh = SSHExecutor.newInstance();System.out.println("================");long shell1 = ssh.shell("ls\n","C:\\Users\\hidden\\Desktop\\shell.txt");long shell2 = ssh.shell("pwd\n","C:\\Users\\hidden\\Desktop\\shell.txt");System.out.println("shell 1 执行了"+shell1+"ms");System.out.println("shell 2 执行了"+shell2+"ms");System.out.println("================");int cmd1 = ssh.exec("ls\n");ssh.close();
测试结果:
The authenticity of host 'xx.xx.xx.5' can't be established.
RSA key fingerprint is 59:0f:32:fc:7b:54:3d:90:c0:ef:5a:6b:fb:11:55:e1.
Are you sure you want to continue connecting?
true
================
shell 1 执行了142ms
shell 2 执行了132ms
================
Exit-status: 0
1.txt
anaconda-ks.cfg
install.log
install.log.syslog
logs
util
vmware-tools-distrib
workspace
公共的
模板
视频
图片
文档
下载
音乐
桌面
还有解释查看一下左边是否有个shell.txt以及shell.txt是否有相应的内容。
欢迎跳转到本文的原文链接:https://honeypps.com/java/jsch-quick-start/
欢迎支持笔者新作:《深入理解Kafka:核心设计与实践原理》和《RabbitMQ实战指南》,同时欢迎关注笔者的微信公众号:朱小厮的博客。