JSch笔记
第 1 章 JSch简介
1.1 简述
1)jsch是ssh2的一个纯Java实现。它允许你连接到一个sshd服务器,使用端口转发、X11转发、文件传输等。
2)SSH 是较可靠,专为远程登录会话和其他网络服务提供安全性的协议。
3)ftp协议通常是用来在两个服务器之间传输文件的,但是它本质上是不安全的。
4)SFTP可以理解为SSH + FTP,也就是安全的网络文件传输协议。
1.2 实现原理
Jsch进行服务器连接时可以看作java的jdbc连接,首先需要实例化一个jsch对象,再利用这个对象根据用户名,主机ip,端口获取一个Session对象,设置好相应的参数后,进行连接,创建连接后,这个session时一直可用的,所以不需要关闭。之后我们需要在session上建立channel通道。
1.3 JSch官网
http://www.jcraft.com/jsch/
1.4 导入依赖
<!-- jsch --><dependency><groupId>com.jcraft</groupId><artifactId>jsch</artifactId><version>0.1.54</version></dependency>
1.5 Channel的常用类型
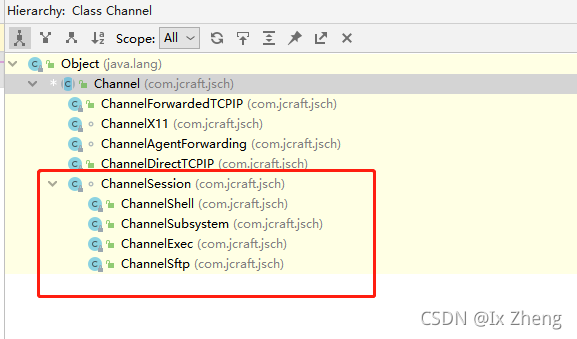
1)Channel的常用类型有 ChannelShell 、 ChannelExec 和 ChannelSftp
2)ChannelShell和ChannelExec区别:
ChannelShell可以看作是执行一个交互式的Shell,而ChannelExec是执行一个Shell脚本。
3)ChannelSftp对象实现文件上传下载,ChannelSftp类是Jsch实现SFTP核心类,它包含了所有SFTP的方法
| 方法 | 操作 |
|---|---|
| put() | 文件上传 |
| get() | 文件下载 |
| cd() | 进入指定目录 |
| ls() | 得到指定目录下的文件或目录 |
| rename() | 重命名指定文件或目录 |
| rm() | 删除指定文件 |
| mkdir() | 创建目录 |
| rmdir() | 删除目录 |
第 2 章 Demo
2.1 SSH连接
# 说明
当前Demo可用作判断是否可以和该主机ip通信
JSchConnect.java
package com.ix.utils;import com.jcraft.jsch.JSch;
import com.jcraft.jsch.JSchException;
import com.jcraft.jsch.Session;
import org.slf4j.Logger;
import org.slf4j.LoggerFactory;import java.util.Properties;public class JSchConnect {private static final Logger logger = LoggerFactory.getLogger(JSchConnect.class);public static void main(String[] args) {String username = "root";String password = "123456";String host = "192.168.66.36";int port = 22;// 创建JSch对象JSch jSch = new JSch();Session jSchSession = null;boolean reulst = false;try {// 根据主机账号、ip、端口获取一个Session对象jSchSession = jSch.getSession(username, host, port);// 存放主机密码jSchSession.setPassword(password);Properties config = new Properties();// 去掉首次连接确认config.put("StrictHostKeyChecking", "no");jSchSession.setConfig(config);// 超时连接时间为3秒jSchSession.setTimeout(3000);// 进行连接jSchSession.connect();// 获取连接结果reulst = jSchSession.isConnected();} catch (JSchException e) {logger.warn(e.getMessage());} finally {// 关闭jschSesson流if (jSchSession != null && jSchSession.isConnected()) {jSchSession.disconnect();}}if (reulst) {logger.error("【SSH连接】连接成功");} else {logger.error("【SSH连接】连接失败");}}
}
2.2 文件上传
Jsch支持三种文件传输模式
| OVERWRITE | 完全覆盖模式,JSch默认文件传输模式,如果目标文件已经存在,传输的文件将完全覆盖目标文件,产生新的文件 |
|---|---|
| RESUME | 恢复模式,如果文件已经传输一部分,这时由于网络或其他任何原因导致文件传输终端,如果下次传输相同的文件,则会从上次终端的地方继续上传 |
| APPEND | 追加模式,如果目标文件已经存在,传输的文件将在目标文件后追加。 |
实现文件上传可以调用ChannelSftp对象的put方法。ChannelSftp中有12个put方法的重载方法
| public void put(String src, String dst) | 将本地文件名为src的文件上传到目标服务器,目标文件名为dst,若dst为目录,则目标文件名将与src文件名相同。 采用默认的传输模式:OVERWRITE |
|---|---|
| public void put(String src, String dst, int mode) | 将本地文件名为src的文件上传到目标服务器,目标文件名为dst,若dst为目录,则目标文件名将与src文件名相同。 指定文件传输模式为mode(mode可选值为:ChannelSftp.OVERWRITE,ChannelSftp.RESUME, ChannelSftp.APPEND) |
| public void put(String src, String dst, SftpProgressMonitor monitor) | 将本地文件名为src的文件上传到目标服务器,目标文件名为dst,若dst为目录,则目标文件名将与src文件名相同。 采用默认的传输模式:OVERWRITE 并使用实现了SftpProgressMonitor接口的monitor对象来监控文件传输的进度。 |
| public void put(String src, String dst, SftpProgressMonitor monitor, int mode) | 将本地文件名为src的文件上传到目标服务器,目标文件名为dst,若dst为目录,则目标文件名将与src文件名相同。 指定传输模式为mode 并使用实现了SftpProgressMonitor接口的monitor对象来监控文件传输的进度。 |
| public void put(InputStream src, String dst) | 将本地的input stream对象src上传到目标服务器,目标文件名为dst,dst不能为目录。 采用默认的传输模式:OVERWRITE |
| public void put(InputStream src, String dst, int mode) | 将本地的input stream对象src上传到目标服务器,目标文件名为dst,dst不能为目录。 指定文件传输模式为mode |
| public void put(InputStream src, String dst, SftpProgressMonitor monitor) | 将本地的input stream对象src上传到目标服务器,目标文件名为dst,dst不能为目录。 采用默认的传输模式:OVERWRITE 并使用实现了SftpProgressMonitor接口的monitor对象来监控传输的进度。 |
| public void put(InputStream src, String dst, SftpProgressMonitor monitor, int mode) | 将本地的input stream对象src上传到目标服务器,目标文件名为dst,dst不能为目录。 指定文件传输模式为mode 并使用实现了SftpProgressMonitor接口的monitor对象来监控传输的进度。 |
| public OutputStream put(String dst) | 该方法返回一个输出流,可以向该输出流中写入数据,最终将数据传输到目标服务器,目标文件名为dst,dst不能为目录。 采用默认的传输模式:OVERWRITE |
| public OutputStream put(String dst, final int mode) | 该方法返回一个输出流,可以向该输出流中写入数据,最终将数据传输到目标服务器,目标文件名为dst,dst不能为目录。 指定文件传输模式为mode |
| public OutputStream put(String dst, final SftpProgressMonitor monitor, final int mode) | 该方法返回一个输出流,可以向该输出流中写入数据,最终将数据传输到目标服务器,目标文件名为dst,dst不能为目录。 指定文件传输模式为mode 并使用实现了SftpProgressMonitor接口的monitor对象来监控传输的进度。 |
| public OutputStream put(String dst, final SftpProgressMonitor monitor, final int mode, long offset) | 该方法返回一个输出流,可以向该输出流中写入数据,最终将数据传输到目标服务器,目标文件名为dst,dst不能为目录。 指定文件传输模式为mode 并使用实现了SftpProgressMonitor接口的monitor对象来监控传输的进度。 offset指定了一个偏移量,从输出流偏移offset开始写入数据。 |
package com.ix.utils;import com.jcraft.jsch.*;
import org.slf4j.Logger;
import org.slf4j.LoggerFactory;import java.util.Properties;public class JSchUpload {private static final Logger logger = LoggerFactory.getLogger(JSchUpload.class);public static void main(String[] args) {String username = "root";String password = "123456";String host = "192.168.66.36";int port = 22;// 创建JSch对象JSch jSch = new JSch();Session jSchSession = null;ChannelSftp chSftp = null;try {// 根据主机账号、ip、端口获取一个Session对象jSchSession = jSch.getSession(username, host, port);// 存放主机密码jSchSession.setPassword(password);// 去掉首次连接确认Properties config = new Properties();config.put("StrictHostKeyChecking", "no");jSchSession.setConfig(config);// 超时连接时间为3秒jSchSession.setTimeout(3000);// 进行连接jSchSession.connect();// 打开SFTP通道chSftp = (ChannelSftp)jSchSession.openChannel("sftp");// 建立SFTP通道的连接chSftp.connect();// 设置编码格式chSftp.setFilenameEncoding("UTF-8");/*** 说明:* 1、当前文件上传信息没有任何反馈,如果没有异常则代表成功* 2、如果需要判断是否读取成功的进度,可参考https://blog.csdn.net/coding99/article/details/52416373?locationNum=13&fps=1* 3、将src文件上传到dst路径中*/chSftp.put("D:/node.txt", "/root/2.txt");logger.info("文件上传成功");} catch (JSchException | SftpException  e) {logger.warn(e.getMessage());} finally {// 关闭sftpChannelif (chSftp != null && chSftp.isConnected()) {chSftp.quit();}// 关闭jschSesson流if (jSchSession != null && jSchSession.isConnected()) {jSchSession.disconnect();}}}
}
2.3 文件下载
# 说明
当前Demo适用场景:对指定虚拟机下载一个文件
package com.ix.utils;import com.jcraft.jsch.*;
import org.slf4j.Logger;
import org.slf4j.LoggerFactory;import java.util.Properties;public class JSchDownload {private static final Logger logger = LoggerFactory.getLogger(JSchDownload.class);public static void main(String[] args) {String username = "root";String password = "123456";String host = "192.168.66.36";int port = 22;// 创建JSch对象JSch jSch = new JSch();Session jSchSession = null;ChannelSftp chSftp = null;try {// 根据主机账号、ip、端口获取一个Session对象jSchSession = jSch.getSession(username, host, port);// 存放主机密码jSchSession.setPassword(password);// 去掉首次连接确认Properties config = new Properties();config.put("StrictHostKeyChecking", "no");jSchSession.setConfig(config);// 超时连接时间为3秒jSchSession.setTimeout(3000);// 进行连接jSchSession.connect();// 打开SFTP通道chSftp = (ChannelSftp)jSchSession.openChannel("sftp");// 建立SFTP通道的连接chSftp.connect();// 设置编码格式chSftp.setFilenameEncoding("UTF-8");/*** 说明:* 1、当前上读取文件信息没有任何反馈,如果没有异常则代表成功* 2、如果需要判断是否读取成功的进度,可参考https://blog.csdn.net/coding99/article/details/52416373?locationNum=13&fps=1* 3、将src文件下载到dst路径中*/chSftp.get("/root/2.txt", "D:/node.txt");logger.info("文件下载成功");} catch (JSchException | SftpException e) {logger.warn(e.getMessage());} finally {// 关闭sftpChannelif (chSftp != null && chSftp.isConnected()) {chSftp.quit();}// 关闭jschSesson流if (jSchSession != null && jSchSession.isConnected()) {jSchSession.disconnect();}}}
}
2.4 执行shell命令
package com.ix.utils;import com.jcraft.jsch.*;
import org.slf4j.Logger;
import org.slf4j.LoggerFactory;import java.io.BufferedReader;
import java.io.InputStream;
import java.util.Properties;public class JSchExecShell {private static final Logger logger = LoggerFactory.getLogger(JSchExecShell.class);public static void main(String[] args) {String username = "root";String password = "123456";String host = "192.168.66.36";int port = 22;// 创建JSch对象JSch jSch = new JSch();Session jSchSession = null;Channel jschChannel = null;// 存放执行命令结果StringBuffer result = new StringBuffer();int exitStatus = 0;String command = "ls -l";try {// 根据主机账号、ip、端口获取一个Session对象jSchSession = jSch.getSession(username, host, port);// 存放主机密码jSchSession.setPassword(password);// 去掉首次连接确认Properties config = new Properties();config.put("StrictHostKeyChecking", "no");jSchSession.setConfig(config);// 超时连接时间为3秒jSchSession.setTimeout(3000);// 进行连接jSchSession.connect();jschChannel = jSchSession.openChannel("exec");((ChannelExec) jschChannel).setCommand(command);jschChannel.setInputStream(null);// 错误信息输出流,用于输出错误的信息,当exitstatus<0的时候((ChannelExec)jschChannel).setErrStream(System.err);// 执行命令,等待执行结果jschChannel.connect();// 获取命令执行结果InputStream in = jschChannel.getInputStream();/*** 通过channel获取信息的方式,采用官方Demo代码*/byte[] tmp=new byte[1024];while(true){while(in.available() > 0){int i = in.read(tmp, 0, 1024);if (i < 0) {break;}result.append(new String(tmp, 0, i));}// 从channel获取全部信息之后,channel会自动关闭if(jschChannel.isClosed()){if (in.available() > 0) {continue;}exitStatus = jschChannel.getExitStatus();break;}try{Thread.sleep(1000);}catch(Exception ee){}}} catch (Exception e) {logger.warn(e.getMessage());} finally {// 关闭sftpChannelif (jschChannel != null && jschChannel.isConnected()) {jschChannel.disconnect();}// 关闭jschSesson流if (jSchSession != null && jSchSession.isConnected()) {jSchSession.disconnect();}}logger.info("获取执行命令的结果结果:"+result);logger.info("退出码为:"+exitStatus);}
}
2.5 交互执行shell命令
# 说明
当前Shell交互有弊端,执行完毕之后没有进行资源释放
package com.ix.utils;import com.jcraft.jsch.*;
import java.util.Properties;public class JSchInteractionShell{public static void main(String[] arg){String username = "root";String password = "123456";String host = "192.168.66.36";int port = 22;// 创建JSch对象JSch jSch = new JSch();Session jSchSession = null;Channel jschChannel = null;try{// 根据主机账号、ip、端口获取一个Session对象jSchSession = jSch.getSession(username, host, port);// 存放主机密码jSchSession.setPassword(password);// 去掉首次连接确认Properties config = new Properties();config.put("StrictHostKeyChecking", "no");jSchSession.setConfig(config);// 超时连接时间为3秒jSchSession.setTimeout(3000);// 进行连接jSchSession.connect();jschChannel = jSchSession.openChannel("shell");jschChannel.setInputStream(System.in);jschChannel.setOutputStream(System.out);jschChannel.connect();}catch(Exception e){System.out.println(e);}}}
2.6 通过公钥免密登录
# 前置准备# 生成公私钥,第一回车可以选择生成的位置
$ ssh-keygen -t rsa -C 'mysqlapi'# 默认情况下,最新版本的OpenSSH(7.8及更高版本)会以新的OpenSSH格式生成密钥,其开头为:
$ ssh-keygen -p -f  /c/Users/86186/.ssh/id_rsa -m pem -P "" -N ""# 记录公钥
cat /home/mysqlapi/.ssh/id_rsa.pub# 记录私钥
cat /home/mysqlapi/.ssh/id_rsa# 该目录如果没有known_hosts文件,进行创建
known_hosts# 登录需要连接的主机
[root@Node1 ~/.ssh]# pwd
/root/.ssh# 将JSch服务器所在的主机的公钥放入该文件中
[root@Node1 ~/.ssh]# vim authorized_keys
package com.ix.utils;import com.jcraft.jsch.JSch;
import com.jcraft.jsch.JSchException;
import com.jcraft.jsch.Session;
import org.slf4j.Logger;
import org.slf4j.LoggerFactory;import java.util.Properties;public class JSchIdentity {private static final Logger logger = LoggerFactory.getLogger(JSchIdentity.class);public static void main(String[] args) {String username = "root";String host = "192.168.66.36";int port = 22;// 创建JSch对象JSch jSch = new JSch();Session jSchSession = null;boolean reulst = false;try {// 存放公钥jSch.setKnownHosts("C:/Users/86186/.ssh/known_hosts");jSch.addIdentity("C:/Users/86186/.ssh/id_rsa");// 根据主机账号、ip、端口获取一个Session对象jSchSession = jSch.getSession(username, host, port);// 去掉首次连接确认Properties config = new Properties();config.put("StrictHostKeyChecking", "no");jSchSession.setConfig(config);// 超时连接时间为3秒jSchSession.setTimeout(3000);// 进行连接jSchSession.connect();// 获取连接结果reulst = jSchSession.isConnected();} catch (JSchException e) {logger.warn(e.getMessage());} finally {// 关闭jschSesson流if (jSchSession != null && jSchSession.isConnected()) {jSchSession.disconnect();}}if (reulst) {logger.error("【SSH连接】连接成功");} else {logger.error("【SSH连接】连接失败");}}
}第 3 章 提取工具类
3.1 单次使用工具类
JschUtil.java
package com.ix.utils;import com.jcraft.jsch.*;
import org.slf4j.Logger;
import org.slf4j.LoggerFactory;import java.io.*;
import java.nio.charset.Charset;
import java.util.Properties;public class JschUtil {private static final Logger logger = LoggerFactory.getLogger(JschUtil.class);private JSch jSch;// session对象private Session session;// JAVA与主机的连接通道private Channel channel;// sftp通道ChannelSftp chSftp;// 主机ipprivate String host;// 主机端口号private int port;// 主机账号private String username;// 主机密码private String password;public JschUtil(String host, int port, String username, String password) {this.host = host;this.port = port;this.username = username;this.password = password;}public JschUtil() {}/*** 检测是否可以和主机通信* @return*/public boolean connect() {jSch = new JSch();boolean reulst = false;try {// 根据主机账号、ip、端口获取一个Session对象session = jSch.getSession(username, host, port);// 存放主机密码session.setPassword(password);// 首次连接,去掉公钥确认Properties config = new Properties();config.put("StrictHostKeyChecking", "no");session.setConfig(config);// 超时连接时间为3秒session.setTimeout(3000);// 进行连接session.connect();// 获取连接结果reulst = session.isConnected();if (!reulst) {logger.error("【连接】获取连接失败");}} catch (JSchException e) {logger.warn(e.getMessage());} finally {close();}return reulst;}/*** 关闭连接*/public void close() {if (channel != null && channel.isConnected()) {channel.disconnect();}if (session != null && session.isConnected()) {session.disconnect();}if (chSftp != null && chSftp.isConnected()) {chSftp.quit();}}/*** 执行shell命令* @param command* @return*/public String execCommand(String command) {jSch = new JSch();// 存放执行命令结果StringBuffer result = new StringBuffer();int exitStatus = 0;try {// 根据主机账号、ip、端口获取一个Session对象session = jSch.getSession(username, host, port);// 存放主机密码session.setPassword(password);// 去掉首次连接确认Properties config = new Properties();config.put("StrictHostKeyChecking", "no");session.setConfig(config);// 超时连接时间为3秒session.setTimeout(3000);// 进行连接session.connect();channel = session.openChannel("exec");((ChannelExec) channel).setCommand(command);channel.setInputStream(null);// 错误信息输出流,用于输出错误的信息,当exitstatus<0的时候((ChannelExec)channel).setErrStream(System.err);// 执行命令,等待执行结果channel.connect();// 获取命令执行结果InputStream in = channel.getInputStream();/*** 通过channel获取信息的方式,采用官方Demo代码*/byte[] tmp=new byte[1024];while(true){while(in.available() > 0){int i = in.read(tmp, 0, 1024);if (i < 0) {break;}result.append(new String(tmp, 0, i));}// 从channel获取全部信息之后,channel会自动关闭if(channel.isClosed()){if (in.available() > 0) {continue;}exitStatus = channel.getExitStatus();break;}try{Thread.sleep(1000);}catch(Exception ee){}}} catch (IOException e) {logger.error(e.getMessage());} catch (JSchException e) {logger.error(e.getMessage());} finally {close();}logger.info("退出码为:"+exitStatus);return result.toString();}/*** 文件上传至主机* @param directory 当前文件路径* @param uploadFile 上传至主机的路径*/public void upload(String directory, String uploadFile) {// 创建JSch对象jSch = new JSch();try {// 根据主机账号、ip、端口获取一个Session对象session = jSch.getSession(username, host, port);// 存放主机密码session.setPassword(password);// 去掉首次连接确认Properties config = new Properties();config.put("StrictHostKeyChecking", "no");session.setConfig(config);// 超时连接时间为3秒session.setTimeout(3000);// 进行连接session.connect();// 打开SFTP通道chSftp = (ChannelSftp)session.openChannel("sftp");// 建立STFP连接chSftp.connect();// 设置编码格式chSftp.setFilenameEncoding("UTF-8");/*** 说明:* 1、当前文件上传信息没有任何反馈,如果没有异常则代表成功* 2、如果需要判断是否读取成功的进度,可参考https://blog.csdn.net/coding99/article/details/52416373?locationNum=13&fps=1* 3、将src文件上传到dst路径中*/chSftp.put(directory, uploadFile);logger.info("文件上传成功");} catch (JSchException | SftpException e) {logger.warn(e.getMessage());} finally {close();}}/*** 将主机文件下载至本地* @param directory  下载到本地的位置* @param downloadFile  下载文件在虚拟机的位置*/public void download(String directory, String downloadFile) {try {jSch = new JSch();// 根据主机账号、ip、端口获取一个Session对象session = jSch.getSession(username, host, port);// 存放主机密码session.setPassword(password);// 去掉首次连接确认Properties config = new Properties();config.put("StrictHostKeyChecking", "no");session.setConfig(config);// 超时连接时间为3秒session.setTimeout(3000);// 进行连接session.connect();// 打开SFTP通道chSftp = (ChannelSftp)session.openChannel("sftp");// 建立SFTP通道的连接chSftp.connect();// 设置编码格式chSftp.setFilenameEncoding("UTF-8");/*** 说明:* 1、当前上读取文件信息没有任何反馈,如果没有异常则代表成功* 2、如果需要判断是否读取成功的进度,可参考https://blog.csdn.net/coding99/article/details/52416373?locationNum=13&fps=1* 3、将src文件下载到dst路径中*/chSftp.get(directory, downloadFile);logger.info("文件下载成功");} catch (JSchException | SftpException e) {logger.warn(e.getMessage());}  finally {close();}}
}
RunJsch.java
package com.ix.utils;public class RunJsch {public static void main(String[] args) {JschUtil jSchUtil = new JschUtil("192.168.66.36",22,"root","123456");boolean connect = jSchUtil.connect();System.out.println("ssh连接检测:" + connect);String ls = jSchUtil.execCommand("ls");System.out.println("执行ls命令的结果:" + ls);// 文件上传jSchUtil.upload("D:/2.txt", "/home/1.txt");// 文件下载jSchUtil.download("/home/1.txt", "D:/node1.txt");}
}