Android 数据库框架ormlite 使用精要
前言
本篇博客记录一下笔者在实际开发中使用到的一个数据库框架,这个可以让我们快速实现数据库操作,避免频繁手写sql,提高我们的开发效率,减少出错的机率。
ormlite是什么?
首先可以去它的官网看看www.ormlite.com,它的英文全称是Object Relational Mapping,意思是对象关系映射;如果接触过Java EE开发的,一定知道Java Web开发就有一个类似的数据库映射框架——Hibernate。简单来说,就是我们定义一个实体类,利用这个框架,它可以帮我们吧这个实体映射到我们的数据库中,在Android中是SQLite,数据中的字段就是我们定义实体的成员变量。
为什么要用ormlite?
先说说优点
1. 轻量级
2. 使用简单,易上手
3. 封装完善
4. 文档全面
缺点
1. 基于反射,效率较低
2. 缺少中文翻译文档
如何使用?
导入jar包到项目libs文件夹下
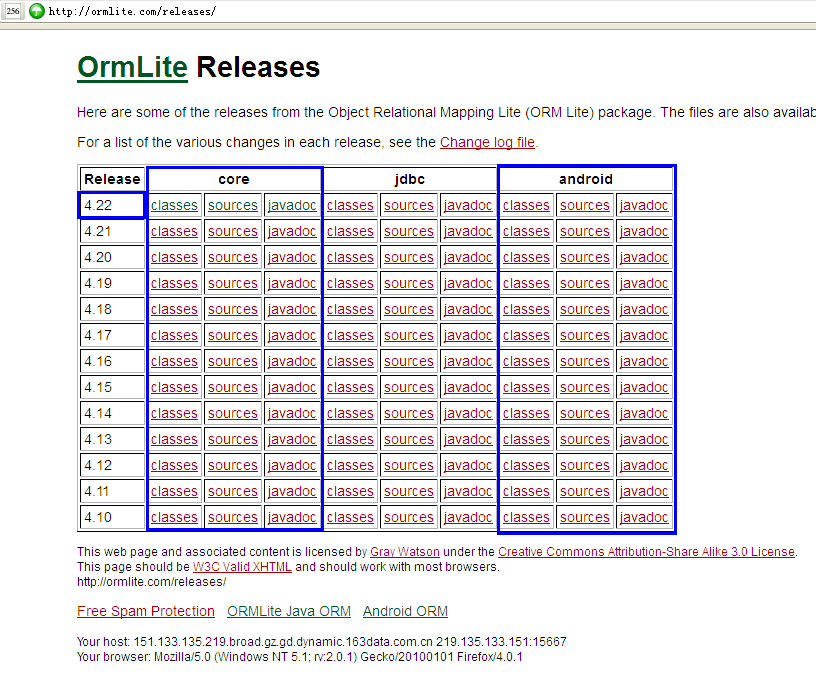
到http://ormlite.com/releases/下载相应版本的jar,下载最新的,目前是最新版本4.49。我们下载稳定的4.48即可。

继承OrmLiteSqliteOpenHelper类定义数据库帮助类
package com.devilwwj.ormlite.db;import java.sql.SQLException;
import java.util.HashMap;
import java.util.Map;import android.content.Context;
import android.database.sqlite.SQLiteDatabase;import com.devilwwj.ormlite.model.Img;
import com.devilwwj.ormlite.model.PackageInfo;
import com.devilwwj.ormlite.model.Photographer;
import com.devilwwj.ormlite.model.Theme;
import com.j256.ormlite.android.apptools.OrmLiteSqliteOpenHelper;
import com.j256.ormlite.dao.Dao;
import com.j256.ormlite.support.ConnectionSource;
import com.j256.ormlite.table.TableUtils;/*** 功能:数据库帮助类* @author devilwwj**/
public class DBHelper extends OrmLiteSqliteOpenHelper {/*** 数据库名字*/private static final String DB_NAME = "test.db";/*** 数据库版本*/private static final int DB_VERSION = 1;/*** 用来存放Dao的地图*/private Map<String, Dao> daos = new HashMap<String, Dao>();private static DBHelper instance;/*** 获取单例* @param context* @return*/public static synchronized DBHelper getHelper(Context context) {context = context.getApplicationContext();if (instance == null) {synchronized (DBHelper.class) {if (instance == null) {instance = new DBHelper(context);}}}return instance;}/*** 构造方法* @param context*/public DBHelper(Context context) {super(context, DB_NAME, null, DB_VERSION);}/*** 这里创建表*/@Overridepublic void onCreate(SQLiteDatabase sqliteDatabase, ConnectionSource connectionSource) {// 创建表try {TableUtils.createTable(connectionSource, PackageInfo.class);TableUtils.createTable(connectionSource, Photographer.class);TableUtils.createTable(connectionSource, Theme.class);TableUtils.createTable(connectionSource, Img.class);} catch (SQLException e) {e.printStackTrace();}}/*** 这里进行更新表操作*/@Overridepublic void onUpgrade(SQLiteDatabase sqLiteDatabase, ConnectionSource connectionSource, int oldVersion,int newVersion) {try  {  TableUtils.dropTable(connectionSource, PackageInfo.class, true);  TableUtils.dropTable(connectionSource, Photographer.class, true);  TableUtils.dropTable(connectionSource, Theme.class, true);  TableUtils.dropTable(connectionSource, Img.class, true);onCreate(sqLiteDatabase, connectionSource);  } catch (SQLException e)  {  e.printStackTrace();  }  }/*** 通过类来获得指定的Dao*/public synchronized Dao getDao(Class clazz) throws SQLException {Dao dao = null;String className = clazz.getSimpleName();if (daos.containsKey(className)) {dao = super.getDao(clazz);daos.put(className, dao); }return dao;}/*** 释放资源*/@Overridepublic void close() {super.close();for (String key : daos.keySet()) {Dao dao = daos.get(key);dao = null;}}}
定义实体类Bean,代表一张表
创建上面用到的Bean,在ormlite中,它代表数据库中的一张表,我们所定义的所有成员变量均可为表中的字段,只要我们按照它提供的注解方式来指定成员变量属性。
举个栗子:
package com.devilwwj.ormlite.model;import java.io.Serializable;import com.j256.ormlite.dao.ForeignCollection;
import com.j256.ormlite.field.DatabaseField;
import com.j256.ormlite.field.ForeignCollectionField;
import com.j256.ormlite.table.DatabaseTable;/*** 套餐* @author wwj_748**/
@DatabaseTable
public class PackageInfo implements Serializable{@DatabaseField(id = true)public int id;@DatabaseFieldpublic String pid;@DatabaseFieldpublic String photographerId;@DatabaseFieldpublic String name;@DatabaseField()public int cost;@DatabaseFieldpublic String description;@DatabaseFieldpublic String detail;// 一个套餐可以对应多个主题@ForeignCollectionField(eager = true) // 必须public ForeignCollection<Theme> themes;// 外部对象,一个套餐只对应一个摄影师,一个摄影师可以对应多个套餐@DatabaseField(foreign = true)public Photographer photographer;@Overridepublic String toString() {return "Package [id=" + id + ", pid=" + pid + ", photographerId="+ photographerId + ", name=" + name + ", cost=" + cost+ ", description=" + description + ", detail=" + detail + "]";}}
上面定义了一个套餐对象,我们来看一下它所用到的几个注解:
@DatabaseTable:表示定义了一个数据表,如果不指定名字,在Android中会以类名作为表名,如packageInfo就是SQLite数据库中的表名,我们也可以指定表名,@DatabaseTable(tableName = “tb_package”) 。
DatabaseField:表示定义了数据中的一个字段,id表示数据中的一个主键,如果指定为generatedId,表示自动增长id,我们不需要给它赋值。其他字段,可以使用columnName来指定字段名,canBeNull表示是否为空,这些赋值可以按照以下来指定
-(id = true, canBeNull = false)
- (columnName = “name”)
还有更多的注解用法,可以到官网查看它提供的文档,非常清楚详尽了,笔者这里不多说。
ormlite的外键约束(一对一、一对多、多对多关系)
使用这个框架需要比较注意的一点就是外键约束,这里笔者只讨论一对一、一对多的情况。
上一节我们定义了PackageInfo这个实体,里面有这样的定义:
// 一个套餐可以对应多个主题@ForeignCollectionField(eager = true) // 必须public ForeignCollection<Theme> themes;// 外部对象,一个套餐只对应一个摄影师,一个摄影师可以对应多个套餐@DatabaseField(foreign = true)public Photographer photographer;这里就用到了外键的约束,我们来分析一下:
一个套餐对应多个主题:1:n的关系
一个套餐对应一个摄影师:1:1的关系
在n的一方,我们可以使用@ForeignCollectionField这样的注解,eager = true表示可以进行懒加载。
如果是一对一,我们还是用@DatabaseField注解,但要指定(foreign = true)表示是一个外键。
现在我们看一下多的一方是怎么定义的:
package com.devilwwj.ormlite.model;import java.io.Serializable;import com.j256.ormlite.dao.ForeignCollection;
import com.j256.ormlite.field.DatabaseField;
import com.j256.ormlite.field.ForeignCollectionField;
import com.j256.ormlite.table.DatabaseTable;/*** 摄影主题* * @author wwj_748* */
@DatabaseTable
public class Theme implements Serializable{@DatabaseField(id = true)public String id;@DatabaseFieldpublic String tid;@DatabaseFieldpublic String photographerId;@DatabaseFieldpublic String packageId; // 隶属套餐@DatabaseFieldpublic String status; // 后台审核状态@DatabaseFieldpublic String title; // 标题@DatabaseFieldpublic String coverId; // 封面Id@DatabaseFieldpublic String coverUrl; // 封面img@DatabaseFieldpublic String detail;  // 详情@DatabaseFieldpublic int photoCount; // 图片个数@DatabaseFieldpublic String photos; //图集@DatabaseFieldpublic String createTime; // 上传时间@DatabaseFieldpublic String recordTime; // 拍摄时间@DatabaseFieldpublic double cost; // 花费@DatabaseFieldpublic String tags; // 标签@DatabaseFieldpublic String address;// 地址@DatabaseFieldpublic String loacationCode; // 位置代码@DatabaseFieldpublic int popularCount; // 热度@DatabaseField(defaultValue = "0")public int favStatus; // 收藏状态// 外部对象字段@DatabaseField(foreign = true, foreignAutoRefresh = true)public PackageInfo mPackage;@DatabaseField(foreign = true, foreignAutoRefresh = true)public Photographer photographer;/*** 这里需要注意的是:属性类型只能是ForeignCollection<T>或者Collection<T>* 如果需要懒加载(延迟加载)可以在@ForeignCollectionField加上参数eager=false* 这个属性也就说明一个部门对应着多个用户*/@ForeignCollectionField(eager = true)public ForeignCollection<Img> imgs;}
我们这里不关注其他字段,关注它的外键字段,前面我们说到,一个套餐对应多个主题,所以我们在主题这个实体类中也需要定义一个关联套餐的字段。
// 外部对象字段@DatabaseField(foreign = true, foreignAutoRefresh = true)public PackageInfo mPackage;注:要实现一对多关系,一定要这样定义,不然会出错。
定义Bean的DAO,对数据库进行增、删、改、查
这里笔者举个例子,大家以后开发根据这样来添加相应的业务逻辑方法:
package com.devilwwj.ormlite.dao;import java.sql.SQLException;
import java.util.ArrayList;
import java.util.List;import android.content.Context;import com.devilwwj.ormlite.db.DBHelper;
import com.devilwwj.ormlite.model.Theme;
import com.j256.ormlite.dao.Dao;/*** 定义数据访问对象,对指定的表进行增删改查操作* @author devilwwj**/
public class ThemeDao {private Dao<Theme, Integer> themeDao;private DBHelper dbHelper;/*** 构造方法* 获得数据库帮助类实例,通过传入Class对象得到相应的Dao* @param context*/public ThemeDao(Context context) {try {dbHelper = DBHelper.getHelper(context);themeDao = dbHelper.getDao(Theme.class);} catch (SQLException e) {e.printStackTrace();}}/*** 添加一条记录* @param theme*/public void add(Theme theme) {try {themeDao.create(theme);} catch (SQLException e) {e.printStackTrace();}}/*** 删除一条记录* @param theme*/public void delete(Theme theme) {try {themeDao.delete(theme);} catch (SQLException e) {e.printStackTrace();}}/*** 更新一条记录* @param theme*/public void update(Theme theme) {try {themeDao.update(theme);} catch (SQLException e) {e.printStackTrace();}}/*** 查询一条记录* @param id* @return*/public Theme queryForId(int id) {Theme theme = null;try {theme = themeDao.queryForId(id);} catch (SQLException e) {e.printStackTrace();}return theme;}/*** 查询所有记录* @return*/public List<Theme> queryForAll() {List<Theme> themes = new ArrayList<Theme>();try {themes = themeDao.queryForAll();} catch (SQLException e) {e.printStackTrace();}return themes;}}
上面笔者定义了一个Dao类,用来进行数据访问的,定义了增加、删除、更新、查询几个方法,我们在应用中就可以使用这个几个方法来帮助我们完成相关的操作。
具体使用方法:
Theme theme = new Theme();
// 赋值
theme.id = 1;
theme.title = "主题";
theme.detail = "主题详情";
new ThemeDao(context).add(theme);
ormlite的批处理操作
/*** 转化json对象为数据库对象* @param context* @param theme* @return* @throws SQLException* @throws Exception*/public static Theme ConvertTheme(Context context, final JSONObject theme) throws SQLException, Exception {JSONObject photographerObj = theme.getJSONObject("photographer");JSONObject packageObj = theme.getJSONObject("package");ThemeDao themeDao = new ThemeDao(context);PhotographDao photographDao = new PhotographDao(context);// 根据id查询摄影师Photographer mPhotographer = photographDao.queryForId(theme.optInt("photographerId"));if (mPhotographer == null)mPhotographer = new Photographer();mPhotographer.id = theme.optString("photographerId");mPhotographer.name = photographerObj.optString("nickname");mPhotographer.serviceArea = photographerObj.optString("serviceArea");mPhotographer.avatar = photographerObj.optString("avatar");// 这里创建或更新摄影师photographDao.createOrUpdate(mPhotographer);PackageDao packageDao = new PackageDao(context);// 根据id查询套餐PackageInfo mPackage = packageDao.queryForId(packageObj.optInt("id"));if (mPackage == null) mPackage = new PackageInfo();mPackage.id = packageObj.optInt("id");mPackage.name = packageObj.optString("title");mPackage.cost = packageObj.optInt("cost");mPackage.detail = packageObj.optString("detail");// 这里创建或更新套餐packageDao.createOrUpdate(mPackage);// 根据id查询作品Theme mThemeTmp = themeDao.queryForId(theme.optInt("id"));if (mThemeTmp == null)mThemeTmp = new Theme(); final Theme mTheme = mThemeTmp;mTheme.id = theme.optString("id");mTheme.title = theme.optString("title");// mTheme.coverId = theme.optString("place");// mTheme.coverUrl = theme.optString("coverUrl");mTheme.photographerId = theme.optString("photographerId");mTheme.detail = theme.optString("detail");// mTheme.cost = theme.optDouble("cost");// mTheme.recordTime = theme.optString("recordTime");mTheme.favStatus = theme.optInt("isFav");mTheme.photoCount = theme.optInt("photoCount");mTheme.tags = theme.optString("tags");mTheme.packageId = theme.optString("packageId");// 同步更新mTheme.photographer = mPhotographer;mTheme.mPackage = mPackage;// 创建或更新主题themeDao.createOrUpdate(mTheme);final ImgDao mDao = new ImgDao(context);Dao<Img, Integer> imgDao = mDao.getImgDao();// 执行批处理操作imgDao.callBatchTasks(new Callable<Void>() {@Overridepublic Void call() throws Exception {JSONArray imgs = theme.getJSONArray("photos");for (int i = 0; i < imgs.length(); i++) {JSONObject jsonObject = imgs.getJSONObject(i);Img mImg = mDao.queryForId(jsonObject.optInt("id"));if (mImg == null)mImg = new Img();mImg.id = jsonObject.optString("id");mImg.isCover = jsonObject.optInt("isCover");mImg.imgUrl = jsonObject.optString("url");mImg.theme = mTheme;mDao.createOrUpdate(mImg);}return null;}});return mTheme;}上面的代码就是把我们从服务端获取的json对象进行数据转化,我们对json数据进行解析,得到相应的数据库对象,再进行创建或更新的操作,如果涉及到较多的插入,就可以使用ormlite为我们提供的批处理回调方法,具体看代码。
在Android中使用
我们通过网络请求得到的json对象,然后直接调用上面写好的转化方法,这样我们就可以实现数据存储了。
private void getTheme(final Theme mTheme) {DataFetcher.getHttpRequestAsync(HttpRequest.getThemeInfoUrl(getActivity(), mTheme.id),new JsonResponseHandler(getActivity(),getString(R.string.tip_requesing_info)) {@Overridepublic void onSuccess(int statusCode, Header[] headers,JSONObject response) {super.onSuccess(statusCode, headers, response);LogUtils.i("info", response.toString());JSONObject jsonObject = response.optJSONObject("msg");try {Converter.ConvertTheme(jsonObject,((BaseActivity) getActivity()).getHelper());// 跳转到详情页Intent intent = new Intent();intent.putExtra("tid", mTheme.id);intent.setClass(getActivity(),ThemeInfolActivity.class);startActivity(intent);} catch (Exception e) {e.printStackTrace();}}@Overridepublic void onFailure(int statusCode, Header[] headers,String responseString, Throwable throwable) {super.onFailure(statusCode, headers, responseString,throwable);if (mTheme.detail != null) {Intent intent = new Intent();intent.putExtra("tid", mTheme.id);intent.setClass(getActivity(), ThemeInfolActivity.class);startActivity(intent);} else {Toast.makeText(getActivity(), responseString,Toast.LENGTH_SHORT).show();}}});}注:这里笔者使用的是android-async-http这个网络库。