蓝牙自动配对,即搜索到其它蓝牙设备之后直接进行配对,不需要弹出配对确认框或者密钥输入框。
转载请注明出处http://blog.csdn.net/qq_25827845/article/details/52400782
源码下载地址:https://github.com/chaohuangtianjie994/BlueTooth-AutoPair
经过最近一段时间得研究,针对网上给出的案例。总结了一个亲测好使的Demo。
说明如下:
1、本Demo用来连接蓝牙设备HC-05,如果你要连接其他蓝牙设备,注意修改相关名字以及修改设备初试pin值。
2、将Demo安装在Android手机上,点击按钮,可以实现与目标蓝牙设备的自动配对。
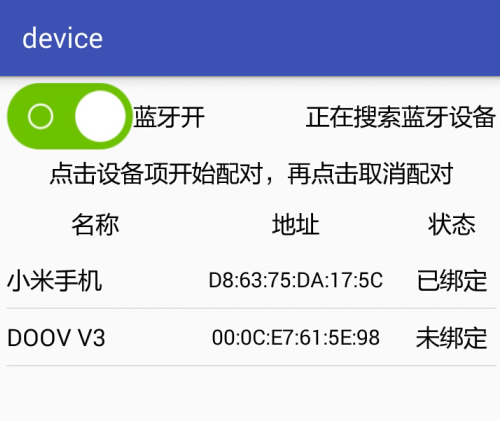
3、若目标蓝牙设备为Android手机的蓝牙,则只能保证本设备不弹出配对框,对方还是会弹出配对框。但是!!不管目标蓝牙点击“确认”or“取消”,在本设备中都显示已经成功配对。实测表明,确实已经配对了,可以进行数据传输。
4、由于使用了广播机制,所以需要在Androidmanifest.xml进行如下配置。
先配置蓝牙使用权限:
<uses-permission android:name="android.permission.BLUETOOTH"/>
<uses-permission android:name="android.permission.BLUETOOTH_ADMIN"/>
然后配置action,将需要用到的广播进行注册
<receiver android:name="com.ywq.broadcast.BluetoothReceiver" >
<intent-filter android:priority="1000">
<action android:name="android.bluetooth.device.action.PAIRING_REQUEST"/>
<action android:name="android.bluetooth.device.action.FOUND" />
</intent-filter>
</receiver>
程序运行流程:
1、点击按钮,判断蓝牙是否打开,,执行bluetoothAdapter.startDiscovery();由本地蓝牙设备扫描远程蓝牙设备,startDiscovery()方法是一个异步方法,调用后立即返回。该方法会进行蓝牙设备的搜索,持续12秒。
2、搜索时,系统会发送3个广播,分别为:ACTION_DISCOVERY_START:开始搜索 、ACTION_DISCOVERY_FINISHED:搜索结束、 ACTION_FOUND:找到设备,该Intent中包含两个extra fields;
3、在广播接收类中BluetoothReceiver.java中,当设备找到之后会执行其onReceive方法。
4、String action = intent.getAction(); //得到action,
第一次action的值为BluetoothDevice.ACTION_FOUND,当找到的设备是我们目标蓝牙设备时,调用createBond方法来进行配对。ClsUtils.createBond(btDevice.getClass(), btDevice);该方法执行后,系统会收到一个请求配对的广播,即android.bluetooth.device.action.PAIRING_REQUEST。最后进行自动配对操作。
5、配对操作借助工具类ClsUtils.java得到了Android蓝牙API中隐藏的方法,实现自动配对,不弹出配对框的功能。
代码如下:
MainActivity.java
package com.example.mybuletooth;import android.app.Activity;
import android.bluetooth.BluetoothAdapter;
import android.os.Bundle;
import android.view.View;
import android.view.View.OnClickListener;
import android.widget.Button;public class MainActivity extends Activity implements OnClickListener{/** Called when the activity is first created. */ private Button autopairbtn=null;private BluetoothAdapter bluetoothAdapter = BluetoothAdapter.getDefaultAdapter();@Overrideprotected void onCreate(Bundle savedInstanceState) {super.onCreate(savedInstanceState);setContentView(R.layout.activity_main);autopairbtn=(Button) findViewById(R.id.button1);autopairbtn.setOnClickListener(this);}//设置按钮的监听方法@Overridepublic void onClick(View arg0) {if (!bluetoothAdapter.isEnabled()){bluetoothAdapter.enable();//异步的,不会等待结果,直接返回。}else{bluetoothAdapter.startDiscovery();}}
}
BluetoothReceiver.java
package com.ywq.broadcast;import com.ywq.tools.ClsUtils;
import android.bluetooth.BluetoothDevice;
import android.content.BroadcastReceiver;
import android.content.Context;
import android.content.Intent;
import android.util.Log;public class BluetoothReceiver extends BroadcastReceiver{String pin = "1234";  //此处为你要连接的蓝牙设备的初始密钥,一般为1234或0000public BluetoothReceiver() {}//广播接收器,当远程蓝牙设备被发现时,回调函数onReceiver()会被执行 @Overridepublic void onReceive(Context context, Intent intent) {String action = intent.getAction(); //得到actionLog.e("action1=", action);BluetoothDevice btDevice=null;  //创建一个蓝牙device对象// 从Intent中获取设备对象btDevice = intent.getParcelableExtra(BluetoothDevice.EXTRA_DEVICE); if(BluetoothDevice.ACTION_FOUND.equals(action)){  //发现设备Log.e("发现设备:", "["+btDevice.getName()+"]"+":"+btDevice.getAddress());if(btDevice.getName().contains("HC-05"))//HC-05设备如果有多个,第一个搜到的那个会被尝试。{if (btDevice.getBondState() == BluetoothDevice.BOND_NONE) {  Log.e("ywq", "attemp to bond:"+"["+btDevice.getName()+"]");try {//通过工具类ClsUtils,调用createBond方法ClsUtils.createBond(btDevice.getClass(), btDevice);} catch (Exception e) {// TODO Auto-generated catch blocke.printStackTrace();}}}elseLog.e("error", "Is faild");}else if(action.equals("android.bluetooth.device.action.PAIRING_REQUEST")) //再次得到的action,会等于PAIRING_REQUEST{Log.e("action2=", action);if(btDevice.getName().contains("HC-05")){Log.e("here", "OKOKOK");try {//1.确认配对ClsUtils.setPairingConfirmation(btDevice.getClass(), btDevice, true);//2.终止有序广播Log.i("order...", "isOrderedBroadcast:"+isOrderedBroadcast()+",isInitialStickyBroadcast:"+isInitialStickyBroadcast());abortBroadcast();//如果没有将广播终止,则会出现一个一闪而过的配对框。//3.调用setPin方法进行配对...boolean ret = ClsUtils.setPin(btDevice.getClass(), btDevice, pin);} catch (Exception e) {// TODO Auto-generated catch blocke.printStackTrace();}}elseLog.e("提示信息", "这个设备不是目标蓝牙设备");}}
}
工具类ClsUtils.java
package com.ywq.tools;/************************************ 蓝牙配对函数 * **************/import java.lang.reflect.Method;
import java.lang.reflect.Field;
import android.bluetooth.BluetoothDevice;
import android.util.Log;  public class ClsUtils
{  /** * 与设备配对 参考源码:platform/packages/apps/Settings.git * /Settings/src/com/android/settings/bluetooth/CachedBluetoothDevice.java */  static public boolean createBond(Class btClass, BluetoothDevice btDevice)  throws Exception  {  Method createBondMethod = btClass.getMethod("createBond");  Boolean returnValue = (Boolean) createBondMethod.invoke(btDevice);  return returnValue.booleanValue();  }  /** * 与设备解除配对 参考源码:platform/packages/apps/Settings.git * /Settings/src/com/android/settings/bluetooth/CachedBluetoothDevice.java */  static public boolean removeBond(Class<?> btClass, BluetoothDevice btDevice)  throws Exception  {  Method removeBondMethod = btClass.getMethod("removeBond");  Boolean returnValue = (Boolean) removeBondMethod.invoke(btDevice);  return returnValue.booleanValue();  }  static public boolean setPin(Class<? extends BluetoothDevice> btClass, BluetoothDevice btDevice,  String str) throws Exception  {  try  {  Method removeBondMethod = btClass.getDeclaredMethod("setPin",  new Class[]  {byte[].class});  Boolean returnValue = (Boolean) removeBondMethod.invoke(btDevice,  new Object[]  {str.getBytes()});  Log.e("returnValue", "" + returnValue);  }  catch (SecurityException e)  {  // throw new RuntimeException(e.getMessage());  e.printStackTrace();  }  catch (IllegalArgumentException e)  {  // throw new RuntimeException(e.getMessage());  e.printStackTrace();  }  catch (Exception e)  {  // TODO Auto-generated catch block  e.printStackTrace();  }  return true;  }  // 取消用户输入  static public boolean cancelPairingUserInput(Class<?> btClass,  BluetoothDevice device)  throws Exception  {  Method createBondMethod = btClass.getMethod("cancelPairingUserInput");
//        cancelBondProcess(btClass, device);Boolean returnValue = (Boolean) createBondMethod.invoke(device);  return returnValue.booleanValue();  }  // 取消配对  static public boolean cancelBondProcess(Class<?> btClass,  BluetoothDevice device)  throws Exception  {  Method createBondMethod = btClass.getMethod("cancelBondProcess");  Boolean returnValue = (Boolean) createBondMethod.invoke(device);  return returnValue.booleanValue();  } //确认配对static public void setPairingConfirmation(Class<?> btClass,BluetoothDevice device,boolean isConfirm)throws Exception {Method setPairingConfirmation = btClass.getDeclaredMethod("setPairingConfirmation",boolean.class); setPairingConfirmation.invoke(device,isConfirm);}/** * * @param clsShow */  static public void printAllInform(Class clsShow)  {  try  {  // 取得所有方法  Method[] hideMethod = clsShow.getMethods();  int i = 0;  for (; i < hideMethod.length; i++)  {  Log.e("method name", hideMethod[i].getName() + ";and the i is:"  + i);  }// 取得所有常量  Field[] allFields = clsShow.getFields();  for (i = 0; i < allFields.length; i++)  {  Log.e("Field name", allFields[i].getName());  }}  catch (SecurityException e)  {  // throw new RuntimeException(e.getMessage());  e.printStackTrace();  }  catch (IllegalArgumentException e)  {  // throw new RuntimeException(e.getMessage());  e.printStackTrace();  }  catch (Exception e)  {  // TODO Auto-generated catch block  e.printStackTrace();  }  }
}
Androidmanifest.xml
<?xml version="1.0" encoding="utf-8"?>
<manifest xmlns:android="http://schemas.android.com/apk/res/android"package="com.example.mybuletooth"android:versionCode="1"android:versionName="1.0" ><uses-sdkandroid:minSdkVersion="8"android:targetSdkVersion="21" /><uses-permission android:name="android.permission.BLUETOOTH"/><uses-permission android:name="android.permission.BLUETOOTH_ADMIN"/><applicationandroid:allowBackup="true"android:icon="@drawable/ic_launcher"android:label="@string/app_name"android:theme="@style/AppTheme" ><activityandroid:name=".MainActivity"android:label="@string/app_name" ><intent-filter><action android:name="android.intent.action.MAIN" /><category android:name="android.intent.category.LAUNCHER" /></intent-filter></activity><receiver android:name="com.ywq.broadcast.BluetoothReceiver" ><intent-filter android:priority="1000"><action android:name="android.bluetooth.device.action.PAIRING_REQUEST"/><action android:name="android.bluetooth.device.action.FOUND" /></intent-filter></receiver></application></manifest>
布局配置文件activity_main.xml
<RelativeLayout xmlns:android="http://schemas.android.com/apk/res/android"xmlns:tools="http://schemas.android.com/tools"android:layout_width="match_parent"android:layout_height="match_parent"android:paddingBottom="@dimen/activity_vertical_margin"android:paddingLeft="@dimen/activity_horizontal_margin"android:paddingRight="@dimen/activity_horizontal_margin"android:paddingTop="@dimen/activity_vertical_margin"tools:context="com.example.mybuletooth.MainActivity" ><Buttonandroid:id="@+id/button1"android:layout_width="wrap_content"android:layout_height="wrap_content"android:layout_alignParentLeft="true"android:layout_alignParentTop="true"android:layout_marginLeft="54dp"android:layout_marginTop="56dp"android:text="自动配对" /><TextViewandroid:id="@+id/textView1"android:layout_width="wrap_content"android:layout_height="wrap_content"android:layout_centerVertical="true"android:text="点击按钮,自动搜索蓝牙设备,并且进行配对" /></RelativeLayout>
针对网上其它帖子中的demo不好使的原因,在此给出一些我的看法,是不是这样不敢保证,至少部分是这些原因吧。。。
1、出现一个一闪而过的配对框怎么办?
答:那是因为广播没有停止,须得调用abortBroadcast();将广播停止。
2、自动配对框还是会弹出来怎么办?
答:网上好多帖子代码有误,或者没有说清楚。请注意相关配置和工具类中函数的使用。
这是本人亲测好使的自动配对Demo,仅供参考,希望对大家有所帮助。有问题可以联系我。
重要更新:********************************************************************************
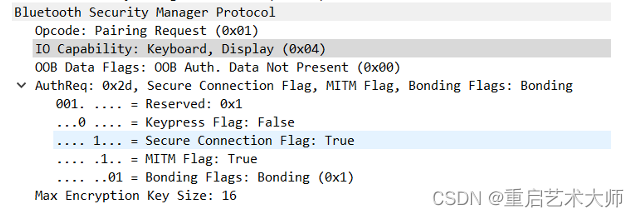
2016-10-20 ,今天和一个咨询我的小伙伴详细的聊了会儿天。他的问题是,下图所示的if语句块进不去。

它的btDevice.getBondState( )=12,但是BluetoothDevice.BOND_NONE=10,这不是肯定进不去么。
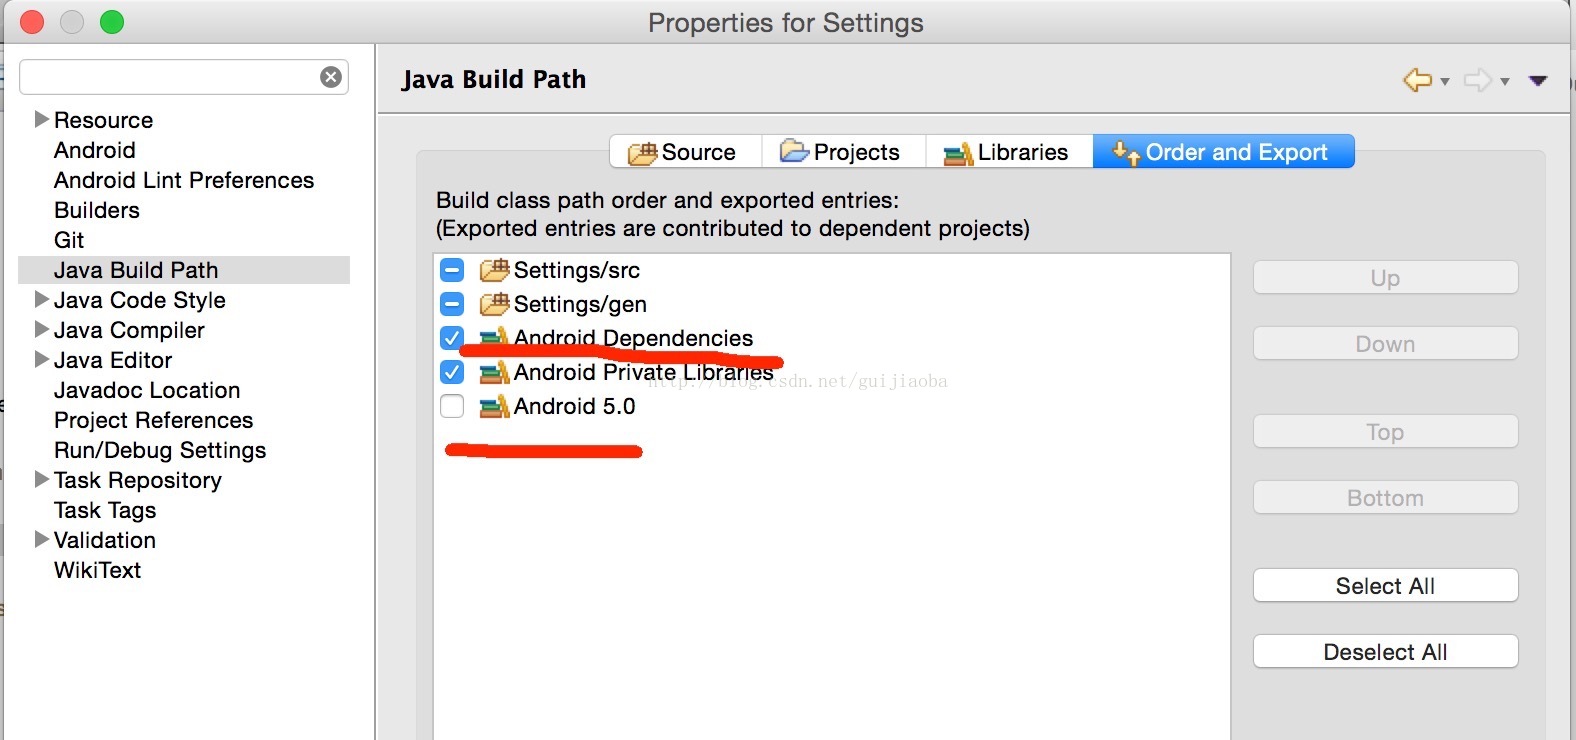
其中,查阅SDK,可以看到BluetoothDevice的这几个函数和数字的含义是什么。
参考网址:http://www.cnblogs.com/over140/archive/2010/12/21/1912482.html
如下所示:


我一看,天呐,很明显的低级错误。我让他打开设置看看,是否显示已经配对。结果自然是已经配对了。
产生原因:这个demo在跑之前,他已经在手机-设置-蓝牙中手动把目标蓝牙配对了。那还玩个毛呀
当手动取消配对后,程序运行正常,log打印和预期一样,自动配对实现。
提示:
通过这个小失误,可以看出,评论里好多说这也不行,那也不行的。既然好多人都说好使,那你为什么就不行呢?还是多从自身找问题吧,心思缜密点,避免这种低级失误。大哥,你是程序猿好不好。


源码下载地址:https://github.com/chaohuangtianjie994/BlueTooth-AutoPair
如果对你有帮助,记得点赞哦~欢迎大家关注我的博客,有问题可以进群366533258讨论哈~