上一篇博客介绍了Android ble的一些情况。
http://blog.csdn.net/guijiaoba/article/details/41172403
蓝牙如果链接好,能够读写,基本上完成了。蓝牙还有个比较烦人的东西,就是蓝牙配对。
Android ble4.0使用的配对方式和原先版本的配对方式不一样。
看了网上很多地方都是hellogv大神的方法,这个真心不错。
http://blog.csdn.net/hellogv/article/details/6042091
本着认真的态度,我把Android系统中Settings的源码给研究了下,发现了配对的流程,Settings的源码大小大概有300m,考虑的攻击
Ble4.0的配对界面有2个部分,首先的是一个请求的配对的通知,点击了是一个确认对话框,再点击,然后又有个通知,点击通知后,有个输入密码的的对话框,输入密码后,点确定,稍后就会有配对的结果。
下面是Settings中的源码
Settings的目录是/package/app/Settings,下面是Setting的源码url,感兴趣的同学可以去研究下
http://git.omapzoom.org/ 所有的源码网址
http://git.omapzoom.org/?p=platform/packages/apps/Settings.git;a=summary Settings的网址
git://git.omapzoom.org/platform/packages/apps/Settings.git Settings的git地址
Settings中的蓝牙代码都在/Settings/src/com/android/settings/bluetooth目录中
主要流程看下面的文件
/Settings/src/com/android/settings/bluetooth/BluetoothPairingDialog.java
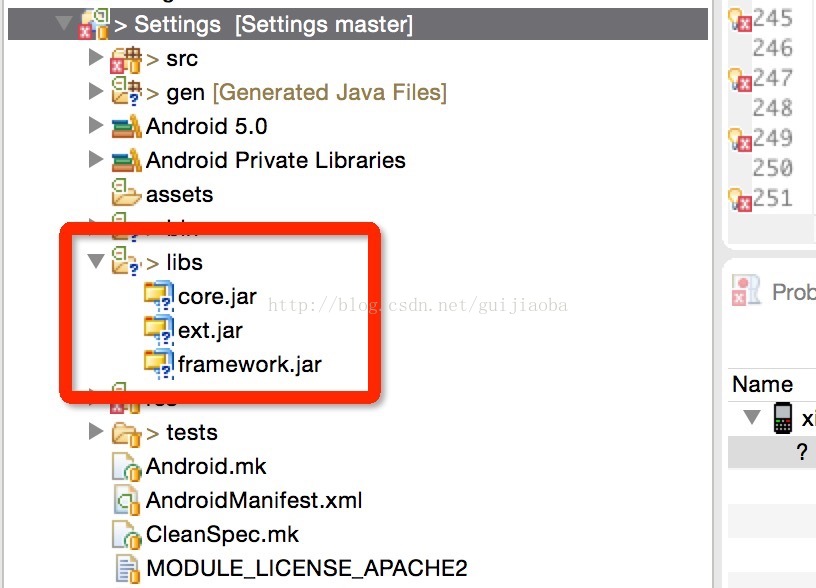
代码中很多的类,在实际的Android应该开发中是没有的,我这边准备了三个jar文件,分别是framework.jar,core.jar,ext.jar,这些事Android系统编译的时候,生产的jar。
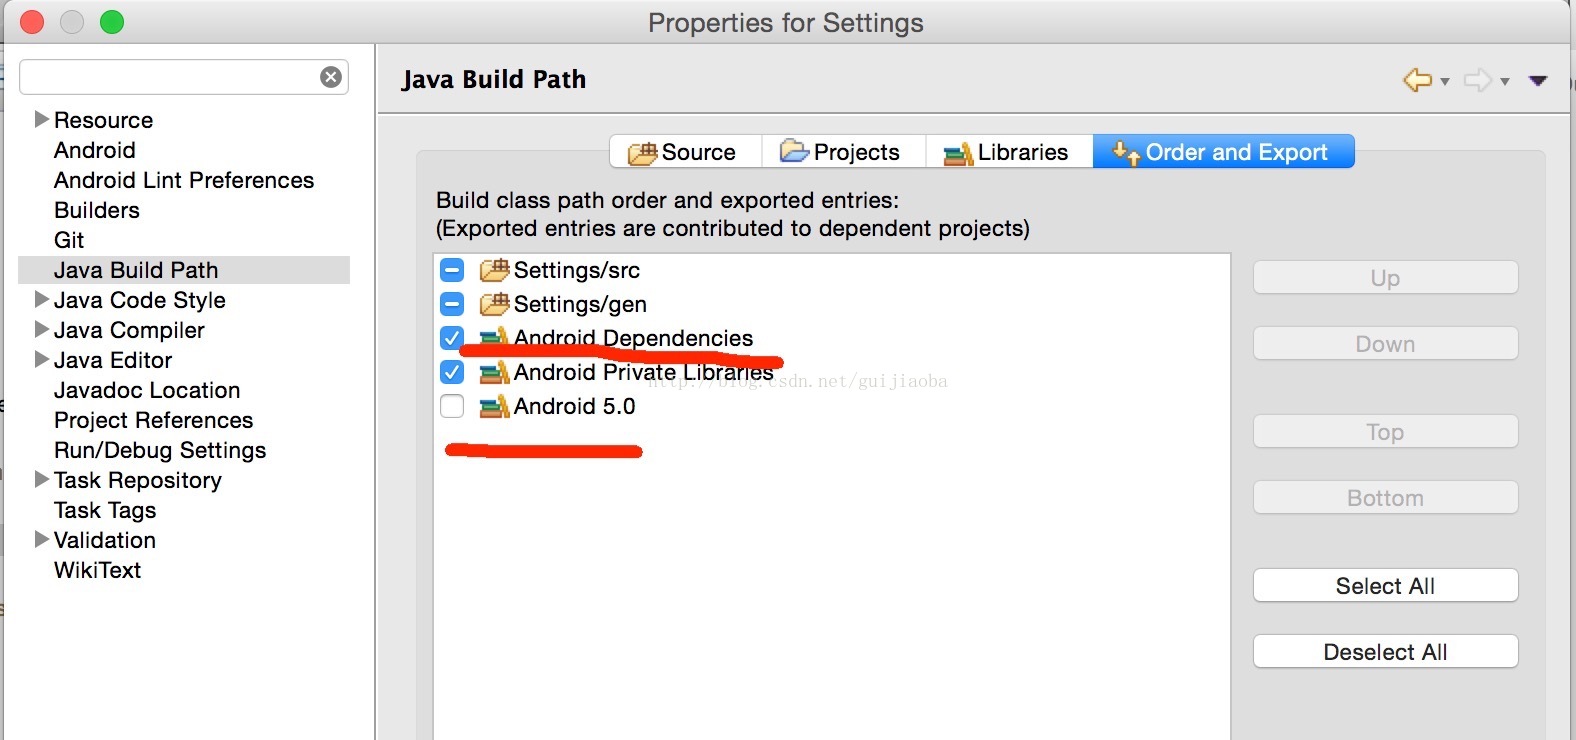
导入到elcipse中,关联此jar就可以。关联的jar时放在libs中,但是有个必须注意的地方,点击项目的属性,在Java BuildPath类别,Order and Export标签,Android Dependenceis必须要比Android 5.0的在上面,这样在引用的时候,就会优先引用Android Dependceis中的jar。
下面是Setting中的BluetoothPairingDialog.java,简单分析下,中文部分是我添加的注释。
package com.android.settings.bluetooth;import android.bluetooth.BluetoothDevice;
import android.content.BroadcastReceiver;
import android.content.Context;
import android.content.DialogInterface;
import android.content.Intent;
import android.content.IntentFilter;
import android.os.Bundle;
import android.text.Editable;
import android.text.Html;
import android.text.InputFilter;
import android.text.InputType;
import android.text.Spanned;
import android.text.TextWatcher;
import android.text.InputFilter.LengthFilter;
import android.util.Log;
import android.view.View;
import android.widget.Button;
import android.widget.CheckBox;
import android.widget.CompoundButton;
import android.widget.EditText;
import android.widget.TextView;import com.android.internal.app.AlertActivity;
import com.android.internal.app.AlertController;
import com.android.settings.R;
import android.view.KeyEvent;import java.util.Locale;/*** BluetoothPairingDialog asks the user to enter a PIN / Passkey / simple* confirmation for pairing with a remote Bluetooth device. It is an activity* that appears as a dialog.*/// BluetoothPairingDialog 说明这个节目是一个对话框
public final class BluetoothPairingDialog extends AlertActivity implements CompoundButton.OnCheckedChangeListener, DialogInterface.OnClickListener, TextWatcher {private static final String TAG = "BluetoothPairingDialog";private static final int BLUETOOTH_PIN_MAX_LENGTH = 16;private static final int BLUETOOTH_PASSKEY_MAX_LENGTH = 6;private BluetoothDevice mDevice;private int mType;private String mPairingKey;private EditText mPairingView;private Button mOkButton;/*** Dismiss the dialog if the bond state changes to bonded or none, or if* pairing was canceled for {@link #mDevice}.*/private final BroadcastReceiver mReceiver = new BroadcastReceiver() {@Overridepublic void onReceive(Context context, Intent intent) {String action = intent.getAction();if (BluetoothDevice.ACTION_BOND_STATE_CHANGED.equals(action)) {// 当设备的配对状态改变的时候,就把对话框去掉int bondState = intent.getIntExtra(BluetoothDevice.EXTRA_BOND_STATE, BluetoothDevice.ERROR);if (bondState == BluetoothDevice.BOND_BONDED || bondState == BluetoothDevice.BOND_NONE) {dismiss();}} else if (BluetoothDevice.ACTION_PAIRING_CANCEL.equals(action)) {BluetoothDevice device = intent.getParcelableExtra(BluetoothDevice.EXTRA_DEVICE);if (device == null || device.equals(mDevice)) {dismiss();}}}};@Overrideprotected void onCreate(Bundle savedInstanceState) {super.onCreate(savedInstanceState);// 必须是ACTION_PAIRING_REQUEST,否则不运行,ACTION_PAIRING_REQUEST是一个请求的配对的广播Intent intent = getIntent();if (!intent.getAction().equals(BluetoothDevice.ACTION_PAIRING_REQUEST是一个请求的配对的广播)) {Log.e(TAG, "Error: this activity may be started only with intent " + BluetoothDevice.ACTION_PAIRING_REQUEST);finish();return;}LocalBluetoothManager manager = LocalBluetoothManager.getInstance(this);if (manager == null) {Log.e(TAG, "Error: BluetoothAdapter not supported by system");finish();return;}CachedBluetoothDeviceManager deviceManager = manager.getCachedDeviceManager();// 获取配对的设备和配对类型,我的项目中配对类型是BluetoothDevice.PAIRING_VARIANT_PINmDevice = intent.getParcelableExtra(BluetoothDevice.EXTRA_DEVICE);mType = intent.getIntExtra(BluetoothDevice.EXTRA_PAIRING_VARIANT, BluetoothDevice.ERROR);// 根据配对的类型,进行分发,我们重点关注PAIRING_VARIANT_PINswitch (mType) {case BluetoothDevice.PAIRING_VARIANT_PIN:case BluetoothDevice.PAIRING_VARIANT_PASSKEY:// 创建用户输入配对密码的对话框createUserEntryDialog(deviceManager);break;case BluetoothDevice.PAIRING_VARIANT_PASSKEY_CONFIRMATION:int passkey = intent.getIntExtra(BluetoothDevice.EXTRA_PAIRING_KEY, BluetoothDevice.ERROR);if (passkey == BluetoothDevice.ERROR) {Log.e(TAG, "Invalid Confirmation Passkey received, not showing any dialog");return;}mPairingKey = String.format(Locale.US, "%06d", passkey);createConfirmationDialog(deviceManager);break;case BluetoothDevice.PAIRING_VARIANT_CONSENT:case BluetoothDevice.PAIRING_VARIANT_OOB_CONSENT:createConsentDialog(deviceManager);break;case BluetoothDevice.PAIRING_VARIANT_DISPLAY_PASSKEY:case BluetoothDevice.PAIRING_VARIANT_DISPLAY_PIN:int pairingKey = intent.getIntExtra(BluetoothDevice.EXTRA_PAIRING_KEY, BluetoothDevice.ERROR);if (pairingKey == BluetoothDevice.ERROR) {Log.e(TAG, "Invalid Confirmation Passkey or PIN received, not showing any dialog");return;}if (mType == BluetoothDevice.PAIRING_VARIANT_DISPLAY_PASSKEY) {mPairingKey = String.format("%06d", pairingKey);} else {mPairingKey = String.format("%04d", pairingKey);}createDisplayPasskeyOrPinDialog(deviceManager);break;default:Log.e(TAG, "Incorrect pairing type received, not showing any dialog");}/** Leave this registered through pause/resume since we still want to* finish the activity in the background if pairing is canceled.*/registerReceiver(mReceiver, new IntentFilter(BluetoothDevice.ACTION_PAIRING_CANCEL));registerReceiver(mReceiver, new IntentFilter(BluetoothDevice.ACTION_BOND_STATE_CHANGED));}// 创建用户输入配对密码的对话框private void createUserEntryDialog(CachedBluetoothDeviceManager deviceManager) {// 创建对话框的界面,// 在看看对话框的确定的回调函数,由于本类是实现DialogInterface.OnClickListener的方法的,我们可以去看下// public void onClick(DialogInterface dialog, int which)final AlertController.AlertParams p = mAlertParams;p.mIconId = android.R.drawable.ic_dialog_info;p.mTitle = getString(R.string.bluetooth_pairing_request);p.mView = createPinEntryView(deviceManager.getName(mDevice));p.mPositiveButtonText = getString(android.R.string.ok);p.mPositiveButtonListener = this;p.mNegativeButtonText = getString(android.R.string.cancel);p.mNegativeButtonListener = this;setupAlert();mOkButton = mAlert.getButton(BUTTON_POSITIVE);mOkButton.setEnabled(false);}private View createPinEntryView(String deviceName) {View view = getLayoutInflater().inflate(R.layout.bluetooth_pin_entry, null);TextView messageView = (TextView) view.findViewById(R.id.message);TextView messageView2 = (TextView) view.findViewById(R.id.message_below_pin);CheckBox alphanumericPin = (CheckBox) view.findViewById(R.id.alphanumeric_pin);mPairingView = (EditText) view.findViewById(R.id.text);mPairingView.addTextChangedListener(this);alphanumericPin.setOnCheckedChangeListener(this);int messageId1;int messageId2;int maxLength;switch (mType) {case BluetoothDevice.PAIRING_VARIANT_PIN:messageId1 = R.string.bluetooth_enter_pin_msg;messageId2 = R.string.bluetooth_enter_pin_other_device;// Maximum of 16 characters in a PINmaxLength = BLUETOOTH_PIN_MAX_LENGTH;break;case BluetoothDevice.PAIRING_VARIANT_PASSKEY:messageId1 = R.string.bluetooth_enter_passkey_msg;messageId2 = R.string.bluetooth_enter_passkey_other_device;// Maximum of 6 digits for passkeymaxLength = BLUETOOTH_PASSKEY_MAX_LENGTH;alphanumericPin.setVisibility(View.GONE);break;default:Log.e(TAG, "Incorrect pairing type for createPinEntryView: " + mType);return null;}// HTML escape deviceName, Format the message string, then parse HTML style tagsString messageText = getString(messageId1, Html.escapeHtml(deviceName));messageView.setText(Html.fromHtml(messageText));messageView2.setText(messageId2);mPairingView.setInputType(InputType.TYPE_CLASS_NUMBER);mPairingView.setFilters(new InputFilter[] { new LengthFilter(maxLength) });return view;}private View createView(CachedBluetoothDeviceManager deviceManager) {View view = getLayoutInflater().inflate(R.layout.bluetooth_pin_confirm, null);// Escape device name to avoid HTML injection.String name = Html.escapeHtml(deviceManager.getName(mDevice));TextView messageView = (TextView) view.findViewById(R.id.message);String messageText; // formatted string containing HTML style tagsswitch (mType) {case BluetoothDevice.PAIRING_VARIANT_PASSKEY_CONFIRMATION:messageText = getString(R.string.bluetooth_confirm_passkey_msg, name, mPairingKey);break;case BluetoothDevice.PAIRING_VARIANT_CONSENT:case BluetoothDevice.PAIRING_VARIANT_OOB_CONSENT:messageText = getString(R.string.bluetooth_incoming_pairing_msg, name);break;case BluetoothDevice.PAIRING_VARIANT_DISPLAY_PASSKEY:case BluetoothDevice.PAIRING_VARIANT_DISPLAY_PIN:messageText = getString(R.string.bluetooth_display_passkey_pin_msg, name, mPairingKey);break;default:Log.e(TAG, "Incorrect pairing type received, not creating view");return null;}messageView.setText(Html.fromHtml(messageText));return view;}private void createConfirmationDialog(CachedBluetoothDeviceManager deviceManager) {final AlertController.AlertParams p = mAlertParams;p.mIconId = android.R.drawable.ic_dialog_info;p.mTitle = getString(R.string.bluetooth_pairing_request);p.mView = createView(deviceManager);p.mPositiveButtonText = getString(R.string.bluetooth_pairing_accept);p.mPositiveButtonListener = this;p.mNegativeButtonText = getString(R.string.bluetooth_pairing_decline);p.mNegativeButtonListener = this;setupAlert();}private void createConsentDialog(CachedBluetoothDeviceManager deviceManager) {final AlertController.AlertParams p = mAlertParams;p.mIconId = android.R.drawable.ic_dialog_info;p.mTitle = getString(R.string.bluetooth_pairing_request);p.mView = createView(deviceManager);p.mPositiveButtonText = getString(R.string.bluetooth_pairing_accept);p.mPositiveButtonListener = this;p.mNegativeButtonText = getString(R.string.bluetooth_pairing_decline);p.mNegativeButtonListener = this;setupAlert();}private void createDisplayPasskeyOrPinDialog(CachedBluetoothDeviceManager deviceManager) {final AlertController.AlertParams p = mAlertParams;p.mIconId = android.R.drawable.ic_dialog_info;p.mTitle = getString(R.string.bluetooth_pairing_request);p.mView = createView(deviceManager);p.mNegativeButtonText = getString(android.R.string.cancel);p.mNegativeButtonListener = this;setupAlert();// Since its only a notification, send an OK to the framework,// indicating that the dialog has been displayed.if (mType == BluetoothDevice.PAIRING_VARIANT_DISPLAY_PASSKEY) {mDevice.setPairingConfirmation(true);} else if (mType == BluetoothDevice.PAIRING_VARIANT_DISPLAY_PIN) {byte[] pinBytes = BluetoothDevice.convertPinToBytes(mPairingKey);mDevice.setPin(pinBytes);}}@Overrideprotected void onDestroy() {super.onDestroy();unregisterReceiver(mReceiver);}public void afterTextChanged(Editable s) {if (mOkButton != null) {mOkButton.setEnabled(s.length() > 0);}}// 进行配对private void onPair(String value) {// 根据类型进行分发switch (mType) {case BluetoothDevice.PAIRING_VARIANT_PIN:// 注意这里是用了转换的方法,不是直接调用value.getBytes();方法byte[] pinBytes = BluetoothDevice.convertPinToBytes(value);if (pinBytes == null) {return;}// 直接调用setPin方法,然后就没有了,等到收到状态改变的广播后就进行dismiss,请看54行的mReceivermDevice.setPin(pinBytes);break;case BluetoothDevice.PAIRING_VARIANT_PASSKEY:int passkey = Integer.parseInt(value);mDevice.setPasskey(passkey);break;case BluetoothDevice.PAIRING_VARIANT_PASSKEY_CONFIRMATION:case BluetoothDevice.PAIRING_VARIANT_CONSENT:mDevice.setPairingConfirmation(true);break;case BluetoothDevice.PAIRING_VARIANT_DISPLAY_PASSKEY:case BluetoothDevice.PAIRING_VARIANT_DISPLAY_PIN:// Do nothing.break;case BluetoothDevice.PAIRING_VARIANT_OOB_CONSENT:mDevice.setRemoteOutOfBandData();break;default:Log.e(TAG, "Incorrect pairing type received");}}private void onCancel() {mDevice.cancelPairingUserInput();}public boolean onKeyDown(int keyCode, KeyEvent event) {if (keyCode == KeyEvent.KEYCODE_BACK) {onCancel();}return super.onKeyDown(keyCode, event);}// 对话框的确定的回调public void onClick(DialogInterface dialog, int which) {switch (which) {case BUTTON_POSITIVE:// 进行配对if (mPairingView != null) {onPair(mPairingView.getText().toString());} else {onPair(null);}break;case BUTTON_NEGATIVE:default:onCancel();break;}}/* Not used */public void beforeTextChanged(CharSequence s, int start, int count, int after) {}/* Not used */public void onTextChanged(CharSequence s, int start, int before, int count) {}public void onCheckedChanged(CompoundButton buttonView, boolean isChecked) {// change input type for soft keyboard to numeric or alphanumericif (isChecked) {mPairingView.setInputType(InputType.TYPE_CLASS_TEXT);} else {mPairingView.setInputType(InputType.TYPE_CLASS_NUMBER);}}
}
1、对话框的创建
当收到请求配对的广播后,此对话框会显示。
protected void onCreate(Bundle savedInstanceState) {super.onCreate(savedInstanceState);// 必须是ACTION_PAIRING_REQUEST,否则不运行,ACTION_PAIRING_REQUEST是一个请求的配对的广播Intent intent = getIntent();if (!intent.getAction().equals(BluetoothDevice.ACTION_PAIRING_REQUEST是一个请求的配对的广播)) {Log.e(TAG, "Error: this activity may be started only with intent " + BluetoothDevice.ACTION_PAIRING_REQUEST);finish();return;}LocalBluetoothManager manager = LocalBluetoothManager.getInstance(this);if (manager == null) {Log.e(TAG, "Error: BluetoothAdapter not supported by system");finish();return;}CachedBluetoothDeviceManager deviceManager = manager.getCachedDeviceManager();// 获取配对的设备和配对类型,我的项目中配对类型是BluetoothDevice.PAIRING_VARIANT_PINmDevice = intent.getParcelableExtra(BluetoothDevice.EXTRA_DEVICE);mType = intent.getIntExtra(BluetoothDevice.EXTRA_PAIRING_VARIANT, BluetoothDevice.ERROR);// 根据配对的类型,进行分发,我们重点关注PAIRING_VARIANT_PINswitch (mType) {case BluetoothDevice.PAIRING_VARIANT_PIN:case BluetoothDevice.PAIRING_VARIANT_PASSKEY:// 创建用户输入配对密码的对话框createUserEntryDialog(deviceManager);break;case BluetoothDevice.PAIRING_VARIANT_PASSKEY_CONFIRMATION:int passkey = intent.getIntExtra(BluetoothDevice.EXTRA_PAIRING_KEY, BluetoothDevice.ERROR);if (passkey == BluetoothDevice.ERROR) {Log.e(TAG, "Invalid Confirmation Passkey received, not showing any dialog");return;}mPairingKey = String.format(Locale.US, "%06d", passkey);createConfirmationDialog(deviceManager);break;case BluetoothDevice.PAIRING_VARIANT_CONSENT:case BluetoothDevice.PAIRING_VARIANT_OOB_CONSENT:createConsentDialog(deviceManager);break;case BluetoothDevice.PAIRING_VARIANT_DISPLAY_PASSKEY:case BluetoothDevice.PAIRING_VARIANT_DISPLAY_PIN:int pairingKey = intent.getIntExtra(BluetoothDevice.EXTRA_PAIRING_KEY, BluetoothDevice.ERROR);if (pairingKey == BluetoothDevice.ERROR) {Log.e(TAG, "Invalid Confirmation Passkey or PIN received, not showing any dialog");return;}if (mType == BluetoothDevice.PAIRING_VARIANT_DISPLAY_PASSKEY) {mPairingKey = String.format("%06d", pairingKey);} else {mPairingKey = String.format("%04d", pairingKey);}createDisplayPasskeyOrPinDialog(deviceManager);break;default:Log.e(TAG, "Incorrect pairing type received, not showing any dialog");}/** Leave this registered through pause/resume since we still want to* finish the activity in the background if pairing is canceled.*/// 注册广播registerReceiver(mReceiver, new IntentFilter(BluetoothDevice.ACTION_PAIRING_CANCEL));registerReceiver(mReceiver, new IntentFilter(BluetoothDevice.ACTION_BOND_STATE_CHANGED));}2、创建有输入框的界面
// 创建用户输入配对密码的对话框private void createUserEntryDialog(CachedBluetoothDeviceManager deviceManager) {// 创建对话框的界面,// 在看看对话框的确定的回调函数,由于本类是实现DialogInterface.OnClickListener的方法的,我们可以去看下// public void onClick(DialogInterface dialog, int which)final AlertController.AlertParams p = mAlertParams;p.mIconId = android.R.drawable.ic_dialog_info;p.mTitle = getString(R.string.bluetooth_pairing_request);p.mView = createPinEntryView(deviceManager.getName(mDevice));p.mPositiveButtonText = getString(android.R.string.ok);p.mPositiveButtonListener = this;p.mNegativeButtonText = getString(android.R.string.cancel);p.mNegativeButtonListener = this;setupAlert();mOkButton = mAlert.getButton(BUTTON_POSITIVE);mOkButton.setEnabled(false);}3、查看输入框的确定回调函数
// 对话框的确定的回调public void onClick(DialogInterface dialog, int which) {switch (which) {case BUTTON_POSITIVE:// 进行配对if (mPairingView != null) {onPair(mPairingView.getText().toString());} else {onPair(null);}break;case BUTTON_NEGATIVE:default:onCancel();break;}}4、配对
// 进行配对private void onPair(String value) {// 根据类型进行分发switch (mType) {case BluetoothDevice.PAIRING_VARIANT_PIN:// 注意这里是用了转换的方法,不是直接调用value.getBytes();方法byte[] pinBytes = BluetoothDevice.convertPinToBytes(value);if (pinBytes == null) {return;}// 直接调用setPin方法,然后就没有了,等到收到状态改变的广播后就进行dismiss,请看54行的mReceivermDevice.setPin(pinBytes);break;case BluetoothDevice.PAIRING_VARIANT_PASSKEY:int passkey = Integer.parseInt(value);mDevice.setPasskey(passkey);break;case BluetoothDevice.PAIRING_VARIANT_PASSKEY_CONFIRMATION:case BluetoothDevice.PAIRING_VARIANT_CONSENT:mDevice.setPairingConfirmation(true);break;case BluetoothDevice.PAIRING_VARIANT_DISPLAY_PASSKEY:case BluetoothDevice.PAIRING_VARIANT_DISPLAY_PIN:// Do nothing.break;case BluetoothDevice.PAIRING_VARIANT_OOB_CONSENT:mDevice.setRemoteOutOfBandData();break;default:Log.e(TAG, "Incorrect pairing type received");}}// 注意这里是用了转换的方法,不是直接调用value.getBytes();方法
byte[] pinBytes = BluetoothDevice.convertPinToBytes(value);
下面是系统的中的配对密码转换
/*** Check that a pin is valid and convert to byte array.** Bluetooth pin's are 1 to 16 bytes of UTF-8 characters.* @param pin pin as java String* @return the pin code as a UTF-8 byte array, or null if it is an invalid* Bluetooth pin.* @hide*/public static byte[] convertPinToBytes(String pin) {if (pin == null) {return null;}byte[] pinBytes;try {pinBytes = pin.getBytes("UTF-8");} catch (UnsupportedEncodingException uee) {Log.e(TAG, "UTF-8 not supported?!?"); // this should not happenreturn null;}if (pinBytes.length <= 0 || pinBytes.length > 16) {return null;}return pinBytes;}
private final BroadcastReceiver mReceiver = new BroadcastReceiver() {@Overridepublic void onReceive(Context context, Intent intent) {String action = intent.getAction();if (BluetoothDevice.ACTION_BOND_STATE_CHANGED.equals(action)) {// 当设备的配对状态改变的时候,就把对话框去掉int bondState = intent.getIntExtra(BluetoothDevice.EXTRA_BOND_STATE, BluetoothDevice.ERROR);if (bondState == BluetoothDevice.BOND_BONDED || bondState == BluetoothDevice.BOND_NONE) {dismiss();}} else if (BluetoothDevice.ACTION_PAIRING_CANCEL.equals(action)) {BluetoothDevice device = intent.getParcelableExtra(BluetoothDevice.EXTRA_DEVICE);if (device == null || device.equals(mDevice)) {dismiss();}}}};以上就是系统的设置的配对流程。
下面是自己的项目中的业务代码
BroadcastReceiver bleReceiver = new BroadcastReceiver() {public void onReceive(Context context, Intent intent) {McLog.mByStackTrace();String action = intent.getAction();McLog.i("action = " + action);if (BluetoothDevice.ACTION_FOUND.equals(action)) {// 搜索设备doDeviceSearch(intent);} else if (BluetoothAdapter.ACTION_DISCOVERY_FINISHED.equals(action)) { //搜索结束doDeviceSearchFinished(intent);} else if (BluetoothDevice.ACTION_BOND_STATE_CHANGED.equals(action)) { // 设备状态改变doStateChange(intent);} else if (BluetoothDevice.ACTION_PAIRING_REQUEST.equals(action)) {// 请求匹配doRequestPari(intent);}}void doStateChange(Intent intent) {BluetoothDevice device = intent.getParcelableExtra(BluetoothDevice.EXTRA_DEVICE);switch (device.getBondState()) {case BluetoothDevice.BOND_NONE:McLog.i("取消配对");break;case BluetoothDevice.BOND_BONDING:McLog.i("正在配对......");break;case BluetoothDevice.BOND_BONDED:McLog.i("完成配对");break;}}void doDeviceSearch(Intent intent) {BluetoothDevice device = intent.getParcelableExtra(BluetoothDevice.EXTRA_DEVICE);McLog.i("device = " + device);if (device.getBondState() == BluetoothDevice.BOND_BONDED) {// 已经配对的则跳过} else {if (!searchDevices.contains(searchDevices)) {searchDevices.add(device);}}}void doDeviceSearchFinished(Intent intent) {McLog.i("search finished, searchDevices's size = " + searchDevices.size());boolean isFindRightDevice = false;for (BluetoothDevice device : searchDevices) {if (isRightDevice(device)) { // 如果是我想要的设备,那么我就进行配对doNormalPair(device);isFindRightDevice = true;break;}}if (!isFindRightDevice) {McLog.i("sorry,do't search user's device[" + bleDeviceMac + "]");}}void doNormalPair(BluetoothDevice device) {McLog.mByStackTrace();currentPairDevice = device;try {// 调用配对的方法,此方法是异步的,系统会触发BluetoothDevice.ACTION_PAIRING_REQUEST的广播// 收到此广播后,设置配对的密码ClsUtils.createBond(BluetoothDevice.class, currentPairDevice);} catch (Exception e) {e.printStackTrace();}}void doRequestPari(Intent intent) {BluetoothDevice btDevice = intent.getParcelableExtra(BluetoothDevice.EXTRA_DEVICE);if (btDevice.getBondState() == BluetoothDevice.BOND_BONDED) {McLog.e("已经绑定");} else {McLog.e("没有绑定");if (currentPairDevice != null && btDevice.getAddress().equalsIgnoreCase(currentPairDevice.getAddress())) {try {McLog.i("invoke setpin :" + bleDeviceMac);// 设置配对的密码 <span style="font-family: Arial, Helvetica, sans-serif;">bleDevicePasswd 设备的配对密码</span>ClsUtils.setPin2(BluetoothDevice.class, currentPairDevice, bleDevicePasswd);} catch (Exception e) {McLog.i("e = " + e);}currentPairDevice = null;uiHandler.postDelayed(new Runnable() {public void run() {loadBleData();// 注销监听unregisterReceiver(bleReceiver);}}, 1000);}}}};
以上就能完成ble4.0的密码自动配对,当然中间的对话框会显示1s左右时间,然后会再次消失。


![[Java]什么是接口回调?](https://img-blog.csdnimg.cn/20210825173351571.jfif?x-oss-process=image/watermark,type_ZmFuZ3poZW5naGVpdGk,shadow_10,text_Q1NETiBAamd3MjAwOA==,size_17,color_FFFFFF,t_70,g_se,x_16)